lights SUBARU CROSSTREK 2017 1.G Repair Manual
[x] Cancel search | Manufacturer: SUBARU, Model Year: 2017, Model line: CROSSTREK, Model: SUBARU CROSSTREK 2017 1.GPages: 572, PDF Size: 41.52 MB
Page 462 of 572
In case of emergency/Jump starting
Jump starting
WARNING
.Battery fluid is SULFURIC ACID.
Do not let it come in contact with
the eyes, skin, clothing or the
vehicle.
If battery fluid gets on you,
thoroughly flush the exposed
area with water immediately. Get
medical help if the fluid has
entered your eyes.
If battery fluid is accidentally
swallowed, immediately drink a
large amount of milk or water,
and obtain immediate medical
help.
Keep everyone including chil-
dren away from the battery.
.The gas generated by a battery
explodes if a flame or spark is
brought near it. Do not smoke or
light a match while jump starting.
.Never attempt jump starting if the
discharged battery is frozen. It
could cause the battery to burst
or explode.
.Whenever working on or around
a battery, always wear suitableeye protectors, and remove metal
objects such as rings, bands or
other metal jewelry.
.Be sure the jumper cables and
clamps on them do not have
loose or missing insulation.
Do not jump start unless cables
in suitable condition are avail-
able.
.A running engine can be danger-
ous. Keep your fingers, hands,
clothing, hair and tools away
from the cooling fan, belts and
any other moving engine parts.
Removing rings, watches and
ties is advisable.
.Jump starting is dangerous if it
done incorrectly. If you are un-
sure about the proper procedure
for jump starting, consult a com-
petent mechanic.
When your vehicle does not start due to a
run down (discharged) battery, the vehicle
may be jump started by connecting your
battery to another battery (called the
booster battery) with jumper cables.
&How to jump start
1. Make sure the booster battery is 12
volts and the negative terminal is
grounded.
2. If the booster battery is in another
vehicle, do not let the two vehicles touch.
3. Turn off all unnecessary lights and
accessories.
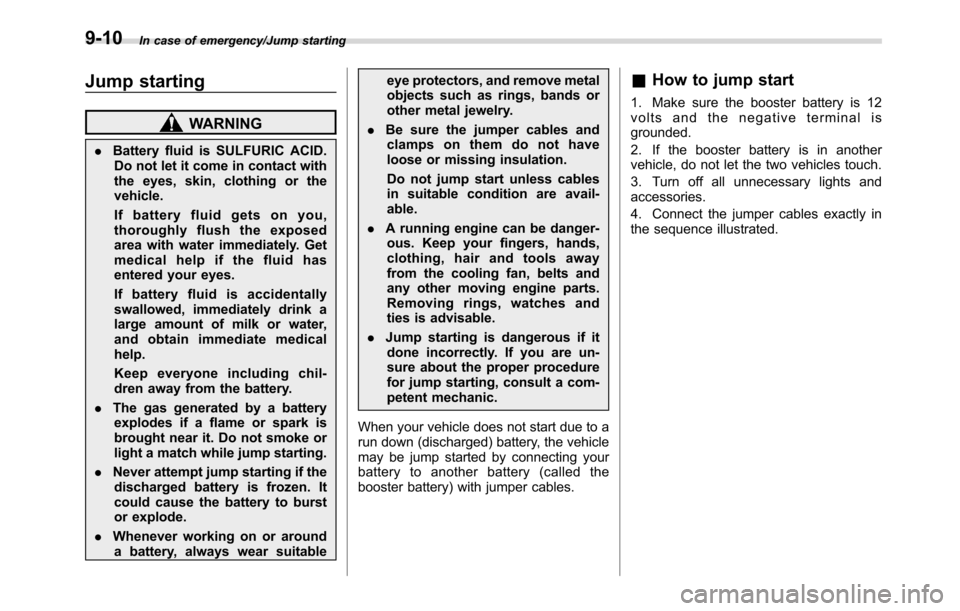
4. Connect the jumper cables exactly in
the sequence illustrated.
9-10
Page 480 of 572
Maintenance and service
Aluminum wheels............................................. 11-28
Windshield washer fluid.................................. 11-28
Adding the windshield washer fluid.................. 11-28
Windshield washer fluid................................... 11-29
Replacement of wiper blades.......................... 11-29Windshield wiper blade assembly..................... 11-30
Windshield wiper blade rubber......................... 11-30
Rear window wiper blade assembly.................. 11-31
Rear window wiper blade rubber....................... 11-32
Battery............................................................... 11-33
Fuses................................................................ 11-34
Installation of accessories............................... 11-36
Replacing bulbs............................................... 11-36
Headlights (models with HID headlights)........... 11-36Headlights (models without HID headlights)...... 11-37
Front turn signal light...................................... 11-38
Parking light.................................................... 11-38
Front fog light.................................................. 11-38
Rear combination lights................................... 11-38
License plate light........................................... 11-40
Map light......................................................... 11-40
Dome light and cargo area light....................... 11-41
Other bulbs..................................................... 11-41
Replacing key battery...................................... 11-42
Safety precautions........................................... 11-42
Replacing battery of access key....................... 11-42
Replacing transmitter battery........................... 11-43
Page 513 of 572
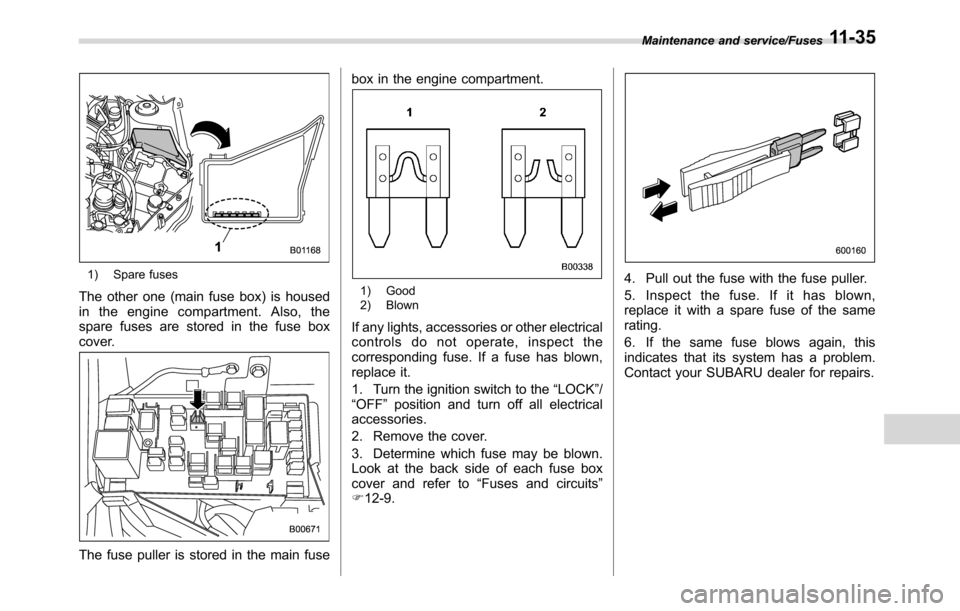
1) Spare fuses
The other one (main fuse box) is housed
in the engine compartment. Also, the
spare fuses are stored in the fuse box
cover.
The fuse puller is stored in the main fusebox in the engine compartment.
1) Good
2) Blown
If any lights, accessories or other electrical
controls do not operate, inspect the
corresponding fuse. If a fuse has blown,
replace it.
1. Turn the ignition switch to the“LOCK”/
“OFF”position and turn off all electrical
accessories.
2. Remove the cover.
3. Determine which fuse may be blown.
Look at the back side of each fuse box
cover and refer to“Fuses and circuits”
F12-9.
4. Pull out the fuse with the fuse puller.
5. Inspect the fuse. If it has blown,
replace it with a spare fuse of the same
rating.
6. If the same fuse blows again, this
indicates that its system has a problem.
Contact your SUBARU dealer for repairs.
Maintenance and service/Fuses11-35
Page 514 of 572

Maintenance and service/Installation of accessories
Installation of accessories
Always consult your SUBARU dealer
before installing fog lights or any other
electrical equipment in your vehicle. Such
accessories may cause the electronic
system to malfunction if they are incor-
rectly installed or if they are not suited for
the vehicle.
Replacing bulbs
WARNING
Bulbs may become very hot while
illuminated. Before replacing bulbs,
turn off the lights and wait until the
bulbs cool down. Otherwise, there is
a risk of sustaining a burn injury.
CAUTION
.Replace any bulb only with a new
bulb of the specified wattage.
Using a bulb of different wattage
could result in a fire. For the
specified wattage of each bulb,
refer to“Bulb chart”F12-13.
.Do not touch the glass portion of
the light bulb with bare hands.
When holding the glass portion
is unavoidable, hold it using a
clean dry cloth to avoid getting
moisture and oils on the bulb.
Also, if the bulb is scratched or
dropped, it may blow out or
crack.
&Headlights (models with HID
headlights)
WARNING
High-intensity-discharge (HID) bulbs
are used for the low beams of the
headlights. These HID bulbs use an
extremely high voltage. To avoid the
risk of an electric shock that could
result in serious injury, observe the
following precautions.
.Do not replace any headlight
bulbs (both low beam and high
beam) by yourself.
.Do not remove/restore the head-
light assemblies by yourself.
.Do not remove any headlight-
assembly components by your-
self.
For replacement, contact your
SUBARU dealer.
11-36
Page 515 of 572
&Headlights (models without
HID headlights)
CAUTION
Halogen headlight bulbs become
very hot while in use. If you touch
the bulb surface with bare hands or
greasy gloves, fingerprints or
grease on the bulb surface will
develop into hot spots, causing the
bulb to break. If there are finger
prints or grease on the bulb surface,
wipe them away with a soft cloth
moistened with alcohol.
NOTE
.If headlight aiming is required, con-
sult your SUBARU dealer for proper
adjustment of the headlight aim.
.It may be difficult to replace the
bulbs. Have the bulbs replaced by your
SUBARU dealer if necessary.
Perform the following steps to replace the
bulbs.
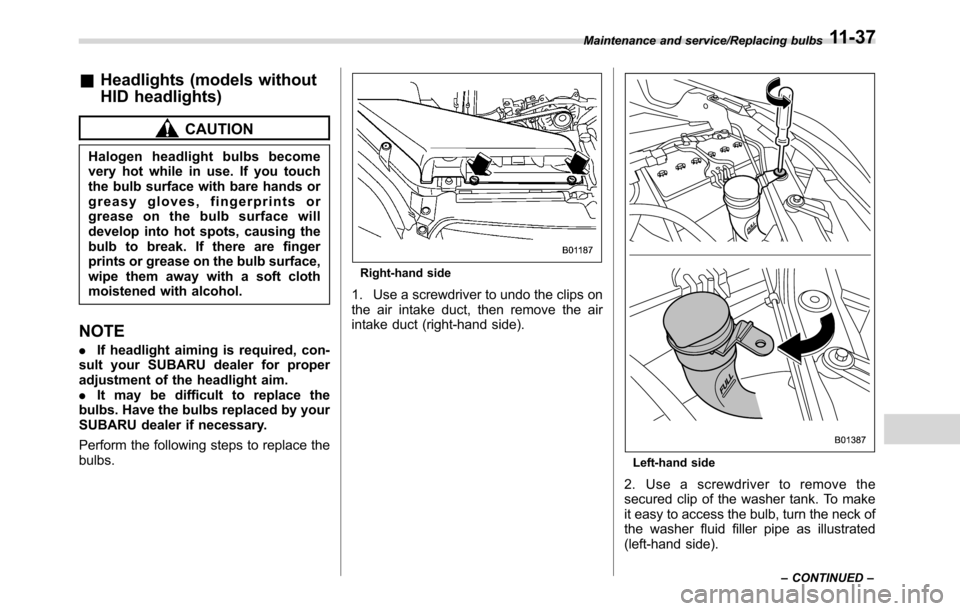
Right-hand side
1. Use a screwdriver to undo the clips on
the air intake duct, then remove the air
intake duct (right-hand side).
Left-hand side
2. Use a screwdriver to remove the
secured clip of the washer tank. To make
it easy to access the bulb, turn the neck of
the washer fluid filler pipe as illustrated
(left-hand side).
Maintenance and service/Replacing bulbs
–CONTINUED–11-37
Page 516 of 572

Maintenance and service/Replacing bulbs
1) Low beam bulb
2) High beam bulb
3. Disconnect the electrical connector
from the bulb and remove the bulb from
the headlight assembly by turning it
counterclockwise.
4. Replace the bulb with new one. At this
time, use care not to touch the bulb
surface.
5. To install the bulb to the headlight
assembly, turn it clockwise until it clicks.
6. Reconnect the electrical connector.
7. Install the air intake duct with clips
(right-hand side).
8. Set the washer fluid filler pipe to the
original place and secure it by clip (left-
hand side).
&Front turn signal light
It may be difficult to replace the bulbs.
Have the bulbs replaced by your SUBARU
dealer if necessary.
&Parking light
It may be difficult to replace the bulbs.
Have the bulbs replaced by your SUBARU
dealer if necessary.
&Front fog light
It may be difficult to replace the bulbs.
Have the bulbs replaced by your SUBARU
dealer if necessary.
&Rear combination lights
1. Using a Phillips screwdriver, remove
the upper and lower screws that secure
the rear combination light assembly.
2. Slide the rear combination light as-
11-38
Page 535 of 572
Bulb chart
&Safety precautions
WARNING
.Bulbs may become very hot while
illuminated. Before replacing
bulbs, turn off the lights and wait
until the bulbs cool down. Other-
wise, there is a risk of sustaining
a burn injury.
.For models with HID low beam
headlights, observe the following
precautions. Not doing so carries
the risk of an electric shock that
could result in serious injury
because the HID bulbs use an
extremely high voltage.
–Do not replace any headlight
bulbs (both low beam and
high beam) by yourself.
–Do not remove/restore the
headlight assemblies by your-
self.
–Do not remove any headlight-
assembly components by
yourself.For replacement, contact your
SUBARU dealer.
CAUTION
Replace any bulb only with a new
bulb of the specified wattage. Using
a bulb of different wattage could
result in a fire.
Specifications/Bulb chart
–CONTINUED–12-13
Page 536 of 572
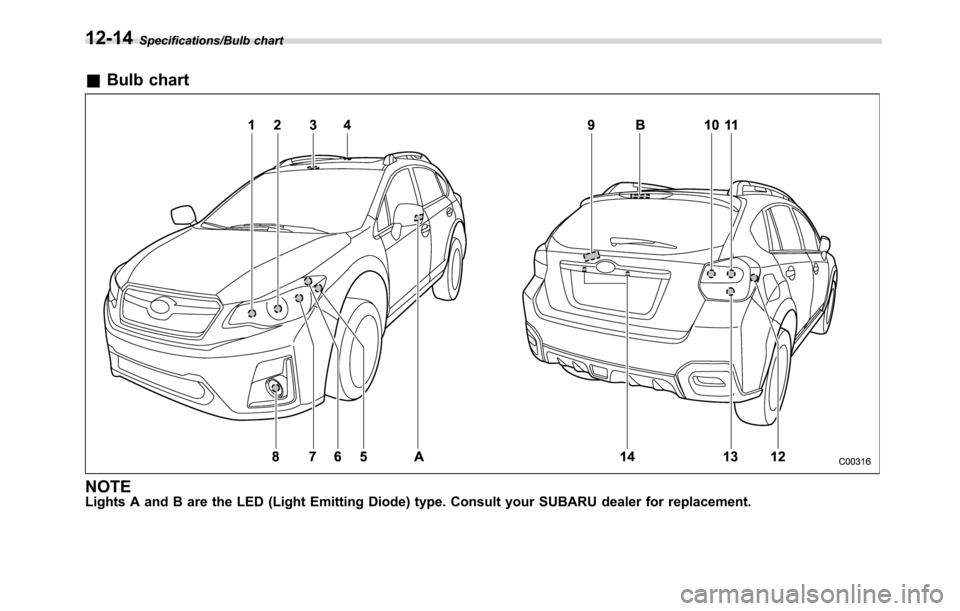
Specifications/Bulb chart
&Bulb chart
NOTELights A and B are the LED (Light Emitting Diode) type. Consult your SUBARU dealer for replacement.
12-14
Page 537 of 572
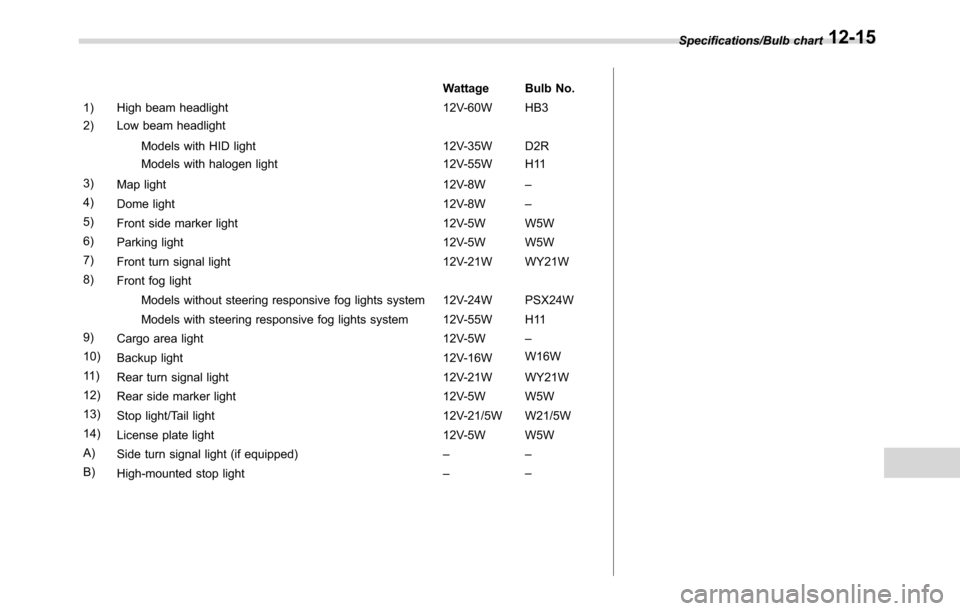
Wattage Bulb No.
1) High beam headlight 12V-60W HB3
2) Low beam headlight
Models with HID light 12V-35W D2R
Models with halogen light 12V-55W H11
3)
Map light 12V-8W–
4)
Dome light 12V-8W–
5)
Front side marker light 12V-5W W5W
6)
Parking light 12V-5W W5W
7)
Front turn signal light 12V-21W WY21W
8)
Front fog light
Models without steering responsive fog lights system 12V-24W PSX24W
Models with steering responsive fog lights system 12V-55W H11
9)
Cargo area light 12V-5W–
10)
Backup light 12V-16WW16W
11 )
Rear turn signal light 12V-21W WY21W
12)
Rear side marker light 12V-5W W5W
13)
Stop light/Tail light 12V-21/5W W21/5W
14)
License plate light 12V-5W W5W
A)
Side turn signal light (if equipped)––
B)
High-mounted stop light––Specifications/Bulb chart
12-15
Page 558 of 572

14-2Index
A
Abbreviation................................................................... 3
ABS (Anti-lock Brake System)..................................... 7-32
Warning light......................................................... 3-21
Access key................................................................. 2-9
Warning indicator................................................... 3-25
Accessories.............................................................. 11-36
Accessory power outlet................................................. 6-8
Air cleaner element................................................... 11-12
Air conditioner
Automatic climate control.......................................... 4-7
Manual climate control.............................................. 4-8
Air filtration system..................................................... 4-12
Air flow mode.............................................................. 4-8
Alarm system............................................................ 2-26
All-Wheel Drive warning light....................................... 3-23
Aluminum wheel....................................................... 11-28
Cleaning............................................................... 10-3
Antenna...................................................................... 5-2
Anti-lock Brake System (ABS)..................................... 7-32
Arming the system..................................................... 2-27
Armrest....................................................................... 1-8
Ashtray..................................................................... 6-10
AT OIL TEMP warning light......................................... 3-19
Audio
aha
TMby HARMAN................................................ 5-43
AM/FM radio......................................................... 5-28
AUX ..................................................................... 5-60
Base display audio set.............................................. 5-4
Basic operation...................................................... 5-18
Bluetooth audio...................................................... 5-57CD ....................................................................... 5-52
iPod...................................................................... 5-55
Pandora
®.............................................................. 5-49
SiriusXM Satellite Radio.......................................... 5-37
STARLINK
TM7.0 Multimedia Plus audio set................ 5-6
Steering switches for audio...................................... 5-62
SUBARU STARLINK............................................... 5-26
Unit setting............................................................ 5-19
USB memory......................................................... 5-54
Auto on/off headlights................................................. 3-89
Automatic headlight beam leveler................................. 3-93
Warning light.......................................................... 3-31
Automatic Locking Retractor/Emergency Locking
Retractor (ALR/ELR)................................................ 1-12
B
Battery
Drainage prevention function..................................... 2-7
Jump starting......................................................... 9-10
Replacement (access key)..................................... 11-42
Replacement (transmitter)...................................... 11-43
Vehicle battery..................................................... 11-33
Bluetooth
®
Audio.................................................................... 5-57
Hands-free phone system........................................ 5-70
Settings................................................................. 5-65
Troubleshooting...................................................... 5-88
Bluetooth
®settings..................................................... 5-65
Booster seat.............................................................. 1-31
Bottle holder............................................................... 6-7