mirror SUBARU CROSSTREK 2017 1.G Owners Manual
[x] Cancel search | Manufacturer: SUBARU, Model Year: 2017, Model line: CROSSTREK, Model: SUBARU CROSSTREK 2017 1.GPages: 572, PDF Size: 41.52 MB
Page 18 of 572
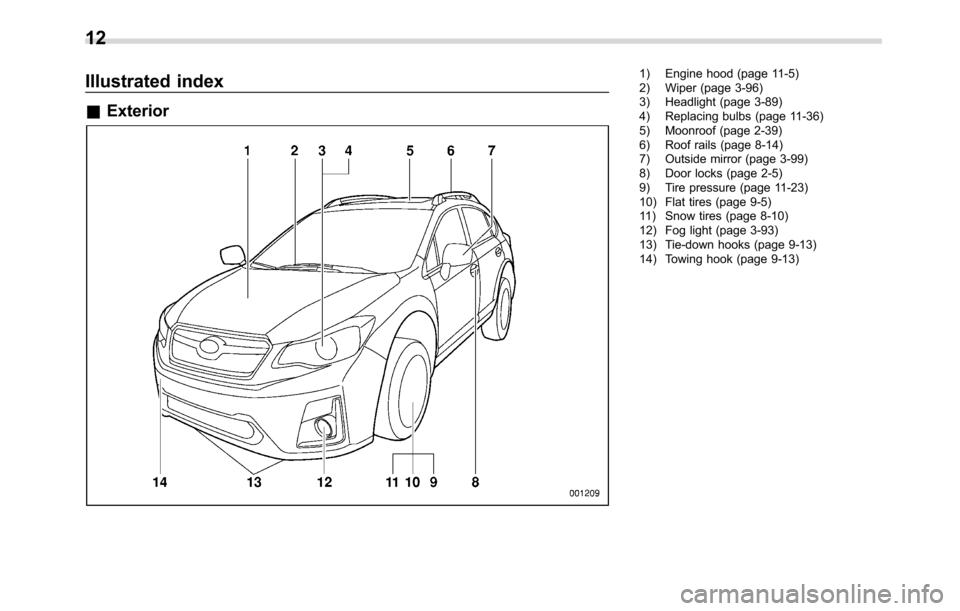
Illustrated index
&Exterior
1) Engine hood (page 11-5)
2) Wiper (page 3-96)
3) Headlight (page 3-89)
4) Replacing bulbs (page 11-36)
5) Moonroof (page 2-39)
6) Roof rails (page 8-14)
7) Outside mirror (page 3-99)
8) Door locks (page 2-5)
9) Tire pressure (page 11-23)
10) Flat tires (page 9-5)
11) Snow tires (page 8-10)
12) Fog light (page 3-93)
13) Tie-down hooks (page 9-13)
14) Towing hook (page 9-13)
12
Page 21 of 572
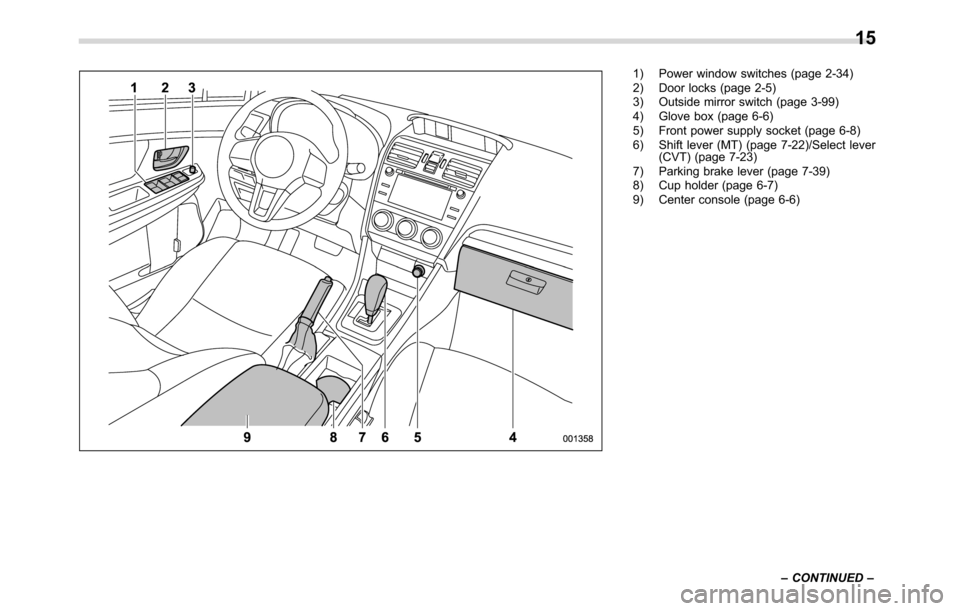
1) Power window switches (page 2-34)
2) Door locks (page 2-5)
3) Outside mirror switch (page 3-99)
4) Glove box (page 6-6)
5) Front power supply socket (page 6-8)
6) Shift lever (MT) (page 7-22)/Select lever
(CVT) (page 7-23)
7) Parking brake lever (page 7-39)
8) Cup holder (page 6-7)
9) Center console (page 6-6)
–CONTINUED–
15
Page 32 of 572
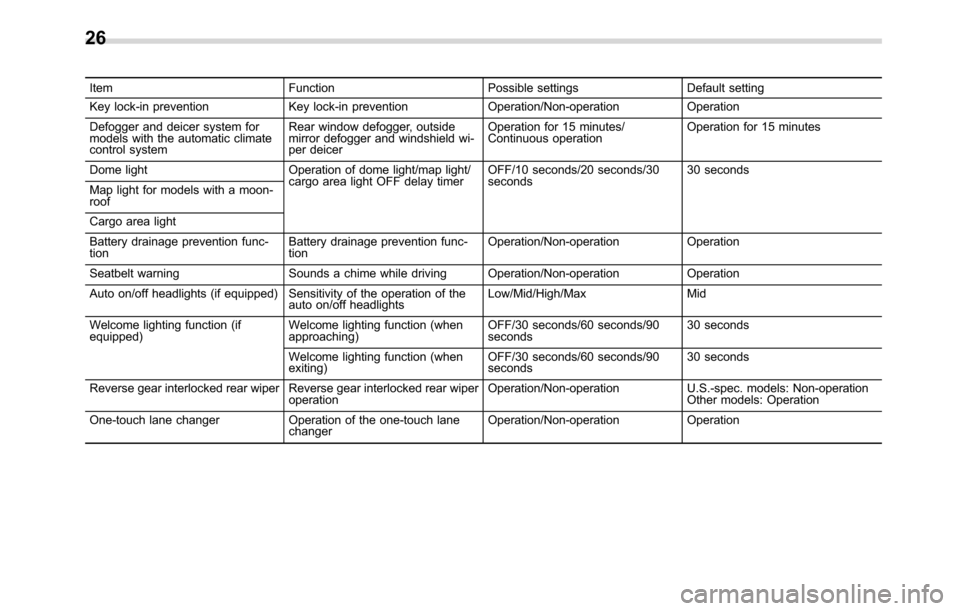
Item Function Possible settings Default setting
Key lock-in prevention Key lock-in prevention Operation/Non-operation Operation
Defogger and deicer system for
models with the automatic climate
control systemRear window defogger, outside
mirror defogger and windshield wi-
per deicerOperation for 15 minutes/
Continuous operationOperation for 15 minutes
Dome light Operation of dome light/map light/
cargo area light OFF delay timerOFF/10 seconds/20 seconds/30
seconds30 seconds
Map light for models with a moon-
roof
Cargo area light
Battery drainage prevention func-
tionBattery drainage prevention func-
tionOperation/Non-operation Operation
Seatbelt warning Sounds a chime while driving Operation/Non-operation Operation
Auto on/off headlights (if equipped) Sensitivity of the operation of the
auto on/off headlightsLow/Mid/High/Max Mid
Welcome lighting function (if
equipped)Welcome lighting function (when
approaching)OFF/30 seconds/60 seconds/90
seconds30 seconds
Welcome lighting function (when
exiting)OFF/30 seconds/60 seconds/90
seconds30 seconds
Reverse gear interlocked rear wiper Reverse gear interlocked rear wiper
operationOperation/Non-operation U.S.-spec. models: Non-operation
Other models: Operation
One-touch lane changer Operation of the one-touch lane
changerOperation/Non-operation Operation
26
Page 72 of 572
Seat, seatbelt and SRS airbags/*SRS airbag (Supplemental Restraint System airbag)
vehicle, causing injury.
.Do not put any objects under the
driver’s side of the instrument
panel. If the SRS knee airbag
deploys, those objects could in-
terfere with its proper operation
and could be propelled inside the
vehicle, causing injury.
.The key must not be attached to
heavy, sharp or hard acces-
sories, or another key. If the
SRS knee airbag deploys, those
objects could interfere with its
proper operation and could be
propelled inside the vehicle and
cause injury.WARNING
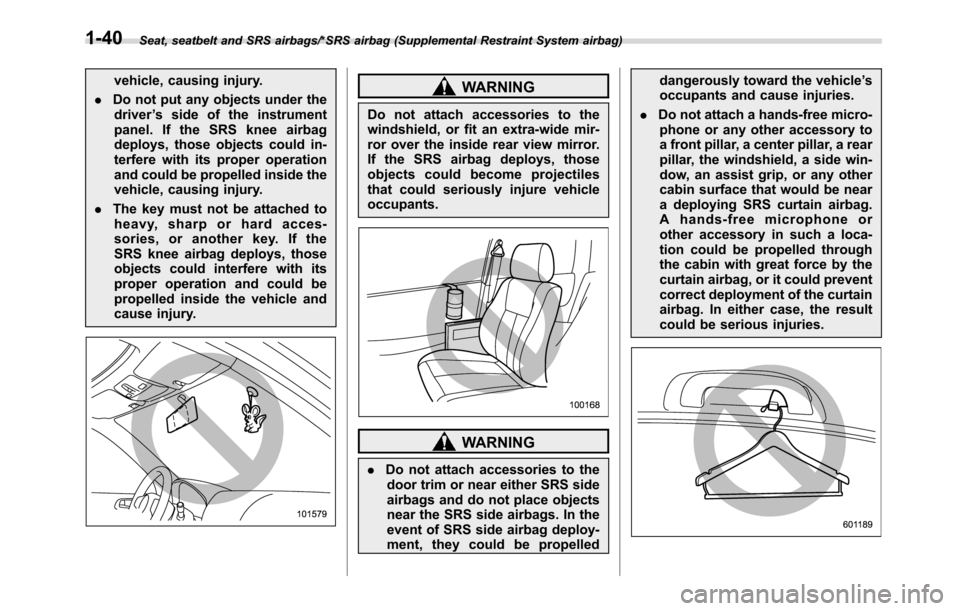
Do not attach accessories to the
windshield, or fit an extra-wide mir-
ror over the inside rear view mirror.
If the SRS airbag deploys, those
objects could become projectiles
that could seriously injure vehicle
occupants.
WARNING
.Do not attach accessories to the
door trim or near either SRS side
airbags and do not place objects
near the SRS side airbags. In the
event of SRS side airbag deploy-
ment, they could be propelleddangerously toward the vehicle’s
occupants and cause injuries.
.Do not attach a hands-free micro-
phone or any other accessory to
a front pillar, a center pillar, a rear
pillar, the windshield, a side win-
dow, an assist grip, or any other
cabin surface that would be near
a deploying SRS curtain airbag.
A hands-free microphone or
other accessory in such a loca-
tion could be propelled through
the cabin with great force by the
curtain airbag, or it could prevent
correct deployment of the curtain
airbag. In either case, the result
could be serious injuries.
1-40
Page 140 of 572
Instruments and controls
Cruise control indicator light (if equipped).......... 3-31
Cruise control set indicator light (if
equipped)......................................................... 3-31
Automatic headlight beam leveler warning light
(models with HID headlights)............................ 3-31
Front fog light indicator light.............................. 3-31
Headlight indicator light..................................... 3-32
Steering responsive fog lights warning indicator/
Steering responsive fog lights OFF indicator
(models with EyeSight system)......................... 3-32
BSD/RCTA warning indicator (if equipped).......... 3-32
BSD/RCTA OFF indicator (if equipped)................ 3-32
Information display (if equipped)...................... 3-32Outside temperature indicator............................ 3-33
Driving information display................................. 3-33
Clock................................................................. 3-37
Multi information display (models with type
B combination meter)..................................... 3-38
Basic operation.................................................. 3-39
Welcome screen and Good-bye screen............... 3-39
Warning screen.................................................. 3-39
Basic screens.................................................... 3-39
Menu screens.................................................... 3-40
Multi function display (if equipped).................. 3-42Models without multi function display................. 3-42
Safety precautions............................................. 3-42
Features............................................................ 3-43
Locations........................................................... 3-43
Basic operation.................................................. 3-43
Welcome screen................................................. 3-44
Date screen........................................................ 3-44Ending screen................................................... 3-44
Self-check screen.............................................. 3-45
Interruption screen............................................ 3-46
Basic screens.................................................... 3-46
Selection screen................................................ 3-53
Date and time settings....................................... 3-56
Image quality and volume settings..................... 3-63
Screen settings.................................................. 3-65
Maintenance settings......................................... 3-73
Driving history registration................................. 3-76
Car settings....................................................... 3-77
Initialize............................................................. 3-85
Light control switch........................................... 3-88Headlights......................................................... 3-89
High/low beam change (dimmer) ........................ 3-90
Headlight flasher............................................... 3-91
Daytime running light system............................. 3-91
Turn signal lever................................................ 3-92One-touch lane changer..................................... 3-92
Illumination brightness control......................... 3-92
Headlight beam leveler (if equipped)............... 3-93
Automatic headlight beam leveler (models with
HID headlights)................................................ 3-93
Fog light switch................................................. 3-93
Steering responsive fog lights system (models
with EyeSight system)..................................... 3-94
Wiper and washer.............................................. 3-95Windshield wiper and washer switches.............. 3-96
Rear window wiper and washer switch............... 3-98
Mirrors................................................................ 3-99Inside mirror...................................................... 3-99
Page 141 of 572
Instruments and controls
Outside mirrors.................................................. 3-99
Defogger and deicer........................................ 3-100Tilt/telescopic steering wheel......................... 3-102
Horn.................................................................. 3-102
Page 237 of 572
This setting can be changed by a
SUBARU dealer. Consult your SUBARU
dealer for details.
CAUTION
Do not attach anything that disturbs
the rear wiper operation on the rear
gate. Doing so may damage the rear
wiper when it operates.
!Washer
To wash the rear window while the rear
wiper is operating, turn the knob switch
upward to the“
”position. The washer
fluid sprays until you release the knob.
To wash the rear window when the rear
wiper is not in use, turn the knob switch
downward to the“
”position. The washer
fluid sprays and the wiper operates until
you release the knob.
Mirrors
Always check that the inside and outside
mirrors are properly adjusted before you
start driving.
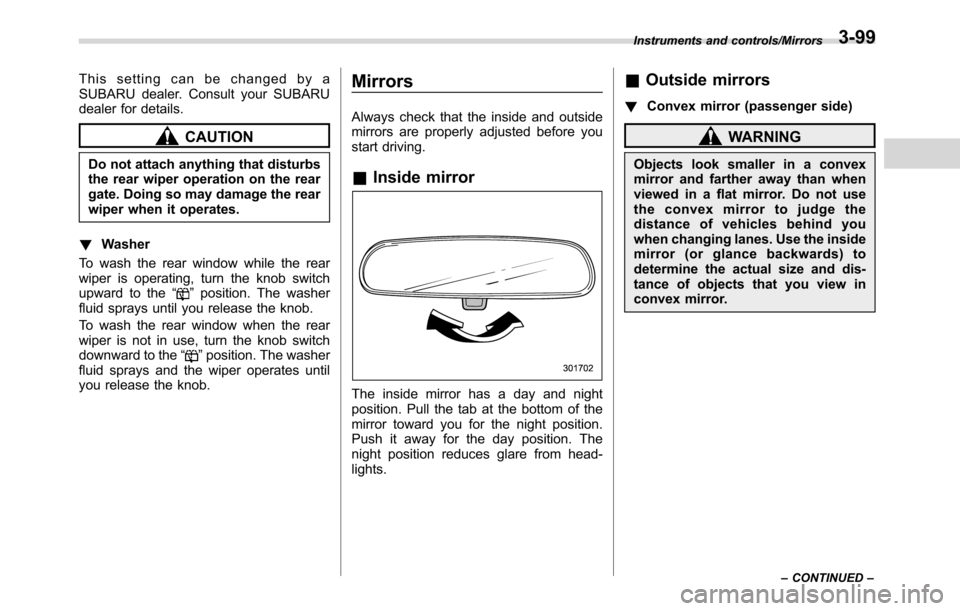
&Inside mirror
The inside mirror has a day and night
position. Pull the tab at the bottom of the
mirror toward you for the night position.
Push it away for the day position. The
night position reduces glare from head-
lights.
&Outside mirrors
!Convex mirror (passenger side)
WARNING
Objects look smaller in a convex
mirror and farther away than when
viewed in a flat mirror. Do not use
the convex mirror to judge the
distance of vehicles behind you
when changing lanes. Use the inside
mirror (or glance backwards) to
determine the actual size and dis-
tance of objects that you view in
convex mirror.
Instruments and controls/Mirrors
–CONTINUED–3-99
Page 238 of 572
Instruments and controls/Defogger and deicer
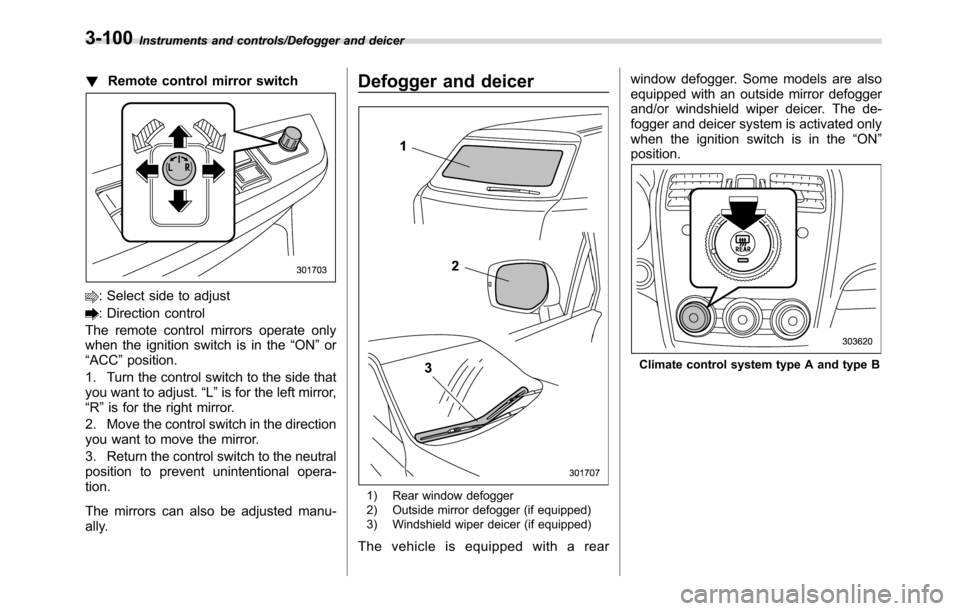
!Remote control mirror switch
: Select side to adjust
: Direction control
The remote control mirrors operate only
when the ignition switch is in the“ON”or
“ACC”position.
1. Turn the control switch to the side that
you want to adjust.“L”is for the left mirror,
“R”is for the right mirror.
2. Move the control switch in the direction
you want to move the mirror.
3. Return the control switch to the neutral
position to prevent unintentional opera-
tion.
The mirrors can also be adjusted manu-
ally.
Defogger and deicer
1) Rear window defogger
2) Outside mirror defogger (if equipped)
3) Windshield wiper deicer (if equipped)
The vehicle is equipped with a rearwindow defogger. Some models are also
equipped with an outside mirror defogger
and/or windshield wiper deicer. The de-
fogger and deicer system is activated only
when the ignition switch is in the“ON”
position.
Climate control system type A and type B
3-100
Page 239 of 572
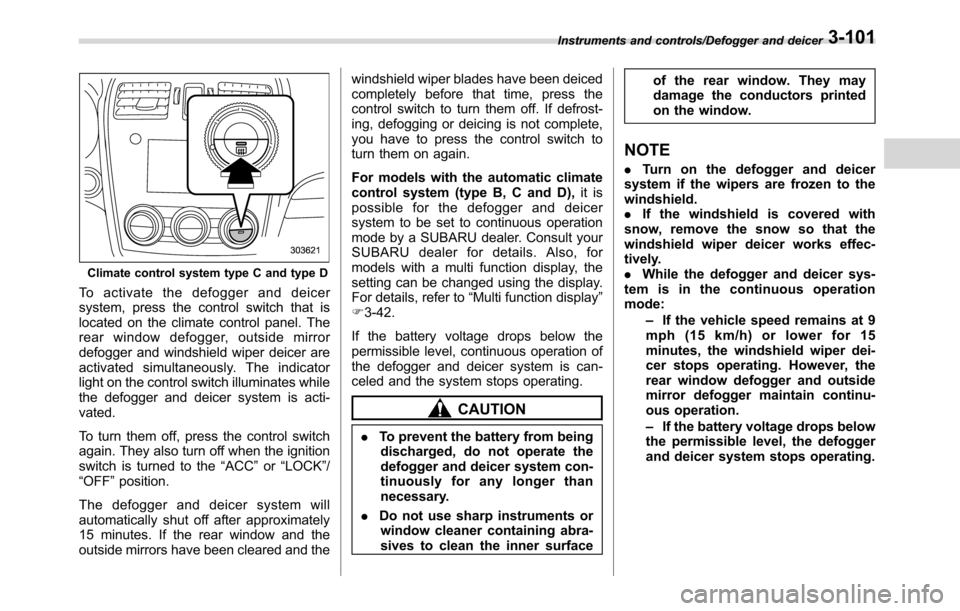
Climate control system type C and type D
To activate the defogger and deicer
system, press the control switch that is
located on the climate control panel. The
rear window defogger, outside mirror
defogger and windshield wiper deicer are
activated simultaneously. The indicator
light on the control switch illuminates while
the defogger and deicer system is acti-
vated.
To turn them off, press the control switch
again. They also turn off when the ignition
switch is turned to the“ACC”or“LOCK”/
“OFF”position.
The defogger and deicer system will
automatically shut off after approximately
15 minutes. If the rear window and the
outside mirrors have been cleared and thewindshield wiper blades have been deiced
completely before that time, press the
control switch to turn them off. If defrost-
ing, defogging or deicing is not complete,
you have to press the control switch to
turn them on again.
For models with the automatic climate
control system (type B, C and D),it is
possible for the defogger and deicer
system to be set to continuous operation
mode by a SUBARU dealer. Consult your
SUBARU dealer for details. Also, for
models with a multi function display, the
setting can be changed using the display.
For details, refer to“Multi function display”
F3-42.
If the battery voltage drops below the
permissible level, continuous operation of
the defogger and deicer system is can-
celed and the system stops operating.
CAUTION
.To prevent the battery from being
discharged, do not operate the
defogger and deicer system con-
tinuously for any longer than
necessary.
.Do not use sharp instruments or
window cleaner containing abra-
sives to clean the inner surfaceof the rear window. They may
damage the conductors printed
on the window.
NOTE
.Turn on the defogger and deicer
system if the wipers are frozen to the
windshield.
.If the windshield is covered with
snow, remove the snow so that the
windshield wiper deicer works effec-
tively.
.While the defogger and deicer sys-
tem is in the continuous operation
mode:
–If the vehicle speed remains at 9
mph (15 km/h) or lower for 15
minutes, the windshield wiper dei-
cer stops operating. However, the
rear window defogger and outside
mirror defogger maintain continu-
ous operation.
–If the battery voltage drops below
the permissible level, the defogger
and deicer system stops operating.
Instruments and controls/Defogger and deicer3-101
Page 349 of 572
Interior lights....................................................... 6-2
Dome light.......................................................... 6-2
Cargo area light.................................................. 6-2
Map lights........................................................... 6-3
OFF delay timer.................................................. 6-3
Sun visors........................................................... 6-4Sun visor extension plate (models with the
EyeSight system).............................................. 6-4
Vanity mirror....................................................... 6-5
Storage compartment......................................... 6-5Glove box........................................................... 6-6
Center console.................................................... 6-6
Cup holders......................................................... 6-7
Bottle holders...................................................... 6-7
Accessory power outlets.................................... 6-8
Use with a cigarette lighter (dealer option)........... 6-9
Ashtray (dealer option)...................................... 6-10
Floor mat (if equipped)...................................... 6-11
Coat hook........................................................... 6-11
Shopping bag hook........................................... 6-12
Cargo area cover (if equipped)......................... 6-12
Using the cover................................................. 6-12
To remove the cover housing ............................. 6-13
Stowage of the cargo area cover........................ 6-13
To install the cover housing............................... 6-14
Cargo tie-down hooks (if equipped)................. 6-14
Rear view camera.............................................. 6-15
How to use the rear view camera....................... 6-16
Viewing range on the screen.............................. 6-17
Help line............................................................ 6-18
Interior equipment
6