towing SUBARU CROSSTREK 2017 1.G Owners Manual
[x] Cancel search | Manufacturer: SUBARU, Model Year: 2017, Model line: CROSSTREK, Model: SUBARU CROSSTREK 2017 1.GPages: 572, PDF Size: 41.52 MB
Page 18 of 572
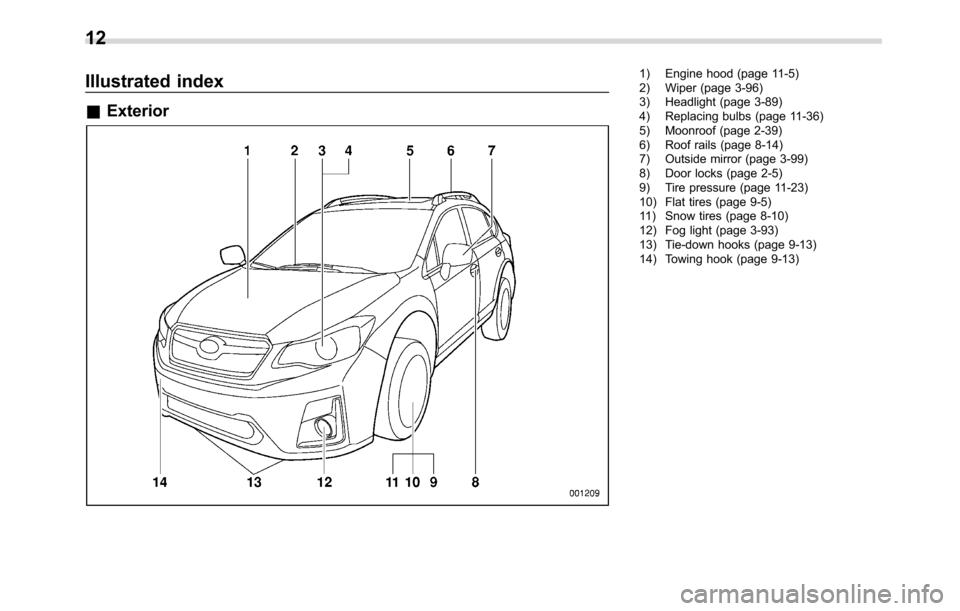
Illustrated index
&Exterior
1) Engine hood (page 11-5)
2) Wiper (page 3-96)
3) Headlight (page 3-89)
4) Replacing bulbs (page 11-36)
5) Moonroof (page 2-39)
6) Roof rails (page 8-14)
7) Outside mirror (page 3-99)
8) Door locks (page 2-5)
9) Tire pressure (page 11-23)
10) Flat tires (page 9-5)
11) Snow tires (page 8-10)
12) Fog light (page 3-93)
13) Tie-down hooks (page 9-13)
14) Towing hook (page 9-13)
12
Page 19 of 572
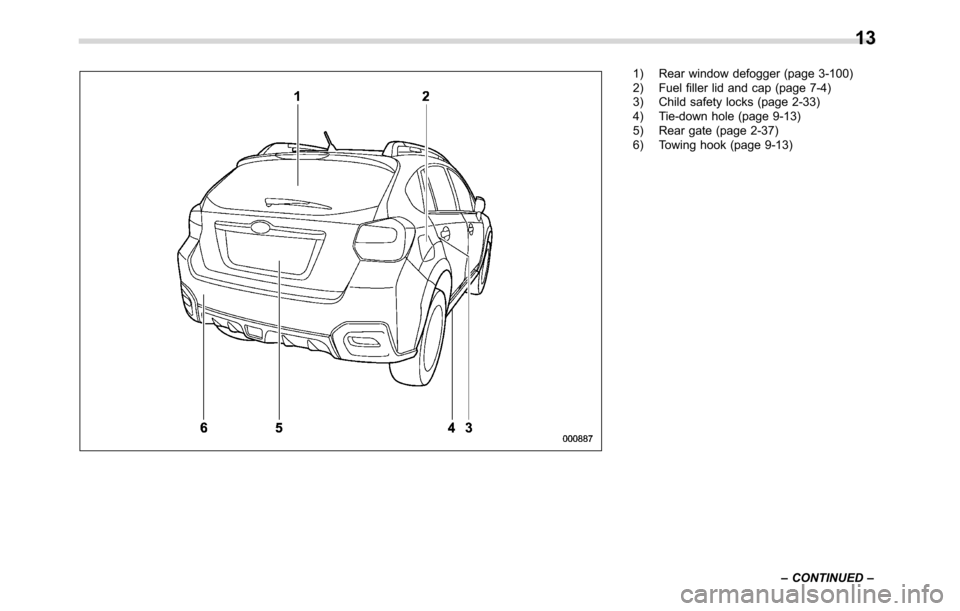
1) Rear window defogger (page 3-100)
2) Fuel filler lid and cap (page 7-4)
3) Child safety locks (page 2-33)
4) Tie-down hole (page 9-13)
5) Rear gate (page 2-37)
6) Towing hook (page 9-13)
–CONTINUED–
13
Page 155 of 572
NOTE
This light also illuminates when the fuel
filler cap is not tightened until it clicks.
If you have recently refueled your vehicle,
the cause of the CHECK ENGINE warning
light/malfunction indicator light illuminating
could be a loose or missing fuel filler cap.
Remove the cap and retighten it until it
clicks. Make sure nothing is interfering
with the sealing of the cap. Tightening the
cap will not make the CHECK ENGINE
warning light turn off immediately. It may
take several driving trips. If the light does
not turn off, take your vehicle to your
authorized SUBARU dealer immediately.
!If the light is blinking
If the light is blinking while driving, an
engine misfire condition has been de-
tected which may damage the emission
control system.
To prevent serious damage to the emis-
sion control system, you should do the
following.
.Reduce vehicle speed.
.Avoid hard acceleration.
.Avoid steep uphill grades.
.Reduce the amount of cargo, if possi-
ble.
.If towing a trailer, stop doing so as soon
as possible.The CHECK ENGINE warning light may
stop blinking and illuminate steadily after
several driving trips. You should have your
vehicle checked by an authorized
SUBARU dealer immediately.
&Coolant temperature
low indicator light/Cool-
ant temperature high
warning light
CAUTION
.After turning the ignition switch
to the“ON”position, if this
indicator light/warning light be-
haves in any of the following
ways, the electrical system may
be malfunctioning. Contact your
SUBARU dealer immediately for
an inspection.
–It remains blinking in RED.
–It remains illuminated in RED
for more than 2 seconds.
–It remains blinking in RED and
BLUE alternately.
.While driving, if this indicator
light/warning light behaves in
any of the following ways, take
the specified appropriate mea-
sure listed below.–Blinking or illuminated in
RED:
Safely stop the vehicle as
soon as possible, and refer
to the emergency steps to
take in the case of engine
overheating. After that, have
the system checked by your
nearest SUBARU dealer. Refer
to“Engine overheating”F9-
12.
–Blinking in RED and BLUE
alternately:
The electrical system may be
malfunctioning. Contact your
SUBARU dealer for an inspec-
tion.
This coolant temperature low indicator
light/coolant temperature high warning
light has the following three functions.
.Illumination inBLUEindicates insuffi-
cient warming up of the engine
.Blinking inREDindicates that the
engine is close to overheating
.Illumination inREDindicates overheat-
ing condition of the engine
For a system check, this indicator light/
warning light illuminates inREDfor
approximately 2 seconds when the igni-
tion switch is turned to the“ON”position.
Instruments and controls/Warning and indicator lights
–CONTINUED–3-17
Page 364 of 572
Interior equipment/Rear view camera
not to apply the wax to the camera. If it
comes in contact with the camera,
moisten a clean cloth with a diluted
neutral detergent to remove the wax.
.The camera lens has a hard coating
to help prevent scratches. However,
when washing the vehicle or cleaning
the camera lens, be careful not to
scratch the camera lens. Do not use a
washing brush directly on the camera
lens. The image quality of the rear view
camera may deteriorate.
.Strong light shined on the camera
lens may develop vertical lines around
the light source. This is not a malfunc-
tion.
.Under fluorescent light, the display
may flicker. However, this is not a
malfunction.
.The image of the rear view camera
may be slightly different from the
actual color of the objects.&How to use the rear view
camera
When the shift lever/select lever is set to
“R”, the rear view camera automatically
displays the rear view image from the
vehicle. When the lever is set to other
positions, the image before setting to“R”
is displayed.
1. Set the ignition switch to“ON”.
2. Set the shift lever/select lever to“R”.
NOTE
.For models with the genuine
SUBARU navigation system or audio
system, while the navigation system is
activated, the image of the rear view
camera will not be displayed. However,
the image of the rear view camera has
priority over other screen displays.
.The image of the rear view camera is
horizontally reversed as is the case
with the vehicle rearview mirror or the
side view mirror.
.It may be difficult to see the rear
view camera image in the following
cases. This is not a malfunction of the
camera.
–The vehicle is used for towing or
a trailer hitch is installed.
–The vehicle is in a dark place (at
night, in a tunnel, etc.).–The vehicle is in an extremely hot
or cold place.
–An object (such as raindrops,
snow, dirt, etc.) that disturbs the
view of the rear view camera sticks
to the lens of the camera.
–Strong light shined directly on
the camera lens (occasionally, there
are vertical lines on the screen).
6-16
Page 376 of 572
Starting and operating/Preparing to drive
The U.S. Environmental Protection
Agency (EPA) and states using two-wheel
dynamometers in their emission testing
program have EXEMPTED SUBARU
AWD vehicles from the portion of the
testing program that involves a two-wheel
dynamometer. There are some states that
use four-wheel dynamometers in their
testing program. When properly used, this
equipment should not damage a SUBARU
AWD vehicle.
Under no circumstances should the rear
wheels be jacked off the ground, nor
should the driveshaft be disconnected for
state emission testing.Preparing to drive
You should perform the following checks
and adjustments every day before you
start driving.
1. Check that all windows, mirrors, and
lights are clean and unobstructed.
2. Check the appearance and condition
of the tires. Also check tires for proper
inflation.
3. Look under the vehicle for any sign of
leaks.
4. Check that the hood and rear gate are
fully closed.
5. Check the adjustment of the seat.
6. Check the adjustment of the inside
and outside mirrors.
7. Fasten your seatbelt. Check that your
passengers have fastened their seatbelts.
8. Check the operation of the warning
and indicator lights when the ignition
switch is turned to the“ON”position.
9. Check the gauges, indicator and warn-
ing lights after starting the engine.
10. Check that no small animals enter the
engine compartment.
CAUTION
Trapping small animals in the cool-
ing fan and belts of the engine may
result in a malfunction. Check that
no small animal enters the engine
compartment and under the vehicle
before starting the engine.
NOTE
.Engine oil, engine coolant, brake
fluid, washer fluid and other fluid levels
should be checked daily, weekly or at
fuel stops.
.When towing a trailer, refer to“Trai-
ler hitch (dealer option)”F8-15.
7-8
Page 392 of 572
Starting and operating/Continuously variable transmission
transmission fluid to overheat.
.Never move the vehicle rearward
by inertia with the select lever set
in a forward driving position or
move the vehicle forward by
inertia with the select lever set
in the“R”position. Doing so may
result in an unexpected accident
or malfunction.
.When parking the vehicle, first
securely apply the parking brake
and then place the select lever in
the“P”position. Do not park for
a long time with the select lever
in any other position as doing so
could result in a dead battery.
&Continuously variable trans-
mission features
The continuously variable transmission is
electronically controlled and provides an
infinite number of forward speeds and 1
reverse speed. It also has a manual mode.
NOTE
.When the engine coolant tempera-
ture is still low, the transmission will
upshift or downshift at higher engine
speeds than when the coolant tempera-
ture is sufficiently high in order to
shorten the warm-up time and improvedriveability. The gearshift timing will
automatically shift to the normal timing
after the engine has warmed up.
.Immediately after transmission fluid
is replaced, you may feel that the
transmission operation is somewhat
unusual. This results from invalidation
of data which the on-board computer
has collected and stored in memory to
allow the transmission to shift at the
most appropriate times for the current
condition of your vehicle. Optimized
shifting will be restored as the vehicle
continues to be driven for a while.
.When driving a CVT model under
continuous heavy load conditions such
as when towing a camper or climbing a
long, steep hill, the engine speed or the
vehicle speed may automatically be
reduced. This is not a malfunction. This
phenomenon results from the engine
control function maintaining the cool-
ing performance of the vehicle. The
engine and vehicle speed will return to
a normal speed when the engine is able
to maintain the optimum cooling per-
formance after the heavy load de-
creases. Driving under a heavy load
must be performed with extreme care.
Do not try to pass a vehicle in front
when driving on an uphill slope while
towing..The continuously variable transmis-
sion is a chain type system that
provides superior transmission effi-
ciency for maximum fuel economy. At
times, depending on varying driving
conditions, a chain operating sound
may be heard that is characteristic of
this type of system.
&Select lever
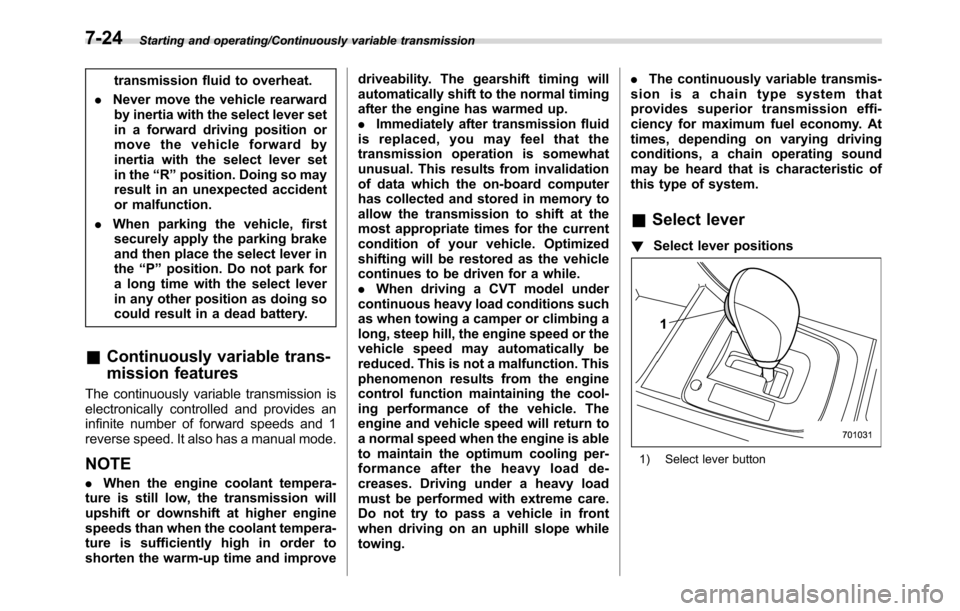
!Select lever positions
1) Select lever button
7-24
Page 403 of 572
spare tire, the effectiveness of
the Vehicle Dynamics Control
system is reduced and this
should be taken into account
when driving the vehicle in
such a condition.
.If non-matching tires are used,
the Vehicle Dynamics Control
system may not operate cor-
rectly.
.The Vehicle Dynamics Control
system helps prevent unstable
vehicle motion such as skidding
using control of the brakes and
engine power. Do not turn off the
Vehicle Dynamics Control sys-
tem unless it is absolutely ne-
cessary. If you must turn off the
Vehicle Dynamics Control sys-
tem, drive very carefully accord-
ing to the road surface condi-
tions.
&System features
In the event of wheelspin and/or skidding
on a slippery road surface and/or during
cornering and/or an evasive maneuver,
the Vehicle Dynamics Control system
adjusts the engine’s output and the
wheels’respective braking forces to helpmaintain traction and directional control.
.Traction Control Function
The traction control function is designed to
prevent spinning of the driving wheels on
slippery road surfaces, thereby helping to
maintain traction and directional control.
Activation of this function is shown by
flashing the Vehicle Dynamics Control
operation indicator light.
.Skid Suppression Function
The skid suppression function is designed
to help maintain directional stability by
suppressing the wheels’tendency to slide
sideways during steering operations. Acti-
vation of this function is shown by flashing
the Vehicle Dynamics Control operation
indicator light.
NOTE
.The Vehicle Dynamics Control sys-
tem may be considered normal when
the following conditions occur.
–Slight twitching of the brake
pedal is felt.
–The vehicle or steering wheel
shakes to a small degree.
–An operating sound from the
engine compartment is heard
briefly when starting the engine
and when driving off after starting
the engine.–The brake pedal seems to jolt
when driving off after starting the
engine.
.In the circumstances shown in the
following list, the vehicle may be less
stable than it feels to the driver. The
Vehicle Dynamics Control System may
therefore operate. Such operation does
not indicate a system malfunction.
–on gravel-covered or rutted
roads
–on unfinished roads
–when the vehicle is towing a
trailer
–when the vehicle is fitted with
snow tires or winter tires
.Activation of the Vehicle Dynamics
Control system will cause operation of
the steering wheel to feel slightly
different compared to that for normal
conditions.
.It is always important to reduce
speed when approaching a corner,
even if your vehicle is equipped with
the Vehicle Dynamics Control system.
.Always turn off the engine before
replacing a tire. Failure to do so may
render the Vehicle Dynamics Control
system unable to operate correctly.
Starting and operating/Vehicle Dynamics Control system
–CONTINUED–7-35
Page 408 of 572
Starting and operating/Parking your vehicle
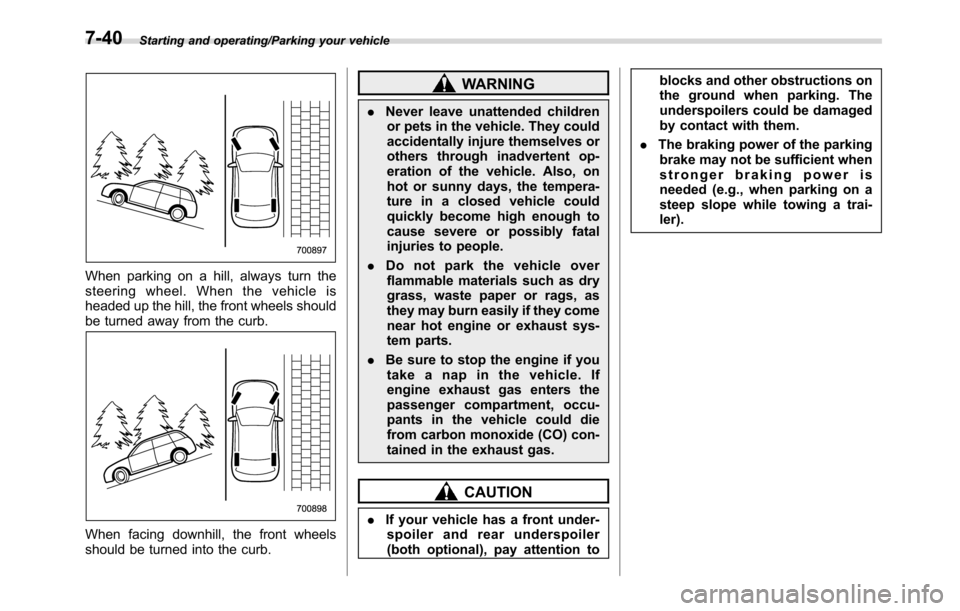
When parking on a hill, always turn the
steering wheel. When the vehicle is
headed up the hill, the front wheels should
be turned away from the curb.
When facing downhill, the front wheels
should be turned into the curb.
WARNING
.Never leave unattended children
or pets in the vehicle. They could
accidentally injure themselves or
others through inadvertent op-
eration of the vehicle. Also, on
hot or sunny days, the tempera-
ture in a closed vehicle could
quickly become high enough to
cause severe or possibly fatal
injuries to people.
.Do not park the vehicle over
flammable materials such as dry
grass, waste paper or rags, as
they may burn easily if they come
near hot engine or exhaust sys-
tem parts.
.Be sure to stop the engine if you
take a nap in the vehicle. If
engine exhaust gas enters the
passenger compartment, occu-
pants in the vehicle could die
from carbon monoxide (CO) con-
tained in the exhaust gas.
CAUTION
.If your vehicle has a front under-
spoiler and rear underspoiler
(both optional), pay attention toblocks and other obstructions on
the ground when parking. The
underspoilers could be damaged
by contact with them.
.The braking power of the parking
brake may not be sufficient when
stronger braking power is
needed (e.g., when parking on a
steep slope while towing a trai-
ler).
7-40
Page 410 of 572
Starting and operating/Hill start assist system
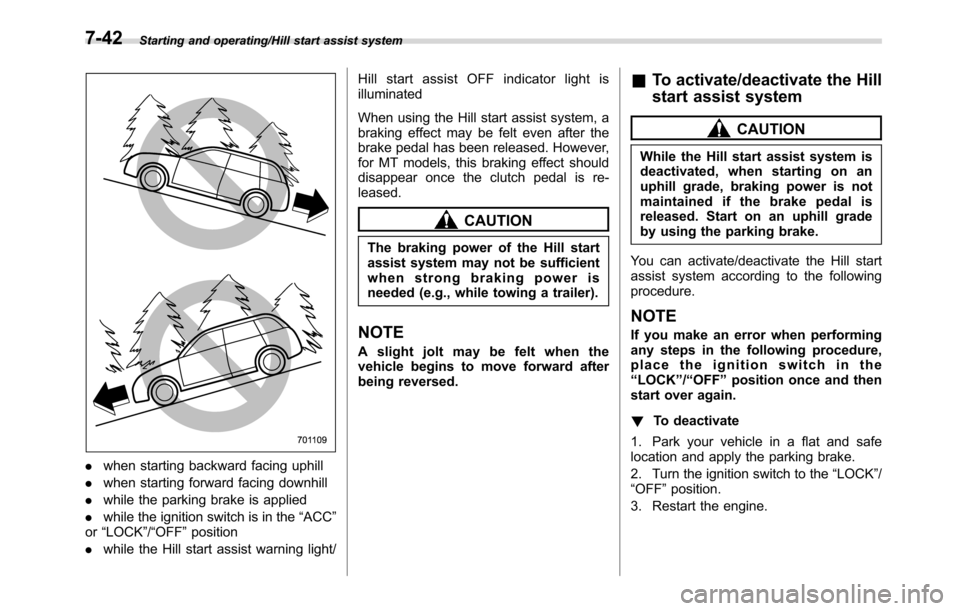
.when starting backward facing uphill
.when starting forward facing downhill
.while the parking brake is applied
.while the ignition switch is in the“ACC”
or“LOCK”/“OFF”position
.while the Hill start assist warning light/Hill start assist OFF indicator light is
illuminated
When using the Hill start assist system, a
braking effect may be felt even after the
brake pedal has been released. However,
for MT models, this braking effect should
disappear once the clutch pedal is re-
leased.
CAUTION
The braking power of the Hill start
assist system may not be sufficient
when strong braking power is
needed (e.g., while towing a trailer).
NOTE
A slight jolt may be felt when the
vehicle begins to move forward after
being reversed.
&To activate/deactivate the Hill
start assist system
CAUTION
While the Hill start assist system is
deactivated, when starting on an
uphill grade, braking power is not
maintained if the brake pedal is
released. Start on an uphill grade
by using the parking brake.
You can activate/deactivate the Hill start
assist system according to the following
procedure.
NOTE
If you make an error when performing
any steps in the following procedure,
place the ignition switch in the
“LOCK”/“OFF”position once and then
start over again.
!To deactivate
1. Park your vehicle in a flat and safe
location and apply the parking brake.
2. Turn the ignition switch to the“LOCK”/
“OFF”position.
3. Restart the engine.
7-42
Page 412 of 572
Starting and operating/Cruise control
assist OFF indicator light blinks.
8. Turn the ignition switch to the“LOCK”/
“OFF”position. The hill start assist system
has now been deactivated.
NOTE
While the Hill start assist system is
deactivated, the Hill start assist OFF
indicator light blinks.
!To activate
When the procedure to deactivate the Hill
start assist system is performed again, the
system is activated. When the Hill start
assist system is activated, the Hill start
assist OFF indicator light turns off.
&Hill start assist warning light/
Hill start assist OFF indicator
light
Refer to“Hill start assist warning light/Hill
start assist OFF indicator light”F3-22.
Cruise control (if equipped)
NOTE
For models with EyeSight system:
Refer to the Owner’s Manual supple-
ment for the EyeSight system.
Cruise control enables you to maintain a
constant vehicle speed without holding
your foot on the accelerator pedal and it is
operative when the vehicle speed is 25
mph (40 km/h) or more.
WARNING
Do not use the cruise control under
any of the following conditions.
These may cause loss of vehicle
control.
.driving up or down a steep grade
.driving on slippery or winding
roads
.driving in heavy traffic
.towing a trailer
NOTE
Make sure the cruise control system is
turned off when the cruise control is
not in use to avoid unintentionally
setting of the cruise control.
&To set cruise control
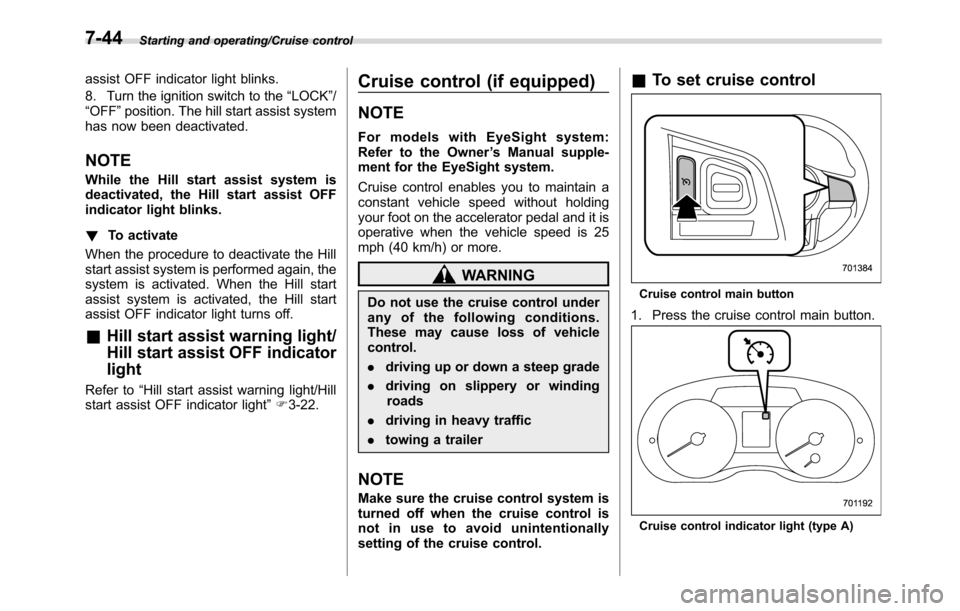
Cruise control main button
1. Press the cruise control main button.
Cruise control indicator light (type A)
7-44