o2 sensor SUBARU CROSSTREK 2018 Owner's Manual
[x] Cancel search | Manufacturer: SUBARU, Model Year: 2018, Model line: CROSSTREK, Model: SUBARU CROSSTREK 2018Pages: 474, PDF Size: 20.76 MB
Page 173 of 474
(178,1)
北米Model "A1320BE-C" EDITED: 2017/ 10/ 10
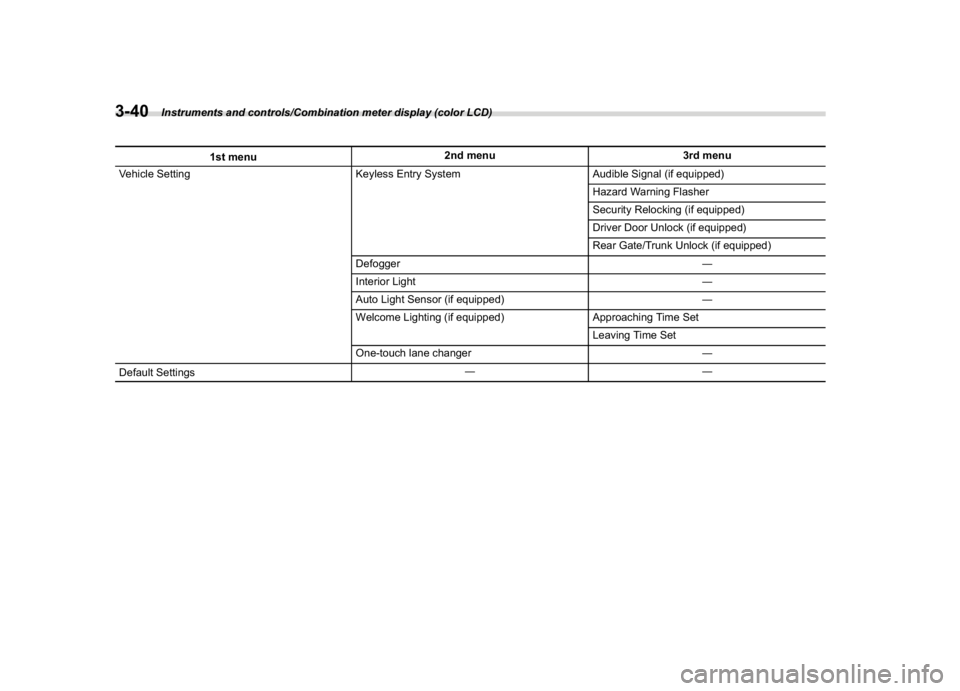
1st menu2nd menu 3rd menu
Vehicle Setting Keyless Entry System Audible Signal (if equipped)
Hazard Warning Flasher
Security Relocking (if equipped)
Driver Door Unlock (if equipped)
Rear Gate/Trunk Unlock (if equipped)
Defogger―
Interior Light―
Auto Light Sensor (if equipped)―
Welcome Lighting (if equipped) Approaching Time Set
Leaving Time Set
One-touch lane changer―
Default Settings――
Instruments and controls/Combination meter display (color LCD)
3-40
Page 175 of 474
(180,1)
北米Model "A1320BE-C" EDITED: 2017/ 10/ 10
doors to unlock simultaneously when
accessing from the cargo area.
!Defogger
Sets and customizes the operation of the
defogger.
!Interior Light
Sets and customizes the interior light off
delay timer.
!Auto Light Sensor (if equipped)
Sets and customizes the sensitivity of the
auto light sensor.
!Welcome Lighting (if equipped)
Sets the leaving time and approaching
time.
.Approaching time set
Sets the illumination time of the headlights
that illuminate when you approach the
vehicle.
.Leaving time set
Sets the time until the headlights turn off
when you have moved away from the
vehicle.
!One-touch lane changer
Sets the one-touch lane changer on/off.!Default Settings
Select“Ye s”to use the menu screen to
restore customized settings to the factory
default settings. Select“No”to return to the
previous screen without restoring to the
factory default settings.
Multi-function display (black
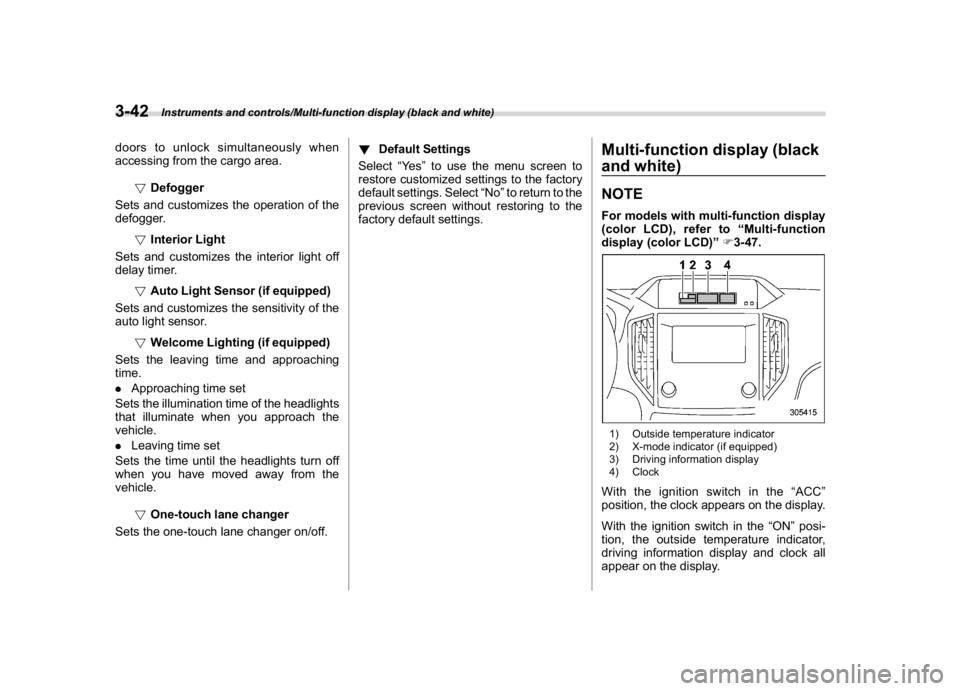
and white)NOTEFor models with multi-function display
(color LCD), refer to“Multi-function
display (color LCD)”F3-47.1) Outside temperature indicator
2) X-mode indicator (if equipped)
3) Driving information display
4) ClockWith the ignition switch in the“ACC”
position, the clock appears on the display.
With the ignition switch in the“ON”posi-
tion, the outside temperature indicator,
driving information display and clock all
appear on the display.
Instruments and controls/Multi-function display (black and white)
3-42
Page 179 of 474
(184,1)
北米Model "A1320BE-C" EDITED: 2017/ 10/ 10
time a complete hour has elapsed. If the
display is giving a reading other than the
journey time, the display switches to the
journey time, flashes for 5 seconds, and
returns to its original reading each time a
complete hour has elapsed.NOTEThe journey time is reset when the
ignition switch is turned to the“ACC”
or“LOCK”/“OFF”position.
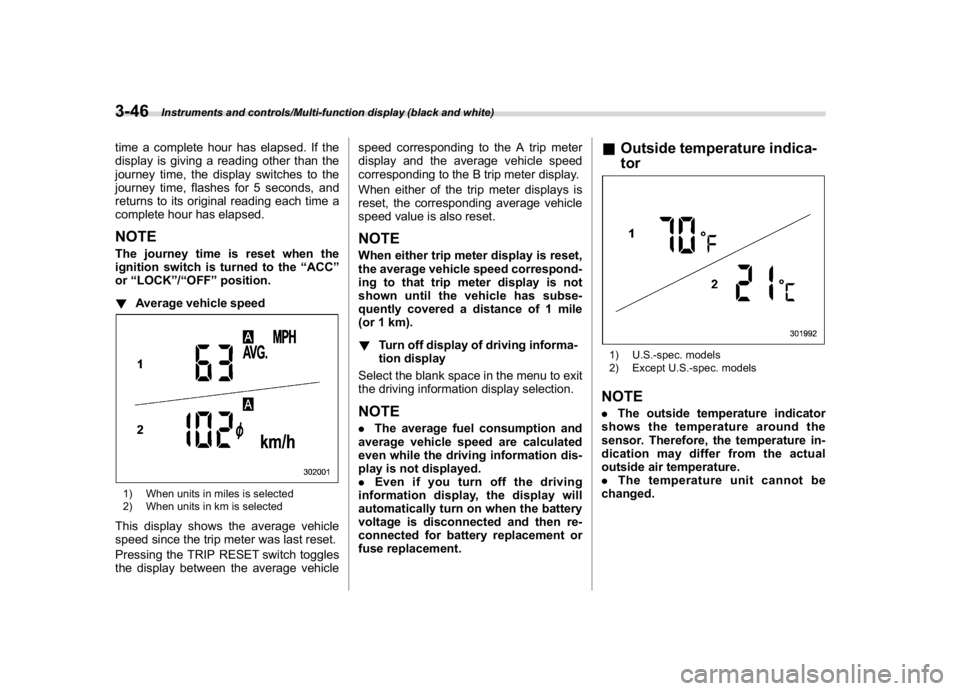
!Average vehicle speed1) When units in miles is selected
2) When units in km is selectedThis display shows the average vehicle
speed since the trip meter was last reset.
Pressing the TRIP RESET switch toggles
the display between the average vehiclespeed corresponding to the A trip meter
display and the average vehicle speed
corresponding to the B trip meter display.
When either of the trip meter displays is
reset, the corresponding average vehicle
speed value is also reset.
NOTEWhen either trip meter display is reset,
the average vehicle speed correspond-
ing to that trip meter display is not
shown until the vehicle has subse-
quently covered a distance of 1 mile
(or 1 km).
!Turn off display of driving informa-
tion display
Select the blank space in the menu to exit
the driving information display selection.NOTE.The average fuel consumption and
average vehicle speed are calculated
even while the driving information dis-
play is not displayed.
.Even if you turn off the driving
information display, the display will
automatically turn on when the battery
voltage is disconnected and then re-
connected for battery replacement or
fuse replacement.
&Outside temperature indica-
tor1) U.S.-spec. models
2) Except U.S.-spec. modelsNOTE.The outside temperature indicator
shows the temperature around the
sensor. Therefore, the temperature in-
dication may differ from the actual
outside air temperature.
.The temperature unit cannot be
changed.
Instruments and controls/Multi-function display (black and white)
3-46
Page 183 of 474
(188,1)
北米Model "A1320BE-C" EDITED: 2017/ 10/ 10
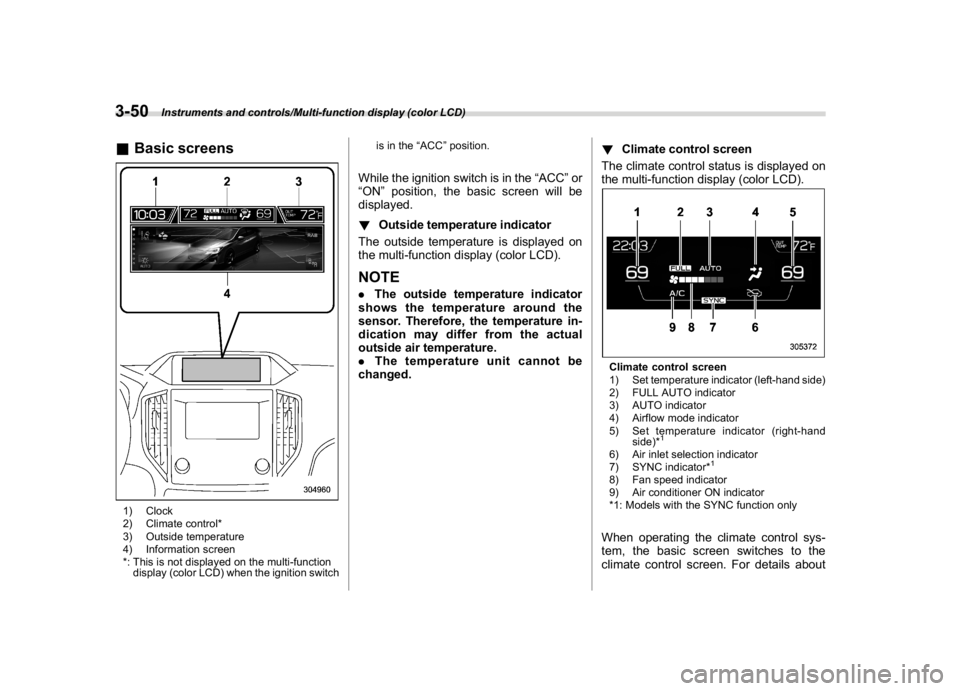
&Basic screens1) Clock
2) Climate control*
3) Outside temperature
4) Information screen
*: This is not displayed on the multi-function
display (color LCD) when the ignition switchis in the“ACC”position.
While the ignition switch is in the“ACC”or
“ON”position, the basic screen will be
displayed.
!Outside temperature indicator
The outside temperature is displayed on
the multi-function display (color LCD).NOTE.The outside temperature indicator
shows the temperature around the
sensor. Therefore, the temperature in-
dication may differ from the actual
outside air temperature.
.The temperature unit cannot be
changed.!Climate control screen
The climate control status is displayed on
the multi-function display (color LCD).
Climate control screen
1) Set temperature indicator (left-hand side)
2) FULL AUTO indicator
3) AUTO indicator
4) Airflow mode indicator
5) Set temperature indicator (right-hand
side)*
1
6) Air inlet selection indicator
7) SYNC indicator*
1
8) Fan speed indicator
9) Air conditioner ON indicator
*1: Models with the SYNC function onlyWhen operating the climate control sys-
tem, the basic screen switches to the
climate control screen. For details about
Instruments and controls/Multi-function display (color LCD)
3-50
Page 201 of 474
(206,1)
北米Model "A1320BE-C" EDITED: 2017/ 10/ 10
When exiting:
While the welcome lighting function is
activated, the low beam headlights will
remain illuminated even when either of the
following operation is done.
.The push-button ignition switch is
turned to the“OFF”status (models with
“keyless access with push-button start
system”)
.The key is pulled out from the ignition
switch (models without“keyless access
with push-button start system”)
The low beam headlights will turn off under
any of the following conditions.
.3 minutes have passed since the low
beam headlights were illuminated by the
welcome lighting function.
.30 seconds have passed since the door
is opened and closed.
*1
.The light control switch is turned to a
position other than“AUTO”.
.The locking procedure is performed
twice. When performing the unlocking
procedure after performing the locking
procedure, perform the locking procedure
twice again.*1: The setting for the period of time in which the
low beam headlights remain on by the welcome
lighting function can be changed by a SUBARU
dealer. Contact your SUBARU dealer for de-tails.
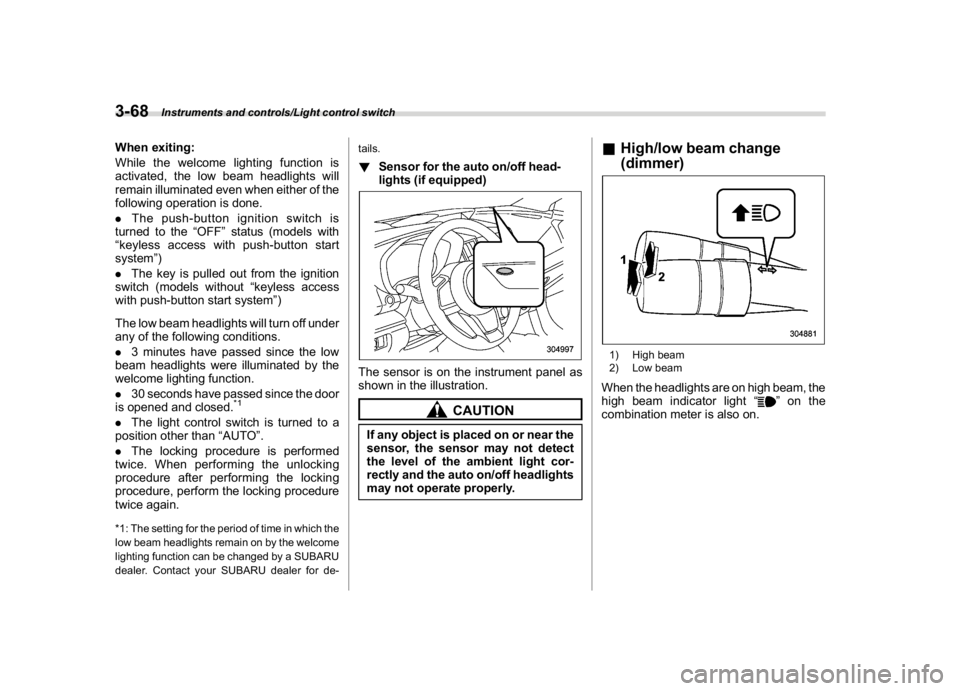
!Sensor for the auto on/off head-
lights (if equipped)The sensor is on the instrument panel as
shown in the illustration.
CAUTION
If any object is placed on or near the
sensor, the sensor may not detect
the level of the ambient light cor-
rectly and the auto on/off headlights
may not operate properly.
&High/low beam change
(dimmer)1) High beam
2) Low beamWhen the headlights are on high beam, the
high beam indicator light“
”on the
combination meter is also on.
Instruments and controls/Light control switch
3-68
Page 226 of 474
(233,1)
北米Model "A1320BE-C" EDITED: 2017/ 10/ 10
Ventilator control....................................................4-2
Center ventilators.................................................. 4-2
Side ventilators...................................................... 4-2
Climate control panel.............................................4-2
Type A ................................................................... 4-3
Type B ................................................................... 4-4
Type C ................................................................... 4-5
Automatic climate control operation
(type B andC) ......................................................4-6
Sensors................................................................. 4-6
Manual climate controloperation..........................4-7
Airflow mode selection........................................... 4-7
MAX A/C mode (for type B and C).......................... 4-8
Temperature control............................................... 4-8
Fan speed control.................................................. 4-9
Air conditioner control........................................... 4-9Air inlet selection...................................................4-9
To turn off the climate control system.....................4-9
Defrosting..............................................................4-10
Operating tips for heater andair conditioner.... 4-10
Cleaning ventilation grille.....................................4-10
Efficient cooling after parking in direct sunlight .... 4-10
Lubrication oil circulation in the refrigerant
circuit................................................................ 4-11
Checking air conditioning system before summer
season.............................................................. 4-11
Cooling and dehumidifying in high humidity
and low temperature weather conditions ............ 4-11
Air conditioner compressor shut-off when
engine is heavily loaded.................................... 4-11
Refrigerant for your climate control system.......... 4-11
Air filtration system...............................................4-11
Replacing a cabin air filter....................................4-12
Climate control
4
Page 231 of 474
(238,1)
北米Model "A1320BE-C" EDITED: 2017/ 10/ 10
Automatic climate control
operation (type B and C)When this mode is selected, the fan speed,
airflow distribution, air-inlet control, and air
conditioner compressor operation are
automatically controlled. To activate this
mode, perform the following.
1. Press the AUTO button. The indicator
light“FULL AUTO”on the multi-function
display (color LCD) illuminates.
2. Set the preferred temperature using
the temperature control dial.NOTE.Operate the automatic climate con-
trol system when the engine is running.
.Even when cooling is not necessary,
the air conditioner compressor will
automatically turn on if the temperature
is set much lower than the current
outlet air temperature. Even in this
case, the“A/C”indicator light on the
control panel illuminates.
.The controllable temperature range
may vary depending on the regional
specifications of the vehicle.
.If you operate any of the buttons on
the control panel other than the ON/
OFF button, rear window defogger
button, SYNC button and temperature
control dial(s) during FULL AUTO modeoperation, the“FULL”indicator light on
the multi-function display (color LCD)
will turn off and the“AUTO”indicator
light will remain illuminated. You can
then manually control the system as
desired using the button you operated.
To change the system back to the FULL
AUTO mode, press the AUTO button.
To turn off the climate control system,
press the ON/OFF button. Then the air
inlet selection will be set to the following.
.When the air inlet selection is set to
auto mode: Outside air circulation
.When the air inlet selection is set to
manual mode: No change
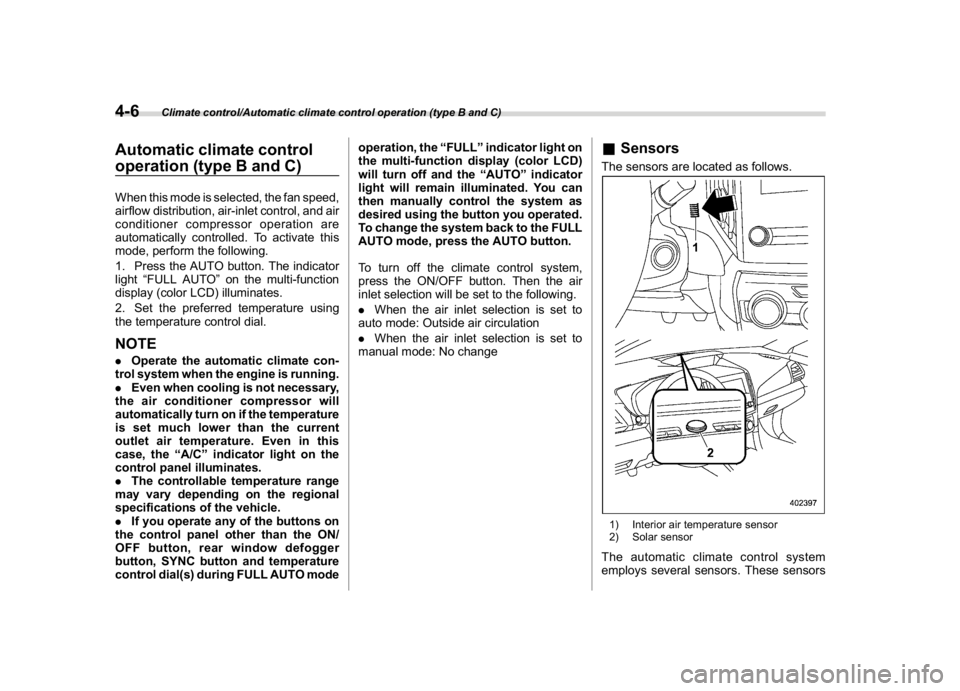
&SensorsThe sensors are located as follows.1) Interior air temperature sensor
2) Solar sensorThe automatic climate control system
employs several sensors. These sensors
Climate control/Automatic climate control operation (type B and C)
4-6
Page 232 of 474
(239,1)
北米Model "A1320BE-C" EDITED: 2017/ 10/ 10
are delicate. If they are not treated properly
and become damaged, the system may
not be able to control the interior tempera-
ture correctly. To avoid damaging the
sensors, observe the following precau-
tions.
.Do not subject the sensors to impact.
.Keep water away from the sensors.
.Do not cover the sensors.
Manual climate control op-
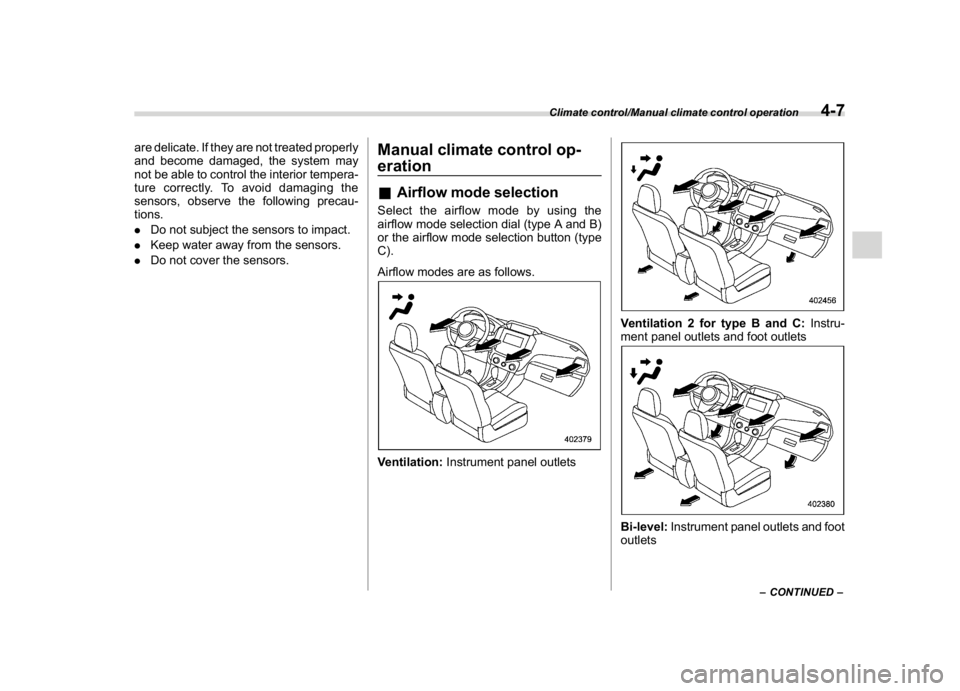
eration&Airflow mode selectionSelect the airflow mode by using the
airflow mode selection dial (type A and B)
or the airflow mode selection button (type
C).
Airflow modes are as follows.Ventilation:Instrument panel outlets
Ventilation 2 for type B and C:Instru-
ment panel outlets and foot outletsBi-level:Instrument panel outlets and foot
outlets
–CONTINUED–
Climate control/Manual climate control operation
4-7
4
Page 259 of 474
(268,1)
北米Model "A1320BE-C" EDITED: 2017/ 10/ 10
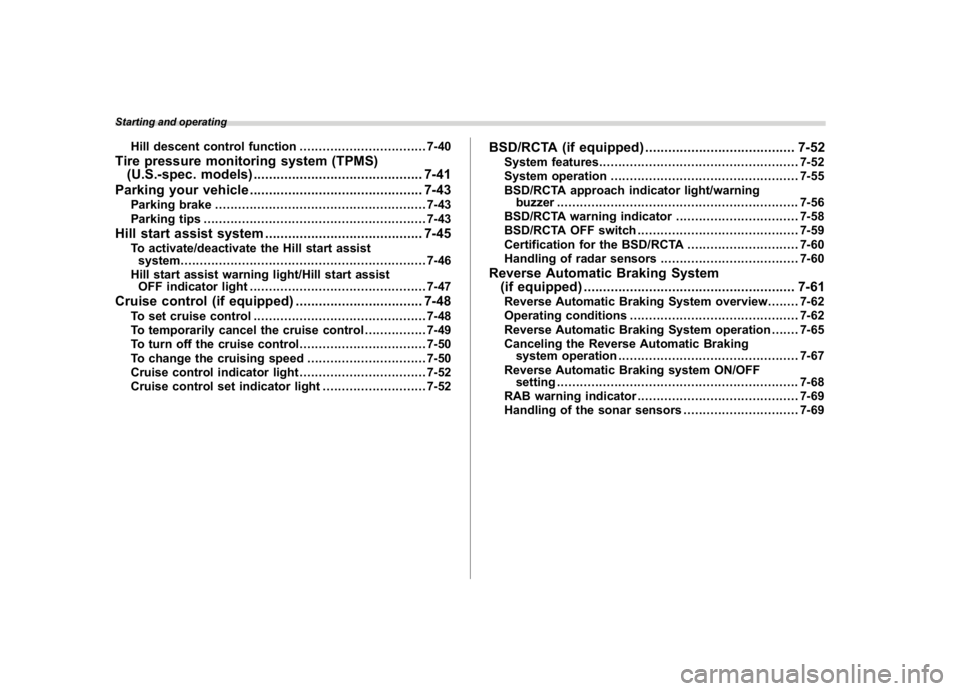
Hill descent control function.................................7-40
Tire pressure monitoring system (TPMS)
(U.S.-spec. models)............................................7-41
Parking your vehicle.............................................7-43
Parking brake.......................................................7-43
Parking tips..........................................................7-43
Hill start assistsystem.........................................7-45
To activate/deactivate the Hill start assist
system................................................................7-46
Hill start assist warning light/Hill start assist
OFF indicator light..............................................7-47
Cruise control (ifequipped).................................7-48
To set cruise control.............................................7-48
To temporarily cancel the cruise control................7-49
To turn off the cruise control.................................7-50
To change the cruising speed...............................7-50
Cruise control indicator light.................................7-52
Cruise control set indicator light...........................7-52
BSD/RCTA (ifequipped).......................................7-52
System features....................................................7-52
System operation.................................................7-55
BSD/RCTA approach indicator light/warning
buzzer...............................................................7-56
BSD/RCTA warning indicator................................7-58
BSD/RCTA OFF switch..........................................7-59
Certification for the BSD/RCTA.............................7-60
Handling of radar sensors....................................7-60
Reverse Automatic Braking System
(if equipped).......................................................7-61
Reverse Automatic Braking System overview........7-62
Operating conditions............................................7-62
Reverse Automatic Braking System operation .......7-65
Canceling the Reverse Automatic Braking
system operation...............................................7-67
Reverse Automatic Braking system ON/OFF
setting...............................................................7-68
RAB warning indicator..........................................7-69
Handling of the sonar sensors..............................7-69
Starting and operating
Page 299 of 474
(308,1)
北米Model "A1320BE-C" EDITED: 2017/ 10/ 10
never brake suddenly. Instead,
perform the following procedure.
Otherwise, an accident involving
serious vehicle damage and ser-
ious personal injury could occur.
(1) Keep driving straight ahead
while gradually reducing
speed.
(2) Slowly pull off the road to a
safe location.
(3) Check the pressure for all four
tires and adjust the pressure
to the COLD tire pressure
shown on the tire placard.
The tire placard is located on
the door pillar on the driver’s
side.
Even when the vehicle is driven a
very short distance, the tires get
warm and their pressures in-
crease accordingly. Be sure to
let the tires cool thoroughly be-
fore adjusting their pressures to
the standard values shown on the
tire placard. Refer to“Tires and
wheels”F11-21. The tire pres-
sure monitoring system does not
function when the vehicle is sta-
tionary. After adjusting the tire
pressures, increase the vehicle
speed to at least 20 mph (32 km/h)to start the TPMS rechecking of
the tire inflation pressures. If the
tire pressures are now above the
severe low pressure threshold,
the low tire pressure warning
light should turn off a few min-
utes later.
If this light still illuminates while
driving after adjusting the tire
pressure, a tire may have signifi-
cant damage and a fast leak that
causes the tire to lose air rapidly.
If you have a flat tire, replace it
with a spare tire as soon as
possible.
.When a spare tire is mounted or a
wheel rim is replaced without the
original pressure sensor/trans-
mitter being transferred, the low
tire pressure warning light will
illuminate steadily after blinking
for approximately one minute.
This indicates the TPMS is unable
to monitor all four road wheels.
Contact your SUBARU dealer as
soon as possible for tire and
sensor replacement and/or sys-
tem resetting.
.When a tire is repaired with liquid
sealant, the tire pressure warning
valve and transmitter may not
operate properly. If a liquid sea-lant is used, contact your nearest
SUBARU dealer or other qualified
service shop as soon as possi-
ble. Make sure to replace the tire
pressure warning valve and
transmitter when replacing the
tire. You may reuse the wheel if
there is no damage to it and if the
sealant residue is properly
cleaned off. Do not inject any tire
liquid or aerosol tire sealant into
the tires, as this may cause a
malfunction of the tire pressure
sensors. If the light illuminates
steadily after blinking for ap-
proximately one minute,
promptly contact a SUBARU
dealer to have the system in-
spected.
CAUTION
Do not place metal film or any metal
parts in the cargo area. This may
cause poor reception of the signals
from the tire pressure sensors, and
the tire pressure monitoring system
will not function properly.
Starting and operating/Tire pressure monitoring system (TPMS) (U.S.-spec. models)
7-42