mirror SUBARU CROSSTREK 2018 Owners Manual
[x] Cancel search | Manufacturer: SUBARU, Model Year: 2018, Model line: CROSSTREK, Model: SUBARU CROSSTREK 2018Pages: 474, PDF Size: 20.76 MB
Page 15 of 474

(14,1)
北米Model "A1320BE-C" EDITED: 2017/ 10/ 10
Illustrated index&Exterior
1) Engine hood (page 11-5)
2) Front wipers (page 3-77)
3) Headlights (page 3-67)
4) Replacing bulbs (page 11-36)
5) Moonroof (page 2-32)
6) Roof rails (page 8-13)
7) Outside mirror (page 3-88)
8) Door locks (page 2-21)
9) Tire pressure (page 11-23)
10) Flat tires (page 9-5)
11) Snow tires (page 8-10)
12) Fog lights (page 3-74)
13) Tie-down hooks (page 9-13)
14) Towing hook (page 9-13)
12
Page 18 of 474
(17,1)
北米Model "A1320BE-C" EDITED: 2017/ 10/ 10
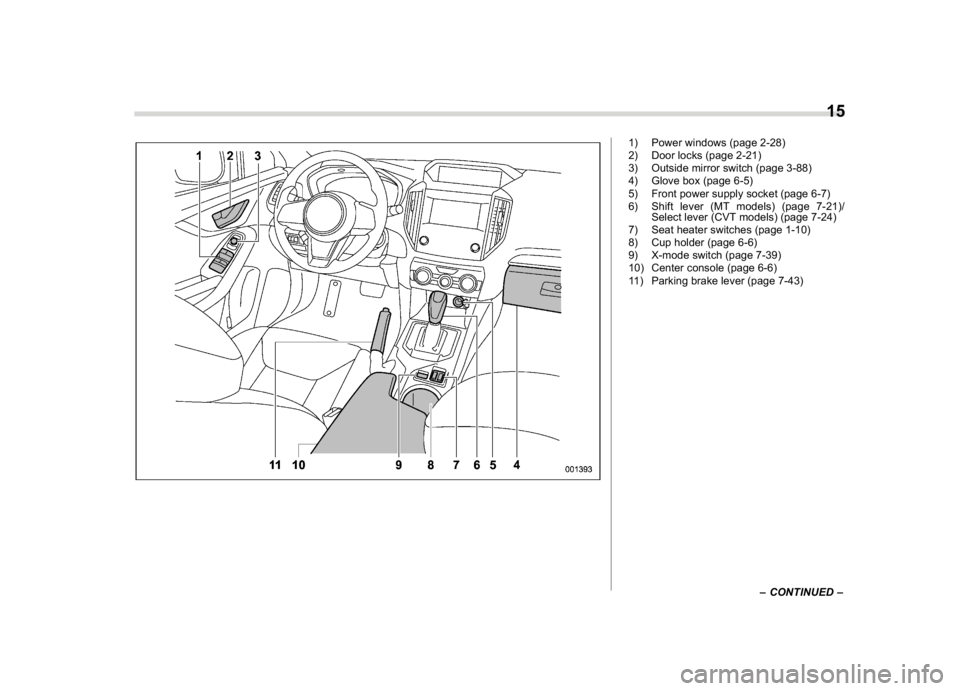
1) Power windows (page 2-28)
2) Door locks (page 2-21)
3) Outside mirror switch (page 3-88)
4) Glove box (page 6-5)
5) Front power supply socket (page 6-7)
6) Shift lever (MT models) (page 7-21)/
Select lever (CVT models) (page 7-24)
7) Seat heater switches (page 1-10)
8) Cup holder (page 6-6)
9) X-mode switch (page 7-39)
10) Center console (page 6-6)
11) Parking brake lever (page 7-43)
–CONTINUED–
15
0
Page 69 of 474
(70,1)
北米Model "A1320BE-C" EDITED: 2017/ 10/ 10
of fire caused by leaking fuel. For
details about restarting of the engine,
refer to“If your vehicle is involved in an
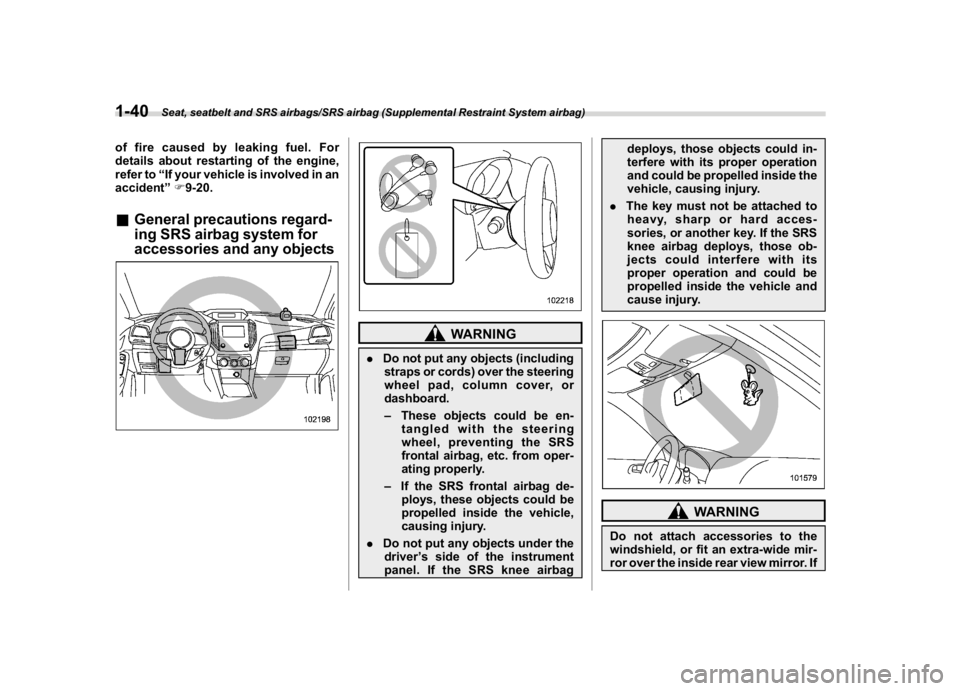
accident”F9-20.&General precautions regard-
ing SRS airbag system for
accessories and any objects
WARNING
.Do not put any objects (including
straps or cords) over the steering
wheel pad, column cover, or
dashboard.
–These objects could be en-
tangled with the steering
wheel, preventing the SRS
frontal airbag, etc. from oper-
ating properly.
–If the SRS frontal airbag de-
ploys, these objects could be
propelled inside the vehicle,
causing injury.
.Do not put any objects under the
driver’s side of the instrument
panel. If the SRS knee airbagdeploys, those objects could in-
terfere with its proper operation
and could be propelled inside the
vehicle, causing injury.
.The key must not be attached to
heavy, sharp or hard acces-
sories, or another key. If the SRS
knee airbag deploys, those ob-
jects could interfere with its
proper operation and could be
propelled inside the vehicle and
cause injury.
WARNING
Do not attach accessories to the
windshield, or fit an extra-wide mir-
ror over the inside rear view mirror. If
Seat, seatbelt and SRS airbags/SRS airbag (Supplemental Restraint System airbag)
1-40
Page 136 of 474

(141,1)
北米Model "A1320BE-C" EDITED: 2017/ 10/ 10
Turn signallever...................................................3-75
One-touch lane changer........................................3-76
Wiper and washer.................................................3-76
Windshield wiper and washer switches .................3-77
Rear window wiper and washer switch..................3-79
Mirrors...................................................................3-80
Inside mirror.........................................................3-80
Auto-dimming mirror/compass (if equipped)..........3-80Auto-dimming mirror/compass with HomeLink
®
(if equipped)......................................................3-81
Outside mirrors....................................................3-88
Defogger and deicer (ifequipped)......................3-89
Tilt/telescopic steeringwheel..............................3-90
Heated Steering Wheel system (if equipped).........3-91
Horn.......................................................................3-92
Instruments and controls
Page 204 of 474

(209,1)
北米Model "A1320BE-C" EDITED: 2017/ 10/ 10
and license plate lights will be on.
!Tips for the high beam assist sys-
tem
.The high beam assist function recog-
nizes the conditions surrounding the ve-
hicle based on the brightness of illumina-
tion ahead of your vehicle, etc. Therefore,
the headlight mode may switch in some
situations that do not match to the driver’s
sense.
.A bicycle or cargo cycle may not be
detected.
.Under the following situations, the
brightness of ambient illumination may
not be detected correctly and the high
beam assist function may not work prop-
erly. As a result, the glare of the high beam
maydisturbtheoncomingvehicleor
vehicle ahead. Also, the low beam mode
may continue although there are no
oncoming vehicles and vehicles ahead.
In the such cases, change the headlight
mode manually.
–In bad weather (fog, snow, sand
storm, heavy rain, etc.).
–When the windshield glass is dirty or
fogged.
–When the windshield is cracked or
damaged.
–Whenthestereocameraisde-
formed or the stereo camera lensesare dirty.
–If there are lights similar to the
headlights or the tail lights in the
surrounding area.
–When an oncoming vehicle or ve-
hicle ahead is driven without its head-
lights and tail lights on.
–If the headlights of an oncoming
vehicle or the tail lights of a vehicle
ahead are dirty or discolored, or if the
light beams are not aimed correctly.
–When a rapid change of brightness
continues while driving.
–When driving on a road with many
ups and downs or uneven surfaces.
–When driving on a road with many
curves.
–When there are some objects that
reflect light strongly, such as a road
sign or a mirror in vehicle ahead.
–When the rear part of the vehicle
ahead, such as a container, reflects
light strongly.
–When the headlights of your vehicle
are damaged or dirty.
–When your vehicle is tilted, such as
in case the vehicle has a flat tire or is
being towed.
–Immediately after the engine has
started.
.In the following conditions, the head-
light mode will not be automatically chan-ged from the high beam to the low beam.
–When your vehicle passes an on-
coming vehicle suddenly in a blind
curve.
–When another vehicle passes in
front of your vehicle.
–When an oncoming vehicle or ve-
hicle ahead comes in and out of view
because of continuous curves, median
strips, roadside trees, etc.
.If the stereo camera detects the light of
the front fog lights of an oncoming vehicle,
the headlight mode may change from the
high beam to the low beam automatically.
.The headlight mode may change from
the high beam to the low beam, or the low
beam mode may continue, when affected
by a street light, traffic signal, illumination
of an advertisement board, or a reflective
object such as a road sign and signboard.
.The timing of the change of headlight
mode may differ due to the following
factors.
–Color or brightness of the headlights
of an oncoming vehicle or the tail lights
of a vehicle ahead.
–The headlights of the oncoming
vehicle or the tail lights of the vehicle
ahead are covered with mud, snow,
etc.
–Movement and direction of an on-
coming vehicle or a vehicle ahead.
–CONTINUED–
Instruments and controls/Light control switch
3-71
3
Page 213 of 474
(218,1)
北米Model "A1320BE-C" EDITED: 2017/ 10/ 10
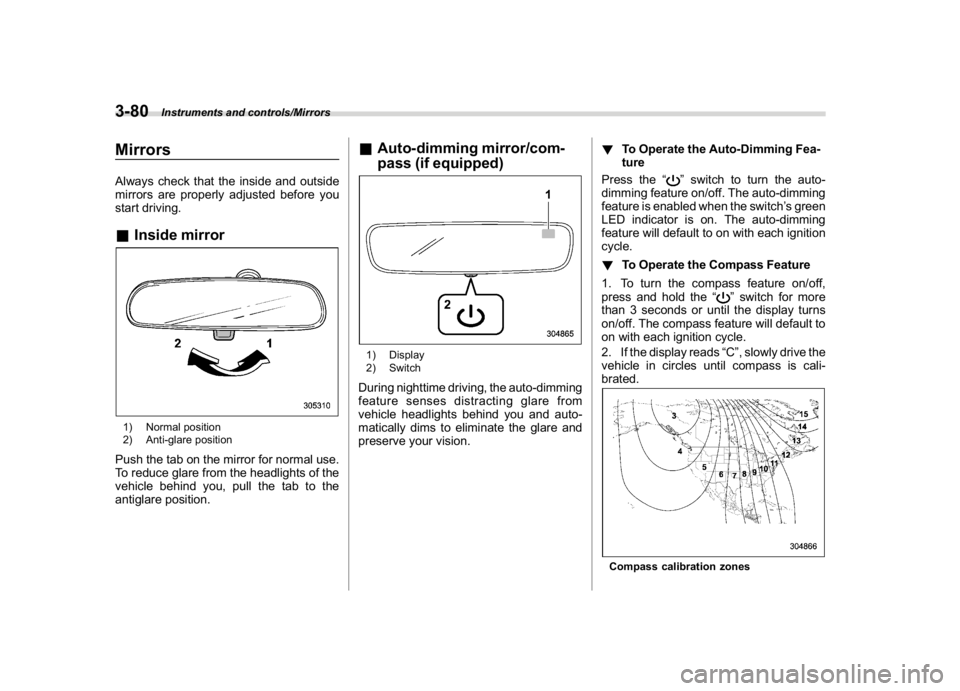
MirrorsAlways check that the inside and outside
mirrors are properly adjusted before you
start driving.&Inside mirror1) Normal position
2) Anti-glare positionPush the tab on the mirror for normal use.
To reduce glare from the headlights of the
vehicle behind you, pull the tab to the
antiglare position.
&Auto-dimming mirror/com-
pass (if equipped)1) Display
2) SwitchDuring nighttime driving, the auto-dimming
feature senses distracting glare from
vehicle headlights behind you and auto-
matically dims to eliminate the glare and
preserve your vision.!To Operate the Auto-Dimming Fea-
ture
Press the“
”switch to turn the auto-
dimming feature on/off. The auto-dimming
feature is enabled when the switch’s green
LED indicator is on. The auto-dimming
feature will default to on with each ignition
cycle.
!To Operate the Compass Feature
1. To turn the compass feature on/off,
press and hold the“
”switch for more
than 3 seconds or until the display turns
on/off. The compass feature will default to
on with each ignition cycle.
2. If the display reads“C”, slowly drive the
vehicle in circles until compass is cali-
brated.
Compass calibration zones
Instruments and controls/Mirrors
3-80
Page 214 of 474
(219,1)
北米Model "A1320BE-C" EDITED: 2017/ 10/ 10
3. To adjust for compass zone variance:
(1) Find your current location and
zone number on the map.
(2) Press and hold the“
”switch for
more than 6 seconds or until a zone
number appears in the display.
(3) Once the zone number appears in
the display, toggle the“”switch
again until your current location zone
number appears. After you stop press-
ing the switch, your new zone number
will be saved. Within a few seconds,
the display will show a compass direc-
tion.
4. If the vehicle’s magnetics have chan-
ged or if the compass appears inaccurate,
recalibrate the compass. Press and hold
the“
”switch for more than 9 seconds or
until a“C”appears in the display. Once a
“C”appears in the display, slowly drive the
vehicle in circles until compass is cali-
brated.
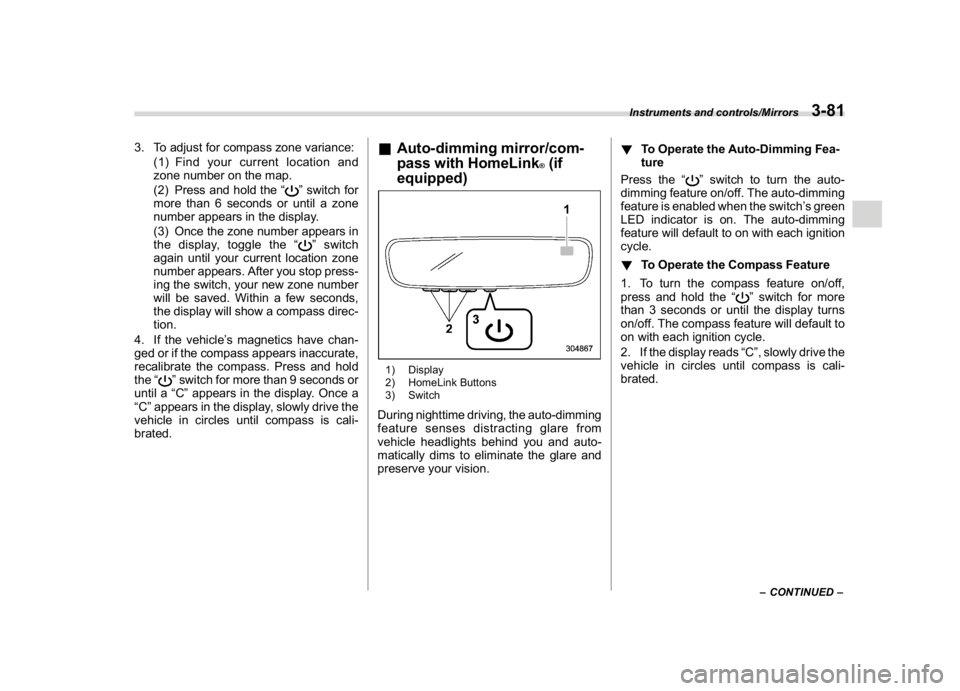
&Auto-dimming mirror/com-
pass with HomeLink
®(if
equipped)
1) Display
2) HomeLink Buttons
3) SwitchDuring nighttime driving, the auto-dimming
feature senses distracting glare from
vehicle headlights behind you and auto-
matically dims to eliminate the glare and
preserve your vision.!To Operate the Auto-Dimming Fea-
ture
Press the“
”switch to turn the auto-
dimming feature on/off. The auto-dimming
feature is enabled when the switch’s green
LED indicator is on. The auto-dimming
feature will default to on with each ignition
cycle.
!To Operate the Compass Feature
1. To turn the compass feature on/off,
press and hold the“
”switch for more
than 3 seconds or until the display turns
on/off. The compass feature will default to
on with each ignition cycle.
2. If the display reads“C”, slowly drive the
vehicle in circles until compass is cali-
brated.–CONTINUED–
Instruments and controls/Mirrors
3-81
3
Page 215 of 474
(220,1)
北米Model "A1320BE-C" EDITED: 2017/ 10/ 10
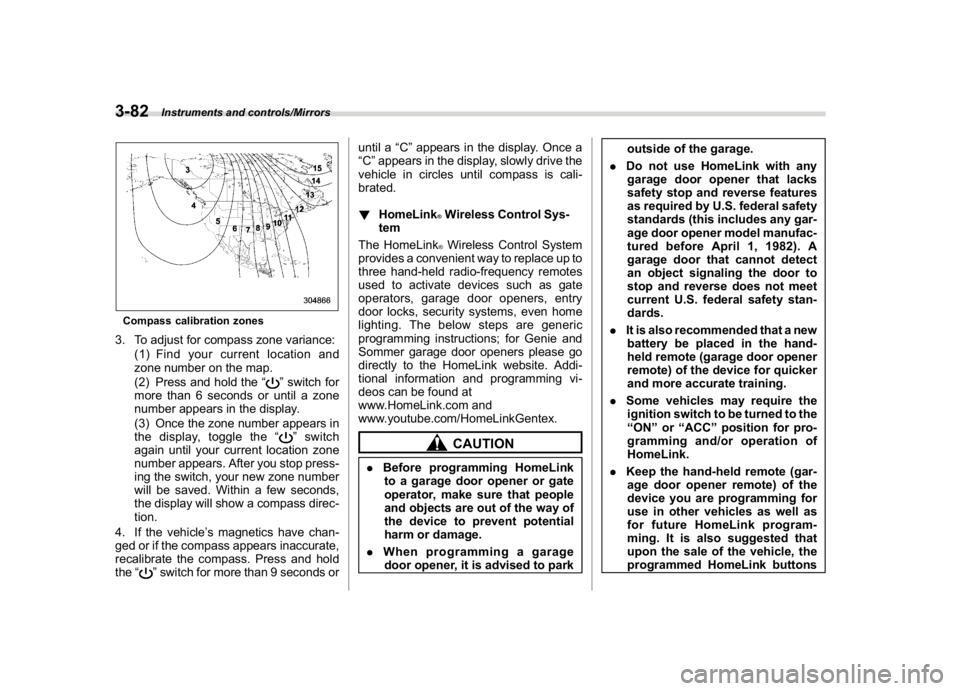
Compass calibration zones3. To adjust for compass zone variance:
(1) Find your current location and
zone number on the map.
(2) Press and hold the“
”switch for
more than 6 seconds or until a zone
number appears in the display.
(3) Once the zone number appears in
the display, toggle the“”switch
again until your current location zone
number appears. After you stop press-
ing the switch, your new zone number
will be saved. Within a few seconds,
the display will show a compass direc-
tion.
4. If the vehicle’s magnetics have chan-
ged or if the compass appears inaccurate,
recalibrate the compass. Press and hold
the“
”switch for more than 9 seconds oruntil a“C”appears in the display. Once a
“C”appears in the display, slowly drive the
vehicle in circles until compass is cali-
brated.
!HomeLink
®Wireless Control Sys-
tem
The HomeLink®Wireless Control System
provides a convenient way to replace up to
three hand-held radio-frequency remotes
used to activate devices such as gate
operators, garage door openers, entry
door locks, security systems, even home
lighting. The below steps are generic
programming instructions; for Genie and
Sommer garage door openers please go
directly to the HomeLink website. Addi-
tional information and programming vi-
deos can be found at
www.HomeLink.com and
www.youtube.com/HomeLinkGentex.CAUTION
.Before programming HomeLink
to a garage door opener or gate
operator, make sure that people
and objects are out of the way of
the device to prevent potential
harm or damage.
.When programming a garage
door opener, it is advised to parkoutside of the garage.
.Do not use HomeLink with any
garage door opener that lacks
safety stop and reverse features
as required by U.S. federal safety
standards (this includes any gar-
age door opener model manufac-
tured before April 1, 1982). A
garage door that cannot detect
an object signaling the door to
stop and reverse does not meet
current U.S. federal safety stan-
dards.
.It is also recommended that a new
battery be placed in the hand-
held remote (garage door opener
remote) of the device for quicker
and more accurate training.
.Some vehicles may require the
ignition switch to be turned to the
“ON”or“ACC”position for pro-
gramming and/or operation of
HomeLink.
.Keep the hand-held remote (gar-
age door opener remote) of the
device you are programming for
use in other vehicles as well as
for future HomeLink program-
ming. It is also suggested that
upon the sale of the vehicle, the
programmed HomeLink buttons
Instruments and controls/Mirrors
3-82
Page 216 of 474
(221,1)
北米Model "A1320BE-C" EDITED: 2017/ 10/ 10
be erased for security purposes.
Refer to“Erasing HomeLink But-
tons”F3-85.
!Programming a New HomeLink
Button
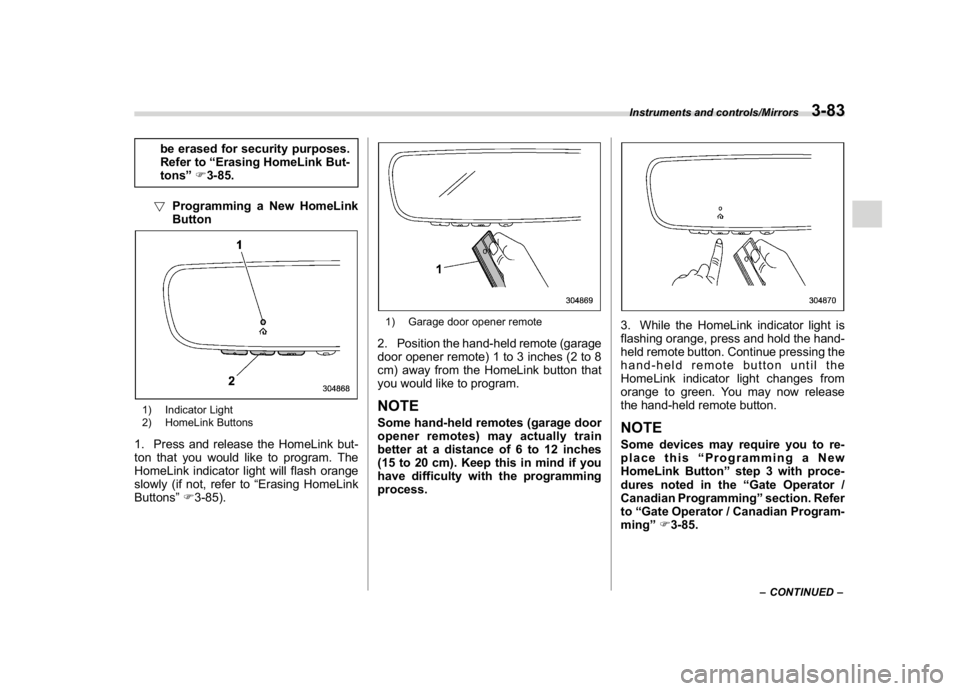
1) Indicator Light
2) HomeLink Buttons1. Press and release the HomeLink but-
ton that you would like to program. The
HomeLink indicator light will flash orange
slowly (if not, refer to“Erasing HomeLink
Buttons”F3-85).
1) Garage door opener remote2. Position the hand-held remote (garage
door opener remote) 1 to 3 inches (2 to 8
cm) away from the HomeLink button that
you would like to program.NOTESome hand-held remotes (garage door
opener remotes) may actually train
better at a distance of 6 to 12 inches
(15 to 20 cm). Keep this in mind if you
have difficulty with the programming
process.
3. While the HomeLink indicator light is
flashing orange, press and hold the hand-
held remote button. Continue pressing the
hand-held remote button until the
HomeLink indicator light changes from
orange to green. You may now release
the hand-held remote button.NOTESome devices may require you to re-
place this“Programming a New
HomeLink Button”step 3 with proce-
dures noted in the“Gate Operator /
Canadian Programming”section. Refer
to“Gate Operator / Canadian Program-
ming”F3-85.
–CONTINUED–
Instruments and controls/Mirrors
3-83
3
Page 217 of 474
(222,1)
北米Model "A1320BE-C" EDITED: 2017/ 10/ 10
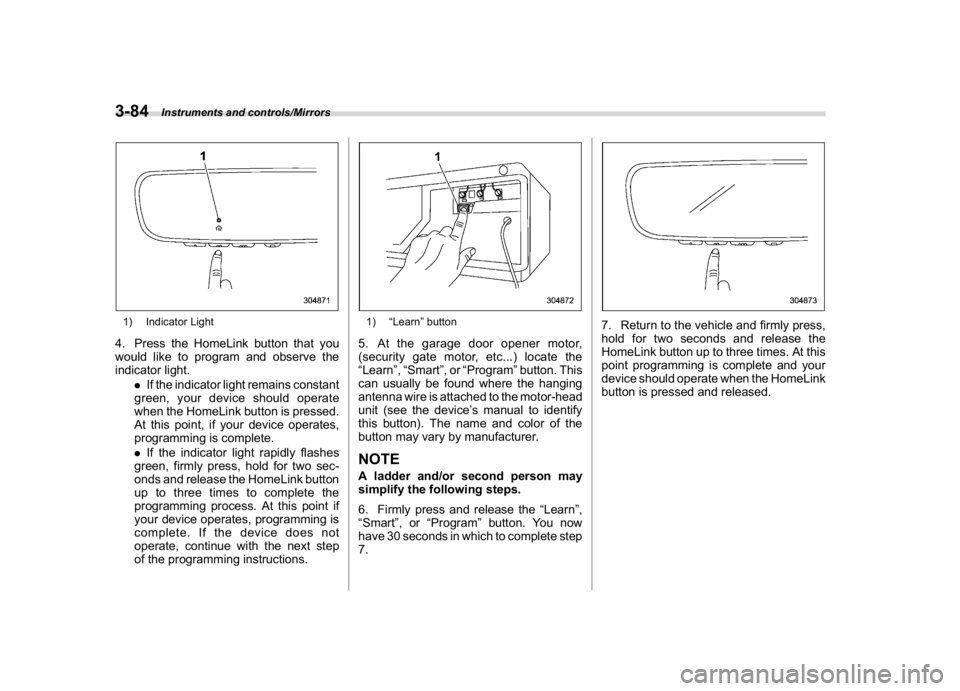
1) Indicator Light4. Press the HomeLink button that you
would like to program and observe the
indicator light.
.If the indicator light remains constant
green, your device should operate
when the HomeLink button is pressed.
At this point, if your device operates,
programming is complete.
.If the indicator light rapidly flashes
green, firmly press, hold for two sec-
onds and release the HomeLink button
up to three times to complete the
programming process. At this point if
your device operates, programming is
complete. If the device does not
operate, continue with the next step
of the programming instructions.
1)“Learn”button5. At the garage door opener motor,
(security gate motor, etc...) locate the
“Learn”,“Smart”,or“Program”button. This
can usually be found where the hanging
antenna wire is attached to the motor-head
unit (see the device’s manual to identify
this button). The name and color of the
button may vary by manufacturer.NOTEA ladder and/or second person may
simplify the following steps.
6. Firmly press and release the“Learn”,
“Smart”,or“Program”button. You now
have 30 seconds in which to complete step
7.
7. Return to the vehicle and firmly press,
hold for two seconds and release the
HomeLink button up to three times. At this
point programming is complete and your
device should operate when the HomeLink
button is pressed and released.
Instruments and controls/Mirrors
3-84