buttons SUBARU CROSSTREK 2018 Owners Manual
[x] Cancel search | Manufacturer: SUBARU, Model Year: 2018, Model line: CROSSTREK, Model: SUBARU CROSSTREK 2018Pages: 474, PDF Size: 20.76 MB
Page 17 of 474
(16,1)
北米Model "A1320BE-C" EDITED: 2017/ 10/ 10
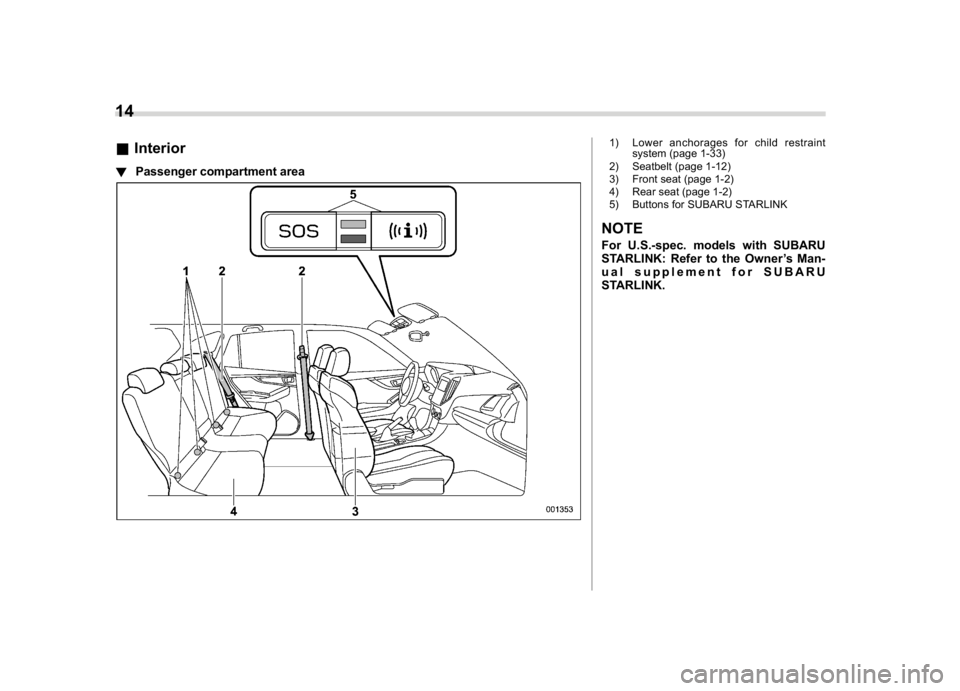
&Interior!Passenger compartment area
1) Lower anchorages for child restraint
system (page 1-33)
2) Seatbelt (page 1-12)
3) Front seat (page 1-2)
4) Rear seat (page 1-2)
5) Buttons for SUBARU STARLINKNOTEFor U.S.-spec. models with SUBARU
STARLINK: Refer to the Owner’s Man-
ual supplement for SUBARU
STARLINK.
14
Page 101 of 474
(104,1)
北米Model "A1320BE-C" EDITED: 2017/ 10/ 10
KeysNOTEFor models with“keyless access with
push-button start system”, refer to
“Keyless access with push-button start
system”F2-2.
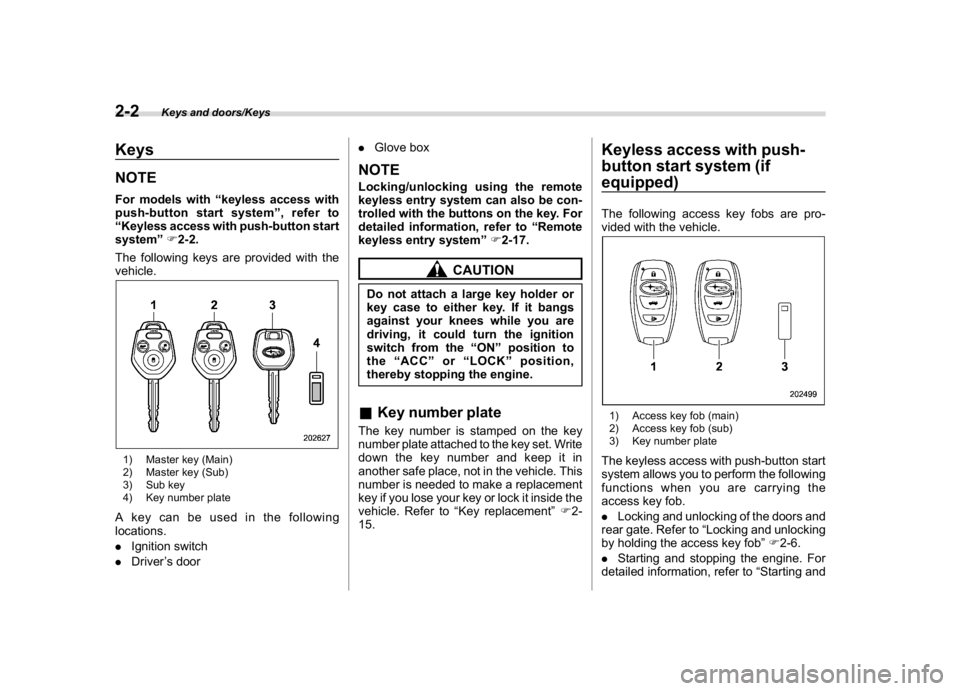
The following keys are provided with the
vehicle.1) Master key (Main)
2) Master key (Sub)
3) Sub key
4) Key number plateAkeycanbeusedinthefollowing
locations.
.Ignition switch
.Driver’s door.Glove box
NOTELocking/unlocking using the remote
keyless entry system can also be con-
trolled with the buttons on the key. For
detailed information, refer to“Remote
keyless entry system”F2-17.
CAUTION
Do not attach a large key holder or
key case to either key. If it bangs
against your knees while you are
driving, it could turn the ignition
switch from the“ON”position to
the“ACC”or“LOCK”position,
thereby stopping the engine.&Key number plateThe key number is stamped on the key
number plate attached to the key set. Write
down the key number and keep it in
another safe place, not in the vehicle. This
number is needed to make a replacement
key if you lose your key or lock it inside the
vehicle. Refer to“Key replacement”F2-
15.
Keyless access with push-
button start system (if
equipped)The following access key fobs are pro-
vided with the vehicle.1) Access key fob (main)
2) Access key fob (sub)
3) Key number plateThe keyless access with push-button start
system allows you to perform the following
functions when you are carrying the
access key fob.
.Locking and unlocking of the doors and
rear gate. Refer to“Locking and unlocking
by holding the access key fob”F2-6.
.Starting and stopping the engine. For
detailed information, refer to“Starting and
Keys and doors/Keys
2-2
Page 102 of 474

(105,1)
北米Model "A1320BE-C" EDITED: 2017/ 10/ 10
stopping engine (models with push-button
start system)”F7-11.
.Arming and disarming the alarm sys-
tem. For detailed information, refer to
“Alarm system”F2-24.NOTE.Locking/unlocking using the remote
keyless entry system can also be con-
trolled with the buttons on the access
key fob. For detailed information, refer
to“Remote keyless entry system”F2-
17.
.Carefully store the key number plate
supplied with the access key fob. It is
necessary for vehicle repair and addi-
tional registration of access key fobs.
For details, refer to“Key replacement”
F2-15.
An emergency key is attached to each
access key fob.
1) Release button
2) Emergency keyWhile pressing the release button of the
access key fob, take out the emergency
key.
The emergency key is used for the follow-
ing operations.
.Locking and unlocking the driver’s door
.Locking and unlocking the glove boxNOTEThe glove box can be kept locked when
you leave your vehicle and the access
key fob (with the emergency key re-
moved) at a parking facility.
&Safety precautions
WARNING
If you wear an implanted pacemaker
or an implanted defibrillator, stay at
least 8.7 in (22 cm) away from the
transmitting antennas installed on
the vehicle.
The radio waves from the transmit-
ting antennas on the vehicle could
adversely affect the operation of
implanted pacemakers and im-
planted defibrillators.
If you wear electronic medical equip-
ment other than an implanted pace-
maker or an implanted defibrillator,
before using the keyless access
with push-button start system, refer
to“Radio waves used for the key-
less access with push-button start
system”mentioned later, and con-
tact the electronic medical equip-
ment manufacturer for more infor-
mation. The radio waves from the
transmitting antennas on the vehicle
could adversely affect the operation
of the electronic medical equipment.
“Radio waves used for the keyless
access with push-button start sys-
tem”
–CONTINUED–
Keys and doors/Keyless access with push-button start system
2-3
2
Page 104 of 474

(107,1)
北米Model "A1320BE-C" EDITED: 2017/ 10/ 10
may damage the battery or
cause circuit malfunctions.
–Do not wash the access key
fob in an ultrasonic washer.
–Do not leave the access key
fob in humid or dusty loca-
tions. Doing so may cause
malfunctions.
–Keep the access key fob away
from magnetic sources.
–Do not leave the access key
fob near a personal computer
or home electrical appliance.
–Do not leave the access key
fob near a battery charger or
any electrical accessories.
–Do not apply metallic window
tint or attach metallic objects
to the windows.
–Do not fit non genuine acces-
sories or parts.
.If the access key fob is dropped,
the integrated emergency key in-
side may become loose. Be care-
ful not to lose the emergency key.
.When traveling in an airplane, do
not press the button of the ac-
cess key fob. If any button of the
access key fob is pressed, radio
waves are emitted and may affectthe operation of the airplane.
When carrying the access key
fob in a bag, take measures to
prevent the buttons from being
pressed accidentally.
NOTE.The operational/non-operational
setting for the keyless access function
can be changed. For the setting proce-
dure, refer to“Disabling keyless ac-
cess function”F2-12.
.For detailed information about the
operation method for the push-button
ignition switch while the keyless ac-
cess function is switched to the non-
operational mode, refer to“Access key
fob–if access key fob does not operate
properly”F9-17.
.The keyless access with push-but-
ton start system uses weak radio
waves. The status of the access key
fob and environmental conditions may
interfere with the communication be-
tween the access key fob and the
vehicle under the following conditions,
and it may not be possible to lock or
unlock the doors or start the engine.
–When operating near a facility
where strong radio waves are trans-
mitted, such as a broadcast stationand power transmission lines
–When products that transmit
radio waves are used, such as an
access key fob or a remote trans-
mitter key of another vehicle
–When carrying the access key fob
of your vehicle together with the
access key fob or the remote trans-
mitter of another vehicle
–When the access key fob is
placed near wireless communica-
tion equipment such as a cell phone
–When the access key fob is
placed near a metallic object
–When metallic accessories are
attached to the access key fob
–When carrying the access key fob
with electronic appliances such as a
laptop computer
–When the battery of the access
key fob is discharged
.The access key fob is always com-
municating with the vehicle and is
continuously using the battery.
Although the life of the battery varies
depending on the operating conditions,
it is approximately 1 to 2 years. If the
battery becomes fully discharged, re-
place it with a new one.
.If an access key fob is lost, it is
recommended that all of the remaining
access key fobs be reregistered. For
–CONTINUED–
Keys and doors/Keyless access with push-button start system
2-5
2
Page 111 of 474
(114,1)
北米Model "A1320BE-C" EDITED: 2017/ 10/ 10
the remote keyless entry system
–Lock or unlock the doors by using
the power door locking switch
–Open either of the front doors
&Power saving function of ac-
cess key fobThis function stops the access key fob
from receiving signals and helps minimize
the battery consumption of the access key
fob.
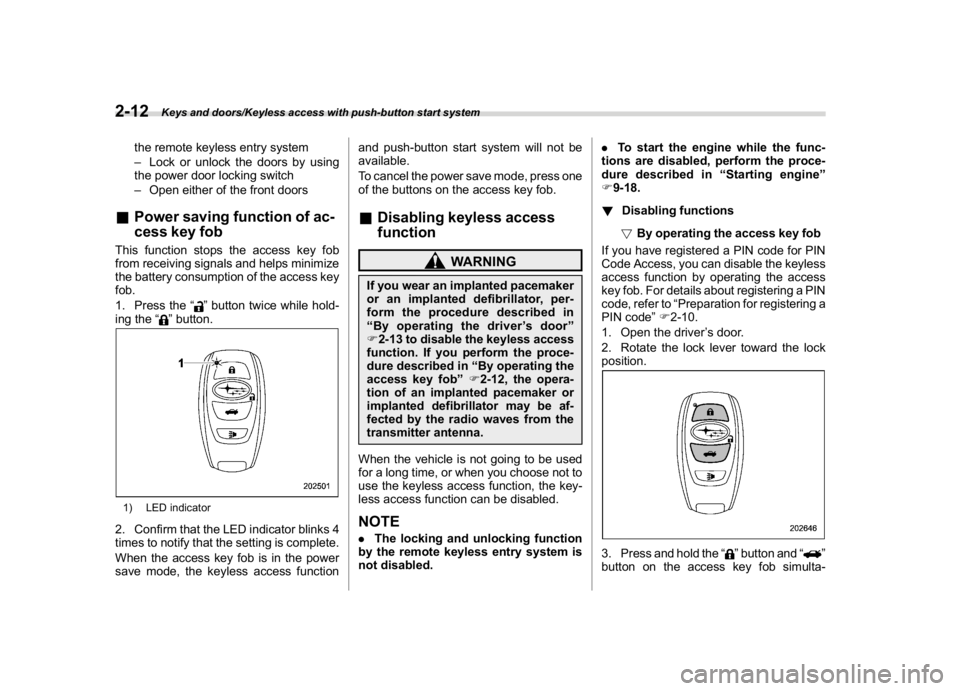
1. Press the“
”button twice while hold-
ing the“
”button.
1) LED indicator2. Confirm that the LED indicator blinks 4
times to notify that the setting is complete.
When the access key fob is in the power
save mode, the keyless access functionand push-button start system will not be
available.
To cancel the power save mode, press one
of the buttons on the access key fob.
&Disabling keyless access
function
WARNING
If you wear an implanted pacemaker
or an implanted defibrillator, per-
form the procedure described in
“By operating the driver’s door”
F2-13 to disable the keyless access
function. If you perform the proce-
dure described in“By operating the
access key fob”F2-12, the opera-
tion of an implanted pacemaker or
implanted defibrillator may be af-
fected by the radio waves from the
transmitter antenna.
When the vehicle is not going to be used
for a long time, or when you choose not to
use the keyless access function, the key-
less access function can be disabled.NOTE.The locking and unlocking function
by the remote keyless entry system is
not disabled..To start the engine while the func-
tions are disabled, perform the proce-
dure described in“Starting engine”
F9-18.
!Disabling functions
!By operating the access key fob
If you have registered a PIN code for PIN
Code Access, you can disable the keyless
access function by operating the access
key fob. For details about registering a PIN
code, refer to“Preparation for registering a
PIN code”F2-10.
1. Open the driver’s door.
2. Rotate the lock lever toward the lock
position.
3. Press and hold the“
”button and“
”
button on the access key fob simulta-
Keys and doors/Keyless access with push-button start system
2-12
Page 116 of 474
(119,1)
北米Model "A1320BE-C" EDITED: 2017/ 10/ 10
–Mexico-spec. models
Remote keyless entry system
CAUTION
.Do not expose the remote trans-
mitter to severe shocks, such as
those experienced as a result of
dropping or throwing.
.Do not take the remote transmit-
ter apart except when replacing
the battery.
.Do not get the remote transmitter
wet. If it gets wet, wipe it dry with
a cloth immediately.
.When you carry the remote trans-
mitter on an airplane, do not
press the button of the remote
transmitter while in the airplane.
When any button of the remote
transmitter is pressed, radio
waves are sent and may affect
the operation of the airplane.
When you carry the remote trans-
mitter in a bag on an airplane,
take measures to prevent the
buttons of the remote transmitter
from being pressed.
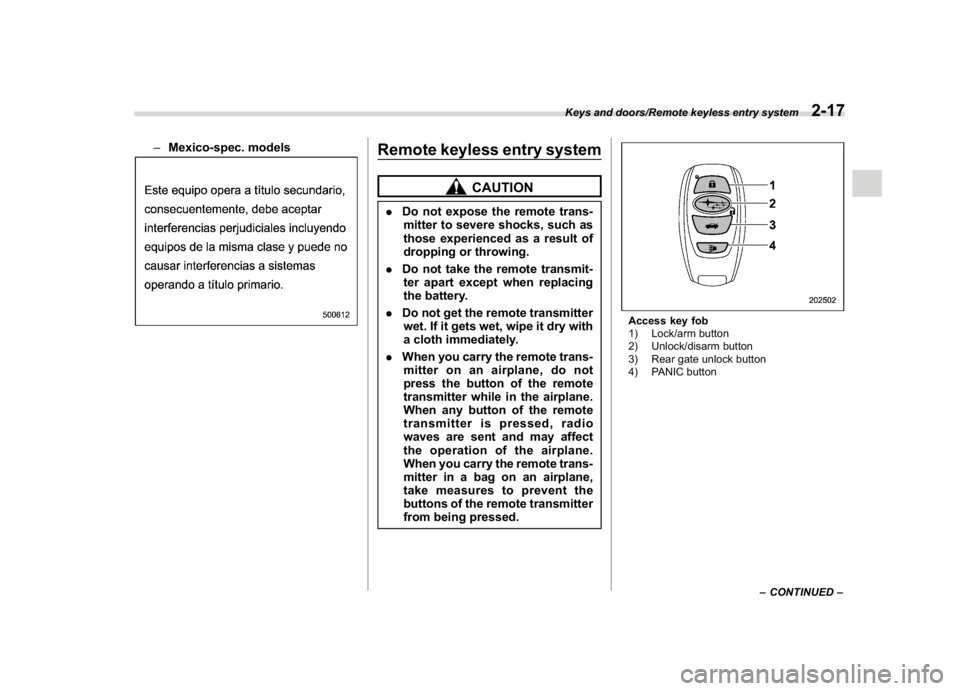
Access key fob
1) Lock/arm button
2) Unlock/disarm button
3) Rear gate unlock button
4) PANIC button
–CONTINUED–
Keys and doors/Remote keyless entry system
2-17
2
Page 214 of 474
(219,1)
北米Model "A1320BE-C" EDITED: 2017/ 10/ 10
3. To adjust for compass zone variance:
(1) Find your current location and
zone number on the map.
(2) Press and hold the“
”switch for
more than 6 seconds or until a zone
number appears in the display.
(3) Once the zone number appears in
the display, toggle the“”switch
again until your current location zone
number appears. After you stop press-
ing the switch, your new zone number
will be saved. Within a few seconds,
the display will show a compass direc-
tion.
4. If the vehicle’s magnetics have chan-
ged or if the compass appears inaccurate,
recalibrate the compass. Press and hold
the“
”switch for more than 9 seconds or
until a“C”appears in the display. Once a
“C”appears in the display, slowly drive the
vehicle in circles until compass is cali-
brated.
&Auto-dimming mirror/com-
pass with HomeLink
®(if
equipped)
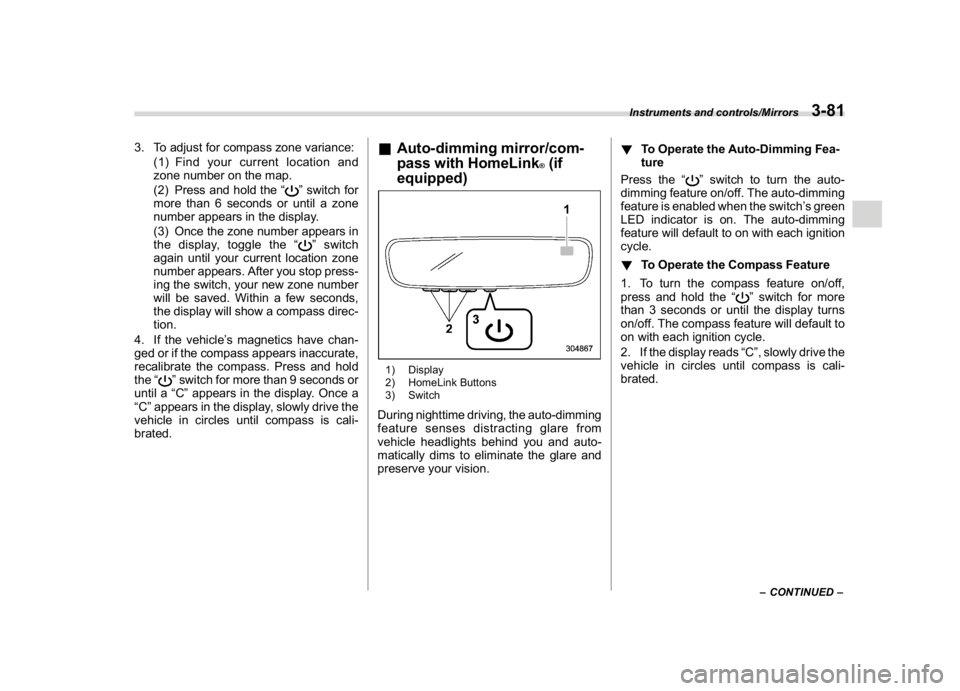
1) Display
2) HomeLink Buttons
3) SwitchDuring nighttime driving, the auto-dimming
feature senses distracting glare from
vehicle headlights behind you and auto-
matically dims to eliminate the glare and
preserve your vision.!To Operate the Auto-Dimming Fea-
ture
Press the“
”switch to turn the auto-
dimming feature on/off. The auto-dimming
feature is enabled when the switch’s green
LED indicator is on. The auto-dimming
feature will default to on with each ignition
cycle.
!To Operate the Compass Feature
1. To turn the compass feature on/off,
press and hold the“
”switch for more
than 3 seconds or until the display turns
on/off. The compass feature will default to
on with each ignition cycle.
2. If the display reads“C”, slowly drive the
vehicle in circles until compass is cali-
brated.–CONTINUED–
Instruments and controls/Mirrors
3-81
3
Page 215 of 474
(220,1)
北米Model "A1320BE-C" EDITED: 2017/ 10/ 10
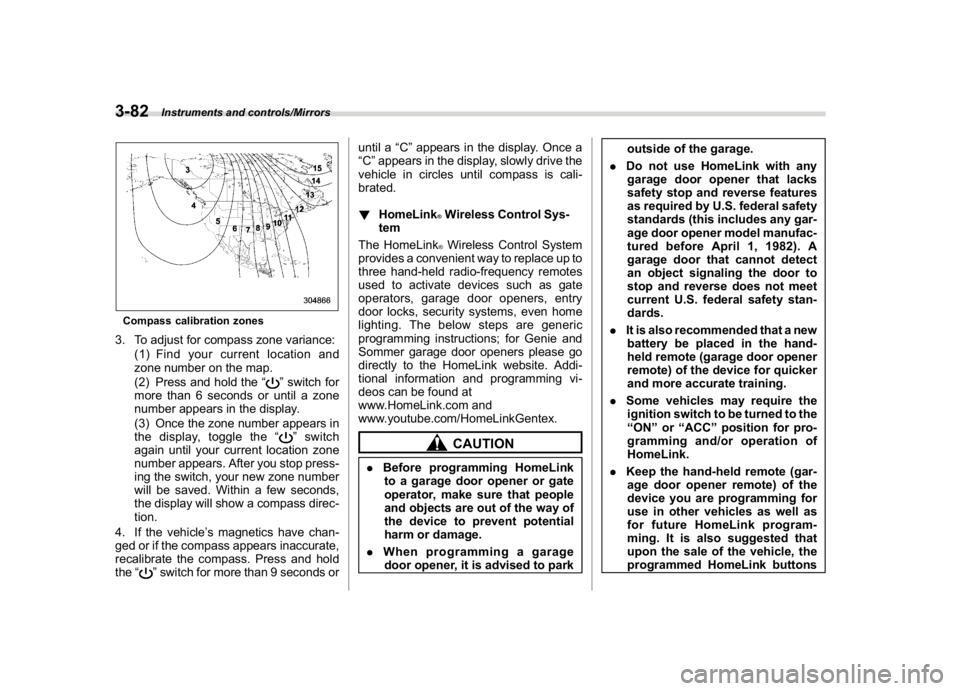
Compass calibration zones3. To adjust for compass zone variance:
(1) Find your current location and
zone number on the map.
(2) Press and hold the“
”switch for
more than 6 seconds or until a zone
number appears in the display.
(3) Once the zone number appears in
the display, toggle the“”switch
again until your current location zone
number appears. After you stop press-
ing the switch, your new zone number
will be saved. Within a few seconds,
the display will show a compass direc-
tion.
4. If the vehicle’s magnetics have chan-
ged or if the compass appears inaccurate,
recalibrate the compass. Press and hold
the“
”switch for more than 9 seconds oruntil a“C”appears in the display. Once a
“C”appears in the display, slowly drive the
vehicle in circles until compass is cali-
brated.
!HomeLink
®Wireless Control Sys-
tem
The HomeLink®Wireless Control System
provides a convenient way to replace up to
three hand-held radio-frequency remotes
used to activate devices such as gate
operators, garage door openers, entry
door locks, security systems, even home
lighting. The below steps are generic
programming instructions; for Genie and
Sommer garage door openers please go
directly to the HomeLink website. Addi-
tional information and programming vi-
deos can be found at
www.HomeLink.com and
www.youtube.com/HomeLinkGentex.CAUTION
.Before programming HomeLink
to a garage door opener or gate
operator, make sure that people
and objects are out of the way of
the device to prevent potential
harm or damage.
.When programming a garage
door opener, it is advised to parkoutside of the garage.
.Do not use HomeLink with any
garage door opener that lacks
safety stop and reverse features
as required by U.S. federal safety
standards (this includes any gar-
age door opener model manufac-
tured before April 1, 1982). A
garage door that cannot detect
an object signaling the door to
stop and reverse does not meet
current U.S. federal safety stan-
dards.
.It is also recommended that a new
battery be placed in the hand-
held remote (garage door opener
remote) of the device for quicker
and more accurate training.
.Some vehicles may require the
ignition switch to be turned to the
“ON”or“ACC”position for pro-
gramming and/or operation of
HomeLink.
.Keep the hand-held remote (gar-
age door opener remote) of the
device you are programming for
use in other vehicles as well as
for future HomeLink program-
ming. It is also suggested that
upon the sale of the vehicle, the
programmed HomeLink buttons
Instruments and controls/Mirrors
3-82
Page 216 of 474
(221,1)
北米Model "A1320BE-C" EDITED: 2017/ 10/ 10
be erased for security purposes.
Refer to“Erasing HomeLink But-
tons”F3-85.
!Programming a New HomeLink
Button
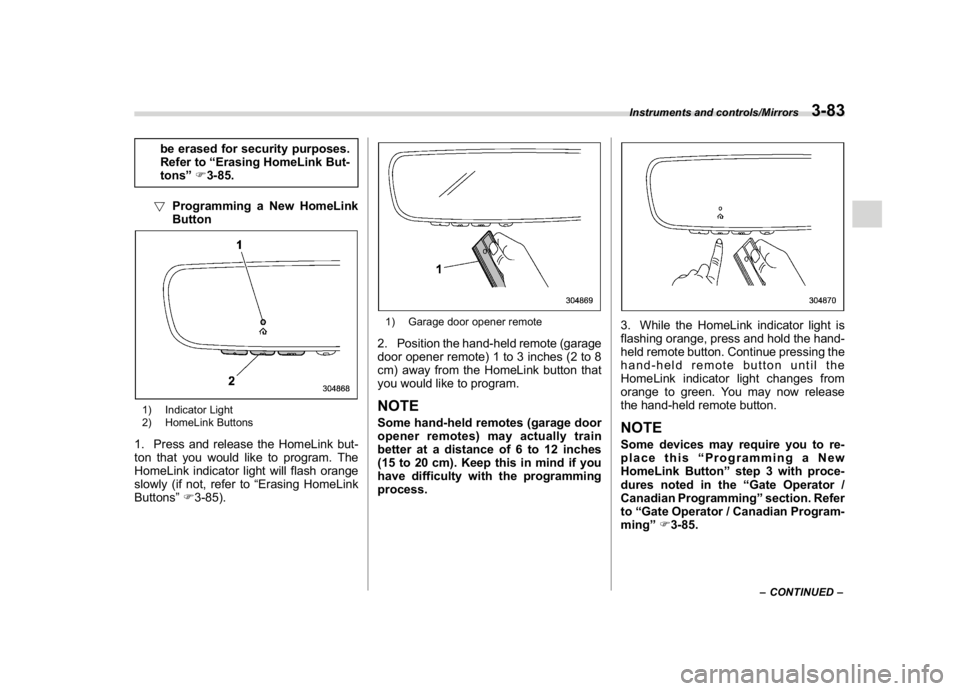
1) Indicator Light
2) HomeLink Buttons1. Press and release the HomeLink but-
ton that you would like to program. The
HomeLink indicator light will flash orange
slowly (if not, refer to“Erasing HomeLink
Buttons”F3-85).
1) Garage door opener remote2. Position the hand-held remote (garage
door opener remote) 1 to 3 inches (2 to 8
cm) away from the HomeLink button that
you would like to program.NOTESome hand-held remotes (garage door
opener remotes) may actually train
better at a distance of 6 to 12 inches
(15 to 20 cm). Keep this in mind if you
have difficulty with the programming
process.
3. While the HomeLink indicator light is
flashing orange, press and hold the hand-
held remote button. Continue pressing the
hand-held remote button until the
HomeLink indicator light changes from
orange to green. You may now release
the hand-held remote button.NOTESome devices may require you to re-
place this“Programming a New
HomeLink Button”step 3 with proce-
dures noted in the“Gate Operator /
Canadian Programming”section. Refer
to“Gate Operator / Canadian Program-
ming”F3-85.
–CONTINUED–
Instruments and controls/Mirrors
3-83
3
Page 218 of 474
(223,1)
北米Model "A1320BE-C" EDITED: 2017/ 10/ 10
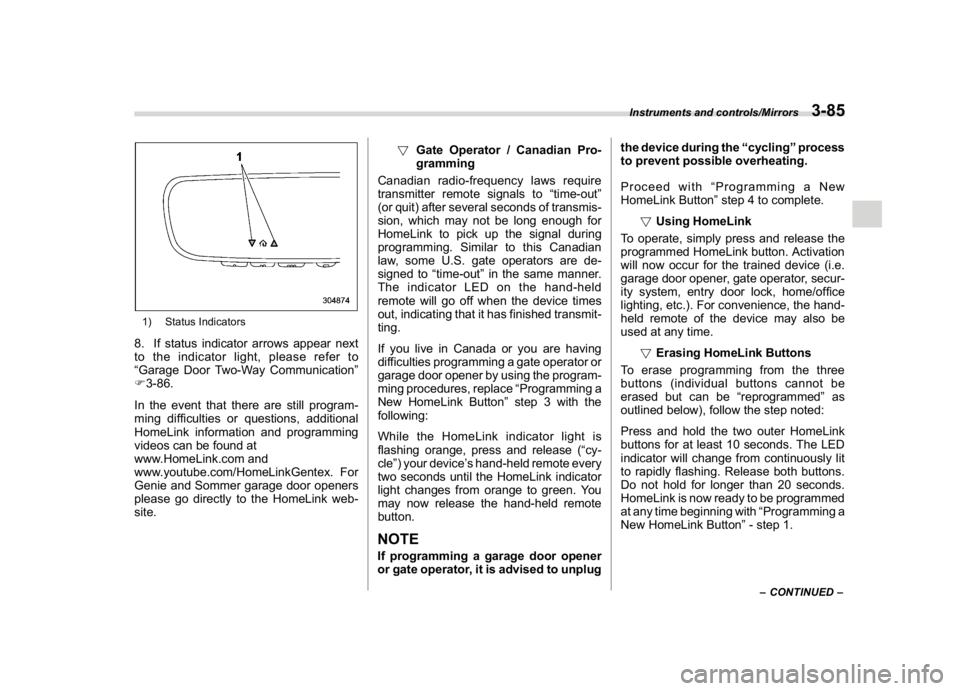
1) Status Indicators8. If status indicator arrows appear next
to the indicator light, please refer to
“Garage Door Two-Way Communication”
F3-86.
In the event that there are still program-
ming difficulties or questions, additional
HomeLink information and programming
videos can be found at
www.HomeLink.com and
www.youtube.com/HomeLinkGentex. For
Genie and Sommer garage door openers
please go directly to the HomeLink web-
site.!Gate Operator / Canadian Pro-
gramming
Canadian radio-frequency laws require
transmitter remote signals to“time-out”
(or quit) after several seconds of transmis-
sion, which may not be long enough for
HomeLink to pick up the signal during
programming. Similar to this Canadian
law, some U.S. gate operators are de-
signed to“time-out”in the same manner.
The indicator LED on the hand-held
remote will go off when the device times
out, indicating that it has finished transmit-
ting.
If you live in Canada or you are having
difficulties programming a gate operator or
garage door opener by using the program-
ming procedures, replace“Programming a
New HomeLink Button”step 3 with the
following:
While the HomeLink indicator light is
flashing orange, press and release (“cy-
cle”) your device’s hand-held remote every
two seconds until the HomeLink indicator
light changes from orange to green. You
may now release the hand-held remote
button.
NOTEIf programming a garage door opener
or gate operator, it is advised to unplugthe device during the“cycling”process
to prevent possible overheating.
Proceed with“Programming a New
HomeLink Button”step 4 to complete.
!Using HomeLink
To operate, simply press and release the
programmed HomeLink button. Activation
will now occur for the trained device (i.e.
garage door opener, gate operator, secur-
ity system, entry door lock, home/office
lighting, etc.). For convenience, the hand-
held remote of the device may also be
used at any time.
!Erasing HomeLink Buttons
To erase programming from the three
buttons (individual buttons cannot be
erased but can be“reprogrammed”as
outlined below), follow the step noted:
Press and hold the two outer HomeLink
buttons for at least 10 seconds. The LED
indicator will change from continuously lit
to rapidly flashing. Release both buttons.
Do not hold for longer than 20 seconds.
HomeLink is now ready to be programmed
at any time beginning with“Programming a
New HomeLink Button”- step 1.
–CONTINUED–
Instruments and controls/Mirrors
3-85
3