instrument panel SUBARU CROSSTREK 2019 Quick Guide
[x] Cancel search | Manufacturer: SUBARU, Model Year: 2019, Model line: CROSSTREK, Model: SUBARU CROSSTREK 2019Pages: 31, PDF Size: 1.94 MB
Page 3 of 31
2-5 Getting Started
6-7 Instrument Panel
8-11 Gauges
12-13 Personalize
14-19 Controls
20-21 While Operating
22-23 Safety/In Case of Emergency
24-26 Additional Information
Table of Contents
3640014_19b_Crosstrek_QG_072318.indd 57/23/18 3:33 PM
Page 5 of 31
3
Getting
Started
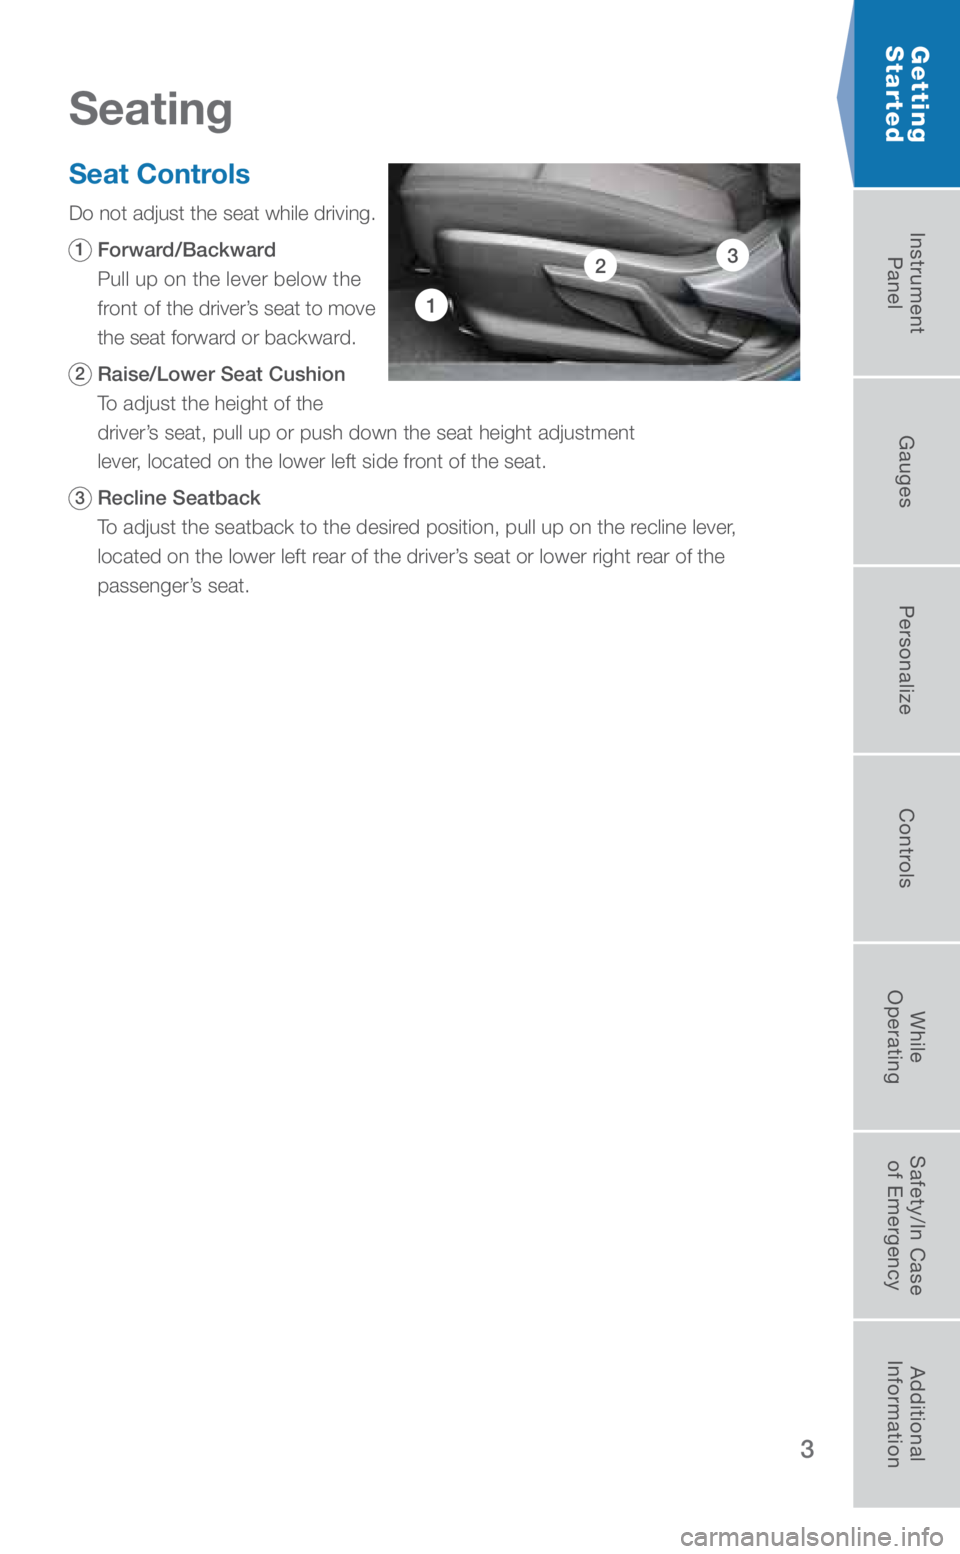
Seat Controls
Do not adjust the seat while driving.
1 Forward/Backward
Pull up on the lever below the
front of the driver’s seat to move
the seat forward or backward.
2 Raise/Lower Seat Cushion
To adjust the height of the
driver’s seat, pull up or push down the seat height adjustment
lever, located on the lower left side front of the seat.
3 Recline Seatback
To adjust the seatback to the desired position, pull up on the recline lever,
located on the lower left rear of the driver’s seat or lower right rear of the
passenger’s seat.
1
23
Seating
3640014_19b_Crosstrek_QG_072318.indd 37/23/18 3:33 PM
Getting
Started Instrument
Panel Gauges
Personalize ControlsWhile
Operating Safety/In Case
of Emergency Additional
Information
Page 7 of 31
5
Getting
Started
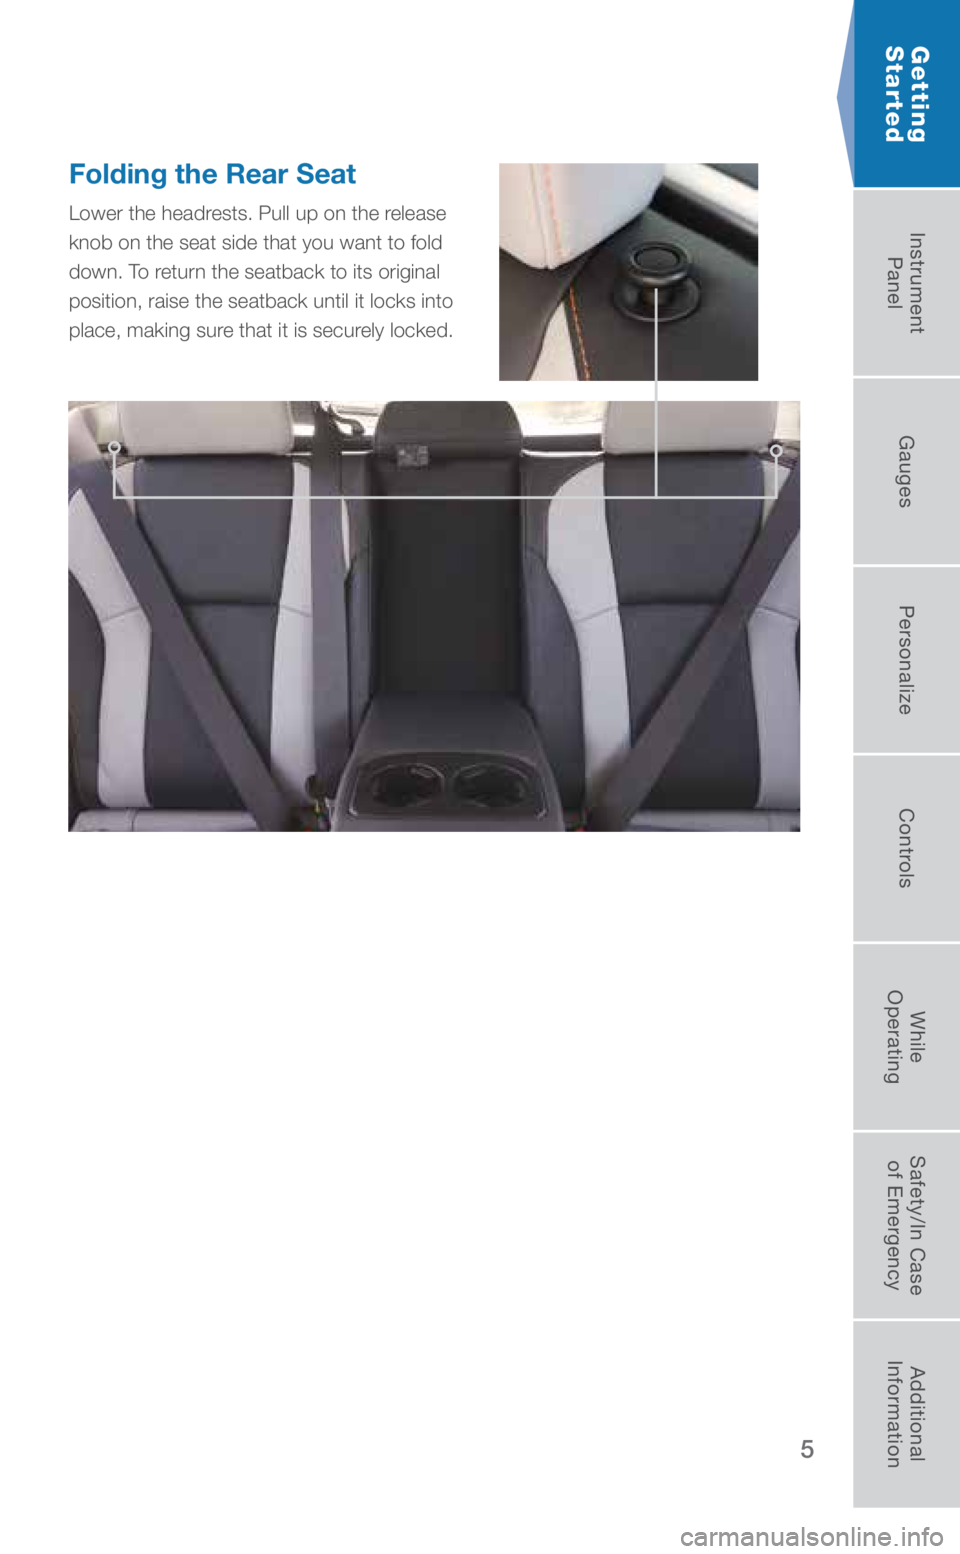
Folding the Rear Seat
Lower the headrests. Pull up on the release
knob on the seat side that you want to fold
down. To return the seatback to its original
position, raise the seatback until it locks into
place, making sure that it is securely locked.
3640014_19b_Crosstrek_QG_072318.indd 57/23/18 3:33 PM
Getting
Started Instrument
Panel Gauges
Personalize ControlsWhile
Operating Safety/In Case
of Emergency Additional
Information
Page 8 of 31
6
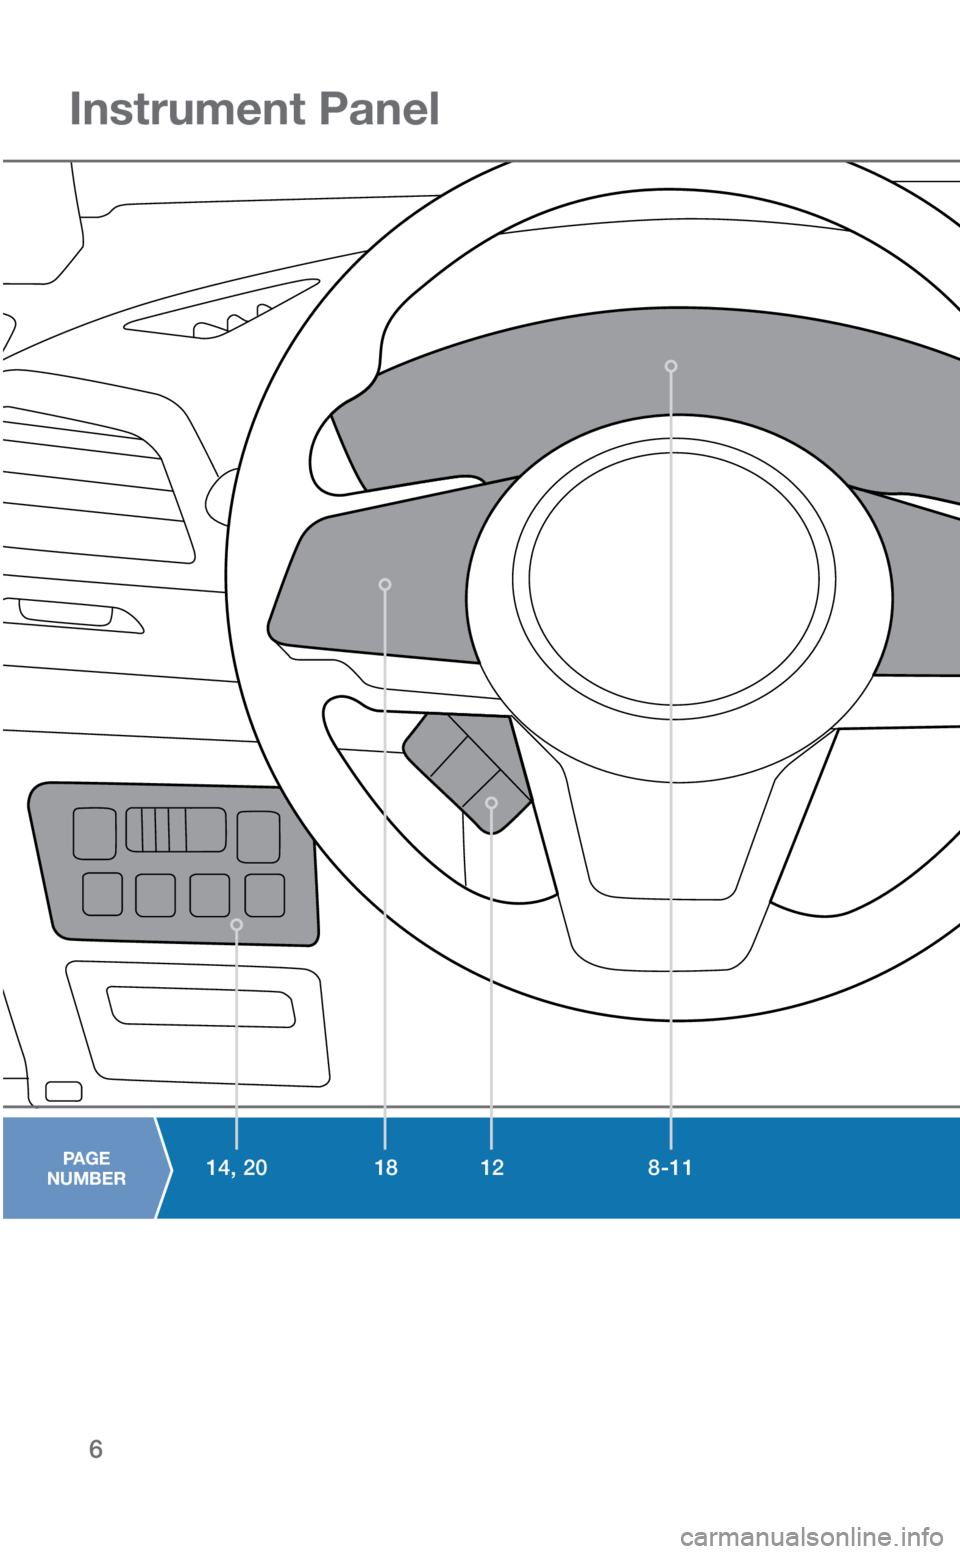
Instrument Panel
8-11
18 12
14, 20PAGE
NUMBER
3640014_19b_Crosstrek_QG_072318.indd 67/23/18 3:33 PM
Page 9 of 31
7
Instrument Panel
Instrument
Panel
16-17
19
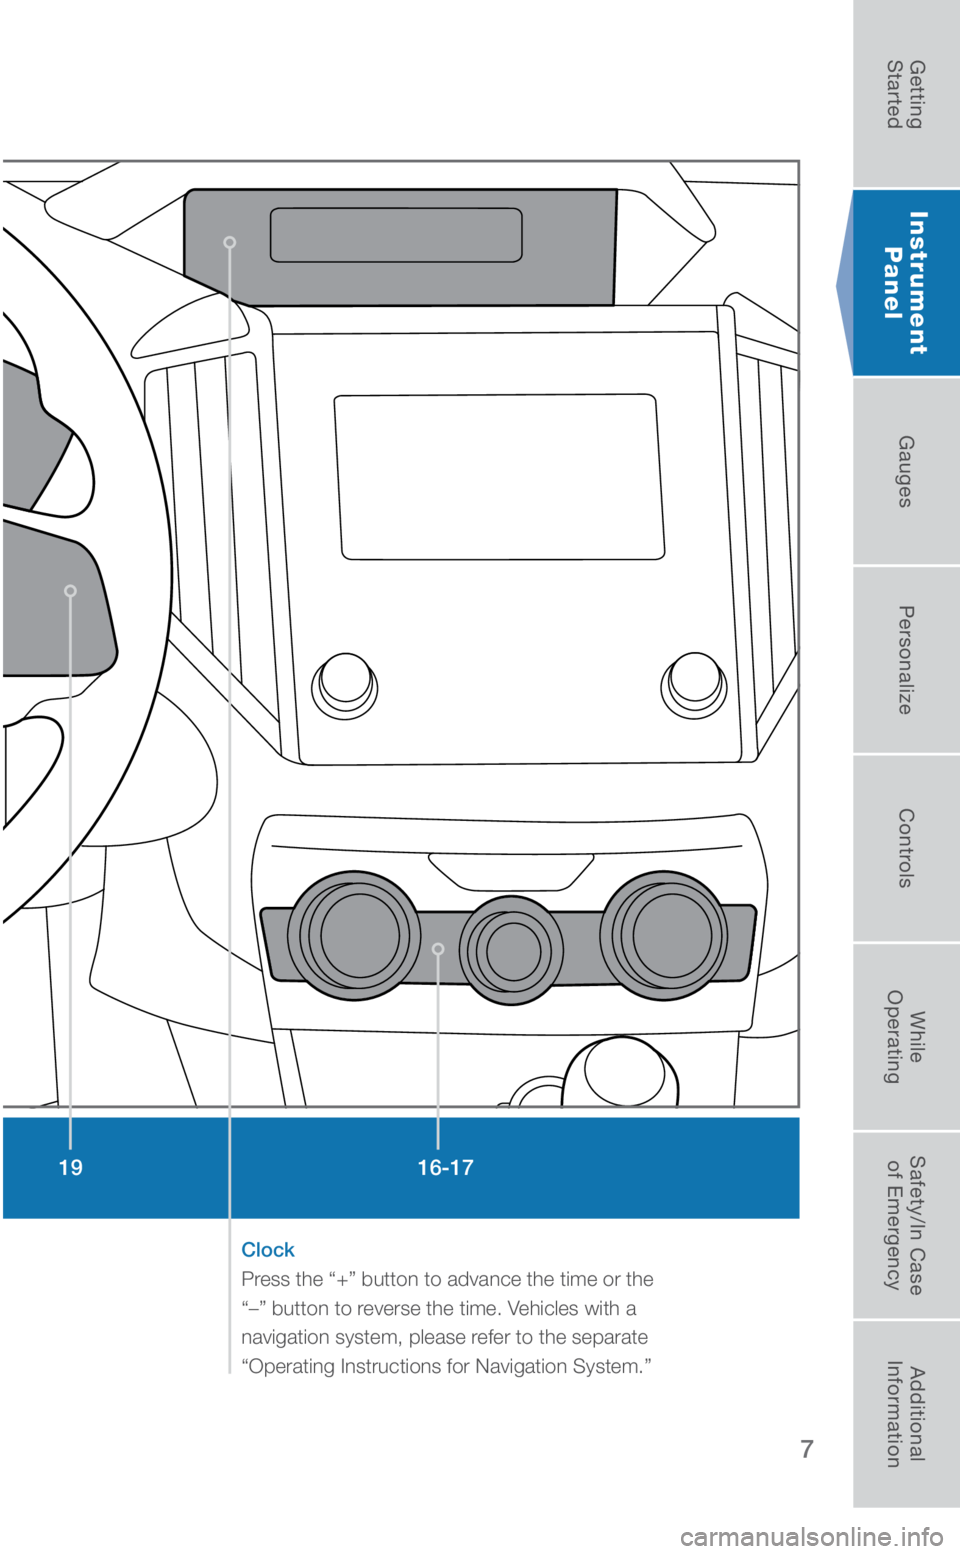
Clock
Press the “+” button to advance the time or the
“–” button to reverse the time. Vehicles with a
navigation system, please refer to the separate
“Operating Instructions for Navigation System.”
3640014_19b_Crosstrek_QG_072318.indd 77/23/18 3:33 PM
Getting
Started Instrument
Panel Gauges
Personalize ControlsWhile
Operating Safety/In Case
of Emergency Additional
Information
Page 11 of 31
9
Gauges
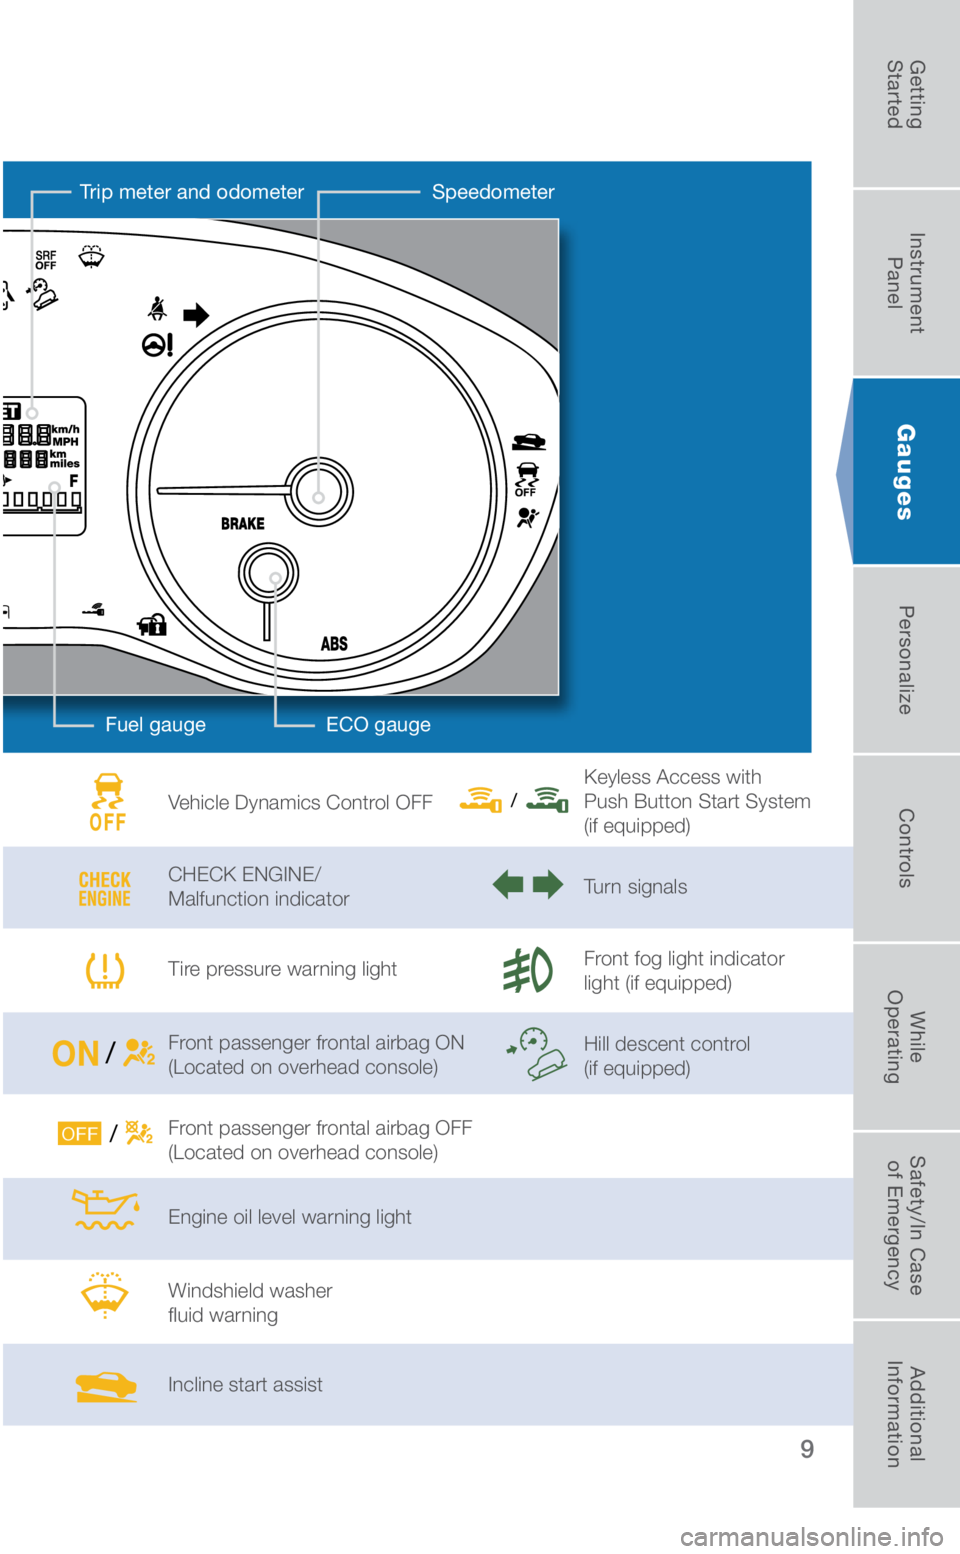
Vehicle Dynamics Control OFF
CHECK ENGINE/
Malfunction indicator
Tire pressure warning light
Front passenger frontal airbag ON
(Located on overhead console)
Front passenger frontal airbag OFF
(Located on overhead console)
Engine oil level warning light
Windshield washer
fluid warning
Incline start assist Keyless Access with
Push Button Start System
(if equipped)
Turn signals
Front fog light indicator
light (if equipped)
Hill descent control
(if equipped)
Fuel gauge
Speedometer
Trip meter and odometer
ECO gauge
3640014_19b_Crosstrek_QG_072318.indd 97/23/18 3:34 PM
Getting
Started Instrument
Panel Gauges
Personalize ControlsWhile
Operating Safety/In Case
of Emergency Additional
Information
Page 13 of 31
11
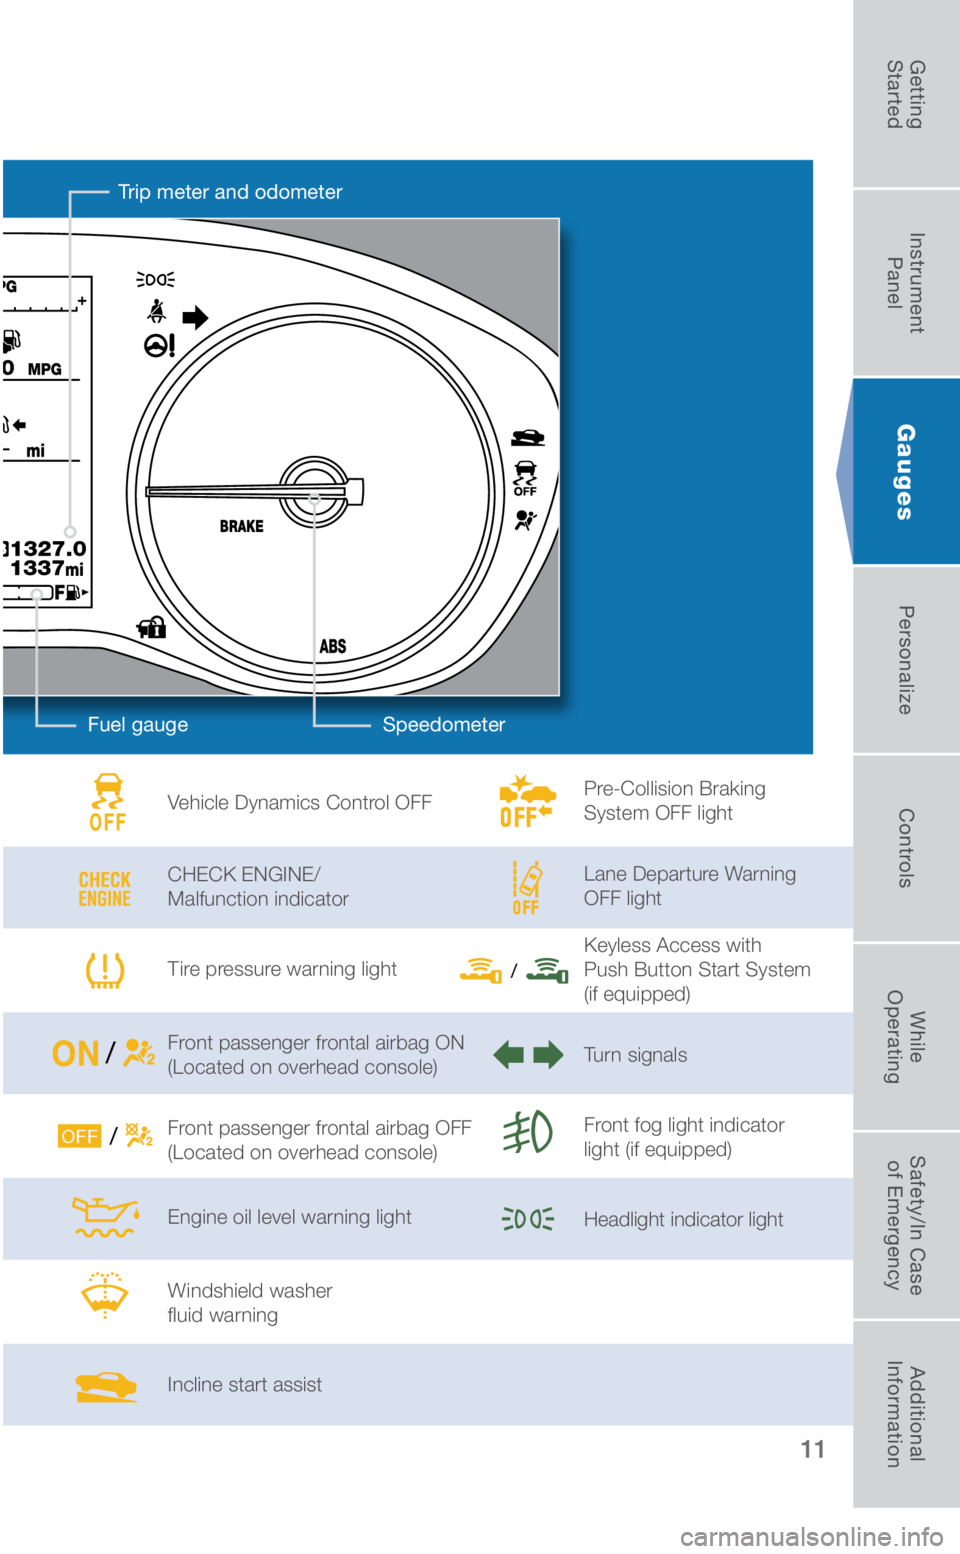
Vehicle Dynamics Control OFF
CHECK ENGINE/
Malfunction indicator
Tire pressure warning light
Front passenger frontal airbag ON
(Located on overhead console)
Front passenger frontal airbag OFF
(Located on overhead console)
Engine oil level warning light
Windshield washer
fluid warning
Incline start assist Pre-Collision Braking
System OFF light
Lane Departure Warning
OFF light
Keyless Access with
Push Button Start System
(if equipped)
Turn signals
Front fog light indicator
light (if equipped)
Headlight indicator light
Gauges
Fuel gauge Speedometer
Trip meter and odometer
3640014_19b_Crosstrek_QG_072318.indd 117/23/18 3:34 PM
Getting
Started Instrument
Panel Gauges
Personalize ControlsWhile
Operating Safety/In Case
of Emergency Additional
Information
Page 15 of 31
13
Personalize
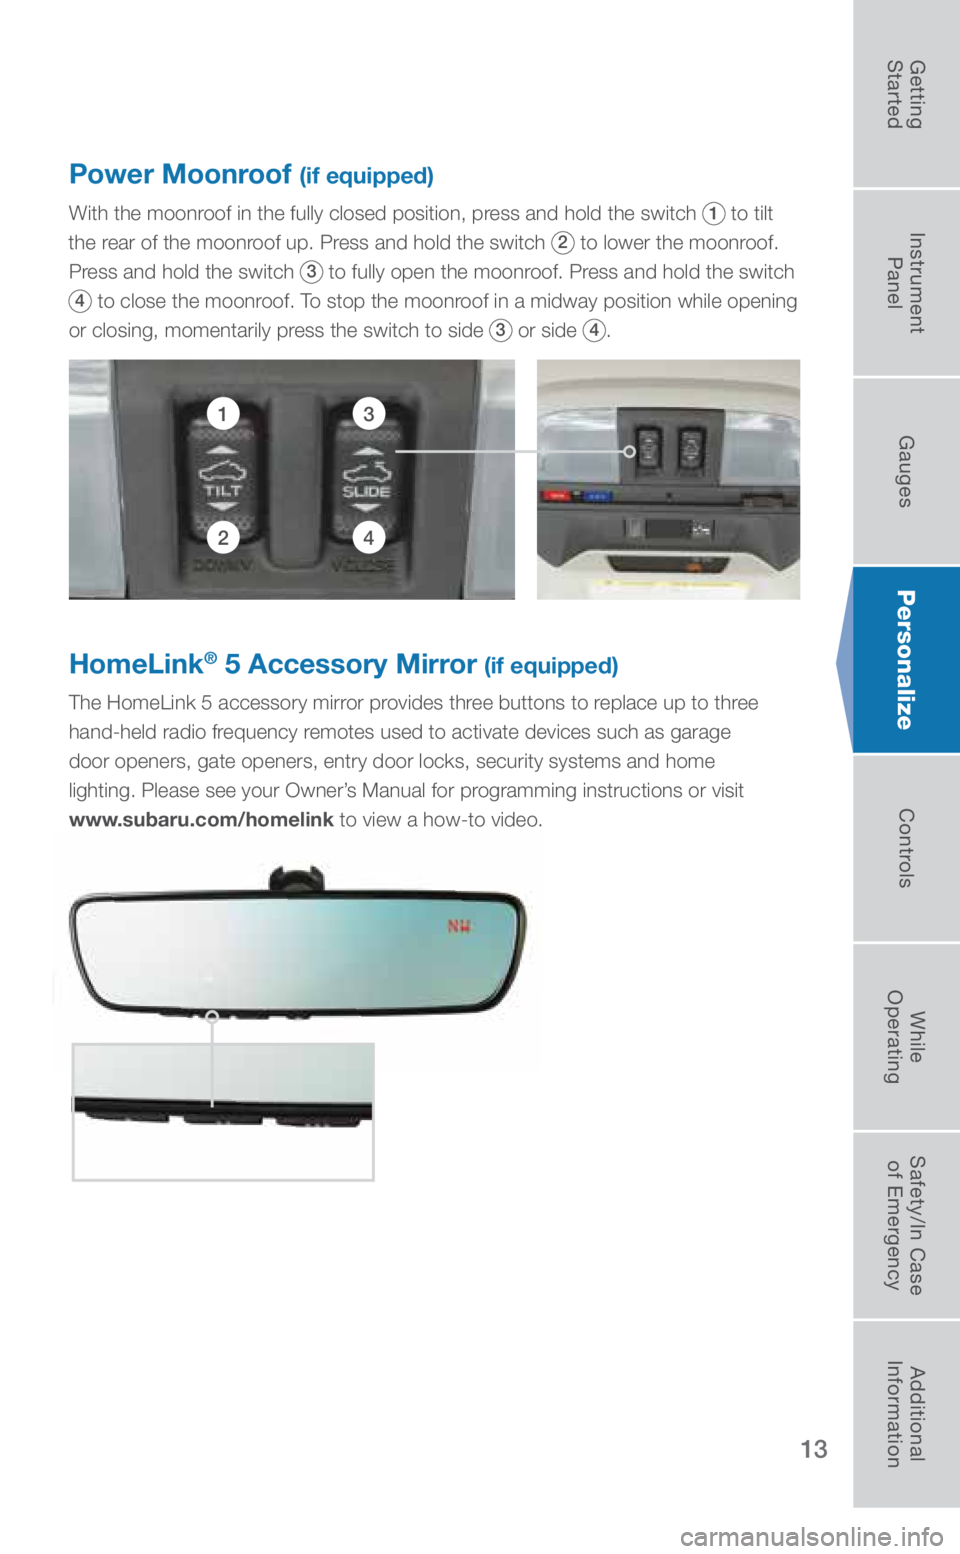
HomeLink® 5 Accessory Mirror (if equipped)
The HomeLink 5 accessory mirror provides three buttons to replace up to three
hand-held radio frequency remotes used to activate devices such as garage
door openers, gate openers, entry door locks, security systems and home \
lighting. Please see your Owner’s Manual for programming instructions or visit
www.subaru.com/homelink to view a how-to video.
Power Moonroof (if equipped)
With the moonroof in the fully closed position, press and hold the switch 1 to tilt
the rear of the moonroof up. Press and hold the switch
2 to lower the moonroof.
Press and hold the switch
3 to fully open the moonroof. Press and hold the switch
4 to close the moonroof. To stop the moonroof in a midway position while opening
or closing, momentarily press the switch to side
3 or side 4.
13
24
3640014_19b_Crosstrek_QG_072318.indd 137/23/18 3:34 PM
Getting
Started Instrument
Panel Gauges
Personalize ControlsWhile
Operating Safety/In Case
of Emergency Additional
Information
Page 16 of 31
14
Controls
Light Controls
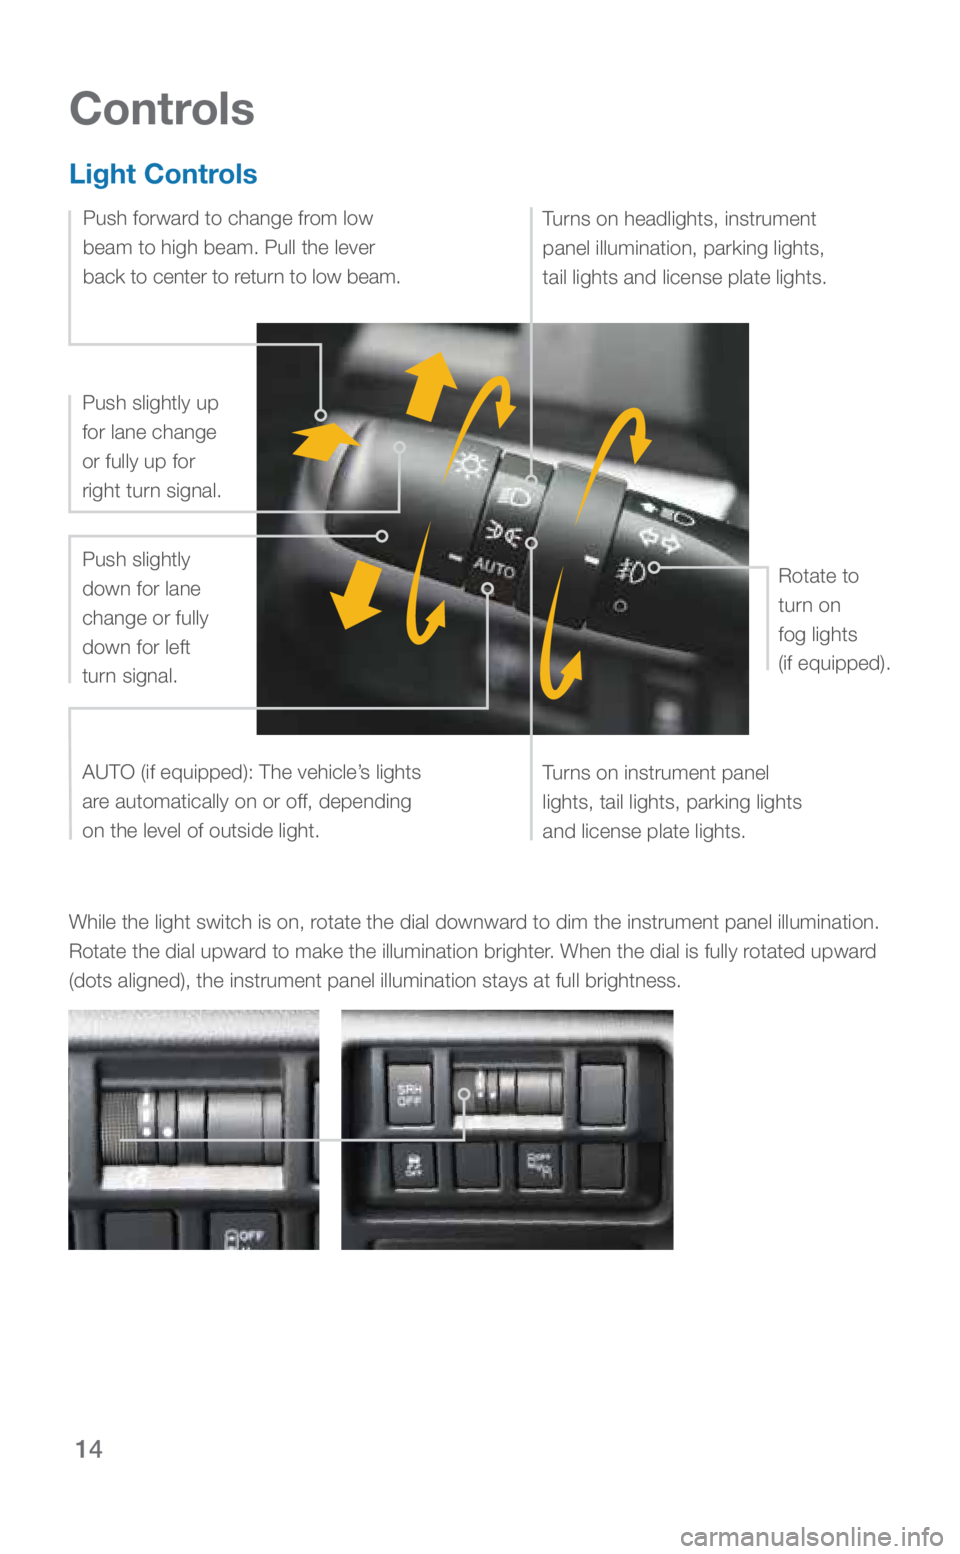
While the light switch is on, rotate the dial downward to dim the instrument panel illumination.
Rotate the dial upward to make the illumination brighter. When the dial is fully rotated upward
(dots aligned), the instrument panel illumination stays at full bright\
ness.
Turns on instrument panel
lights, tail lights, parking lights
and license plate lights.
Turns on headlights, instrument
panel illumination, parking lights,
tail lights and license plate lights.
Rotate to
turn on
fog lights
(if equipped).
Push slightly up
for lane change
or fully up for
right turn signal.
Push slightly
down for lane
change or fully
down for left
turn signal.
AUTO (if equipped): The vehicle’s lights
are automatically on or off, depending
on the level of outside light.
Push forward to change from low
beam to high beam. Pull the lever
back to center to return to low beam.
3640014_19b_Crosstrek_QG_072318.indd 147/23/18 3:34 PM
Page 17 of 31
15
Windshield Wipers
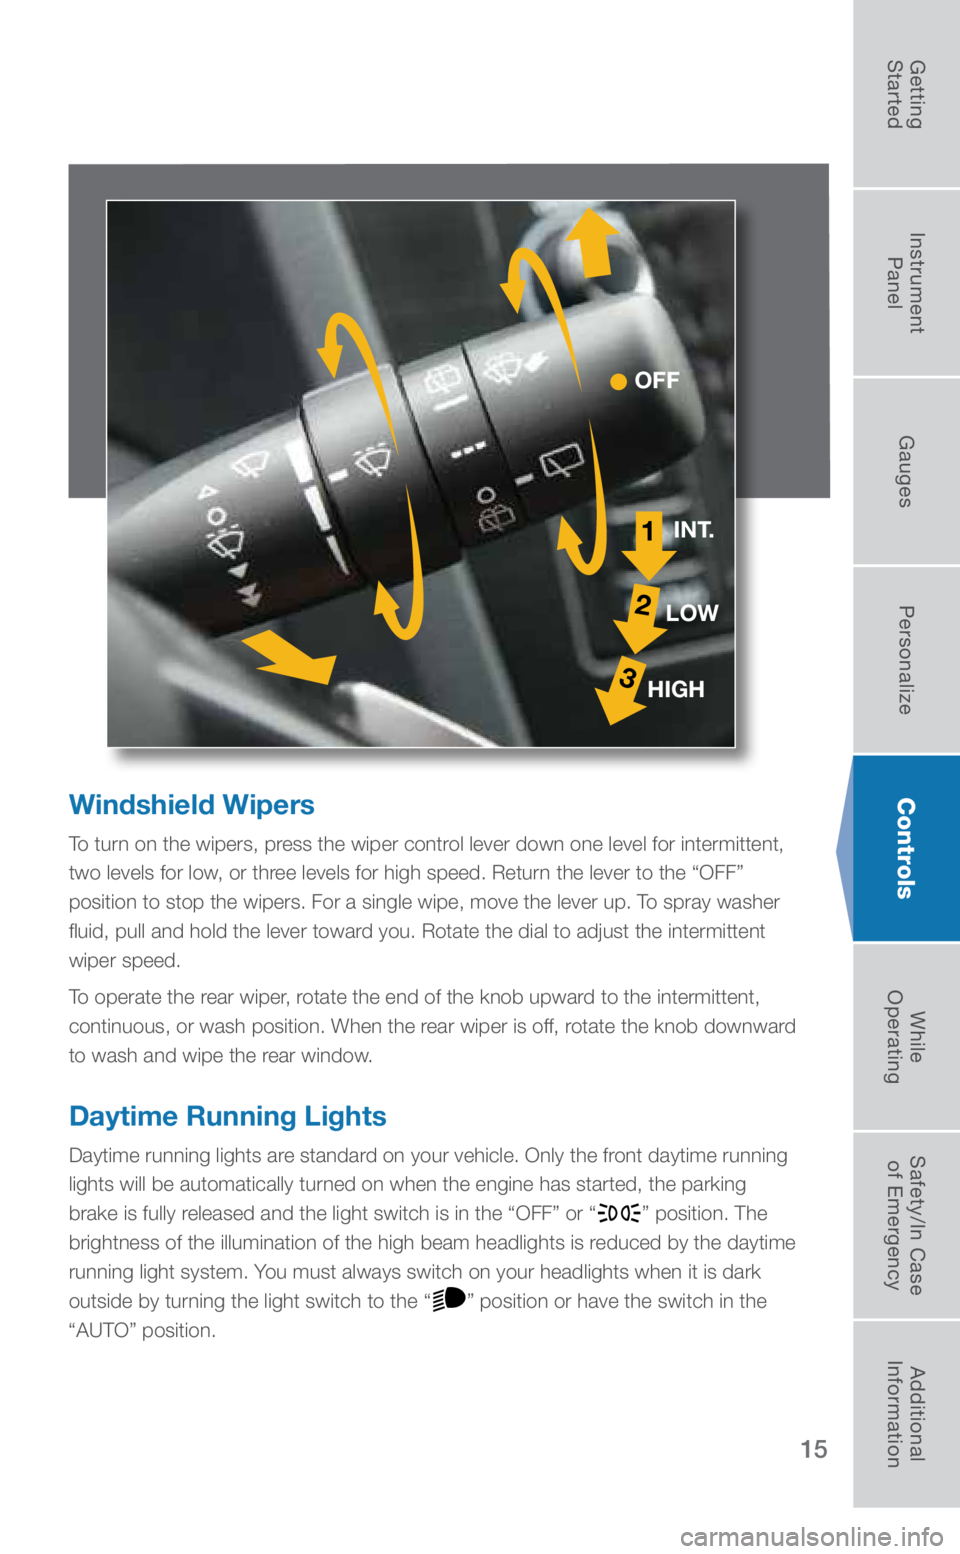
To turn on the wipers, press the wiper control lever down one level for intermittent,
two levels for low, or three levels for high speed. Return the lever to the “OFF”
position to stop the wipers. For a single wipe, move the lever up. To spray washer
fluid, pull and hold the lever toward you. Rotate the dial to adjust the intermittent
wiper speed.
To operate the rear wiper, rotate the end of the knob upward to the intermittent,
continuous, or wash position. When the rear wiper is off, rotate the knob downward
to wash and wipe the rear window.
Daytime Running Lights
Daytime running lights are standard on your vehicle. Only the front daytime running
lights will be automatically turned on when the engine has started, the parking
brake is fully released and the light switch is in the “OFF” or “
” position. The
brightness of the illumination of the high beam headlights is reduced by the daytime
running light system. You must always switch on your headlights when it is dark
outside by turning the light switch to the “
” position or have the switch in the
“AUTO” position.
1
2
3
INT.
LOW
HIGH
OFF
Controls
3640014_19b_Crosstrek_QG_072318.indd 157/23/18 3:34 PM
Getting
Started Instrument
Panel Gauges
Personalize ControlsWhile
Operating Safety/In Case
of Emergency Additional
Information