fuel SUBARU FORESTER 1999 Service Repair Manual
[x] Cancel search | Manufacturer: SUBARU, Model Year: 1999, Model line: FORESTER, Model: SUBARU FORESTER 1999Pages: 345, PDF Size: 5.6 MB
Page 187 of 345

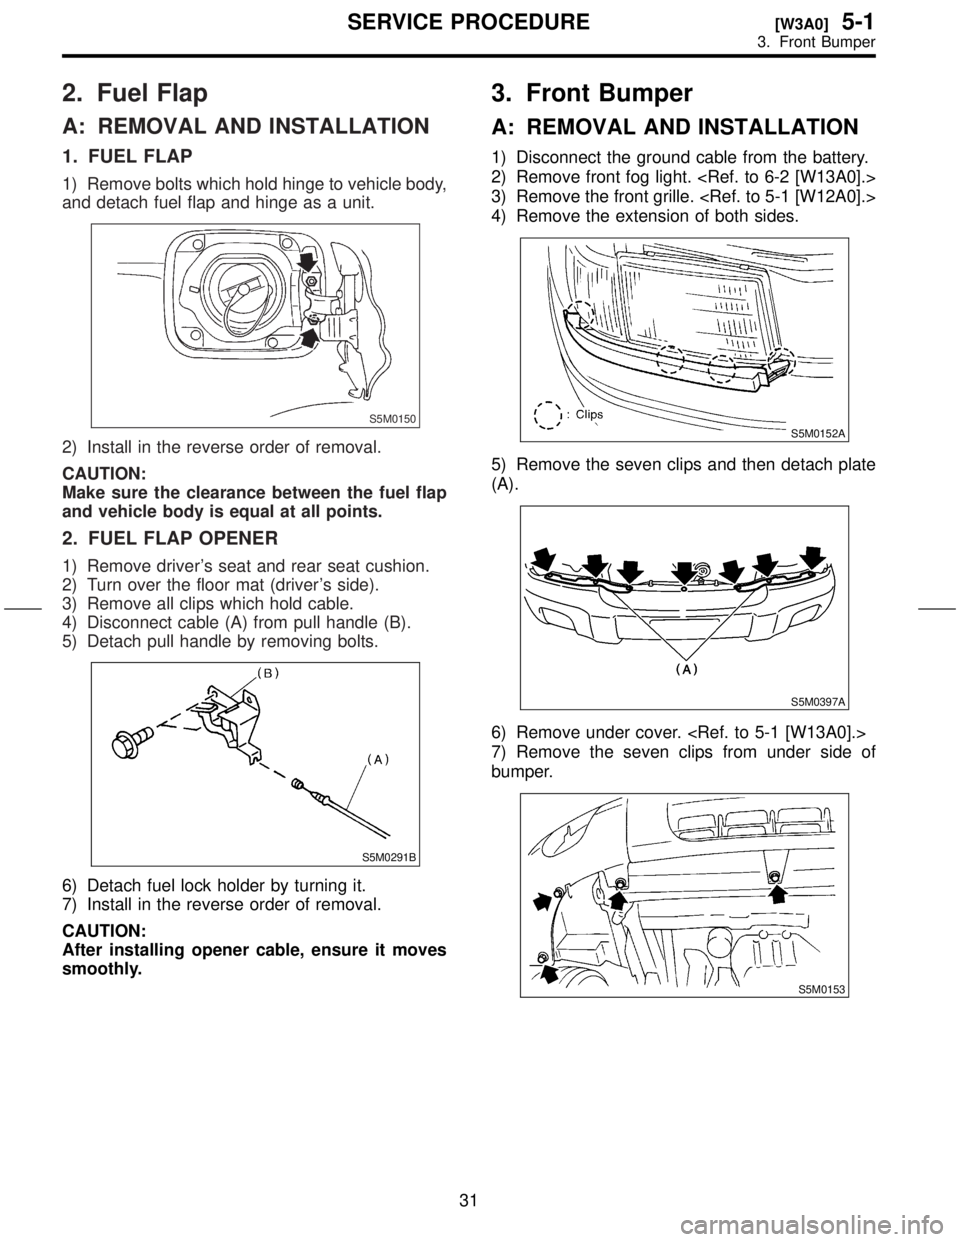
2. Fuel Flap
A: REMOVAL AND INSTALLATION
1. FUEL FLAP
1) Remove bolts which hold hinge to vehicle body,
and detach fuel flap and hinge as a unit.
S5M0150
2) Install in the reverse order of removal.
CAUTION:
Make sure the clearance between the fuel flap
and vehicle body is equal at all points.
2. FUEL FLAP OPENER
1) Remove driver's seat and rear seat cushion.
2) Turn over the floor mat (driver's side).
3) Remove all clips which hold cable.
4) Disconnect cable (A) from pull handle (B).
5) Detach pull handle by removing bolts.
S5M0291B
6) Detach fuel lock holder by turning it.
7) Install in the reverse order of removal.
CAUTION:
After installing opener cable, ensure it moves
smoothly.
3. Front Bumper
A: REMOVAL AND INSTALLATION
1) Disconnect the ground cable from the battery.
2) Remove front fog light.
3) Remove the front grille.
4) Remove the extension of both sides.
S5M0152A
5) Remove the seven clips and then detach plate
(A).
S5M0397A
6) Remove under cover.
7) Remove the seven clips from under side of
bumper.
S5M0153
31
[W3A0]5-1SERVICE PROCEDURE
3. Front Bumper
Page 188 of 345

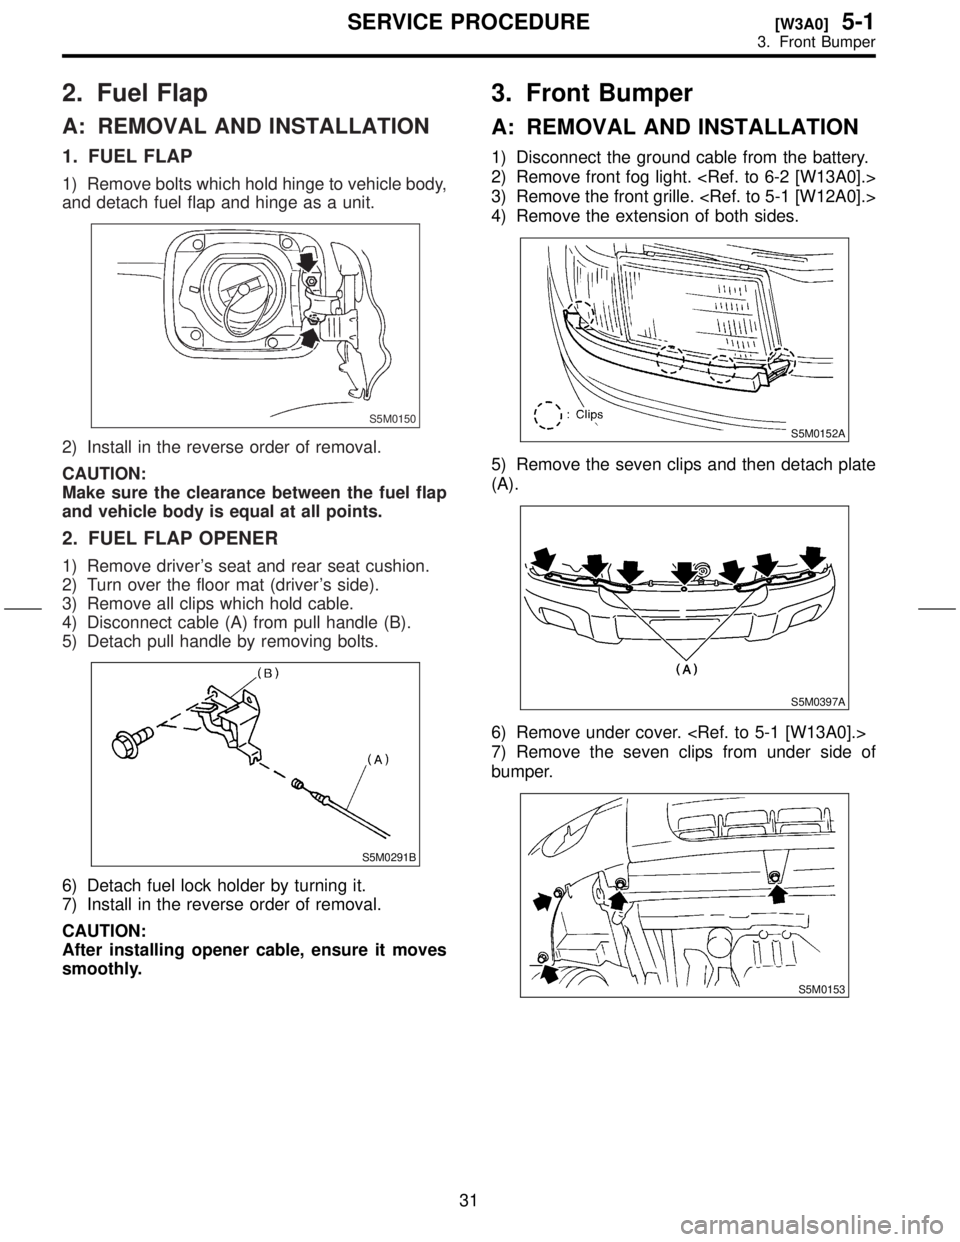
2. Fuel Flap
A: REMOVAL AND INSTALLATION
1. FUEL FLAP
1) Remove bolts which hold hinge to vehicle body,
and detach fuel flap and hinge as a unit.
S5M0150
2) Install in the reverse order of removal.
CAUTION:
Make sure the clearance between the fuel flap
and vehicle body is equal at all points.
2. FUEL FLAP OPENER
1) Remove driver's seat and rear seat cushion.
2) Turn over the floor mat (driver's side).
3) Remove all clips which hold cable.
4) Disconnect cable (A) from pull handle (B).
5) Detach pull handle by removing bolts.
S5M0291B
6) Detach fuel lock holder by turning it.
7) Install in the reverse order of removal.
CAUTION:
After installing opener cable, ensure it moves
smoothly.
3. Front Bumper
A: REMOVAL AND INSTALLATION
1) Disconnect the ground cable from the battery.
2) Remove front fog light.
3) Remove the front grille.
4) Remove the extension of both sides.
S5M0152A
5) Remove the seven clips and then detach plate
(A).
S5M0397A
6) Remove under cover.
7) Remove the seven clips from under side of
bumper.
S5M0153
31
[W3A0]5-1SERVICE PROCEDURE
3. Front Bumper
Page 310 of 345

7) Install in the reverse order of removal.
Tightening torque (Spark plug):
20.6
±2.9 N´m (2.10±0.30 kg-m, 15.19±2.14
ft-lb)
CAUTION:
The above torque should be only applied to
new spark plugs without oil on their threads.
In case their threads are lubricated, the torque
should be reduced by approximately 1/3 of the
specified torque in order to avoid over-stress-
ing.
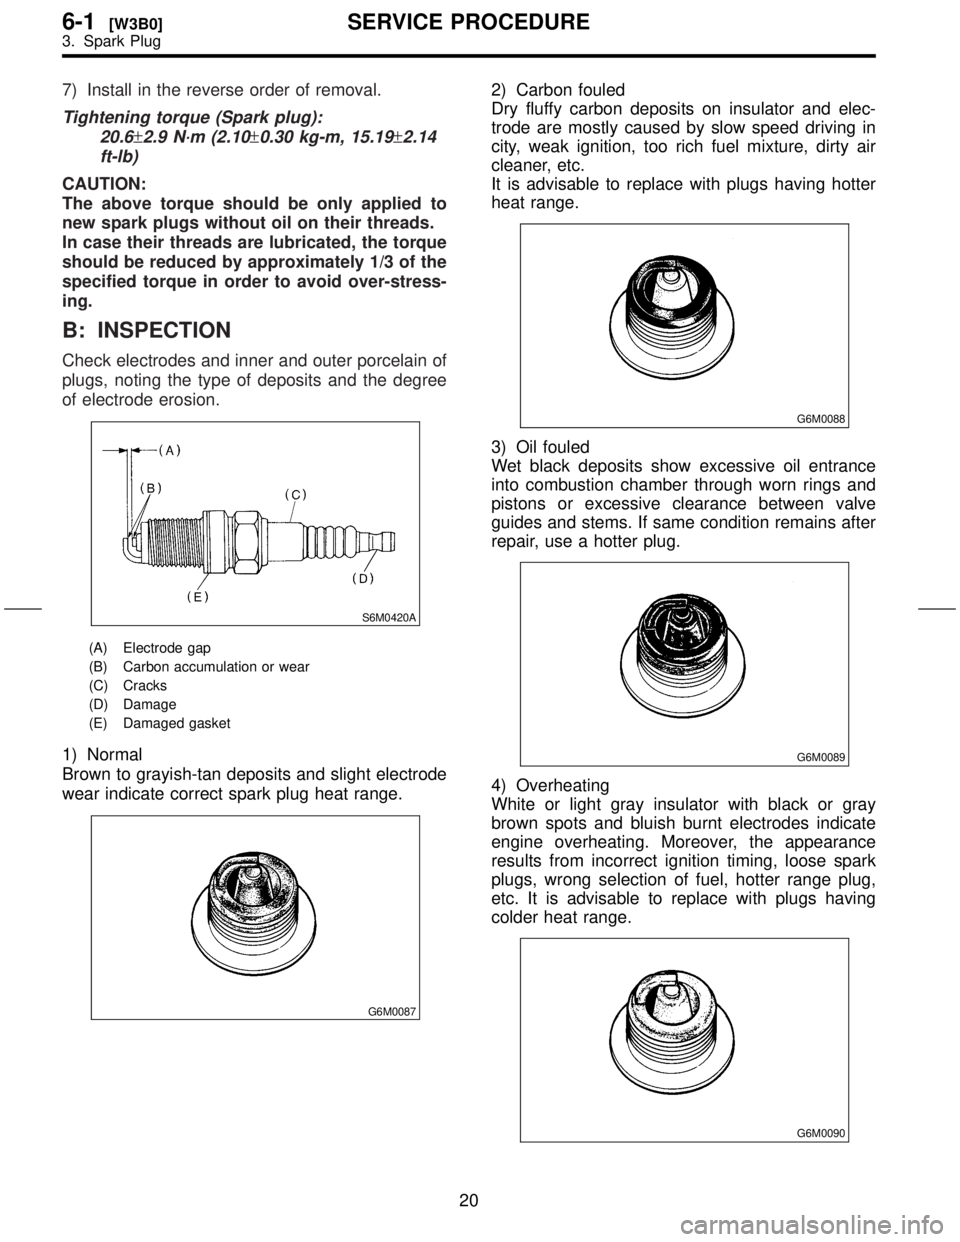
B: INSPECTION
Check electrodes and inner and outer porcelain of
plugs, noting the type of deposits and the degree
of electrode erosion.
S6M0420A
(A) Electrode gap
(B) Carbon accumulation or wear
(C) Cracks
(D) Damage
(E) Damaged gasket
1) Normal
Brown to grayish-tan deposits and slight electrode
wear indicate correct spark plug heat range.
G6M0087
2) Carbon fouled
Dry fluffy carbon deposits on insulator and elec-
trode are mostly caused by slow speed driving in
city, weak ignition, too rich fuel mixture, dirty air
cleaner, etc.
It is advisable to replace with plugs having hotter
heat range.
G6M0088
3) Oil fouled
Wet black deposits show excessive oil entrance
into combustion chamber through worn rings and
pistons or excessive clearance between valve
guides and stems. If same condition remains after
repair, use a hotter plug.
G6M0089
4) Overheating
White or light gray insulator with black or gray
brown spots and bluish burnt electrodes indicate
engine overheating. Moreover, the appearance
results from incorrect ignition timing, loose spark
plugs, wrong selection of fuel, hotter range plug,
etc. It is advisable to replace with plugs having
colder heat range.
G6M0090
20
6-1[W3B0]SERVICE PROCEDURE
3. Spark Plug
Page 317 of 345

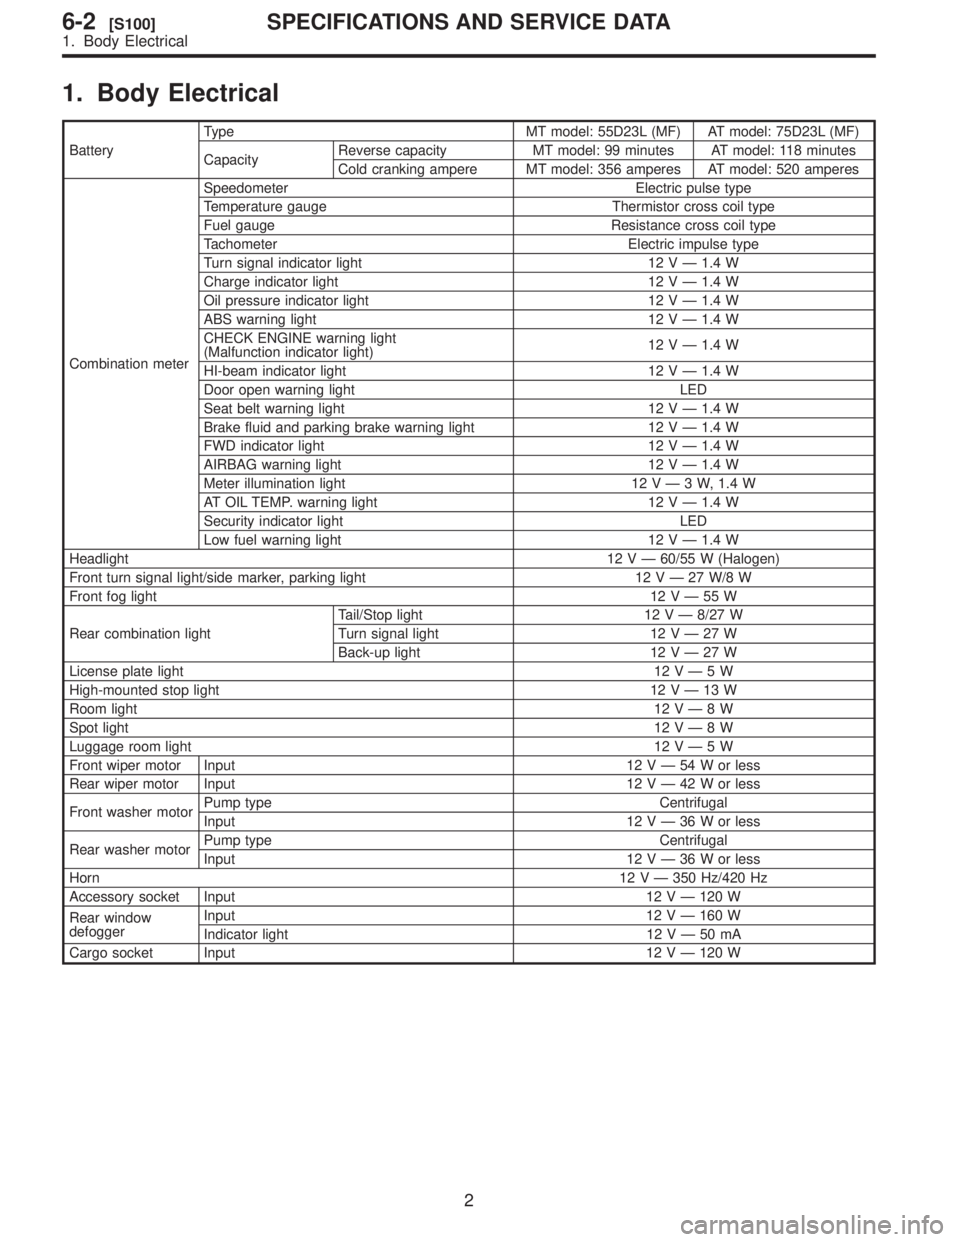
1.
BatteryT
Capacity
Reverse
Cold
Combination Speedometer
T
Fuel
T
T
2
Charge 2
Oil 2
ABS 2
CHECK
\(Malfunction 12
HI-beam 2
Door
Seat 2
Brake 2
FWD 2
AIRBAG 2
Meter 2V\3203W
A 2
Security
Low 2
Headlight 12
Front 2V\3202
Front 1
Rear T
2
T 2V\3202
Back-up 2V\3202
License 1
High-mounted 2V\3201
Room 1
Spot 1
Luggage 1
Front 2V\3205less
Rear 2V\3204less
Front Pump
Input
2V\3203less
Rear Pump
Input
2V\3203less
Horn 12
Accessory 2
Rear
defogger Input
2
Indicator 2V\3205
Cargo 2
2
6-2[S100]SPECIFICA
1.