fuel cap release SUBARU FORESTER 2004 Service Repair Manual
[x] Cancel search | Manufacturer: SUBARU, Model Year: 2004, Model line: FORESTER, Model: SUBARU FORESTER 2004Pages: 2870, PDF Size: 38.67 MB
Page 730 of 2870
PI-7
PRE-DELIVERY INSPECTION
Pre-delivery Inspection
8. CHECK THE REAR GATE FOR LOCK/
UNLOCK AND OPEN/CLOSE OPERA-
TIONS.
1) Open and close the rear gate several times for
smooth movement.
2) Operate the rear gate lever to check that the rear
gate is locked and unlocked normally.
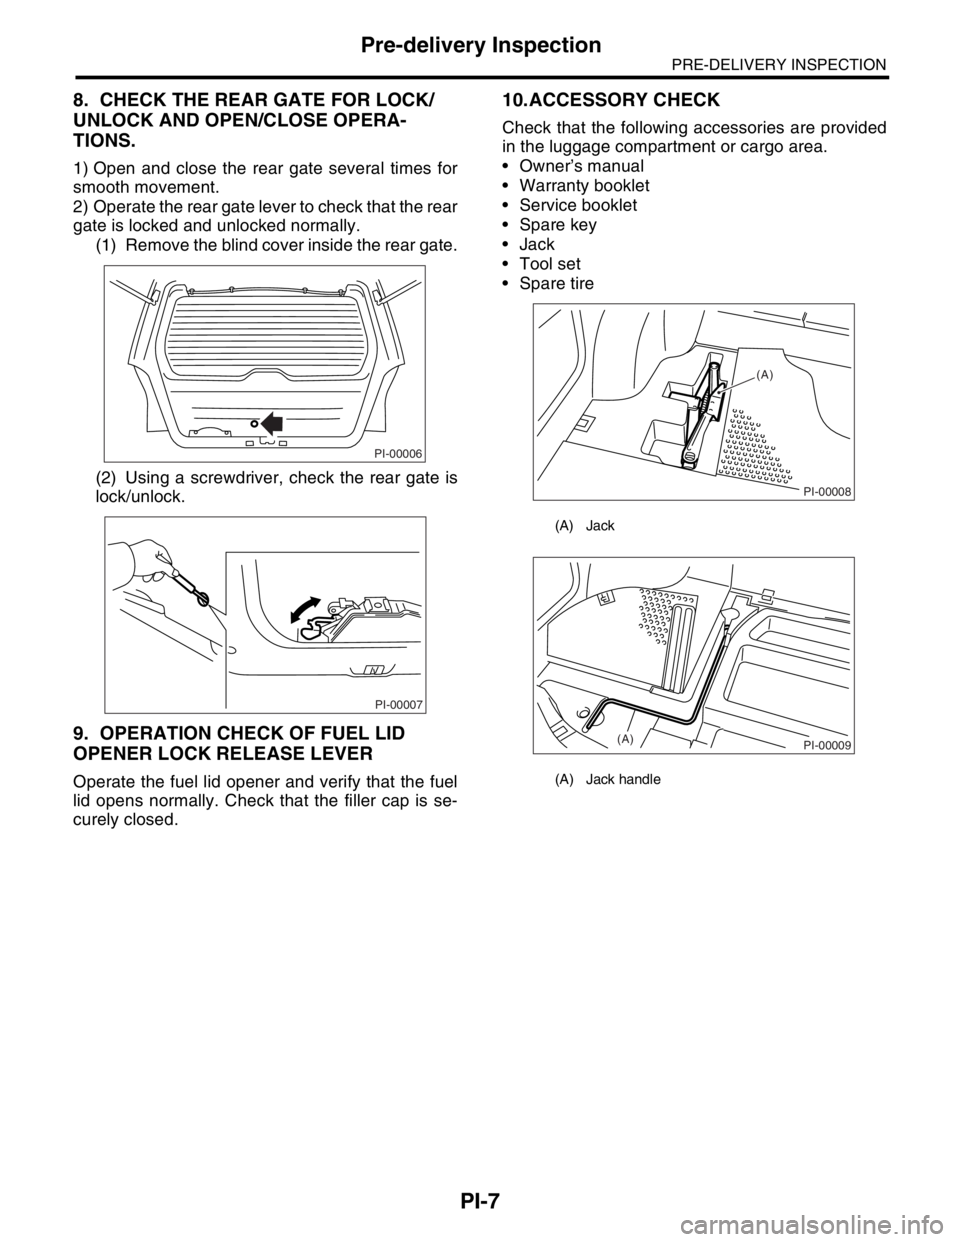
(1) Remove the blind cover inside the rear gate.
(2) Using a screwdriver, check the rear gate is
lock/unlock.
9. OPERATION CHECK OF FUEL LID
OPENER LOCK RELEASE LEVER
Operate the fuel lid opener and verify that the fuel
lid opens normally. Check that the filler cap is se-
curely closed.
10.ACCESSORY CHECK
Check that the following accessories are provided
in the luggage compartment or cargo area.
Owner’s manual
Warranty booklet
Service booklet
Spare key
Jack
Tool set
Spare tire
PI-00006
PI-00007
(A) Jack
(A) Jack handle
PI-00008
(A)
PI-00009(A)
Page 796 of 2870
FU(H4SO)-14
FUEL INJECTION (FUEL SYSTEM)
Intake Manifold
3. Intake Manifold
A: REMOVAL
1) Release the fuel pressure.
TION, Fuel.>
2) Open the fuel flap lid, and remove the fuel filler
cap.
3) Disconnect the ground cable from battery.
4) Remove the air intake duct and air cleaner case.
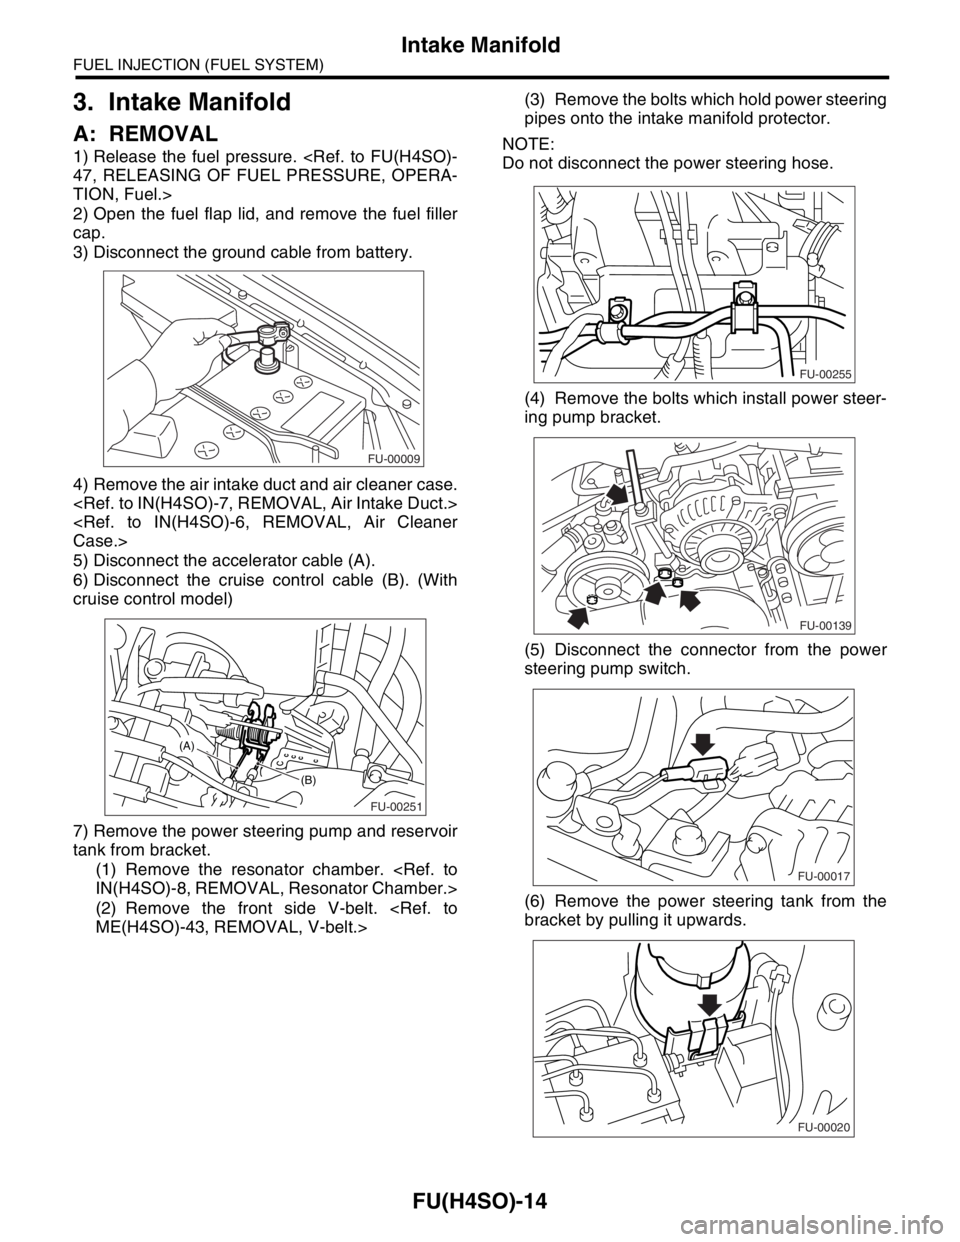
5) Disconnect the accelerator cable (A).
6) Disconnect the cruise control cable (B). (With
cruise control model)
7) Remove the power steering pump and reservoir
tank from bracket.
(1) Remove the resonator chamber.
(2) Remove the front side V-belt.
pipes onto the intake manifold protector.
NOTE:
Do not disconnect the power steering hose.
(4) Remove the bolts which install power steer-
ing pump bracket.
(5) Disconnect the connector from the power
steering pump switch.
(6) Remove the power steering tank from the
bracket by pulling it upwards.
FU-00009
FU-00251
(B)
(A)
FU-00255
FU-00139
FU-00017
FU-00020
Page 817 of 2870
FU(H4SO)-35
FUEL INJECTION (FUEL SYSTEM)
Fuel Injector
13.Fuel Injector
A: REMOVAL
1. RH SIDE
1) Release the fuel pressure.
2) Open the fuel flap lid, and remove the fuel filler
cap.
3) Disconnect the ground cable from battery.
4) Remove the resonator chamber.
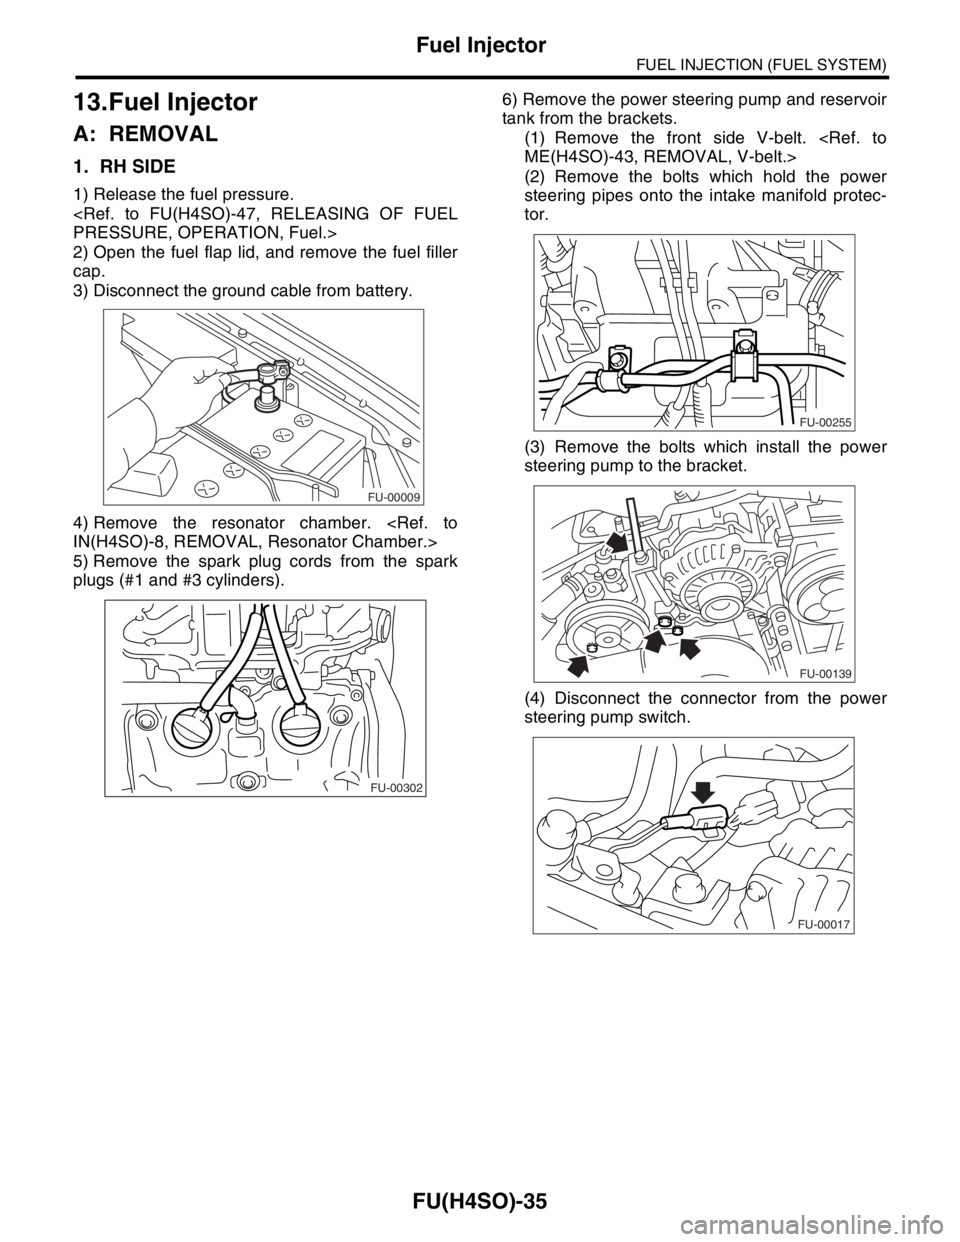
5) Remove the spark plug cords from the spark
plugs (#1 and #3 cylinders).6) Remove the power steering pump and reservoir
tank from the brackets.
(1) Remove the front side V-belt.
(2) Remove the bolts which hold the power
steering pipes onto the intake manifold protec-
tor.
(3) Remove the bolts which install the power
steering pump to the bracket.
(4) Disconnect the connector from the power
steering pump switch.
FU-00009
FU-00302
FU-00255
FU-00139
FU-00017
Page 819 of 2870
FU(H4SO)-37
FUEL INJECTION (FUEL SYSTEM)
Fuel Injector
2. LH SIDE
1) Release the fuel pressure.
TION, Fuel.>
2) Open the fuel flap lid, and remove the fuel filler
cap.
3) Disconnect the ground cable from battery.
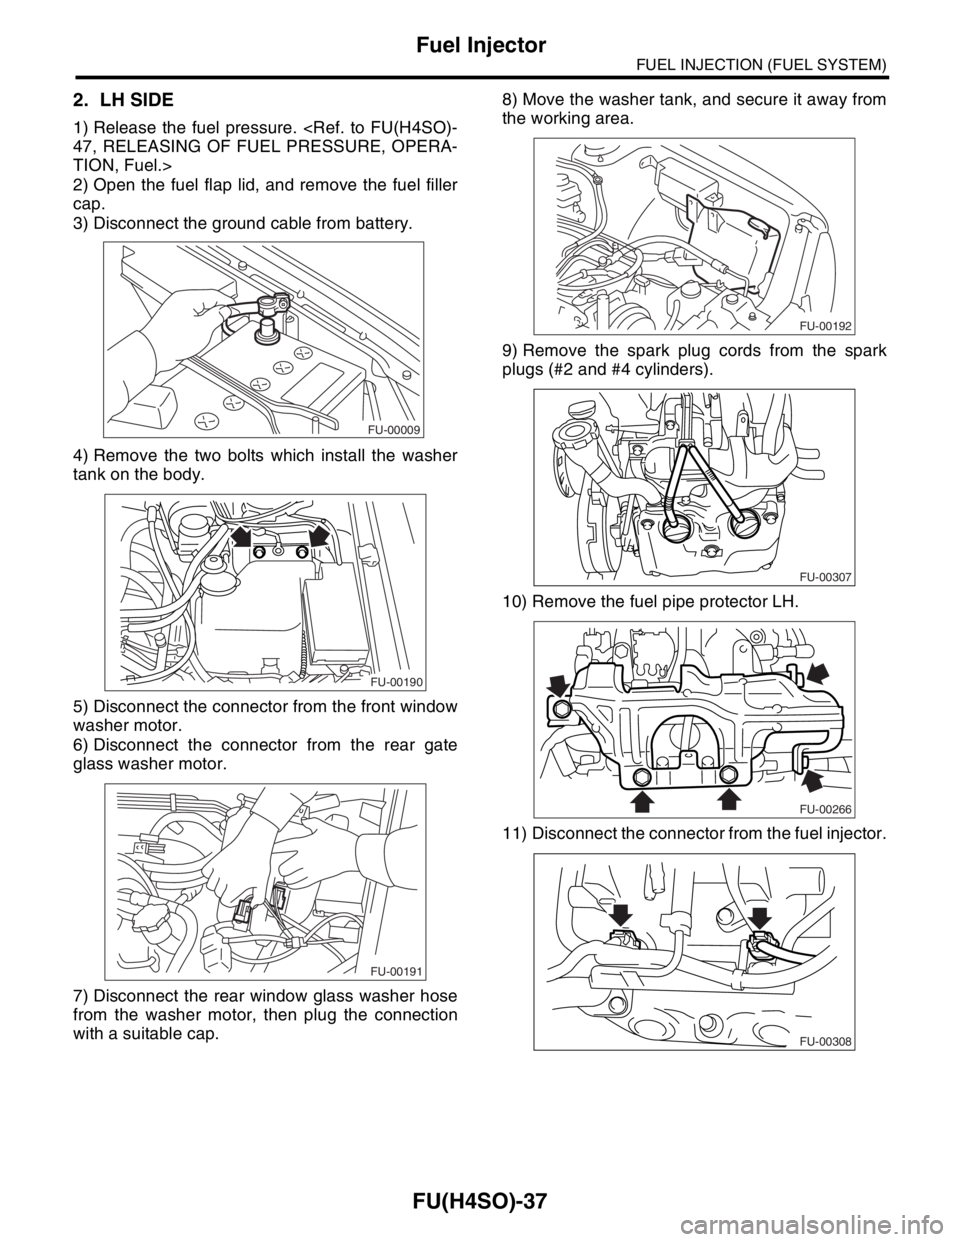
4) Remove the two bolts which install the washer
tank on the body.
5) Disconnect the connector from the front window
washer motor.
6) Disconnect the connector from the rear gate
glass washer motor.
7) Disconnect the rear window glass washer hose
from the washer motor, then plug the connection
with a suitable cap.8) Move the washer tank, and secure it away from
the working area.
9) Remove the spark plug cords from the spark
plugs (#2 and #4 cylinders).
10) Remove the fuel pipe protector LH.
11) Disconnect the connector from the fuel injector.
FU-00009
FU-00190
FU-00191
FU-00192
FU-00307
FU-00266
FU-00308
Page 833 of 2870
FU(H4SO)-51
FUEL INJECTION (FUEL SYSTEM)
Fuel Filler Pipe
21.Fuel Filler Pipe
A: REMOVAL
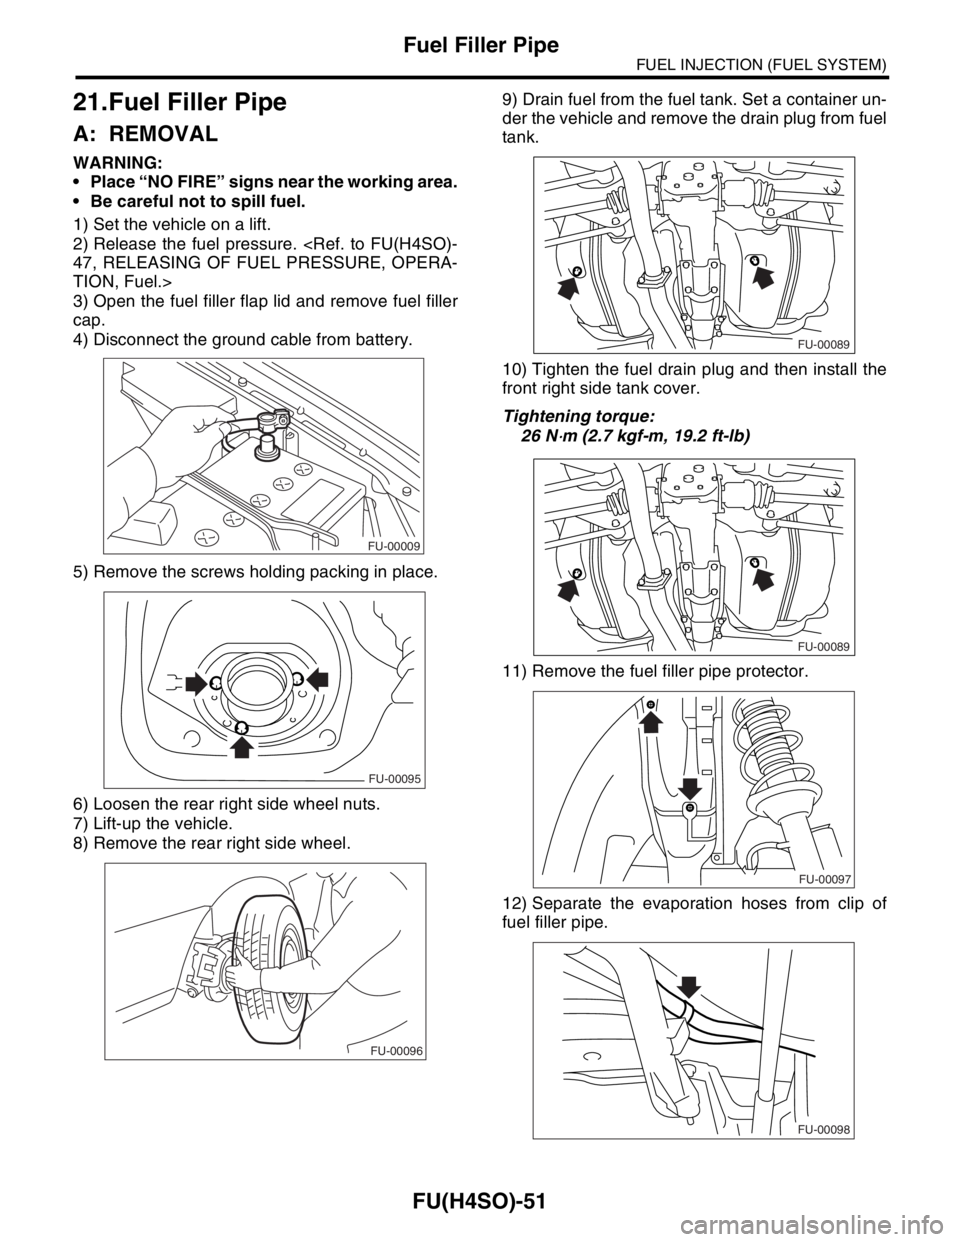
WARNING:
Place “NO FIRE” signs near the working area.
Be careful not to spill fuel.
1) Set the vehicle on a lift.
2) Release the fuel pressure.
TION, Fuel.>
3) Open the fuel filler flap lid and remove fuel filler
cap.
4) Disconnect the ground cable from battery.
5) Remove the screws holding packing in place.
6) Loosen the rear right side wheel nuts.
7) Lift-up the vehicle.
8) Remove the rear right side wheel.9) Drain fuel from the fuel tank. Set a container un-
der the vehicle and remove the drain plug from fuel
tank.
10) Tighten the fuel drain plug and then install the
front right side tank cover.
Tightening torque:
26 N
⋅m (2.7 kgf-m, 19.2 ft-lb)
11) Remove the fuel filler pipe protector.
12) Separate the evaporation hoses from clip of
fuel filler pipe.
FU-00009
FU-00095
FU-00096
FU-00089
FU-00089
FU-00097
FU-00098
Page 837 of 2870
FU(H4SO)-55
FUEL INJECTION (FUEL SYSTEM)
Fuel Pump
22.Fuel Pump
A: REMOVAL
WARNING:
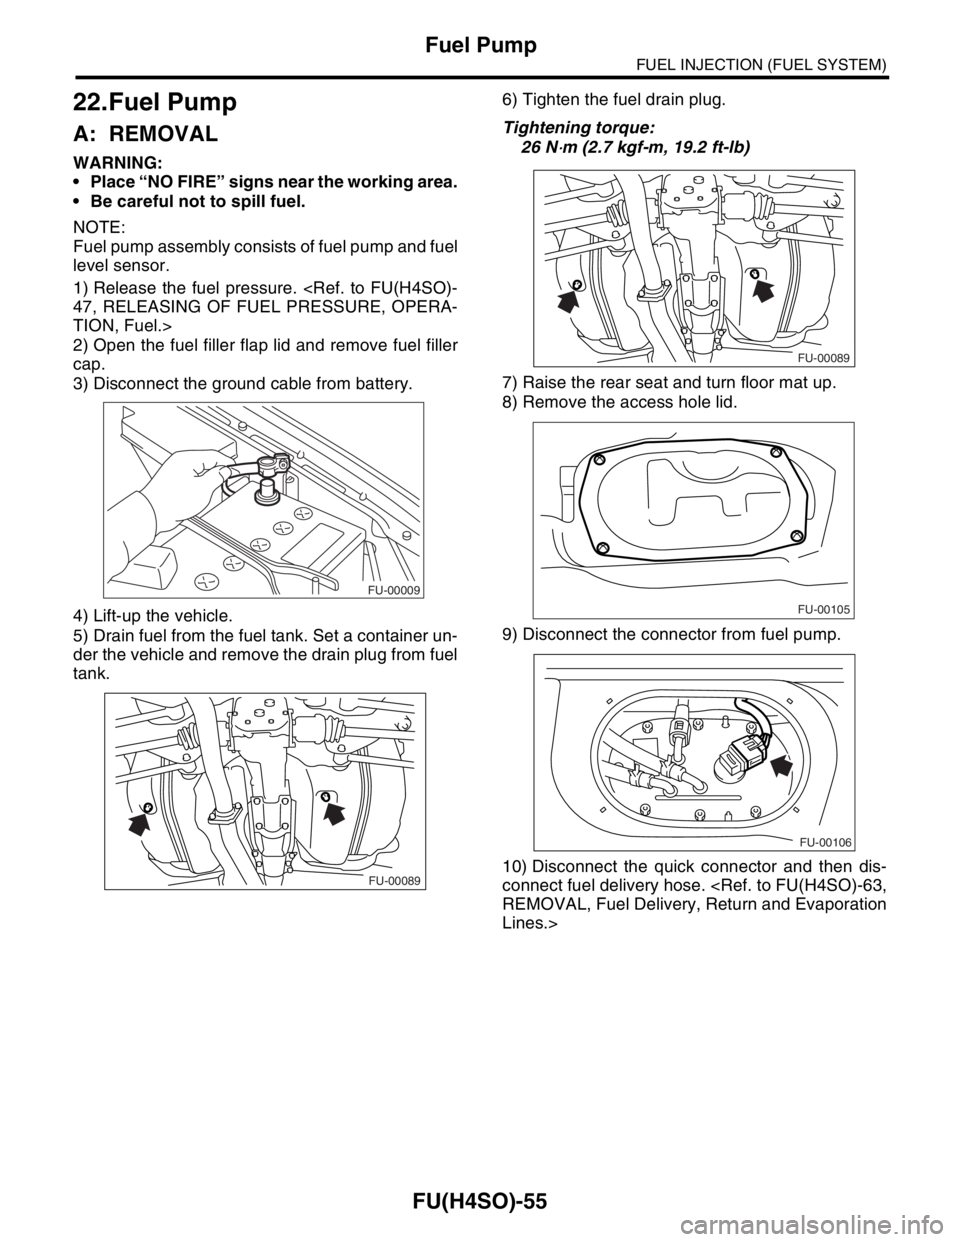
Place “NO FIRE” signs near the working area.
Be careful not to spill fuel.
NOTE:
Fuel pump assembly consists of fuel pump and fuel
level sensor.
1) Release the fuel pressure.
TION, Fuel.>
2) Open the fuel filler flap lid and remove fuel filler
cap.
3) Disconnect the ground cable from battery.
4) Lift-up the vehicle.
5) Drain fuel from the fuel tank. Set a container un-
der the vehicle and remove the drain plug from fuel
tank.6) Tighten the fuel drain plug.
Tightening torque:
26 N
⋅m (2.7 kgf-m, 19.2 ft-lb)
7) Raise the rear seat and turn floor mat up.
8) Remove the access hole lid.
9) Disconnect the connector from fuel pump.
10) Disconnect the quick connector and then dis-
connect fuel delivery hose.
Lines.>
FU-00009
FU-00089
FU-00089
FU-00105
FU-00106
Page 845 of 2870

FU(H4SO)-63
FUEL INJECTION (FUEL SYSTEM)
Fuel Delivery, Return and Evaporation Lines
28.Fuel Delivery, Return and Evaporation Lines
A: REMOVAL
1) Set the vehicle on a lift.
2) Release the fuel pressure.
3) Open the fuel filler flap lid and remove fuel filler cap.
4) Remove the floor mat.
5) Remove the fuel delivery pipes and hoses, fuel return pipes and hoses, evaporation pipes and hoses.
6) In the engine compartment, detach the fuel de-
livery hose (A), return hose (B) and evaporation
hose (C).
7) Lift-up the vehicle.8) Disconnect the two-way valve hose (A) from
two-way valve and disconnect the canister hose (B)
from canister.
FU-00122
(B) (A)
(C)
FU-00374
(A)(B)
FU-00091
Page 899 of 2870
ME(H4SO)-30
MECHANICAL
Fuel Pressure
7. Fuel Pressure
A: INSPECTION
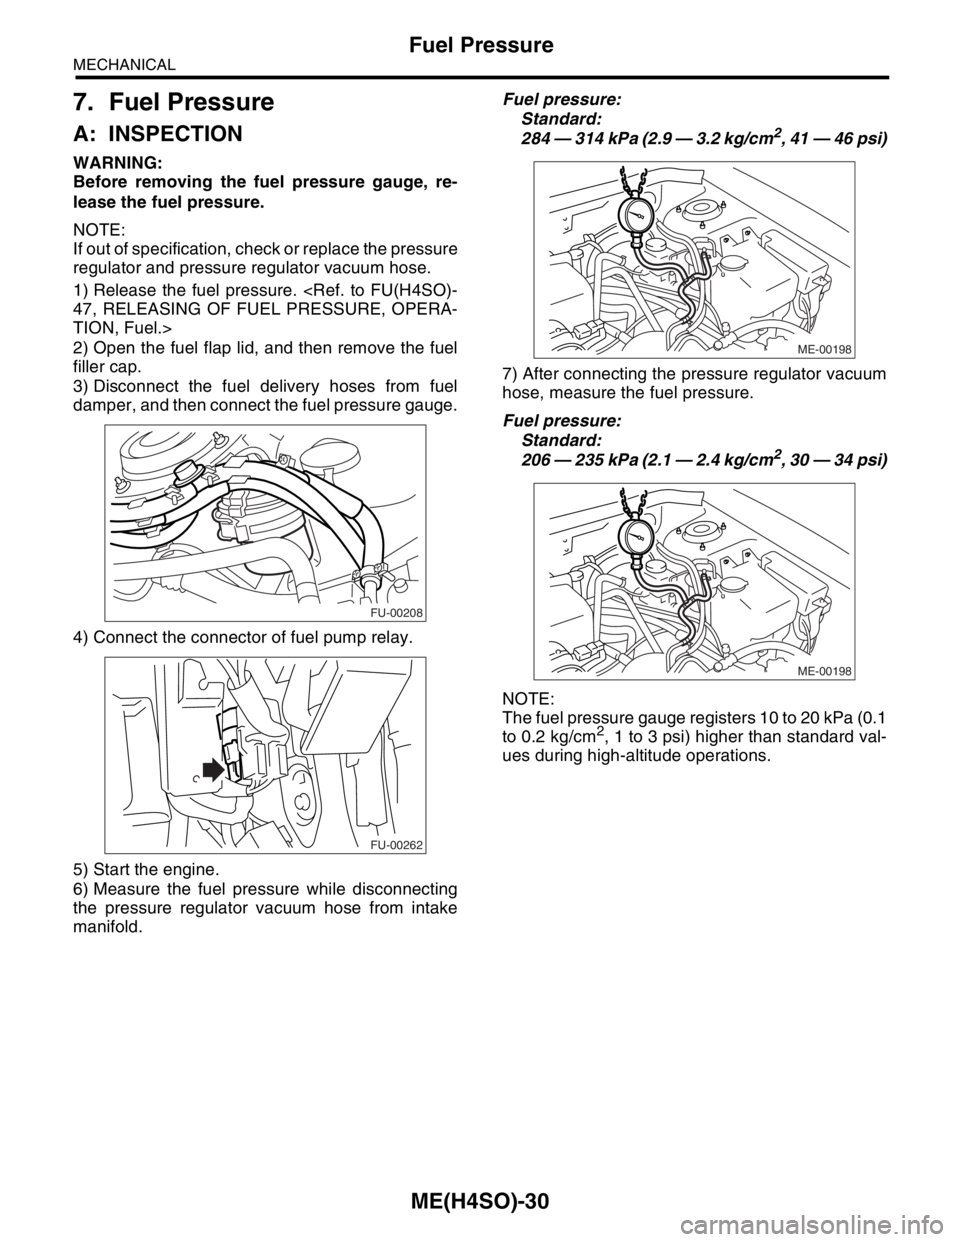
WARNING:
Before removing the fuel pressure gauge, re-
lease the fuel pressure.
NOTE:
If out of specification, check or replace the pressure
regulator and pressure regulator vacuum hose.
1) Release the fuel pressure.
TION, Fuel.>
2) Open the fuel flap lid, and then remove the fuel
filler cap.
3) Disconnect the fuel delivery hoses from fuel
damper, and then connect the fuel pressure gauge.
4) Connect the connector of fuel pump relay.
5) Start the engine.
6) Measure the fuel pressure while disconnecting
the pressure regulator vacuum hose from intake
manifold.Fuel pressure:
Standard:
284 — 314 kPa (2.9 — 3.2 kg/cm
2, 41 — 46 psi)
7) After connecting the pressure regulator vacuum
hose, measure the fuel pressure.
Fuel pressure:
Standard:
206 — 235 kPa (2.1 — 2.4 kg/cm
2, 30 — 34 psi)
NOTE:
The fuel pressure gauge registers 10 to 20 kPa (0.1
to 0.2 kg/cm
2, 1 to 3 psi) higher than standard val-
ues during high-altitude operations.
FU-00208
FU-00262
ME-00198
ME-00198
Page 903 of 2870
ME(H4SO)-34
MECHANICAL
Engine Assembly
9. Engine Assembly
A: REMOVAL
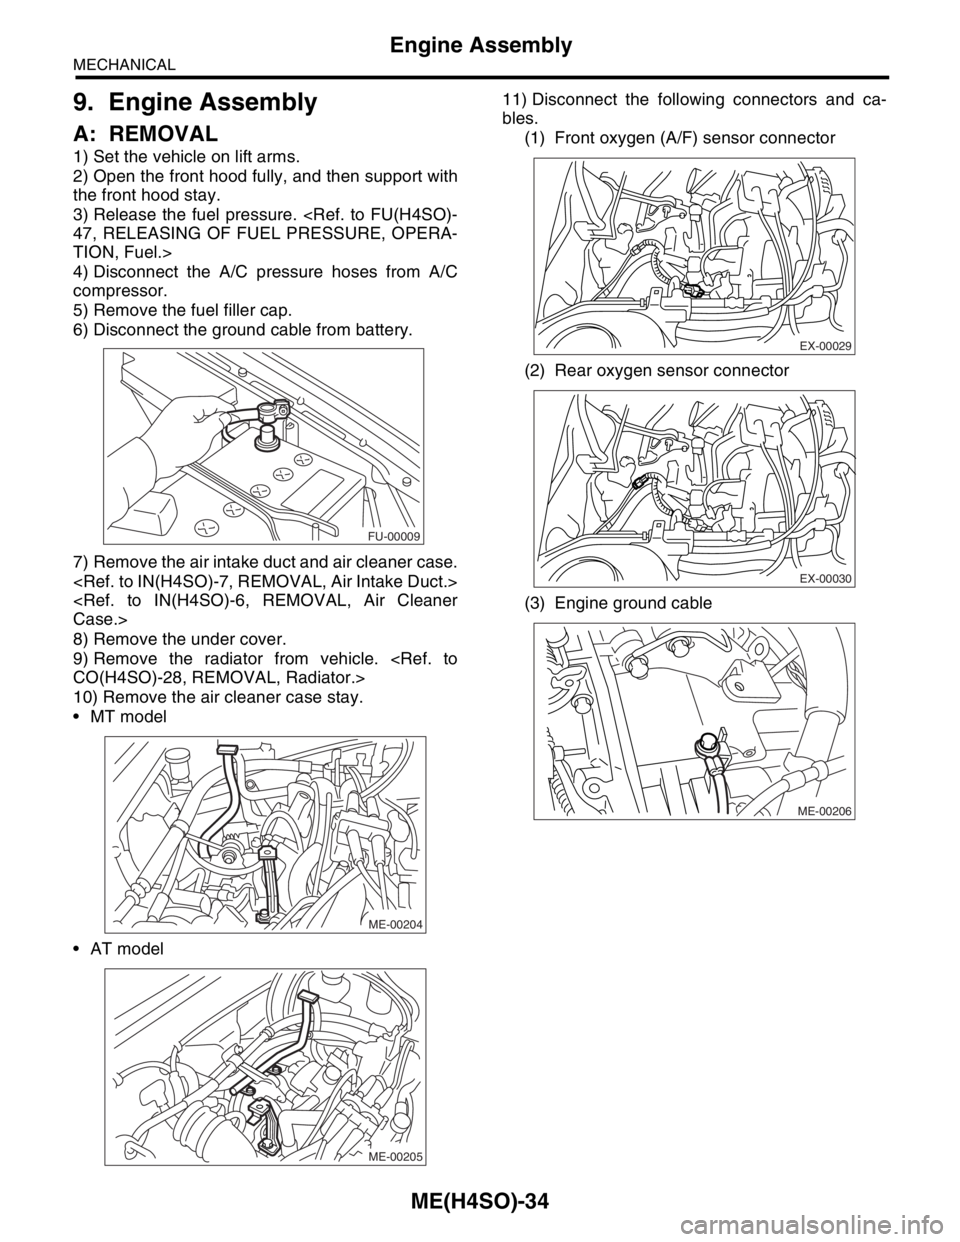
1) Set the vehicle on lift arms.
2) Open the front hood fully, and then support with
the front hood stay.
3) Release the fuel pressure.
TION, Fuel.>
4) Disconnect the A/C pressure hoses from A/C
compressor.
5) Remove the fuel filler cap.
6) Disconnect the ground cable from battery.
7) Remove the air intake duct and air cleaner case.
8) Remove the under cover.
9) Remove the radiator from vehicle.
10) Remove the air cleaner case stay.
MT model
AT model11) Disconnect the following connectors and ca-
bles.
(1) Front oxygen (A/F) sensor connector
(2) Rear oxygen sensor connector
(3) Engine ground cable
FU-00009
ME-00204
ME-00205
EX-00029
EX-00030
ME-00206
Page 1105 of 2870
EN(H4SO)-7
ENGINE (DIAGNOSTIC)
General Description
The antenna feeder must be placed as far
apart as possible from the ECM and MFI har-
ness.
Carefully adjust the antenna for correct
matching.
When mounting a large power type radio, pay
special attention to the three items above men-
tioned.
Incorrect installation of the radio may affect
the operation of the ECM.
13) Before disconnecting the fuel hose, disconnect
the fuel pump connector and crank the engine for
more than five seconds to release pressure in the
fuel system. If engine starts during this operation,
run it until it stops.
14) Problems in the electronic-controlled automatic
transmission may be caused by failure of the en-
gine, the electronic control system, the transmis-
sion proper, or by a combination of these. These
three causes must be distinguished clearly when
performing diagnostics.
15) Diagnostics should be conducted by rotating
with simple, easy operations and proceeding to
complicated, difficult operations. The most impor-
tant thing in diagnostics is to understand the cus-
tomer’s complaint, and distinguish between the
three causes.
16) In AT models, do not continue the stall for more
than five seconds. (from closed throttle, fully open
throttle to stall engine speed.)
17) On the model with ABS, when performing driv-
ing test in jacked-up or lifted-up position, some-
times the warning light may be lit, but this is not a
malfunction of the system. The reason for this is the
speed difference between the front and rear
wheels. After diagnosis of engine control system,
perform the ABS memory clearance procedure of
self-diagnosis function.
B: INSPECTION
Before performing diagnostics, check the following
items which might affect engine problems:
1. BATTERY
1) Measure battery voltage and specific gravity of
electrolyte.
Standard voltage: 12 V
Specific gravity: Above 1.260
2) Check the condition of the main and other fuses,
and harnesses and connectors. Also check for
proper grounding.
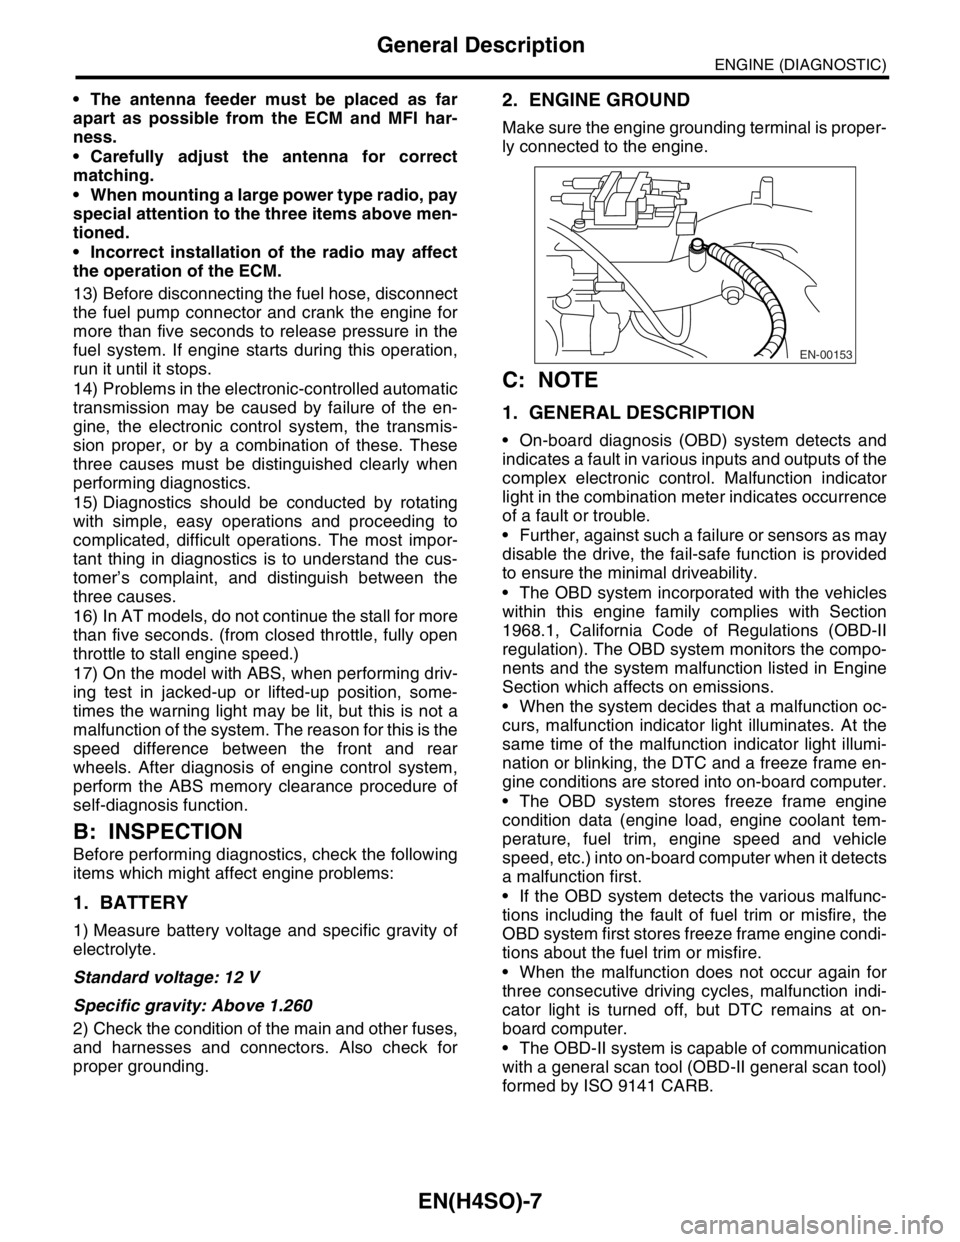
2. ENGINE GROUND
Make sure the engine grounding terminal is proper-
ly connected to the engine.
C: NOTE
1. GENERAL DESCRIPTION
On-board diagnosis (OBD) system detects and
indicates a fault in various inputs and outputs of the
complex electronic control. Malfunction indicator
light in the combination meter indicates occurrence
of a fault or trouble.
Further, against such a failure or sensors as may
disable the drive, the fail-safe function is provided
to ensure the minimal driveability.
The OBD system incorporated with the vehicles
within this engine family complies with Section
1968.1, California Code of Regulations (OBD-II
regulation). The OBD system monitors the compo-
nents and the system malfunction listed in Engine
Section which affects on emissions.
When the system decides that a malfunction oc-
curs, malfunction indicator light illuminates. At the
same time of the malfunction indicator light illumi-
nation or blinking, the DTC and a freeze frame en-
gine conditions are stored into on-board computer.
The OBD system stores freeze frame engine
condition data (engine load, engine coolant tem-
perature, fuel trim, engine speed and vehicle
speed, etc.) into on-board computer when it detects
a malfunction first.
If the OBD system detects the various malfunc-
tions including the fault of fuel trim or misfire, the
OBD system first stores freeze frame engine condi-
tions about the fuel trim or misfire.
When the malfunction does not occur again for
three consecutive driving cycles, malfunction indi-
cator light is turned off, but DTC remains at on-
board computer.
The OBD-II system is capable of communication
with a general scan tool (OBD-II general scan tool)
formed by ISO 9141 CARB.
EN-00153