fuel cap release SUBARU FORESTER 2004 Service User Guide
[x] Cancel search | Manufacturer: SUBARU, Model Year: 2004, Model line: FORESTER, Model: SUBARU FORESTER 2004Pages: 2870, PDF Size: 38.67 MB
Page 1237 of 2870
EN(H4SO)-139
ENGINE (DIAGNOSTIC)
Diagnostic Procedure with Diagnostic Trouble Code (DTC)
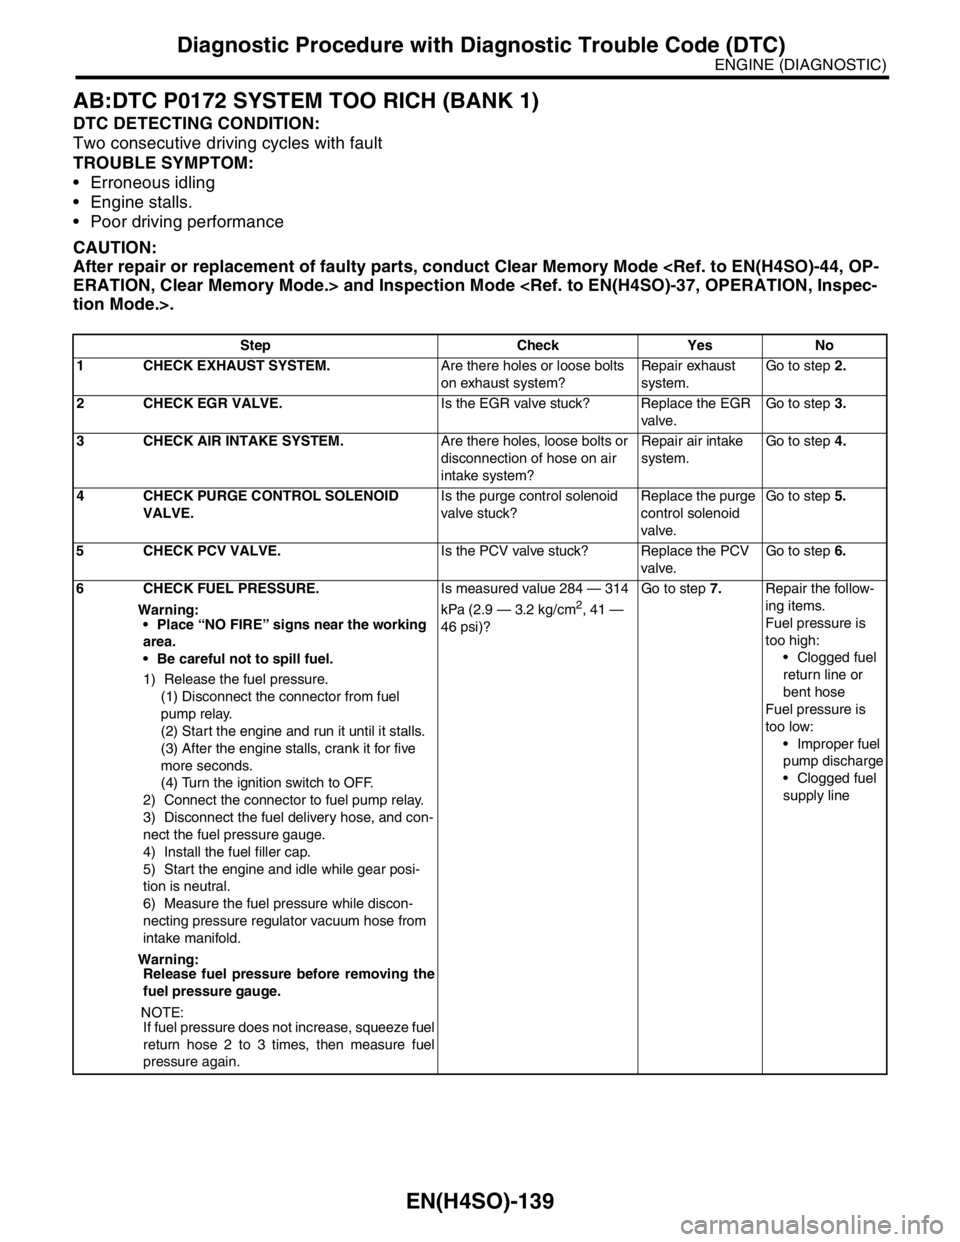
AB:DTC P0172 SYSTEM TOO RICH (BANK 1)
DTC DETECTING CONDITION:
Two consecutive driving cycles with fault
TROUBLE SYMPTOM:
Erroneous idling
Engine stalls.
Poor driving performance
CAUTION:
After repair or replacement of faulty parts, conduct Clear Memory Mode
Step Check Yes No
1 CHECK EXHAUST SYSTEM.Are there holes or loose bolts
on exhaust system?Repair exhaust
system.Go to step 2.
2 CHECK EGR VALVE.Is the EGR valve stuck? Replace the EGR
valve.Go to step 3.
3 CHECK AIR INTAKE SYSTEM.Are there holes, loose bolts or
disconnection of hose on air
intake system?Repair air intake
system.Go to step 4.
4 CHECK PURGE CONTROL SOLENOID
VALVE.Is the purge control solenoid
valve stuck?Replace the purge
control solenoid
valve.Go to step 5.
5 CHECK PCV VALVE.Is the PCV valve stuck? Replace the PCV
valve.Go to step 6.
6 CHECK FUEL PRESSURE.
Warning:
Place “NO FIRE” signs near the working
area.
Be careful not to spill fuel.
1) Release the fuel pressure.
(1) Disconnect the connector from fuel
pump relay.
(2) Start the engine and run it until it stalls.
(3) After the engine stalls, crank it for five
more seconds.
(4) Turn the ignition switch to OFF.
2) Connect the connector to fuel pump relay.
3) Disconnect the fuel delivery hose, and con-
nect the fuel pressure gauge.
4) Install the fuel filler cap.
5) Start the engine and idle while gear posi-
tion is neutral.
6) Measure the fuel pressure while discon-
necting pressure regulator vacuum hose from
intake manifold.
Warning:
Release fuel pressure before removing the
fuel pressure gauge.
NOTE:
If fuel pressure does not increase, squeeze fuel
return hose 2 to 3 times, then measure fuel
pressure again.Is measured value 284 — 314
kPa (2.9 — 3.2 kg/cm
2, 41 —
46 psi)?Go to step 7.Repair the follow-
ing items.
Fuel pressure is
too high:
Clogged fuel
return line or
bent hose
Fuel pressure is
too low:
Improper fuel
pump discharge
Clogged fuel
supply line
Page 1369 of 2870
FU(H4DOTC)-14
FUEL INJECTION (FUEL SYSTEM)
Intake Manifold
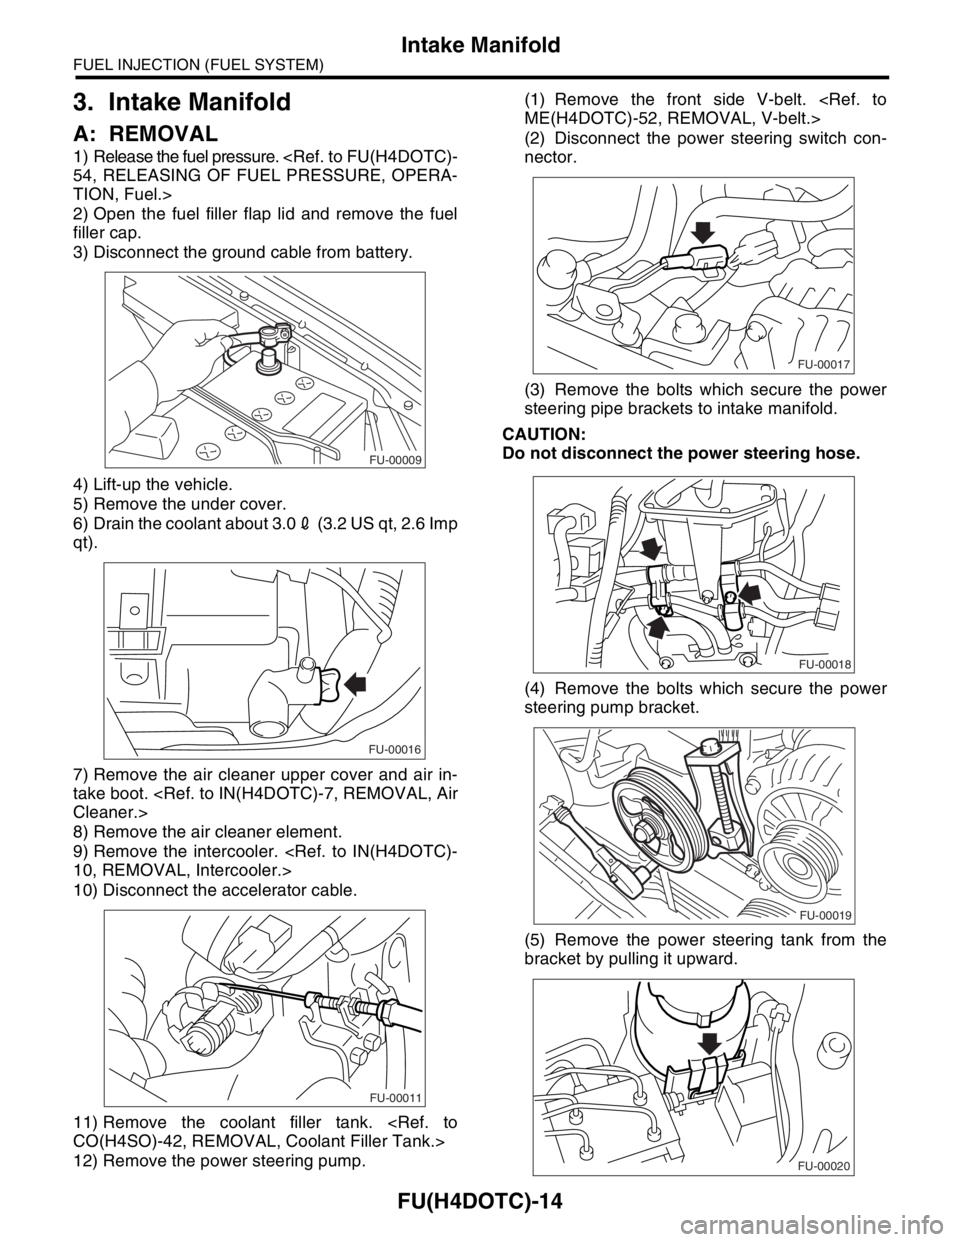
3. Intake Manifold
A: REMOVAL
1) Release the fuel pressure.
TION, Fuel.>
2) Open the fuel filler flap lid and remove the fuel
filler cap.
3) Disconnect the ground cable from battery.
4) Lift-up the vehicle.
5) Remove the under cover.
6) Drain the coolant about 3.02 (3.2 US qt, 2.6 Imp
qt).
7) Remove the air cleaner upper cover and air in-
take boot.
8) Remove the air cleaner element.
9) Remove the intercooler.
10) Disconnect the accelerator cable.
11) Remove the coolant filler tank.
12) Remove the power steering pump.(1) Remove the front side V-belt.
(2) Disconnect the power steering switch con-
nector.
(3) Remove the bolts which secure the power
steering pipe brackets to intake manifold.
CAUTION:
Do not disconnect the power steering hose.
(4) Remove the bolts which secure the power
steering pump bracket.
(5) Remove the power steering tank from the
bracket by pulling it upward.
FU-00009
FU-00016
FU-00011
FU-00017
FU-00018
FU-00019
FU-00020
Page 1393 of 2870

FU(H4DOTC)-38
FUEL INJECTION (FUEL SYSTEM)
Fuel Injector
13.Fuel Injector
A: REMOVAL
1. RH SIDE
1) Release the fuel pressure.
TION, Fuel.>
2) Open the fuel filler flap lid and remove the fuel
filler cap.
3) Disconnect the ground cable from battery.
4) Remove the intake manifold.
5) Remove the fuel pipe protector RH.
NOTE:
Bolt (A) is tightened together with ground cable.
6) Disconnect the connector from fuel injector.7) Remove the bolts which hold the injector pipe to
intake manifold.
8) Remove the fuel injector while lifting up the fuel
injector pipe.
2. LH SIDE
1) Release the fuel pressure.
TION, Fuel.>
2) Open the fuel filler flap lid and remove the fuel
filler cap.
3) Disconnect the ground cable from battery.
FU-00009
FU-00522
(A)
FU-00615
FU-00046
FU-00619
FU-00048
FU-00009
Page 1397 of 2870

FU(H4DOTC)-42
FUEL INJECTION (FUEL SYSTEM)
Tumble Generator Valve Assembly
14.Tumble Generator Valve As-
sembly
A: REMOVAL
1) Release the fuel pressure.
TION, Fuel.>
2) Open the fuel filler flap lid, and then remove the
fuel filler cap.
3) Disconnect the ground cable from battery.
4) Remove the intake manifold.
5) Disconnect the connector from tumble generator
valve sensor.
6) Disconnect the connector from tumble generator
valve actuator.
7) Remove the fuel injector.
intake manifold.
B: INSTALLATION
Install in the reverse order of removal.
NOTE:
Always use new gaskets.
Tightening torque:
8.25 N
⋅m (0.84 kgf-m, 6.1 ft-lb)
FU-00009
FU-00617
FU-00616
FU-00053
FU-00053
Page 1398 of 2870

FU(H4DOTC)-43
FUEL INJECTION (FUEL SYSTEM)
Tumble Generator Valve Actuator
15.Tumble Generator Valve Ac-
tuator
A: REMOVAL
1. RH SIDE
1) Release the fuel pressure.
SURE, OPERATION, Fuel.>
2) Open the fuel filler flap lid and remove the fuel
filler cap.
3) Disconnect the ground cable from battery.
4) Remove the intake manifold.
5) Disconnect the connector from tumble generator
valve actuator RH.
6) Remove the tumble generator valve RH.
2. LH SIDE
1) Disconnect the ground cable from battery.
2) Disconnect the connector from tumble generator
valve LH.
3) Remove the tumble generator valve actuator LH.
B: INSTALLATION
1. RH SIDE
Install in the reverse order of removal.
2. LH SIDE
Install in the reverse order of removal.
FU-00009
FU-00621
FU-00009
FU-00622
Page 1413 of 2870
FU(H4DOTC)-58
FUEL INJECTION (FUEL SYSTEM)
Fuel Filler Pipe
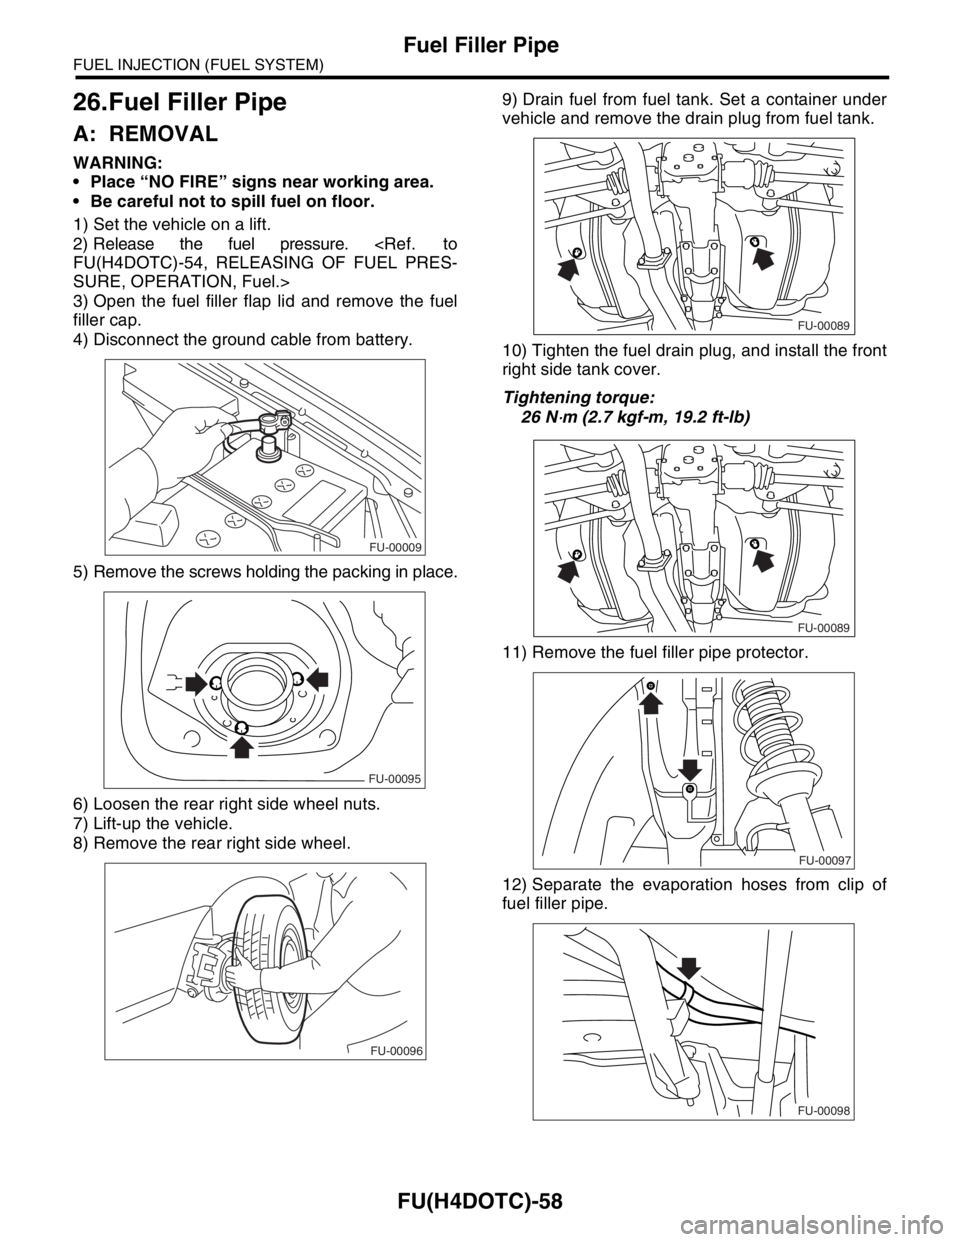
26.Fuel Filler Pipe
A: REMOVAL
WARNING:
Place “NO FIRE” signs near working area.
Be careful not to spill fuel on floor.
1) Set the vehicle on a lift.
2) Release the fuel pressure.
SURE, OPERATION, Fuel.>
3) Open the fuel filler flap lid and remove the fuel
filler cap.
4) Disconnect the ground cable from battery.
5) Remove the screws holding the packing in place.
6) Loosen the rear right side wheel nuts.
7) Lift-up the vehicle.
8) Remove the rear right side wheel.9) Drain fuel from fuel tank. Set a container under
vehicle and remove the drain plug from fuel tank.
10) Tighten the fuel drain plug, and install the front
right side tank cover.
Tightening torque:
26 N
⋅m (2.7 kgf-m, 19.2 ft-lb)
11) Remove the fuel filler pipe protector.
12) Separate the evaporation hoses from clip of
fuel filler pipe.
FU-00009
FU-00095
FU-00096
FU-00089
FU-00089
FU-00097
FU-00098
Page 1417 of 2870
FU(H4DOTC)-62
FUEL INJECTION (FUEL SYSTEM)
Fuel Pump
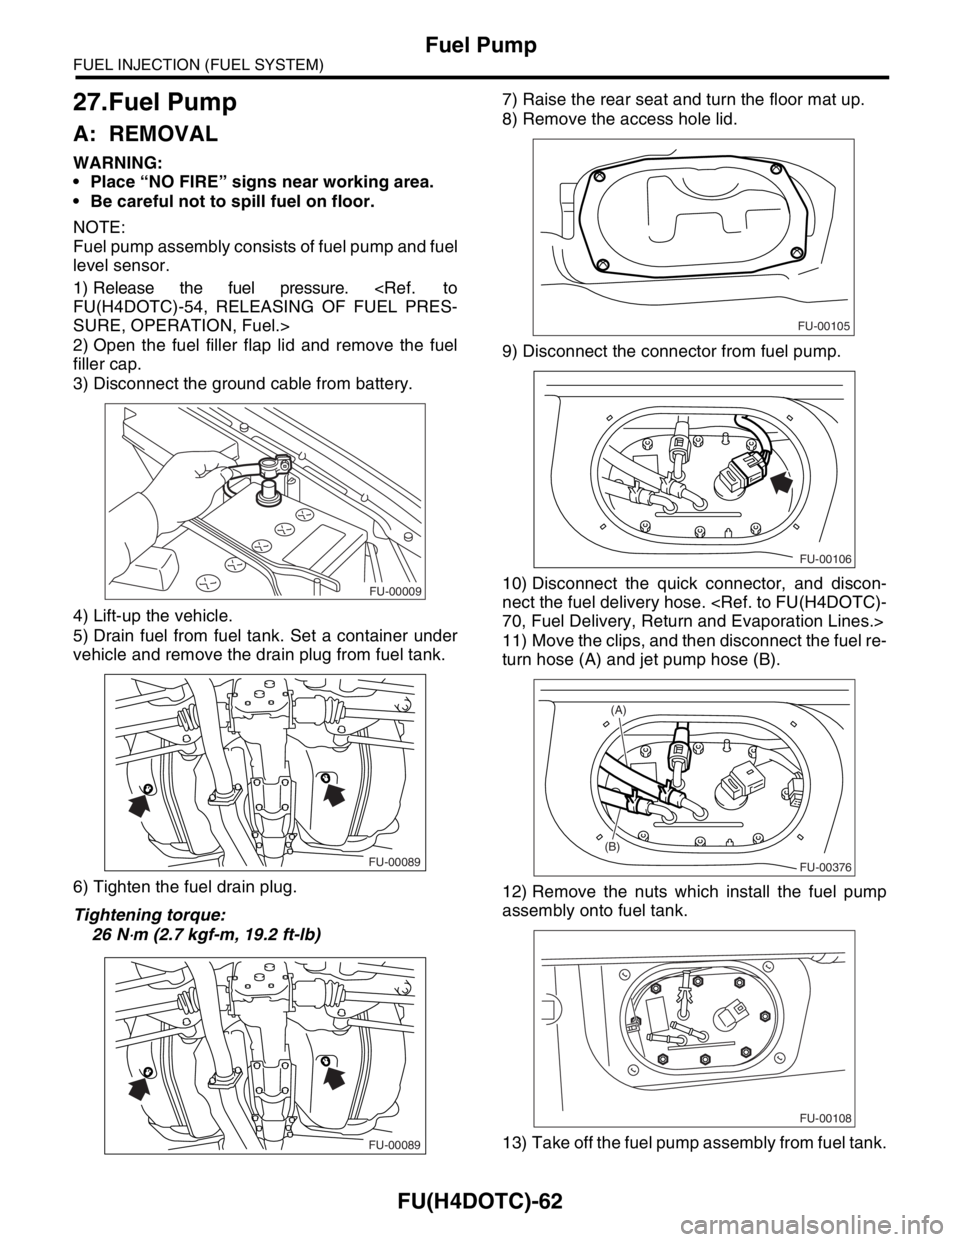
27.Fuel Pump
A: REMOVAL
WARNING:
Place “NO FIRE” signs near working area.
Be careful not to spill fuel on floor.
NOTE:
Fuel pump assembly consists of fuel pump and fuel
level sensor.
1) Release the fuel pressure.
SURE, OPERATION, Fuel.>
2) Open the fuel filler flap lid and remove the fuel
filler cap.
3) Disconnect the ground cable from battery.
4) Lift-up the vehicle.
5) Drain fuel from fuel tank. Set a container under
vehicle and remove the drain plug from fuel tank.
6) Tighten the fuel drain plug.
Tightening torque:
26 N
⋅m (2.7 kgf-m, 19.2 ft-lb)7) Raise the rear seat and turn the floor mat up.
8) Remove the access hole lid.
9) Disconnect the connector from fuel pump.
10) Disconnect the quick connector, and discon-
nect the fuel delivery hose.
11) Move the clips, and then disconnect the fuel re-
turn hose (A) and jet pump hose (B).
12) Remove the nuts which install the fuel pump
assembly onto fuel tank.
13) Take off the fuel pump assembly from fuel tank.
FU-00009
FU-00089
FU-00089
FU-00105
FU-00106
FU-00376
(B)
(A)
FU-00108
Page 1425 of 2870

FU(H4DOTC)-70
FUEL INJECTION (FUEL SYSTEM)
Fuel Delivery, Return and Evaporation Lines
33.Fuel Delivery, Return and Evaporation Lines
A: REMOVAL
1) Set the vehicle on a lift.
2) Release the fuel pressure.
3) Open the fuel filler flap lid and remove the fuel filler cap.
4) Remove the floor mat.
5) Remove the fuel delivery pipes and hoses, fuel return pipes and hoses, evaporation pipes and hoses.
6) In the engine compartment, detach the fuel de-
livery hoses (A), return hoses (B) and evaporation
hoses (C).
7) Lift-up the vehicle.8) Disconnect the two-way valve hose (A) from
two-way valve and disconnect the canister hose (B)
from canister.
FU-00122
(B) (A)
(C)
FU-00374
(A)(B)
FU-00091
Page 1492 of 2870
ME(H4DOTC)-36
MECHANICAL
Fuel Pressure
7. Fuel Pressure
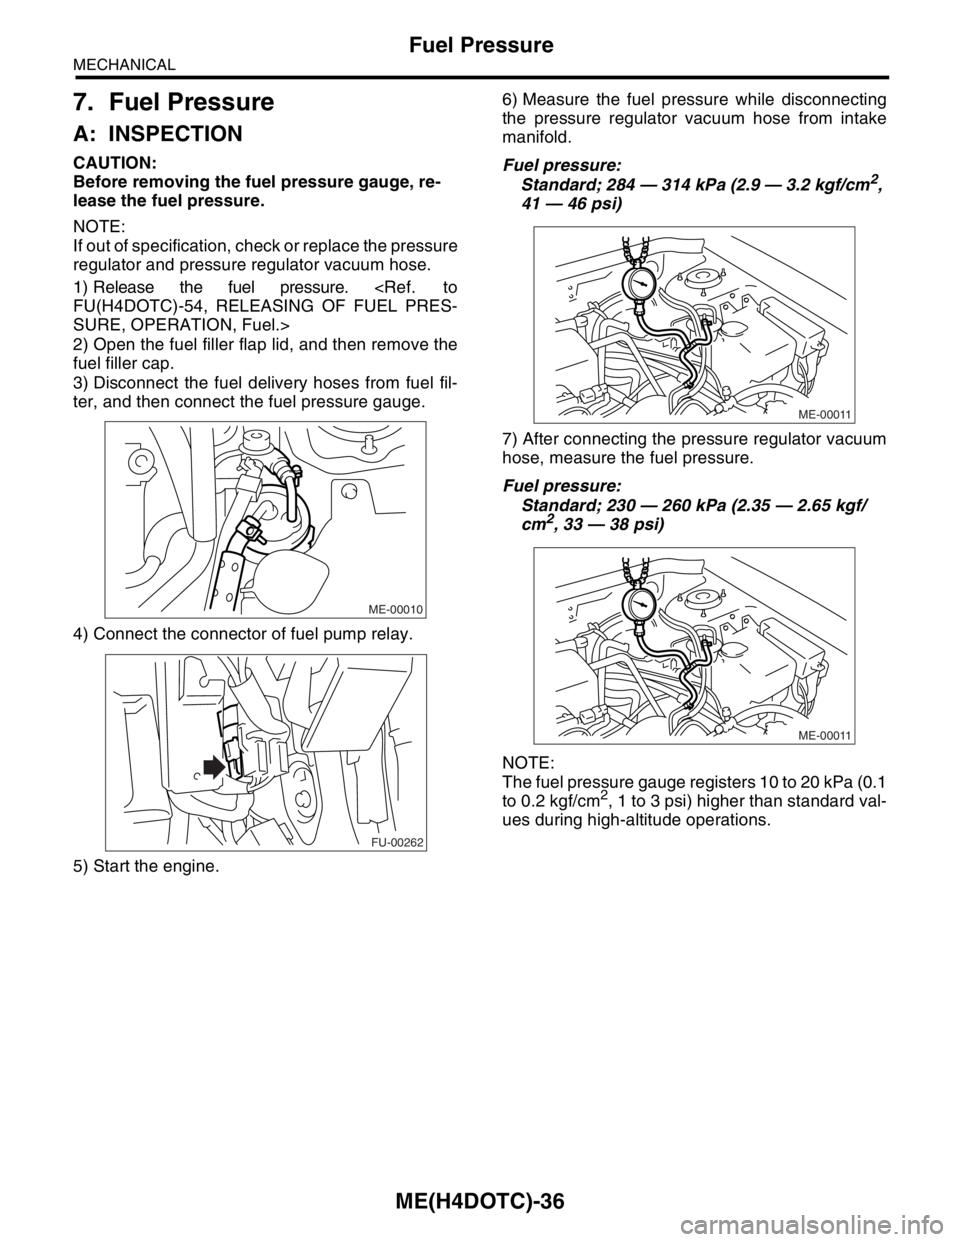
A: INSPECTION
CAUTION:
Before removing the fuel pressure gauge, re-
lease the fuel pressure.
NOTE:
If out of specification, check or replace the pressure
regulator and pressure regulator vacuum hose.
1) Release the fuel pressure.
SURE, OPERATION, Fuel.>
2) Open the fuel filler flap lid, and then remove the
fuel filler cap.
3) Disconnect the fuel delivery hoses from fuel fil-
ter, and then connect the fuel pressure gauge.
4) Connect the connector of fuel pump relay.
5) Start the engine.6) Measure the fuel pressure while disconnecting
the pressure regulator vacuum hose from intake
manifold.
Fuel pressure:
Standard; 284 — 314 kPa (2.9 — 3.2 kgf/cm2,
41 — 46 psi)
7) After connecting the pressure regulator vacuum
hose, measure the fuel pressure.
Fuel pressure:
Standard; 230 — 260 kPa (2.35 — 2.65 kgf/
cm
2, 33 — 38 psi)
NOTE:
The fuel pressure gauge registers 10 to 20 kPa (0.1
to 0.2 kgf/cm
2, 1 to 3 psi) higher than standard val-
ues during high-altitude operations.
ME-00010
FU-00262
ME-00011
ME-00011
Page 1499 of 2870
ME(H4DOTC)-41
MECHANICAL
Engine Assembly
9. Engine Assembly
A: REMOVAL
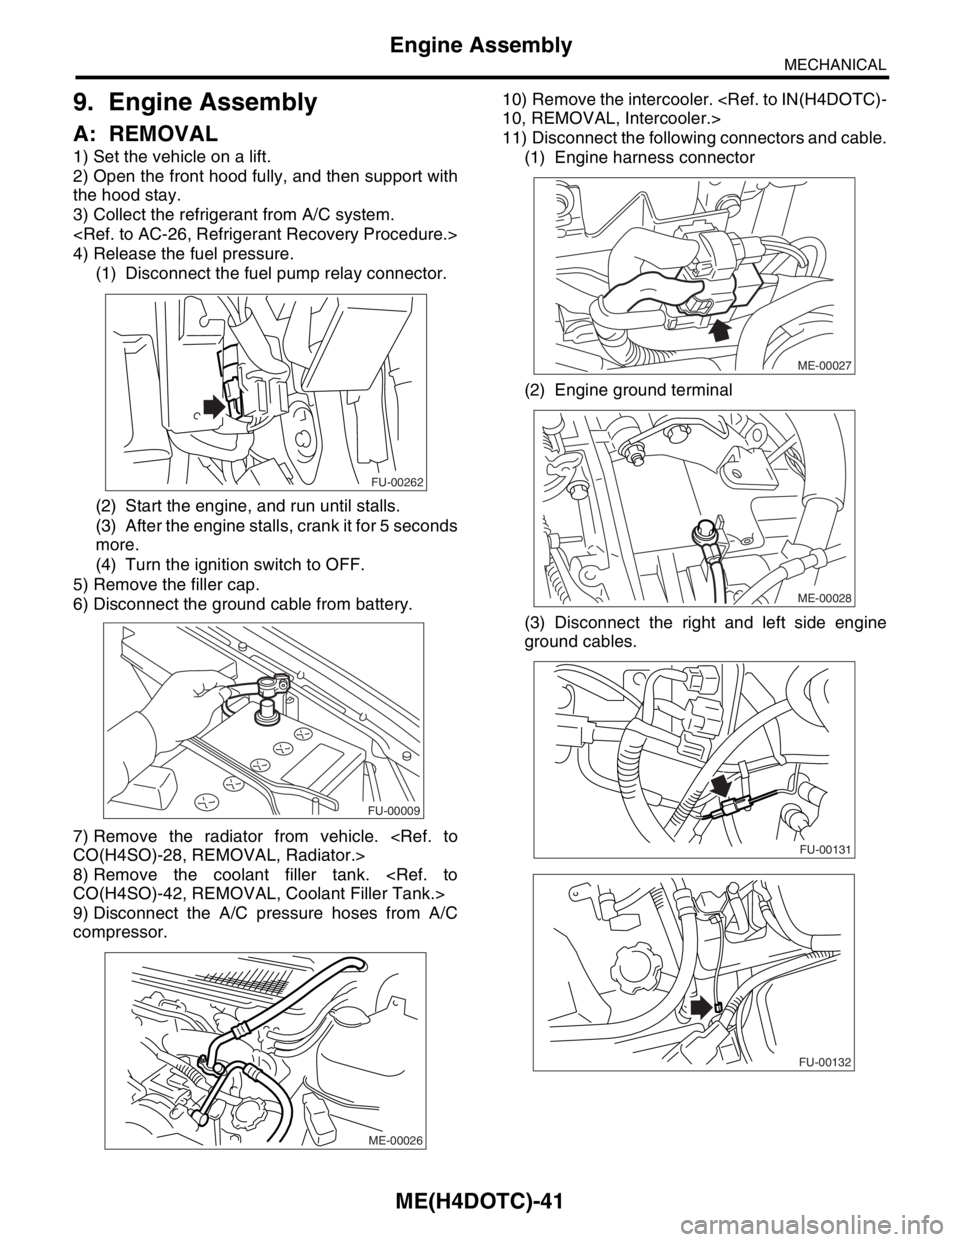
1) Set the vehicle on a lift.
2) Open the front hood fully, and then support with
the hood stay.
3) Collect the refrigerant from A/C system.
4) Release the fuel pressure.
(1) Disconnect the fuel pump relay connector.
(2) Start the engine, and run until stalls.
(3) After the engine stalls, crank it for 5 seconds
more.
(4) Turn the ignition switch to OFF.
5) Remove the filler cap.
6) Disconnect the ground cable from battery.
7) Remove the radiator from vehicle.
8) Remove the coolant filler tank.
9) Disconnect the A/C pressure hoses from A/C
compressor.10) Remove the intercooler.
11) Disconnect the following connectors and cable.
(1) Engine harness connector
(2) Engine ground terminal
(3) Disconnect the right and left side engine
ground cables.
FU-00262
FU-00009
ME-00026
ME-00027
ME-00028
FU-00131
FU-00132