check engine SUBARU FORESTER 2004 Service Repair Manual
[x] Cancel search | Manufacturer: SUBARU, Model Year: 2004, Model line: FORESTER, Model: SUBARU FORESTER 2004Pages: 2870, PDF Size: 38.67 MB
Page 22 of 2870

AC-20
HVAC SYSTEM (HEATER, VENTILATOR AND A/C)
General Description
C: CAUTION
1. HFC-134a A/C SYSTEM
The cooling system components for the HFC-
134a system such as the refrigerant and compres-
sor oil are different from the old conventional HFC-
12 system components and they are incompatible
with each other.
Vehicles with the HFC-134a system can be iden-
tified by the label (A) attached to the vehicle.
Before maintenance, check which A/C system is in-
stalled in the vehicle.
2. COMPRESSOR OIL
HFC-134a compressor oil has no compatibility
with that for R12 system.
Use only the manufacturer-authorized compres-
sor oil for the HFC-134a system; only use
ZXL200PG.
Do not mix multiple compressor oils.
If HFC-12 compressor oil is used in a HFC-134a A/
C system, the compressor may become stuck due
to poor lubrication, or the refrigerant may leak due
to swelling of rubber parts.
On the other hand, if HFC-134a compressor oil is
used in a HFC-12 A/C system, the durability of the
A/C system will be lowered.
HFC-134a compressor oil is very hygroscopic.
When replacing or installing/removing A/C parts,
immediately isolate the oil from the atmosphere us-
ing a plug or tape. In order to avoid moisture, store
the oil in a container with its cap securely closed.
3. REFRIGERANT
The HFC-12 refrigerant cannot be used in the
HFC-134a A/C system. The HFC-134a refrigerant,
also, cannot be used in the HFC-12 A/C system.
If an incorrect or no refrigerant is used, poor lu-
brication will result and the compressor itself may
be damaged.
4. HANDLING OF REFRIGERANT
The refrigerant boils at approx. −30°C (−22°F).
When handling it, be sure to wear safety goggles
and protective gloves. Direct contact of the refriger-
ant with skin may cause frostbite.
If the refrigerant gets into your eye, avoid rubbing
your eyes with your hands. Wash your eye with
plenty of water, and receive medical treatment from
an eye doctor.
Do not heat a service can. If a service can is di-
rectly heated, or put into boiling water, the inside
pressure will become extremely high. This may
cause the can to explode. If a service can must be
warmed up, use hot water in 40°C (104°F) max.
Do not drop or impact a service can. (Observe
the precautions and operation procedure described
on the refrigerant can.)
When the engine is running, do not open the
high-pressure valve of the manifold gauge. The
high-pressure gas will back-flow resulting in an ex-
plosion of the can.
Provide good ventilation and do not work in a
closed area.
In order to prevent global warming, avoid releas-
ing HFC-134a into the atmosphere. Using a refrig-
erant recovery system, discharge and reuse it.
AC-00006
(A)
(A) Goggles
(B) Gloves
(C) Avoid open flame
(D) No direct heat on container
(E) Do not discharge
(F) Loosen
(A)
(B)
(C) (D)
(E) (F)
AC-00007
Page 27 of 2870

AC-25
HVAC SYSTEM (HEATER, VENTILATOR AND A/C)
Refrigerant Pressure with Manifold Gauge Set
2. Refrigerant Pressure with Manifold Gauge Set
A: OPERATION
1) Place the vehicle in the shade and draftless condition.
2) Connect the manifold gauge set.
3) Open the front windows and close all doors.
4) Open the hood.
5) Increase the engine speed to 1,500 rpm.
6) Turn ON the A/C switch.
7) Turn the temperature control dial to MAX COOL.
8) Set the air inlet select switch to RECIRC position.
9) Turn the fan dial to HI.
10) Read the gauge.
Standard:
Low pressure: 127 — 196 kPa (1.3 — 2.0 kg/cm
2, 18 — 28 psi)
High pressure: 1,471 — 1, 667 kPa (15 — 17 kg/cm2, 213 — 242 psi)
Ambient temperature: 30 — 35
°C (86 — 95°F)
B: INSPECTION
Symptom Probable cause Repair order
High-pressure side is unusually high. Defective condenser fan motor
Clogged condenser fin
Too much refrigerant
Air inside the system
Defective receiver dryer Replace the fan motor.
Clean the condenser fin.
Discharge refrigerant.
Replace the receiver dryer.
After reevacuating the receiver dryer,
charge appropriate amount of refriger-
ant.
High-pressure side is unusually low. Defective compressor
Not enough refrigerant
Clogged expansion valve
Expansion valve frozen temporarily by
moisture Replace the compressor.
Check for leaks.
Replace the expansion valve.
Fully evacuate the expansion valve.
Low-pressure side is unusually high. Defective compressor
Defective expansion valve
Too much refrigerant Replace the compressor.
Replace the expansion valve.
Discharge refrigerant.
Low-pressure side is unusually low. Not enough refrigerant
Clogged expansion valve
Expansion valve frozen temporarily by
moisture
Saturated receiver dryer Check for leaks.
Replace the expansion valve.
Replace the receiver dryer.
Page 30 of 2870
AC-28
HVAC SYSTEM (HEATER, VENTILATOR AND A/C)
Refrigerant Charging Procedure
6) Leave it at least 5 to 10 minutes after closing the
valves on low-/high-pressure sides, and then check
the low-pressure gauge reading for any changes.
When the gauge reading changes, this is a sign of
leakage. Check the pipe or hose connector points,
and repair if necessary. Repeat the procedure from
1) after repairing the faulty part.
7) If there are no leaks, further evacuate the sys-
tem 20 to 30 minutes.
8) Close all valves and stop the vacuum pump.
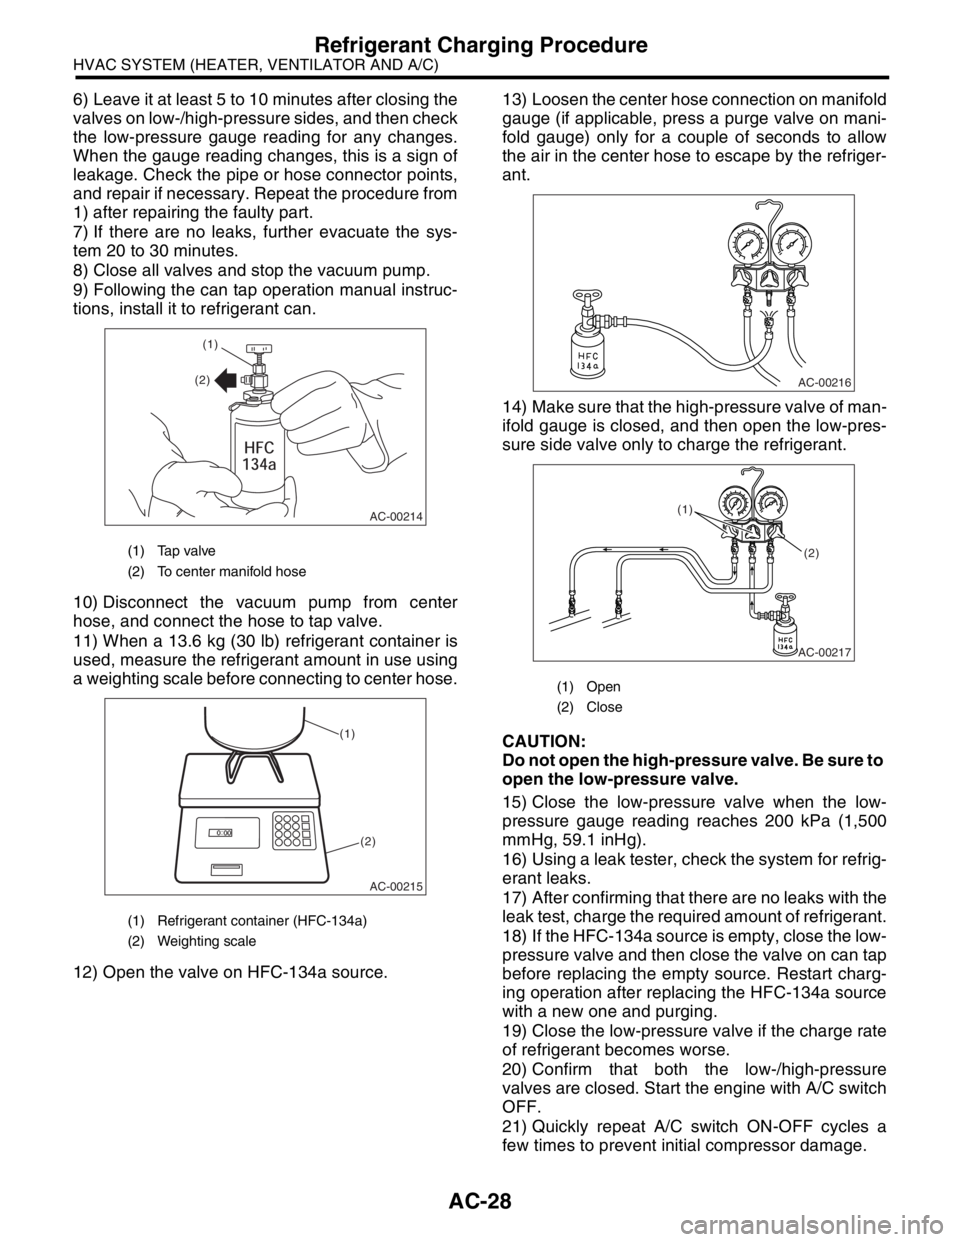
9) Following the can tap operation manual instruc-
tions, install it to refrigerant can.
10) Disconnect the vacuum pump from center
hose, and connect the hose to tap valve.
11) When a 13.6 kg (30 lb) refrigerant container is
used, measure the refrigerant amount in use using
a weighting scale before connecting to center hose.
12) Open the valve on HFC-134a source.13) Loosen the center hose connection on manifold
gauge (if applicable, press a purge valve on mani-
fold gauge) only for a couple of seconds to allow
the air in the center hose to escape by the refriger-
ant.
14) Make sure that the high-pressure valve of man-
ifold gauge is closed, and then open the low-pres-
sure side valve only to charge the refrigerant.
CAUTION:
Do not open the high-pressure valve. Be sure to
open the low-pressure valve.
15) Close the low-pressure valve when the low-
pressure gauge reading reaches 200 kPa (1,500
mmHg, 59.1 inHg).
16) Using a leak tester, check the system for refrig-
erant leaks.
17) After confirming that there are no leaks with the
leak test, charge the required amount of refrigerant.
18) If the HFC-134a source is empty, close the low-
pressure valve and then close the valve on can tap
before replacing the empty source. Restart charg-
ing operation after replacing the HFC-134a source
with a new one and purging.
19) Close the low-pressure valve if the charge rate
of refrigerant becomes worse.
20) Confirm that both the low-/high-pressure
valves are closed. Start the engine with A/C switch
OFF.
21) Quickly repeat A/C switch ON-OFF cycles a
few times to prevent initial compressor damage.
(1) Tap valve
(2) To center manifold hose
(1) Refrigerant container (HFC-134a)
(2) Weighting scale
AC-00214
(1)
(2)
AC-00215
(1)
(2)
(1) Open
(2) Close
AC-00216
AC-00217
(1)
(2)
Page 32 of 2870
AC-30
HVAC SYSTEM (HEATER, VENTILATOR AND A/C)
Refrigerant Leak Check
5. Refrigerant Leak Check
A: INSPECTION
1) Operate the A/C system for approx. 10 minutes,
and confirm that the high-pressure side shows at
least 690 kPa (7.03 kg/cm
2, 100 psi). Then stop the
engine to start the leak test.
2) Starting from the connection between the high-
pressure pipe and evaporator, check the system for
leaks along the high-pressure side through the
compressor. The following items must be checked
thoroughly.
3) Check the joint and seam between the pressure
switch (triple pressure switch) and high-pressure
pipe.
4) Check the connections between the condenser
and pipes, and welded joints on the condenser.
The leak tester may detect the oil on the condenser
fins as a leak.
5) Check the joint between the compressor and
hoses.
6) Check the machined area of compressor and
other joints on the compressor.
7) Check the compressor shaft seal at the area
near the center of compressor clutch pulley.
Some shaft seals show a slight amount of leakage
about 28 g (1.0 oz) per year. This is not a problem.
8) Starting from the connection between the low-
pressure pipe and evaporator, check the system for
leakage along the low-pressure side through the
compressor. The following items must be checked
thoroughly.
Connection between two parts
Connection between the pipe and plate
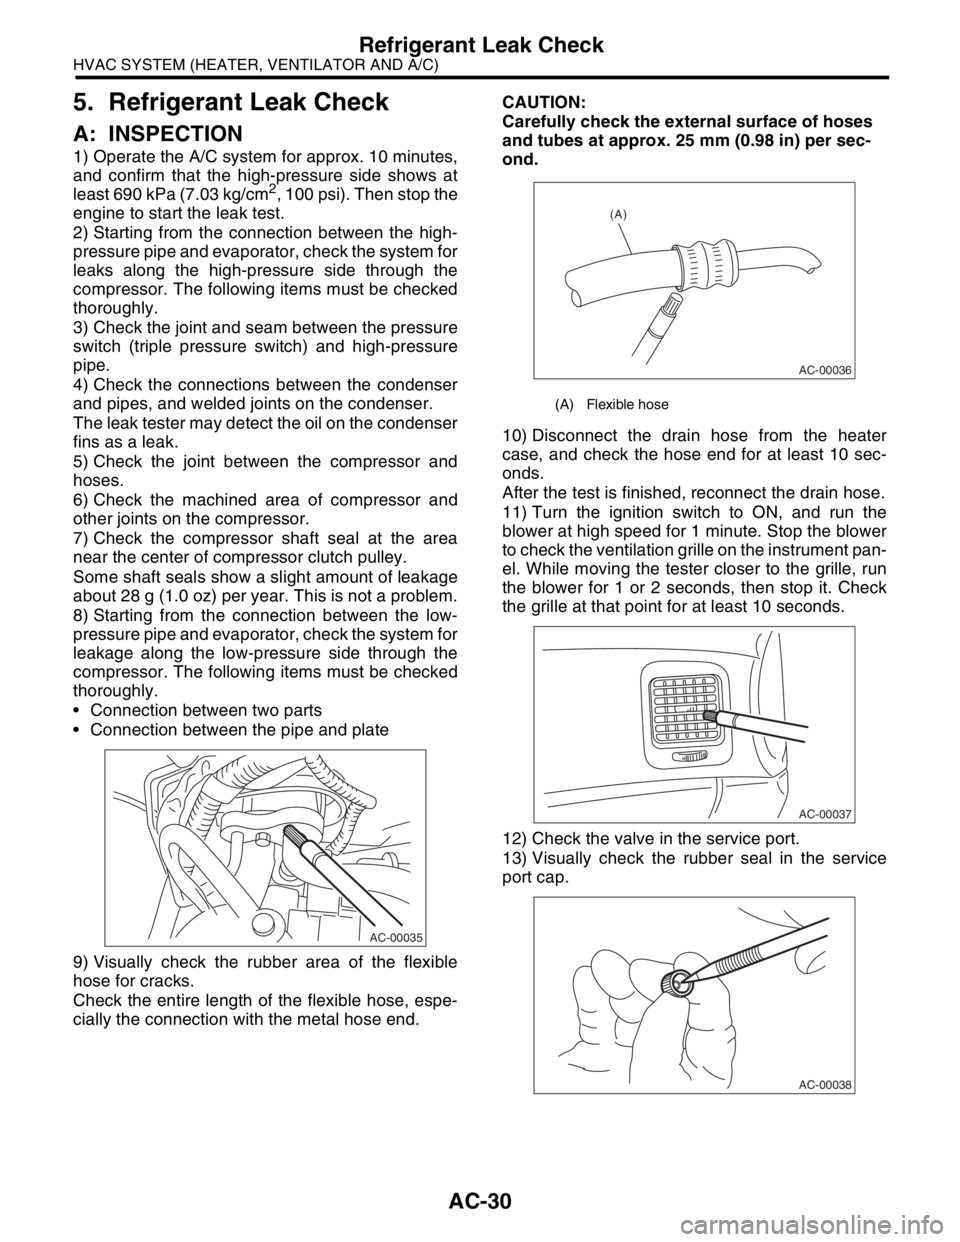
9) Visually check the rubber area of the flexible
hose for cracks.
Check the entire length of the flexible hose, espe-
cially the connection with the metal hose end.CAUTION:
Carefully check the external surface of hoses
and tubes at approx. 25 mm (0.98 in) per sec-
ond.
10) Disconnect the drain hose from the heater
case, and check the hose end for at least 10 sec-
onds.
After the test is finished, reconnect the drain hose.
11) Turn the ignition switch to ON, and run the
blower at high speed for 1 minute. Stop the blower
to check the ventilation grille on the instrument pan-
el. While moving the tester closer to the grille, run
the blower for 1 or 2 seconds, then stop it. Check
the grille at that point for at least 10 seconds.
12) Check the valve in the service port.
13) Visually check the rubber seal in the service
port cap.
AC-00035
(A) Flexible hose
AC-00036
(A)
AC-00037
AC-00038
Page 38 of 2870
AC-36
HVAC SYSTEM (HEATER, VENTILATOR AND A/C)
Compressor
11.Compressor
A: INSPECTION
1. MAGNETIC CLUTCH CLEARANCE
1) Check the clearance of the entire circumference
around the drive plate and pulley.
Standard:
0.3 — 0.6 mm (0.0118 — 0.0236 in)
2. MAGNETIC CLUTCH OPERATION
1) Disconnect the compressor connector.
2) Connect the battery positive (+) terminal to the
No. 3 terminal of the compressor connector.
3) Make sure the magnet clutch engages.
If NG, replace the compressor.
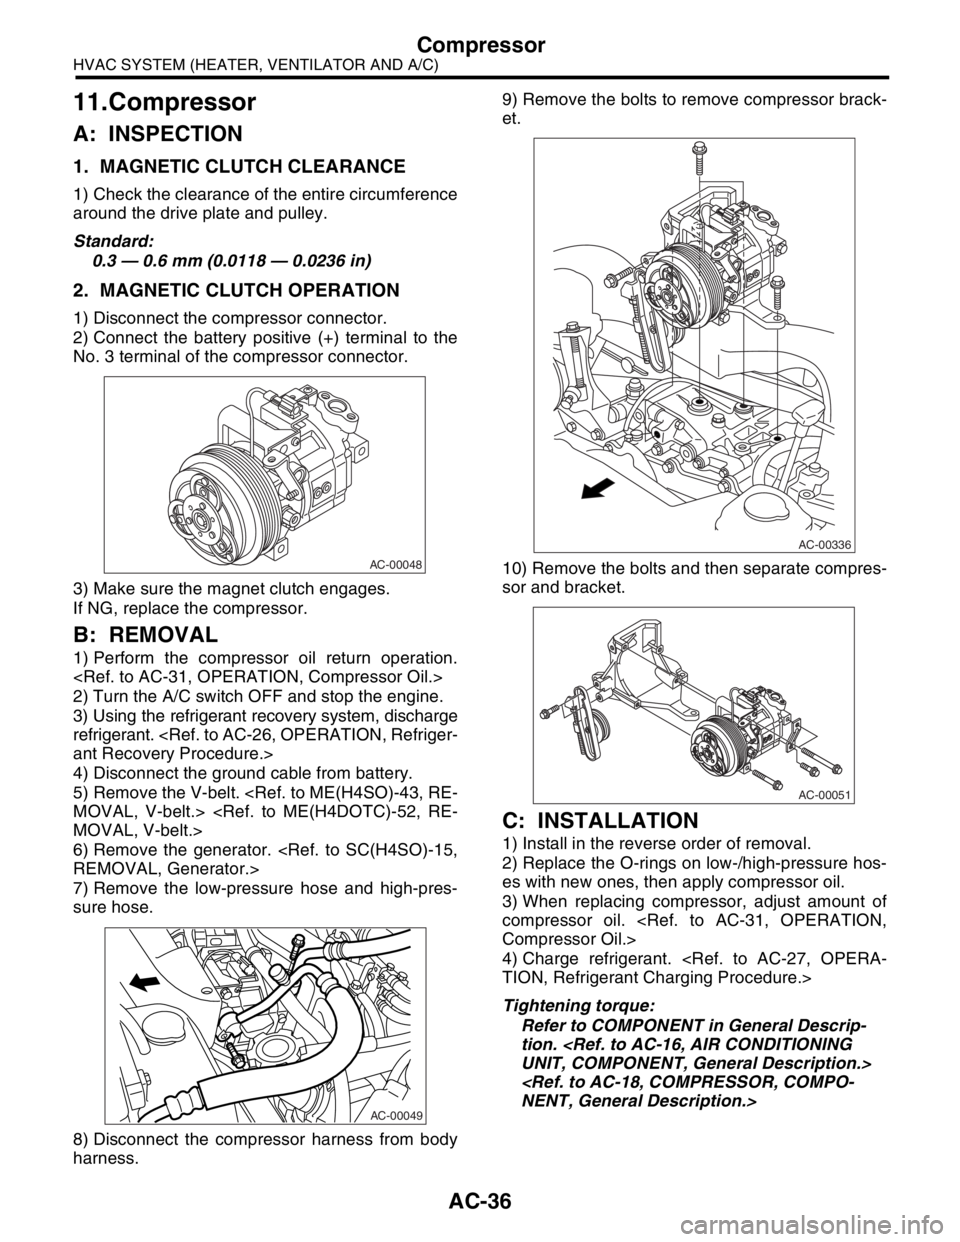
B: REMOVAL
1) Perform the compressor oil return operation.
2) Turn the A/C switch OFF and stop the engine.
3) Using the refrigerant recovery system, discharge
refrigerant.
4) Disconnect the ground cable from battery.
5) Remove the V-belt.
6) Remove the generator.
7) Remove the low-pressure hose and high-pres-
sure hose.
8) Disconnect the compressor harness from body
harness.9) Remove the bolts to remove compressor brack-
et.
10) Remove the bolts and then separate compres-
sor and bracket.
C: INSTALLATION
1) Install in the reverse order of removal.
2) Replace the O-rings on low-/high-pressure hos-
es with new ones, then apply compressor oil.
3) When replacing compressor, adjust amount of
compressor oil.
4) Charge refrigerant.
Tightening torque:
Refer to COMPONENT in General Descrip-
tion.
AC-00048
AC-00049
AC-00336
AC-00051
Page 51 of 2870
AC-49
HVAC SYSTEM (HEATER, VENTILATOR AND A/C)
Heater Cock Solenoid Valve
24.Heater Cock Solenoid Valve
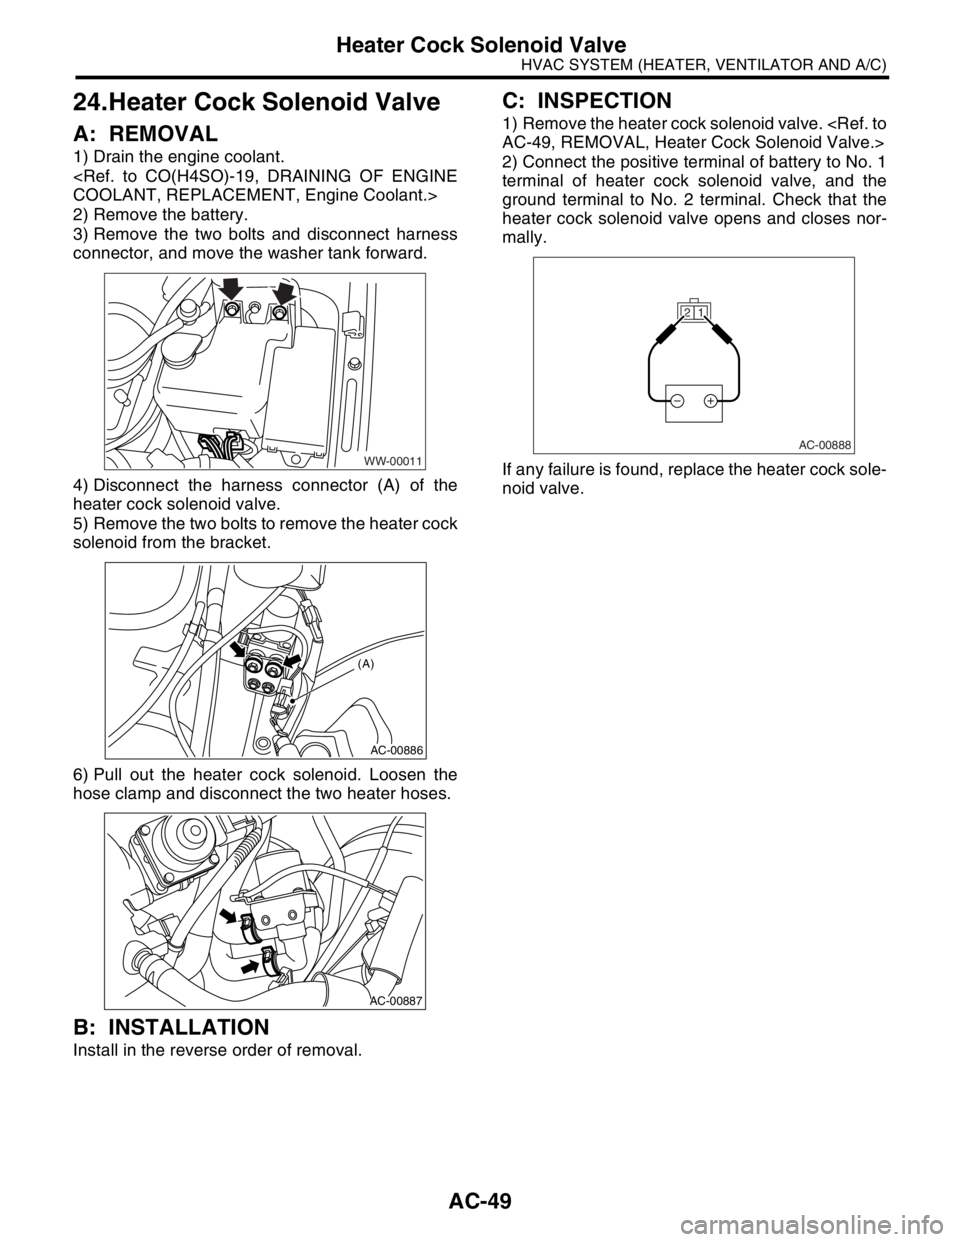
A: REMOVAL
1) Drain the engine coolant.
2) Remove the battery.
3) Remove the two bolts and disconnect harness
connector, and move the washer tank forward.
4) Disconnect the harness connector (A) of the
heater cock solenoid valve.
5) Remove the two bolts to remove the heater cock
solenoid from the bracket.
6) Pull out the heater cock solenoid. Loosen the
hose clamp and disconnect the two heater hoses.
B: INSTALLATION
Install in the reverse order of removal.
C: INSPECTION
1) Remove the heater cock solenoid valve.
2) Connect the positive terminal of battery to No. 1
terminal of heater cock solenoid valve, and the
ground terminal to No. 2 terminal. Check that the
heater cock solenoid valve opens and closes nor-
mally.
If any failure is found, replace the heater cock sole-
noid valve.
WW-00011
AC-00886
(A)
AC-00887
1 2
AC-00888
Page 59 of 2870
AC-3
HVAC SYSTEM (AUTO A/C)(DIAGNOSTIC)
General Description
2. General Description
A: CAUTION
1) Never connect the battery in reverse polarity.
Auto A/C control module may be destroyed instant-
ly.
2) Do not disconnect the battery terminals while the
engine is running.
A large counter electromotive force will be generat-
ed in the generator, and this voltage may damage
electronic parts such as auto A/C control module,
etc.
3) Before disconnecting the connectors of each
sensor and the auto A/C control module, be sure to
turn off the ignition switch.
Auto A/C control module may be damaged.
4) Every A/C-related part is a precision part. Do not
drop them.
5) Airbag system wiring harness is routed near the
A/C control panel (auto A/C control module) and
junction box.
CAUTION:
For airbag system, yellow-colored wiring har-
ness and connectors are all used. Do not use
the electrical test equipment on these circuits.
Be careful not to damage the airbag system
wiring harness when servicing the A/C control
panel (auto A/C control module) and junction
box.
B: INSPECTION
Before performing the diagnosis, check the follow-
ing items which might affect A/C system problems.
1. BATTERY
1) Measure battery voltage and specific gravity of
electrolyte.
Standard voltage: 12 V
Specific gravity: More than 1.260
2) Check the condition of the fuses for A/C system
power supply and other fuses.
3) Check the condition of harness and harness
connector connections.
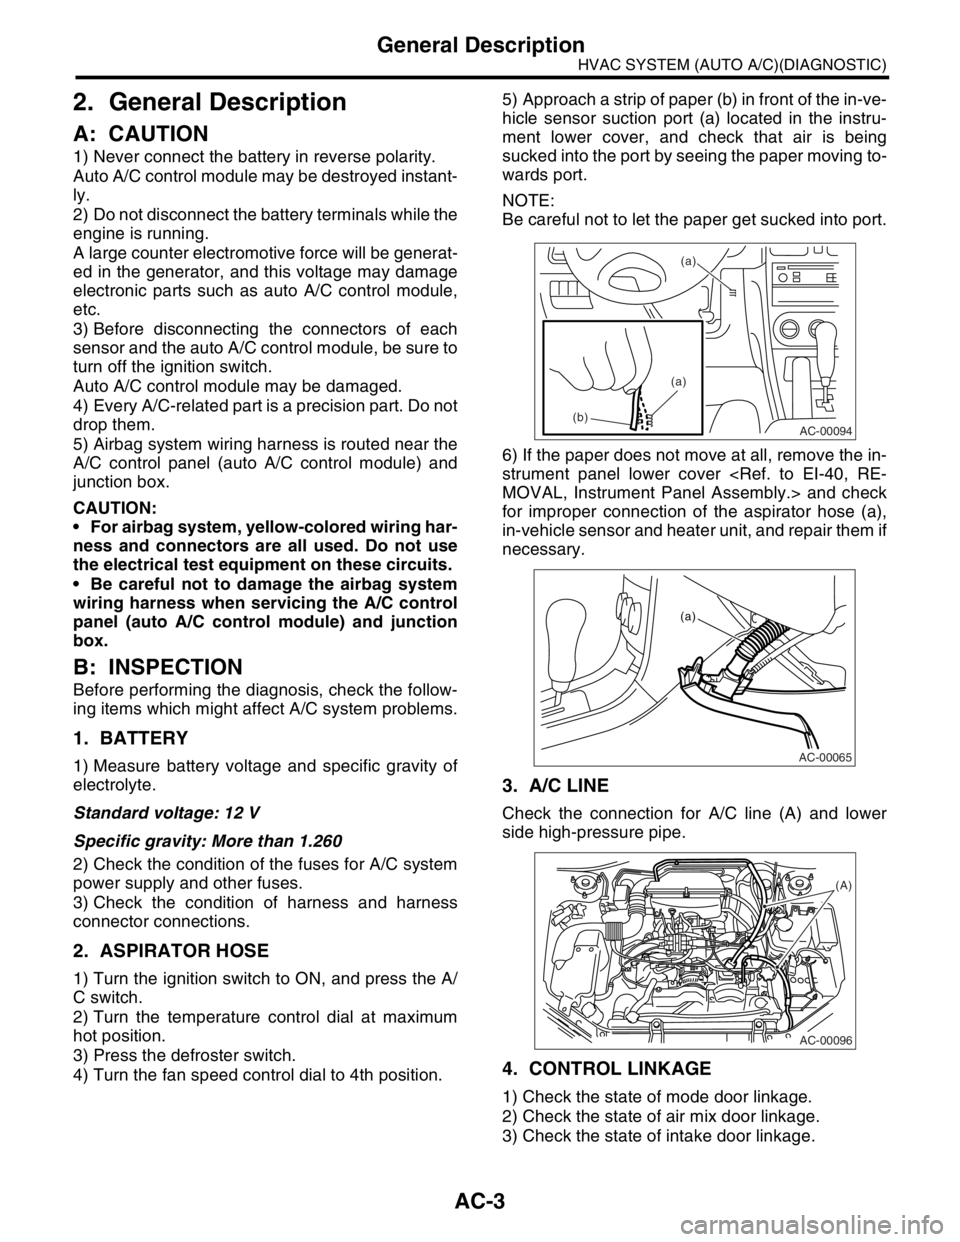
2. ASPIRATOR HOSE
1) Turn the ignition switch to ON, and press the A/
C switch.
2) Turn the temperature control dial at maximum
hot position.
3) Press the defroster switch.
4) Turn the fan speed control dial to 4th position.5) Approach a strip of paper (b) in front of the in-ve-
hicle sensor suction port (a) located in the instru-
ment lower cover, and check that air is being
sucked into the port by seeing the paper moving to-
wards port.
NOTE:
Be careful not to let the paper get sucked into port.
6) If the paper does not move at all, remove the in-
strument panel lower cover
for improper connection of the aspirator hose (a),
in-vehicle sensor and heater unit, and repair them if
necessary.
3. A/C LINE
Check the connection for A/C line (A) and lower
side high-pressure pipe.
4. CONTROL LINKAGE
1) Check the state of mode door linkage.
2) Check the state of air mix door linkage.
3) Check the state of intake door linkage.
AC-00094
(a)
(a)
(b)
AC-00065
(a)
AC-00096
(A)
Page 60 of 2870

AC-4
HVAC SYSTEM (AUTO A/C)(DIAGNOSTIC)
General Description
5. CONTROL SWITCHES
Start and warm-up the engine completely.
1) Inspection using switches
2) Compressor operation inspection
3) Inspection of illumination control
No. Point to check Switch operation Judgment standard
1 Fan speed control dial Turn the fan speed control dial clockwise.Fan speed changes 1st → 2nd → 3rd → 4th
as dial turn.
2AUTO switch1) Press the AUTO switch.
2) Turn the temperature control dial to the left
fully, and set maximum cool position. Outlet air temperature: COOL
Fan speed: 4th
Outlet opening: VENT
Inlet opening: RECIRC
Compressor: AUTO
3) Turn the temperature control dial to the right
slowly, and change the setting from maximum
cool position to maximum hot position gradually. Outlet air temperature: COOL → HOT
Fan speed: AUTO
Outlet opening: AUTO
Inlet opening: AUTO
Compressor: AUTO
4) Turn the temperature control dial to the right
fully, and set maximum hot position. Outlet air temperature: HOT
Fan speed: 4th
Outlet opening: HEAT
Inlet opening: FRESH
Compressor: AUTO
3 Defroster switch Press the defroster switch. Outlet air temperature: AUTO
Fan speed: AUTO
Outlet opening: DEF
Inlet opening: FRESH
Compressor: ON
4FRESH/RECIRC
switchPress the FRESH/RECIRC switch.Inlet opening switches RECIRC → FRESH or
FRESH → RECIRC each time pressing the
switch.
5 Mode control dial Press the mode control dial.Outlet opening switches VENT → BI-LEVEL
→ HEAT → DEF/HEAT each time dialing
clockwise.
No. Point to check Switch operation Judgment standard
1 Compressor1) A/C switch is turned to ON.
2) Turn the fan speed control clockwise.Compressor: ON
No. Point to check Switch operation Judgment standard
1 Illumination1) Turn the lighting switch to ON. Illumination comes on.
2) Press the OFF switch one second or more. Illumination dimming is cancelled.
Page 66 of 2870

AC-10
HVAC SYSTEM (AUTO A/C)(DIAGNOSTIC)
Diagnostic Chart for Self-Diagnosis
Step Check Yes No
1 SELECT CONTROL PANEL TO SELF-DIAG-
NOSIS MODE.
1) Turn the ignition switch to OFF.
2) Start the engine while pressing defroster
switch and A/C switch.
N
OTE:
Self-diagnosis can also be performed with the
ignition switch ON, but start the engine be-
cause telling the magnet clutch operation is dif-
ficult.
3) The LED in A/C control panel blinks.Does the self-diagnosis mode
operate?Go to step 2.
NOSIS SYS-
TEMS DO NOT
OPERATE, Diag-
nostics for A/C
System Malfunc-
tion.>
2 CHECK LED ILLUMINATION.
Make sure that three LED blink in turn on A/C
control panel (5 patterns are repeated 2 times).Do all LED blink? Go to step 3.Go to step 5.
3 CHECK SENSORS MALFUNCTION.
1) After completing the LED check or when
AUTO switch is pressed, the A/C switch LED
illuminates, and then the sensor check is
started.
2) Check the input signal of each sensor in
turn. If there are any trouble for each sensor,
DEF, MODE and fan speed LEDs are blinked.
Also check for each sensor is possible respec-
tively every time AUTO switch is pressed. (At
this time, the AUTO switch LED illuminates.)
3) If there is no trouble, DEF, MODE and fan
speed LEDs are turned off.
N
OTE:
Rear window defogger LED illuminates in case
of stored malfunction but does not illuminate in
case of present malfunction.Does each DEF, MODE and
fan speed LED turn off?Go to step 4.Confirm the com-
bination of illumi-
nating LEDs by
using Sensor
Check Table, and
identify the mal-
functioning sensor
before repairing.
TABLE, OPERA-
TION, Diagnostic
Chart for Self-
Diagnosis.>
4 CHECK OPERATION OF EACH ACTUATOR,
COMPRESSOR AND FAN MOTOR.
1) Press the FRESH/RECIRC switch
(FRESH/RECIRC switch LED illuminates at
this time.).
2) Refer to OPERATING MODE TABLE to
check the operation of each actuator, compres-
sor and fan motor.
Chart for Self-Diagnosis.>
Also check for each step is possible respec-
tively every time AUTO switch pressed. (At this
time, the AUTO switch LED illuminates.)Does each actuator, compres-
sor and fan motor operate
according to operating mode
table?Press the OFF
switch or turn the
ignition switch to
OFF and finish the
self-diagnosis
mode.Refer to each
diagnostics chart
for actuator, com-
pressor and fan
motor, and repair
the malfunctioning
par t as necessary.
C System Mal-
function.>
Procedure for
Actuators.>
5 CHECK POOR CONTACT.
Check the auto A/C control module connector
for poor contact.Is there a poor contact in con-
nector?Replace the auto
A/C control mod-
ule.Repair the con-
nector.
Page 74 of 2870

AC-18
HVAC SYSTEM (AUTO A/C)(DIAGNOSTIC)
Diagnostics for A/C System Malfunction
Step Check Yes No
1 CHECK FUSE.
1) Turn the ignition switch to OFF.
2) Remove the main fan fuse and sub fan fuse
in main fuse box.
3) Check the condition of fuse.Is the fuse blown out? Replace the fuse. Go to step 2.
2 CHECK THE POWER SUPPLY TO PRES-
SURE SWITCH.
1) Disconnect the connector from pressure
switch.
2) Turn the ignition switch to ON.
3) Measure the voltage between harness con-
nector and chassis ground.
Connector & terminal
(F79) No. 1 (+) — Chassis ground (
−):Is the voltage more than 10 V? Go to step 3.Repair the har-
ness for pressure
switch power sup-
ply circuit.
3 CHECK THE HARNESS BETWEEN PRES-
SURE SWITCH AND A/C RELAY HARNESS.
1) Turn the ignition switch to OFF.
2) Remove the A/C relay in the main fuse box.
3) Measure the resistance between A/C relay
and pressure switch connector.
Connector & terminal
(F27) No. 17 — (F79) No. 2:Is the resistance less than 1
Ω?Go to step 4.Repair the har-
ness between A/C
relay and pres-
sure switch.
4 CHECK THE PRESSURE SWITCH.
Measure the resistance between pressure
switch terminals.
Te r m i n a l s
No. 1 — No. 2:Is the resistance less than 1
Ω?Go to step 5.Replace the pres-
sure switch.
5 CHECK THE A/C CUT SIGNAL CIRCUIT.
1) Disconnect the connector from auto A/C
control module.
2) Measure the resistance between auto A/C
control module and pressure switch connector.
Connector & terminal
(i48) No. 10 — (F79) No. 2:Is the resistance less than 1
Ω?Go to step 6.Repair the har-
ness between auto
A/C control mod-
ule and pressure
switch.
6 CHECK THE A/C ON SIGNAL CIRCUIT.
1) Disconnect the connector from ECM.
2) Measure the resistance between ECM and
auto A/C control module connector.
Connector & terminal
Turbo model
(B137) No. 17 — (i49) No. 17:
Non-turbo model
(B136) No. 11 — (i49) No. 17:Is the resistance less than 1
Ω?Go to step 7.Repair the har-
ness between auto
A/C control mod-
ule and ECM.
7 CHECK A/C RELAY.
1) Remove the A/C relay in main fuse box.
2) Check the A/C relay.
OK?Go to step 8.Replace the A/C
relay.
8 CHECK POWER SUPPLY TO MAGNET
CLUTCH OF A/C COMPRESSOR.
1) Turn the ignition switch to OFF, and then
connect the A/C relay connector and all
removed connectors.
2) Start the engine, and turn A/C switch to
ON.
3) Set the temperature control dial to maxi-
mum cold position.
4) Measure the voltage between magnet
clutch harness connector and chassis ground.
Connector & terminal
(F24) No. 1 (+) — Chassis ground (
−):Is the voltage more than 10.5 V
(at normal temperature)?Go to step 9.Repair the har-
ness for power
supply line of A/C
compressor.