stop start SUBARU FORESTER 2011 SH / 3.G User Guide
[x] Cancel search | Manufacturer: SUBARU, Model Year: 2011, Model line: FORESTER, Model: SUBARU FORESTER 2011 SH / 3.GPages: 446, PDF Size: 15.93 MB
Page 129 of 446
3-18Instruments and controls
CAUTION
Do not operate the engine with the
oil pressure warning light on. This
may cause serious engine damage.
& AT OIL TEMP warning
light (AT models)
If this light illuminates when the engine is
running, it may indicate that the automatic
transmission fluid temperature is too hot.
If the light illuminates while driving, im-
mediately stop the vehicle in a safe place
and let the engine idle until the warning
light turns off. !Automatic transmission control
system warning
If the light flashes after the engine starts, it
may indicate that the automatic transmis-
sion control system is not working prop-
erly. Contact your nearest SUBARU deal-
er for service immediately. &
Low tire pressure
warning light (U.S.-spec. models)
When the ignition switch is turned to the “ON ”position, the low tire pressure warn-
ing light will illuminate for approximately 2
seconds to check that the tire pressure
monitoring system (TPMS) is functioning
properly. If there is no problem and all tires
are properly inflated, the light will turn off.
Each tire, including the spare (if provided),
should be checked monthly when cold
and inflated to the inflation pressure
recommended by the vehicle manufac-
turer on the vehicle placard or tire inflation
pressure label. (If your vehicle has tires of
a different size than the size indicated on
the vehicle placard or tire inflation pres-
sure label, you should determine the
proper tire inflation pressure for thosetires.)
As an added safety feature, your vehicle
has been equipped with a tire pressure
monitoring system (TPMS) that illuminates
a low tire pressure telltale when one or
more of your tires is significantly under-
inflated. Accordingly, when the low tire
pressure telltale illuminates, you should
stop and check your tires as soon as
possible, and inflate them to the proper
pressure. Driving on a significantly under- inflated tire causes the tire to overheat and
can lead to tire failure. Under-inflation also
reduces fuel efficiency and tire tread life,
and may affect the vehicle
’s handling and
stopping ability.
Please note that the TPMS is not a
substitute for proper tire maintenance,
and it is the driver ’s responsibility to
maintain correct tire pressure, even if
under-inflation has not reached the level
to trigger illumination of the TPMS low tire
pressure telltale.
Your vehicle has also been equipped with
a TPMS malfunction indicator to indicate
when the system is not operating properly.
The TPMS malfunction indicator is com-
bined with the low tire pressure telltale.
When the system detects a malfunction,
the telltale will flash for approximately one
minute and then remain continuously
illuminated. This sequence will continue
upon subsequent vehicle start-ups as long
as the malfunction exists. When the
malfunction indicator is illuminated, the
system may not be able to detect or signal
low tire pressure as intended. TPMS
malfunctions may occur for a variety of
reasons, including the installation of re-
placement or alternate tires or wheels on
the vehicle that prevent the TPMS from
functioning properly. Always check the
TPMS malfunction telltale after replacing
Page 131 of 446
3-20Instruments and controls
(12 km/h).
– The warning light illuminates
during driving.
. When the warning light is on (and
the brake system warning light is
off), the ABS function shuts
down. However, the conventional
brake system continues to oper-
ate normally.
With a vehicle equipped with an EBD
system, the ABS warning light illuminates
together with the brake system warning
light if the EBD system malfunctions. For
further details of the EBD system mal-
function warning, refer to “Brake system
warning light ”F 3-20.
NOTE
If the warning light behavior is as
described in the following items, the
ABS system may be considered nor-mal. . The warning light illuminates right
after the engine is started but turns off
immediately, remaining off.. The warning light remains on after
the engine has been started, but it
turns off when the vehicle speed
reaches approximately 8 mph (12km/h).. The warning light illuminates during driving, but it turns off immediately and
remains off.
When driving with an insufficient battery
voltage such as when the engine is jump
started, the ABS warning light may illumi-
nate. This is due to the low battery voltage
and does not indicate a malfunction.
When the battery becomes fully charged,
the light will turn off. &
Brake system
warning light
WARNING
. Driving with the brake system
warning light on is dangerous.
This indicates your brake system
may not be working properly. If
the light remains illuminated,
have the brakes inspected by a
SUBARU dealer immediately.
. If at all in doubt about whether
the brakes are operating prop-
erly, do not drive the vehicle.
Have your vehicle towed to the
nearest SUBARU dealer for re-
pair.
This light has the following functions. !
Parking brake warning
The light illuminates with the parking
brake applied while the ignition switch is
in the “ON ”position. It turns off when the
parking brake is fully released. ! Brake fluid level warning
This light illuminates when the brake fluid
level has dropped to near the “MIN ”level
of the brake fluid reservoir with the ignition
switch in the “ON ”position and with the
parking brake fully released.
If the brake system warning light should
illuminate while driving (with the parking
brake fully released and with the ignition
switch positioned in “ON ”), it could be an
indication of leaking of brake fluid or worn
brake pads. If this occurs, immediately
stop the vehicle at the nearest safe place
and check the brake fluid level. If the fluid
level is below the “MIN ”mark in the
reservoir, do not drive the vehicle. Have
the vehicle towed to the nearest SUBARU
dealer for repair. ! Electronic Brake Force Distribution
(EBD) system warning
The brake system warning light also
illuminates if a malfunction occurs in the
EBD system. In that event, it illuminates
together with the ABS warning light.
The EBD system may be malfunctioning if
Page 132 of 446
the brake system warning light and ABS
warning light illuminate simultaneously
during driving.
Even if the EBD system fails, the conven-
tional braking system will still function.
However, the rear wheels will be more
prone to locking when the brakes are
applied harder than usual and the vehi-cle’s motion may therefore become some-
what harder to control.
If the brake system warning light and ABS
warning light illuminate simultaneously,
take the following steps.
1. Stop the vehicle in the nearest safe,
flat place.
2. Shut down the engine, apply the
parking brake and then restart it.
3. Release the parking brake. If both
warning lights turn off, the EBD system
may be malfunctioning. Drive carefully to
the nearest SUBARU dealer and have the
system inspected.
4. If both warning lights illuminate again
and stay illuminated after the engine has
been restarted, shut down the engine
again, apply the parking brake, and check
the brake fluid level.
5. If the brake fluid level is not below the “ MIN ”mark, the EBD system may be
malfunctioning. Drive carefully to the
nearest SUBARU dealer and have the
system inspected. 6. If the brake fluid level is below the“
MIN ”mark, DO NOT drive the vehicle.
Instead, have the vehicle towed to the
nearest SUBARU dealer for repair.
& Low fuel warning light
The low fuel warning light illuminates
when the tank is nearly empty approxi-
mately 2.6 US gal (10.0 liters, or 2.2 Imp
gal). It only operates when the ignition
switch is in the “ON ”position. When this
light illuminates, fill the fuel tank immedi-
ately.
NOTE
This light does not turn off unless the
tank is replenished up to an internal
fuel quantity of approximately 3.7 US
gal (14 liters, 3.1 Imp gal).
CAUTION
Promptly put fuel in the tank when-
ever the low fuel warning light
illuminates. Engine misfires as a
result of an empty tank could cause
damage to the engine. &
Hill start assist warning
light (MT models)
While the engine is rotating, if there are
any malfunctions in the Hill start assist
system, the light will illuminate.
WARNING
When the Hill start assist warning
light illuminates, have the vehicle
inspected at an authorized SUBARU
dealer.
& Door open warning light
The door open warning light illuminates if
any door or the rear gate is not fullyclosed.
Always make sure this light is out before
you start to drive. &All-Wheel Drive warn-
ing light (AT models)
This light illuminates when All-Wheel
Drive is disengaged and the drive me-
chanism is switched to Front Wheel Drive
for maintenance or similar purposes.
It flashes if the vehicle is driven with tires
of differing diameters fitted on the wheels Instruments and controls
3-21
– CONTINUED –
Page 147 of 446
3-36Instruments and controls
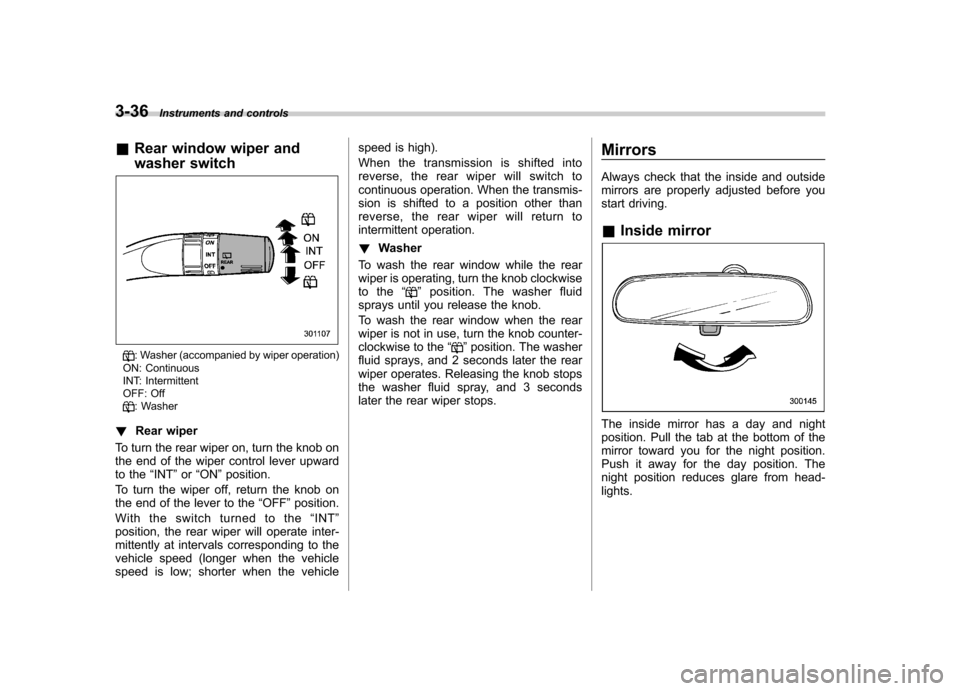
&Rear window wiper and
washer switch
: Washer (accompanied by wiper operation)
ON: Continuous
INT: Intermittent
OFF: Off
: Washer
! Rear wiper
To turn the rear wiper on, turn the knob on
the end of the wiper control lever upward
to the “INT ”or “ON ”position.
To turn the wiper off, return the knob on
the end of the lever to the “OFF ”position.
With the switch turned to the “INT ”
position, the rear wiper will operate inter-
mittently at intervals corresponding to the
vehicle speed (longer when the vehicle
speed is low; shorter when the vehicle speed is high).
When the transmission is shifted into
reverse, the rear wiper will switch to
continuous operation. When the transmis-
sion is shifted to a position other than
reverse, the rear wiper will return to
intermittent operation. !
Washer
To wash the rear window while the rear
wiper is operating, turn the knob clockwise
to the “
”position. The washer fluid
sprays until you release the knob.
To wash the rear window when the rear
wiper is not in use, turn the knob counter-
clockwise to the “
”position. The washer
fluid sprays, and 2 seconds later the rear
wiper operates. Releasing the knob stops
the washer fluid spray, and 3 seconds
later the rear wiper stops. Mirrors
Always check that the inside and outside
mirrors are properly adjusted before you
start driving. &
Inside mirror
The inside mirror has a day and night
position. Pull the tab at the bottom of the
mirror toward you for the night position.
Push it away for the day position. The
night position reduces glare from head-lights.
Page 192 of 446

FM/AM radio operation &FM/AM selection
Type A and B audio
Type C and D audio
Push the “FM/AM ”button when the radio
is off to turn on the radio.
Push the “FM/AM ”button when the radio
is on to select the reception.
Each brief press of the “FM/AM ”button
changes the radio in the following se-
quence starting from the last radio band
with you selected.
Type A, B and C audio:
Type D audio:
& Tuning
! Manual tuning
Type A and B audio
Type C and D audio
Turn the “TUNE/TRACK/CH ”dial clock-
wise to increase the tuning frequency and
turn the “TUNE/TRACK/CH ”dial counter-
clockwise to decrease it.
Each time the dial is turned, the frequency
interval can be changed between 10 kHz
in the AM mode and 0.2 MHz in the FMmode. ! Stereo indicator
The stereo indicator “ST ”(type A, B and C
audio)/ “STEREO ”(type D audio) will
illuminate when an FM stereo broadcast
is received. !
Seek tuning (SEEK)
Type A and B audio:
Seek up
Seek down
Type C audio:
Seek up
Seek down
Type D audio:Seek up
Seek down
If you press the “”or “”button briefly,
the radio will automatically search for a
receivable station and stop at the first one
it finds. This function may not be available, Audio
5-13
– CONTINUED –
Page 203 of 446
5-24Audio
! Inserting a disc in a desired posi- tion
1. Briefly press the
button. If the
magazine in the player has an idle
position where you can insert a disc, the
disc number indicator associated with the
idle position will blink.
The positions in the magazine the indica-
tor of which steadily lights up are already
loaded with discs.
2. Press the disc select button (from
to) at the position where you
want to insert a disc.
3. When the “LOAD ”indicator illumi-
nates, insert the disc. Once you have
inserted the disc, the “LOAD ”indicator will
turn off. The disc will then be automatically
drawn in, and the player will begin to play
the first track on the disc. . If you wish to insert another disc,
repeat the procedure beginning with step 1.
If you do not insert any disc in 15 seconds
after you have pressed the
button,
the player will begin to play back the first
track of the last disc you have inserted. . While the player is in the loading mode,
if you press
orbutton, the
player will enter standby mode. Press the
button to start playback. !
Loading all the magazine (full disc
loading mode)
1. If you continue to press the
button for more than 1.5 seconds, the
player will produce beep sound and will
enter the full disc loading mode.
2. When the disc number indicator
flashes and “ALL LOAD ”indicator illumi-
nates, insert a disc within 15 seconds. If a
disc is successfully loaded during this
period, the disc number indicator will stop
blinking and will steadily light.
3. When the loading of a disc is com-
plete, the next disc number indicator will
blink. Then repeat step 2.
4. When the magazine is filled with discs
by repeating steps 2 and 3, the player will
start playback of the discs, beginning with
the one inserted first.
If you fail to insert any disc during each 15
seconds interval, the full disc loading
mode will be canceled, and the player will
start playback of the disc inserted first. & How to play back a CD
! When there is no CD inserted
Properly insert a CD. Refer to “How to
insert a CD (type A, C and D) ”F 5-23 /
“ How to insert a CD(s) (type B) ”F 5-23.
When a CD is loaded, the player will start
playback of the CD, beginning with the first track. !
When CD is in the player (type A)
When thebutton is pressed, the
player will start playback. ! When there are CDs loaded (type B)
Press a desired one of the disc select
buttons (from
to) the disc
number indicator of which steadily lights
up. The player will then start playback of
the selected CD, beginning with the firsttrack.
If a disc that the player cannot read has
been loaded, the player will display themessage “CHECK DISC ”.
! When CD is in the player (type C
and D)
Each brief press of the
button
changes the modes in the following sequence.
*: For type C audio, “BT-A ”is displayed.
When the CD mode is selected, the player
will start playback.
Page 204 of 446

&To select a track from its beginning
Type A and B audio
Type C and D audio
Turn the “TUNE/TRACK/CH ”dial clock-
wise to skip to the beginning of the next
track/file. Each time the dial is turned, the
indicated track/file number will increase.
Turn the “TUNE/TRACK/CH ”dial counter-
clockwise to skip to the beginning of the
current track/file. Each time the dial is
turned, the indicated track/file number willdecrease.
NOTE
With an MP3, WMA or AAC (type C and
D audio): . Skipping past the last track/file will
take you back to the first track/file in
the folder.. Skipping past the first track/file will
take you to the last track/file in the
folder. &
Fast-forwarding and fast-re- versing
! Fast-forwarding
Type A and B audio
Type C audio
Type D audio
Press the “”button continuously to fast-
forward the disc/folder.
Release the button to stop fast-forwarding.
NOTE
If you fast-forward to the end of the last
track/file, fast-forwarding will stop and
the player will start playback beginning
with the first track/file. In an MP3, WMA
or AAC (type C and D audio) folder, the
player will start playback beginning
with the first track/file of the current
folder. !
Fast-reversing
Type A and B audio
Type C audio
Type D audio
Press the “”button continuously to fast-
reverse the disc/folder.
Release the button to stop fast-reversing. NOTE
If you fast-reverse to the beginning of
the first track/file, fast-reversing will
stop and the player will start playback.
In an MP3, WMA or AAC folder (type C
and D audio), the player will start
playback beginning with the first
track/file of the current folder. Audio
5-25
– CONTINUED –
Page 235 of 446
5-56Audio
Screensaver (type D audio)
If the following operations are not per-
formed for more than 30 seconds while
the audio is ON, the screensaver will bedisplayed. .Operate any button or dial
. Shift the shift lever/select lever to the
“ R ”position
. A cell phone registered in the Hands-
free system is called
If one of the following operations is
performed, the screensaver turns off and
the operation screen will be displayed. . A cell phone registered in the Hands-
free system is called. The update for satellite radio starts.
. The update for satellite radio stops.
If one of the following operations is
performed, the screensaver turns off.
However, the operation screen will not
be displayed. . Operate any button or any dial in a
condition other than the following condi- tions
–Pressing the
button while a
mode other than the CD mode is selected – Pressing the volume control buttons
of the audio control buttons –
Pressing the power switch
. Insert a CD (except reloading a CD)
. Connect a USB storage device or an
iPod
®
NOTE
The screensaver is not displayed under
the following conditions. . While the ignition switch is in the
“ LOCK ”position
. While the audio is OFF
. While the screen is OFF
. While talking on a cell phone regis-
tered in the Hands-free system . While setting the audio
. While seek tuning, PTY group tun-
ing, scan tuning or auto-storing while
the FM/AM radio is on.. While in the category search mode
of the satellite radio. While the rear view camera is being
used & Downloading picture
Perform the following procedure to down-
load a picture to be used as screensaver.
1. Connect a USB storage device. Refer to “ConnectingUSBstoragedevice/
iPod
®” F 5-34.
2. Select the “Picture Download ”menu
by operating the “TUNE/TRACK/CH ”dial. For details, refer to
“Audio settings (type D
audio) ”F 5-10.
3. Select the preferred JPEG file by
operating the “TUNE/TRACK/CH ”dial.
4. Select “Wide ”or “Normal ”by operating
the “TUNE/TRACK/CH ”dial.
NOTE . JPEG files that are 10 MB or less can
be saved. . If the file name is too long, the file
may not be saved.. Up to two JPEG files can be saved in
the in-vehicle equipment.. If the aspect ratio of the displayed
pictureis16:9, “Wide ”cannot be
selected.. If the aspect ratio of the displayed
picture is 4:3, “Normal ”cannot be
selected.
& Selecting picture
1. Select the “Picture Select ”menu by
operating the “TUNE/TRACK/CH ”dial. For
details, refer to “Audio settings (type D
audio) ”F 5-10. If no pictures are saved,
“ No Data ”is displayed. Press thebutton to return to the “Screen Saver ”
mode.
2. Select the preferred picture by operat-
ing the “TUNE/TRACK/CH ”dial.
Page 260 of 446
Fuel...................................................................... 7-2
Fuel requirements ............................................... 7-2
Fuel filler lid and cap ........................................... 7-3
State emission testing (U.S. only) ...................... 7-6
Preparing to drive ............................................... 7-7
Starting the engine .............................................. 7-7
MT models .......................................................... 7-7
AT models ........................................................... 7-8
Stopping the engine ............................................ 7-9
Remote engine start system (dealer option) ..... 7-9
Starting your vehicle .......................................... 7-10
Remote start safety features ............................... 7-10
Entering the vehicle while it is running via remote start ................................................................. 7-10
Entering the vehicle following remote engine start shutdown ......................................................... 7-10
Pre-heating or pre-cooling the interior of the vehicle ............................................................. 7-11
Service mode ..................................................... 7-11
Remote transmitter programming and programmable feature option ............................ 7-11
System maintenance .......................................... 7-12
Manual transmission .......................................... 7-13
Shifting speeds .................................................. 7-14
Driving tips ........................................................ 7-14
Automatic transmission ..................................... 7-15
Select lever ........................................................ 7-16
Shift lock function .............................................. 7-17
Selection of manual mode .................................. 7-19
Driving tips ........................................................ 7-20 SPORT mode
..................................................... 7-20
Power steering ................................................... 7-21
Braking ............................................................... 7-22
Braking tips ....................................................... 7-22
Brake system .................................................... 7-22
Disc brake pad wear warning indicators ............. 7-23
ABS (Anti-lock Brake System) .......................... 7-23
ABS system self-check ...................................... 7-23
ABS warning light .............................................. 7-23
Electronic Brake Force Distribution (EBD) system ............................................................. 7-24
Steps to take if EBD system malfunctions ..... ..... 7-24
Vehicle Dynamics Control system .................... 7-25
Vehicle Dynamics Control system monitor..... ..... 7-26
Vehicle Dynamics Control OFF switch ................ 7-27
Tire pressure monitoring system (TPMS) (U.S.-spec. models). ........................................ 7-28
Parking your vehicle ......................................... 7-29
Parking brake .................................................... 7-29
Parking tips ....................................................... 7-30
Hill start assist system (MT models) ................ 7-31
Hill start assist warning light .............................. 7-32
Cruise control .................................................... 7-32
To set cruise control .......................................... 7-33
To temporarily cancel the cruise control ............. 7-34
To turn off the cruise control .............................. 7-34
To change the cruising speed .. .......................... 7-35
Cruise control indicator light .............................. 7-36
Cruise control set indicator light ........................ 7-36
Starting and operating
7
Page 263 of 446
7-4Starting and operating
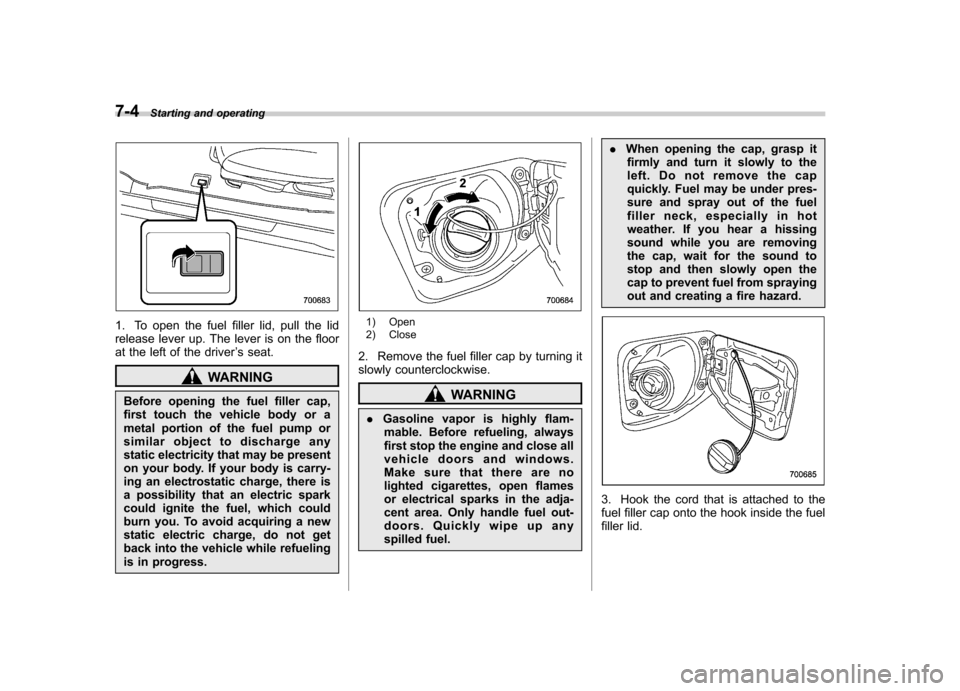
1. To open the fuel filler lid, pull the lid
release lever up. The lever is on the floor
at the left of the driver ’s seat.
WARNING
Before opening the fuel filler cap,
first touch the vehicle body or a
metal portion of the fuel pump or
similar object to discharge any
static electricity that may be present
on your body. If your body is carry-
ing an electrostatic charge, there is
a possibility that an electric spark
could ignite the fuel, which could
burn you. To avoid acquiring a new
static electric charge, do not get
back into the vehicle while refueling
is in progress.
1) Open
2) Close
2. Remove the fuel filler cap by turning it
slowly counterclockwise.
WARNING
. Gasoline vapor is highly flam-
mable. Before refueling, always
first stop the engine and close all
vehicle doors and windows.
Make sure that there are no
lighted cigarettes, open flames
or electrical sparks in the adja-
cent area. Only handle fuel out-
doors. Quickly wipe up any
spilled fuel. .
When opening the cap, grasp it
firmly and turn it slowly to the
left. Do not remove the cap
quickly. Fuel may be under pres-
sure and spray out of the fuel
filler neck, especially in hot
weather. If you hear a hissing
sound while you are removing
the cap, wait for the sound to
stop and then slowly open the
cap to prevent fuel from spraying
out and creating a fire hazard.
3. Hook the cord that is attached to the
fuel filler cap onto the hook inside the fuel
filler lid.