battery SUBARU FORESTER 2017 SJ / 4.G Owners Manual
[x] Cancel search | Manufacturer: SUBARU, Model Year: 2017, Model line: FORESTER, Model: SUBARU FORESTER 2017 SJ / 4.GPages: 634, PDF Size: 11.77 MB
Page 31 of 634
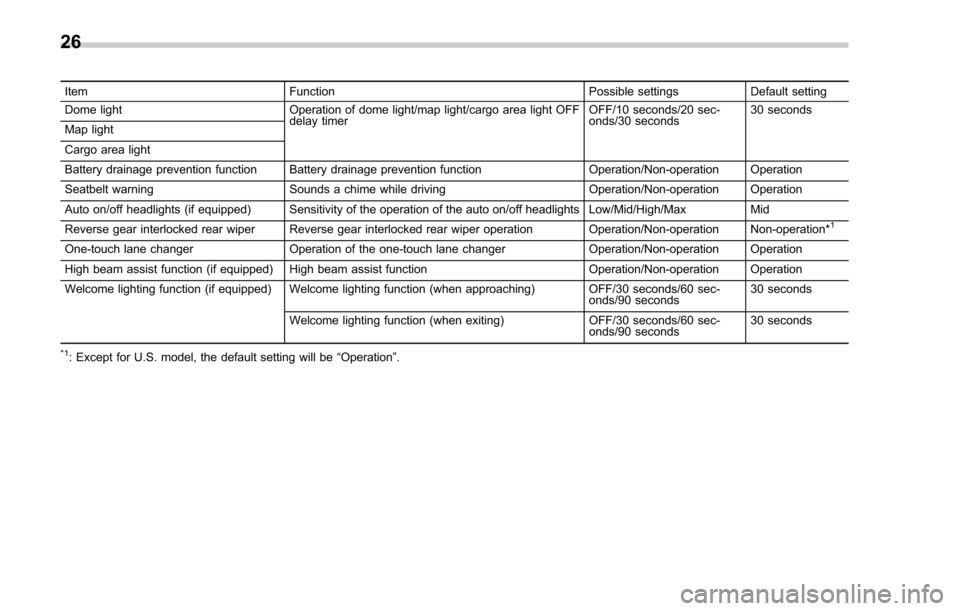
ItemFunction Possible settingsDefault setting
Dome light Operation of dome light/map light/cargo area light OFF
delay timer OFF/10 seconds/20 sec-
onds/30 seconds30 seconds
Map light
Cargo area light
Battery drainage prevention function Battery drainage prevention function Operation/Non-operation Operation
Seatbelt warning Sounds a chime while driving Operation/Non-operation Operation
Auto on/off headlights (if equipped) Sensitivity of the operation of the auto on/off headlights Low/Mid/High/Max Mid
Reverse gear interlocked rear wiper Reverse gear interlocked rear wiper operation Operation/Non-operation Non-operation*
1
One-touch lane changer Operation of the one-touch lane changer Operation/Non-operation Operation
High beam assist function (if equipped) High beam assist function Operation/Non-operation Operation
Welcome lighting function (if equipped) Welcome lighting function (when approaching) OFF/30 seconds/60 sec- onds/90 seconds30 seconds
Welcome lighting function (when exiting) OFF/30 seconds/60 sec-
onds/90 seconds30 seconds
*1: Except for U.S. model, the default setting will be
“Operation ”.
26
Page 38 of 634
A chirp sounds and the seat moves to the
registered position. When the seat moves
to the registered position, a chirp will
sound.
NOTE
.If a new position is registered for the
same button, the previously registered
seat position is deleted.
. If the vehicle battery is removed, the
registered seat position is not deleted.
. When the button “1 ” or “2 ” is
pressed within 45 seconds after the
driver ’s door is opened, the registered
seat position can be retrieved even if
the ignition switch is in the “LOCK ”or
“ OFF ”position. !
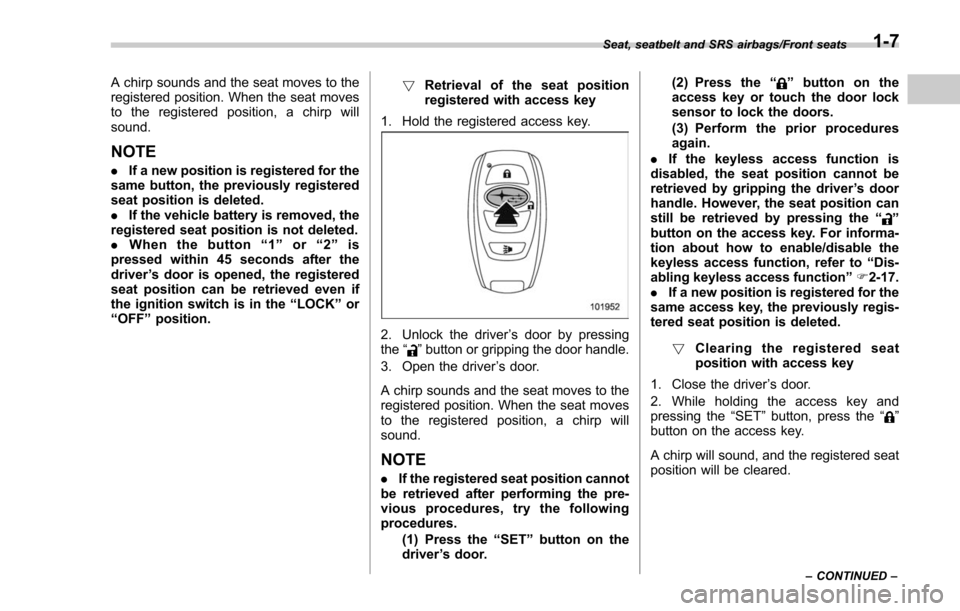
Retrieval of the seat position
registered with access key
1. Hold the registered access key.
2. Unlock the driver ’s door by pressing
the “”button or gripping the door handle.
3. Open the driver ’s door.
A chirp sounds and the seat moves to the
registered position. When the seat moves
to the registered position, a chirp will
sound.
NOTE
. If the registered seat position cannot
be retrieved after performing the pre-
vious procedures, try the following
procedures.
(1) Press the “SET ”button on the
driver ’s door. (2) Press the
“
”button on the
access key or touch the door lock
sensor to lock the doors.
(3) Perform the prior procedures
again.
. If the keyless access function is
disabled, the seat position cannot be
retrieved by gripping the driver ’s door
handle. However, the seat position can
still be retrieved by pressing the “
”
button on the access key. For informa-
tion about how to enable/disable the
keyless access function, refer to “Dis-
abling keyless access function ”F 2-17.
. If a new position is registered for the
same access key, the previously regis-
tered seat position is deleted.
! Clearing the registered seat
position with access key
1. Close the driver ’s door.
2. While holding the access key and
pressing the “SET ”button, press the “
”
button on the access key.
A chirp will sound, and the registered seat
position will be cleared.
Seat, seatbelt and SRS airbags/Front seats
–CONTINUED –1-7
Page 40 of 634
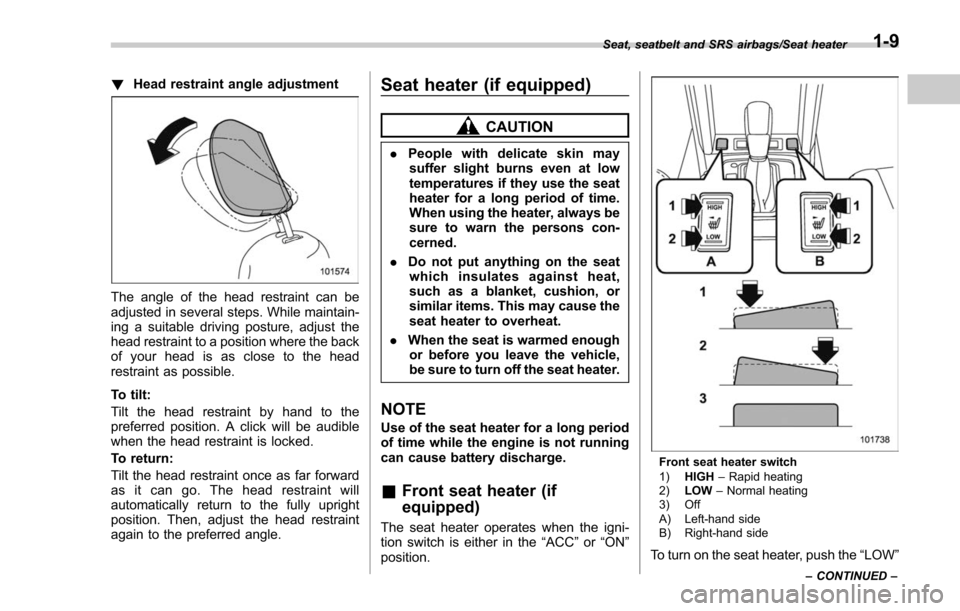
!Head restraint angle adjustment
The angle of the head restraint can be
adjusted in several steps. While maintain-
ing a suitable driving posture, adjust the
head restraint to a position where the back
of your head is as close to the head
restraint as possible.
To tilt:
Tilt the head restraint by hand to the
preferred position. A click will be audible
when the head restraint is locked.
To return:
Tilt the head restraint once as far forward
as it can go. The head restraint will
automatically return to the fully upright
position. Then, adjust the head restraint
again to the preferred angle.
Seat heater (if equipped)
CAUTION
.People with delicate skin may
suffer slight burns even at low
temperatures if they use the seat
heater for a long period of time.
When using the heater, always be
sure to warn the persons con-
cerned.
. Do not put anything on the seat
which insulates against heat,
such as a blanket, cushion, or
similar items. This may cause the
seat heater to overheat.
. When the seat is warmed enough
or before you leave the vehicle,
be sure to turn off the seat heater.
NOTE
Use of the seat heater for a long period
of time while the engine is not running
can cause battery discharge.
& Front seat heater (if
equipped)
The seat heater operates when the igni-
tion switch is either in the “ACC”or “ON ”
position.
Front seat heater switch
1) HIGH –Rapid heating
2) LOW –Normal heating
3) Off
A) Left-hand side
B) Right-hand side
To turn on the seat heater, push the “LOW ”
Seat, seatbelt and SRS airbags/Seat heater
–CONTINUED –1-9
Page 55 of 634
Seat, seatbelt and SRS airbags/Seatbelts
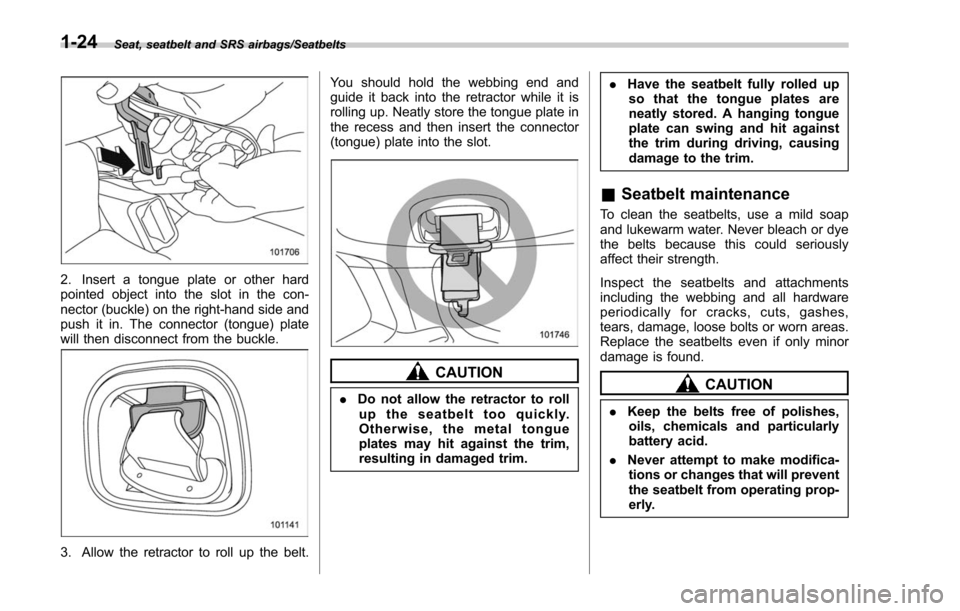
2. Insert a tongue plate or other hard
pointed object into the slot in the con-
nector (buckle) on the right-hand side and
push it in. The connector (tongue) plate
will then disconnect from the buckle.
3. Allow the retractor to roll up the belt.You should hold the webbing end and
guide it back into the retractor while it is
rolling up. Neatly store the tongue plate in
the recess and then insert the connector
(tongue) plate into the slot.
CAUTION
.
Do not allow the retractor to roll
up the seatbelt too quickly.
Otherwise, the metal tongue
plates may hit against the trim,
resulting in damaged trim. .
Have the seatbelt fully rolled up
so that the tongue plates are
neatly stored. A hanging tongue
plate can swing and hit against
the trim during driving, causing
damage to the trim.
& Seatbelt maintenance
To clean the seatbelts, use a mild soap
and lukewarm water. Never bleach or dye
the belts because this could seriously
affect their strength.
Inspect the seatbelts and attachments
including the webbing and all hardware
periodically for cracks, cuts, gashes,
tears, damage, loose bolts or worn areas.
Replace the seatbelts even if only minor
damage is found.
CAUTION
. Keep the belts free of polishes,
oils, chemicals and particularly
battery acid.
. Never attempt to make modifica-
tions or changes that will prevent
the seatbelt from operating prop-
erly.
1-24
Page 104 of 634
Keys..................................................................... 2-3Key number plate ................................................ 2-3
Immobilizer.......................................................... 2-3Security indicator light ........................................ 2-4
Key replacement ................................................. 2-4
Certification for immobilizer system ..................... 2-4
Door locks........................................................... 2-5Locking and unlocking from the outside .. ............ 2-5
Locking and unlocking from the inside ................ 2-7
Battery drainage prevention function ................... 2-7
Power door locking switches............................. 2-8Key lock-in prevention function ........................... 2-9
Keyless access with push-button start
system (if equipped) ........................................ 2-9
Safety precautions............................................. 2-10
Locking and unlocking with “keyless access ”
entry function. .................................................. 2-13
Selecting audible signal operation ...................... 2-16
Warning chimes and warning light ...................... 2-16
Disabling keyless access function ...................... 2-17
When access key does not operate properly ....... 2-18
Replacing battery of access key ......................... 2-18
Replacing access key ......................................... 2-18
Certification for keyless access with push-button start system ..................................................... 2-19
PIN Code Access (models with “keyless
access with push-button start system ”)........ 2-19
Registering a PIN code ....................................... 2-20
Unlocking .......................................................... 2-21
Remote keyless entry system ........................... 2-21Locking the doors.............................................. 2-23
Unlocking the doors .......................................... 2-23
Vehicle finder function ....................................... 2-23
Sounding a panic alarm ..................................... 2-24
Selecting audible signal operation (models without “keyless access with push-button start
system ”).......................................................... 2-24
Replacing the battery ......................................... 2-24
Replacing lost transmitters ................................ 2-24
Alarm system..................................................... 2-25System operation ............................................... 2-25
Activating and deactivating the alarm system ..... 2-25
If you have accidentally triggered the alarm system ............................................................ 2-26
Arming the system ............................................ 2-26
Disarming the system ........................................ 2-29
Valet mode ........................................................ 2-29
Passive arming (models without “keyless access
with push-button start system ”) ....................... 2-30
Tripped sensor identification .............................. 2-31
Shock sensors (dealer option).. .......................... 2-31
Child safety locks.............................................. 2-32
Windows ............................................................. 2-32
Power window operation by driver ..................... 2-33
Power window operation by passengers ............. 2-36
Initialization of power window .. .......................... 2-38
Rear gate............................................................ 2-38Manual rear gate (if equipped) .. .......................... 2-38
Power rear gate (if equipped) ... .......................... 2-39
Keys and doors
2
Page 108 of 634
–Canada-spec. models
NOTE
This device complies with Industry
Canada licence-exempt RSS standard
(s). Operation is subject to the follow-
ing two conditions: (1) this device may
not cause interference, and (2) this
device must accept any interference,
including interference that may cause
undesired operation of the device.
NOTE
Le présent appareil est conforme aux
CNR d’ Industrie Canada applicables
aux appareils radio exempts de licence.
L ’exploitation est autorisée aux deux
conditions suivantes: (1) l ’appareil ne
doit pas produire de brouillage, et (2)
l ’utilisateur de l ’appareil doit accepter
tout brouillage radioélectrique subi,
même si le brouillage est susceptible
d ’en compromettre le fonctionnement. –
Mexico-spec. models
Door locks
& Locking and unlocking from
the outside
NOTE
If you unlock the driver ’s door with a
key (including a mechanical key) and
open the door while the alarm system
is armed, the alarm system is triggered
and the vehicle ’s horn sounds. In this
case, perform any of the following
operations:
Models with “keyless access with
push-button start system ”:
. Press any button on the access key
(except when the access key battery is
discharged).
. Turn the push-button ignition switch
to the “ACC ”position.
. Carry the access key and perform
either of the following procedures.
–Grip the front door handle
– Press the rear gate opener button
Models without “keyless access with
push-button start system ”:
. Press any button on the remote
transmitter (except when the transmit-
ter battery is discharged).
. Insert the key into the ignition
switch and turn the ignition switch to
Keys and doors/Door locks
–CONTINUED –2-5
Page 110 of 634
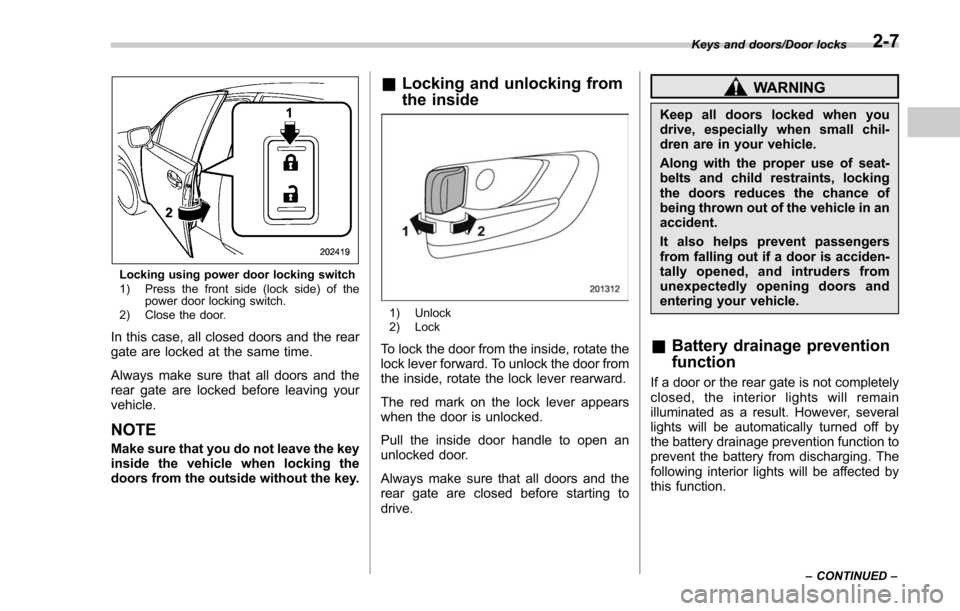
Locking using power door locking switch
1) Press the front side (lock side) of thepower door locking switch.
2) Close the door.
In this case, all closed doors and the rear
gate are locked at the same time.
Always make sure that all doors and the
rear gate are locked before leaving your
vehicle.
NOTE
Make sure that you do not leave the key
inside the vehicle when locking the
doors from the outside without the key.
& Locking and unlocking from
the inside
1) Unlock
2) Lock
To lock the door from the inside, rotate the
lock lever forward. To unlock the door from
the inside, rotate the lock lever rearward.
The red mark on the lock lever appears
when the door is unlocked.
Pull the inside door handle to open an
unlocked door.
Always make sure that all doors and the
rear gate are closed before starting to
drive.
WARNING
Keep all doors locked when you
drive, especially when small chil-
dren are in your vehicle.
Along with the proper use of seat-
belts and child restraints, locking
the doors reduces the chance of
being thrown out of the vehicle in an
accident.
It also helps prevent passengers
from falling out if a door is acciden-
tally opened, and intruders from
unexpectedly opening doors and
entering your vehicle.
&Battery drainage prevention
function
If a door or the rear gate is not completely
closed, the interior lights will remain
illuminated as a result. However, several
lights will be automatically turned off by
the battery drainage prevention function to
prevent the battery from discharging. The
following interior lights will be affected by
this function.
Keys and doors/Door locks
–CONTINUED –2-7
Page 111 of 634
Keys and doors/Power door locking switches
ItemSwitch
position Automatically turning
off
Map lights DOOR
*1Approximately 20 minutes later
Dome light DOOR Approximately 20
minutes later
Ignition
switch light —Approximately 20
minutes later
Door step
lights —
None
*2
Cargo
area lightDOORApproximately 20
minutes later
*1: The map lights can be controlled by the
battery drainage prevention function only when
the map light switches are in the OFF position
and the door interlock switch is in the DOOR
position. For the switch positions, refer to “Map
lights ”F 6-3
.
*2: The door step lights are not affected by the
battery drainage prevention function, so the
lights will not turn off automatically. To turn off
the lights, it is necessary that each door is
completely closed.
The operational/non-operational setting of
this function can be changed by a
SUBARU dealer. Contact your SUBARU
dealer to change the setting.
NOTE
. The factory setting (default setting)
for this function is set as “operational”.
. When leaving the vehicle, please
make sure that all doors and the rear
gate are completely closed.
. The battery drainage prevention
function does not operate while the
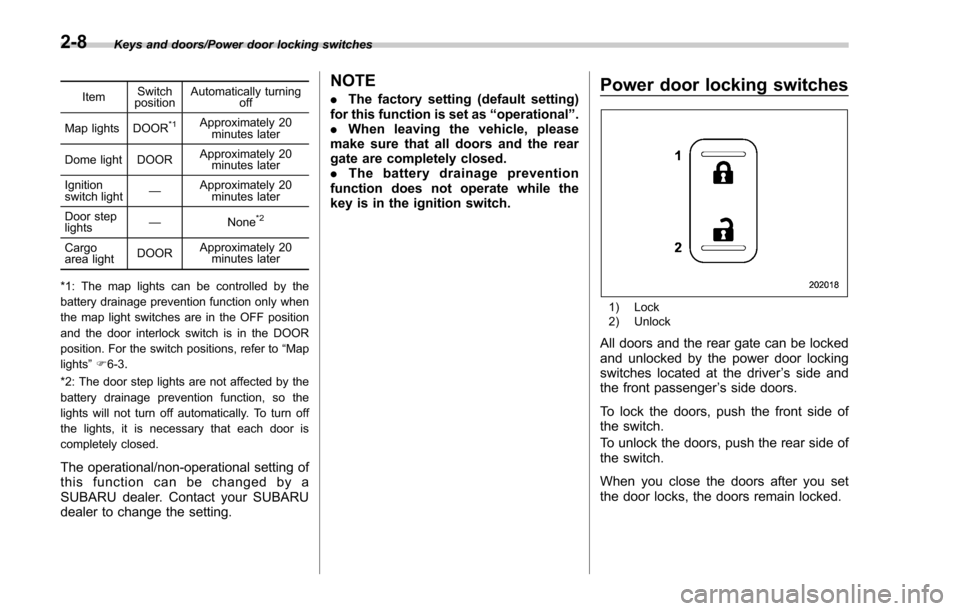
key is in the ignition switch.Power door locking switches
1) Lock
2) Unlock
All doors and the rear gate can be locked
and unlocked by the power door locking
switches located at the driver ’s side and
the front passenger ’s side doors.
To lock the doors, push the front side of
the switch.
To unlock the doors, push the rear side of
the switch.
When you close the doors after you set
the door locks, the doors remain locked.
2-8
Page 114 of 634
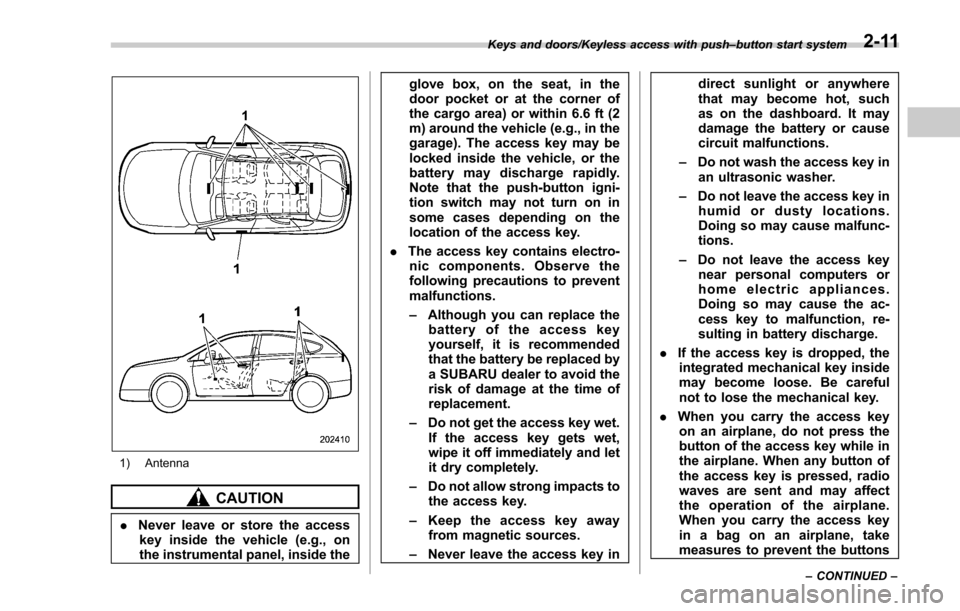
1) Antenna
CAUTION
.Never leave or store the access
key inside the vehicle (e.g., on
the instrumental panel, inside the glove box, on the seat, in the
door pocket or at the corner of
the cargo area) or within 6.6 ft (2
m) around the vehicle (e.g., in the
garage). The access key may be
locked inside the vehicle, or the
battery may discharge rapidly.
Note that the push-button igni-
tion switch may not turn on in
some cases depending on the
location of the access key.
. The access key contains electro-
nic components. Observe the
following precautions to prevent
malfunctions.
– Although you can replace the
battery of the access key
yourself, it is recommended
that the battery be replaced by
a SUBARU dealer to avoid the
risk of damage at the time of
replacement.
– Do not get the access key wet.
If the access key gets wet,
wipe it off immediately and let
it dry completely.
– Do not allow strong impacts to
the access key.
– Keep the access key away
from magnetic sources.
– Never leave the access key in direct sunlight or anywhere
that may become hot, such
as on the dashboard. It may
damage the battery or cause
circuit malfunctions.
– Do not wash the access key in
an ultrasonic washer.
– Do not leave the access key in
humid or dusty locations.
Doing so may cause malfunc-
tions.
– Do not leave the access key
near personal computers or
home electric appliances.
Doing so may cause the ac-
cess key to malfunction, re-
sulting in battery discharge.
. If the access key is dropped, the
integrated mechanical key inside
may become loose. Be careful
not to lose the mechanical key.
. When you carry the access key
on an airplane, do not press the
button of the access key while in
the airplane. When any button of
the access key is pressed, radio
waves are sent and may affect
the operation of the airplane.
When you carry the access key
in a bag on an airplane, take
measures to prevent the buttons
Keys and doors/Keyless access with push –button start system
–CONTINUED –2-11
Page 115 of 634
Keys and doors/Keyless access with push–button start system
of the access key from being
pressed.
NOTE
. The operational/non-operational
setting for the keyless access function
can be changed. For the setting proce-
dure, refer to “Disabling keyless ac-
cess function ”F 2-17. The setting can
also be changed by a SUBARU dealer.
For more details, contact a SUBARU
dealer.
. For detailed information about the
operation method for the push-button
ignition switch while the keyless ac-
cess function is switched to the non-
operational mode, refer to “Access key
– if access key does not operate
properly ”F 9-17.
. The keyless access with push-but-
ton start system uses weak radio
waves. The status of the access key
and environmental conditions may in-
terfere with the communication be-
tween the access key and the vehicle
under the following conditions, and it
may not be possible to lock or unlock
the doors or start the engine.
–When operating near a facility
where strong radio waves are trans-
mitted, such as a broadcast station and power transmission lines
–
When products that transmit
radio waves are used, such as an
access key or a remote transmitter
key of another vehicle
– When carrying the access key of
your vehicle together with an ac-
cess key or a remote transmitter of
another vehicle
– When the access key is placed
near wireless communication
equipment such as a cell phone
– When the access key is placed
near a metallic object
– When metallic accessories are
attached to the access key
– When carrying the access key
with electronic appliances such as
a laptop computer
– When the battery of the access
key is discharged
. The access key is always commu-
nicating with the vehicle and is con-
tinuously using the battery. Although
the life of the battery varies depending
on the operating conditions, it is ap-
proximately 1 to 2 years. If the battery
becomes fully discharged, replace it
with a new one.
. If an access key is lost, it is
recommended that the remaining ac-
cess key be reregistered. For reregis- tration of an access key, contact a
SUBARU dealer.
.
For a spare access key, contact a
SUBARU dealer.
. Up to 7 access keys can be regis-
tered for one vehicle.
. Carefully store the key number plate
supplied with the access key. It is
necessary for vehicle repair.
. Do not leave the access key in the
storage spaces inside the vehicle, such
as the door pocket, dashboard and the
corner of the cargo area. Vibrations
may damage the key or turn on the
switch, possibly resulting in a lockout.
. After the vehicle battery is dis-
charged or replaced, initialization of
the steering lock system may be re-
quired to start the engine. In this case,
perform the following procedure to
initialize the steering lock.
(1) Turn the push-button ignition
switch to the “OFF”position. For
details, refer to “Switching power
status ”F 3-7.
(2) Open and close the driver ’s
door.
(3) Wait for approximately 10 sec-
onds.
When the steering is locked, the initi-
alization is completed.
2-12