SUBARU IMPREZA 2006 2.G Owners Manual
Manufacturer: SUBARU, Model Year: 2006, Model line: IMPREZA, Model: SUBARU IMPREZA 2006 2.GPages: 365, PDF Size: 7.09 MB
Page 241 of 365
8-14 Driving tips
placard attached to the driver s side door
pillar. It includes the total weight of the
driver and all passengers and their be-
longings, any optional equipment such as
a trailer hitch, roof rack or bike carrier,
etc., and the tongue load of a trailer.
GVWR and GAWR (Gross Ve-
hicle Weight Rating and
Gross Axle Weight Rating)
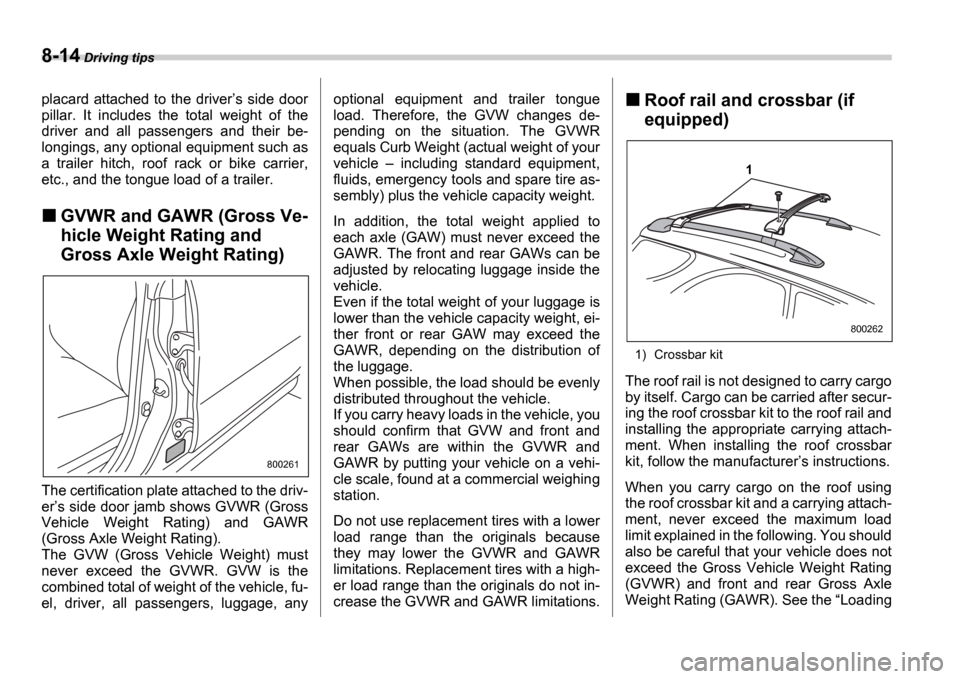
The certification plate attached to the driv-
er s side door jamb shows GVWR (Gross
Vehicle Weight Rating) and GAWR
(Gross Axle Weight Rating).
The GVW (Gross Vehicle Weight) must
never exceed the GVWR. GVW is the
combined total of weight of the vehicle, fu-
el, driver, all passengers, luggage, any optional equipment and trailer tongue
load. Therefore, the GVW changes de-
pending on the situation. The GVWR
equals Curb Weight (actual weight of your
vehicle
including standard equipment,
fluids, emergency tools and spare tire as-
sembly) plus the vehicle capacity weight.
In addition, the total weight applied to
each axle (GAW) must never exceed the
GAWR. The front and rear GAWs can be
adjusted by relocating luggage inside the
vehicle.
Even if the total weight of your luggage is
lower than the vehicle capacity weight, ei-
ther front or rear GAW may exceed the
GAWR, depending on the distribution of
the luggage.
When possible, the load should be evenly
distributed throughout the vehicle.
If you carry heavy loads in the vehicle, you
should confirm that GVW and front and
rear GAWs are within the GVWR and
GAWR by putting your vehicle on a vehi-
cle scale, found at a commercial weighing
station.
Do not use replacement tires with a lower
load range than the originals because
they may lower the GVWR and GAWR
limitations. Replacement tires with a high-
er load range than the originals do not in-
crease the GVWR and GAWR limitations.
Roof rail and crossbar (if
equipped)
1) Crossbar kit
The roof rail is not designed to carry cargo
by itself. Cargo can be carried after secur-
ing the roof crossbar kit to the roof rail and
installing the appropriate carrying attach-
ment. When installing the roof crossbar
kit, follow the manufacturer s instructions.
When you carry cargo on the roof using
the roof crossbar kit and a carrying attach-
ment, never exceed the maximum load
limit explained in the following. You should
also be careful that your vehicle does not
exceed the Gross Vehicle Weight Rating
(GVWR) and front and rear Gross Axle
Weight Rating (GAWR). See the Loading
800261
1
800262
Page 242 of 365
Driving tips 8-15
CONTINUED
your vehicle
section in this chapter for in-
formation on loading cargo into or onto
your vehicle. The maximum load limit of
the cargo, crossbars and carrying attach-
ment must not exceed 100 lbs (45 kg).
Place the heaviest load at the bottom,
nearest the roof, and evenly distribute the
cargo. Always properly secure all cargo.
Installing carrying attachments on
the crossbars
When installing any carrying attachment
such as a bike carrier, ski carrier, kayak carrier, cargo basket, etc. on the cross-
bars, follow the manufacturer
s instruc-
tions and make sure that the attachment is
securely fixed to the crossbars. Use only
attachments designed specifically for the
crossbars. A set of the crossbars is de-
signed to carry loads (cargo and attach-
ment) of not more than 100 lbs (45 kg).
Before operating the vehicle, make sure
that the cargo is properly secured on the
attachment.
NOTE
Remember that the vehicle s center of
gravity is altered with the weight of the
load on the roof, thus affecting the
driving characteristics.
Drive carefully. Avoid rapid starts, hard
cornering and abrupt stops. Crosswind
effects will be increased.
Removal and installation of the
crossbars
The crossbars can be removed when you
do not use the roof to carry cargo.
To remove the crossbar
1. Loosen and remove the T-30 torx Æ
head screw from the top of each crossbar
end support.
2. Rotate the lower clamp on the bottom
of each end support downward approxi-
mately 90 . 3. Carefully raise the crossbar from roof
rails.
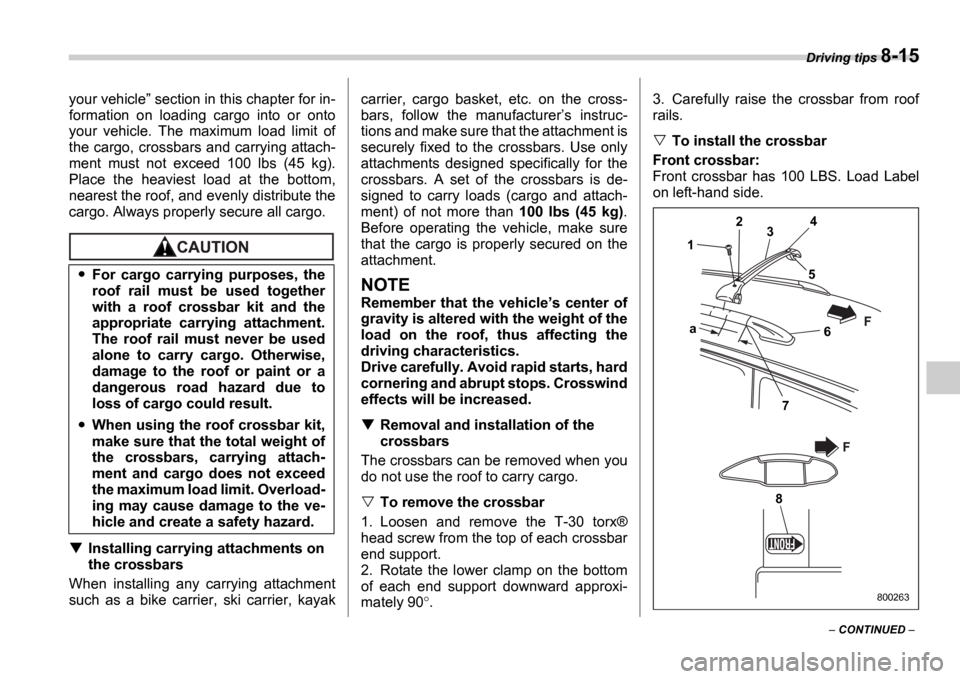
To install the crossbar
Front crossbar:
Front crossbar has 100 LBS. Load Label
on left-hand side.
For cargo carrying purposes, the
roof rail must be used together
with a roof crossbar kit and the
appropriate carrying attachment.
The roof rail must never be used
alone to carry cargo. Otherwise,
damage to the roof or paint or a
dangerous road hazard due to
loss of cargo could result.
When using the roof crossbar kit,
make sure that the total weight of
the crossbars, carrying attach-
ment and cargo does not exceed
the maximum load limit. Overload-
ing may cause damage to the ve-
hicle and create a safety hazard.
1 2
3 4
5
6
7
a
8
F
F
800263
Page 243 of 365
8-16 Driving tips
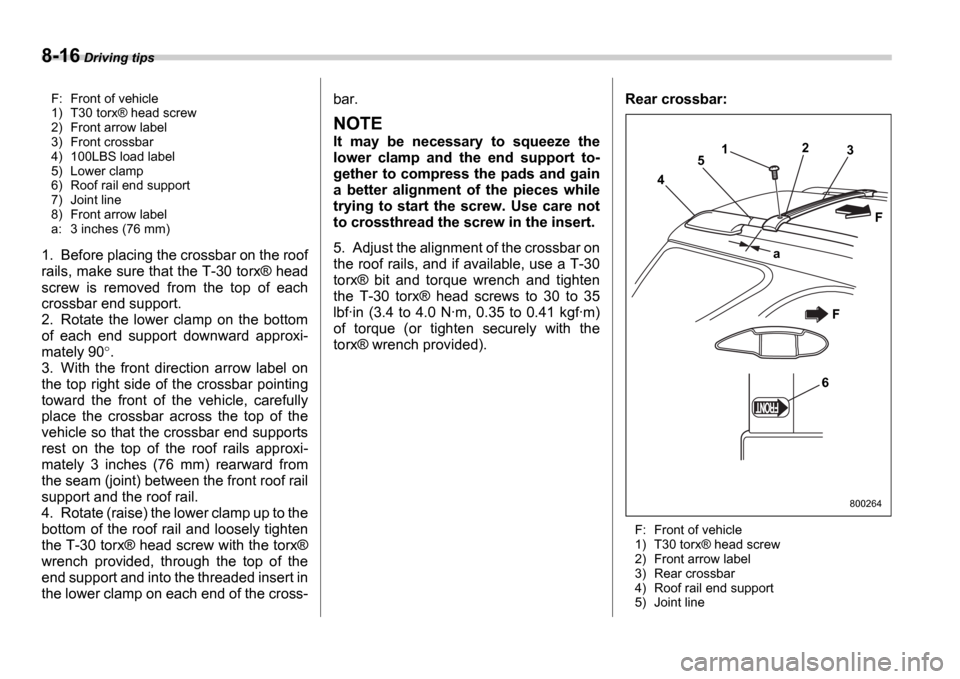
F: Front of vehicle
1) T30 torx Æ head screw
2) Front arrow label
3) Front crossbar
4) 100LBS load label
5) Lower clamp
6) Roof rail end support
7) Joint line
8) Front arrow label
a: 3 inches (76 mm)
1. Before placing the crossbar on the roof
rails, make sure that the T-30 torx Æ head
screw is removed from the top of each
crossbar end support.
2. Rotate the lower clamp on the bottom
of each end support downward approxi-
mately 90 .
3. With the front direction arrow label on
the top right side of the crossbar pointing
toward the front of the vehicle, carefully
place the crossbar across the top of the
vehicle so that the crossbar end supports
rest on the top of the roof rails approxi-
mately 3 inches (76 mm) rearward from
the seam (joint) between the front roof rail
support and the roof rail.
4. Rotate (raise) the lower clamp up to the
bottom of the roof rail and loosely tighten
the T-30 torx Æ head screw with the torx Æ
wrench provided, through the top of the
end support and into the threaded insert in
the lower clamp on each end of the cross- bar.
NOTE
It may be necessary to squeeze the
lower clamp and the end support to-
gether to compress the pads and gain
a better alignment of the pieces while
trying to start the screw. Use care not
to crossthread the screw in the insert.
5. Adjust the alignment of the crossbar on
the roof rails, and if available, use a T-30
torx
Æ bit and torque wrench and tighten
the T-30 torx Æ head screws to 30 to 35
lbf ∑in (3.4 to 4.0 N ∑m, 0.35 to 0.41 kgf ∑m)
of torque (or tighten securely with the
torx Æ wrench provided). Rear crossbar:
F: Front of vehicle
1) T30 torx
Æ head screw
2) Front arrow label
3) Rear crossbar
4) Roof rail end support
5) Joint line
6 3
F
2
1
5
a
4
F
800264
Page 244 of 365
Driving tips 8-17
CONTINUED
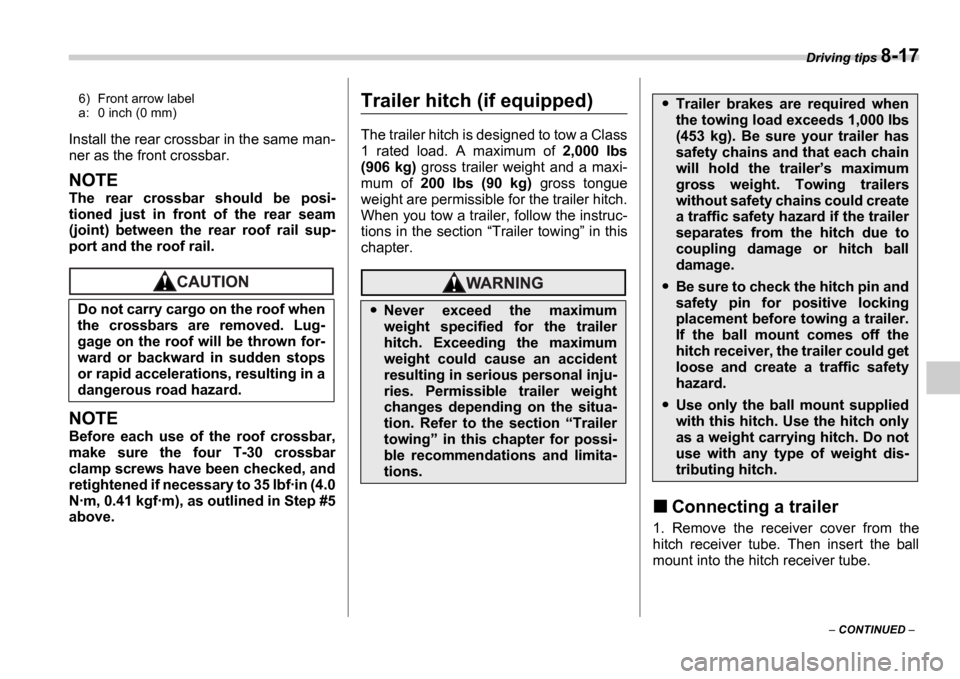
6) Front arrow label
a: 0 inch (0 mm)
Install the rear crossbar in the same man-
ner as the front crossbar.
NOTE
The rear crossbar should be posi-
tioned just in front of the rear seam
(joint) between the rear roof rail sup-
port and the roof rail.
NOTE
Before each use of the roof crossbar,
make sure the four T-30 crossbar
clamp screws have been checked, and
retightened if necessary to 35 lbf ∑in (4.0
N ∑m, 0.41 kgf ∑m), as outlined in Step #5
above.
Trailer hitch (if equipped)
The trailer hitch is designed to tow a Class
1 rated load. A maximum of 2,000 lbs
(906 kg) gross trailer weight and a maxi-
mum of 200 lbs (90 kg) gross tongue
weight are permissible for the trailer hitch.
When you tow a trailer, follow the instruc-
tions in the section Trailer towing in this
chapter.
Connecting a trailer
1. Remove the receiver cover from the
hitch receiver tube. Then insert the ball
mount into the hitch receiver tube.
Do not carry cargo on the roof when
the crossbars are removed. Lug-
gage on the roof will be thrown for-
ward or backward in sudden stops
or rapid accelerations, resulting in a
dangerous road hazard.
Never exceed the maximum
weight specified for the trailer
hitch. Exceeding the maximum
weight could cause an accident
resulting in serious personal inju-
ries. Permissible trailer weight
changes depending on the situa-
tion. Refer to the section
Trailer
towing in this chapter for possi-
ble recommendations and limita-
tions.
Trailer brakes are required when
the towing load exceeds 1,000 lbs
(453 kg). Be sure your trailer has
safety chains and that each chain
will hold the trailer s maximum
gross weight. Towing trailers
without safety chains could create
a traffic safety hazard if the trailer
separates from the hitch due to
coupling damage or hitch ball
damage.
Be sure to check the hitch pin and
safety pin for positive locking
placement before towing a trailer.
If the ball mount comes off the
hitch receiver, the trailer could get
loose and create a traffic safety
hazard.
Use only the ball mount supplied
with this hitch. Use the hitch only
as a weight carrying hitch. Do not
use with any type of weight dis-
tributing hitch.
Page 245 of 365
8-18 Driving tips
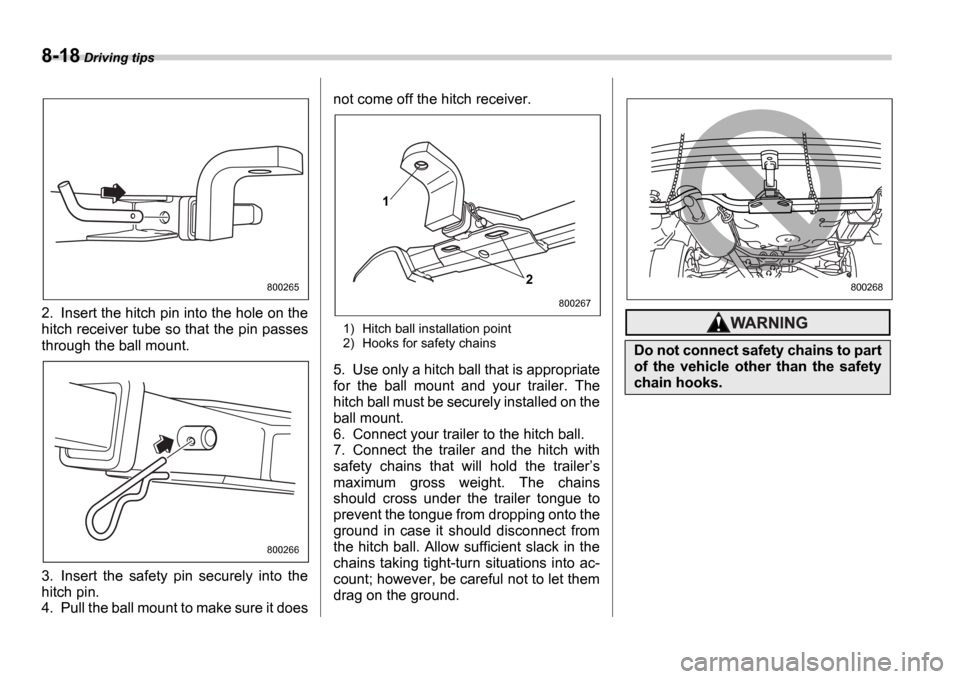
2. Insert the hitch pin into the hole on the
hitch receiver tube so that the pin passes
through the ball mount.
3. Insert the safety pin securely into the
hitch pin.
4. Pull the ball mount to make sure it does not come off the hitch receiver.
1) Hitch ball installation point
2) Hooks for safety chains
5. Use only a hitch ball that is appropriate
for the ball mount and your trailer. The
hitch ball must be securely installed on the
ball mount.
6. Connect your trailer to the hitch ball.
7. Connect the trailer and the hitch with
safety chains that will hold the trailer
s
maximum gross weight. The chains
should cross under the trailer tongue to
prevent the tongue from dropping onto the
ground in case it should disconnect from
the hitch ball. Allow sufficient slack in the
chains taking tight-turn situations into ac-
count; however, be careful not to let them
drag on the ground.
800265
800266
1
2
800267
Do not connect safety chains to part
of the vehicle other than the safety
chain hooks.
800268
Page 246 of 365
Driving tips 8-19
CONTINUED
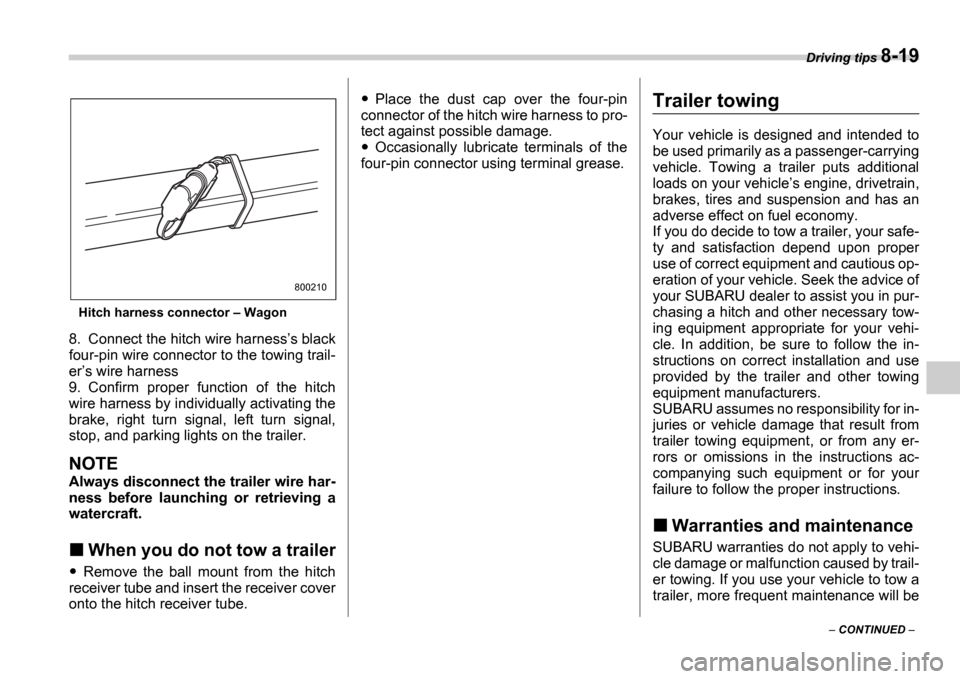
Hitch harness connector Wagon
8. Connect the hitch wire harness s black
four-pin wire connector to the towing trail-
er s wire harness
9. Confirm proper function of the hitch
wire harness by individually activating the
brake, right turn signal, left turn signal,
stop, and parking lights on the trailer.
NOTE
Always disconnect the trailer wire har-
ness before launching or retrieving a
watercraft.
When you do not tow a trailer
Remove the ball mount from the hitch
receiver tube and insert the receiver cover
onto the hitch receiver tube.
Place the dust cap over the four-pin
connector of the hitch wire harness to pro-
tect against possible damage.
Occasionally lubricate terminals of the
four-pin connector using terminal grease.
Trailer towing
Your vehicle is designed and intended to
be used primarily as a passenger-carrying
vehicle. Towing a trailer puts additional
loads on your vehicle s engine, drivetrain,
brakes, tires and suspension and has an
adverse effect on fuel economy.
If you do decide to tow a trailer, your safe-
ty and satisfaction depend upon proper
use of correct equipment and cautious op-
eration of your vehicle. Seek the advice of
your SUBARU dealer to assist you in pur-
chasing a hitch and other necessary tow-
ing equipment appropriate for your vehi-
cle. In addition, be sure to follow the in-
structions on correct installation and use
provided by the trailer and other towing
equipment manufacturers.
SUBARU assumes no responsibility for in-
juries or vehicle damage that result from
trailer towing equipment, or from any er-
rors or omissions in the instructions ac-
companying such equipment or for your
failure to follow the proper instructions.
Warranties and maintenance
SUBARU warranties do not apply to vehi-
cle damage or malfunction caused by trail-
er towing. If you use your vehicle to tow a
trailer, more frequent maintenance will be
800210
Page 247 of 365
8-20 Driving tips
required due to the additional load. (Refer
to Maintenance schedule under severe
driving conditions in the Warranty and
Maintenance Booklet .)
Under no circumstances should a trailer
be towed with a new vehicle or a vehicle
with any new powertrain component (en-
gine, transmission, differential, wheel
bearings, etc.) for the first 1,000 miles
(1,600 km) of driving.
Maximum load limits
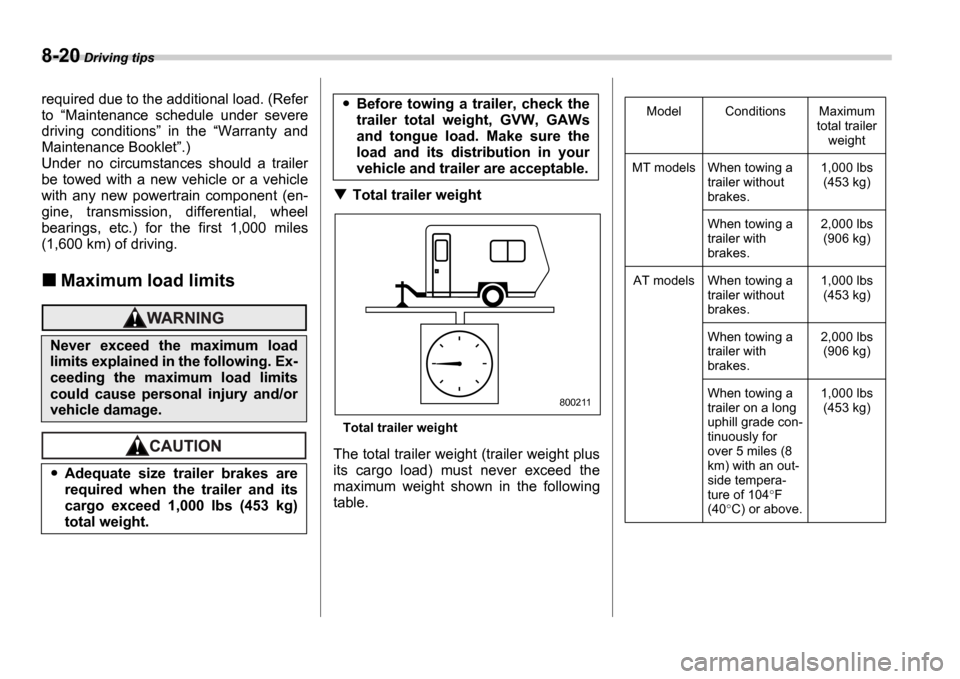
Total trailer weight
Total trailer weight
The total trailer weight (trailer weight plus
its cargo load) must never exceed the
maximum weight shown in the following
table.
Never exceed the maximum load
limits explained in the following. Ex-
ceeding the maximum load limits
could cause personal injury and/or
vehicle damage.
Adequate size trailer brakes are
required when the trailer and its
cargo exceed 1,000 lbs (453 kg)
total weight.
Before towing a trailer, check the
trailer total weight, GVW, GAWs
and tongue load. Make sure the
load and its distribution in your
vehicle and trailer are acceptable.
800211
Model Conditions Maximum total trailer weight
MT models When towing a trailer without
brakes. 1,000 lbs
(453 kg)
When towing a
trailer with
brakes. 2,000 lbs
(906 kg)
AT models When towing a trailer without
brakes. 1,000 lbs
(453 kg)
When towing a
trailer with
brakes. 2,000 lbs
(906 kg)
When towing a
trailer on a long
uphill grade con-
tinuously for
over 5 miles (8
km) with an out-
side tempera-
ture of 104 F
(40 C) or above. 1,000 lbs
(453 kg)
Page 248 of 365
Driving tips 8-21
CONTINUED
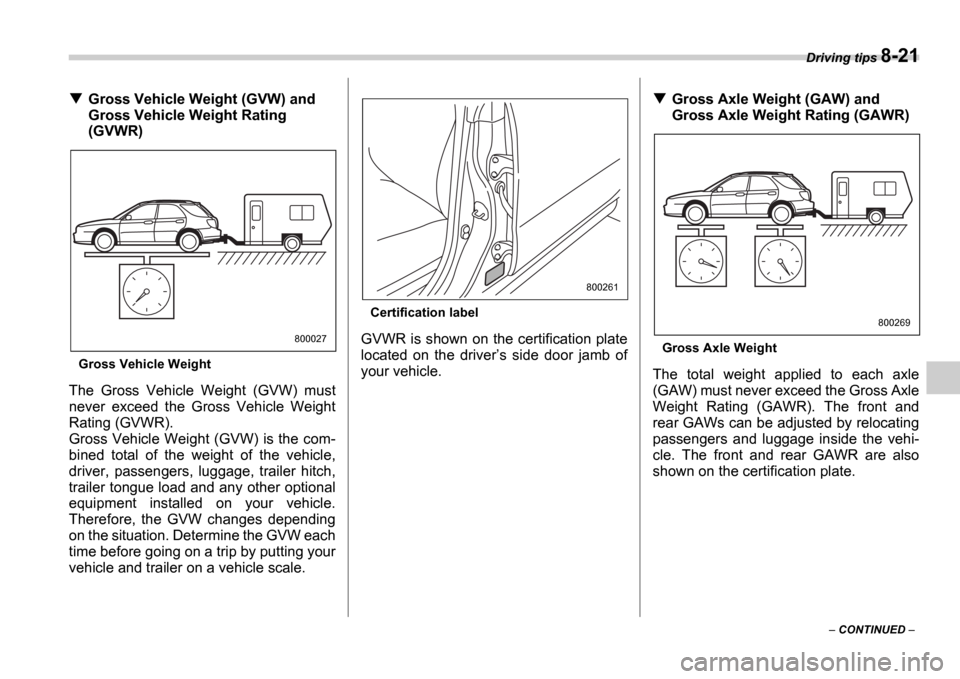
Gross Vehicle Weight (GVW) and
Gross Vehicle Weight Rating
(GVWR)
Gross Vehicle Weight
The Gross Vehicle Weight (GVW) must
never exceed the Gross Vehicle Weight
Rating (GVWR).
Gross Vehicle Weight (GVW) is the com-
bined total of the weight of the vehicle,
driver, passengers, luggage, trailer hitch,
trailer tongue load and any other optional
equipment installed on your vehicle.
Therefore, the GVW changes depending
on the situation. Determine the GVW each
time before going on a trip by putting your
vehicle and trailer on a vehicle scale.
Certification label
GVWR is shown on the certification plate
located on the driver s side door jamb of
your vehicle.
Gross Axle Weight (GAW) and
Gross Axle Weight Rating (GAWR)
Gross Axle Weight
The total weight applied to each axle
(GAW) must never exceed the Gross Axle
Weight Rating (GAWR). The front and
rear GAWs can be adjusted by relocating
passengers and luggage inside the vehi-
cle. The front and rear GAWR are also
shown on the certification plate.
800027
800261
800269
Page 249 of 365
8-22 Driving tips
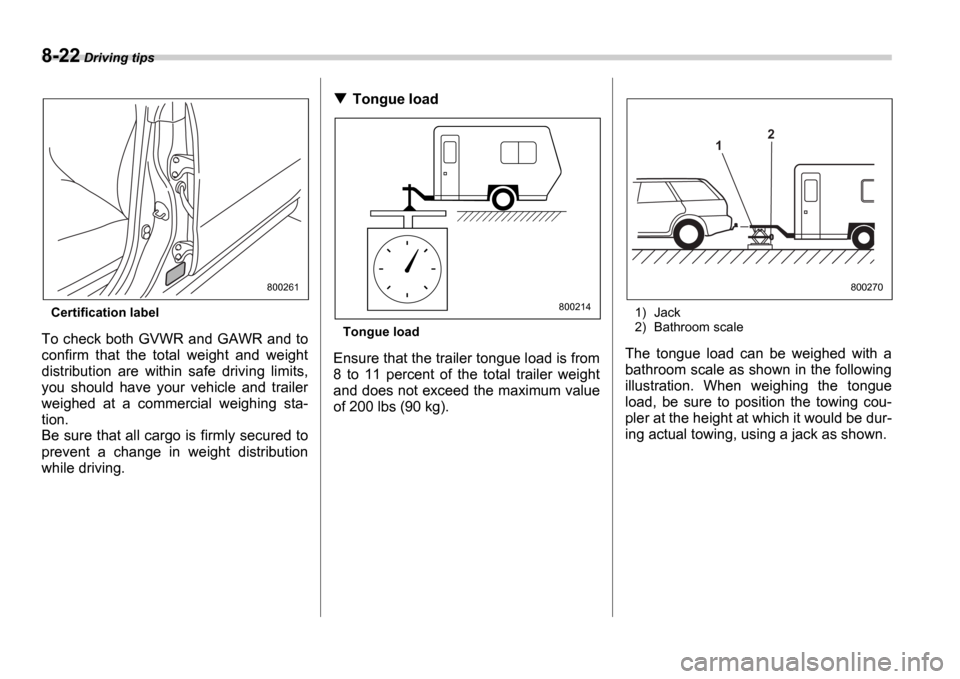
Certification label
To check both GVWR and GAWR and to
confirm that the total weight and weight
distribution are within safe driving limits,
you should have your vehicle and trailer
weighed at a commercial weighing sta-
tion.
Be sure that all cargo is firmly secured to
prevent a change in weight distribution
while driving.
Tongue load
Tongue load
Ensure that the trailer tongue load is from
8 to 11 percent of the total trailer weight
and does not exceed the maximum value
of 200 lbs (90 kg).
1) Jack
2) Bathroom scale
The tongue load can be weighed with a
bathroom scale as shown in the following
illustration. When weighing the tongue
load, be sure to position the towing cou-
pler at the height at which it would be dur-
ing actual towing, using a jack as shown.
800261
800214
1 2
800270
Page 250 of 365
Driving tips 8-23
CONTINUED
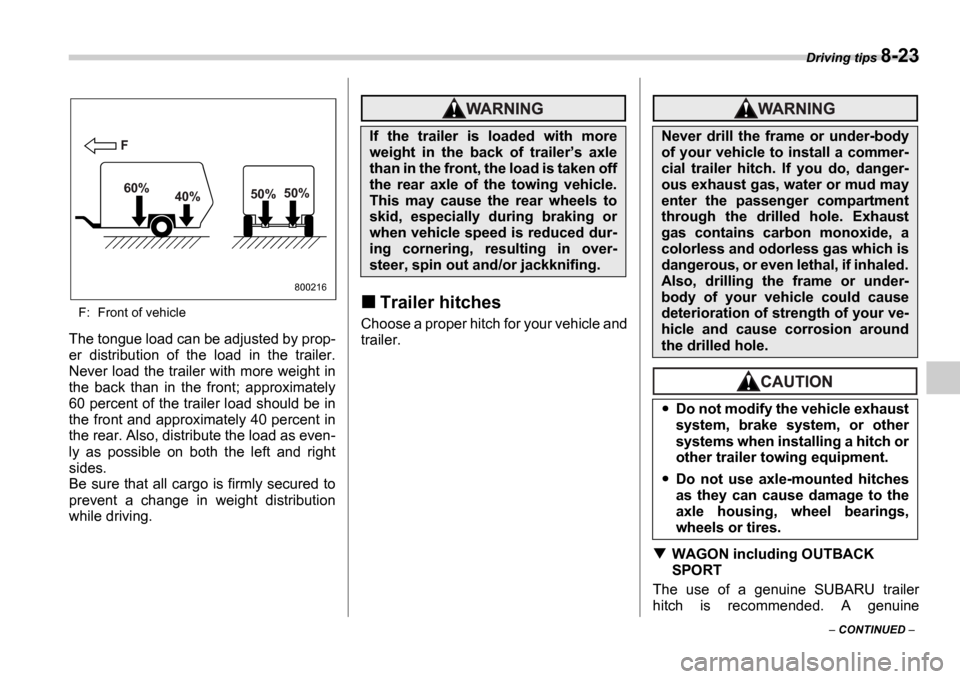
F: Front of vehicle
The tongue load can be adjusted by prop-
er distribution of the load in the trailer.
Never load the trailer with more weight in
the back than in the front; approximately
60 percent of the trailer load should be in
the front and approximately 40 percent in
the rear. Also, distribute the load as even-
ly as possible on both the left and right
sides.
Be sure that all cargo is firmly secured to
prevent a change in weight distribution
while driving.
Trailer hitches
Choose a proper hitch for your vehicle and
trailer.
WAGON including OUTBACK
SPORT
The use of a genuine SUBARU trailer
hitch is recommended. A genuine
F
60% 40% 50%
50%
800216
If the trailer is loaded with more
weight in the back of trailer
s axle
than in the front, the load is taken off
the rear axle of the towing vehicle.
This may cause the rear wheels to
skid, especially during braking or
when vehicle speed is reduced dur-
ing cornering, resulting in over-
steer, spin out and/or jackknifing.Never drill the frame or under-body
of your vehicle to install a commer-
cial trailer hitch. If you do, danger-
ous exhaust gas, water or mud may
enter the passenger compartment
through the drilled hole. Exhaust
gas contains carbon monoxide, a
colorless and odorless gas which is
dangerous, or even lethal, if inhaled.
Also, drilling the frame or under-
body of your vehicle could cause
deterioration of strength of your ve-
hicle and cause corrosion around
the drilled hole.
Do not modify the vehicle exhaust
system, brake system, or other
systems when installing a hitch or
other trailer towing equipment.
Do not use axle-mounted hitches
as they can cause damage to the
axle housing, wheel bearings,
wheels or tires.