transmission oil SUBARU IMPREZA 2016 5.G Owners Manual
[x] Cancel search | Manufacturer: SUBARU, Model Year: 2016, Model line: IMPREZA, Model: SUBARU IMPREZA 2016 5.GPages: 594, PDF Size: 5.36 MB
Page 164 of 594

NOTE
.After replacing or adding the engine
oil, if the engine oil level is within the
normal range when restarting the en-
gine on a level surface, the warning
light will turn off.
. The warning light may illuminate
temporarily in the following conditions
because a low oil level may be detected
as a result of significant oil movement
in the engine.
–when the vehicle is considerably
inclined on an uphill or steep slope
– when the vehicle has continu-
ously accelerated and decelerated
– when the vehicle is continuously
turned
– when the vehicle is driven on a
road that alternates continuously
between uphill and downhill
&Windshield washer
fluid warning light
This light illuminates when the fluid level in
the windshield washer fluid tank de-
creases to the lower limit (approximately
1.1 US qt, 1.0 liter, 0.9 Imp qt).
&AT OIL TEMP warning
light (CVT models)
If this light illuminates when the engine is
running, it may indicate that the transmis-
sion fluid temperature is too hot.
If the light illuminates while driving, im-
mediately stop the vehicle in a safe place
and let the engine idle until the warning
light turns off.
! Transmission control system warn-
ing
If the “AT OIL TEMP ”warning light flashes
after the engine has started, it may
indicate that the transmission control
system is not working properly. Contact
your nearest SUBARU dealer for service
immediately.
&Low tire pressure
warning light (U.S.-spec.
models)
When the ignition switch is turned to the
“ON ”position, the low tire pressure warn-
ing light will illuminate for approximately 2
seconds to check that the tire pressure
monitoring system (TPMS) is functioning
properly. If there is no problem and all tires
are properly inflated, the light will turn off.
Each tire, including the spare (if provided), should be checked monthly when cold
and inflated to the inflation pressure
recommended by the vehicle manufac-
turer on the vehicle placard or tire inflation
pressure label. (If your vehicle has tires of
a different size than the size indicated on
the vehicle placard or tire inflation pres-
sure label, you should determine the
proper tire inflation pressure for those
tires.)
As an added safety feature, your vehicle
has been equipped with a tire pressure
monitoring system (TPMS) that illuminates
a low tire pressure telltale when one or
more of your tires is significantly under-
inflated. Accordingly, when the low tire
pressure telltale illuminates, you should
stop and check your tires as soon as
possible, and inflate them to the proper
pressure. Driving on a significantly under-
inflated tire causes the tire to overheat and
can lead to tire failure. Under-inflation also
reduces fuel efficiency and tire tread life,
and may affect the vehicle
’s handling and
stopping ability.
Please note that the TPMS is not a
substitute for proper tire maintenance,
and it is the driver ’s responsibility to
maintain correct tire pressure, even if
under-inflation has not reached the level
to trigger illumination of the TPMS low tire
pressure telltale.
Instruments and controls/Warning and indicator lights
–CONTINUED –3-19
Page 413 of 594

Starting and operating/Continuously variable transmission
sion.
.The transmission automatically se-
lects 1st gear when the vehicle stops
moving.
. If the temperature of the transmis-
sion fluid becomes too high, the “AT
OIL TEMP ”warning light on the combi-
nation meter will illuminate. Immedi-
ately stop the vehicle in a safe location
and let the engine idle until the warning
light turns off.
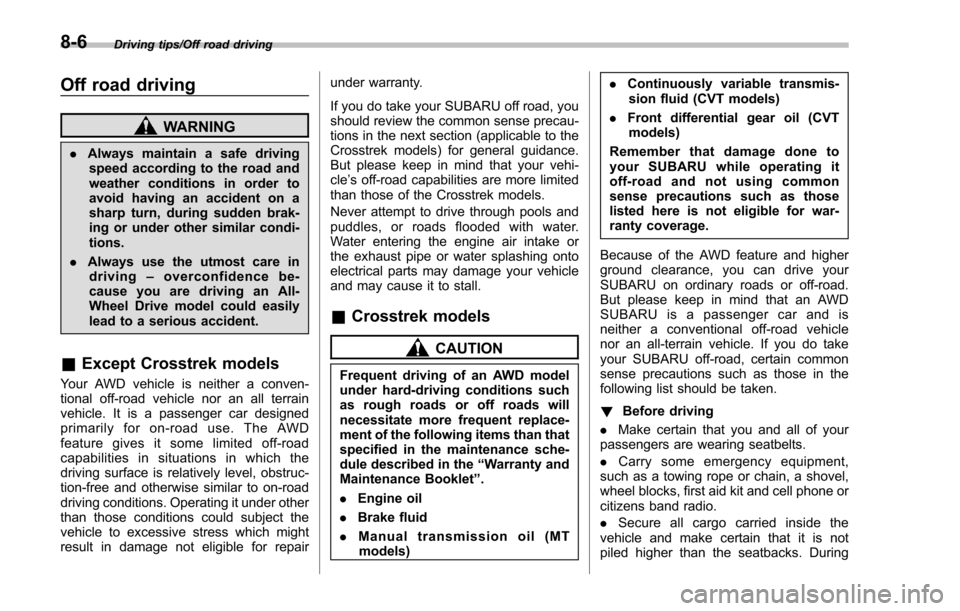
& Selection of “L ” (if equipped)
“L ”is for using engine braking when going
down a hill, etc. To select this mode, move
the select lever from the “D”position to the
“L ”position.
When selected, the indicator “L ” will
illuminate on the combination meter.
To deselect “L”, move the select lever to
the “D ”position.
& Shift lock function
The shift lock function helps prevent the
improper operation of the select lever.
. The select lever cannot be operated
unless the ignition switch is turned to the
“ ON ”position and the brake pedal is
depressed.
. The select lever cannot be moved from
the “P ” position to any other position
before the brake pedal is depressed.
Depress the brake pedal first, and then
operate the select lever.
. Only the “P”position allows you to turn the ignition switch from the
“ACC ”position
to the “LOCK”/ “OFF”position and remove
the key from the ignition switch.
. If the ignition switch is turned to the
“LOCK ”/“OFF ”position while the select
lever is in the “N”position, the select lever
may not be moved to the “P ”position after
a period of time. Therefore, move the
select lever to the “P ” position with the
brake pedal depressed soon after the
ignition switch is turned to the “LOCK”/
“OFF ”position.
! Shift lock release
If the select lever cannot be operated, turn
the ignition switch back to the “ON ”
position then move the select lever to the
“P ”position with the select lever button
pressed and brake pedal depressed.
If the select lever does not move after
performing the above procedure, perform
the following steps.
. When the select lever cannot be
shifted from “P”to “N ”:
Refer to “Shift lock release using the shift
lock release button ”F 7-29.
. When
the
select lever cannot be
shifted from “N”to “R”,“P ”:
Within 60 seconds after placing the igni-
tion switch in the “ACC”position, move the
select lever to the “P”position with the
7-28
Page 449 of 594

Driving tips/Off road driving
Off road driving
WARNING
.Always maintain a safe driving
speed according to the road and
weather conditions in order to
avoid having an accident on a
sharp turn, during sudden brak-
ing or under other similar condi-
tions.
. Always use the utmost care in
driving –overconfidence be-
cause you are driving an All-
Wheel Drive model could easily
lead to a serious accident.
& Except Crosstrek models
Your AWD vehicle is neither a conven-
tional off-road vehicle nor an all terrain
vehicle. It is a passenger car designed
primarily for on-road use. The AWD
feature gives it some limited off-road
capabilities in situations in which the
driving surface is relatively level, obstruc-
tion-free and otherwise similar to on-road
driving conditions. Operating it under other
than those conditions could subject the
vehicle to excessive stress which might
result in damage not eligible for repair under warranty.
If you do take your SUBARU off road, you
should review the common sense precau-
tions in the next section (applicable to the
Crosstrek models) for general guidance.
But please keep in mind that your vehi-
cle
’s off-road capabilities are more limited
than those of the Crosstrek models.
Never attempt to drive through pools and
puddles, or roads flooded with water.
Water entering the engine air intake or
the exhaust pipe or water splashing onto
electrical parts may damage your vehicle
and may cause it to stall.
& Crosstrek models
CAUTION
Frequent driving of an AWD model
under hard-driving conditions such
as rough roads or off roads will
necessitate more frequent replace-
ment of the following items than that
specified in the maintenance sche-
dule described in the “Warranty and
Maintenance Booklet ”.
. Engine oil
. Brake fluid
. Manual transmission oil (MT
models) .
Continuously variable transmis-
sion fluid (CVT models)
. Front differential gear oil (CVT
models)
Remember that damage done to
your SUBARU while operating it
off-road and not using common
sense precautions such as those
listed here is not eligible for war-
ranty coverage.
Because of the AWD feature and higher
ground clearance, you can drive your
SUBARU on ordinary roads or off-road.
But please keep in mind that an AWD
SUBARU is a passenger car and is
neither a conventional off-road vehicle
nor an all-terrain vehicle. If you do take
your SUBARU off-road, certain common
sense precautions such as those in the
following list should be taken.
! Before driving
. Make certain that you and all of your
passengers are wearing seatbelts.
. Carry some emergency equipment,
such as a towing rope or chain, a shovel,
wheel blocks, first aid kit and cell phone or
citizens band radio.
. Secure all cargo carried inside the
vehicle and make certain that it is not
piled higher than the seatbacks. During
8-6
Page 469 of 594

Driving tips/Trailer towing (Crosstrek models)
!Driving on grades
. Before going down a steep hill, slow
down and shift into lower gear (if neces-
sary, use 1st gear) in order to utilize the
engine braking effect and prevent over-
heating of your vehicle’ s brakes. Do not
make sudden downshifts.
. When driving uphill in hot weather, the
air conditioner may turn off automatically
to protect the engine from overheating.
. When driving uphill in hot weather, pay
attention to the following indicators be-
cause the engine and transmission are
relatively prone to overheating.
: Coolant temperature high warning light
: AT OIL TEMP warning light (CVT models)
If the coolant temperature high warning
light and/or the AT OIL TEMP warning light
illuminates, immediately turn off the air
conditioner and stop the vehicle in the
nearest safe location. For further instruc-
tions and additional information, refer to
the following sections. –“If you park your vehicle in case of
an emergency ”F 9-2
–“ Engine overheating ”F 9-13
–“ Coolant temperature low indicator
light/Coolant temperature high warn-
ing light ”F 3-17 –“
AT OIL TEMP warning light (CVT
models) ”F 3-19
. For CVT models, avoid using the
accelerator pedal to stay stationary on
an uphill slope instead of using the
parking brake or foot brake. That may
cause the transmission fluid to overheat.
! Parking on a grade
Always block the wheels under both
vehicle and trailer when parking. Apply
the parking brake firmly. You should not
park on a hill or slope. If parking on a hill or
slope cannot be avoided, you should take
the following steps:
1. Apply the brakes and hold the pedal
down.
2. Have someone place wheel blocks
under both the vehicle and trailer wheels.
3. When the wheel blocks are in place,
release the regular brakes slowly until the
blocks absorb the load.
4. Apply the regular brakes and then
apply the parking brake; slowly release
the regular brakes.
5. Shift into 1st or reverse gear (MT
models) or “P ” position (CVT models)
and shut off the engine.
8-26
Page 486 of 594

properly with safety chains. Each safety
chain should be equally tightened and
care must be taken not to pull the chains
so tightly that the suspension bottoms out.
CAUTION
If your vehicle has a front under-
spoiler and rear underspoiler (both
optional), be careful not to scrape
them when placing the vehicle on
the carrier and when removing the
vehicle from the carrier.
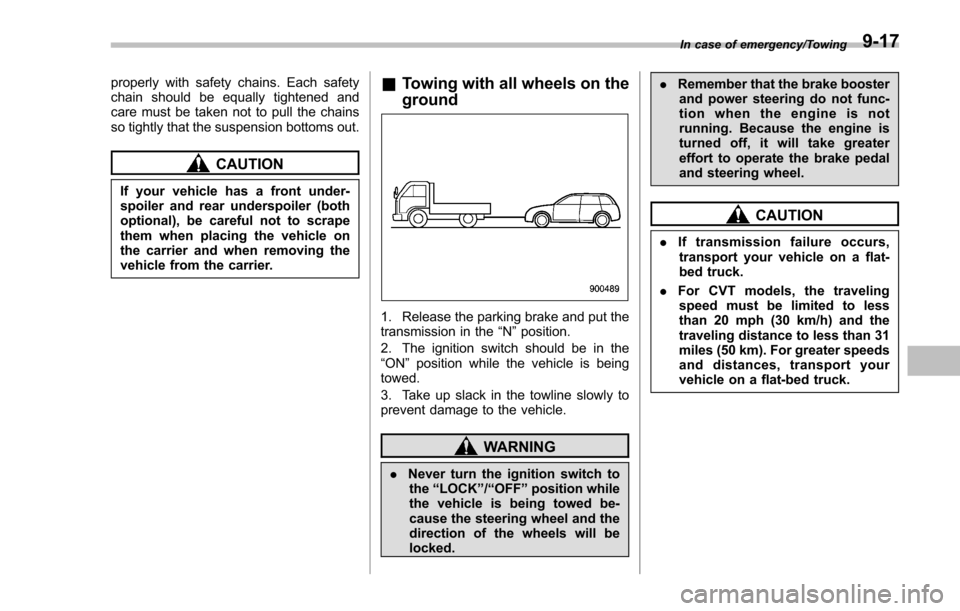
&Towing with all wheels on the
ground
1. Release the parking brake and put the
transmission in the “N”position.
2. The ignition switch should be in the
“ON ”position while the vehicle is being
towed.
3. Take up slack in the towline slowly to
prevent damage to the vehicle.
WARNING
. Never turn the ignition switch to
the “LOCK ”/“OFF ”position while
the vehicle is being towed be-
cause the steering wheel and the
direction of the wheels will be
locked. .
Remember that the brake booster
and power steering do not func-
tion when the engine is not
running. Because the engine is
turned off, it will take greater
effort to operate the brake pedal
and steering wheel.
CAUTION
. If transmission failure occurs,
transport your vehicle on a flat-
bed truck.
. For CVT models, the traveling
speed must be limited to less
than 20 mph (30 km/h) and the
traveling distance to less than 31
miles (50 km). For greater speeds
and distances, transport your
vehicle on a flat-bed truck.
In case of emergency/Towing9-17
Page 496 of 594

Maintenance schedule....................................... 11-3
Maintenance precautions ................................... 11-3
Before checking or servicing in the engine
compartment .................................................... 11-4
When checking or servicing in the engine compartment .................................................... 11-4
When checking or servicing in the engine compartment while the engine is running .......... 11-5
Engine hood....................................................... 11-5
Engine compartment overview .......................... 11-7
Engine oil ............................................................ 11-8
Engine oil consumption ...................................... 11-8
Locations of the oil level gauge, oil filler cap and oil filter ............................................................ 11-8
Checking the oil level ......................................... 11-8
Changing the oil and oil filter .............................. 11-9
Recommended grade and viscosity .................. 11-10
Synthetic oil ..................................................... 11-10
Cooling system ................................................ 11-10Safety precautions ........................................... 11-10
Cooling fan, hose and connections ................... 11-11
Engine coolant ................................................. 11-11
Air cleaner element .......................................... 11-12Replacing the air cleaner element ..................... 11-13
Spark plugs...................................................... 11-14Recommended spark plugs .............................. 11-14
Drive belts........................................................ 11-14
Manual transmission oil .................................. 11-14
Recommended grade and viscosity .................. 11-14
Continuously variable transmission fluid ....... 11-15Front differential gear oil (CVT models)
......... 11-15
Recommended grade and viscosity.................. 11-15
Rear differential gear oil.................................. 11-15Recommended grade and viscosity .................. 11-15
Brake fluid........................................................ 11-16Checking the fluid level .................................... 11-16
Recommended brake fluid ............................... 11-16
Clutch fluid (MT models)................................. 11-17Checking the fluid level.................................... 11-17
Recommended clutch fluid ............................... 11-17
Brake booster.................................................. 11-18
Brake pedal ...................................................... 11-18
Checking the brake pedal free play .................. 11-18
Checking the brake pedal reserve distance ....... 11-18
Clutch pedal (MT models) ............................... 11-19Checking the clutch function ............................ 11-19
Checking the clutch pedal free play .................. 11-19
Hill start assist system.................................... 11-19
Replacement of brake pad and lining ............ 11-20
Breaking-in of new brake pads and linings ....... 11-20
Parking brake stroke ....................................... 11-21
Tires and wheels .............................................. 11-21
Types of tires................................................... 11-21
Tire pressure monitoring system (TPMS) (if equipped) ...................................................... 11-21
Tire inspection ................................................. 11-23
Tire pressures and wear .................................. 11-23
Wheel balance ................................................. 11-25
Wear indicators ............................................... 11-25
Tire rotation direction mark .............................. 11-26
Maintenance and service
11
Page 503 of 594

Maintenance and service/Engine oil
Engine oil
CAUTION
.If the level gauge cannot be
pulled out easily, twist the level
gauge right and left, then gently
pull it out. Otherwise, you may be
injured accidentally straining
yourself.
. Use only engine oil with the
recommended grade and vis-
cosity.
. Be careful not to spill engine oil
when adding it. If oil touches the
exhaust pipe, it may cause a bad
smell, smoke, and/or a fire. If
engine oil gets on the exhaust
pipe, be sure to wipe it off.
& Engine oil consumption
Some engine oil will be consumed while
driving. The rate of consumption can be
affected by such factors as transmission
type, driving style, terrain and tempera-
ture. Under the following conditions, oil
consumption can be increased and thus
require refilling between maintenance
intervals:
. When the engine is new and within the break-in period
.
When the engine oil is of lower quality
. When the incorrect oil viscosity is used
. When engine brakin g is employed
(repeatedly)
. When the engine is operated at high
engine speeds (for extended periods of
time)
. When the engine is operated under
heavy loads (for extended periods of time)
. When towing a trailer (Crosstrek mod-
els)
. When the engine idles for extended
periods of time
. When the vehicle is operated in stop
and go and/or heavy traffic situations
. When the vehicle is used under severe
thermal conditions
. When the vehicle accelerates and
decelerates frequently
Under these or similar conditions, you
should check your oil at least every 2nd
fuel fill-up and change your engine oil
more frequently. Different drivers in the
same car may experience different results.
If your oil consumption rate is greater than
expected, contact your authorized
SUBARU retailer who may perform a test
under controlled conditions.
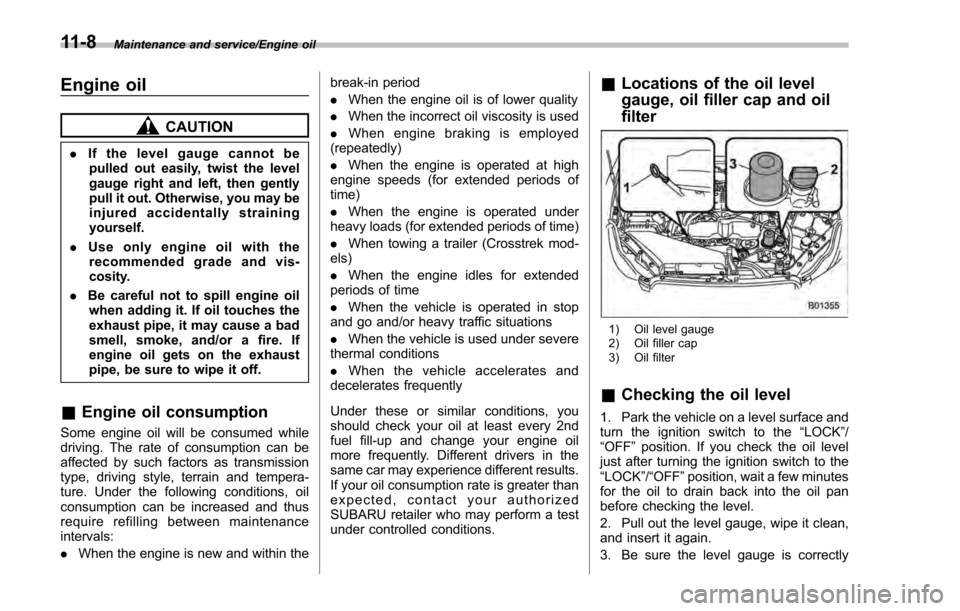
& Locations of the oil level
gauge, oil filler cap and oil
filter
1) Oil level gauge
2) Oil filler cap
3) Oil filter
&Checking the oil level
1. Park the vehicle on a level surface and
turn the ignition switch to the “LOCK”/
“OFF ”position. If you check the oil level
just after turning the ignition switch to the
“LOCK ”/“OFF ”position, wait a few minutes
for the oil to drain back into the oil pan
before checking the level.
2. Pull out the level gauge, wipe it clean,
and insert it again.
3. Be sure the level gauge is correctly
11-8
Page 509 of 594

Maintenance and service/Spark plugs
Spark plugs
It may be difficult to replace the spark
plugs. It is recommended that you have
the spark plugs replaced by your
SUBARU dealer.
The spark plugs should be replaced
according to the maintenance schedule
in the“Warranty and Maintenance Book-
let ”.
CAUTION
Make sure the cables are replaced in
the correct order.
& Recommended spark plugs
For the recommended spark plugs, refer
to“Electrical system ”F 12-7.
Drive belts
It is unnecessary to check the deflection of
the drive belt periodically because your
engine is equipped with an automatic belt
tension adjuster. However, replacement of
the belt should be done according to the
maintenance schedule in the “Warranty
and Maintenance Booklet ”. Consult your
SUBARU dealer for replacement.
If the drive belt is loose, cracked or worn,
contact your SUBARU dealer.
Manual transmission oil
It is not necessary to check the transmis-
sion oil level. Check that there are no
cracks, damage or leakage. However, the
oil inspection should be performed ac-
cording to the maintenance schedule in
the “Warranty and Maintenance Booklet ”.
Consult your SUBARU dealer for details.
& Recommended grade and
viscosity
Each oil manufacturer has its own base
oils and additives. Never use different
brands together. For details, refer to
“Manual transmission, front differential
and rear differential gear oil ”F 12-6.
11-14
Page 510 of 594

Continuously variable trans-
mission fluid
It is not necessary to check the transmis-
sion fluid level. Check that there are no
cracks, damage or leakage. However, the
fluid inspection should be performed
according to the maintenance schedule
in the“Warranty and Maintenance Book-
let ”. Consult your SUBARU dealer for
details.
Front differential gear oil
(CVT models)
It is not necessary to check the gear oil
level. Check that there are no cracks,
damage or leakage. However, the oil
inspection should be performed according
to the maintenance schedule in the
“ Warranty and Maintenance Booklet ”.
Consult your SUBARU dealer for details.
& Recommended grade and
viscosity
Each oil manufacturer has its own base
oils and additives. Never use different
brands together. For details, refer to
“Manual transmission, front differential
and rear differential gear oil ”F 12-6.
CAUTION
Using a differential gear oil other
than the specified oil may cause a
decline in vehicle performance.
Rear differential gear oil
It is not necessary to check the gear oil
level. Check that there are no cracks,
damage or leakage. However, the oil
inspection should be performed according
to the maintenance schedule in the
“Warranty and Maintenance Booklet” .
Consult your SUBARU dealer for details.
& Recommended grade and
viscosity
Each oil manufacturer has its own base
oils and additives. Never use different
brands together. For details, refer to
“Manual transmission, front differential
and rear differential gear oil ”F 12-6.
CAUTION
Using a differential gear oil other
than the specified oil may cause a
decline in vehicle performance.
Maintenance and service/Continuously variable transmission fluid11-15
Page 542 of 594

Specifications..................................................... 12-2Dimensions........................................................ 12-2
Engine ............................................................... 12-3
Fuel ................................................................... 12-3
Engine oil .......................................................... 12-4
Manual transmission, front differential and rear differential gear oil ........................................... 12-6
Fluids ................................................................ 12-7
Engine coolant ................................................... 12-7
Electrical system ................................................ 12-7
Tires .................................................................. 12-8 Brake disc
......................................................... 12-9Fuses and circuits ........................................... 12-10Fuse panel located in the passenger
compartment ................................................. 12-10
Fuse panel located in the engine compartment ................................................. 12-12
Bulb chart......................................................... 12-14Safety precautions ........................................... 12-14
Bulb chart ....................................................... 12-15
Vehicle identification ....................................... 12-17
Specifications
12