SUBARU IMPREZA 2022 Getting Started Guide
IMPREZA 2022
SUBARU
SUBARU
https://www.carmanualsonline.info/img/17/40416/w960_40416-0.png
SUBARU IMPREZA 2022 Getting Started Guide
Trending: roof, fuel cap, sport mode, radio, child seat, open hood, lane assist
Page 11 of 124
KEYLESS ACCESS WITH PUSH BUTTON START
(if equipped)
The Keyless Access with Push-Button Start system features the following touch-activated
door locking or unlocking functions without the key ever leaving your pocket or purse;
simply carry the access key fob with you. You can customize the touch-activated door
locking or unlocking settings using the Combination Meter Display or through the
STARLINK
®Touchscreen by selecting “Settings” then “Vehicle”.
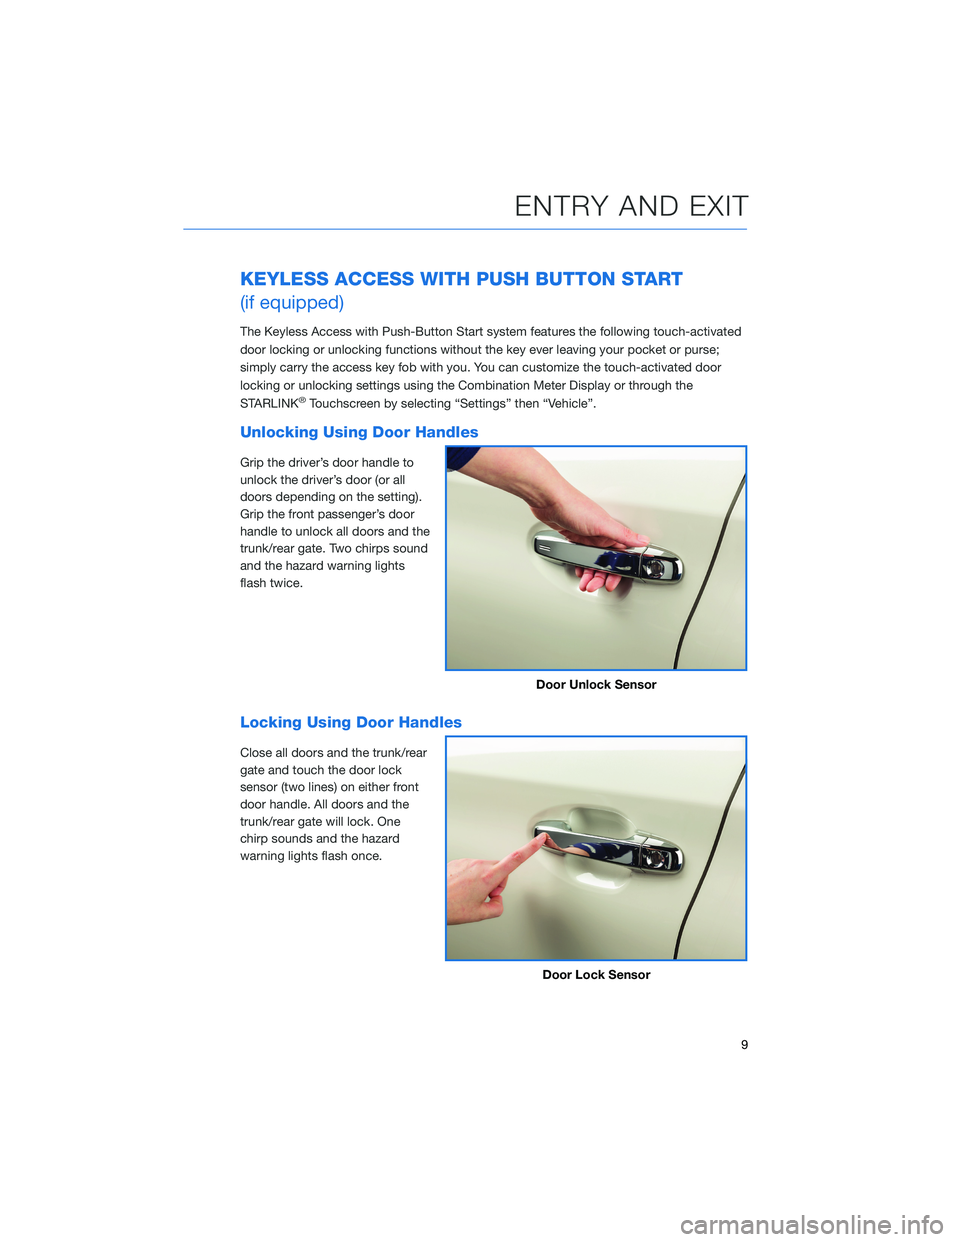
Unlocking Using Door Handles
Grip the driver’s door handle to
unlock the driver’s door (or all
doors depending on the setting).
Grip the front passenger’s door
handle to unlock all doors and the
trunk/rear gate. Two chirps sound
and the hazard warning lights
flash twice.
Locking Using Door Handles
Close all doors and the trunk/rear
gate and touch the door lock
sensor (two lines) on either front
door handle. All doors and the
trunk/rear gate will lock. One
chirp sounds and the hazard
warning lights flash once.
Door Unlock Sensor
Door Lock Sensor
ENTRY AND EXIT
9
Page 12 of 124
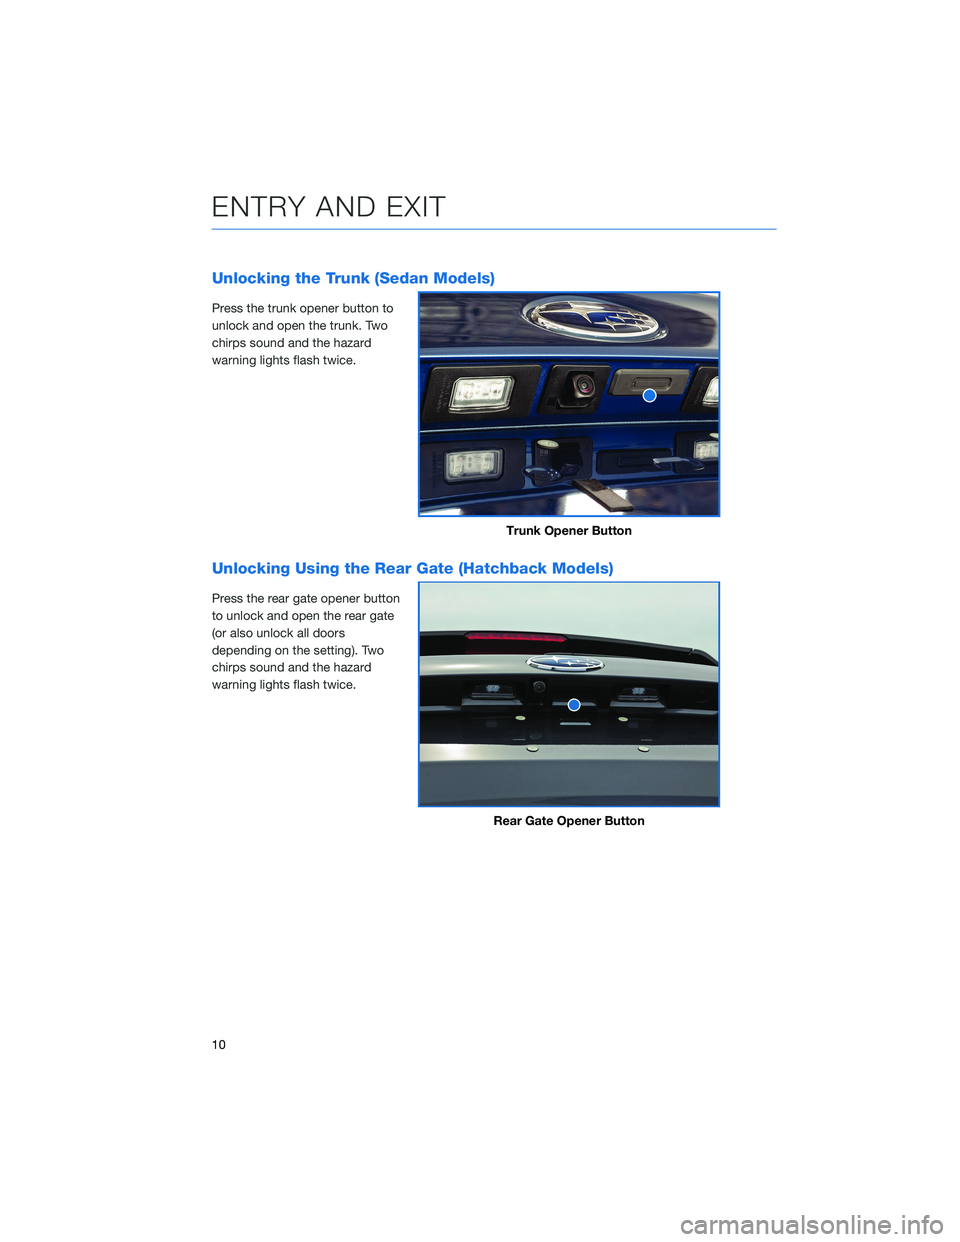
Unlocking the Trunk (Sedan Models)
Press the trunk opener button to
unlock and open the trunk. Two
chirps sound and the hazard
warning lights flash twice.
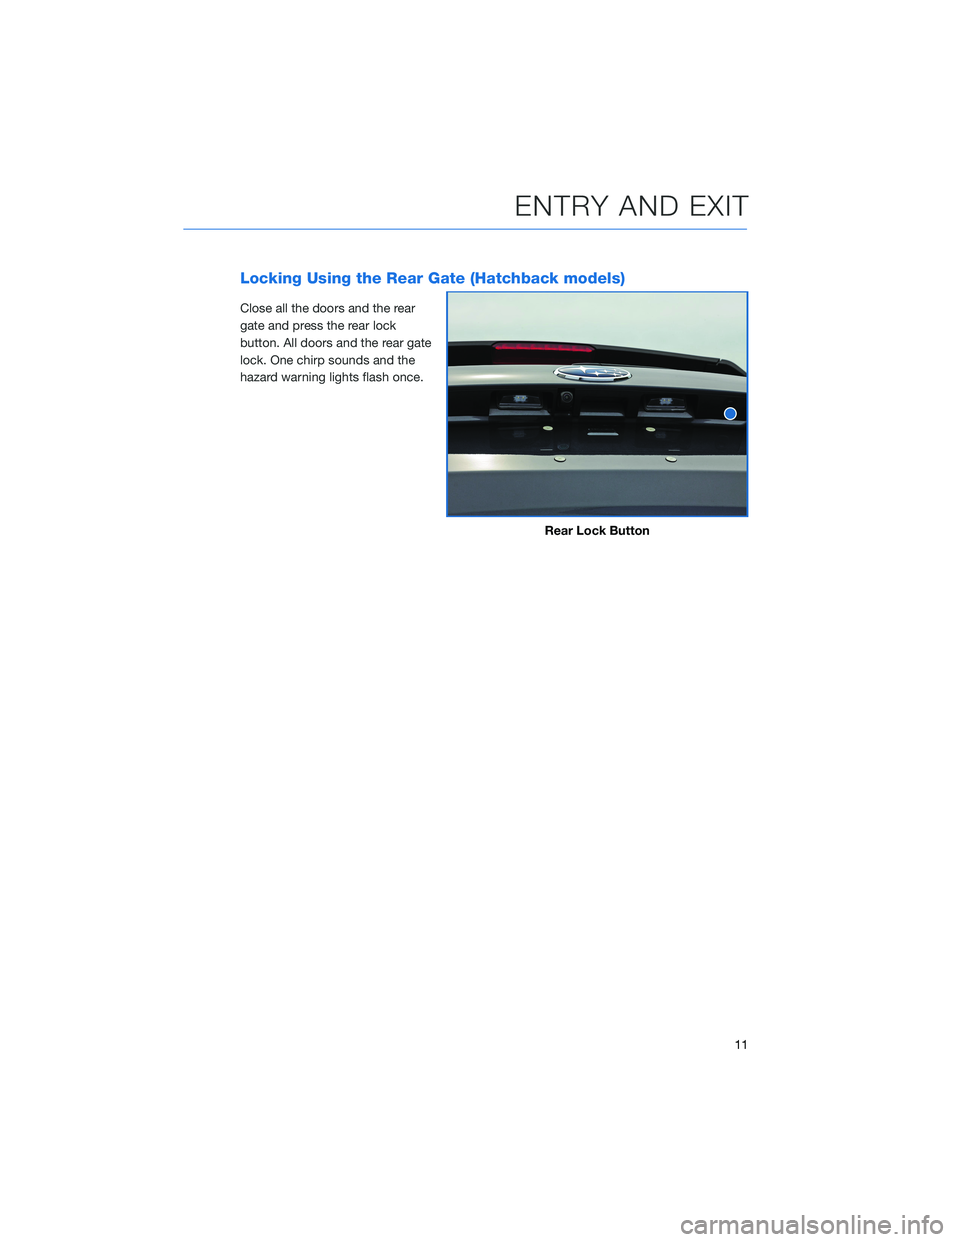
Unlocking Using the Rear Gate (Hatchback Models)
Press the rear gate opener button
to unlock and open the rear gate
(or also unlock all doors
depending on the setting). Two
chirps sound and the hazard
warning lights flash twice.
Trunk Opener Button
Rear Gate Opener Button
ENTRY AND EXIT
10
Page 13 of 124
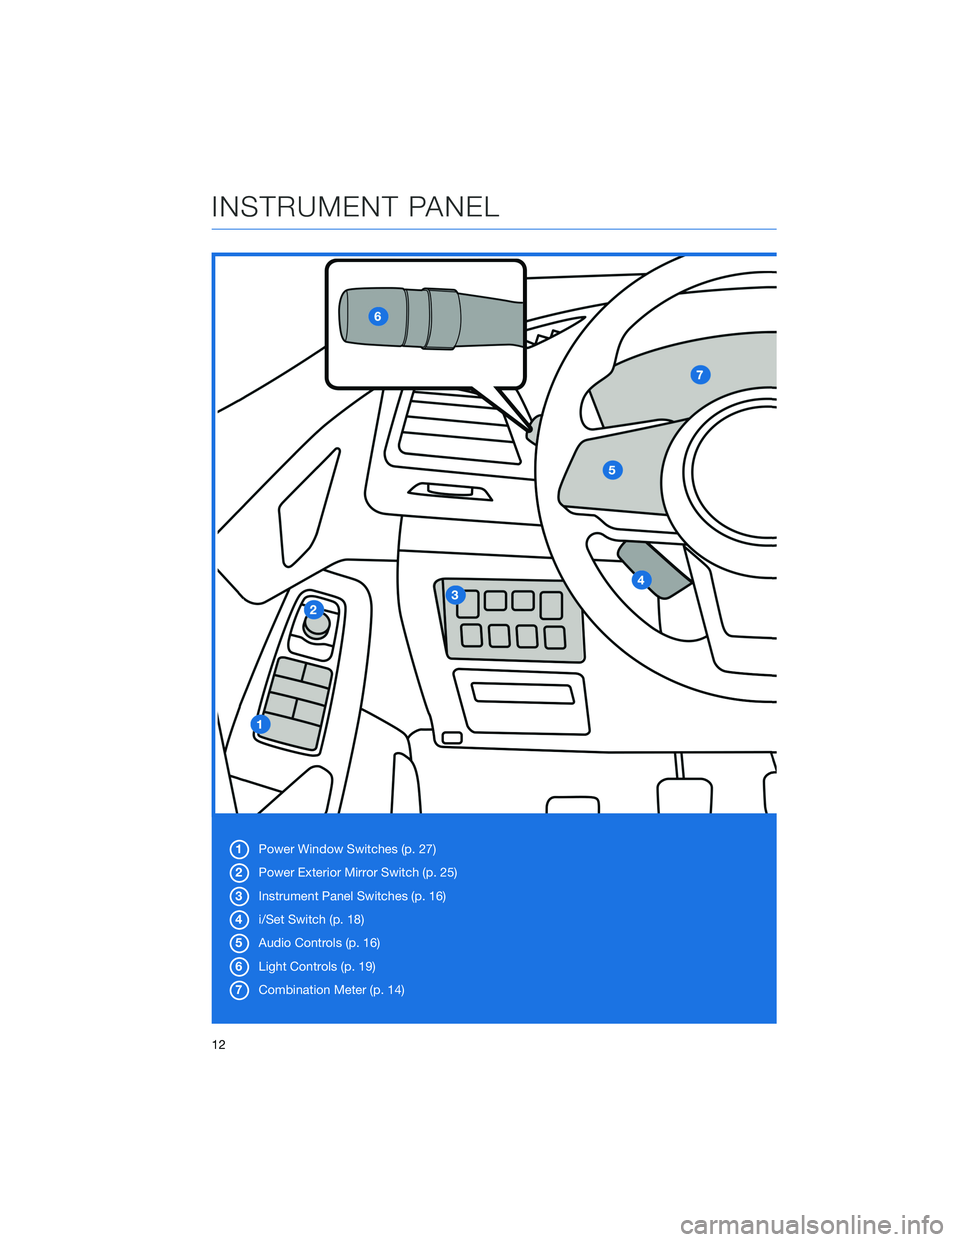
Locking Using the Rear Gate (Hatchback models)
Close all the doors and the rear
gate and press the rear lock
button. All doors and the rear gate
lock. One chirp sounds and the
hazard warning lights flash once.
Rear Lock Button
ENTRY AND EXIT
11
Page 14 of 124
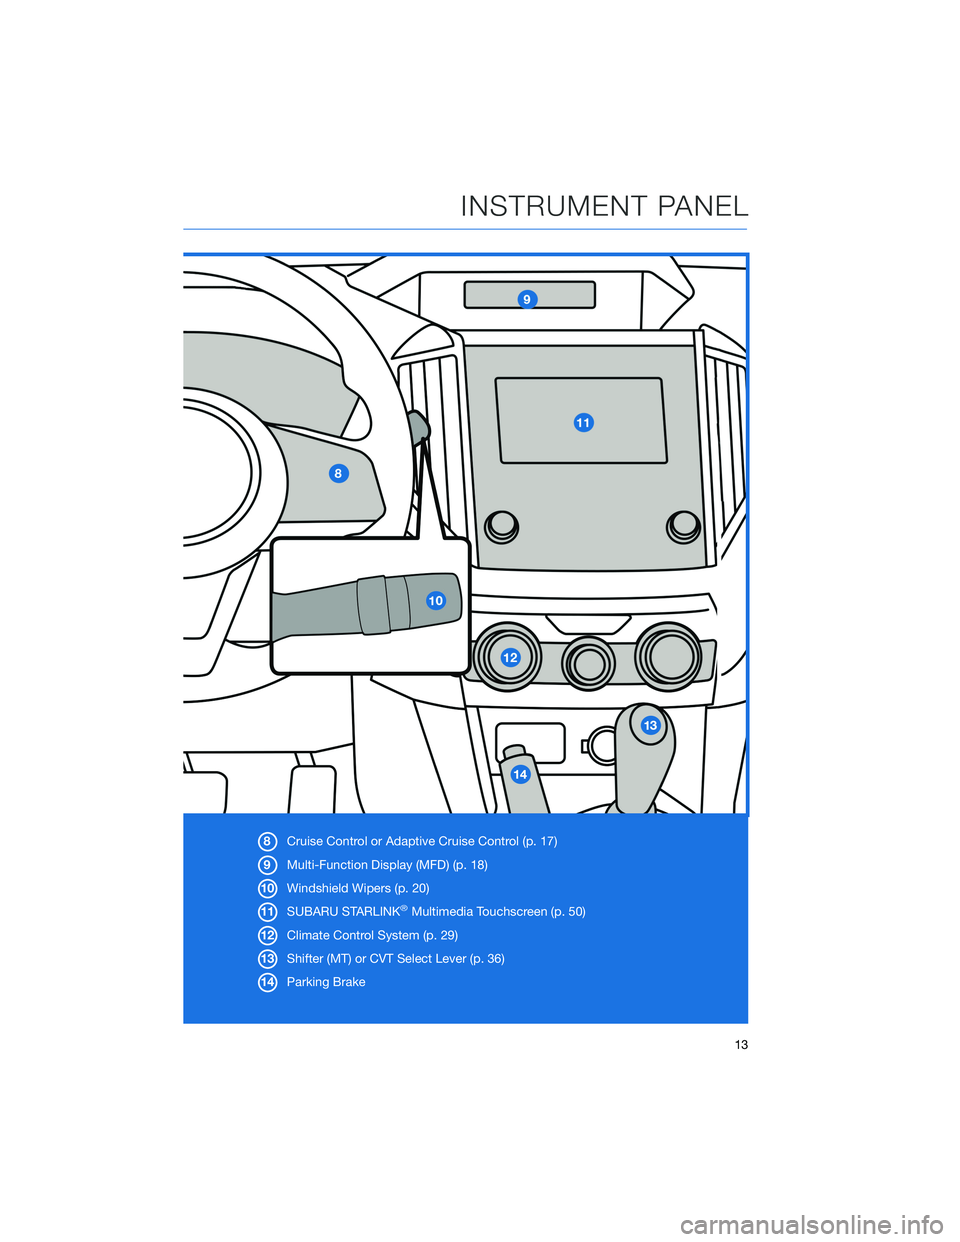
1Power Window Switches (p. 27)
2 Power Exterior Mirror Switch (p. 25)
3 Instrument Panel Switches (p. 16)
4 i/Set Switch (p. 18)
5 Audio Controls (p. 16)
6 Light Controls (p. 19)
7 Combination Meter (p. 14)
INSTRUMENT PANEL
12
Page 15 of 124
8Cruise Control or Adaptive Cruise Control (p. 17)
9 Multi-Function Display (MFD) (p. 18)
10 Windshield Wipers (p. 20)
11 SUBARU STARLINK
®Multimedia Touchscreen (p. 50)
12 Climate Control System (p. 29)
13 Shifter (MT) or CVT Select Lever (p. 36)
14 Parking Brake
INSTRUMENT PANEL
13
Page 16 of 124
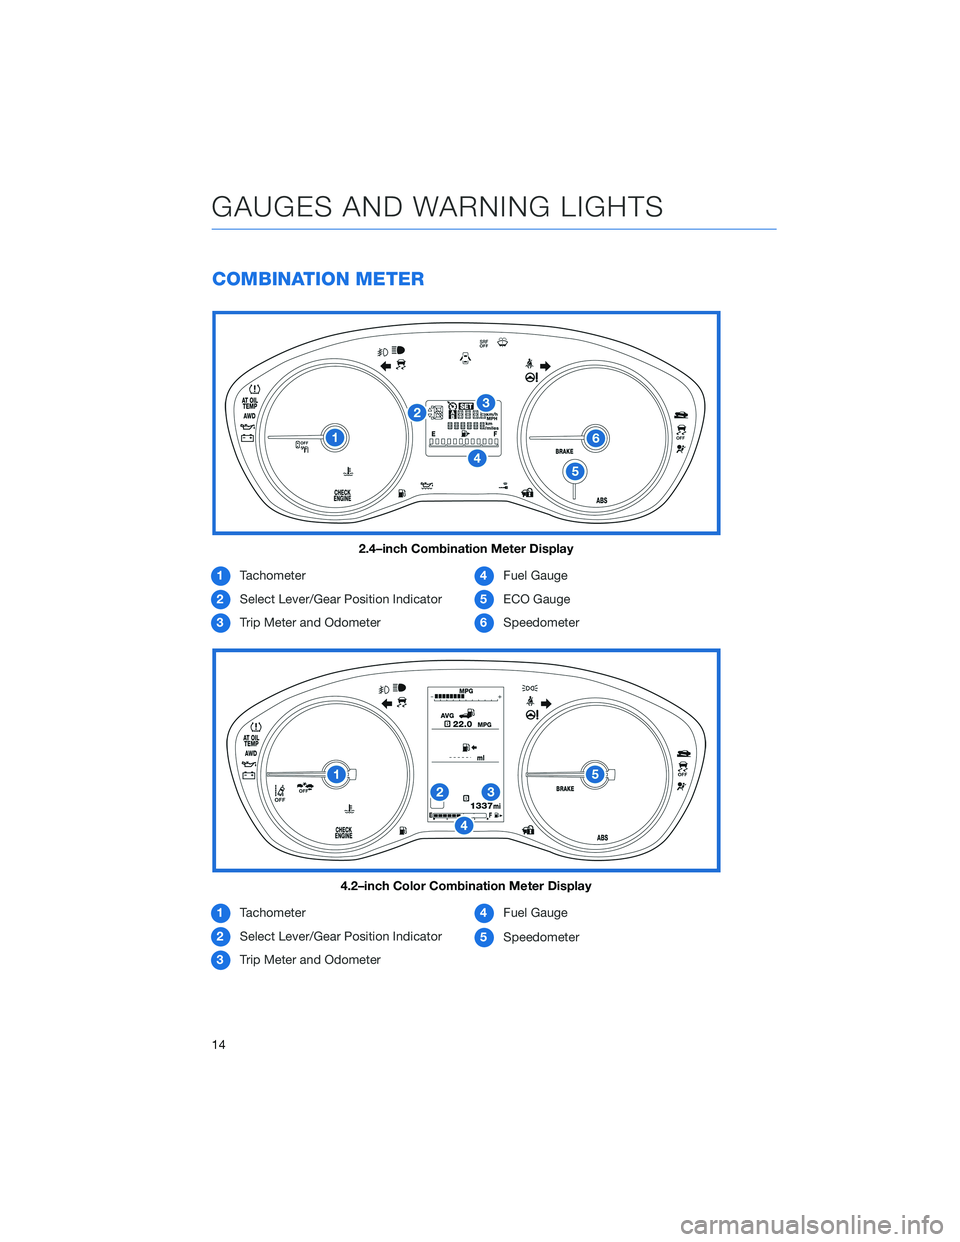
COMBINATION METER
1Tachometer
2 Select Lever/Gear Position Indicator
3 Trip Meter and Odometer 4
Fuel Gauge
5 ECO Gauge
6 Speedometer
1 Tachometer
2 Select Lever/Gear Position Indicator
3 Trip Meter and Odometer 4
Fuel Gauge
5 Speedometer
2.4–inch Combination Meter Display
4.2–inch Color Combination Meter Display
GAUGES AND WARNING LIGHTS
14
Page 17 of 124
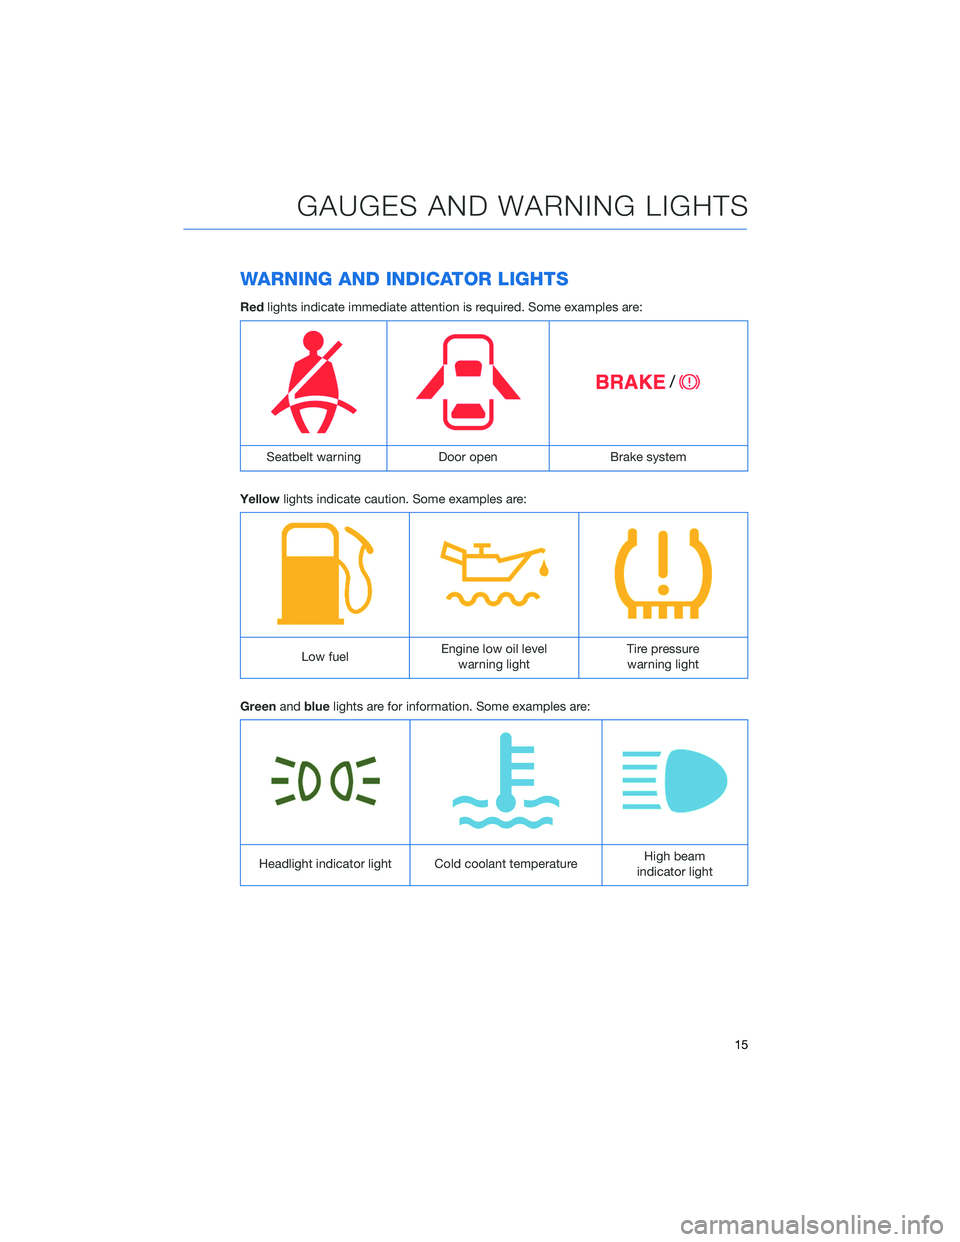
WARNING AND INDICATOR LIGHTS
Redlights indicate immediate attention is required. Some examples are:
Seatbelt warning Door openBrake system
Yellow lights indicate caution. Some examples are:
Low fuel Engine low oil level
warning light Tire pressure
warning light
Green andblue lights are for information. Some examples are:
Headlight indicator light Cold coolant temperature High beam
indicator light
GAUGES AND WARNING LIGHTS
15
Page 18 of 124
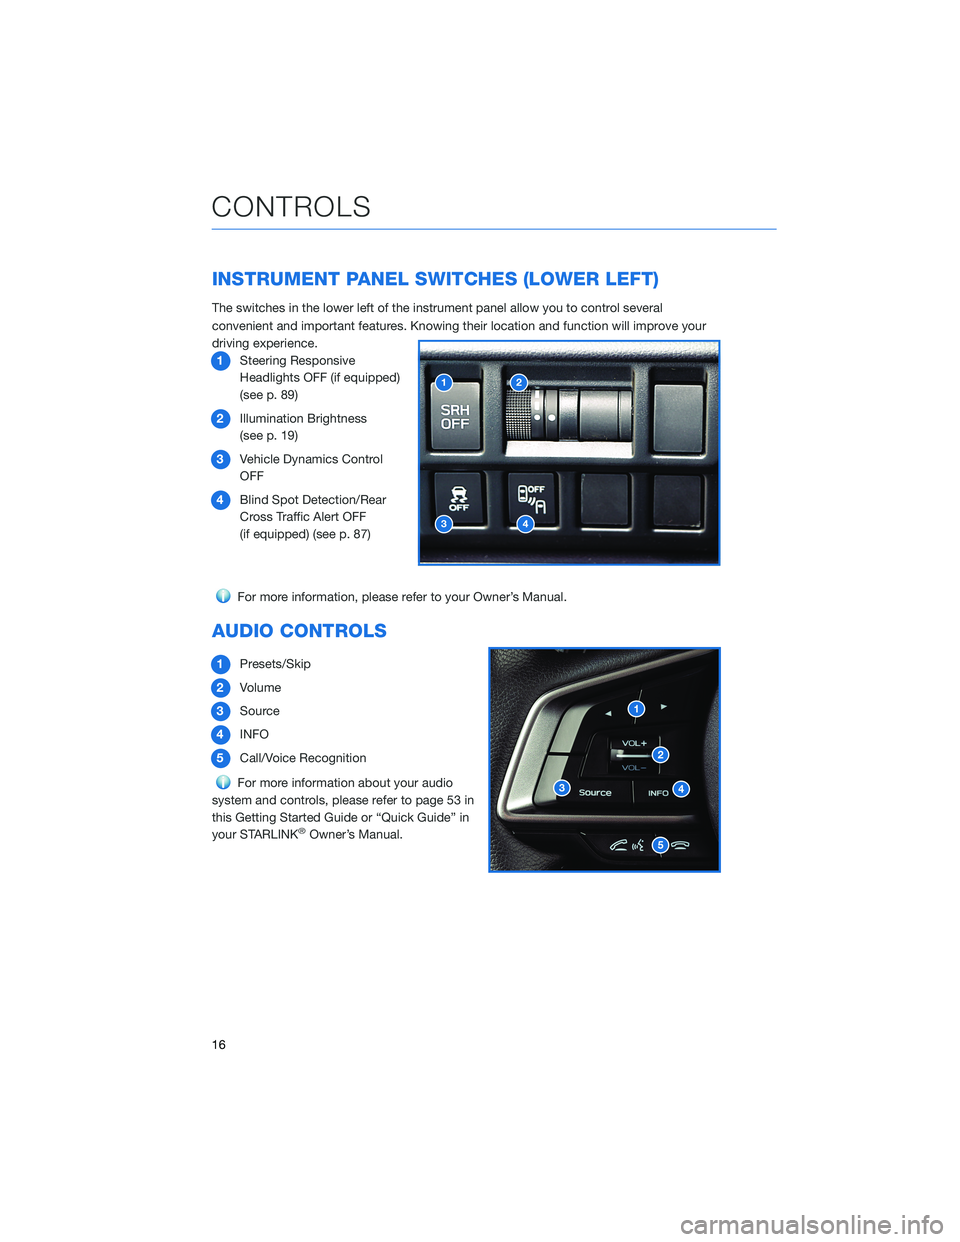
INSTRUMENT PANEL SWITCHES (LOWER LEFT)
The switches in the lower left of the instrument panel allow you to control several
convenient and important features. Knowing their location and function will improve your
driving experience.1 Steering Responsive
Headlights OFF (if equipped)
(see p. 89)
2 Illumination Brightness
(see p. 19)
3 Vehicle Dynamics Control
OFF
4 Blind Spot Detection/Rear
Cross Traffic Alert OFF
(if equipped) (see p. 87)
For more information, please refer to your Owner’s Manual.
AUDIO CONTROLS
1Presets/Skip
2 Volume
3 Source
4 INFO
5 Call/Voice Recognition
For more information about your audio
system and controls, please refer to page 53 in
this Getting Started Guide or “Quick Guide” in
your STARLINK
®Owner’s Manual.
CONTROLS
16
Page 19 of 124
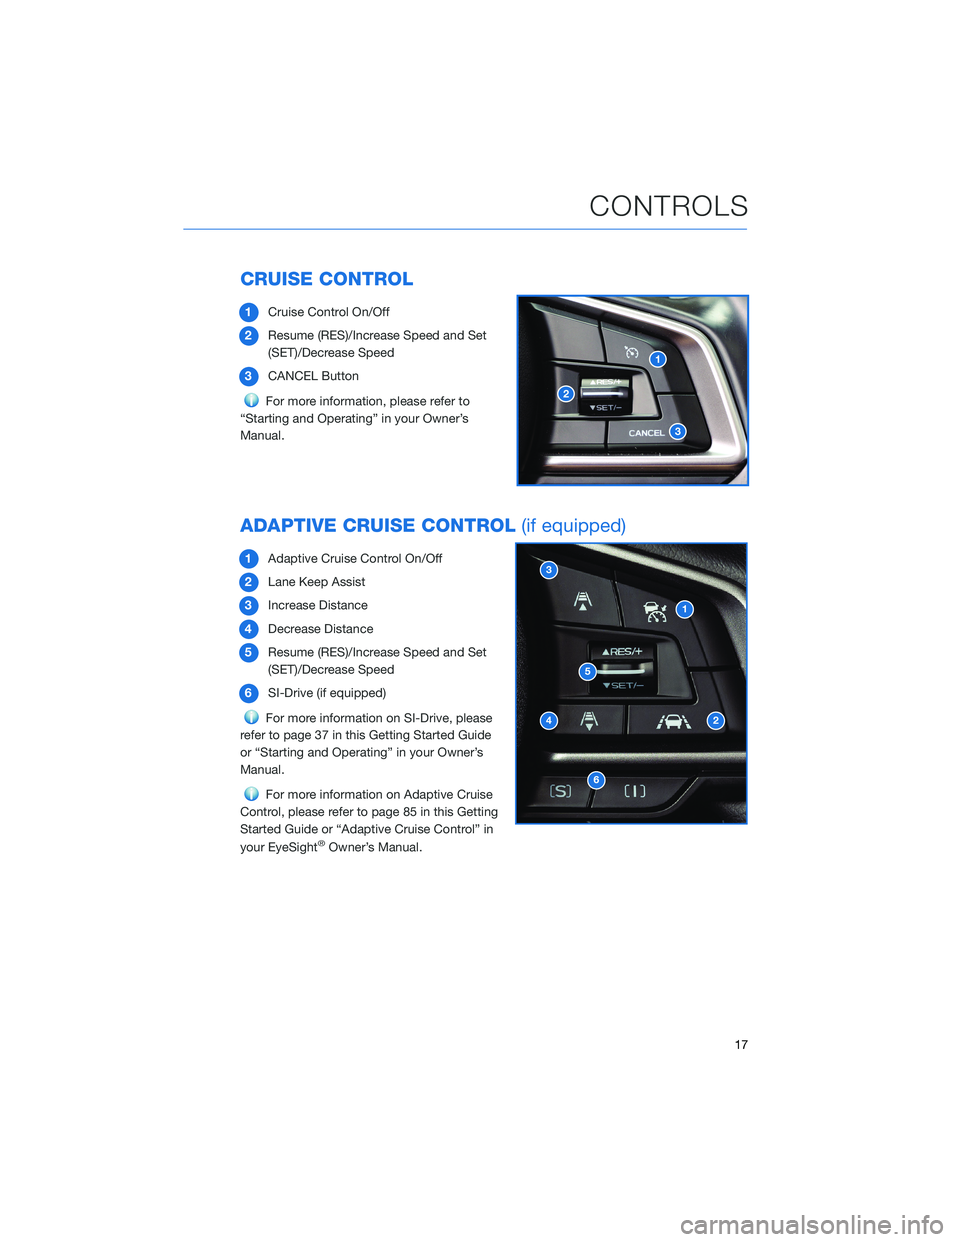
CRUISE CONTROL
1Cruise Control On/Off
2 Resume (RES)/Increase Speed and Set
(SET)/Decrease Speed
3 CANCEL Button
For more information, please refer to
“Starting and Operating” in your Owner’s
Manual.
ADAPTIVE CRUISE CONTROL (if equipped)
1Adaptive Cruise Control On/Off
2 Lane Keep Assist
3 Increase Distance
4 Decrease Distance
5 Resume (RES)/Increase Speed and Set
(SET)/Decrease Speed
6 SI-Drive (if equipped)
For more information on SI-Drive, please
refer to page 37 in this Getting Started Guide
or “Starting and Operating” in your Owner’s
Manual.
For more information on Adaptive Cruise
Control, please refer to page 85 in this Getting
Started Guide or “Adaptive Cruise Control” in
your EyeSight
®Owner’s Manual.
CONTROLS
17
Page 20 of 124
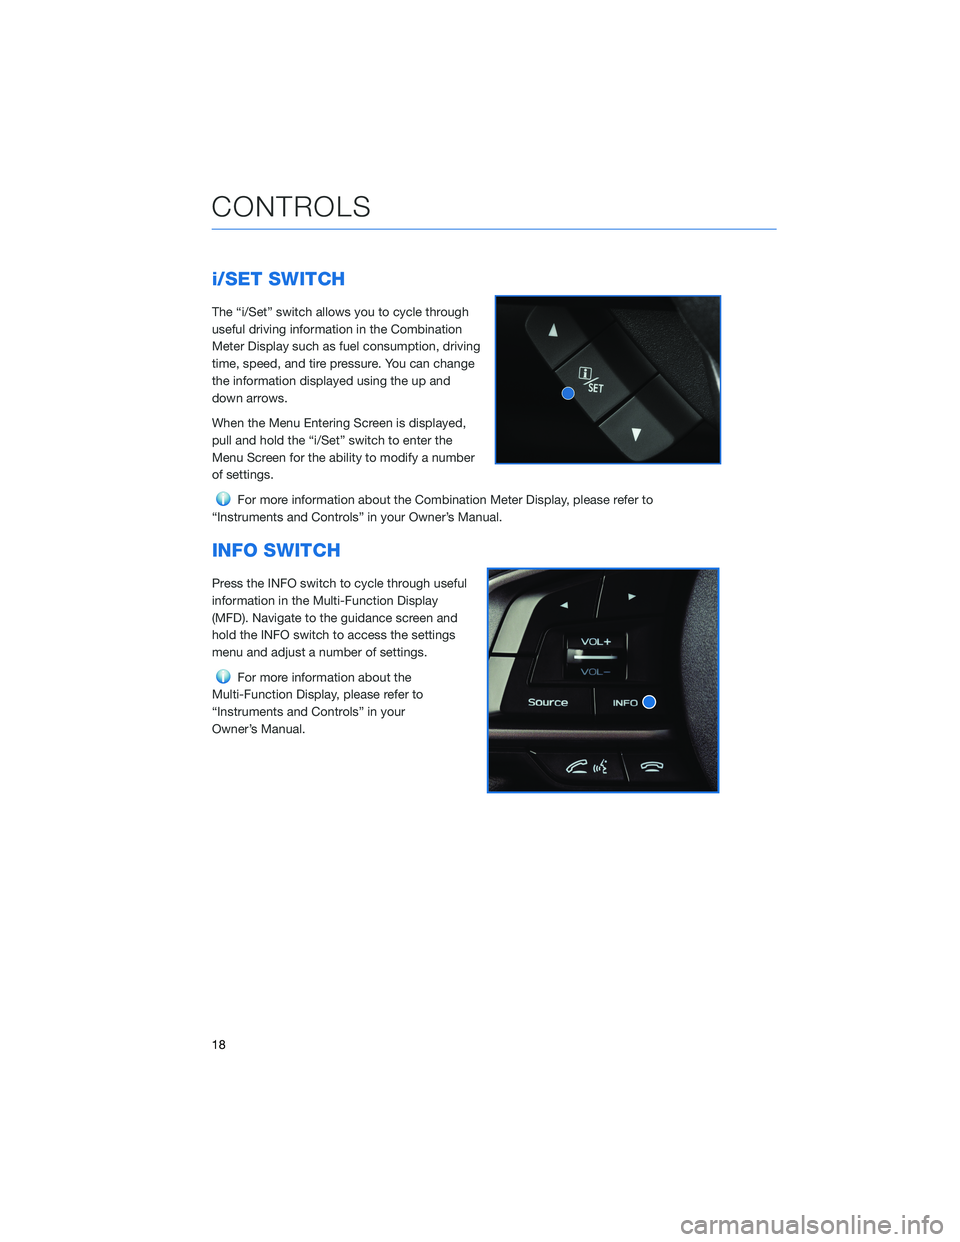
i/SET SWITCH
The “i/Set” switch allows you to cycle through
useful driving information in the Combination
Meter Display such as fuel consumption, driving
time, speed, and tire pressure. You can change
the information displayed using the up and
down arrows.
When the Menu Entering Screen is displayed,
pull and hold the “i/Set” switch to enter the
Menu Screen for the ability to modify a number
of settings.
For more information about the Combination Meter Display, please refer to
“Instruments and Controls” in your Owner’s Manual.
INFO SWITCH
Press the INFO switch to cycle through useful
information in the Multi-Function Display
(MFD). Navigate to the guidance screen and
hold the INFO switch to access the settings
menu and adjust a number of settings.
For more information about the
Multi-Function Display, please refer to
“Instruments and Controls” in your
Owner’s Manual.
CONTROLS
18
Trending: fuel pressure, length, trailer, light, fold seats, lights, turn signal

