display SUBARU IMPREZA 2022 Getting Started Guide
[x] Cancel search | Manufacturer: SUBARU, Model Year: 2022, Model line: IMPREZA, Model: SUBARU IMPREZA 2022Pages: 124, PDF Size: 33.04 MB
Page 110 of 124
MAPS(if equipped)
Finding a Destination by Address
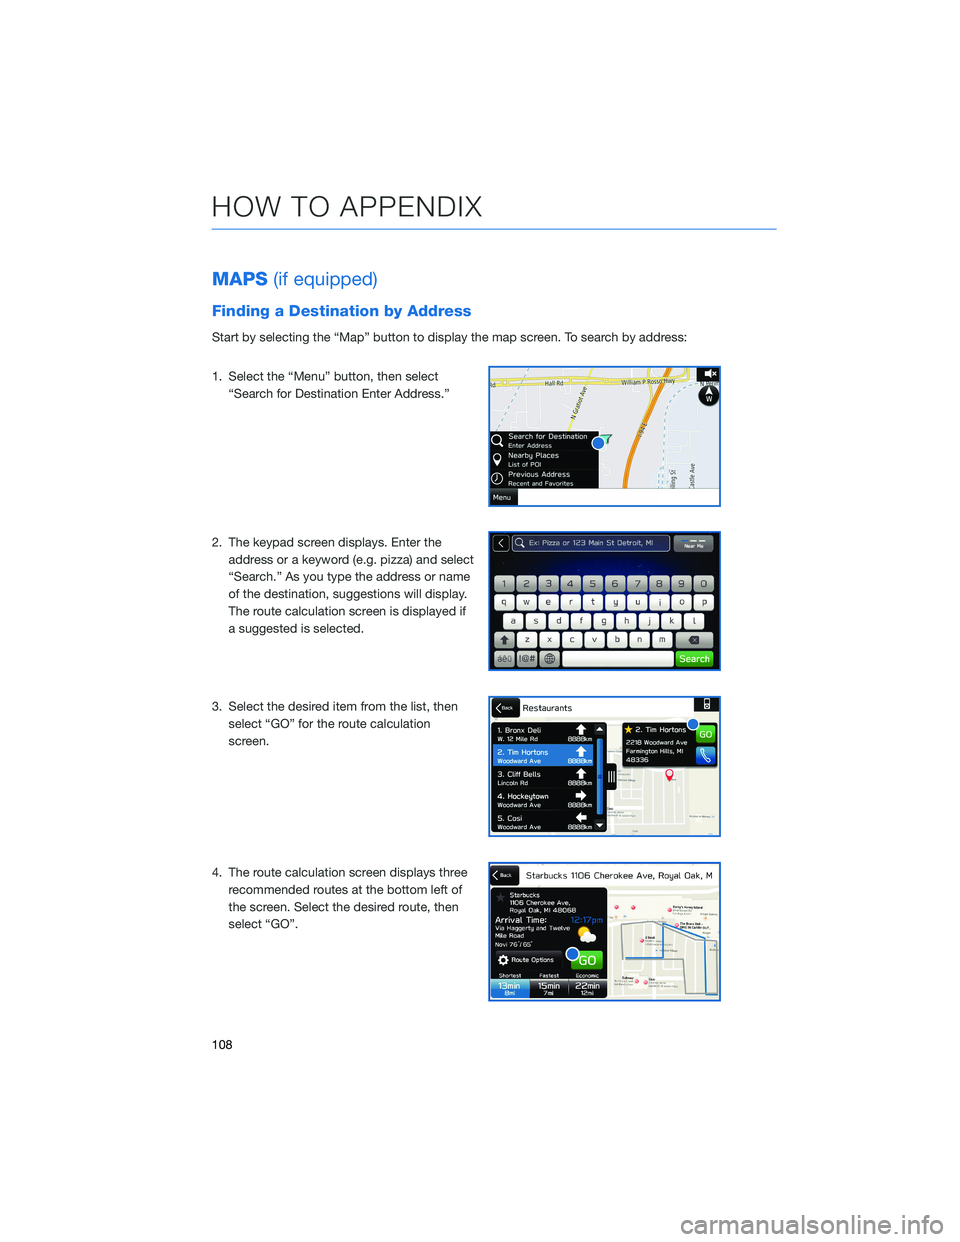
Start by selecting the “Map” button to display the map screen. To search by address:
1. Select the “Menu” button, then select
“Search for Destination Enter Address.”
2. The keypad screen displays. Enter the address or a keyword (e.g. pizza) and select
“Search.” As you type the address or name
of the destination, suggestions will display.
The route calculation screen is displayed if
a suggested is selected.
3. Select the desired item from the list, then select “GO” for the route calculation
screen.
4. The route calculation screen displays three recommended routes at the bottom left of
the screen. Select the desired route, then
select “GO”.
HOW TO APPENDIX
108
Page 111 of 124
Finding a Destination by POI
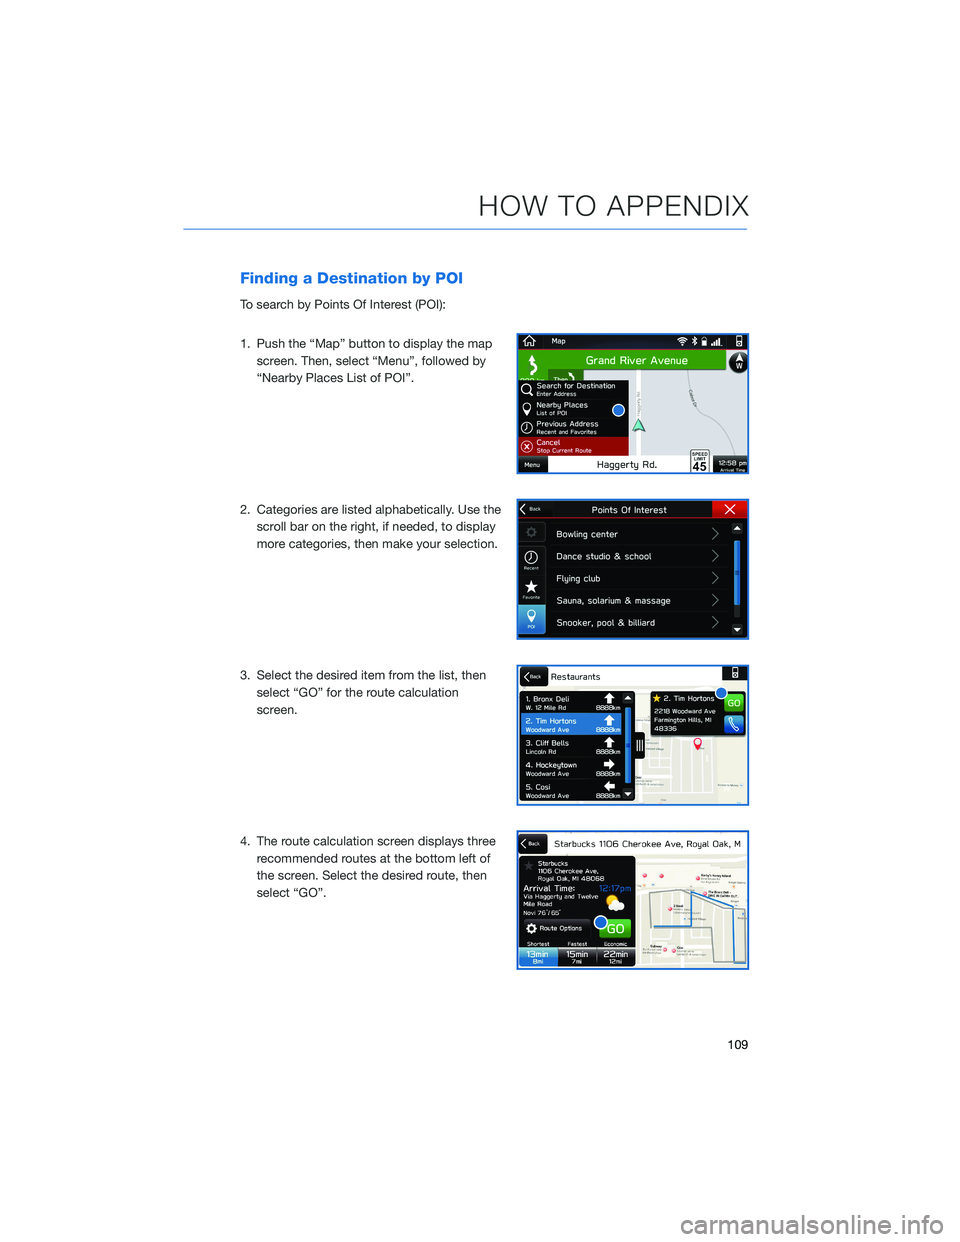
To search by Points Of Interest (POI):
1. Push the “Map” button to display the mapscreen. Then, select “Menu”, followed by
“Nearby Places List of POI”.
2. Categories are listed alphabetically. Use the scroll bar on the right, if needed, to display
more categories, then make your selection.
3. Select the desired item from the list, then select “GO” for the route calculation
screen.
4. The route calculation screen displays three recommended routes at the bottom left of
the screen. Select the desired route, then
select “GO”.
HOW TO APPENDIX
109
Page 114 of 124
Map View/Perspective
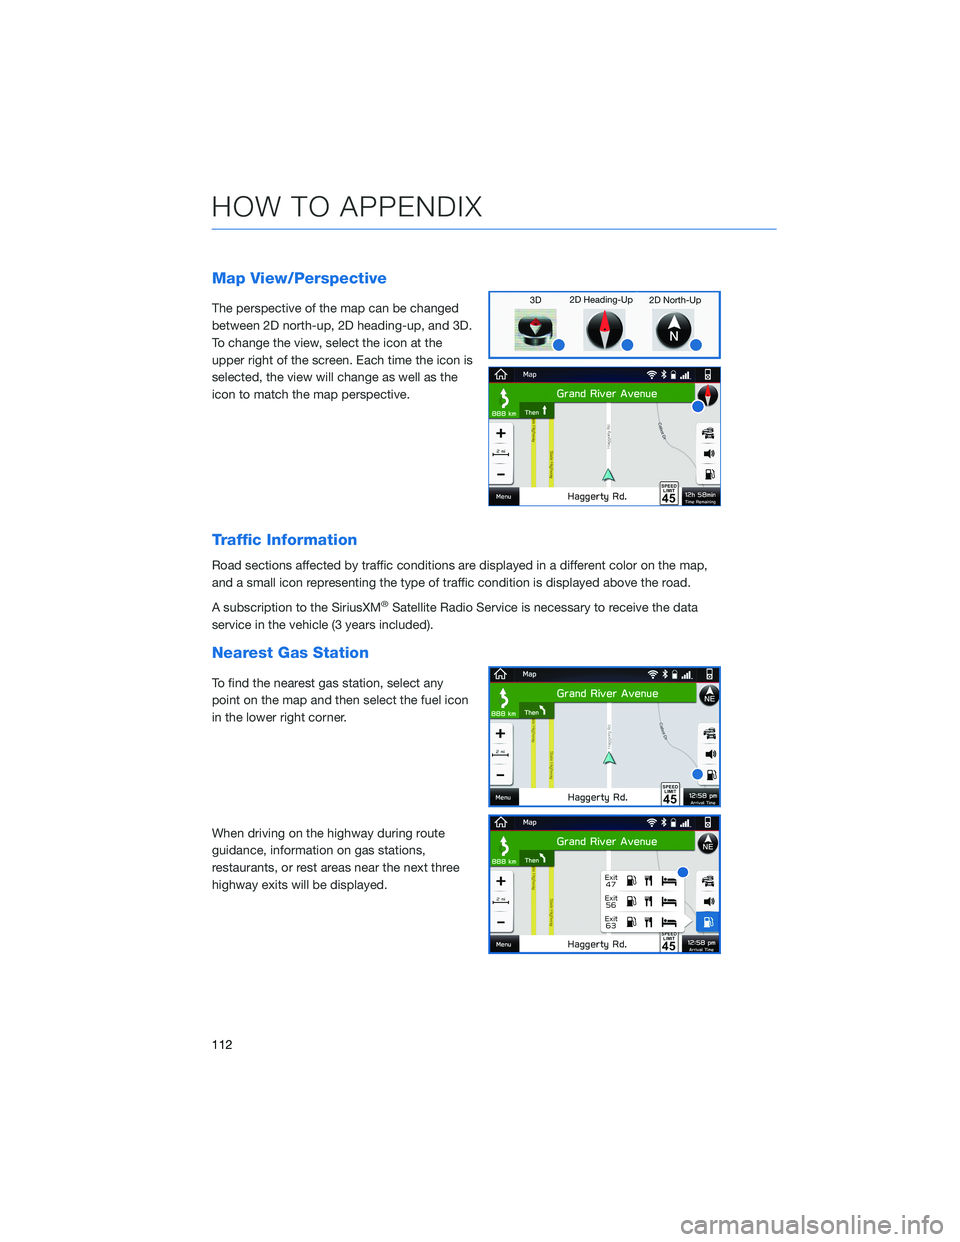
The perspective of the map can be changed
between 2D north-up, 2D heading-up, and 3D.
To change the view, select the icon at the
upper right of the screen. Each time the icon is
selected, the view will change as well as the
icon to match the map perspective.
Traffic Information
Road sections affected by traffic conditions are displayed in a different color on the map,
and a small icon representing the type of traffic condition is displayed above the road.
A subscription to the SiriusXM
®Satellite Radio Service is necessary to receive the data
service in the vehicle (3 years included).
Nearest Gas Station
To find the nearest gas station, select any
point on the map and then select the fuel icon
in the lower right corner.
When driving on the highway during route
guidance, information on gas stations,
restaurants, or rest areas near the next three
highway exits will be displayed.
HOW TO APPENDIX
112
Page 115 of 124
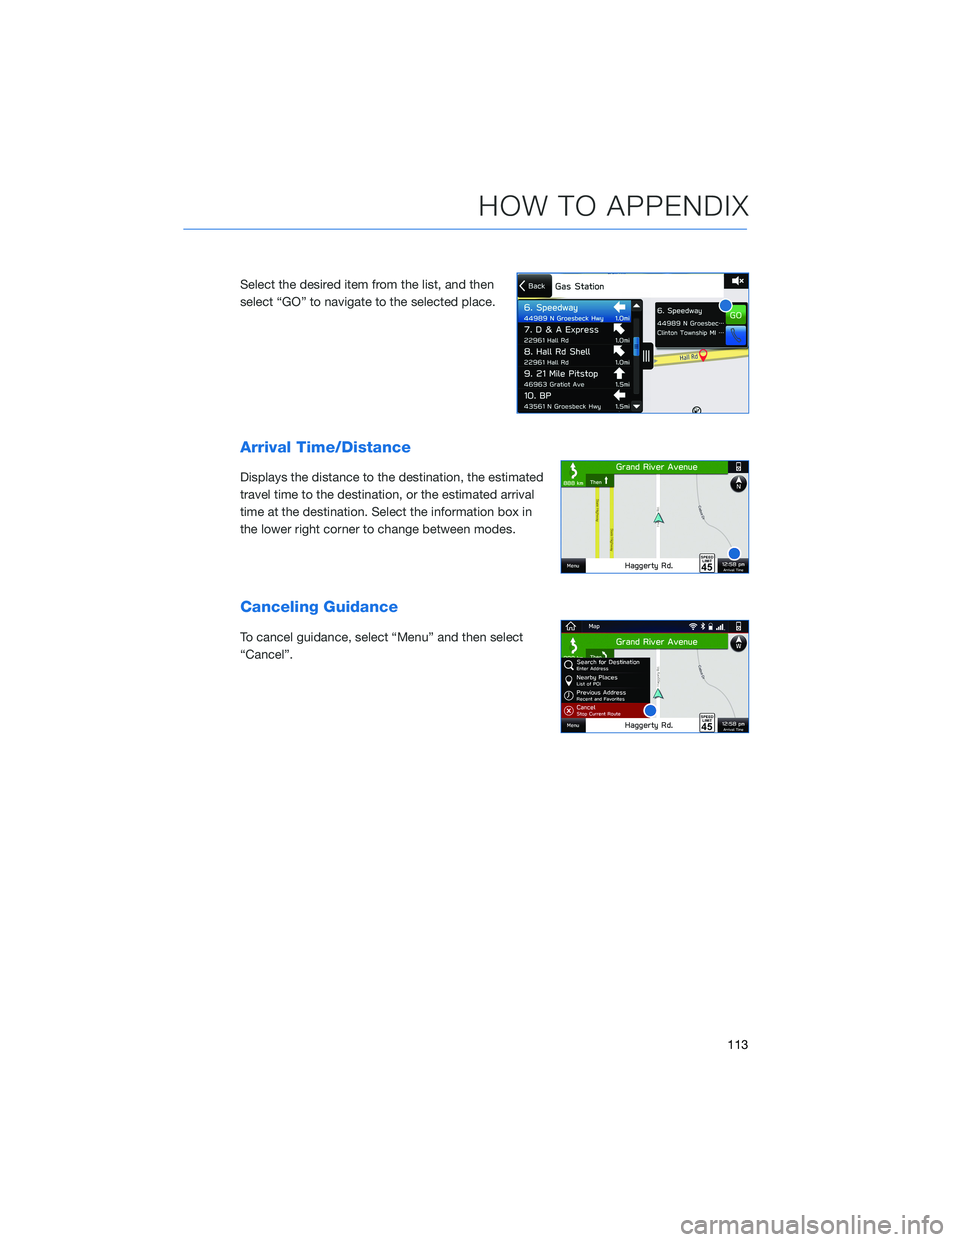
Select the desired item from the list, and then
select “GO” to navigate to the selected place.
Arrival Time/Distance
Displays the distance to the destination, the estimated
travel time to the destination, or the estimated arrival
time at the destination. Select the information box in
the lower right corner to change between modes.
Canceling Guidance
To cancel guidance, select “Menu” and then select
“Cancel”.
HOW TO APPENDIX
113
Page 117 of 124
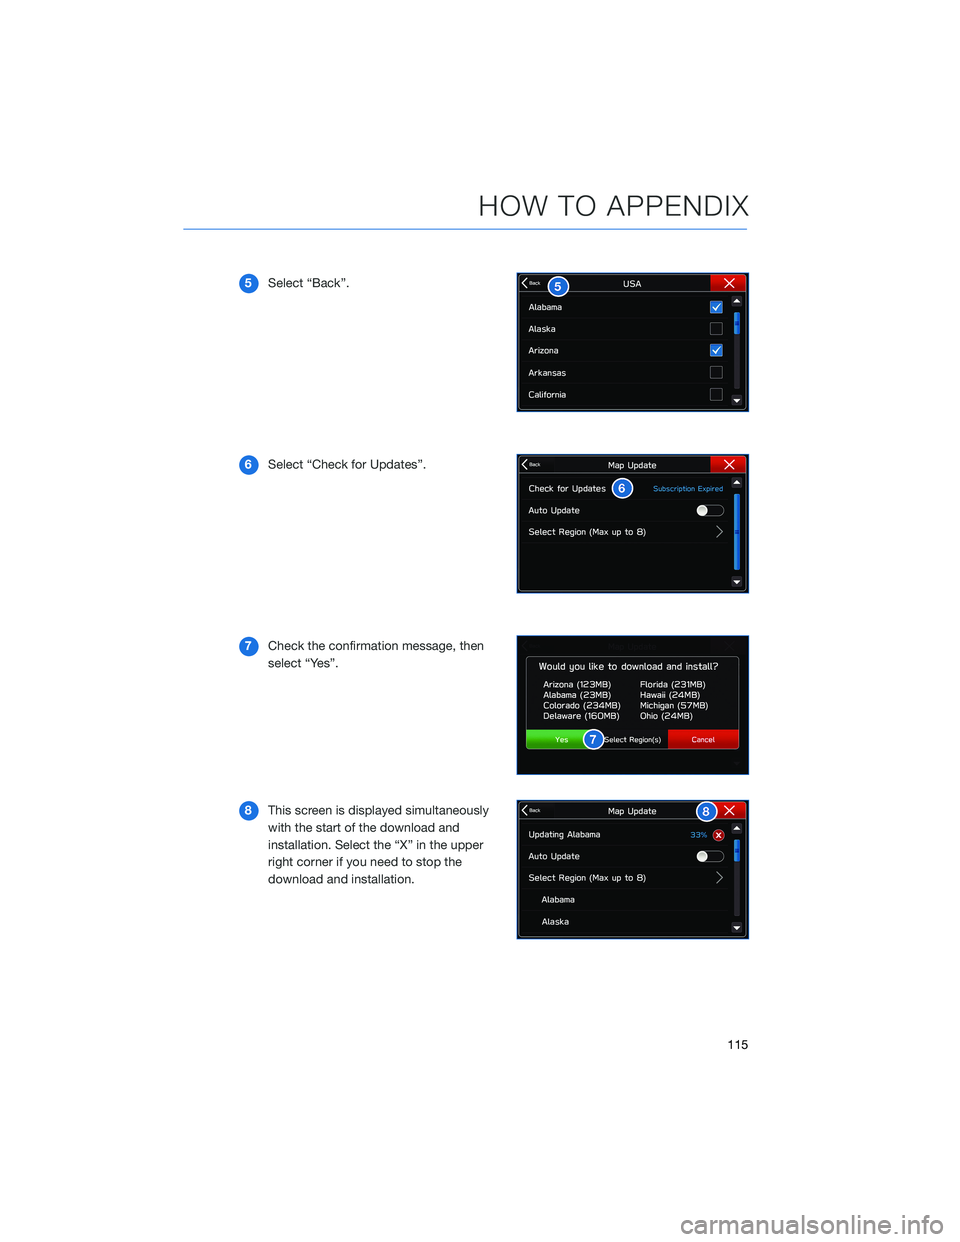
5Select “Back”.
6 Select “Check for Updates”.
7 Check the confirmation message, then
select “Yes”.
8 This screen is displayed simultaneously
with the start of the download and
installation. Select the “X” in the upper
right corner if you need to stop the
download and installation.
HOW TO APPENDIX
115
Page 118 of 124
FIRMWARE AND SOFTWARE UPDATES
For 8.0–inch Multimedia Plus and 8.0–inch Multimedia Navigation systems, you can
update the system software via a Wi-Fi connection or the aha™ application on your
smartphone (depending on your smartphone communication and transfer speed).
To accurately check for updates, make sure the clock is set to “Auto” with a GPS signal
available (system with navigation) or a phone paired via Bluetooth
®(system without
navigation). See page 76 for step by step directions on setting the clock. System
functionality will be restricted during installation.
1. Connect to a Wi-Fi network or start the aha application on your smartphone (see page 106).
2. Return to the general settings screen (if needed, press the “Home” button, select “Settings”, and then select “General”).
3. Select “Check for Updates”. • If “Automatically Check for Updates” is turned on at the general settings screen, anupdate check will be performed automatically before proceeding to the next step.
• If “Automatically Download Updates” is turned on at the general settings screen, the software update will be downloaded automatically before proceeding to “Update
Installation”.
4. If the “Software Update Ready to Download” pop-up is displayed, select “Download Now” to begin the download. The download status progress is displayed in the upper
right of the screen.
5. Select “Install Now” to start the installation process. The installation process will take several minutes to complete. If you need to stop the installation process, press
“Cancel”.
6. When the installation is complete, select “I Agree” on the confirmation message to complete the update process. By selecting “I Agree”, the system will restart
automatically.
HOW TO APPENDIX
116