SUBARU IMPREZA WRX 2014 4.G Owners Manual
IMPREZA WRX 2014 4.G
SUBARU
SUBARU
https://www.carmanualsonline.info/img/17/7263/w960_7263-0.png
SUBARU IMPREZA WRX 2014 4.G Owners Manual
Trending: engine oil capacity, sensor, keyless start, tow bar, relay, airbag off, lane assist
Page 361 of 414
11-42Maintenance and service/Replacing bulbs
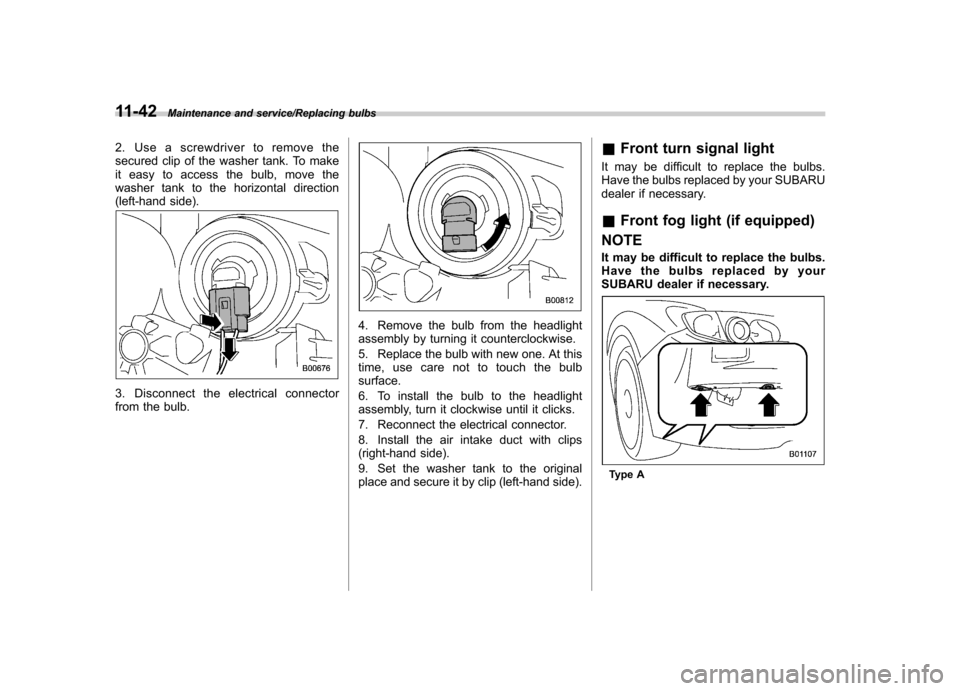
2. Use a screwdriver to remove the
secured clip of the washer tank. To make
it easy to access the bulb, move the
washer tank to the horizontal direction
(left-hand side).
3. Disconnect the electrical connector
from the bulb.
4. Remove the bulb from the headlight
assembly by turning it counterclockwise.
5. Replace the bulb with new one. At this
time, use care not to touch the bulbsurface.
6. To install the bulb to the headlight
assembly, turn it clockwise until it clicks.
7. Reconnect the electrical connector.
8. Install the air intake duct with clips
(right-hand side).
9. Set the washer tank to the original
place and secure it by clip (left-hand side).&
Front turn signal light
It may be difficult to replace the bulbs.
Have the bulbs replaced by your SUBARU
dealer if necessary. & Front fog light (if equipped)
NOTE
It may be difficult to replace the bulbs.
Have the bulbs replaced by your
SUBARU dealer if necessary.
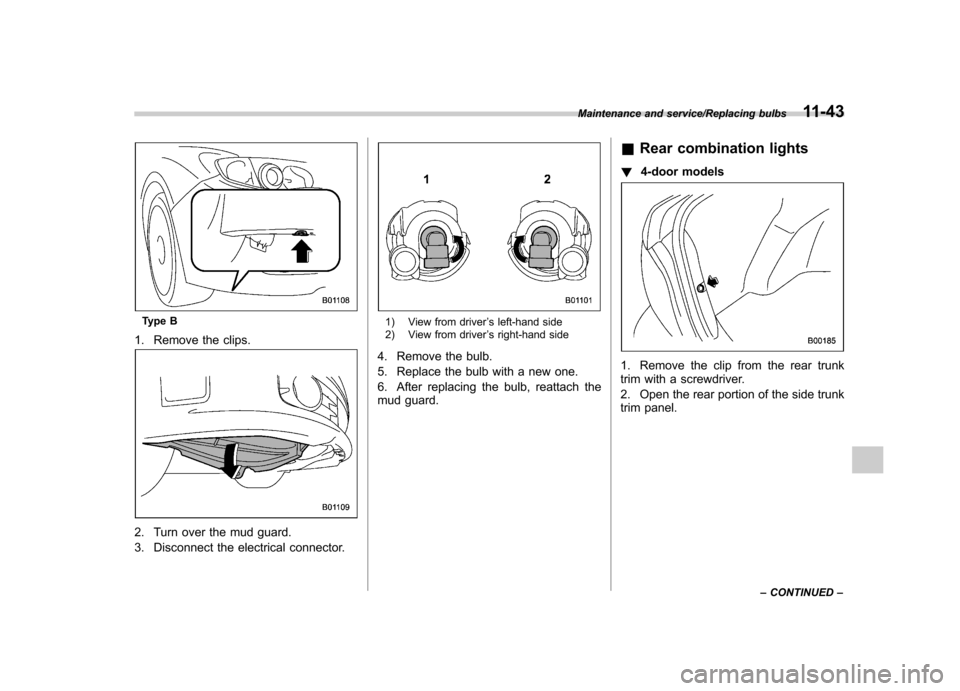
Type A
Page 362 of 414
Type B
1. Remove the clips.
2. Turn over the mud guard.
3. Disconnect the electrical connector.
1) View from driver ’s left-hand side
2) View from driver ’s right-hand side
4. Remove the bulb.
5. Replace the bulb with a new one.
6. After replacing the bulb, reattach the
mud guard. &
Rear combination lights
! 4-door models
1. Remove the clip from the rear trunk
trim with a screwdriver.
2. Open the rear portion of the side trunk
trim panel.
Maintenance and service/Replacing bulbs11-43
– CONTINUED –
Page 363 of 414
11-44Maintenance and service/Replacing bulbs
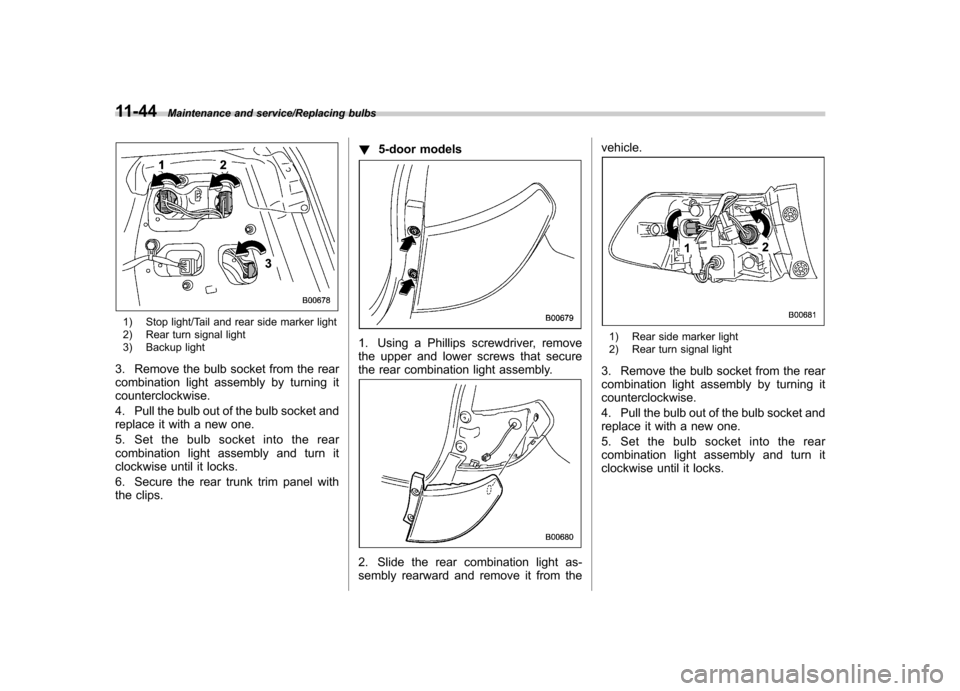
1) Stop light/Tail and rear side marker light
2) Rear turn signal light
3) Backup light
3. Remove the bulb socket from the rear
combination light assembly by turning itcounterclockwise.
4. Pull the bulb out of the bulb socket and
replace it with a new one.
5. Set the bulb socket into the rear
combination light assembly and turn it
clockwise until it locks.
6. Secure the rear trunk trim panel with
the clips. !
5-door models
1. Using a Phillips screwdriver, remove
the upper and lower screws that secure
the rear combination light assembly.
2. Slide the rear combination light as-
sembly rearward and remove it from the vehicle.
1) Rear side marker light
2) Rear turn signal light
3. Remove the bulb socket from the rear
combination light assembly by turning itcounterclockwise.
4. Pull the bulb out of the bulb socket and
replace it with a new one.
5. Set the bulb socket into the rear
combination light assembly and turn it
clockwise until it locks.
Page 364 of 414
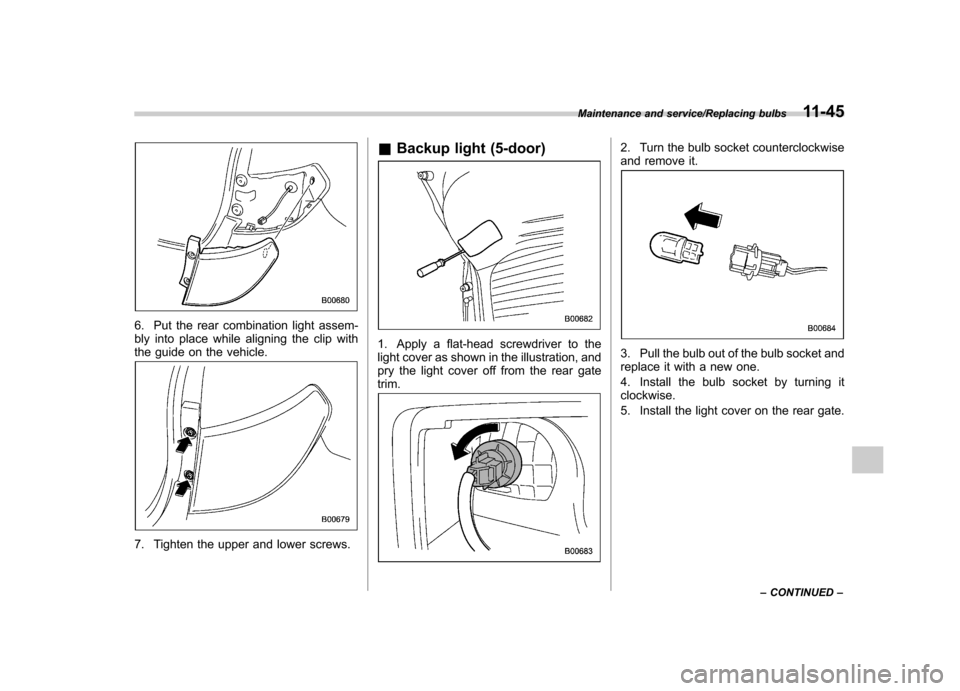
6. Put the rear combination light assem-
bly into place while aligning the clip with
the guide on the vehicle.
7. Tighten the upper and lower screws.&
Backup light (5-door)
1. Apply a flat-head screwdriver to the
light cover as shown in the illustration, and
pry the light cover off from the rear gatetrim.
2. Turn the bulb socket counterclockwise
and remove it.
3. Pull the bulb out of the bulb socket and
replace it with a new one.
4. Install the bulb socket by turning it clockwise.
5. Install the light cover on the rear gate.
Maintenance and service/Replacing bulbs11-45
– CONTINUED –
Page 365 of 414
11-46Maintenance and service/Replacing bulbs
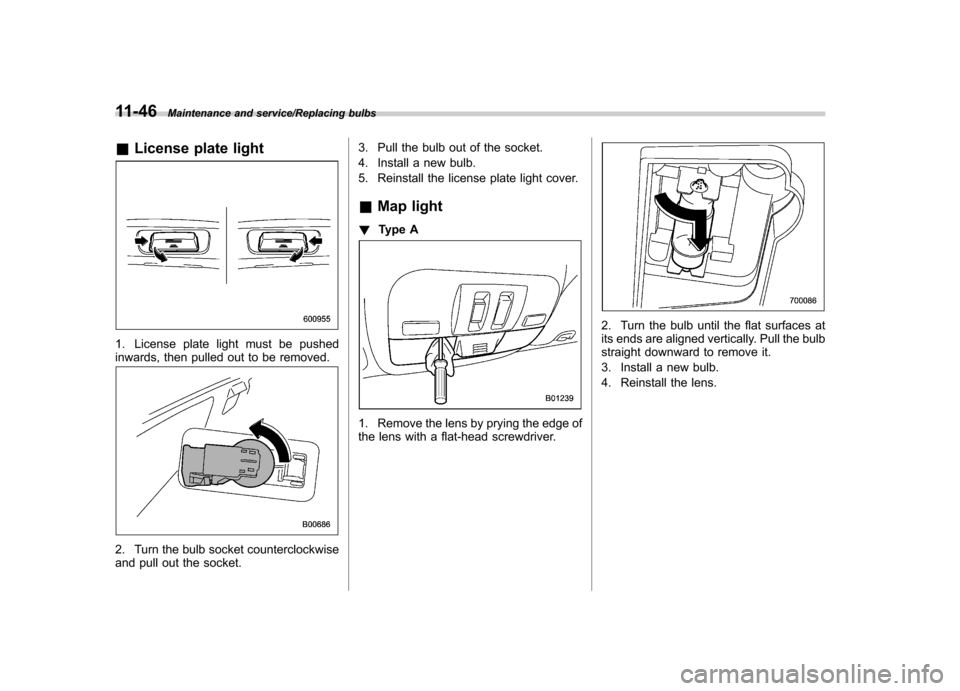
&License plate light
1. License plate light must be pushed
inwards, then pulled out to be removed.
2. Turn the bulb socket counterclockwise
and pull out the socket. 3. Pull the bulb out of the socket.
4. Install a new bulb.
5. Reinstall the license plate light cover.
& Map light
! Type A
1. Remove the lens by prying the edge of
the lens with a flat-head screwdriver.
2. Turn the bulb until the flat surfaces at
its ends are aligned vertically. Pull the bulb
straight downward to remove it.
3. Install a new bulb.
4. Reinstall the lens.
Page 366 of 414
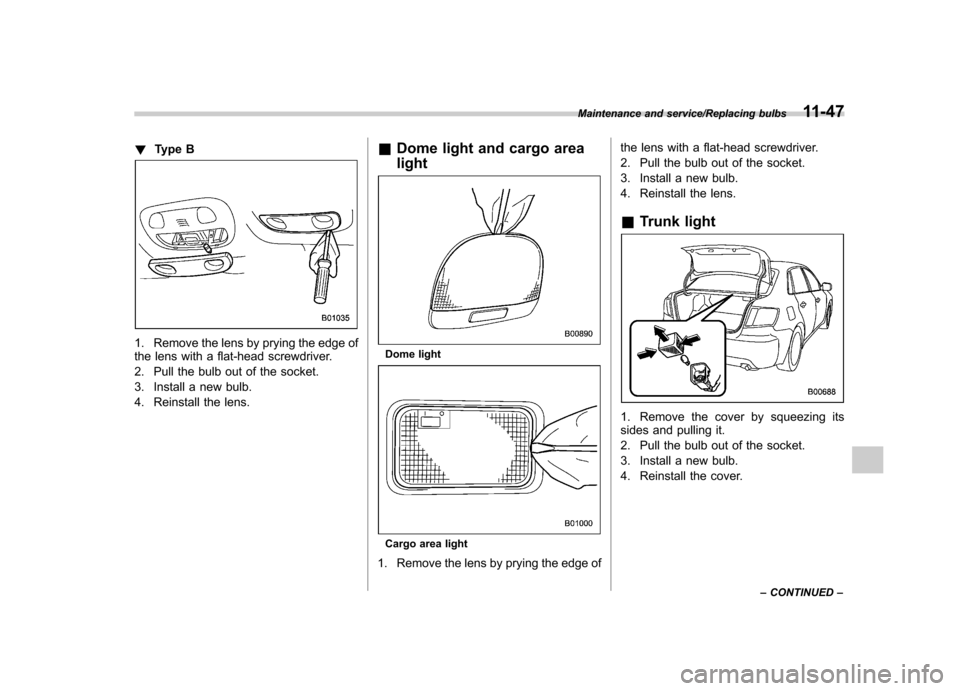
!Type B
1. Remove the lens by prying the edge of
the lens with a flat-head screwdriver.
2. Pull the bulb out of the socket.
3. Install a new bulb.
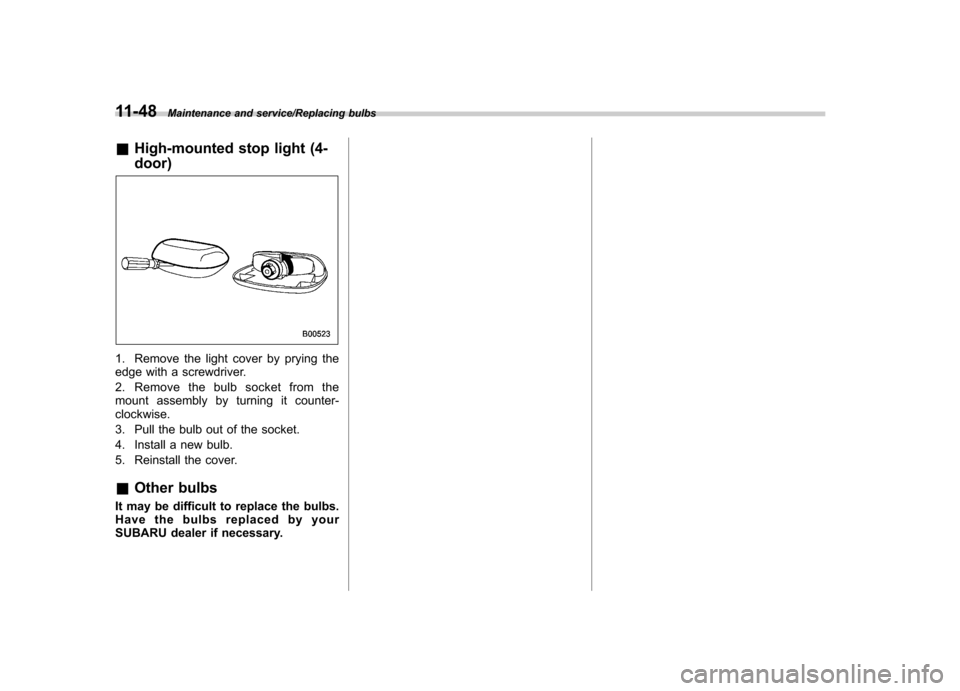
4. Reinstall the lens. &
Dome light and cargo area lightDome light
Cargo area light
1. Remove the lens by prying the edge of the lens with a flat-head screwdriver.
2. Pull the bulb out of the socket.
3. Install a new bulb.
4. Reinstall the lens. &
Trunk light
1. Remove the cover by squeezing its
sides and pulling it.
2. Pull the bulb out of the socket.
3. Install a new bulb.
4. Reinstall the cover.
Maintenance and service/Replacing bulbs11-47
– CONTINUED –
Page 367 of 414
11-48Maintenance and service/Replacing bulbs
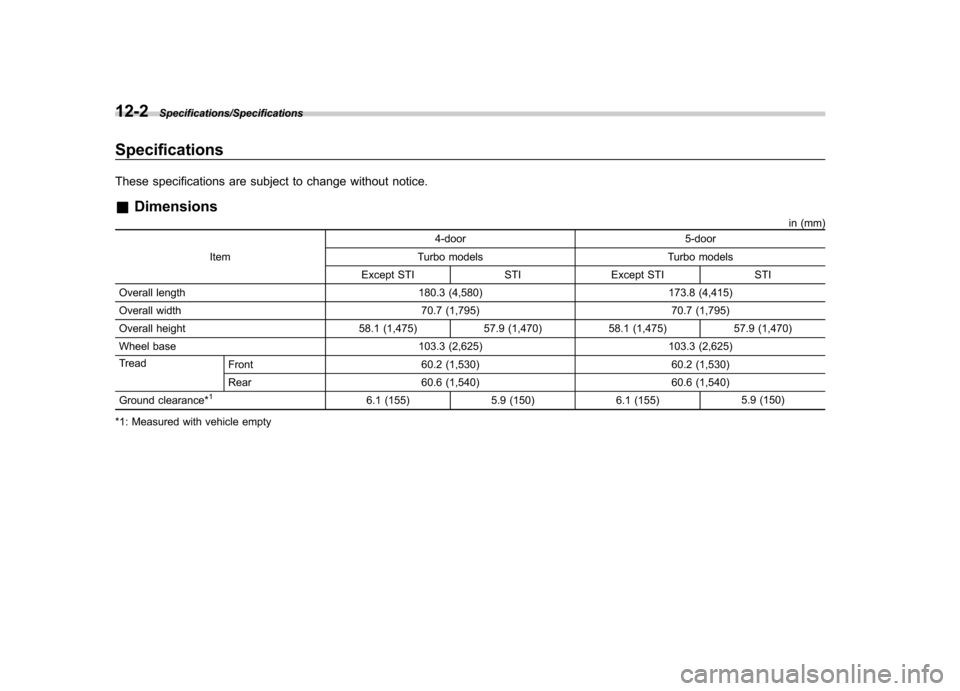
&High-mounted stop light (4- door)
1. Remove the light cover by prying the
edge with a screwdriver.
2. Remove the bulb socket from the
mount assembly by turning it counter-clockwise.
3. Pull the bulb out of the socket.
4. Install a new bulb.
5. Reinstall the cover. &Other bulbs
It may be difficult to replace the bulbs.
Have the bulbs replaced by your
SUBARU dealer if necessary.
Page 368 of 414
Specifications..................................................... 12-2
Dimensions ........................................................ 12-2
Engine ............................................................... 12-3
Electrical system ................................................ 12-3
Fuel ................................................................... 12-4
Lubricants. ......................................................... 12-5
Fluids ................................................................ 12-7
Engine coolant ................................................... 12-8 Tires
.................................................................. 12-9
Fuses and circuits ........................................... 12-10
Fuse panel located in the passenger compartment ................................................. 12-10
Fuse panel located in the engine compartment ................................................. 12-12
Bulb chart ......................................................... 12-14
Vehicle identification ....................................... 12-17Specifications
12
Page 369 of 414
12-2Specifications/Specifications
Specifications
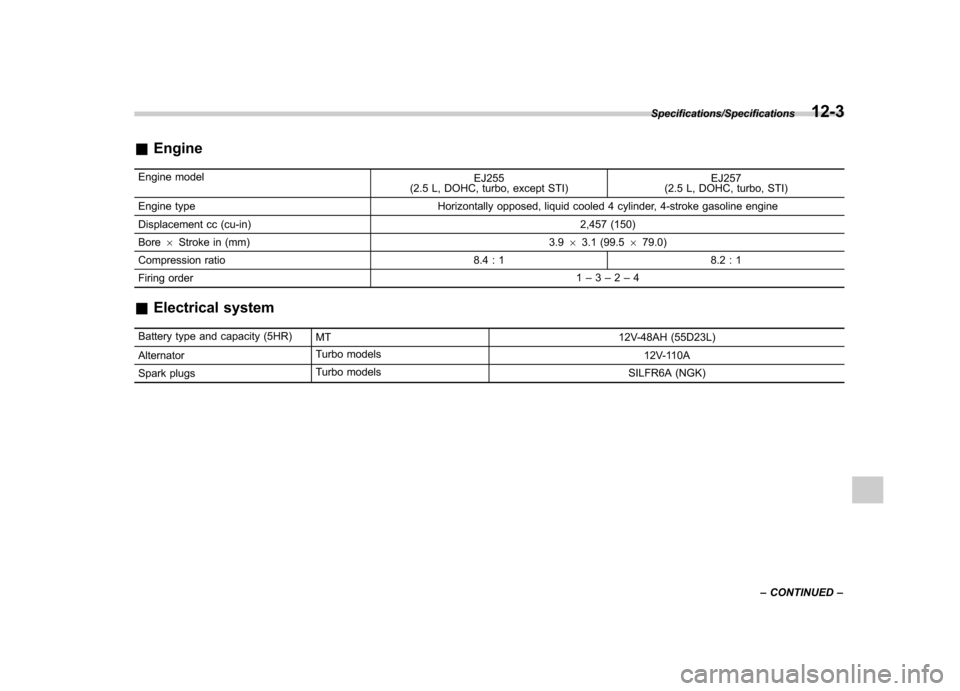
These specifications are subject to change without notice. &Dimensions
in (mm)
Item 4-door
5-door
Turbo models Turbo models
Except STI STI Except STI STI
Overall length 180.3 (4,580)173.8 (4,415)
Overall width 70.7 (1,795)70.7 (1,795)
Overall height 58.1 (1,475) 57.9 (1,470) 58.1 (1,475) 57.9 (1,470)
Wheel base 103.3 (2,625)103.3 (2,625)
Tread Front 60.2 (1,530) 60.2 (1,530)
Rear 60.6 (1,540) 60.6 (1,540)
Ground clearance*
16.1 (155) 5.9 (150) 6.1 (155) 5.9 (150)
*1: Measured with vehicle empty
Page 370 of 414
&Engine
Engine model EJ255
(2.5 L, DOHC, turbo, except STI) EJ257
(2.5 L, DOHC, turbo, STI)
Engine type Horizontally opposed, liquid cooled 4 cylinder, 4-stroke gasoline engine
Displacement cc (cu-in) 2,457 (150)
Bore 6Stroke in (mm) 3.963.1 (99.5 679.0)
Compression ratio 8.4 : 18.2 : 1
Firing order 1
– 3–2– 4
& Electrical system
Battery type and capacity (5HR) MT 12V-48AH (55D23L)
Alternator Turbo models
12V-110A
Spark plugs Turbo models
SILFR6A (NGK)
Specifications/Specifications12-3
– CONTINUED –
Trending: manual transmission, parking sensors, spare wheel, wiper blades, winter tires, automatic transmission, headlights
