open hood SUBARU LEGACY 1999 Service Repair Manual
[x] Cancel search | Manufacturer: SUBARU, Model Year: 1999, Model line: LEGACY, Model: SUBARU LEGACY 1999Pages: 1456, PDF Size: 59.93 MB
Page 439 of 1456
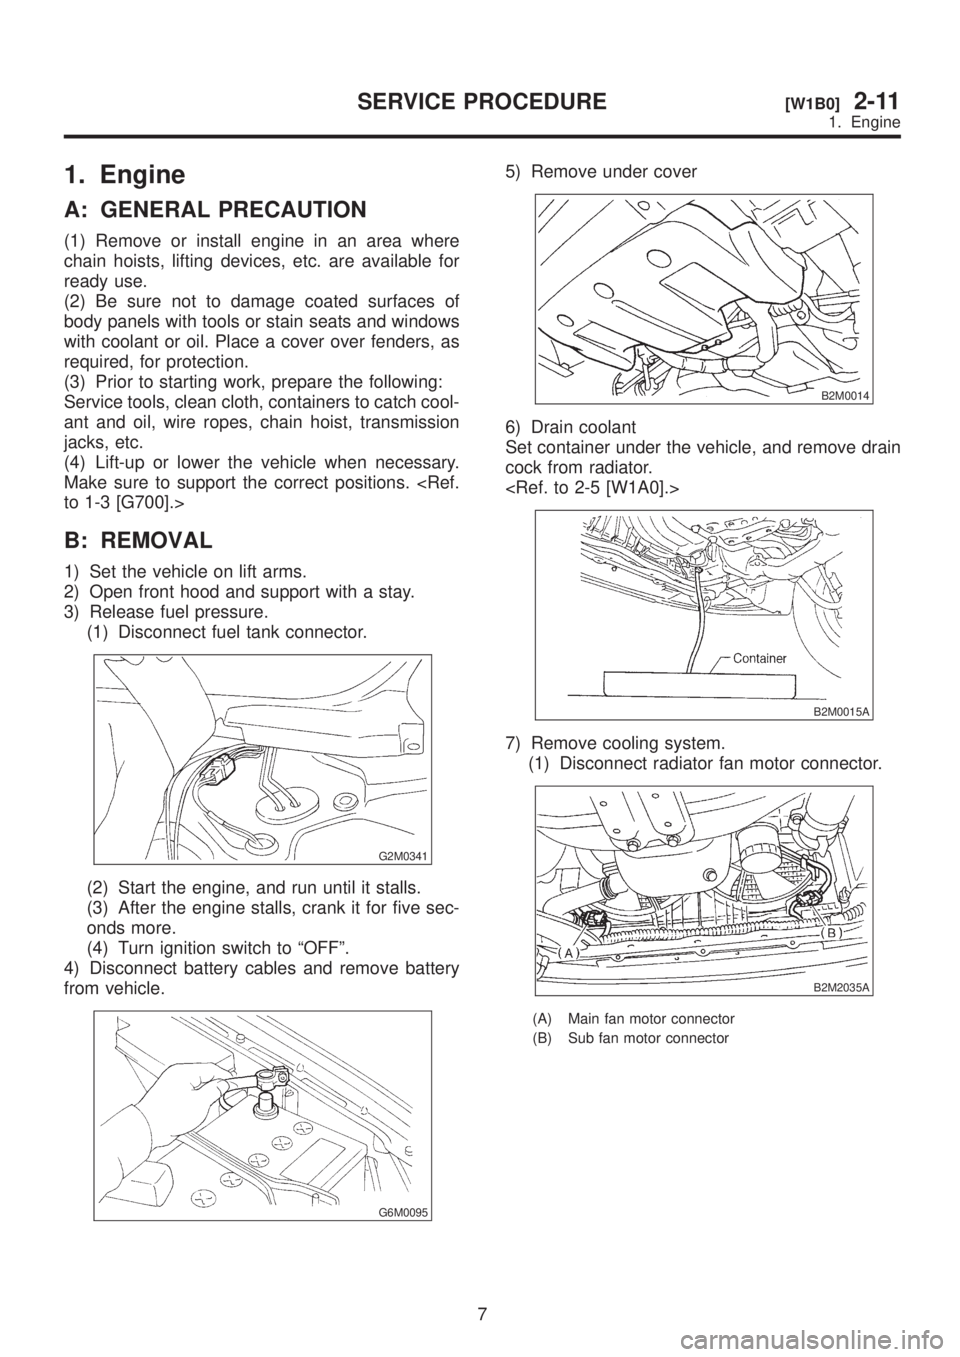
1. Engine
A: GENERAL PRECAUTION
(1) Remove or install engine in an area where
chain hoists, lifting devices, etc. are available for
ready use.
(2) Be sure not to damage coated surfaces of
body panels with tools or stain seats and windows
with coolant or oil. Place a cover over fenders, as
required, for protection.
(3) Prior to starting work, prepare the following:
Service tools, clean cloth, containers to catch cool-
ant and oil, wire ropes, chain hoist, transmission
jacks, etc.
(4) Lift-up or lower the vehicle when necessary.
Make sure to support the correct positions.
B: REMOVAL
1) Set the vehicle on lift arms.
2) Open front hood and support with a stay.
3) Release fuel pressure.
(1) Disconnect fuel tank connector.
G2M0341
(2) Start the engine, and run until it stalls.
(3) After the engine stalls, crank it for five sec-
onds more.
(4) Turn ignition switch to ªOFFº.
4) Disconnect battery cables and remove battery
from vehicle.
G6M0095
5) Remove under cover
B2M0014
6) Drain coolant
Set container under the vehicle, and remove drain
cock from radiator.
B2M0015A
7) Remove cooling system.
(1) Disconnect radiator fan motor connector.
B2M2035A
(A) Main fan motor connector
(B) Sub fan motor connector
7
[W1B0]2-11SERVICE PROCEDURE
1. Engine
Page 453 of 1456
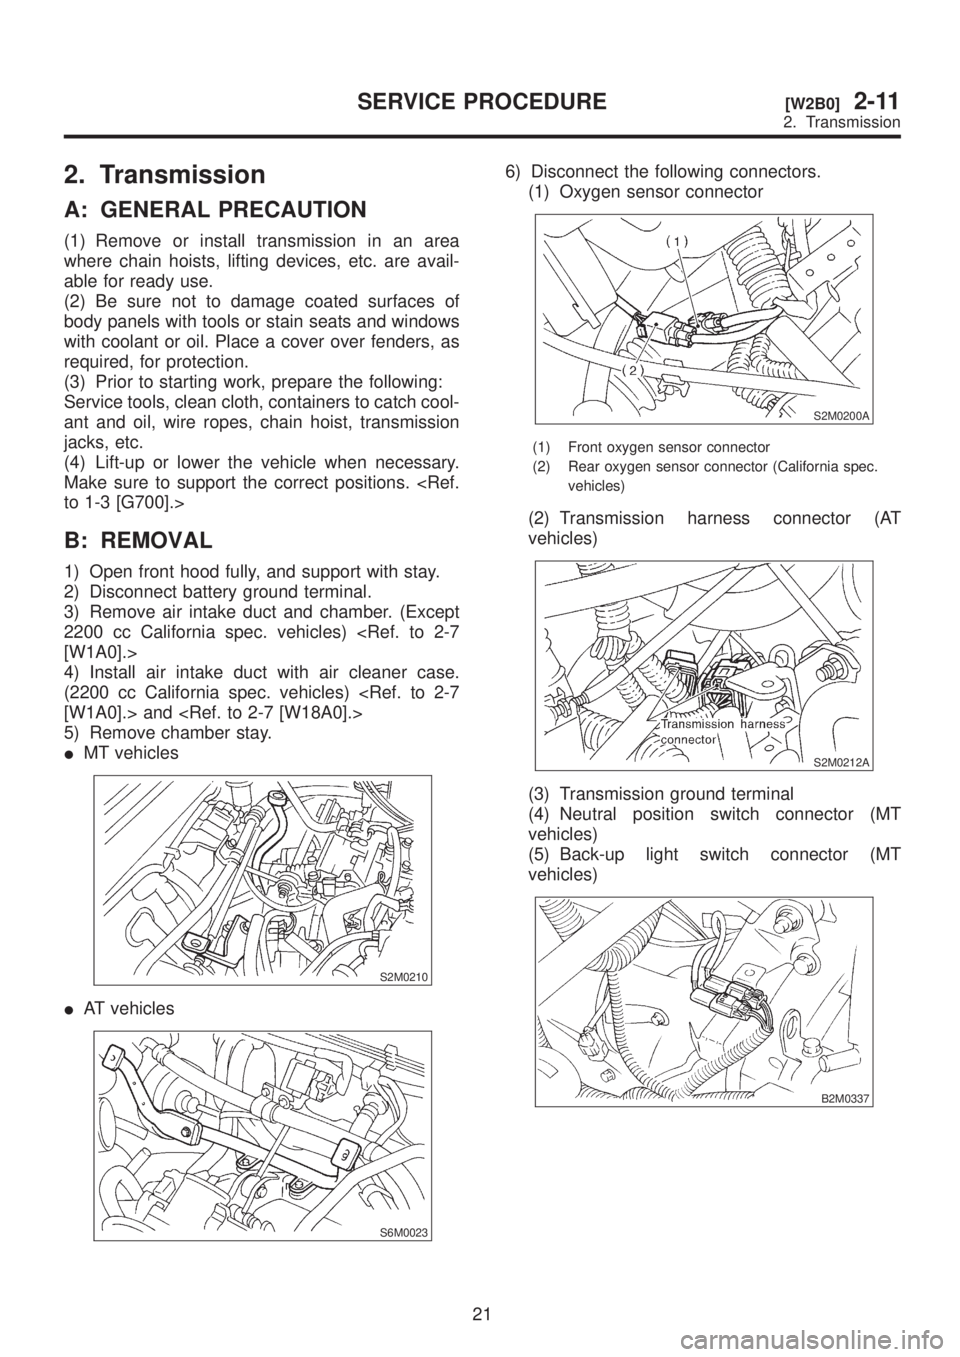
2. Transmission
A: GENERAL PRECAUTION
(1) Remove or install transmission in an area
where chain hoists, lifting devices, etc. are avail-
able for ready use.
(2) Be sure not to damage coated surfaces of
body panels with tools or stain seats and windows
with coolant or oil. Place a cover over fenders, as
required, for protection.
(3) Prior to starting work, prepare the following:
Service tools, clean cloth, containers to catch cool-
ant and oil, wire ropes, chain hoist, transmission
jacks, etc.
(4) Lift-up or lower the vehicle when necessary.
Make sure to support the correct positions.
B: REMOVAL
1) Open front hood fully, and support with stay.
2) Disconnect battery ground terminal.
3) Remove air intake duct and chamber. (Except
2200 cc California spec. vehicles)
4) Install air intake duct with air cleaner case.
(2200 cc California spec. vehicles)
5) Remove chamber stay.
IMT vehicles
S2M0210
IAT vehicles
S6M0023
6) Disconnect the following connectors.
(1) Oxygen sensor connector
S2M0200A
(1) Front oxygen sensor connector
(2) Rear oxygen sensor connector (California spec.
vehicles)
(2) Transmission harness connector (AT
vehicles)
S2M0212A
(3) Transmission ground terminal
(4) Neutral position switch connector (MT
vehicles)
(5) Back-up light switch connector (MT
vehicles)
B2M0337
21
[W2B0]2-11SERVICE PROCEDURE
2. Transmission
Page 999 of 1456
10. Performance Test
A: INSPECTION
1. VEHICLE SET UP
In order to obtain meaningful test results, the
vehicle must be set up to meet the following con-
ditions.
IVehicle in shade
INo wind
IAll vehicle doors closed
IFront windows opened
IHood opened
IEngine speed set at 1,500 rpm.
IA/C ON
ITemperature control lever Ð Maximum cold
IAir source Ð Recirculation
IBlower speed Ð 4th position (High)
IOperate A/C for 10 minutes (Minimum) before
taking measurement.
2. MEASUREMENTS
After 10 minutes (Minimum) of A/C operation and
using accurate test equipment, take the following
measurements (in order).
1) Evaporator intake air temperature at recircula-
tion door.
2) Evaporator discharge air temperature at center
grill.
3) Condenser (Ambient) intake air temperature
measured 0.9 m (3 ft) in front and in line with the
center of the condenser.
4) Suction (Low) side pressure
5) Discharge (High) side pressure
NOTE:
If only one thermometer is available; 1)take the
ambient measurement first; then 2)the intake air;
and 3)discharge air temperature.
22
4-7[W10A1]SERVICE PROCEDURE
10. Performance Test
Page 1060 of 1456
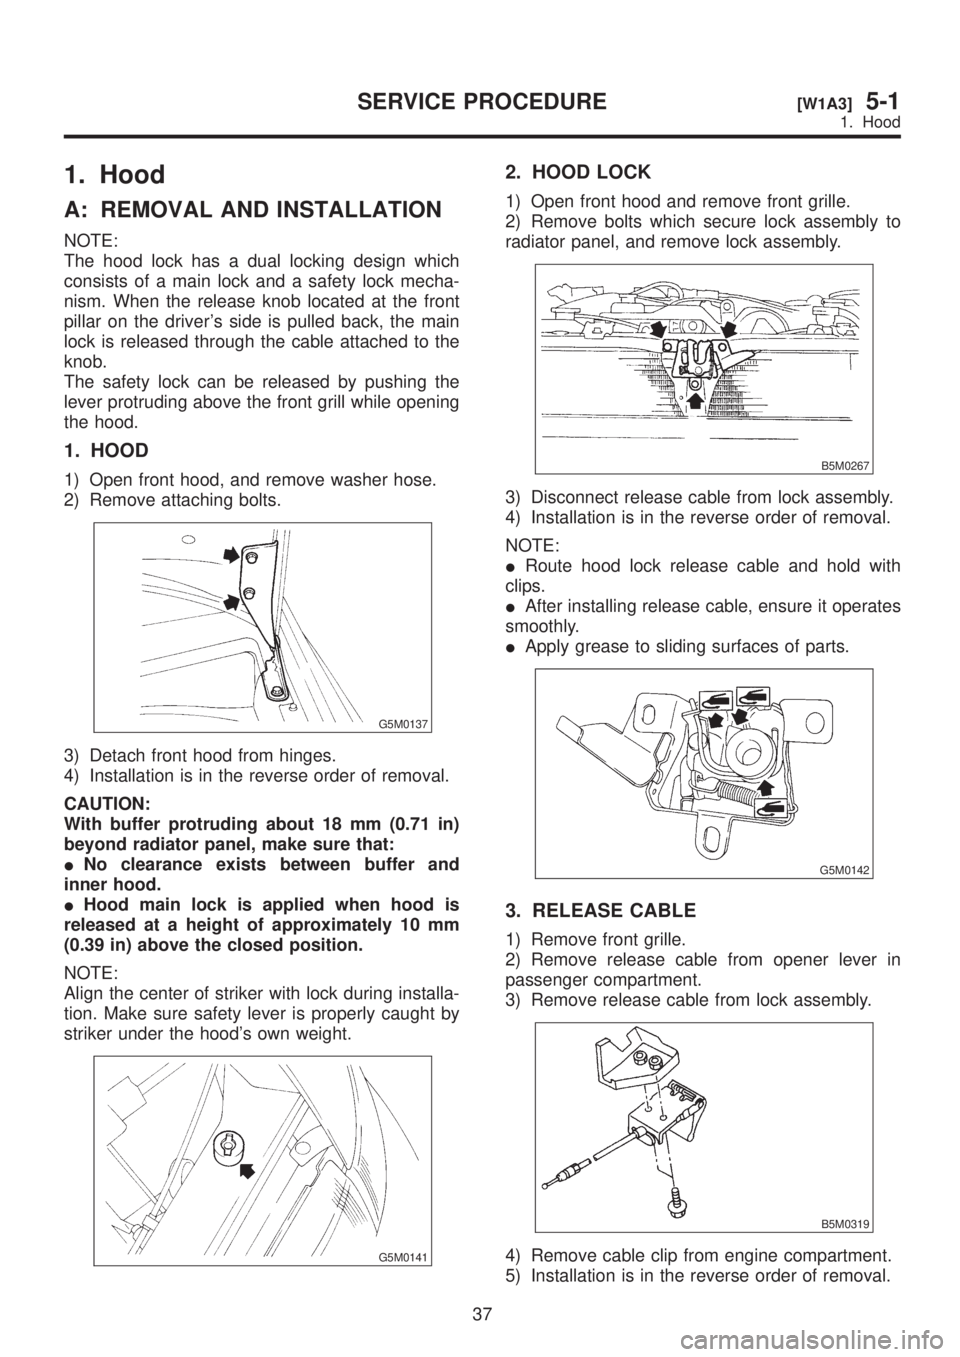
1. Hood
A: REMOVAL AND INSTALLATION
NOTE:
The hood lock has a dual locking design which
consists of a main lock and a safety lock mecha-
nism. When the release knob located at the front
pillar on the driver's side is pulled back, the main
lock is released through the cable attached to the
knob.
The safety lock can be released by pushing the
lever protruding above the front grill while opening
the hood.
1. HOOD
1) Open front hood, and remove washer hose.
2) Remove attaching bolts.
G5M0137
3) Detach front hood from hinges.
4) Installation is in the reverse order of removal.
CAUTION:
With buffer protruding about 18 mm (0.71 in)
beyond radiator panel, make sure that:
INo clearance exists between buffer and
inner hood.
IHood main lock is applied when hood is
released at a height of approximately 10 mm
(0.39 in) above the closed position.
NOTE:
Align the center of striker with lock during installa-
tion. Make sure safety lever is properly caught by
striker under the hood's own weight.
G5M0141
2. HOOD LOCK
1) Open front hood and remove front grille.
2) Remove bolts which secure lock assembly to
radiator panel, and remove lock assembly.
B5M0267
3) Disconnect release cable from lock assembly.
4) Installation is in the reverse order of removal.
NOTE:
IRoute hood lock release cable and hold with
clips.
IAfter installing release cable, ensure it operates
smoothly.
IApply grease to sliding surfaces of parts.
G5M0142
3. RELEASE CABLE
1) Remove front grille.
2) Remove release cable from opener lever in
passenger compartment.
3) Remove release cable from lock assembly.
B5M0319
4) Remove cable clip from engine compartment.
5) Installation is in the reverse order of removal.
37
[W1A3]5-1SERVICE PROCEDURE
1. Hood
Page 1061 of 1456
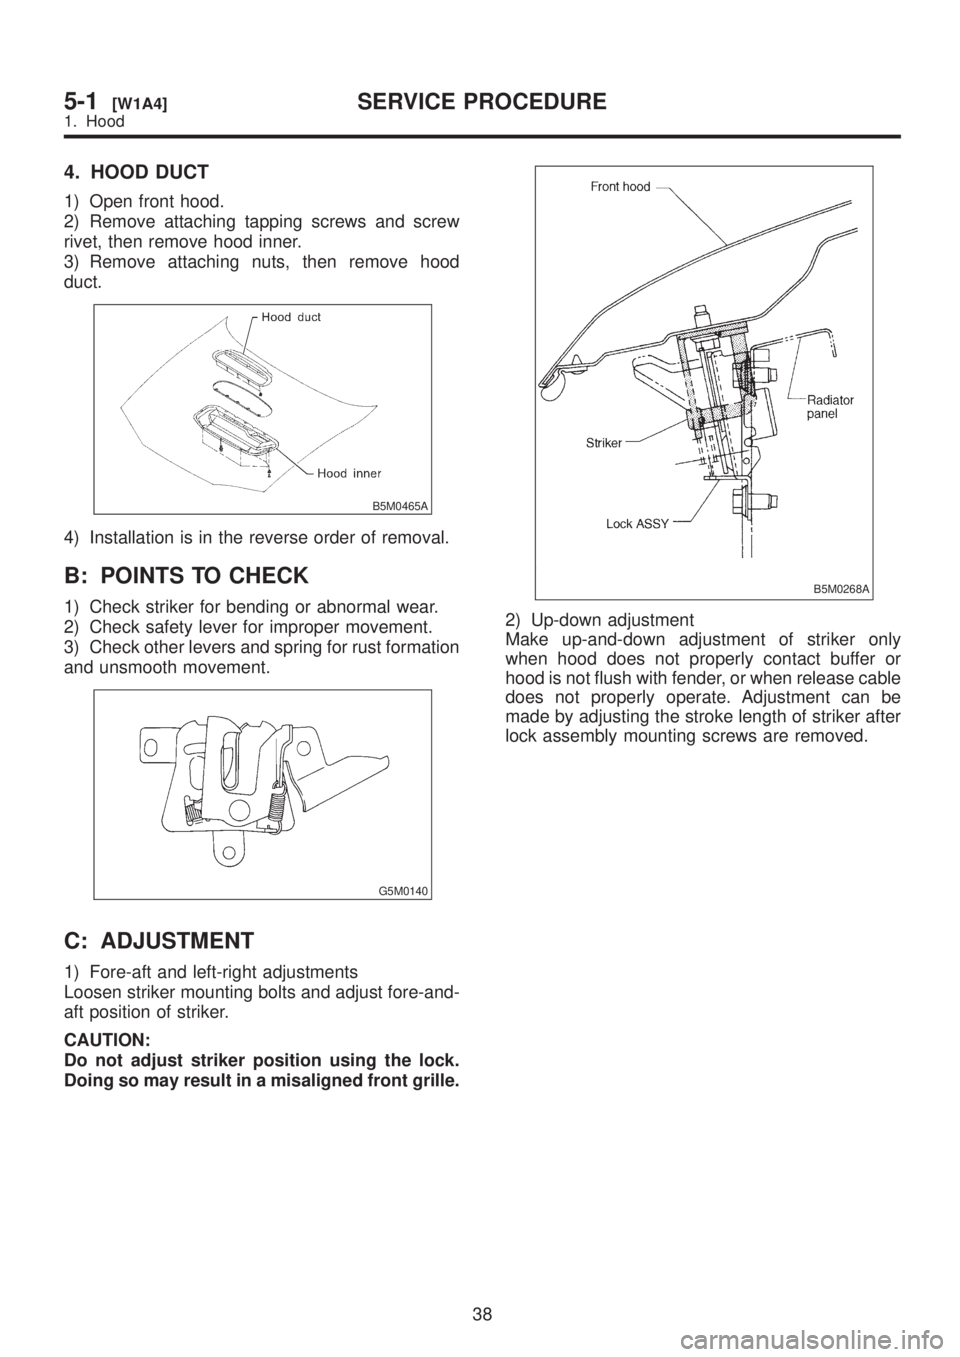
4. HOOD DUCT
1) Open front hood.
2) Remove attaching tapping screws and screw
rivet, then remove hood inner.
3) Remove attaching nuts, then remove hood
duct.
B5M0465A
4) Installation is in the reverse order of removal.
B: POINTS TO CHECK
1) Check striker for bending or abnormal wear.
2) Check safety lever for improper movement.
3) Check other levers and spring for rust formation
and unsmooth movement.
G5M0140
C: ADJUSTMENT
1) Fore-aft and left-right adjustments
Loosen striker mounting bolts and adjust fore-and-
aft position of striker.
CAUTION:
Do not adjust striker position using the lock.
Doing so may result in a misaligned front grille.
B5M0268A
2) Up-down adjustment
Make up-and-down adjustment of striker only
when hood does not properly contact buffer or
hood is not flush with fender, or when release cable
does not properly operate. Adjustment can be
made by adjusting the stroke length of striker after
lock assembly mounting screws are removed.
38
5-1[W1A4]SERVICE PROCEDURE
1. Hood
Page 1078 of 1456
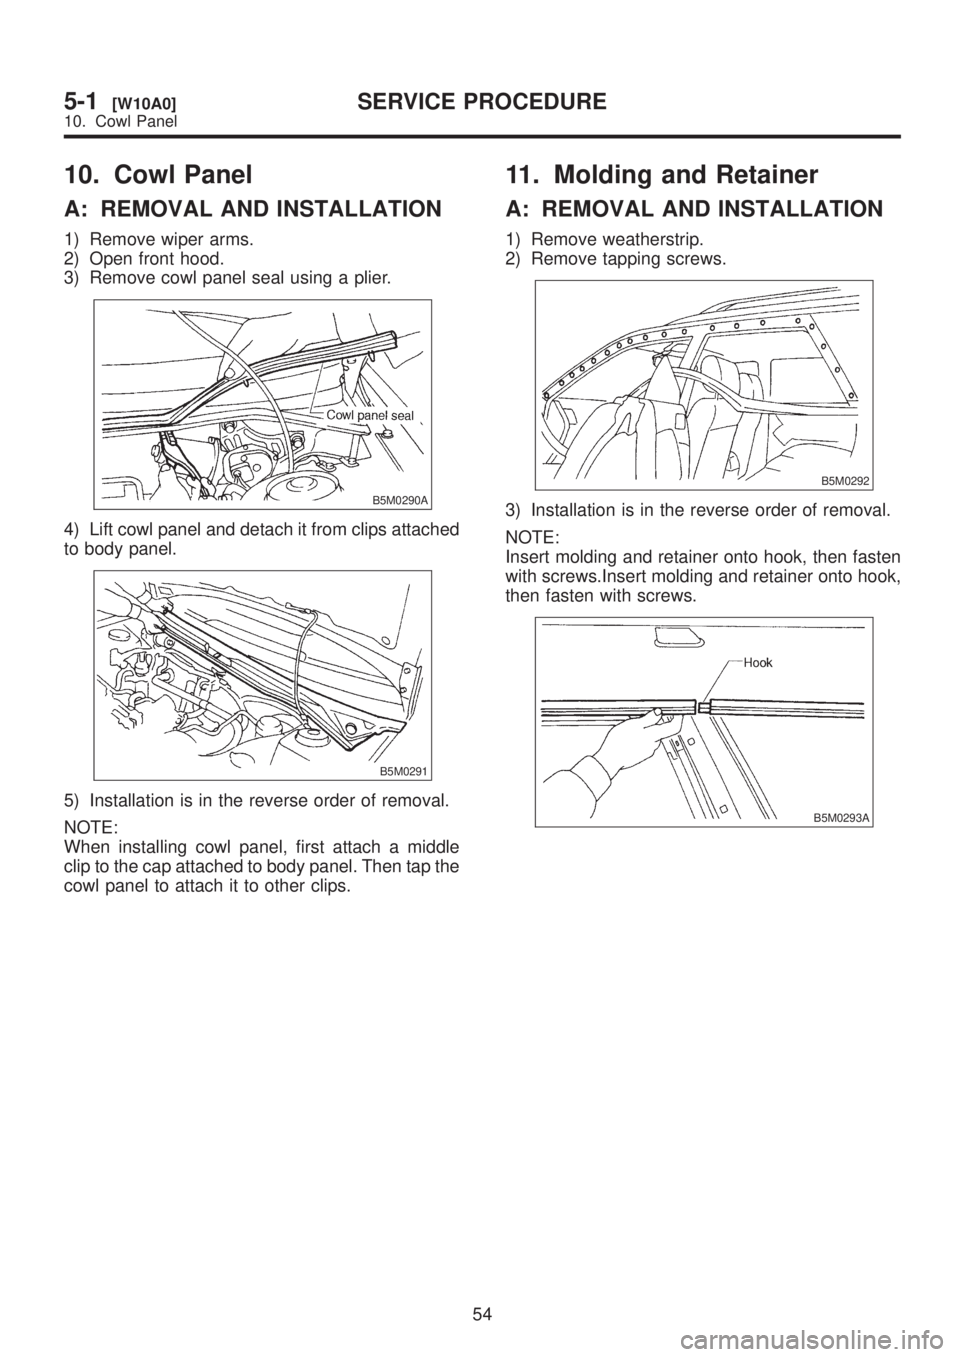
10. Cowl Panel
A: REMOVAL AND INSTALLATION
1) Remove wiper arms.
2) Open front hood.
3) Remove cowl panel seal using a plier.
B5M0290A
4) Lift cowl panel and detach it from clips attached
to body panel.
B5M0291
5) Installation is in the reverse order of removal.
NOTE:
When installing cowl panel, first attach a middle
clip to the cap attached to body panel. Then tap the
cowl panel to attach it to other clips.
11. Molding and Retainer
A: REMOVAL AND INSTALLATION
1) Remove weatherstrip.
2) Remove tapping screws.
B5M0292
3) Installation is in the reverse order of removal.
NOTE:
Insert molding and retainer onto hook, then fasten
with screws.Insert molding and retainer onto hook,
then fasten with screws.
B5M0293A
54
5-1[W10A0]SERVICE PROCEDURE
10. Cowl Panel
Page 1079 of 1456
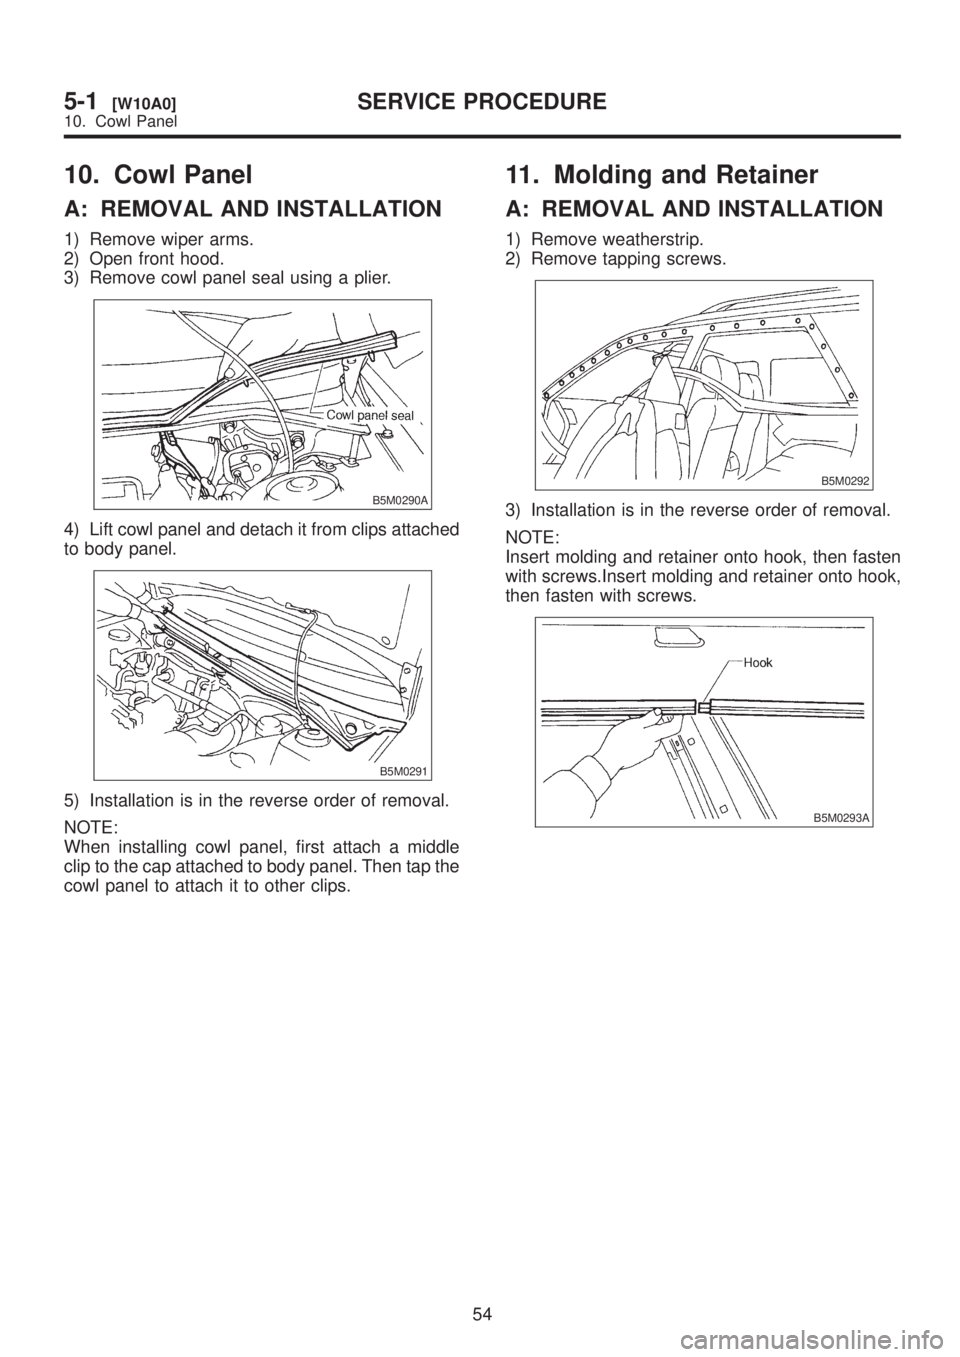
10. Cowl Panel
A: REMOVAL AND INSTALLATION
1) Remove wiper arms.
2) Open front hood.
3) Remove cowl panel seal using a plier.
B5M0290A
4) Lift cowl panel and detach it from clips attached
to body panel.
B5M0291
5) Installation is in the reverse order of removal.
NOTE:
When installing cowl panel, first attach a middle
clip to the cap attached to body panel. Then tap the
cowl panel to attach it to other clips.
11. Molding and Retainer
A: REMOVAL AND INSTALLATION
1) Remove weatherstrip.
2) Remove tapping screws.
B5M0292
3) Installation is in the reverse order of removal.
NOTE:
Insert molding and retainer onto hook, then fasten
with screws.Insert molding and retainer onto hook,
then fasten with screws.
B5M0293A
54
5-1[W10A0]SERVICE PROCEDURE
10. Cowl Panel
Page 1240 of 1456
![SUBARU LEGACY 1999 Service Repair Manual 7. Turn Signal and Hazard
Warning Light
A: REMOVAL AND INSTALLATION
1. FRONT TURN SIGNAL LIGHT
Remove and install front turn signal light. <Ref. to
6-2 [W4B2].>
NOTE:
The front turn signal light is un SUBARU LEGACY 1999 Service Repair Manual 7. Turn Signal and Hazard
Warning Light
A: REMOVAL AND INSTALLATION
1. FRONT TURN SIGNAL LIGHT
Remove and install front turn signal light. <Ref. to
6-2 [W4B2].>
NOTE:
The front turn signal light is un](/img/17/57435/w960_57435-1239.png)
7. Turn Signal and Hazard
Warning Light
A: REMOVAL AND INSTALLATION
1. FRONT TURN SIGNAL LIGHT
Remove and install front turn signal light.
NOTE:
The front turn signal light is united with headlight
assembly.
2. REAR COMBINATION LIGHT
Remove and install rear combination light.
3. COMBINATION SWITCH
Remove and install combination switch.
4. HAZARD SWITCH
1) Remove center panel from instrument panel.
2) Disconnect connector of hazard switch from
body harness.
3) Remove hazard switch from center panel.
B6M0063
4) Installation is in the reverse order of removal.
5. TURN SIGNAL AND HAZARD UNIT
1) Remove instrument panel lower cover.
2) Remove engine hood opener lever bracket.
3) Disconnect connector of turn signal and hazard
unit.4) Remove screw, and then remove turn signal
and hazard unit from bracket.
B6M0343A
5) Installation is in the reverse order of removal.
B: DISASSEMBLY AND ASSEMBLY
1. COMBINATION SWITCH
Disassemble and assemble combination switch.
C: INSPECTION
1. COMBINATION SWITCH (ON-CAR)
1) Remove instrument panel lower cover.
2) Remove lower column cover.
3) Unfasten holddown clip which secures harness,
and disconnect connectors from body harness.
4) Move combination switch to respective posi-
tions and check continuity between terminals.
B6M0702
14
6-2[W7A1]SERVICE PROCEDURE
7. Turn Signal and Hazard Warning Light
Page 1245 of 1456
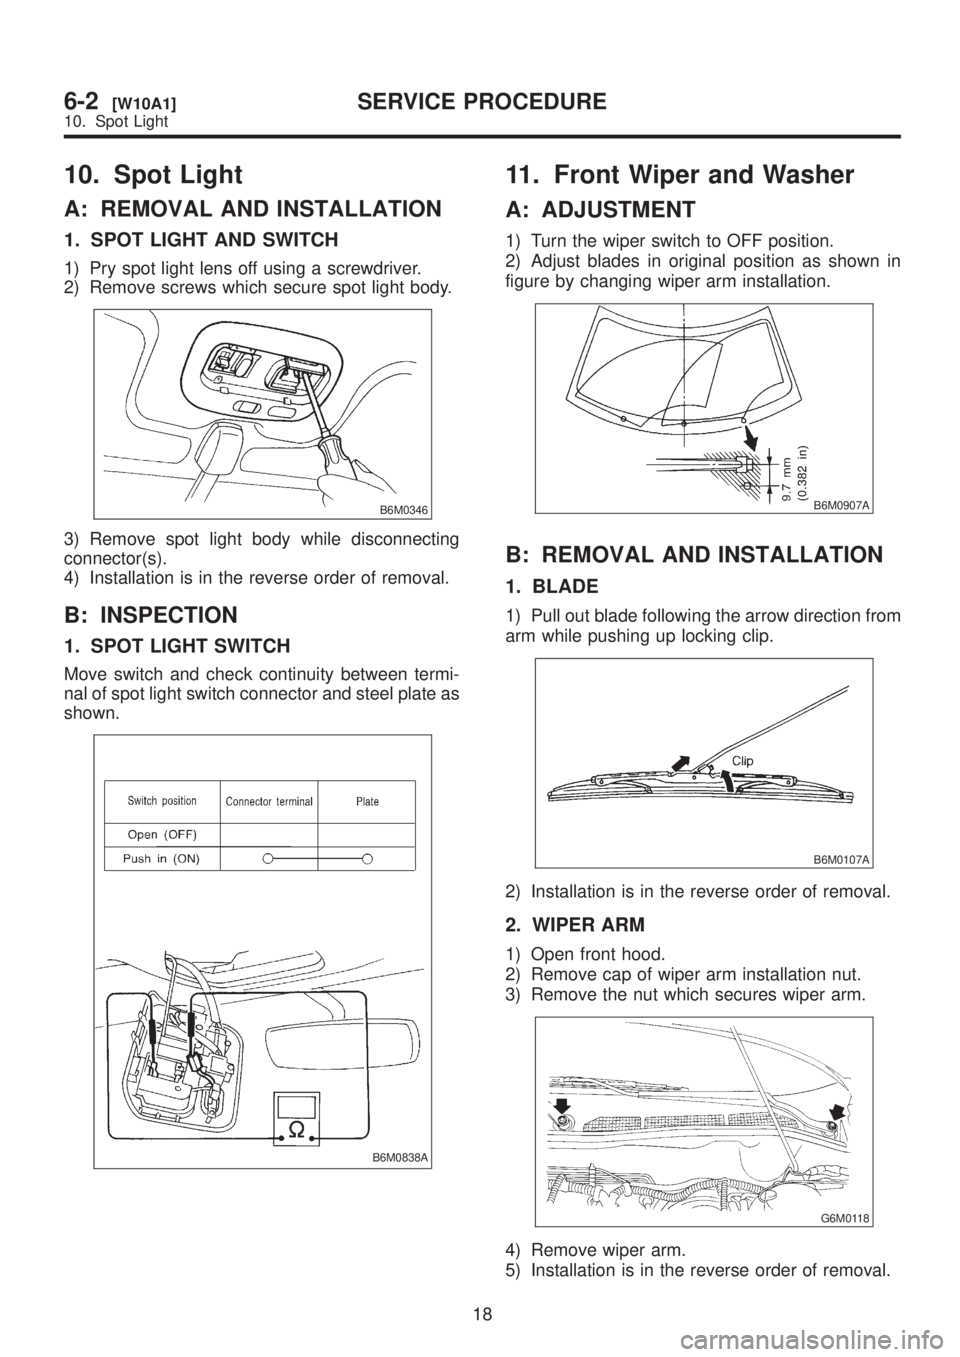
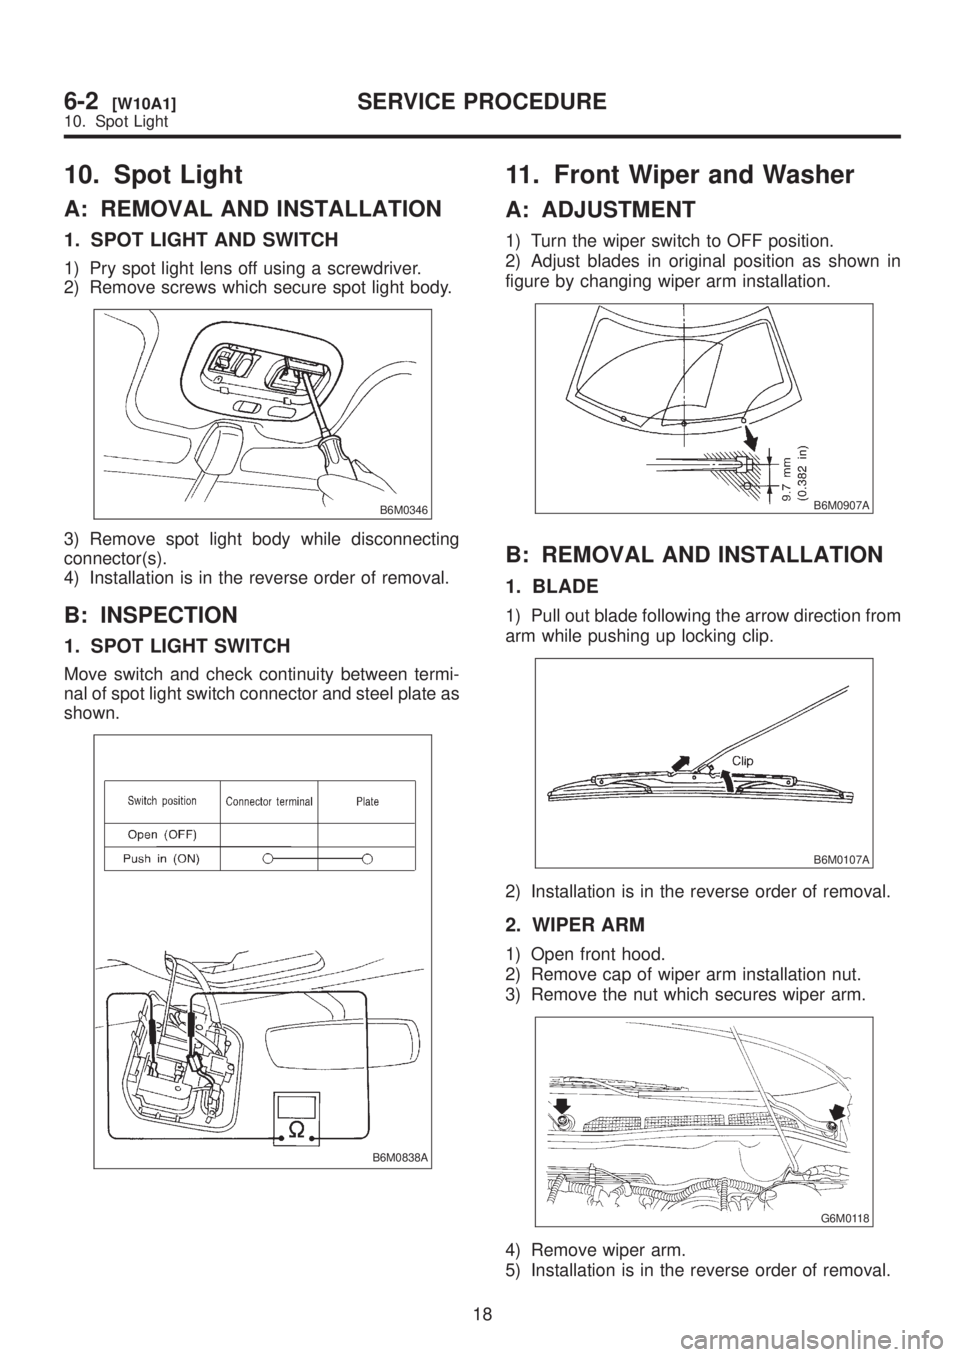
10. Spot Light
A: REMOVAL AND INSTALLATION
1. SPOT LIGHT AND SWITCH
1) Pry spot light lens off using a screwdriver.
2) Remove screws which secure spot light body.
B6M0346
3) Remove spot light body while disconnecting
connector(s).
4) Installation is in the reverse order of removal.
B: INSPECTION
1. SPOT LIGHT SWITCH
Move switch and check continuity between termi-
nal of spot light switch connector and steel plate as
shown.
B6M0838A
11. Front Wiper and Washer
A: ADJUSTMENT
1) Turn the wiper switch to OFF position.
2) Adjust blades in original position as shown in
figure by changing wiper arm installation.
B6M0907A
B: REMOVAL AND INSTALLATION
1. BLADE
1) Pull out blade following the arrow direction from
arm while pushing up locking clip.
B6M0107A
2) Installation is in the reverse order of removal.
2. WIPER ARM
1) Open front hood.
2) Remove cap of wiper arm installation nut.
3) Remove the nut which secures wiper arm.
G6M0118
4) Remove wiper arm.
5) Installation is in the reverse order of removal.
18
6-2[W10A1]SERVICE PROCEDURE
10. Spot Light
Page 1246 of 1456
10. Spot Light
A: REMOVAL AND INSTALLATION
1. SPOT LIGHT AND SWITCH
1) Pry spot light lens off using a screwdriver.
2) Remove screws which secure spot light body.
B6M0346
3) Remove spot light body while disconnecting
connector(s).
4) Installation is in the reverse order of removal.
B: INSPECTION
1. SPOT LIGHT SWITCH
Move switch and check continuity between termi-
nal of spot light switch connector and steel plate as
shown.
B6M0838A
11. Front Wiper and Washer
A: ADJUSTMENT
1) Turn the wiper switch to OFF position.
2) Adjust blades in original position as shown in
figure by changing wiper arm installation.
B6M0907A
B: REMOVAL AND INSTALLATION
1. BLADE
1) Pull out blade following the arrow direction from
arm while pushing up locking clip.
B6M0107A
2) Installation is in the reverse order of removal.
2. WIPER ARM
1) Open front hood.
2) Remove cap of wiper arm installation nut.
3) Remove the nut which secures wiper arm.
G6M0118
4) Remove wiper arm.
5) Installation is in the reverse order of removal.
18
6-2[W10A1]SERVICE PROCEDURE
10. Spot Light