key SUBARU LEGACY 2012 5.G Navigation Manual
[x] Cancel search | Manufacturer: SUBARU, Model Year: 2012, Model line: LEGACY, Model: SUBARU LEGACY 2012 5.GPages: 90, PDF Size: 1.82 MB
Page 4 of 90

18 Navigation
Before Use
■Points to note before use
Starting the engine before using the system
The navigation system can be used with the ignition key in either the
ON position or the ACC position. To preserve the battery, however, it
should be used with the engine running whenever possible. Using
the system for a long time with the engine off can cause the battery
to run down.
Delay before display of current position
The system will not immediately display a correct indication of your
vehicle's current position after being switched on for the first time or
after the battery has been disconnected for a long time. It will display
a correct current position indication as soon as it receives Global Posi-
tioning System (GPS) signals.
Program reloading after battery disconnection
The navigation program will be erased from the system's memory if
the battery is disconnected. If this happens, load the provided DVD-
ROM disc in the system's main unit and turn the ignition switch to
the ON or ACC position. The system will automatically reload the pro-
gram and start operating normally again.
Incorrect operation on rough roads
The system may operate incorrectly or be unable to read the data on
the DVD-ROM disc when subjected to severe vibration caused by
driving on rough roads.
Handling the GPS antenna
Do not paint the antenna. Doing so could impair or prevent signal
reception.Disabled switches
Some switches are disabled during operation of the system. These
switches are displayed in fainter colors and no messages are dis-
played for them.
Risk of damage to the main unit
Be mindful of the occupant compartment temperature. Using the
system when the occupant compartment temperature is extremely
high or low can damage it or cause it to malfunction. Also, note that
the system's main unit can be damaged by strong vibration and by
any metallic object or water that gets inside.
Condensation
Condensation can form on the lens inside the main unit when there
is a rapid change in occupant compartment temperature (for exam-
ple, when the heater is switched on in cold weather). Such condensa-
tion can cause the system to operate abnormally. If you wait an hour
or so for the condensation to disappear, the system should start
working normally again. If normal operation is still not restored after
several hours, we recommend that you contact the nearest SUBARU
dealer.
Replacing the DVD-ROM disc
If you need to replace the DVD-ROM disc, make sure the replacement
disc is compatible with your system's main unit. Inserting an incom-
patible disc could damage the unit.
Page 10 of 90
24 Navigation
Starting Up the Navigation System
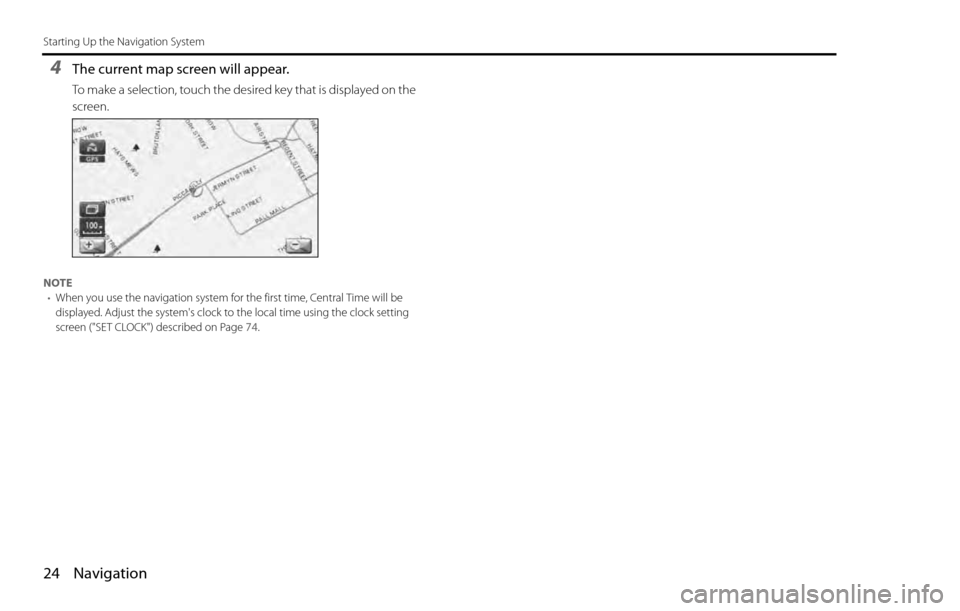
4The current map screen will appear.
To make a selection, touch the desired key that is displayed on the
screen.
NOTE
•When you use the navigation system for the first time, Central Time will be
displayed. Adjust the system's clock to the local time using the clock setting
screen ("SET CLOCK") described on Page 74
.
Page 13 of 90

Navigation 27
Markers and Controls Displayed on Maps
(8) "Store memory point" key
Stores the marked position on the map as a memory point.
(9) Point of interest (POI) key
Allows you to display the POI selection screen (See Page 87).
On the screen, you can program POIs to appear on a map as
markers.
(10) Distance from current position
Indicates the distance from the current vehicle position to
the position marked by .
(11) Destination/waypoint key
Programs a destination or waypoint at the position marked
by on a scroll screen.
Page 14 of 90
28 Navigation
Markers and Controls Displayed on Maps
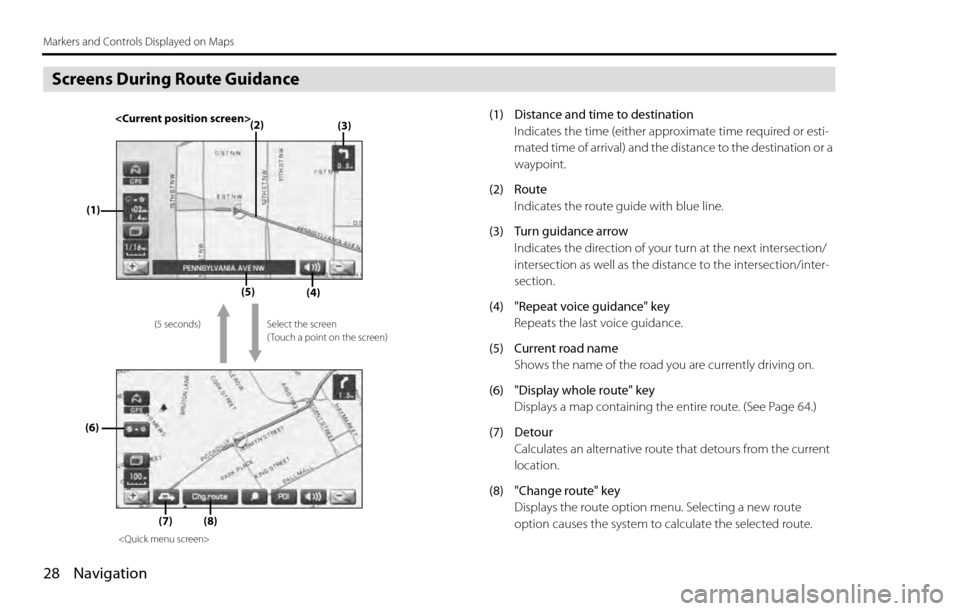
Screens During Route Guidance
(1) Distance and time to destination
Indicates the time (either approximate time required or esti-
mated time of arrival) and the distance to the destination or a
waypoint.
(2) Route
Indicates the route guide with blue line.
(3) Turn guidance arrow
Indicates the direction of your turn at the next intersection/
intersection as well as the distance to the intersection/inter-
section.
(4) "Repeat voice guidance" key
Repeats the last voice guidance.
(5) Current road name
Shows the name of the road you are currently driving on.
(6) "Display whole route" key
Displays a map containing the entire route. (See Page 64.)
(7) Detour
Calculates an alternative route that detours from the current
location.
(8) "Change route" key
Displays the route option menu. Selecting a new route
option causes the system to calculate the selected route.(3)(2)
(1)
(4)(5)
(6)
(7)
Select the screen
( Touch a point on the screen) (5 seconds)
(8)
Page 15 of 90
Navigation 29
Menu Screen Keys and Functions
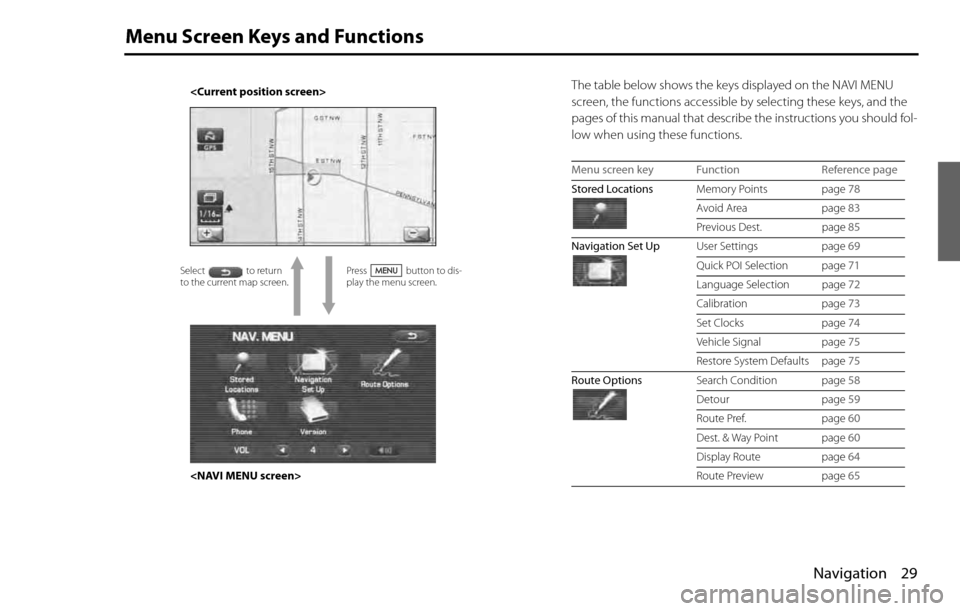
The table below shows the keys displayed on the NAVI MENU
screen, the functions accessible by selecting these keys, and the
pages of this manual that describe the instructions you should fol-
low when using these functions.
Press button to dis-
play the menu screen.
Select to return
to the current map screen.
Menu screen key Function Reference page
Stored LocationsMemory Points page 78
Avoid Area page 83
Previous Dest. page 85
Navigation Set UpUser Settings page 69
Quick POI Selection page 71
Language Selection page 72
Calibration page 73
Set Clocks page 74
Vehicle Signal page 75
Restore System Defaults page 75
Route OptionsSearch Condition page 58
Detour page 59
Route Pref. page 60
Dest. & Way Point page 60
Display Route page 64
Route Preview page 65
Page 16 of 90
30 Navigation
Menu Screen Keys and Functions
Phone
Bluetooth Phone page 240
Redial List page 259
Received Calls page 259
Phone Book page 261
Memory Points page 250
Bluetooth Settings page 252
Version
Version page 96
VOL
Voice guidance volume page 25 Menu screen key Function Reference page
Page 20 of 90
34 Navigation
Setting Route
Setting Destination
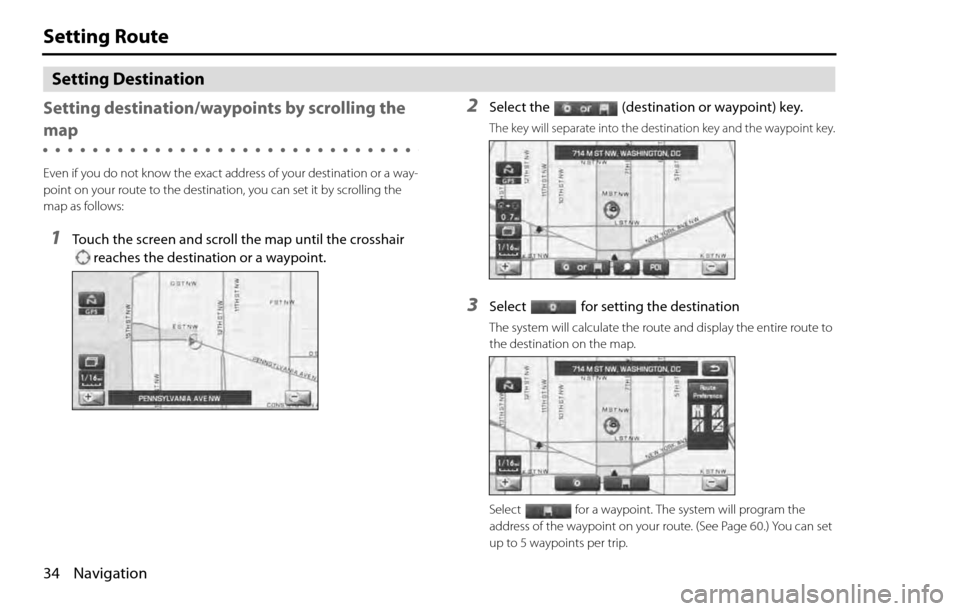
Setting destination/waypoints by scrolling the
map
Even if you do not know the exact address of your destination or a way-
point on your route to the destination, you can set it by scrolling the
map as follows:
1Touch the screen and scroll the map until the crosshair
reaches the destination or a waypoint.
2Select the (destination or waypoint) key.
The key will separate into the destination key and the waypoint key.
3Select for setting the destination
The system will calculate the route and display the entire route to
the destination on the map.
Select for a waypoint. The system will program the
address of the waypoint on your route. (See Page 60.) You can set
up to 5 waypoints per trip.
Page 23 of 90
Navigation 37
Setting Route
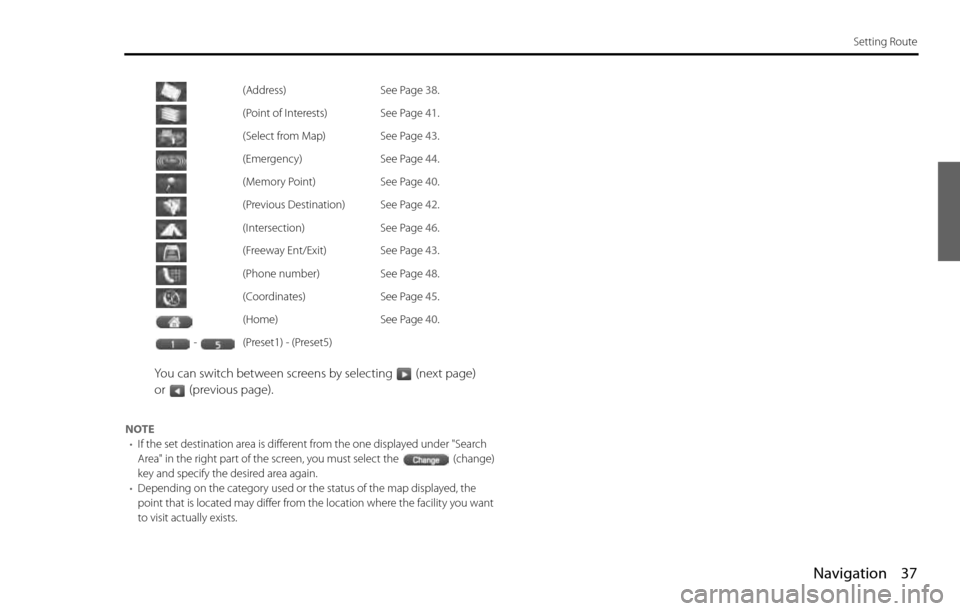
You can switch between screens by selecting (next page)
or (previous page).
NOTE
•If the set destination area is different from the one displayed under "Search
Area" in the right part of the screen, you must select the (change)
key and specify the desired area again.
•Depending on the category used or the status of the map displayed, the
point that is located may differ from the location where the facility you want
to visit actually exists.(Address) See Page 38
.
(Point of Interests) See Page 41
.
(Select from Map) See Page 43
.
(Emergency) See Page 44
.
(Memory Point) See Page 40
.
(Previous Destination) See Page 42
.
(Intersection) See Page 46
.
(Freeway Ent/Exit) See Page 43
.
(Phone number) See Page 48
.
(Coordinates) See Page 45
.
(Home) See Page 40
.
- (Preset1) - (Preset5)
Page 24 of 90
38 Navigation
Setting Route
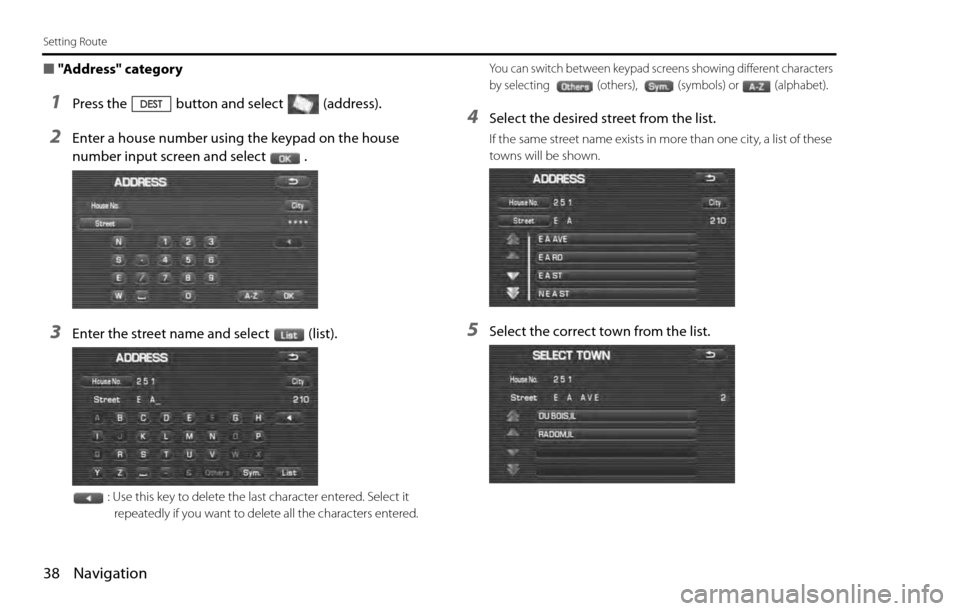
■"Address" category
1Press the button and select (address).
2Enter a house number using the keypad on the house
number input screen and select .
3Enter the street name and select (list).
: Use this key to delete the last character entered. Select it
repeatedly if you want to delete all the characters entered.
You can switch between keypad screens showing different characters
by selecting (others), (symbols) or (alphabet).
4Select the desired street from the list.
If the same street name exists in more than one city, a list of these
towns will be shown.
5Select the correct town from the list.
Page 26 of 90
40 Navigation
Setting Route
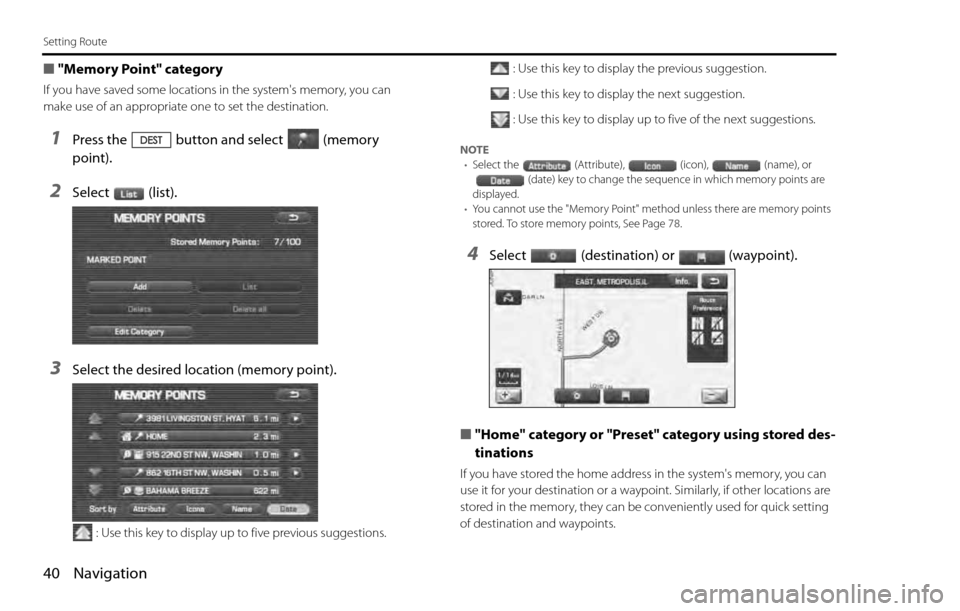
■"Memory Point" category
If you have saved some locations in the system's memory, you can
make use of an appropriate one to set the destination.
1Press the button and select (memory
point).
2Select (list).
3Select the desired location (memory point).
: Use this key to display up to five previous suggestions.: Use this key to display the previous suggestion.
: Use this key to display the next suggestion.
: Use this key to display up to five of the next suggestions.
NOTE
•Select the (Attribute), (icon), (name), or
(date) key to change the sequence in which memory points are
displayed.
•You cannot use the "Memory Point" method unless there are memory points
stored. To store memory points, See Page 78.
4Select (destination) or (waypoint).
■"Home" category or "Preset" category using stored des-
tinations
If you have stored the home address in the system's memory, you can
use it for your destination or a waypoint. Similarly, if other locations are
stored in the memory, they can be conveniently used for quick setting
of destination and waypoints.