navigation system SUBARU LEGACY 2012 5.G Navigation Manual
[x] Cancel search | Manufacturer: SUBARU, Model Year: 2012, Model line: LEGACY, Model: SUBARU LEGACY 2012 5.GPages: 90, PDF Size: 1.82 MB
Page 36 of 90
50 Navigation
Setting Route
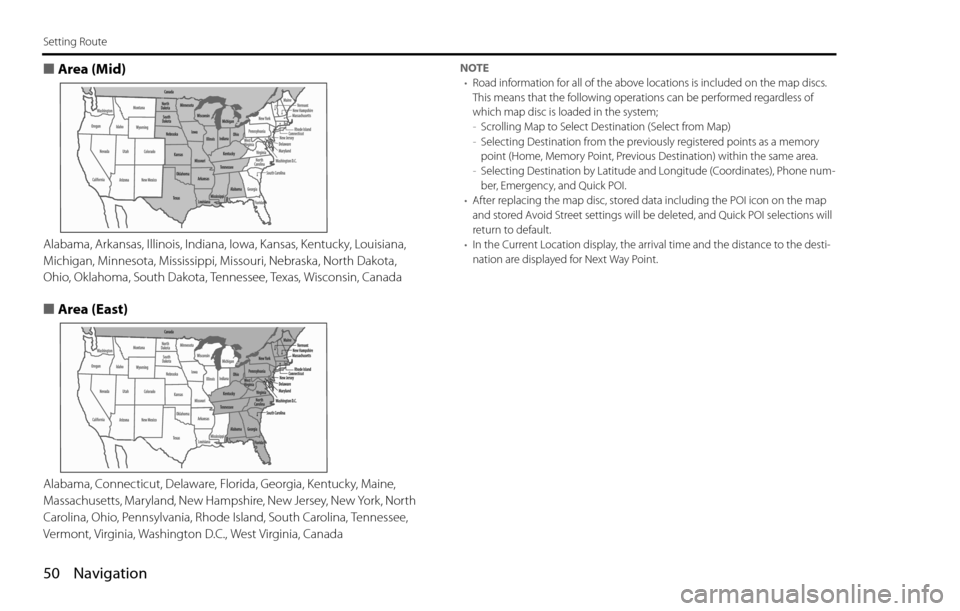
■Area (Mid)
Alabama, Arkansas, Illinois, Indiana, Iowa, Kansas, Kentucky, Louisiana,
Michigan, Minnesota, Mississippi, Missouri, Nebraska, North Dakota,
Ohio, Oklahoma, South Dakota, Tennessee, Texas, Wisconsin, Canada
■Area (East)
Alabama, Connecticut, Delaware, Florida, Georgia, Kentucky, Maine,
Massachusetts, Maryland, New Hampshire, New Jersey, New York, North
Carolina, Ohio, Pennsylvania, Rhode Island, South Carolina, Tennessee,
Vermont, Virginia, Washington D.C., West Virginia, Canada
NOTE
•Road information for all of the above locations is included on the map discs.
This means that the following operations can be performed regardless of
which map disc is loaded in the system;
-Scrolling Map to Select Destination (Select from Map)
-Selecting Destination from the previously registered points as a memory
point (Home, Memory Point, Previous Destination) within the same area.
-Selecting Destination by Latitude and Longitude (Coordinates), Phone num-
ber, Emergency, and Quick POI.
•After replacing the map disc, stored data including the POI icon on the map
and stored Avoid Street settings will be deleted, and Quick POI selections will
return to default.
•In the Current Location display, the arrival time and the distance to the desti-
nation are displayed for Next Way Point.
Page 37 of 90
Navigation 51
Route Guidance
Route Guidance Screen
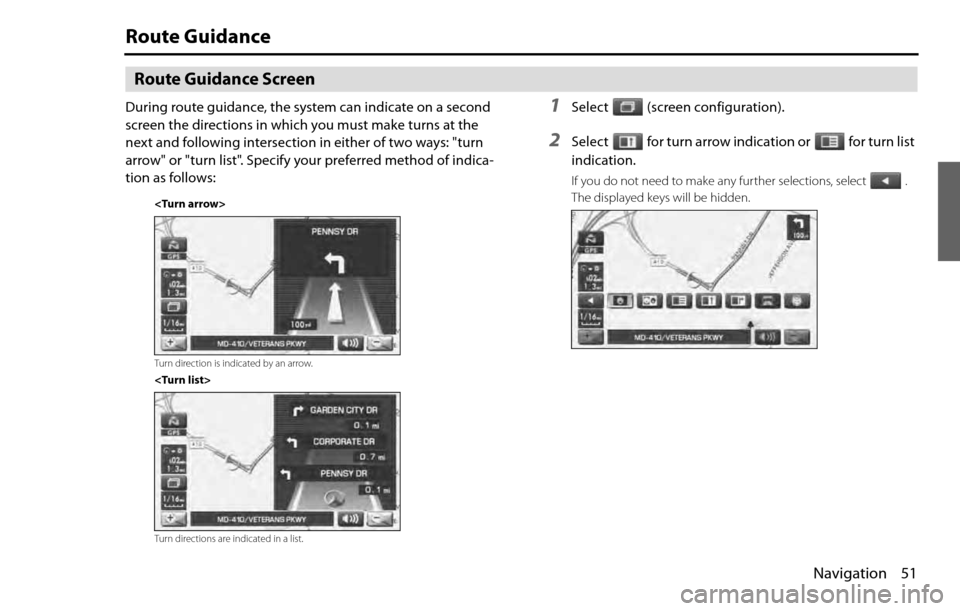
During route guidance, the system can indicate on a second
screen the directions in which you must make turns at the
next and following intersection in either of two ways: "turn
arrow" or "turn list". Specify your preferred method of indica-
tion as follows:1Select (screen configuration).
2Select for turn arrow indication or for turn list
indication.
If you do not need to make any further selections, select .
The displayed keys will be hidden.
Turn direction is indicated by an arrow.
Turn directions are indicated in a list.
Page 38 of 90
52 Navigation
Route Guidance
Zoom-in Map at Intersection
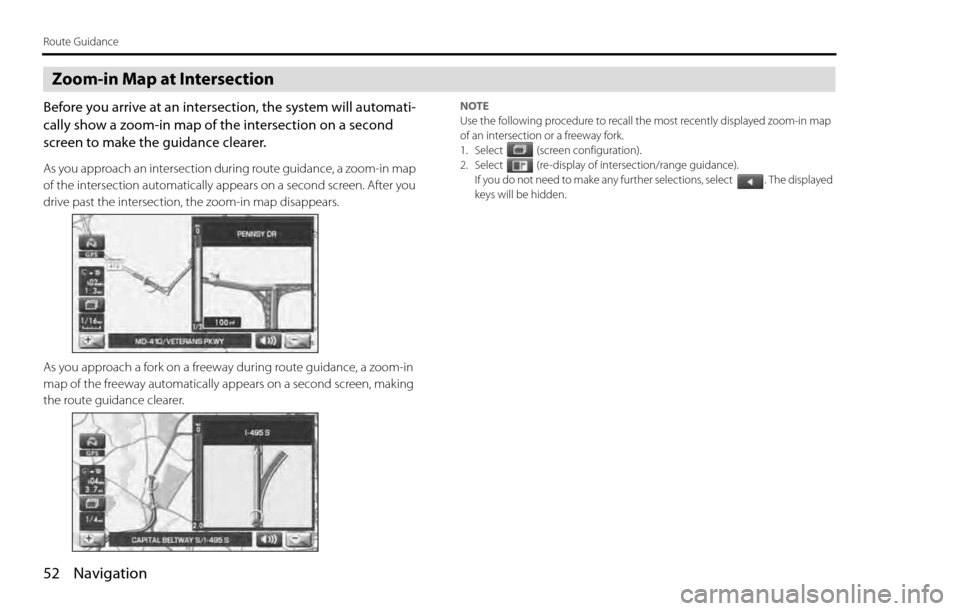
Before you arrive at an intersection, the system will automati-
cally show a zoom-in map of the intersection on a second
screen to make the guidance clearer.
As you approach an intersection during route guidance, a zoom-in map
of the intersection automatically appears on a second screen. After you
drive past the intersection, the zoom-in map disappears.
As you approach a fork on a freeway during route guidance, a zoom-in
map of the freeway automatically appears on a second screen, making
the route guidance clearer.
NOTE
Use the following procedure to recall the most recently displayed zoom-in map
of an intersection or a freeway fork.
1. Select (screen configuration).
2. Select (re-display of intersection/range guidance).
If you do not need to make any further selections, select . The displayed
keys will be hidden.
Page 43 of 90
Navigation 57
Route Options
Setting Route Options
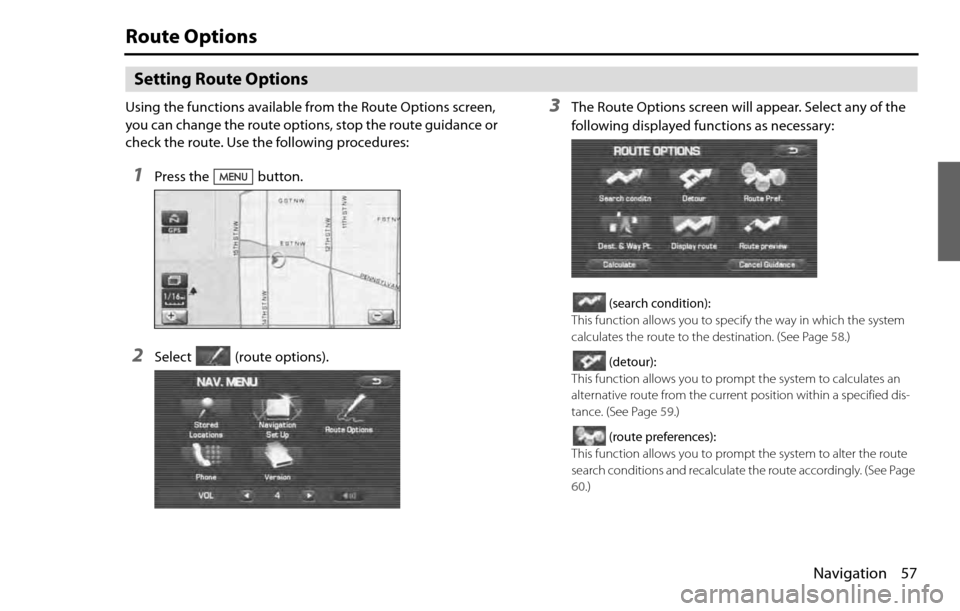
Using the functions available from the Route Options screen,
you can change the route options, stop the route guidance or
check the route. Use the following procedures:
1Press the button.
2Select (route options).
3The Route Options screen will appear. Select any of the
following displayed functions as necessary:
(search condition):
This function allows you to specify the way in which the system
calculates the route to the destination. (See Page 58.)
(detour):
This function allows you to prompt the system to calculates an
alternative route from the current position within a specified dis-
tance. (See Page 59.)
(route preferences):
This function allows you to prompt the system to alter the route
search conditions and recalculate the route accordingly. (See Page
60.)
Page 44 of 90

58 Navigation
Route Options
(destination and waypoint):
This function allows you to modify the destination and waypoints,
and prompt the system to recalculate the route accordingly. (See
Page 60.)
(display route):
This function allows you to confirm the entire route and, if neces-
sary, prompt the system to recalculate the route according to your
specification. (See Page 64.)
(route preview):
This function allows you to simulate a drive along the route that is
calculated by the system before departure. (See Page 65.)
(calculate):
Selecting this key prompts the system to recalculate the route.
(cancel guidance):
Selecting this key prompts the system to stop route guidance.
Note that this erases the destination and waypoints. To prompt
the system to start guidance again, select (calculate).
NOTE
A recalculated route will sometimes be the same route as the one displayed
before recalculation.
Search condition
You can specify the way in which the system calculates the route.
1Press the button, then select (route
options), and then select(search condition).
2Select (Quick), (Alt.),
or (Short) to specify the way of calculating the
route to reach the next waypoint or the destination from
the current point.
: The system will calculate a route with the shortest
driving time required.
: The system will calculate an alternative route.
(You can select , or for the first
waypoint. Only or can be specified for the
second and subsequent waypoints.)
: The system will calculate a route with the shortest
driving distance.
Page 45 of 90
Navigation 59
Route Options
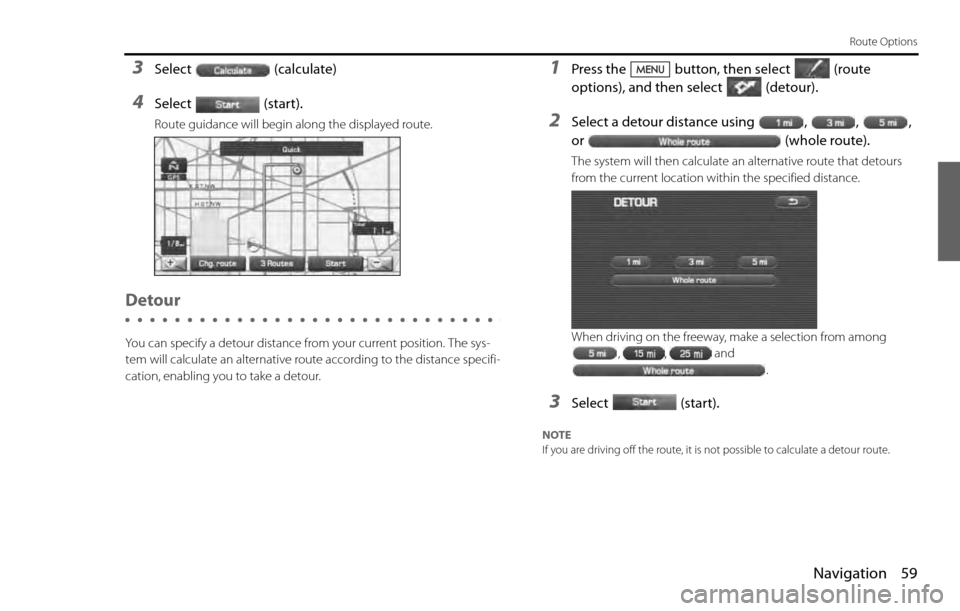
3Select (calculate)
4Select (start).
Route guidance will begin along the displayed route.
Detour
You can specify a detour distance from your current position. The sys-
tem will calculate an alternative route according to the distance specifi-
cation, enabling you to take a detour.
1Press the button, then select (route
options), and then select (detour).
2Select a detour distance using , , ,
or (whole route).
The system will then calculate an alternative route that detours
from the current location within the specified distance.
When driving on the freeway, make a selection from among
, , and
.
3Select (start).
NOTE
If you are driving off the route, it is not possible to calculate a detour route.
Page 50 of 90
64 Navigation
Route Options
■Deleting destination and all waypoints
You can delete the destination and all previously set waypoints in a sin-
gle process.
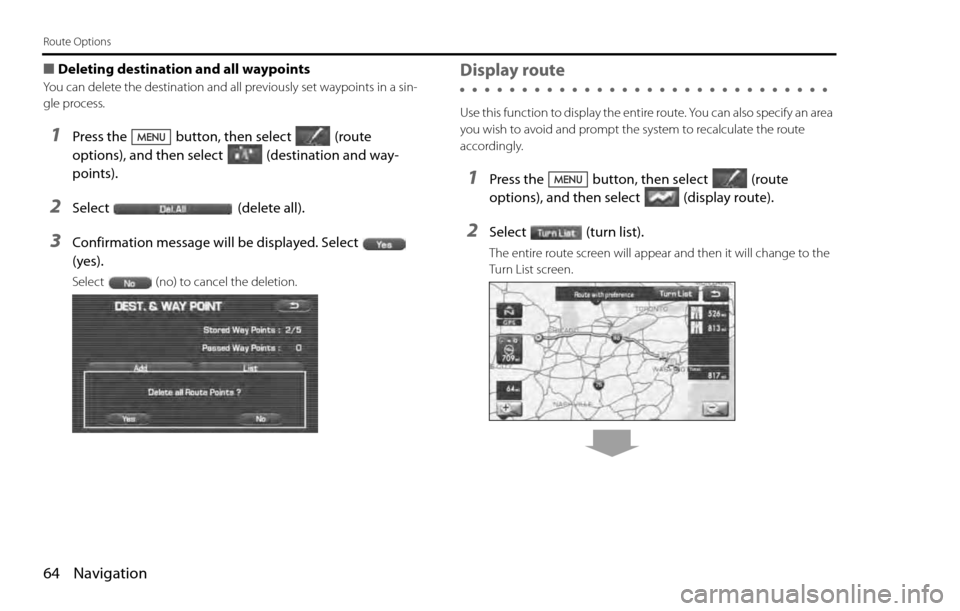
1Press the button, then select (route
options), and then select (destination and way-
points).
2Select (delete all).
3Confirmation message will be displayed. Select
(yes).
Select (no) to cancel the deletion.
Display route
Use this function to display the entire route. You can also specify an area
you wish to avoid and prompt the system to recalculate the route
accordingly.
1Press the button, then select (route
options), and then select (display route).
2Select (turn list).
The entire route screen will appear and then it will change to the
Turn List screen.
Page 51 of 90
Navigation 65
Route Options
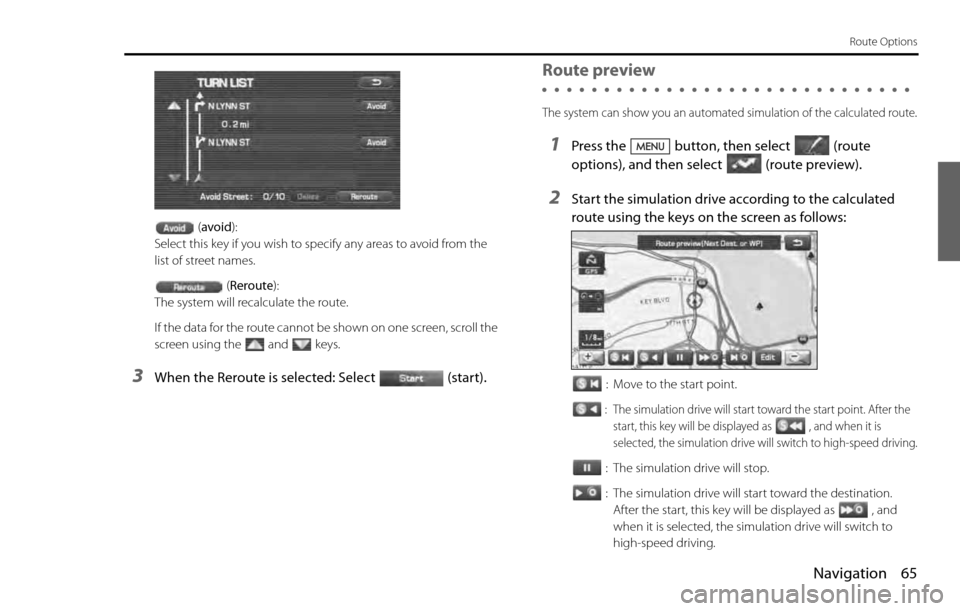
(avoid):
Select this key if you wish to specify any areas to avoid from the
list of street names.
(Reroute):
The system will recalculate the route.
If the data for the route cannot be shown on one screen, scroll the
screen using the and keys.
3When the Reroute is selected: Select (start).
Route preview
The system can show you an automated simulation of the calculated route.
1Press the button, then select (route
options), and then select(route preview).
2Start the simulation drive according to the calculated
route using the keys on the screen as follows:
: Move to the start point.
: The simulation drive will start toward the start point. After the
start, this key will be displayed as , and when it is
selected, the simulation drive will switch to high-speed driving.
: The simulation drive will stop.
: The simulation drive will start toward the destination.
After the start, this key will be displayed as , and
when it is selected, the simulation drive will switch to
high-speed driving.
Page 53 of 90
Navigation 67
Route Options
POI keys:
When you select one of the six POI category keys, the system will
retrieve the selected POI from the Quick POI storage and display it on
the map. When selecting the (others) key,
POIs of other categories can be found. For more details, see Page
71.
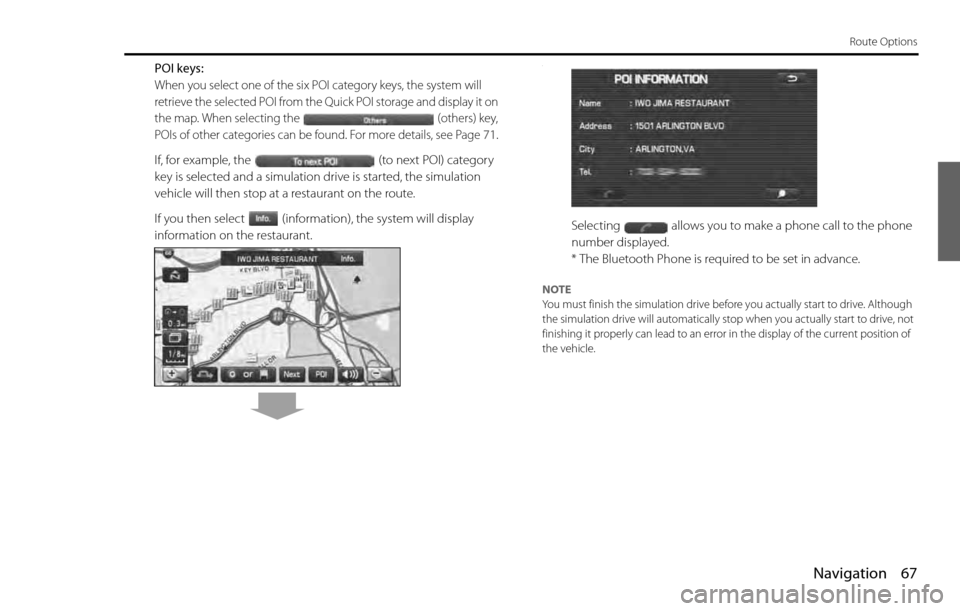
If, for example, the (to next POI) category
key is selected and a simulation drive is started, the simulation
vehicle will then stop at a restaurant on the route.
If you then select (information), the system will display
information on the restaurant.
.
Selecting allows you to make a phone call to the phone
number displayed.
* The Bluetooth Phone is required to be set in advance.
NOTE
You must finish the simulation drive before you actually start to drive. Although
the simulation drive will automatically stop when you actually start to drive, not
finishing it properly can lead to an error in the display of the current position of
the vehicle.
Page 54 of 90
68 Navigation
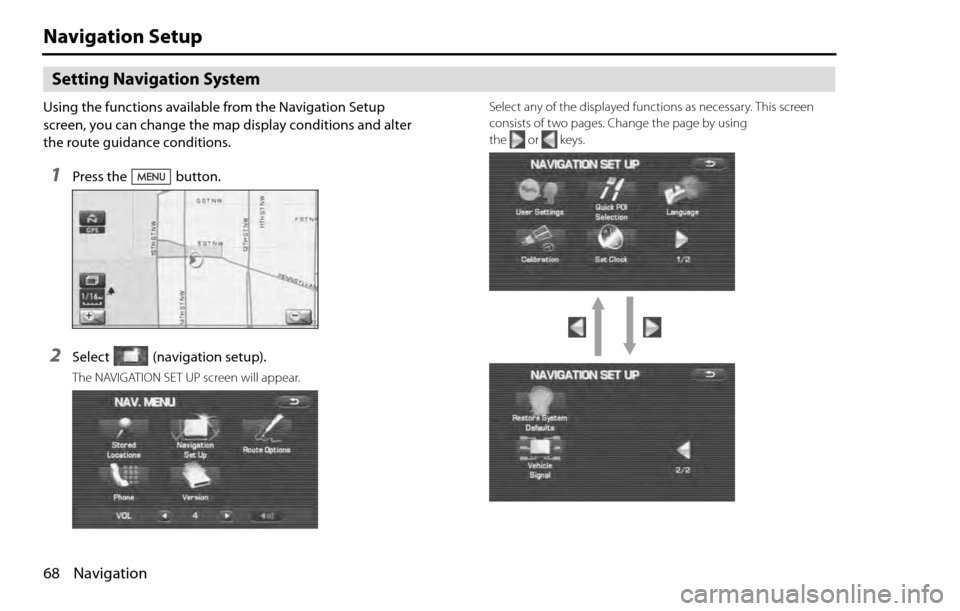
Navigation Setup
Setting Navigation System
Using the functions available from the Navigation Setup
screen, you can change the map display conditions and alter
the route guidance conditions.
1Press the button.
2Select (navigation setup).
The NAVIGATION SET UP screen will appear.Select any of the displayed functions as necessary. This screen
consists of two pages. Change the page by using
the or keys.