keyless SUBARU LEGACY 2012 5.G User Guide
[x] Cancel search | Manufacturer: SUBARU, Model Year: 2012, Model line: LEGACY, Model: SUBARU LEGACY 2012 5.GPages: 474, PDF Size: 17.45 MB
Page 113 of 474
2-24Keys and doors
trunk lid down until the latch engages. NOTE . Do not leave your valuables in the
trunk when you leave your vehicle. . Even when the trunk lid cannot be
opened using the remote keyless entry
system, you can open the trunk lid by
using the key. Refer to “Trunk lid
(Legacy) –if the trunk lid cannot be
opened ”F 9-19.
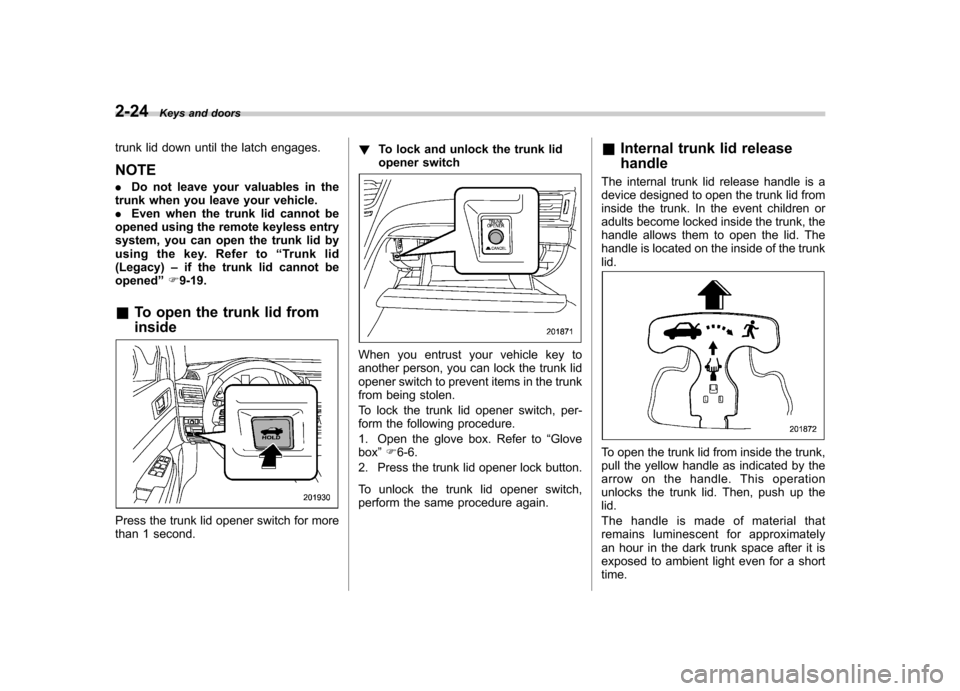
& To open the trunk lid from inside
Press the trunk lid opener switch for more
than 1 second. !
To lock and unlock the trunk lid
opener switch
When you entrust your vehicle key to
another person, you can lock the trunk lid
opener switch to prevent items in the trunk
from being stolen.
To lock the trunk lid opener switch, per-
form the following procedure.
1. Open the glove box. Refer to “Glove
box ”F 6-6.
2. Press the trunk lid opener lock button.
To unlock the trunk lid opener switch,
perform the same procedure again. &
Internal trunk lid release handle
The internal trunk lid release handle is a
device designed to open the trunk lid from
inside the trunk. In the event children or
adults become locked inside the trunk, the
handle allows them to open the lid. The
handle is located on the inside of the trunklid.
To open the trunk lid from inside the trunk,
pull the yellow handle as indicated by the
arrow on the handle. This operation
unlocks the trunk lid. Then, push up thelid.
The handle is made of material that
remains luminescent for approximately
an hour in the dark trunk space after it is
exposed to ambient light even for a shorttime.
Page 115 of 474
2-26Keys and doors
If the latch is not released, contact your
SUBARU dealer.
In that case, use the key to release the
latch, then close the trunk lid.
Also, if the movement of the release
handle feels restric ted or not entirely
smooth during operation, or the handle
and/or handle base is cracked, contact
your SUBARU dealer. Rear gate (Outback)
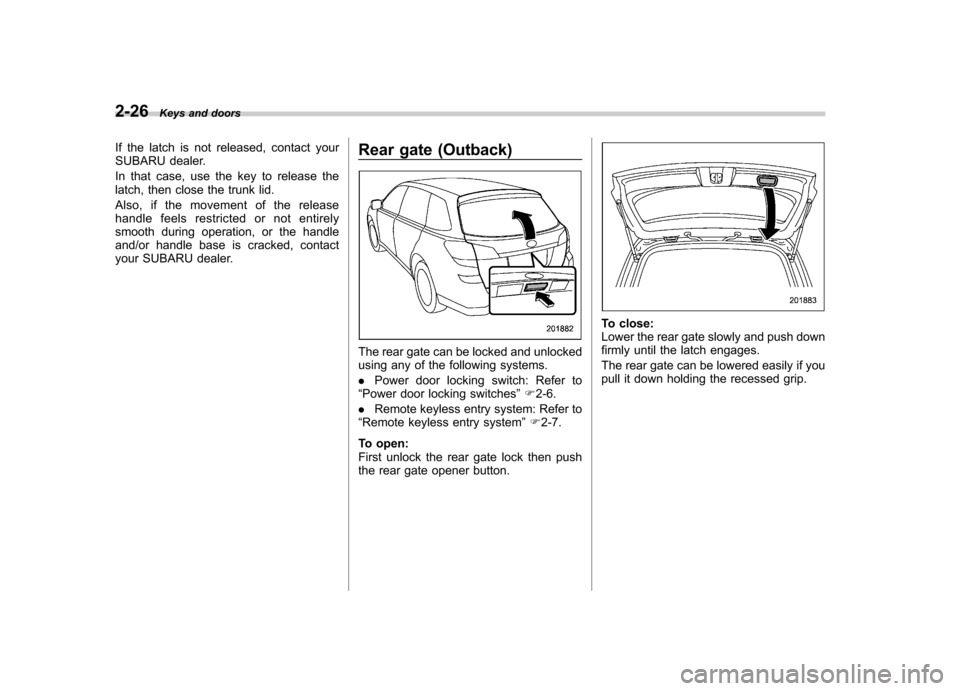
The rear gate can be locked and unlocked
using any of the following systems. .
Power door locking switch: Refer to
“ Power door locking switches ”F 2-6.
. Remote keyless entry system: Refer to
“ Remote keyless entry system ”F 2-7.
To open:
First unlock the rear gate lock then push
the rear gate opener button.
To close:
Lower the rear gate slowly and push down
firmly until the latch engages.
The rear gate can be lowered easily if you
pull it down holding the recessed grip.
Page 123 of 474
3-4Instruments and controls
&Acc
In this position the electrical accessories
(radio, accessory power outlet, etc.) can
be used. & ON
This is the normal operating position after
the engine is started. & START
CAUTION
Do not turn the ignition switch to the “ START ”position while the engine
is running.
The engine is started in this position. The
starter cranks the engine to start it. When
the key is released (after the engine has
started), the key automatically returns tothe “ON ”position.
If the engine does not start with your
registered key, pull out the key once (at
this time, the security indicator light will
blink), wait for at least 10 seconds,
reinsert the key in the ignition switch and
then try to start the engine again.
NOTE
The engine may not start in the follow-
ing cases:
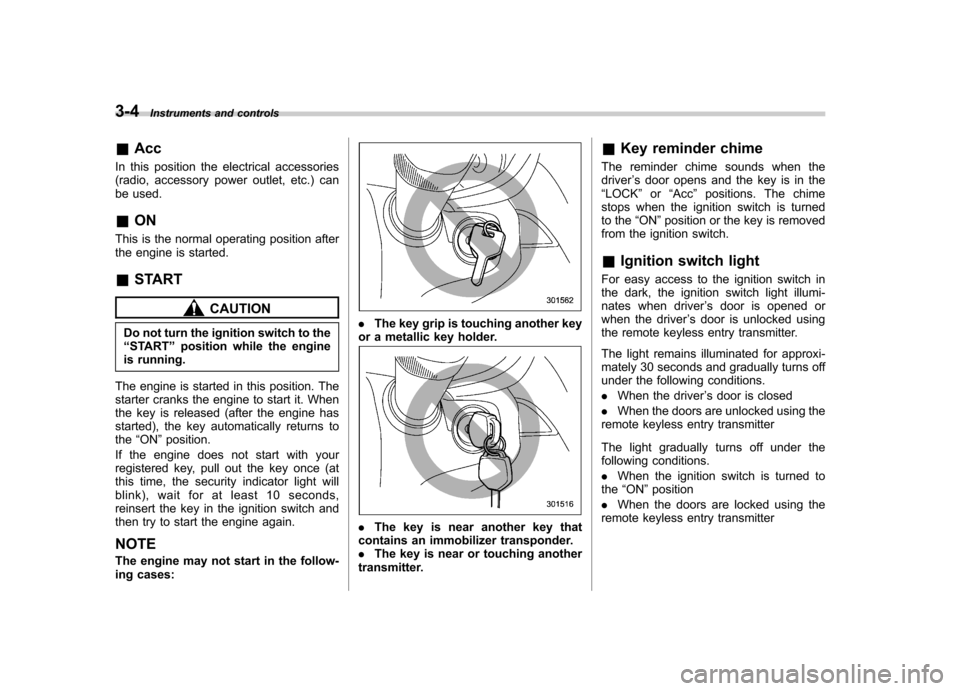
. The key grip is touching another key
or a metallic key holder.
. The key is near another key that
contains an immobilizer transponder. . The key is near or touching another
transmitter. &
Key reminder chime
The reminder chime sounds when thedriver ’s door opens and the key is in the
“ LOCK ”or “Acc ”positions. The chime
stops when the ignition switch is turned
to the “ON ”position or the key is removed
from the ignition switch.
& Ignition switch light
For easy access to the ignition switch in
the dark, the ignition switch light illumi-
nates when driver ’s door is opened or
when the driver ’s door is unlocked using
the remote keyless entry transmitter.
The light remains illuminated for approxi-
mately 30 seconds and gradually turns off
under the following conditions. . When the driver ’s door is closed
. When the doors are unlocked using the
remote keyless entry transmitter
The light gradually turns off under the
following conditions. . When the ignition switch is turned to
the “ON ”position
. When the doors are locked using the
remote keyless entry transmitter
Page 255 of 474
6-2Interior equipment
Interior light
When leaving your vehicle, make sure the
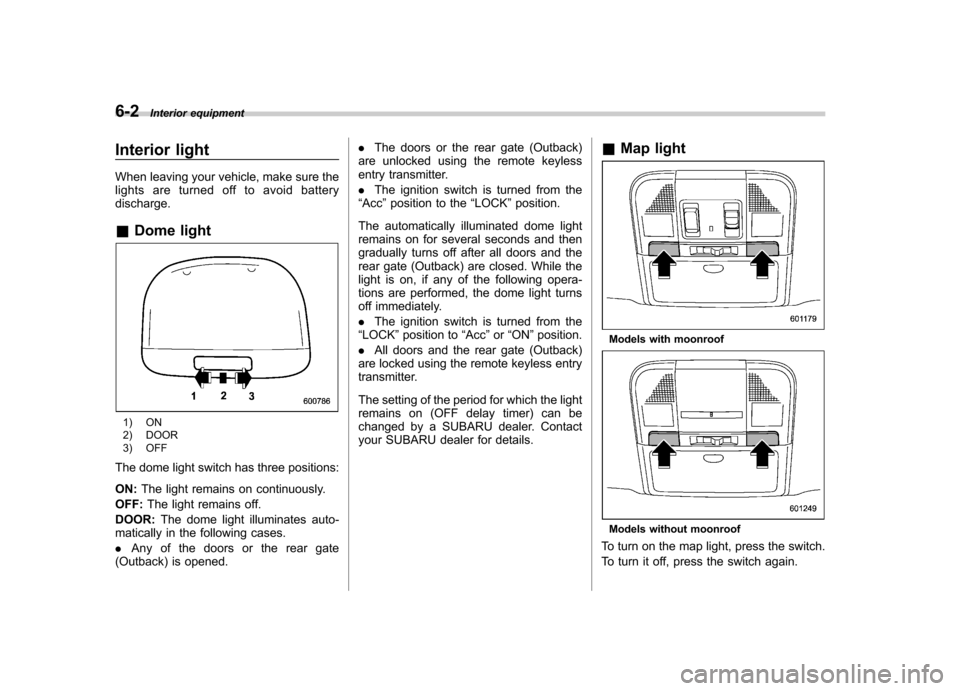
lights are turned off to avoid batterydischarge. &Dome light
1) ON
2) DOOR
3) OFF
The dome light switch has three positions: ON: The light remains on continuously.
OFF: The light remains off.
DOOR: The dome light illuminates auto-
matically in the following cases. . Any of the doors or the rear gate
(Outback) is opened. .
The doors or the rear gate (Outback)
are unlocked using the remote keyless
entry transmitter. . The ignition switch is turned from the
“ Acc ”position to the “LOCK ”position.
The automatically illuminated dome light
remains on for several seconds and then
gradually turns off after all doors and the
rear gate (Outback) are closed. While the
light is on, if any of the following opera-
tions are performed, the dome light turns
off immediately. . The ignition switch is turned from the
“ LOCK ”position to “Acc ”or “ON ”position.
. All doors and the rear gate (Outback)
are locked using the remote keyless entry
transmitter.
The setting of the period for which the light
remains on (OFF delay timer) can be
changed by a SUBARU dealer. Contact
your SUBARU dealer for details. &
Map light
Models with moonroof
Models without moonroof
To turn on the map light, press the switch.
To turn it off, press the switch again.
Page 256 of 474
When leaving the vehicle, make sure the
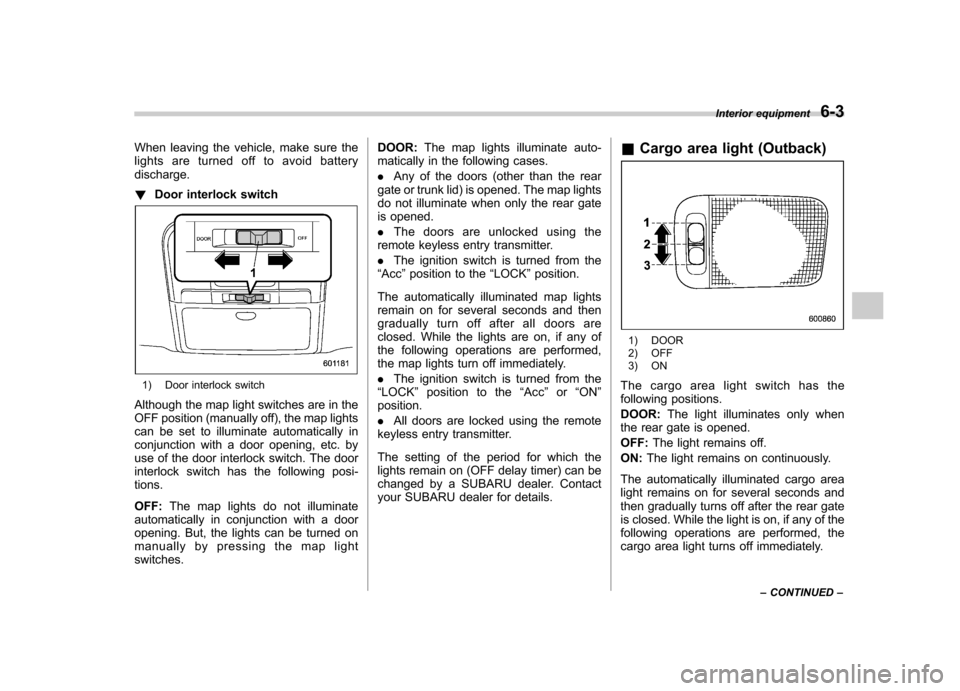
lights are turned off to avoid batterydischarge. !Door interlock switch
1) Door interlock switch
Although the map light switches are in the
OFF position (manually off), the map lights
can be set to illuminate automatically in
conjunction with a door opening, etc. by
use of the door interlock switch. The door
interlock switch has the following posi-tions. OFF: The map lights do not illuminate
automatically in conjunction with a door
opening. But, the lights can be turned on
manually by pressing the map lightswitches. DOOR:
The map lights illuminate auto-
matically in the following cases. . Any of the doors (other than the rear
gate or trunk lid) is opened. The map lights
do not illuminate when only the rear gate
is opened. . The doors are unlocked using the
remote keyless entry transmitter.. The ignition switch is turned from the
“ Acc ”position to the “LOCK ”position.
The automatically illuminated map lights
remain on for several seconds and then
gradually turn off after all doors are
closed. While the lights are on, if any of
the following operations are performed,
the map lights turn off immediately. . The ignition switch is turned from the
“ LOCK ”position to the “Acc ”or “ON ”
position. . All doors are locked using the remote
keyless entry transmitter.
The setting of the period for which the
lights remain on (OFF delay timer) can be
changed by a SUBARU dealer. Contact
your SUBARU dealer for details. &
Cargo area light (Outback)
1) DOOR
2) OFF
3) ON
The cargo area light switch has the
following positions. DOOR: The light illuminates only when
the rear gate is opened.OFF: The light remains off.
ON: The light remains on continuously.
The automatically illuminated cargo area
light remains on for several seconds and
then gradually turns off after the rear gate
is closed. While the light is on, if any of the
following operations are performed, the
cargo area light turns off immediately. Interior equipment
6-3
– CONTINUED –
Page 257 of 474
6-4Interior equipment
.The ignition switch is turned from the
“ LOCK ”position to the “Acc ”or “ON ”
position. . The rear gate is locked using the
remote keyless entry transmitter.
The setting of the period for which the
lights remain on (OFF delay timer) can be
changed by a SUBARU dealer. Contact
your SUBARU dealer for details. Sun visors
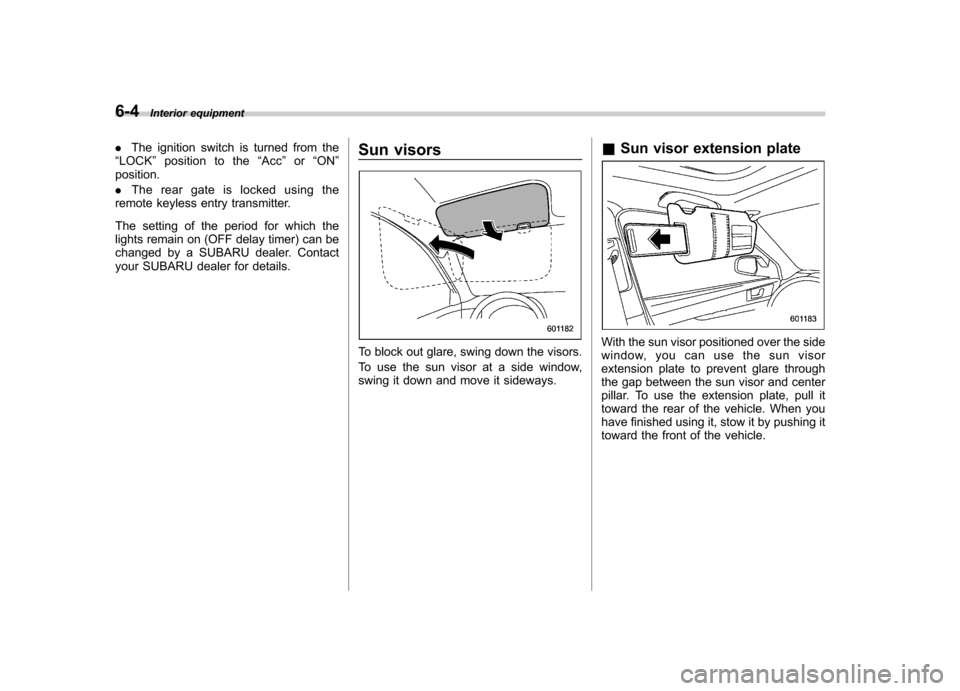
To block out glare, swing down the visors.
To use the sun visor at a side window,
swing it down and move it sideways.&
Sun visor extension plateWith the sun visor positioned over the side
window, you can use the sun visor
extension plate to prevent glare through
the gap between the sun visor and center
pillar. To use the extension plate, pull it
toward the rear of the vehicle. When you
have finished using it, stow it by pushing it
toward the front of the vehicle.
Page 288 of 474

preconditions before starting, and if all
safety parameters are correct, the engine
will start within 5 seconds. Upon success-
ful engine start, the remote start confirma-
tion transmitter button will flash twice
every 5 seconds* and the vehicle will
honk the horn and flash the side marker
lights, tail lights and the front position
lights once, then the lights will illuminate
and remain illuminated, indicating that the
engine is running. While the vehicle is
operating via the remote engine start
function, the power window features will
be disabled. Also, the system has a timer
and will shut down after 15 minutes if you
do not operate the vehicle. Press and hold the“
”button for 2 seconds to turn the
engine off. The remote start confirmation
transmitter button will flash three times*
indicating that the engine has shut down.
If the starter cranks but does not start or
starts and stalls, the remote engine start
system will power off and then attempt to
start the engine an additional three times
unless the remote engine start system
determines that a vehicle malfunction is
preventing the system from starting. If the
engine does not start after additional
attempts, the remote engine start system
will abort and return to a non-activatestate.
*: Provided that the remote engine start transmitter is within the operating range of
the system. &
Remote start safety features
For safety and security reasons, the
system will fail to start and honk the horn
twice or shut down the engine during
remote start operation if any of the
following occur: . Any of the doors or the trunk / rear gate
are open / opened (*the vehicle ’s horn will
honk six times and the side marker lights,
tail lights and the front position lights will
flash six times indicating that a vehicle
door or trunk / rear gate was open when
the remote engine start system wasactivated). . The brake pedal is depressed
. The key was already in the ignition
switch. The engine hood is opened
. The remote start system “Service
mode ”is engaged
. The vehicle ’s engine idle speed has
reached a level over 3,500 RPM. The alarm is triggered by opening a
door or the rear gate.. The select lever is not in the “P ”
position (AT and CVT models)
In addition to the items above, if the vehicle
’s engine management system
determines there is a safety risk due to a
vehicle related problem, the vehicle will
shut down and the vehicle ’s horn will honk
three times.
NOTE . If the alarm system is armed at the
time of remote engine start activation
(the security indicator light on the
combination meter is flashing), the
alarm system will remain armed
throughout the remote start run cycle.. If the alarm system is disarmed at
the time of remote engine start activa-
tion (the security indicator light on the
combination meter is not flashing), the
alarm system will remain disarmed
throughout the remote start run cycle. & Entering the vehicle while it
is running via remote start
1. Unlock the vehicle doors using the
remote keyless entry system. If the vehi-cle ’s doors are unlocked manually using
the key, the vehicle ’s alarm system will
trigger (if the alarm system is armed prior
to activating the remote engine start
system) and the engine will turn off.
Inserting the key into the ignition switch
and turning it to the “ON ”position or
pressing the unlock button “
”on the
Starting and operating
7-11
– CONTINUED –
Page 289 of 474

7-12Starting and operating
remote keyless entry transmitter will dis-
arm the alarm system. Refer to “Alarm
system ”F 2-15.
2. Enter the vehicle.
3. The engine will shut down when any
door or trunk/rear gate is opened.
4. Insert the key into the ignition switch
and turn to the “START ”position to restart
the engine. & Remote start confirmation
transmitter feature
Your remote engine start transmitter is
equipped with a unique bidirectional con-
firmation feature. This feature will allow
the transmitter ’s backlit button to display
the status of the system under the condi-
tion that the vehicle and transmitter are
within the operational range of the system.
Typical transmitter button flash sequences
are outlined in the following chart. Transmitter flash sequence Feature description
Flashes when button is pressed Indicates that the system is transmitting an RF signal.
Two long flashes following re-
mote start activation (transmit-
ter button is pressed two times
within 3 seconds) Indicates that the transmitter did not receive the remote start
activation confirmation from the vehicle system. The transmitter
will automatically send one additional remote start activation
attempt. This usually occurs when the operational range is at its
limit or has been exceeded.
One flash following remote
start activation (transmitter
button is pressed two times
within 3 seconds) Indicates that the engine is running via remote start. If the
transmitter is moved outside of the operating range of the
system, this sequence will timeout after the normal 15-minute
vehicle run cycle.
2 flashes every 5 seconds Indicates that the engine is running via remote start. If the
transmitter is removed outside of the operating range of the
system, this sequence will timeout after the normal 15-minute
vehicle run cycle.
3 flashes Indicates that the engine has turned off due to a remote start
system 15-minute timeout, vehicle safety parameter or normal shutdown.
Page 290 of 474

&Entering the vehicle follow-
ing remote engine start shut- down
An alarm trigger may occur if the vehicle is
opened by the remote keyless entry
transmitter within a few seconds immedi-
ately following remote engine start shut-down. & Pre-heating or pre-cooling
the interior of the vehicle
Models with automatic climate control system:
After the system starts the engine, the
automatic climate control system will
activate the “FULL AUTO ”mode and heat
or cool the interior to the predetermined
median (room) temperature. No pre-
setting of controls is necessary.
Models without automatic climate con-
trol system:
Before exiting the vehicle, set the tem-
perature controls to the desired setting
and operation. After the system starts the
engine, the heater or air conditioning will
activate and heat or cool the interior to
your setting. &
Service mode
In service mode, the remote engine start
function is temporarily disabled to prevent
the system from unexpectedly starting the
engine while being serviced.
To engage or disengage service mode:
1. Enter the vehicle and close all vehicle
doors and the trunk/rear gate.
2. Verify that the select lever is in the “P ”
position (AT and CVT models)
3. Depress and hold the brake pedal
4. Turn the ignition switch to the “ON ”
position
5. Press and release the remote engine
start transmitter “
”button three times.
The system will honk the vehicle ’s horn
each time the button is pressed.
6. The system will pause for 1 second
then honk the vehicle ’s horn three times to
indicate that the service mode has been
engaged or honk one time to indicate that
the service mode has been disengaged.
NOTE
When taking your vehicle in for service,
it is recommended that you inform the
service personnel that your vehicle is
equipped with a remote engine startsystem. &
Remote transmitter program
New transmitters can be programmed to
the remote engine start system in the
event that a transmitter is lost, stolen,
damaged or additional transmitters are
desired (the system will accept up to eight
transmitters). New remote engine start
transmitters can be programmed accord-
ing to the following procedure.
1. Open the driver ’s door (the driver ’s
door must remain opened throughout the
entire process).
2. Depress and hold the brake pedal.
3. Turn the ignition switch to “ON ”then
“ LOCK ”, back to “ON ”then “LOCK ”, then
back to “ON ”again and leave the ignition
“ ON ”throughout the programming pro-
cess.
4. The system will flash the side marker
lights, tail lights and front position lights
and honk the horn three times, indicating
that the system has entered the transmit-
ter learn mode.
5. Press and release the “
”button on
the transmitter that you want to program.
6. The system will flash the side marker
lights, tail lights and front position lights
and honk the horn one time, indicating that
the system has learned the transmitter.
Upon successful programming, the re-
mote start confirmation transmitter button Starting and operating
7-13
– CONTINUED –
Page 363 of 474
9-20In case of emergency
Rear gate (Outback) –if the
rear gate cannot be unlocked
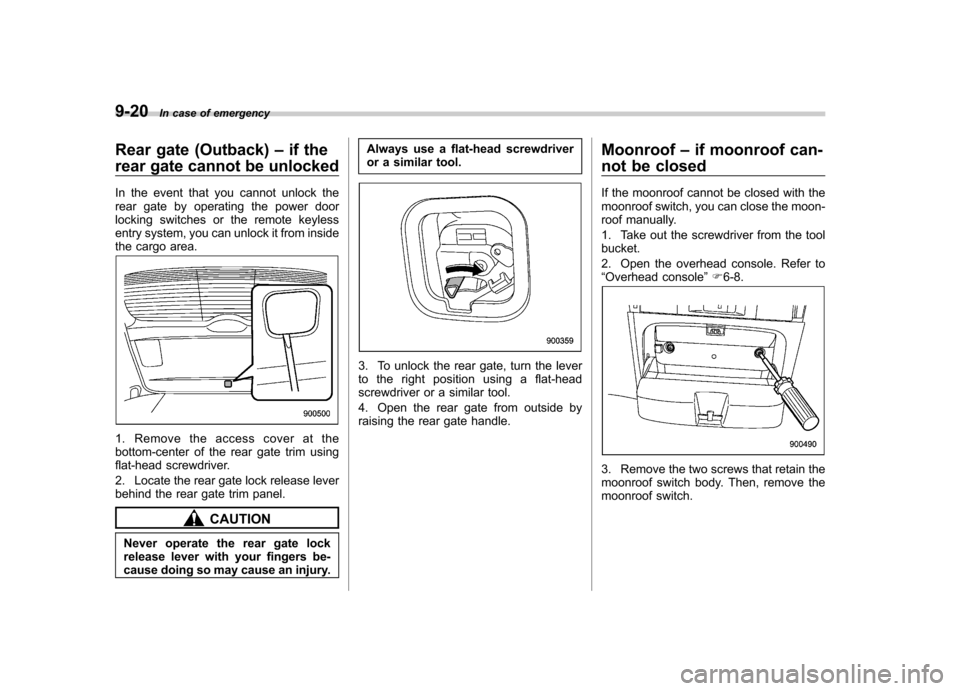
In the event that you cannot unlock the
rear gate by operating the power door
locking switches or the remote keyless
entry system, you can unlock it from inside
the cargo area.
1. Remove the access cover at the
bottom-center of the rear gate trim using
flat-head screwdriver.
2. Locate the rear gate lock release lever
behind the rear gate trim panel.
CAUTION
Never operate the rear gate lock
release lever with your fingers be-
cause doing so may cause an injury. Always use a flat-head screwdriver
or a similar tool.
3. To unlock the rear gate, turn the lever
to the right position using a flat-head
screwdriver or a similar tool.
4. Open the rear gate from outside by
raising the rear gate handle.
Moonroof
–if moonroof can-
not be closed
If the moonroof cannot be closed with the
moonroof switch, you can close the moon-
roof manually.
1. Take out the screwdriver from the tool bucket.
2. Open the overhead console. Refer to “ Overhead console ”F 6-8.
3. Remove the two screws that retain the
moonroof switch body. Then, remove the
moonroof switch.