display SUBARU LEGACY 2012 5.G Owner's Manual
[x] Cancel search | Manufacturer: SUBARU, Model Year: 2012, Model line: LEGACY, Model: SUBARU LEGACY 2012 5.GPages: 474, PDF Size: 17.45 MB
Page 164 of 474
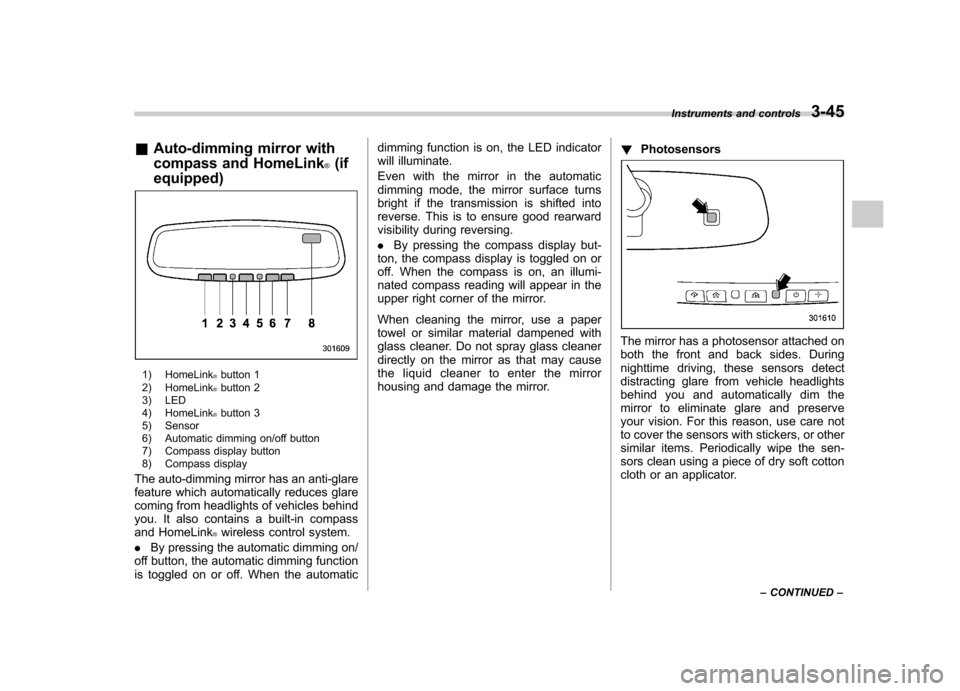
&Auto-dimming mirror with
compass and HomeLink
®(if
equipped)
1) HomeLink®button 1
2) HomeLink®button 2
3) LED
4) HomeLink
®button 3
5) Sensor
6) Automatic dimming on/off button
7) Compass display button
8) Compass display
The auto-dimming mirror has an anti-glare
feature which automatically reduces glare
coming from headlights of vehicles behind
you. It also contains a built-in compass
and HomeLink
®wireless control system.
. By pressing the automatic dimming on/
off button, the automatic dimming function
is toggled on or off. When the automatic dimming function is on, the LED indicator
will illuminate.
Even with the mirror in the automatic
dimming mode, the mirror surface turns
bright if the transmission is shifted into
reverse. This is to ensure good rearward
visibility during reversing. .
By pressing the compass display but-
ton, the compass display is toggled on or
off. When the compass is on, an illumi-
nated compass reading will appear in the
upper right corner of the mirror.
When cleaning the mirror, use a paper
towel or similar material dampened with
glass cleaner. Do not spray glass cleaner
directly on the mirror as that may cause
the liquid cleaner to enter the mirror
housing and damage the mirror. !
Photosensors
The mirror has a photosensor attached on
both the front and back sides. During
nighttime driving, these sensors detect
distracting glare from vehicle headlights
behind you and automatically dim the
mirror to eliminate glare and preserve
your vision. For this reason, use care not
to cover the sensors with stickers, or other
similar items. Periodically wipe the sen-
sors clean using a piece of dry soft cotton
cloth or an applicator. Instruments and controls
3-45
– CONTINUED –
Page 165 of 474
3-46Instruments and controls
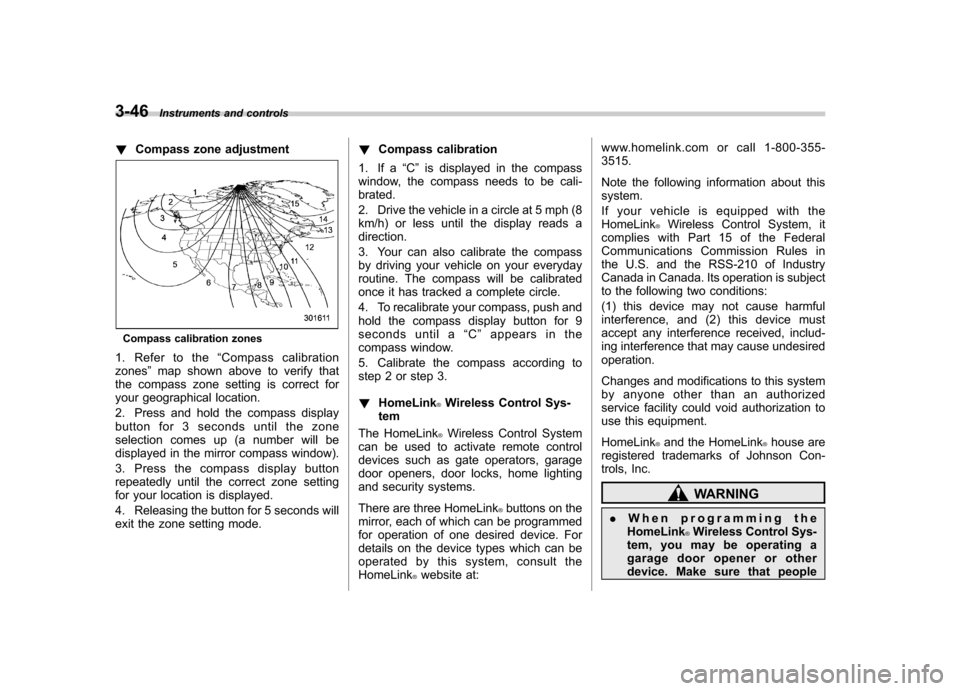
!Compass zone adjustment
Compass calibration zones
1. Refer to the “Compass calibration
zones ”map shown above to verify that
the compass zone setting is correct for
your geographical location.
2. Press and hold the compass display
button for 3 seconds until the zone
selection comes up (a number will be
displayed in the mirror compass window).
3. Press the compass display button
repeatedly until the correct zone setting
for your location is displayed.
4. Releasing the button for 5 seconds will
exit the zone setting mode. !
Compass calibration
1. If a “C ” is displayed in the compass
window, the compass needs to be cali-brated.
2. Drive the vehicle in a circle at 5 mph (8
km/h) or less until the display reads a direction.
3. Your can also calibrate the compass
by driving your vehicle on your everyday
routine. The compass will be calibrated
once it has tracked a complete circle.
4. To recalibrate your compass, push and
hold the compass display button for 9
seconds until a “C ” appears in the
compass window.
5. Calibrate the compass according to
step 2 or step 3. ! HomeLink
®Wireless Control Sys-
tem
The HomeLink
®Wireless Control System
can be used to activate remote control
devices such as gate operators, garage
door openers, door locks, home lighting
and security systems.
There are three HomeLink
®buttons on the
mirror, each of which can be programmed
for operation of one desired device. For
details on the device types which can be
operated by this system, consult the HomeLink
®website at: www.homelink.com or call 1-800-355-3515.
Note the following information about this system.
If your vehicle is equipped with the HomeLink
®Wireless Control System, it
complies with Part 15 of the Federal
Communications Commission Rules in
the U.S. and the RSS-210 of Industry
Canada in Canada. Its operation is subject
to the following two conditions:
(1) this device may not cause harmful
interference, and (2) this device must
accept any interference received, includ-
ing interference that may cause undesiredoperation.
Changes and modifications to this system
by anyone other than an authorized
service facility could void authorization to
use this equipment. HomeLink
®and the HomeLink®house are
registered trademarks of Johnson Con-
trols, Inc.
WARNING
. When programming the
HomeLink
®Wireless Control Sys-
tem, you may be operating a
garage door opener or other
device. Make sure that people
Page 176 of 474
Automatic climate control
system (type B) NOTE .Operate the automatic climate con-
trol system when the engine is running. . The blower fan rotates at a low
speed when the engine coolant tem-
perature is low.. For efficient defogging or dehumidi-
fying in cold weather, press the “A/C ”
button.
When the automatic climate control mode
is selected, the following items are auto-
matically controlled. . Outlet air temperature
. Fan speed
. Airflow distribution
. Air inlet control
. Air conditioner compressor operation
To activate this mode, perform the follow-
ing procedure.
1. Set the preferred temperature using
the temperature control button.
2. Press the “AUTO ”button. The FULL
AUTO mode is selected and the “FULL
AUTO ”indicator light on the display
illuminates. NOTE .
When the “DUAL ”button is pressed,
separate temperature settings for the driver ’s side and passenger ’s side can
be enabled (DUAL mode). To cancel the
DUAL mode, press the “DUAL ”button
again. The temperature setting for thepassenger ’s side becomes the same as
the setting for the driver ’s side.
. If you operate any of the buttons on
the control panel other than the “OFF ”
button, rear window defogger button
and temperature control buttons during
FULL AUTO mode operation, the“ FULL ”indicator light on the control
panel will turn off and the “AUTO ”
indicator light will remain illuminated.
You can then manually control the
system as desired. To change the
system back to the FULL AUTO mode,
press the “AUTO ”button.
3. To turn off the climate control system,
press the “OFF ”button. &
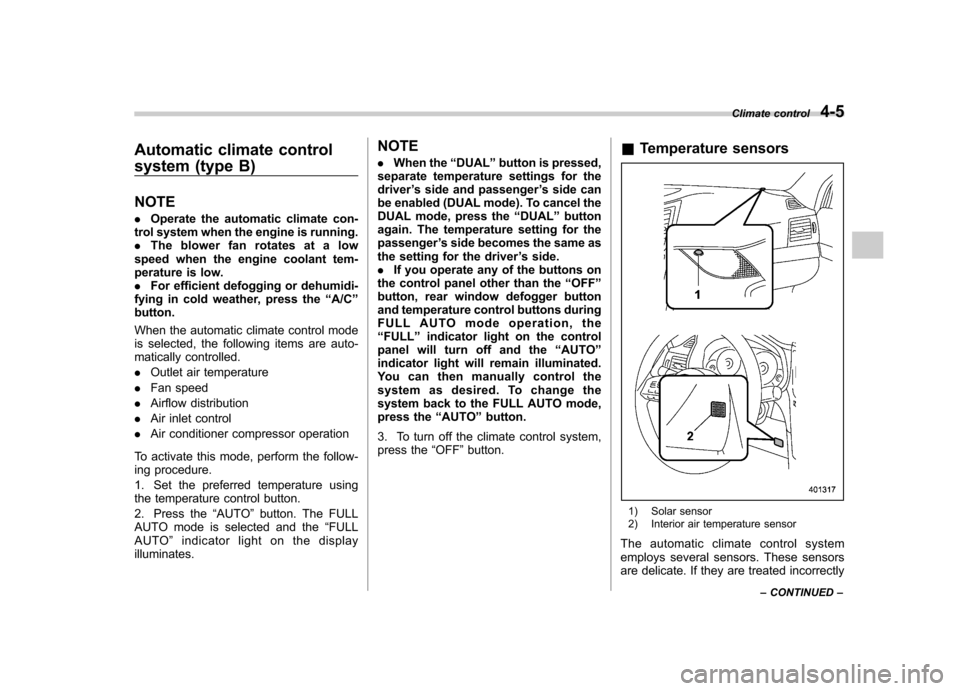
Temperature sensors
1) Solar sensor
2) Interior air temperature sensor
The automatic climate control system
employs several sensors. These sensors
are delicate. If they are treated incorrectly Climate control
4-5
– CONTINUED –
Page 178 of 474

both side windows to prevent fogging.)
(Heat-def): Windshield defroster outlets,
foot outlets and both side outlets of the
instrument panel
(Defrost): Windshield defroster outlets and
both side outlets of the instrument panel&
Temperature control
! Type A
Turn the temperature control dial over a
range from the blue side (cool) to red side
(warm) to regulate the temperature of
airflow from the air outlets. ! Type B
To increase the temperature setting, press the “
”side of the temperature control
button. To decrease the temperature
setting, press the “
”side of the tempera-
ture control button.
Each temperature setting is shown on the
display. When “LO ”is shown, the system
provides maximum cooling performance.When “HI ”is shown, the system provides
maximum heating performance.
NOTE
When the “DUAL ”button is pressed,
separate temperature settings for the driver ’s side and passenger ’s side can
be enabled (DUAL mode). To cancel the
DUAL mode, press the “DUAL ”button
again. The temperature setting for thepassenger ’s side becomes the same as
the setting for the driver ’s side.
& Fan speed control
The fan operates only when the ignition switch is in the
“ON ”position. Select the
preferred fan speed by turning the fan
speed control dial (type A), or by pressing
the fan speed control buttons (type B).
& Air conditioner control
The air conditioner operates only when
the engine is running.
Press the air conditioner button while the
fan is in operation to turn on the air
conditioner. When the air conditioner is
on, the indicator light on the air conditioner
button (type A)/ “A/C ”indicator light (type
B) illuminates.
To turn off the air conditioner, press the
button again. The indicator light will turnoff. NOTE
For efficient defogging or dehumidify-
ing in cold weather, turn on the air
conditioner. & Air inlet selection
Select the air inlet by pressing the air inlet
selection button.
ON position (recirculation) : Interior air is
recirculated inside the vehicle. Press the
air inlet selection button to the ON position
for fast cooling with the air conditioner or
when driving on a dusty road. When the Climate control
4-7
– CONTINUED –
Page 184 of 474
Antenna system...................................................... 5-3
Printed antenna ...................................................... 5-3
FM reception .......................................................... 5-3
Installation of accessories ...................................... 5-3
Audio set ................................................................. 5-4
Type A audio set (if equipped) ................................ 5-5
Type B audio set (if equipped) ................................ 5-6
Type C audio set (if equipped) ................................ 5-7
Power and audio controls ...................................... 5-8
Power switch and volume control ........................... 5-8
Sound controls and audio settings ......................... 5-8
Adjustable level of each mode ............................... 5-11
FM/AM radio operation ......................................... 5-12
FM selection (type A and B audio) ......................... 5-12
AM selection (type A and B audio) ......................... 5-12
FM/AM selection (type C audio) ............................. 5-12
Tuning .................................................................. 5-12
HD Radio
®Technology (Digital AM and FM Radio)
(type C audio) ..................................................... 5-15
RDS text display ................................................... 5-17
Station preset ....................................................... 5-18
Satellite radio operation (if equipped) ................. 5-19
Sirius XM Satellite Radio Activation (for U.S.A. only) ................................................................... 5-19
Satellite radio reception ......................................... 5-19
Displaying satellite radio ID of tuner ...................... 5-20
Band selection ...................................................... 5-20
Channel and category selection ............................. 5-21
Channel preset ...................................................... 5-22
When the following messages are displayed (type C audio) ..................................................... 5-22 CD player operation
..............................................5-23
Play file ................................................................ 5-23
How to insert a CD ............................................... 5-24
How to play back a CD ......................................... 5-24
To select a track from the beginning ..................... 5-24
Fast-forwarding and rewinding . ............................. 5-25
Repeating ............................................................. 5-26
Random playback ................................................. 5-27
Scan .................................................................... 5-28
Display selection (type A and B audio) .................. 5-28
Folder selection .................................................... 5-28
How to eject a CD from the player ......................... 5-29
When the following messages are displayed. . ........ 5-29
Auxiliary input jack ................................................5-30
Precautions to observe when handling a compact disc .......................................................5-31
USB storage device / iPod
®operations
(type B and C audio) ..........................................5-33
Play file ................................................................ 5-33
Connectable USB storage device .......................... 5-33
Connectable iPod
®models .................................... 5-33
Connecting USB storage device / iPod®................ 5-34
How to play back .................................................. 5-35
To select a track from the beginning ..................... 5-35
To select a chapter from the beginning when connecting iPod
®................................................ 5-35
Fast-forwarding and rewinding . ............................. 5-35
Repeating ............................................................. 5-36
Random playback ................................................. 5-36
SCAN (only when connecting USB storage device) ............................................................... 5-37 Audio
5
Page 185 of 474
AudioSelecting category (only when connectingiPod
®) ................................................................. 5-37
Display selection (type B audio) ............................. 5-39
Folder selection (only when connecting USB storage device) ................................................... 5-39
Selection from list (only when connecting USB storage device) (type C audio) ............................. 5-39
Setting the playing speed (only when the audiobook is playing) (type C audio) .................... 5-39
When the following messages are displayed . ......... 5-39
Audio control buttons ........................................... 5-41
MODE button ........................................................ 5-41
“
” and “”switch .............................................. 5-42
Volume control switch ........................................... 5-43 MUTE button (if equipped)
.................................... 5-43
Bluetooth
®audio (type B and C audio) ................5-43
Media format ........................................................ 5-44
Setting Bluetooth
®audio (type B audio) ................ 5-44
Setting Bluetooth®audio (type C audio) ................ 5-45
Bluetooth®audio operation ................................... 5-48
Hands-free system (if equipped) ..........................5-49
Tips for the Hands-free system ............................. 5-49
Certification for the Hands-free system .................. 5-50
Safety precautions ................................................ 5-52
Using the Hands-free system ................................ 5-52
Bluetooth
®setting ................................................ 5-67
Page 192 of 474

!Tone and balance control (type A
and B audio)
“ TUNE ”dial:
Type A audio
Type B audio
Each brief press of the “TUNE ”dial
changes the control modes in the follow-
ing sequence.
Choose the preferred level for each mode
by turning the “TUNE ”dial.
The control function returns to the tune/
track/channel control mode after approxi-
mately 5 seconds. !
Other settings (type A and B audio)
Type A audio
Type B audio
Each brief press of the “MENU ”button
changes the control modes in the follow-
ing sequence.
Type A audio:
Type B audio:
Choose the preferred settings for each
mode by turning the “TUNE ”dial.
The control function returns to the tune/
track/channel control mode after approxi-
mately 5 seconds. !
Position setting (type A audio)
Position setting is used to adjust the
sound to the best condition for the
selected seating position.
ALL: The sound is adjusted to the best for all seating positions.
FR: The sound is adjusted to the best for the front passenger.
FL: The sound is adjusted to the best for the driver.
! Audio settings (type C audio)
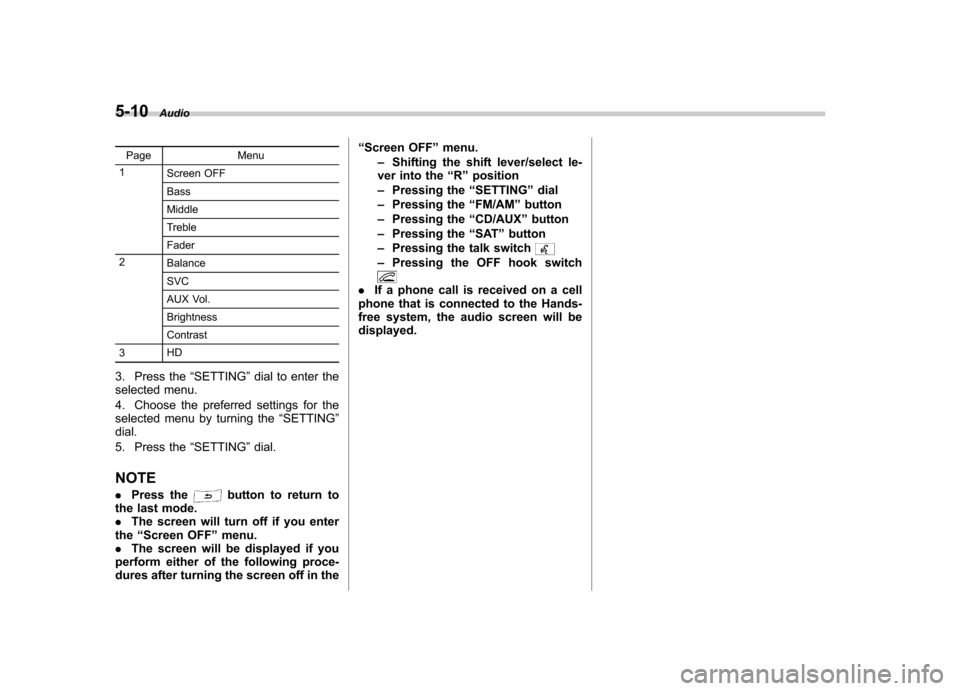
“ SETTING ”dial
1. Press the “SETTING ”dial to display
the “Setting ”menu.
2. Turn the “SETTING ”dial clockwise or
counterclockwise to select the preferred
menu. The menu list is as follows. Audio
5-9
– CONTINUED –
Page 193 of 474
5-10Audio
Page Menu
1 Screen OFF BassMiddle
Treble Fader
2 BalanceSVC
AUX Vol. Brightness Contrast
3 HD
3. Press the “SETTING ”dial to enter the
selected menu.
4. Choose the preferred settings for the
selected menu by turning the “SETTING ”
dial.
5. Press the “SETTING ”dial.
NOTE . Press the
button to return to
the last mode. . The screen will turn off if you enter
the “Screen OFF ”menu.
. The screen will be displayed if you
perform either of the following proce-
dures after turning the screen off in the “
Screen OFF ”menu.
– Shifting the shift lever/select le-
ver into the “R ” position
– Pressing the “SETTING ”dial
– Pressing the “FM/AM ”button
– Pressing the “CD/AUX ”button
– Pressing the “SAT ”button
– Pressing the talk switch
–Pressing the OFF hook switch
. If a phone call is received on a cell
phone that is connected to the Hands-
free system, the audio screen will bedisplayed.
Page 194 of 474

&Adjustable level of each mode
Mode Range of levels (displayed)Initial setting Turn counterclockwise Turn clockwise
Volume Volume control 0 to 40 15 (type A and B audio)/16
(type C)For less volume For more volume
AUX volume control* (type
A and B audio) 0 to 40 15 For less volume For more volume
AUX volume control (type Caudio) LOW, MID, HIGH MID From HIGH to MID, MID to
LOW, LOW to HIGHFrom LOW to MID, MID to
HIGH, HIGH to LOW
Tone and balance Bass control �8 to +8 0 For less bass sound For more bass sound
Midrange control �8 to +8 0 For less midrange sound For more midrange sound
Treble control �8 to +8 0 For less treble sound For more treble sound
Fader R9 to F9 0 Front attenuated Rear attenuated
Balance L9 to R9 0 Right channel attenuated Left channel attenuated
Other settings SPEED VOLUME OFF to 2 OFF For less auto volume change For more auto volume change
CS Auto (type A audio) OFF to 2 OFF From 2 to 1, 1 to OFF From OFF to 1, 1 to 2
POSITION (type A audio) ALL, FR, FL ALL From FL to FR, FR to ALL From ALL to FR, FR to FL
SRS Sound (type B audio) OFF to ON OFF OFF ON
Beep (type B audio) OFF to ON ON OFF ON
Brightness (type C audio) �8 to +8 0 For less brightness For more brightness
Contrast (type C audio) �8 to +8 0 For less contrast For more contrast
HD Radio (type C audio) OFF to ON ON OFF ON
*For type A audio, only when an AUX audio product is connected. Audio
5-11
Page 196 of 474

interval can be changed between 10 kHz
in the AM mode and 0.2 MHz in the FMmode. !Stereo indicator (type A and B audio)
The stereo indicator “ST ”will illuminate
when an FM stereo broadcast is received. ! Seek tuning (SEEK)
Type A audio:
1) Seek up
2) Seek down Type B audio:
Seek up
Seek down
Type C audio:Seek up
Seek down
If you press the indicated button briefly,
the radio will automatically search for a
receivable station and stop at the first one
it finds. This function may not be available
when radio signals are weak. When this
happens, perform manual tuning to select
the preferred station. !
Scan tuning (SCAN)
Type A audio
Type B audio
Type C audio
If you press the “SCAN ”button, the radio
will switch to the scan mode. In this mode,
the radio scans through the radio band
until a station is found. The radio will
briefly stop at the station while displaying
the frequency, after which scanning will
continue until the entire band has beenscanned.
Press the “SCAN ”button again to cancel
the SCAN mode. If you press the “SCAN ”
button while the radio is stopped at a
station, the radio stays stopped at that
station. If you press the button while the
radio is scanning, the radio stops at the
next receivable station (type A and C
audio)/The radio stops at a frequency
when the “SCAN ”button is pressed (type
B audio).
Automatic tuning may not function prop- Audio
5-13
– CONTINUED –