clock SUBARU OUTBACK 2007 4.G Owner's Manual
[x] Cancel search | Manufacturer: SUBARU, Model Year: 2007, Model line: OUTBACK, Model: SUBARU OUTBACK 2007 4.GPages: 442, PDF Size: 13.39 MB
Page 395 of 442
11-52Maintenance and service
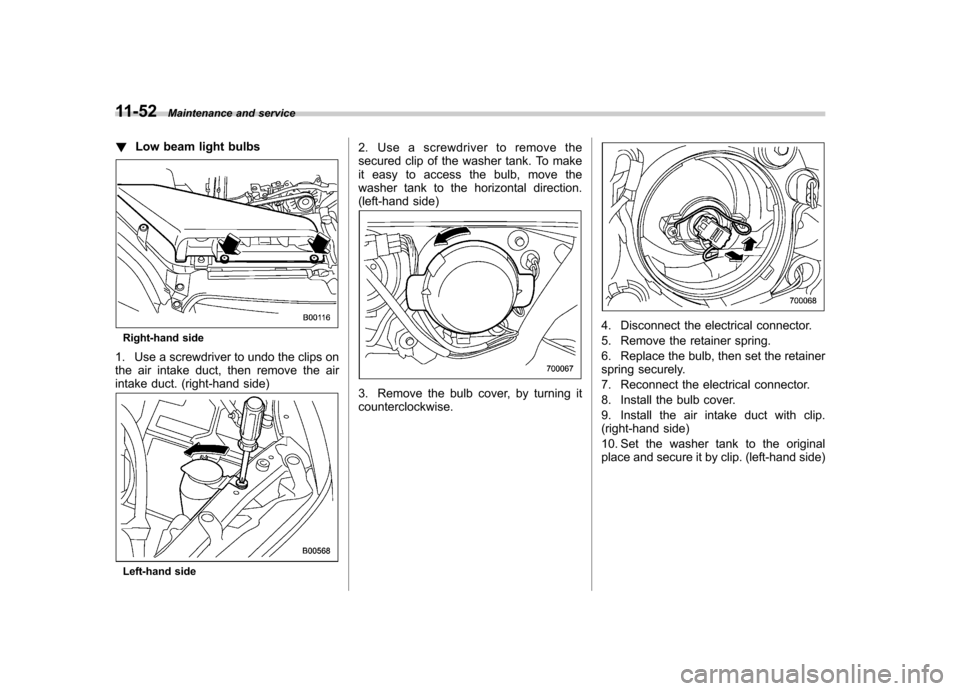
! Low beam light bulbs
Right-hand side
1. Use a screwdriver to undo the clips on
the air intake duct, then remove the air
intake duct. (right-hand side)
Left-hand side 2. Use a screwdriver to remove the
secured clip of the washer tank. To make
it easy to access the bulb, move the
washer tank to the horizontal direction.
(left-hand side)
3. Remove the bulb cover, by turning it counterclockwise.
4. Disconnect the electrical connector.
5. Remove the retainer spring.
6. Replace the bulb, then set the retainer
spring securely.
7. Reconnect the electrical connector.
8. Install the bulb cover.
9. Install the air intake duct with clip.
(right-hand side)
10. Set the washer tank to the original
place and secure it by clip. (left-hand side)
Page 396 of 442
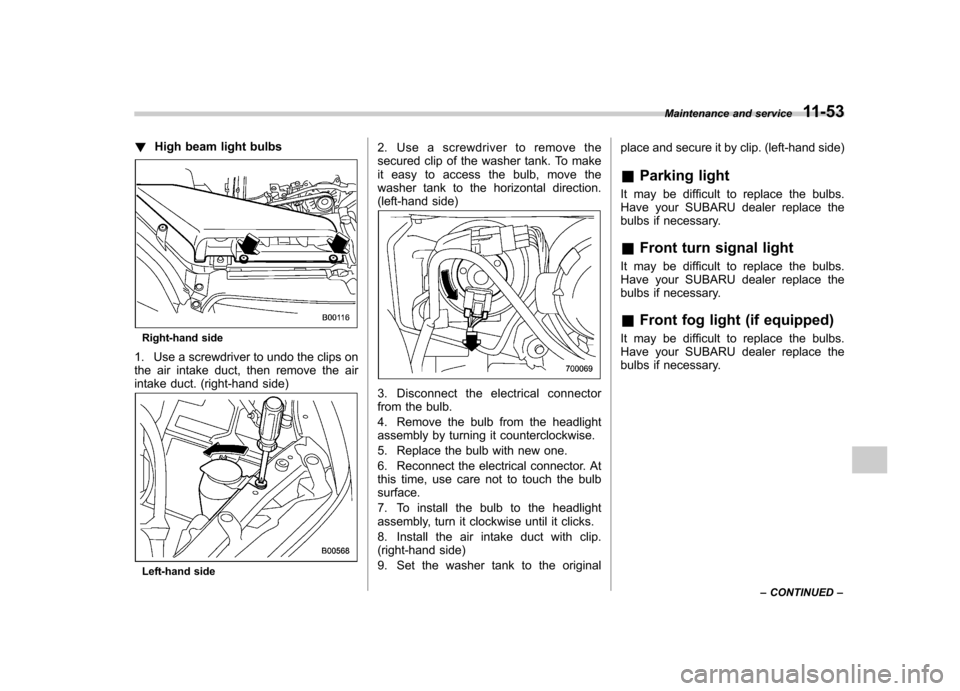
!High beam light bulbs
Right-hand side
1. Use a screwdriver to undo the clips on
the air intake duct, then remove the air
intake duct. (right-hand side)
Left-hand side 2. Use a screwdriver to remove the
secured clip of the washer tank. To make
it easy to access the bulb, move the
washer tank to the horizontal direction.
(left-hand side)
3. Disconnect the electrical connector
from the bulb.
4. Remove the bulb from the headlight
assembly by turning it counterclockwise.
5. Replace the bulb with new one.
6. Reconnect the electrical connector. At
this time, use care not to touch the bulbsurface.
7. To install the bulb to the headlight
assembly, turn it clockwise until it clicks.
8. Install the air intake duct with clip.
(right-hand side)
9. Set the washer tank to the original
place and secure it by clip. (left-hand side) &
Parking light
It may be difficult to replace the bulbs.
Have your SUBARU dealer replace the
bulbs if necessary. & Front turn signal light
It may be difficult to replace the bulbs.
Have your SUBARU dealer replace the
bulbs if necessary. & Front fog light (if equipped)
It may be difficult to replace the bulbs.
Have your SUBARU dealer replace the
bulbs if necessary. Maintenance and service
11-53
– CONTINUED –
Page 397 of 442
11-54Maintenance and service
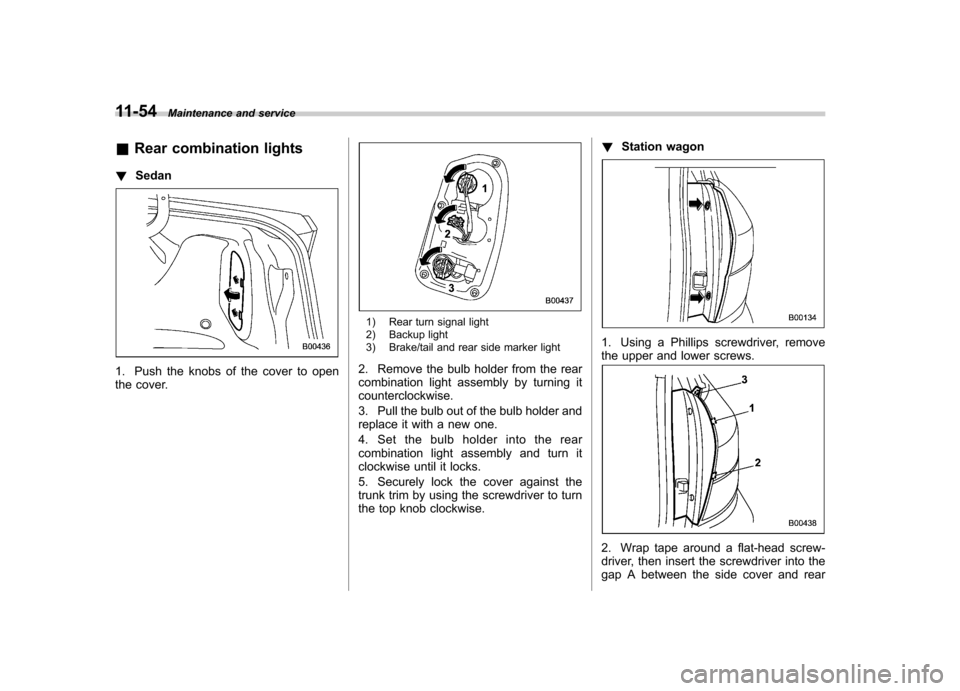
& Rear combination lights
! Sedan
1. Push the knobs of the cover to open
the cover.
1) Rear turn signal light
2) Backup light
3) Brake/tail and rear side marker light
2. Remove the bulb holder from the rear
combination light assembly by turning itcounterclockwise.
3. Pull the bulb out of the bulb holder and
replace it with a new one.
4. Set the bulb holder into the rear
combination light assembly and turn it
clockwise until it locks.
5. Securely lock the cover against the
trunk trim by using the screwdriver to turn
the top knob clockwise. !
Station wagon
1. Using a Phillips screwdriver, remove
the upper and lower screws.
2. Wrap tape around a flat-head screw-
driver, then insert the screwdriver into the
gap A between the side cover and rear
Page 398 of 442
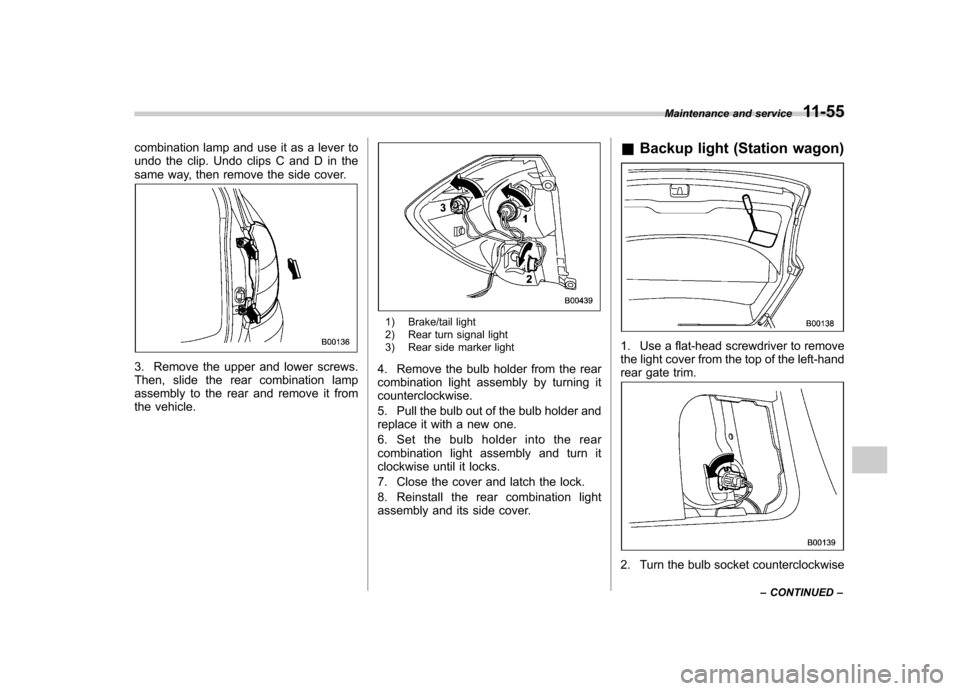
combination lamp and use it as a lever to
undo the clip. Undo clips C and D in the
same way, then remove the side cover.
3. Remove the upper and lower screws.
Then, slide the rear combination lamp
assembly to the rear and remove it from
the vehicle.
1) Brake/tail light
2) Rear turn signal light
3) Rear side marker light
4. Remove the bulb holder from the rear
combination light assembly by turning itcounterclockwise.
5. Pull the bulb out of the bulb holder and
replace it with a new one.
6. Set the bulb holder into the rear
combination light assembly and turn it
clockwise until it locks.
7. Close the cover and latch the lock.
8. Reinstall the rear combination light
assembly and its side cover. &
Backup light (Station wagon)
1. Use a flat-head screwdriver to remove
the light cover from the top of the left-hand
rear gate trim.
2. Turn the bulb socket counterclockwise Maintenance and service
11-55
– CONTINUED –
Page 399 of 442
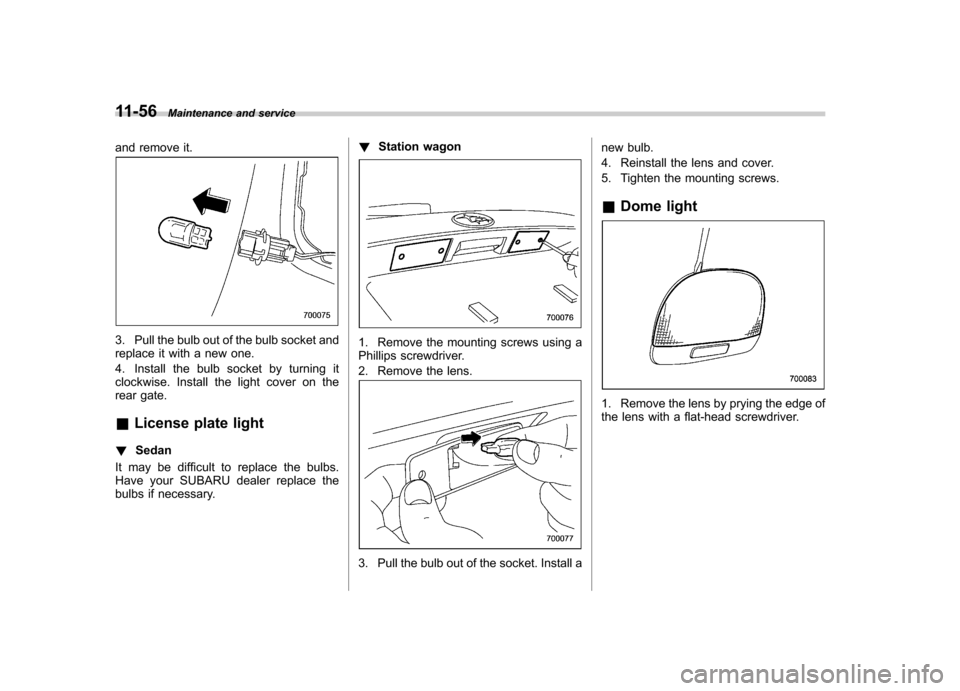
11-56Maintenance and service
and remove it.
3. Pull the bulb out of the bulb socket and
replace it with a new one.
4. Install the bulb socket by turning it
clockwise. Install the light cover on the
rear gate. & License plate light
! Sedan
It may be difficult to replace the bulbs.
Have your SUBARU dealer replace the
bulbs if necessary. !
Station wagon1. Remove the mounting screws using a
Phillips screwdriver.
2. Remove the lens.
3. Pull the bulb out of the socket. Install a new bulb.
4. Reinstall the lens and cover.
5. Tighten the mounting screws. &
Dome light
1. Remove the lens by prying the edge of
the lens with a flat-head screwdriver.
Page 409 of 442
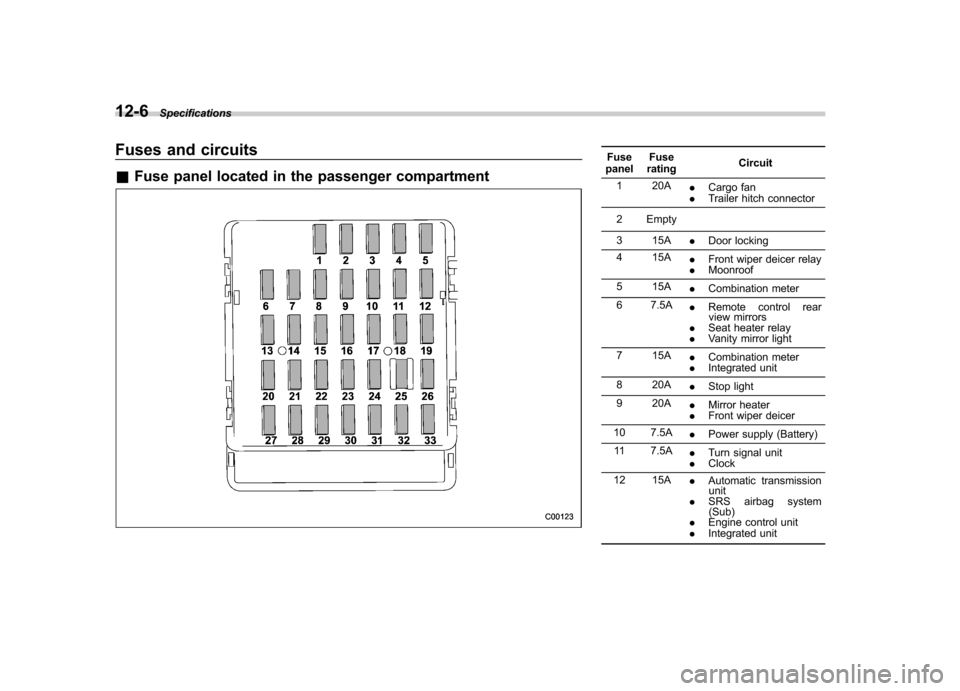
12-6Specifications
Fuses and circuits &Fuse panel located in the passenger compartmentFuse
panel Fuse
rating Circuit
1 20A .Cargo fan
. Trailer hitch connector
2 Empty
3 15A .Door locking
4 15A .Front wiper deicer relay
. Moonroof
5 15A .Combination meter
6 7.5A .Remote control rear
view mirrors
. Seat heater relay
. Vanity mirror light
7 15A .Combination meter
. Integrated unit
8 20A .Stop light
9 20A .Mirror heater
. Front wiper deicer
10 7.5A .Power supply (Battery)
11 7.5A .Turn signal unit
. Clock
12 15A .Automatic transmission
unit
. SRS airbag system
(Sub)
. Engine control unit
. Integrated unit
Page 410 of 442
Fuse
panel Fuse
rating Circuit
13 20A .Cargo socket
14 15A .Position light
. Tail light
. Rear combination light
15 Empty
16 10A .Illumination
17 15A .Seat heaters
18 10A .Backup light
19 7.5A .Headlight right side re-
lay
20 10A .Cigarette lighter socket
21 7.5A .Starter relay
22 15A .Air conditioner
. Rear window defogger
relay coil
23 15A .Rear wiper
. Rear window washer
24 15A .Audio unit
. Clock
25 15A .SRS airbag system
(Main)
26 7.5A .Power window relay
27 15A .Blower fan Fuse
panel Fuse
rating Circuit
28 15A .Blower fan
29 15A .Fog light
30 30A .Front wiper
. Front wiper washer
31 7.5A .Auto air conditioner unit
. Integrated unit
32 7.5A .Headlight left side relay
33 7.5A .ABS/Vehicle dynamics
control unit Specifications
12-7
– CONTINUED –
Page 432 of 442
Tie-down hooks..................................................... 6-16
Catalytic converter ....................................................... 8-3
Center
Console .................................................................. 6-5
Ventilators ............................................................... 4-3
Center and side ventilators ............................................ 4-3
Changing Flat tire ................................................................... 9-4
Oil and oil filter ..................................................... 11-10
Charge warning light .................................................. 3-26
CHECK ENGINE warning light/Malfunction indicator lamp ...................................................................... 3-25
Checking
Brake pedal free play ............................................ 11-31
Brake pedal reserve distance ................................. 11-31
Clutch function ...................................................... 11-32
Clutch pedal free play ............................................ 11-32
Engine oil level ...................................................... 11-9
Fluid level ............................... 11-22, 11-28, 11-29, 11-30
Gear oil level ........................................................ 11-25
Child restraint systems ............................................... 1-27
Installation with A/ELR seatbelt ................................ 1-30
Lower and tether anchorages .................................. 1-35
Child safety .................................................................... 5
Locks ................................................................... 2-19
Chime Key ........................................................................ 3-5 Seatbelt ........................................................ 1-14, 3-22
Cleaning
Aluminum wheels ................................................... 10-3
Interior .................................................................. 10-5 Ventilator grille
....................................................... 4-12
Climate control system Automatic ............................................................... 4-8
Manual ................................................................... 4-3
Clock ........................................................................ 3-34
Clutch Fluid ................................................................... 11-30
Pedal .................................................................. 11-32
Coat hook. ................................................................. 6-10
Cooling system ........................................................ 11-13
Corrosion protection ............................................ 8-10, 10-4
Cruise control ............................................................ 7-46
Set indicator light .................................................... 3-33
Cruise control indicator light ......................................... 3-33
Cup holder ................................................................. 6-7
Front passenger ’s.................................................... 6-8
Rear passenger ’s .................................................... 6-8
D
Daytime running light system ....................................... 3-40
Differential gear oil
Front ................................................................... 11-24
Rear ................................................................... 11-25
Dimensions ................................................................ 12-2
Disarming the system ................................................. 2-17
Disc brake pad wear warning indicators ........................ 7-34
Dome light ......................................................... 6-2, 11-56
Door
Locks ..................................................................... 2-5
Door open warning light .............................................. 3-29
Drive belts ............................................................... 11-20 Index
14-3