instrument panel SUBARU OUTBACK 2013 5.G Quick Reference Guide
[x] Cancel search | Manufacturer: SUBARU, Model Year: 2013, Model line: OUTBACK, Model: SUBARU OUTBACK 2013 5.GPages: 36, PDF Size: 1.05 MB
Page 4 of 36
Table of Contents
Getting Started
Instrument Panel
Gauges
Personalize
Controls
While Operating
Safety/In Case of Emergency
Additional Information
2 - 3
4 - 5
6 - 9
10 - 11
12 - 23
24 - 25
26 - 27
28 - 29
Page 6 of 36
3
Getting
Started Instrument
Panel Gauges
Personalize Controls
While
Operating Safety / In Case
of Emergency Additional
Information
3
Getting
Started
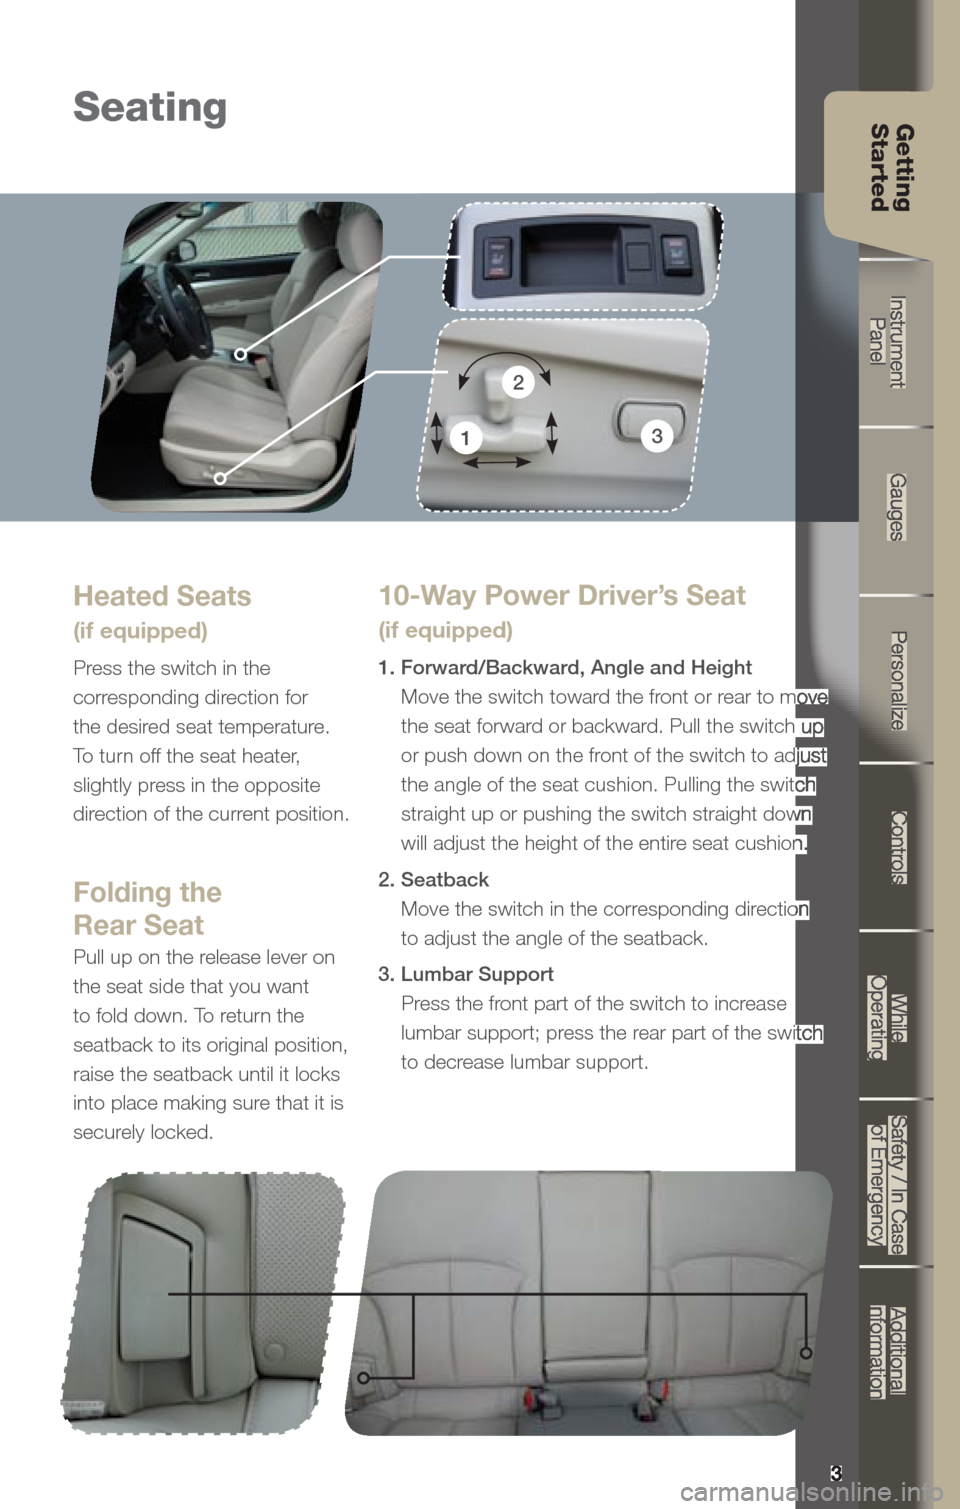
Seating
10-Way Power Driver’s Seat
(if equipped)
1. Forward/Backward, Angle and Height
Move the switch toward the front or rear to move
the seat forward or backward. Pull the switch up
or push down on the front of the switch to adjust
the angle of the seat cushion. Pulling the switch
straight up or pushing the switch straight down
will adjust the height of the entire seat cushion.
2. Seatback Move the switch in the corresponding direction
to adjust the angle of the seatback.
3. Lumbar Support Press the front part of the switch to increase
lumbar support; press the rear part of the switch
to decrease lumbar support.
Heated Seats
(if equipped)
Press the switch in the
corresponding direction for
the desired seat temperature.
To turn off the seat heater,
slightly press in the opposite
direction of the current position.
Folding the
Rear Seat
Pull up on the release lever on
the seat side that you want
to fold down. To return the
seatback to its original position,
raise the seatback until it locks
into place making sure that it is
securely locked.
Instrument Panel
Gauges
Personalize
Controls
While Operating
Safety / In Case of Emergency
Additional Information
333
Getting Getting Getting StartedStartedStarted
Move the switch toward the front or rear to move
the seat forward or backward. Pull the switch up
or push down on the front of the switch to adjust
the angle of the seat cushion. Pulling the switch
straight up or pushing the switch straight down
will adjust the height of the entire seat cushion.
Move the switch in the corresponding direction
lumbar support; press the rear part of the switch
Getting
Started
3
2
1
Page 7 of 36
4
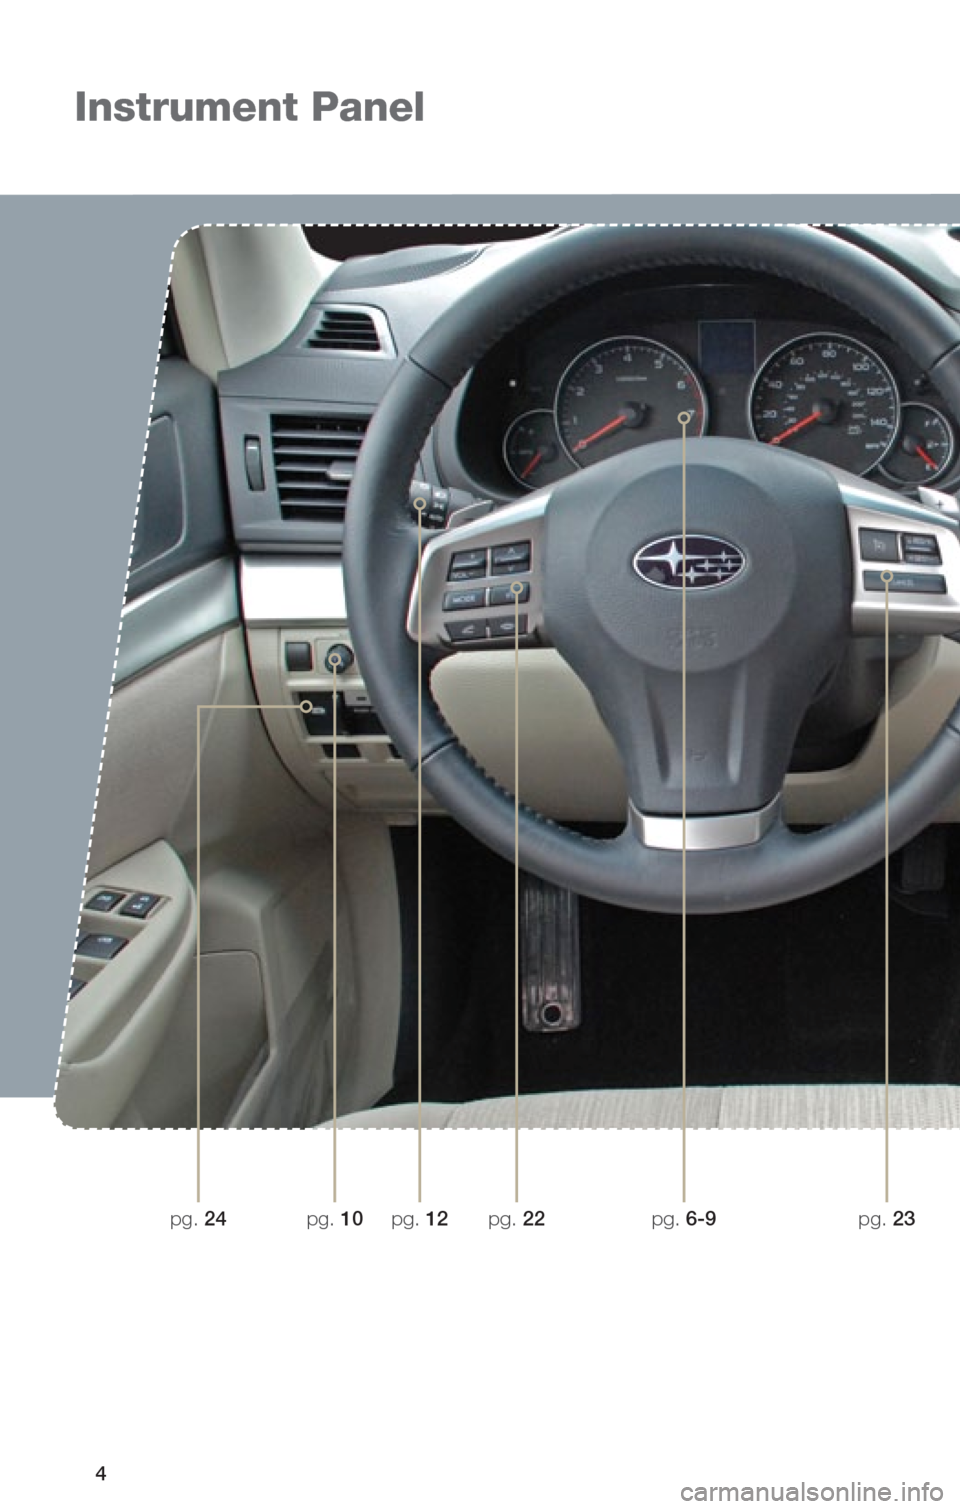
Instrument Panel
pg. 12pg. 6-9pg. 23pg. 24pg. 10pg. 22
Page 8 of 36
5
Getting
Started Instrument
Panel Gauges
Personalize Controls
While
Operating Safety / In Case
of Emergency Additional
Information
5
Getting Started
Instrument Panel
Gauges
Personalize
Controls
While Operating
Safety / In Case of Emergency
Additional Information
555
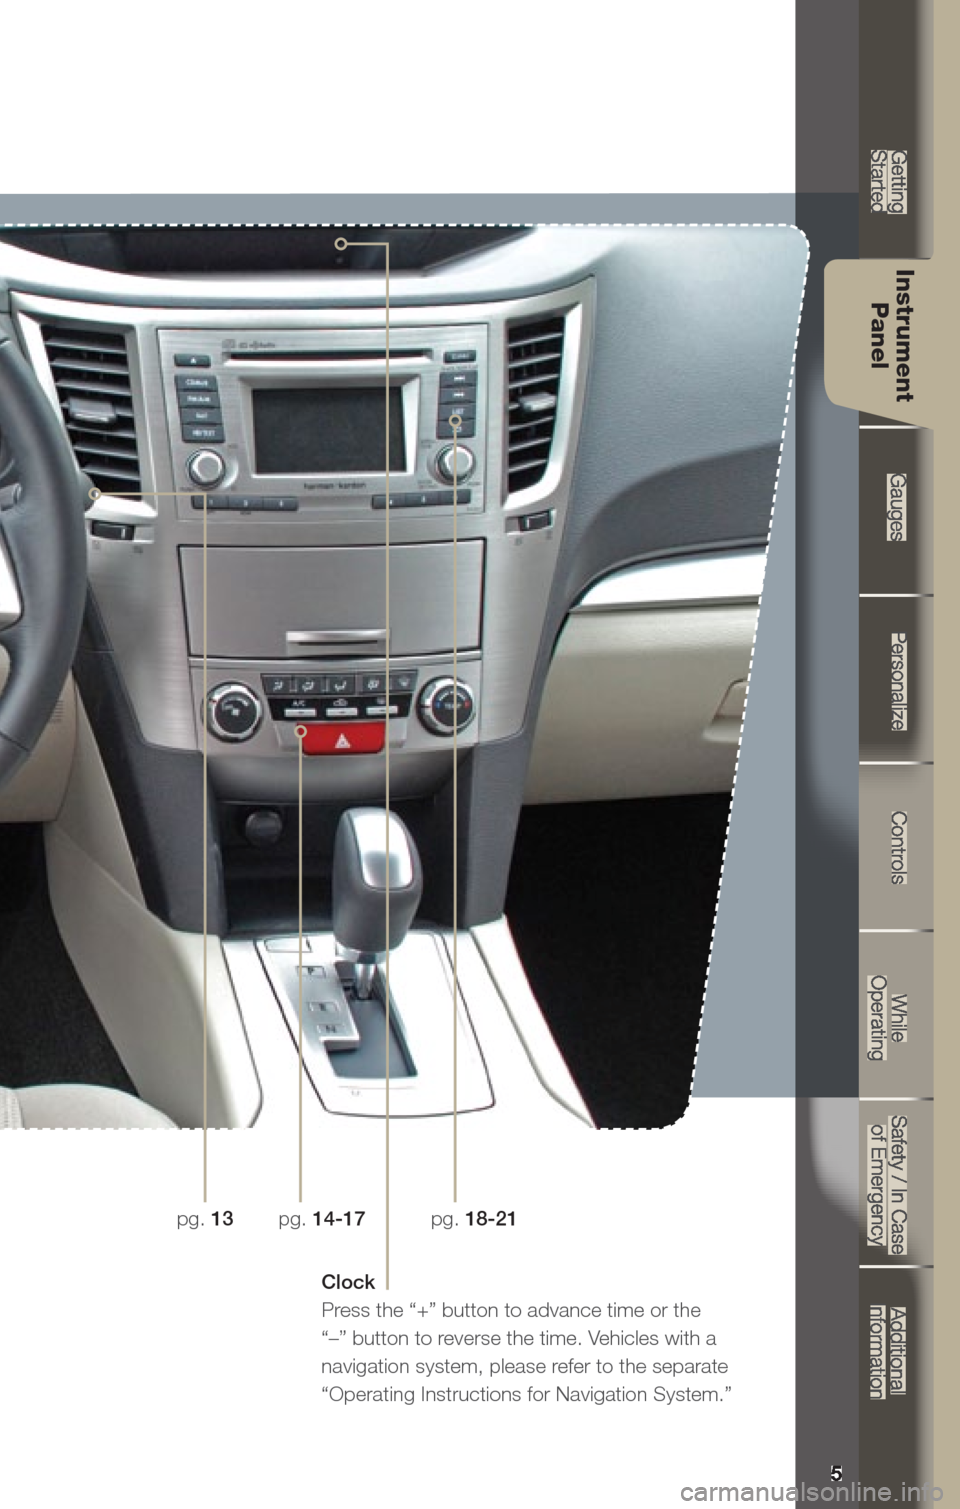
pg. 14-17 pg. 18-21
pg. 13
Clock
Press the “+” button to advance time or the
“–” button to reverse the time. Vehicles with a
navigation system, please refer to the separate
“Operating Instructions for Navigation System.”
Instrument Panel
Page 10 of 36
7
Getting
Started Instrument
Panel Gauges
Personalize Controls
While
Operating Safety / In Case
of Emergency Additional
Information
7
Getting Started
Instrument Panel
Gauges
Personalize
Controls
While Operating
Safety / In Case of Emergency
Additional Information
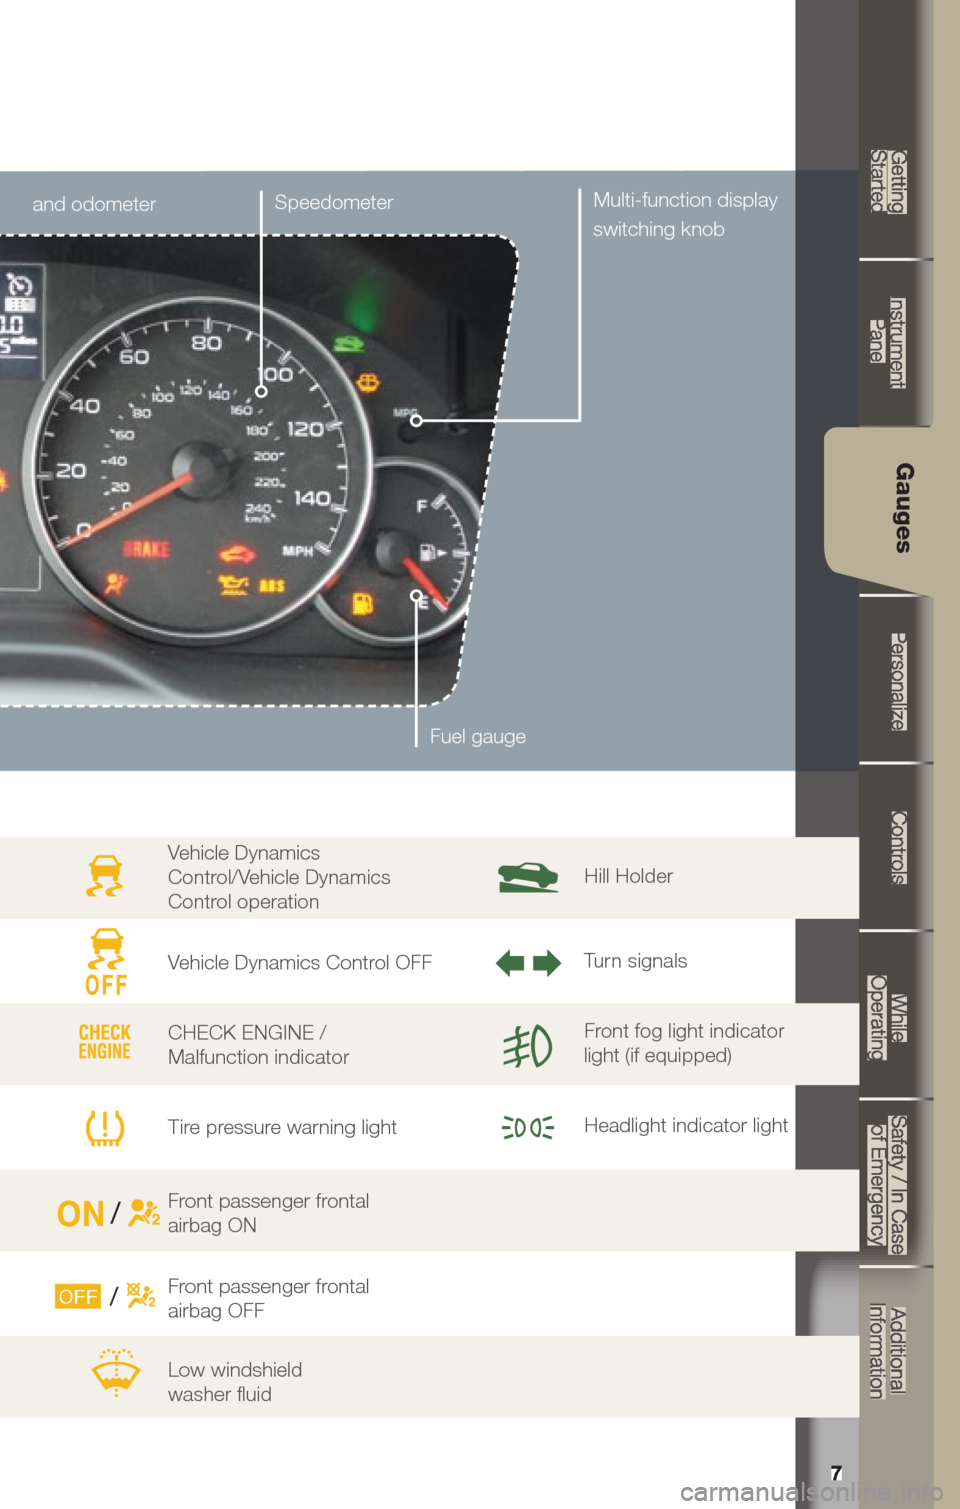
Gauges
Trip meter and odometerSpeedometer
Fuel gauge
Informational
Multi-function display
switching knob
Vehicle Dynamics
Control/Vehicle Dynamics
Control operation
Vehicle Dynamics Control OFF
CHECK ENGINE /
Malfunction indicator
Tire pressure warning light
Front passenger frontal
airbag ON
Front passenger frontal
airbag OFF
Low windshield
washer fluid Hill Holder
Turn signals
Front fog light indicator
light (if equipped)
Headlight indicator light
Page 12 of 36
9
Getting
Started Instrument
Panel Gauges
Personalize Controls
While
Operating Safety / In Case
of Emergency Additional
Information
9
Getting Started
Instrument Panel
Gauges
Personalize
Controls
While Operating
Safety / In Case of Emergency
Additional Information
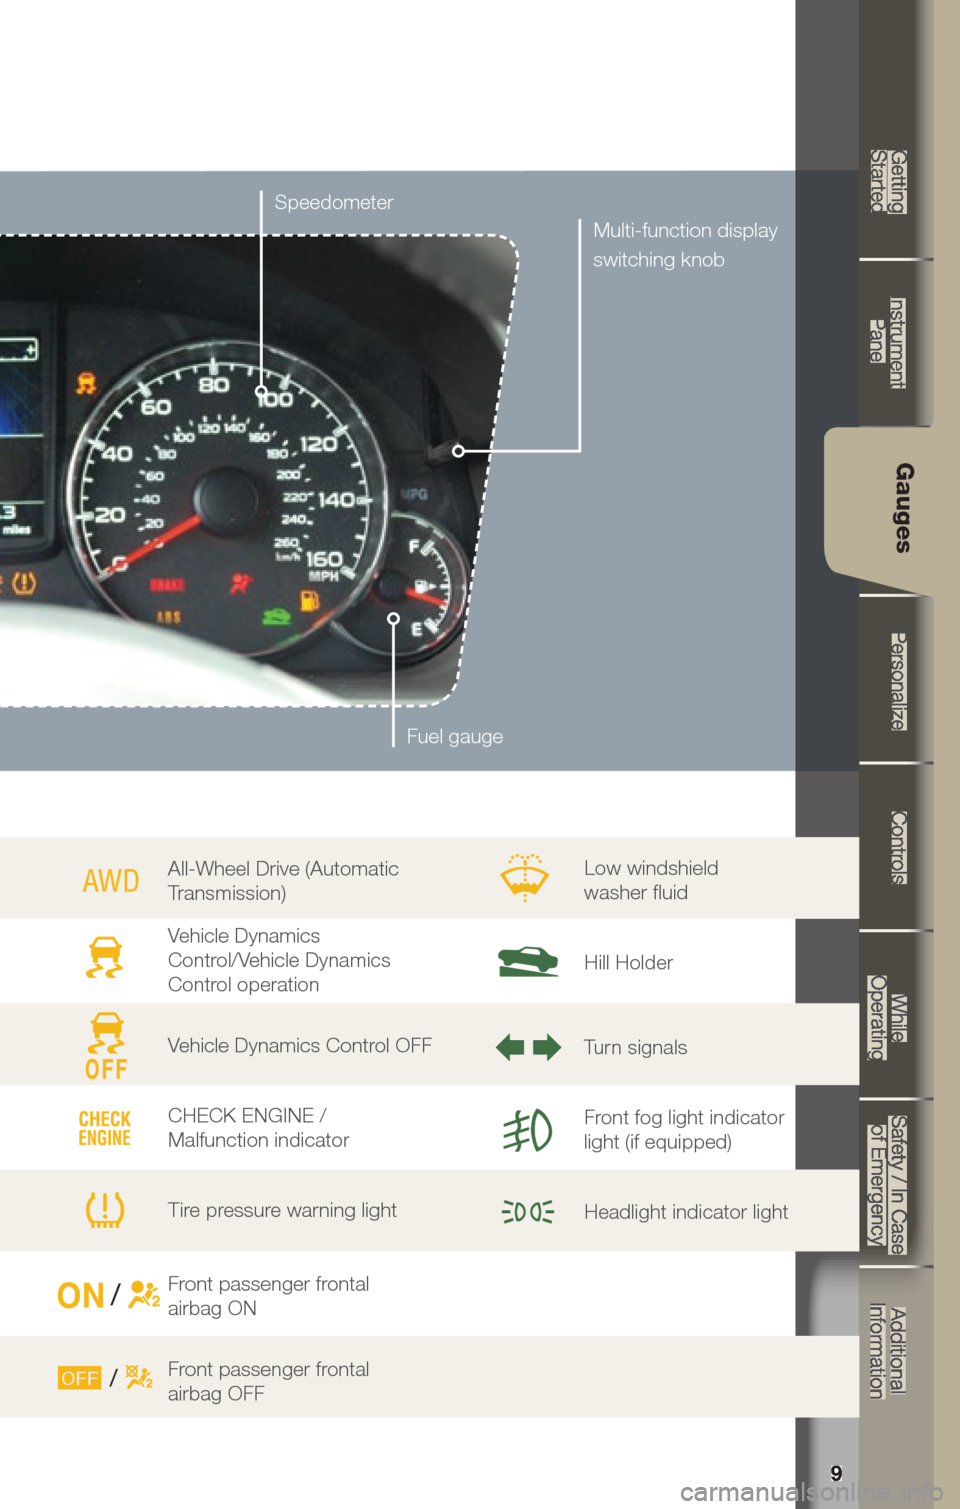
Gauges
Speedometer
Fuel gauge
Informational
Multi-function display
switching knob
All-Wheel Drive (Automatic
Transmission)
Vehicle Dynamics
Control/Vehicle Dynamics
Control operation
Vehicle Dynamics Control OFF
CHECK ENGINE /
Malfunction indicator
Tire pressure warning light
Front passenger frontal
airbag ON
Front passenger frontal
airbag OFF Low windshield
washer fluid
Hill Holder
Turn signals
Front fog light indicator
light (if equipped)
Headlight indicator light
Page 14 of 36
11
Getting
Started Instrument
Panel Gauges
Personalize Controls
While
Operating Safety / In Case
of Emergency Additional
Information
11
Getting Started
Instrument Panel
Gauges
Personalize
Controls
While Operating
Safety / In Case of Emergency
Additional Information
Personalize
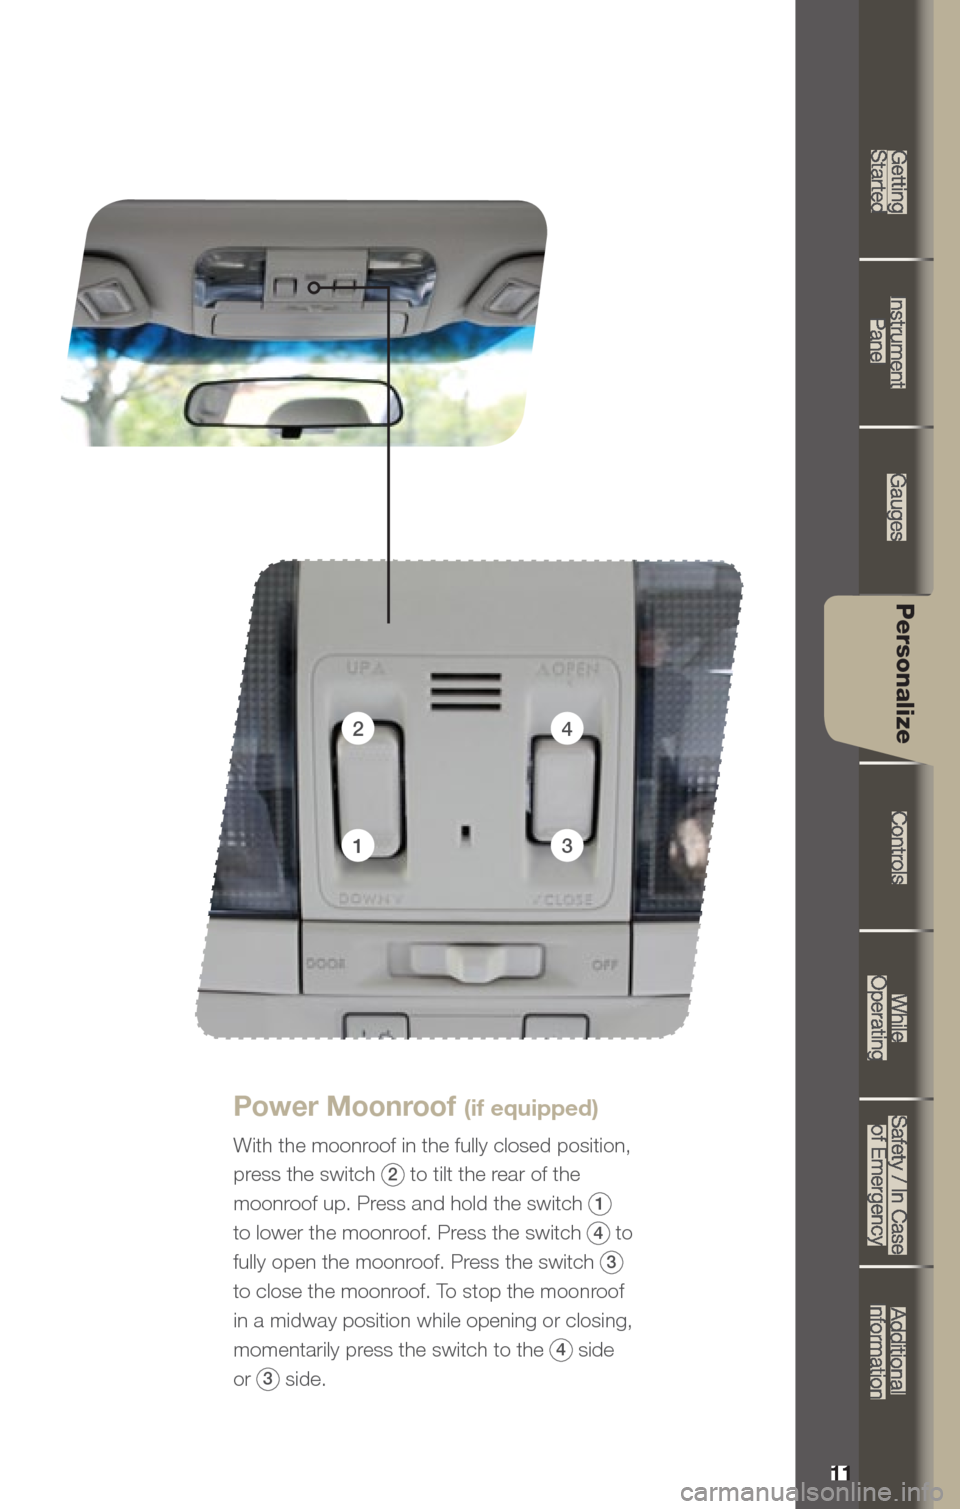
Power Moonroof (if equipped)
With the moonroof in the fully closed position,
press the switch
2 to tilt the rear of the
moonroof up. Press and hold the switch
1
to lower the moonroof. Press the switch
4 to
fully open the moonroof. Press the switch
3
to close the moonroof. To stop the moonroof
in a midway position while opening or closing,
momentarily press the switch to the
4 side
or
3 side.
1
2
3
4
Page 15 of 36
12
Controls
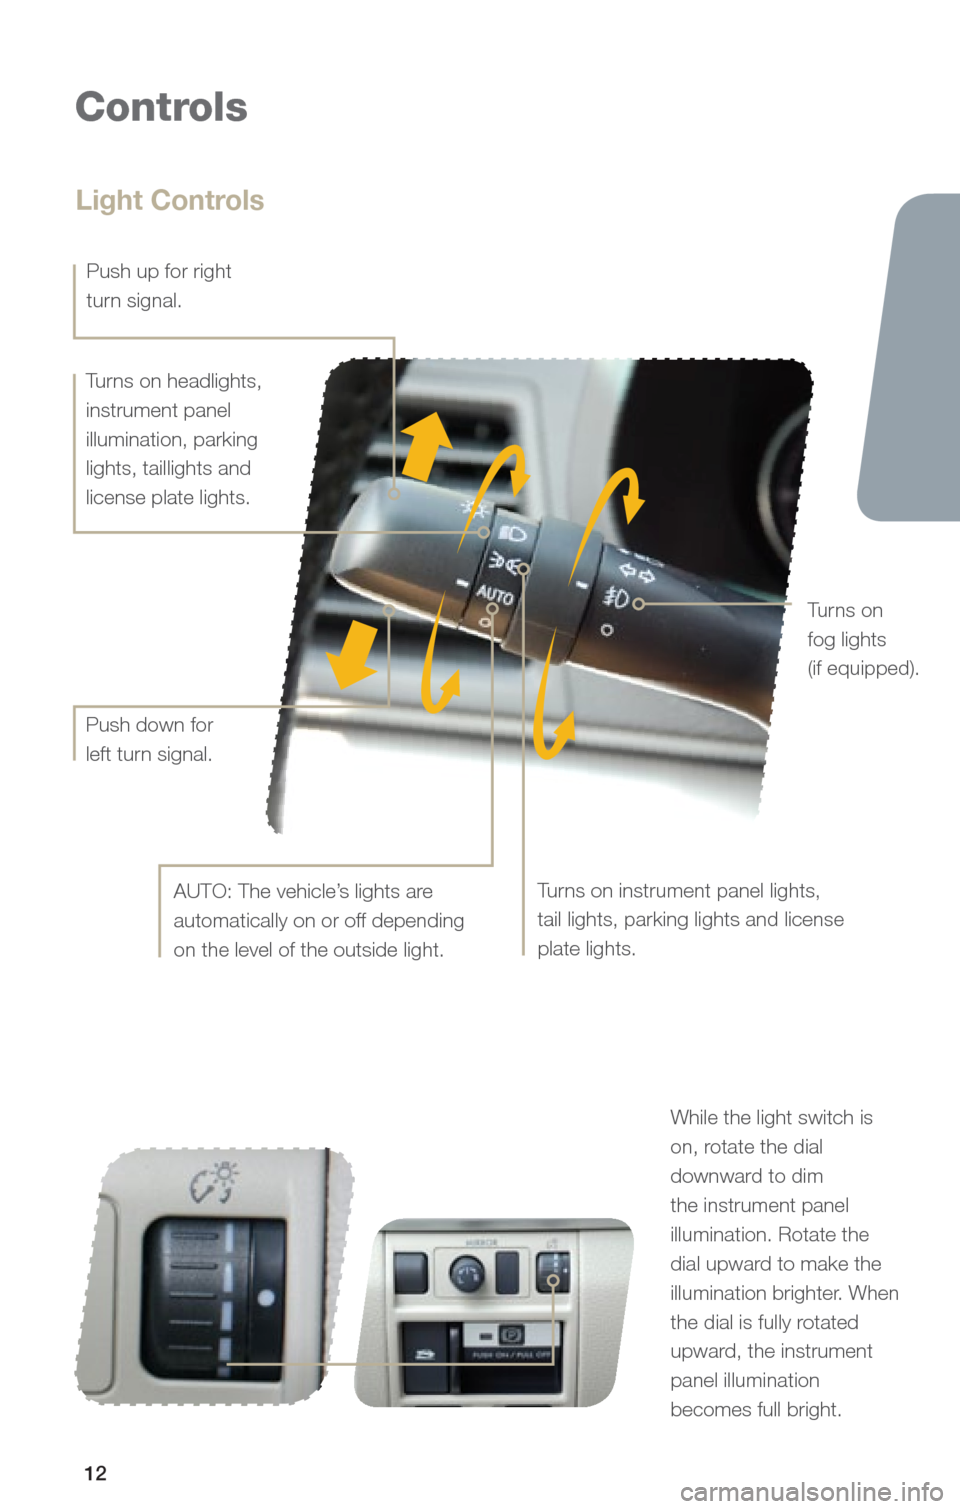
While the light switch is
on, rotate the dial
downward to dim
the instrument panel
illumination. Rotate the
dial upward to make the
illumination brighter. When
the dial is fully rotated
upward, the instrument
panel illumination
becomes full bright.
Light Controls
Turns on instrument panel lights,
tail lights, parking lights and license
plate lights.
Turns on headlights,
instrument panel
illumination, parking
lights, taillights and
license plate lights.AUTO: The vehicle’s lights are
automatically on or off depending
on the level of the outside light. Turns on
fog lights
(if equipped).
Push up for right
turn signal.
Push down for
left turn signal.
Page 16 of 36
13
Getting
Started Instrument
Panel Gauges
Personalize Controls
While
Operating Safety / In Case
of Emergency Additional
Information
13
Getting Started
Instrument Panel
Gauges
Personalize
Controls
While Operating
Safety / In Case of Emergency
Additional Information
Controls
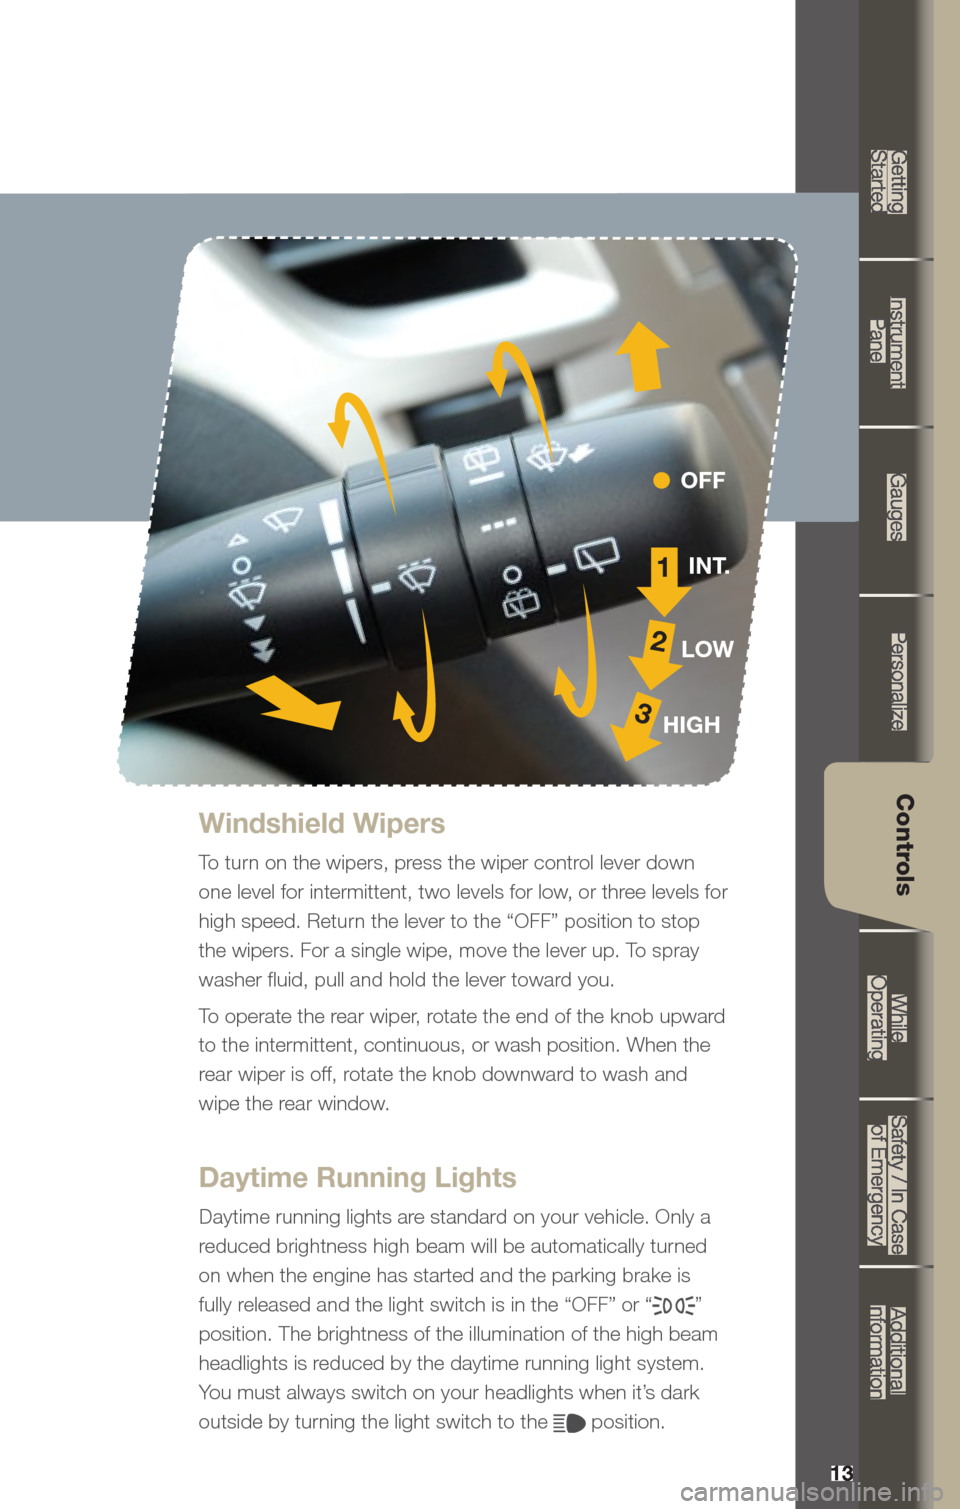
Windshield Wipers
To turn on the wipers, press the wiper control lever down
one level for intermittent, two levels for low, or three levels for
high speed. Return the lever to the “OFF” position to stop
the wipers. For a single wipe, move the lever up. To spray
washer fluid, pull and hold the lever toward you.
To operate the rear wiper, rotate the end of the knob upward
to the intermittent, continuous, or wash position. When the
rear wiper is off, rotate the knob downward to wash and
wipe the rear window.
Daytime Running Lights
Daytime running lights are standard on your vehicle. Only a
reduced brightness high beam will be automatically turned
on when the engine has started and the parking brake is
fully released and the light switch is in the “OFF” or “
”
position. The brightness of the illumination of the high beam
headlights is reduced by the daytime running light system.
You must always switch on your headlights when it’s dark
outside by turning the light switch to the
position.
1
2
3
INT.
LOW
HIGH OFF
Page 18 of 36
15
Getting
Started Instrument
Panel Gauges
Personalize Controls
While
Operating Safety / In Case
of Emergency Additional
Information
15
Getting Started
Instrument Panel
Gauges
Personalize
Controls
While Operating
Safety / In Case of Emergency
Additional Information
Controls
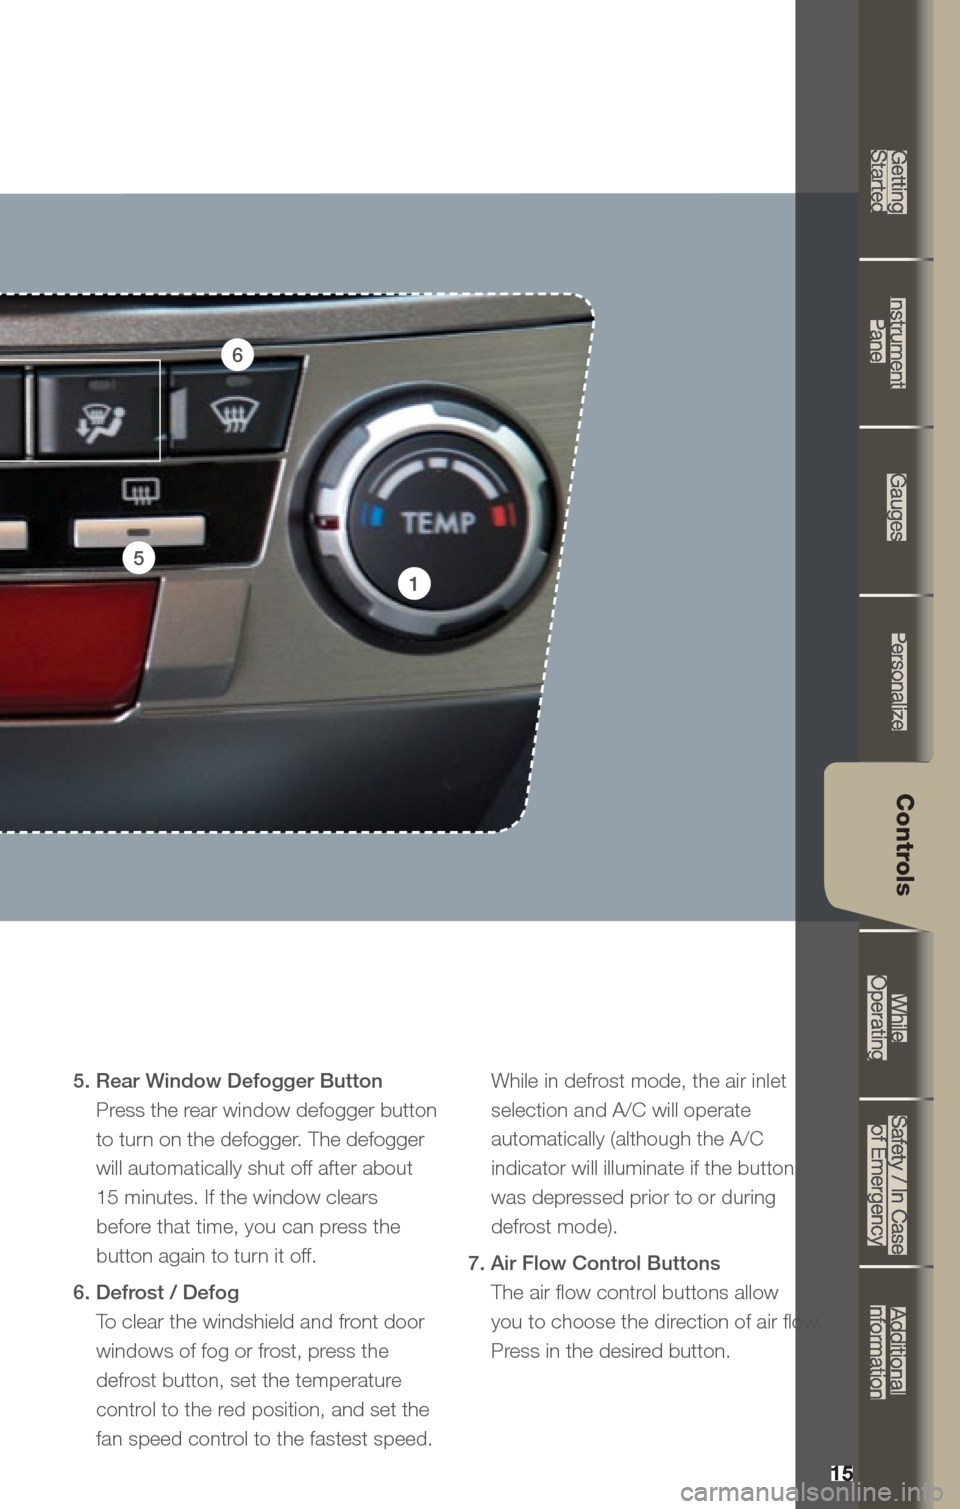
5. Rear Window Defogger Button Press the rear window defogger button
to turn on the defogger. The defogger
will automatically shut off after about
15 minutes. If the window clears
before that time, you can press the
button again to turn it off.
6. Defrost / Defog To clear the windshield and front door
windows of fog or frost, press the
defrost button, set the temperature
control to the red position, and set the
fan speed control to the fastest speed.
While in defrost mode, the air inlet selection and A/C will operate
automatically (although the A/C
indicator will illuminate if the button
was depressed prior to or during
defrost mode).
7. Air Flow Control Buttons The air flow control buttons allow
you to choose the direction of air flow.
Press in the desired button.
1
5
6