navigation SUBARU OUTBACK 2020 Getting Started Guide
[x] Cancel search | Manufacturer: SUBARU, Model Year: 2020, Model line: OUTBACK, Model: SUBARU OUTBACK 2020Pages: 132, PDF Size: 5.99 MB
Page 102 of 132
GENERAL
There are some settings that can be customized for different systems in your Subaru. As
you work through this section, the guide will give some examples of the popular settings
that many people change to suit their personality.
You can update the 11.6-inch Multimedia Plus and the 11.6-inch Multimedia Navigation
systems only. The system software may also be updated by you via a Wi-Fi network. The
update process involves downloading and installing the software update. NOTE: The
system functionality will be restricted during installation.
You can also ask your Preferred Subaru Retailer to update the system software.
Connect to Home Wi-Fi
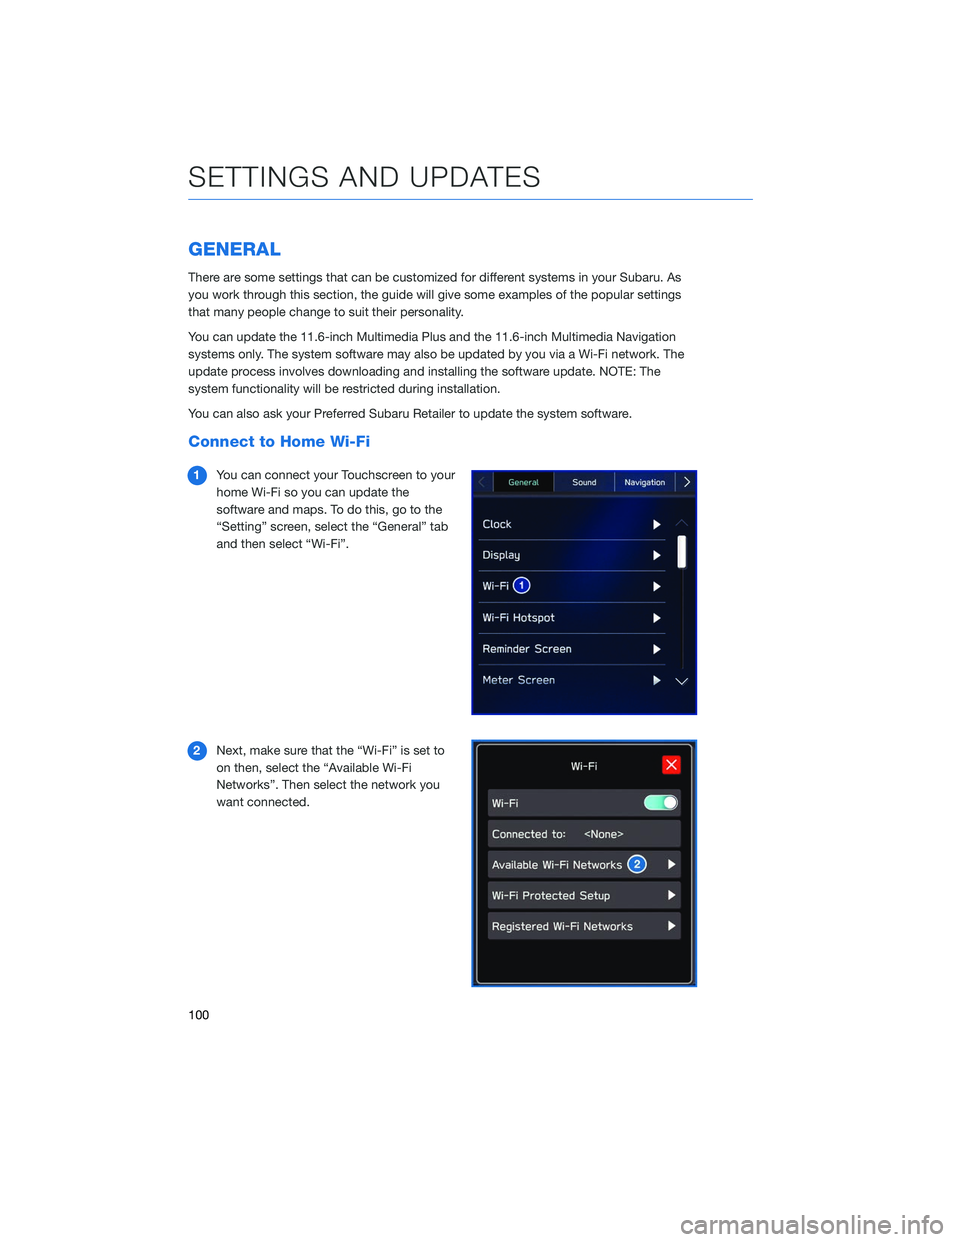
1You can connect your Touchscreen to your
home Wi-Fi so you can update the
software and maps. To do this, go to the
“Setting” screen, select the “General” tab
and then select “Wi-Fi”.
2 Next, make sure that the “Wi-Fi” is set to
on then, select the “Available Wi-Fi
Networks”. Then select the network you
want connected.
SETTINGS AND UPDATES
100
Page 104 of 132
SOUND
To change the sound settings, press the “Home” button and select “Settings”, then
“Sound”. Choose the setting you want to change.
SETTINGFUNCTION
Audio In the audio settings, you may have the following setting capabilities: •Sound Customization — This function allows you to set the Equalizer,
Balance/Fader and Vocal Image Control. • Equalizer — How good an audio program sounds is largely
determined by the mix of the treble, mid and bass levels. In fact,
different kinds of music and vocal programs usually sound better with
different mixes of treble, mid and bass.
• Balance/Fader — A good balance of the left and right stereo
channels and of the front and rear sound levels is also important.
Keep in mind that when listening to a stereo recording or broadcast,
changing the right/left balance will increase the volume of 1 group of
sounds while decreasing the volume of another.
• Vocal Image Control — Extracts only vocal sound from whole sound
and adjusts volume balance off vocals only.
• Sound Restorer — This function plays compressed audio with quality
near original sound by adding the complement signal of high tone.
• Virtual Base — This function corrects the bass sound by adding
harmonic sound.
• Dynamic Beat Enhancer — This function expands the dynamic range
lost in data compression and creates a sharp beat sound.
• Speed Volume Control — The system adjusts to the optimum volume
and tone quality according to vehicle speed to compensate for increased
vehicle noise.
• AUX Volume Gain — Sets the AUX volume gain.
Navigation
Guidance
Volume Sets the navigation prompt volume.
Beep
Sound
Setting Sets the interrupt guidance volume.
Beep
Sound
Volume Turns the tone sound on or off.
Phone
Ringtone
Volume Sets the tone sound volume.
SETTINGS AND UPDATES
102
Page 105 of 132
SETTINGFUNCTION
Incoming
Call
Volume Sets the volume of the received call.
Call
Volume Sets the ringtone volume.
SMS/
MMS
Ringtone
Volume Sets the SMS/MMS ringtone volume.
SMS/
MMS
Read Out
Volume Sets the SMS/MMS read out volume.
Voice
Volume Sets the voice recognition prompts volume.
PHONE
The hands-free system lets you make and receive calls without taking your hands off the
steering wheel.
This system supports Bluetooth
®, a wireless data system. In the settings menu, you will be
able to change the microphone volume, ringtone, and phone volume.
To access the phone screen, press the “Home” button, then select “Phone”. On the
Multimedia Plus and Multimedia Navigation systems only, you can simply press the
“Phone” button.
SETTINGS AND UPDATES
103
Page 106 of 132
MAPS/NAVIGATION
There are many settings that can be customized to your preference. These settings are
under the “Setting” menu and then “Navigation”. Below are some of the common settings
you may want to change:
SETTINGFUNCTION
Show Along Route Turn the display for parking lots, gas
stations and rest areas on or off for the
route being traveled during route guidance.
Arrival Distance/Time Sets the display for the estimated
remaining distance and estimated
remaining time to the destination.
Freeway Exit Preview Sets the freeway exit preview to on or off.
Automatic Zoom Sets whether to automatically enlarge the
map when approaching intersections or
turning points during route guidance on or
off.
Auto-Hide Route Bar Sets the route bar auto-hide function to on
or off.
Route Preference Sets the preferred route type when
searching for a new route.
Avoid Sets avoidance criteria for the route
calculation.
Traffic Warning Tone Sets the traffic alert sound to on or off.
Map Update Sets the updating of the map data.
Checking for Updates
You can update the maps to the latest information. For the best possible navigation
experience, regularly update maps for all frequented regions, including nearby states.
The maps can be updated over the air or with a USB memory device. When updating over
the air, you are limited to updating eight regions (states) at a time. This allows you to
update your home state without having to download the entire map program for the United
States. This option is great if you normally stay in your home state and/or surrounding
states.
SETTINGS AND UPDATES
104
Page 107 of 132
Updating Over-the-Air
To check for available updates over-the-air:
1. Connect to a Wi-Fi Network (see page 120).
2. From the Setting Navigation menu, select “Map Update”.
3. Select “Automatic Update”.
4. Select “Update maps automatically (at most 8 maps can be selected)”.
5. Choose up to eight regions to update by selecting the box for the regions (States) youwant to update.
6. Select “Back”.
You will get a screen if updates are available. From there, choose either “Yes”, “Select
Region(s)”, or “Cancel”.
Updating Using Your PC/MAC
Maps can also be updated using a USB memory device, which will
allow the entire map program to be updated at one time. This is a
great option if you are going to take a cross-country trip and your
maps have not been updated in a while.
To update the map using a USB memory device, start by going to
www.subaru.com. Click on the “For Owners” tab and select the
“Navigation” link, then follow the directions on the screen.
CLOCK
The clock can be updated in different ways depending on if it has navigation or not. It can
also be set manually or automatically through a Bluetooth-connected phone on vehicles
without navigation or through GPS for vehicles with navigation.
SETTINGS AND UPDATES
105
Page 111 of 132
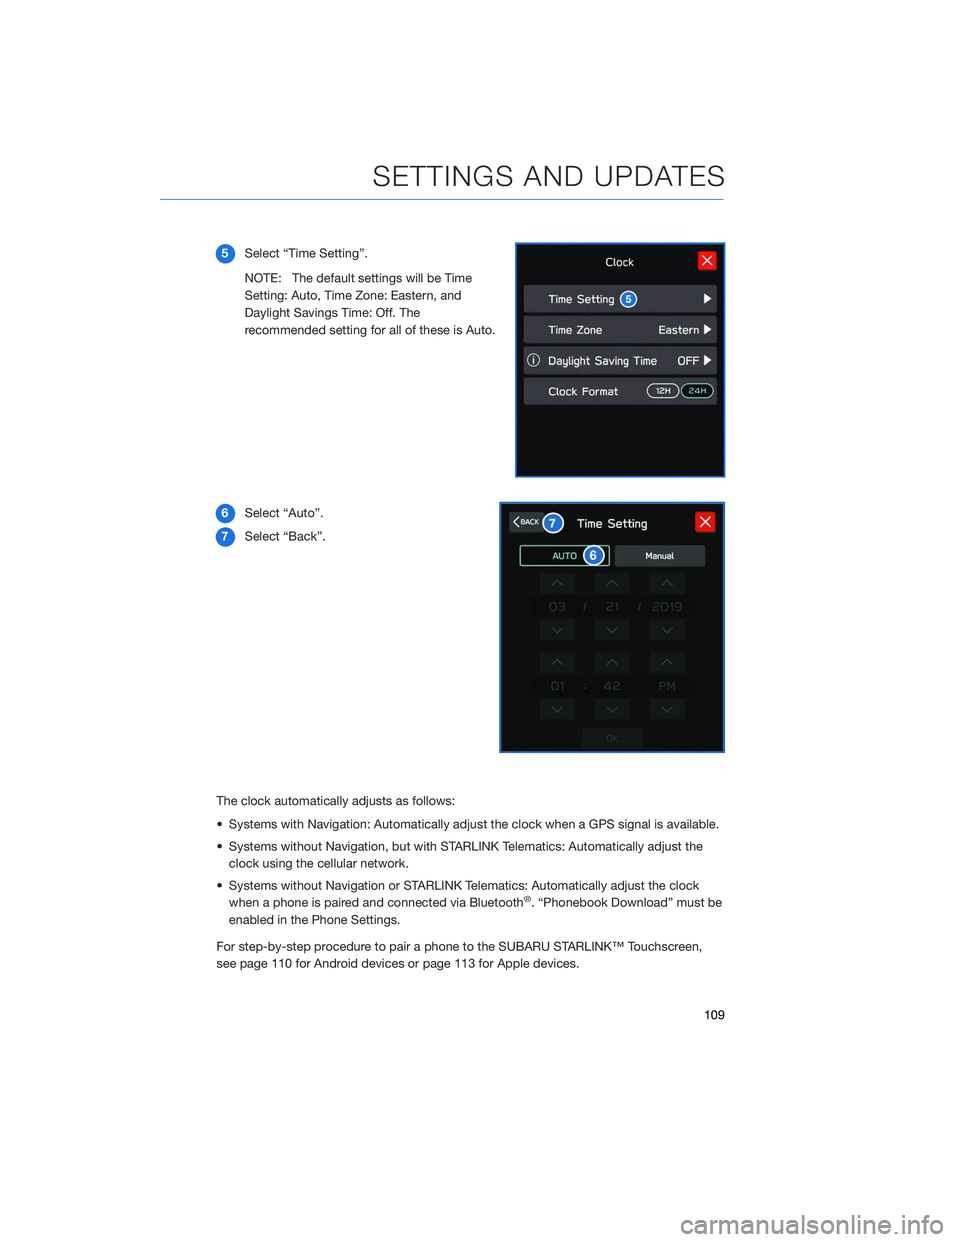
5Select “Time Setting”.
NOTE: The default settings will be Time
Setting: Auto, Time Zone: Eastern, and
Daylight Savings Time: Off. The
recommended setting for all of these is Auto.
6 Select “Auto”.
7 Select “Back”.
The clock automatically adjusts as follows:
• Systems with Navigation: Automatically adjust the clock when a GPS signal is available.
• Systems without Navigation, but with STARLINK Telematics: Automatically adjust the clock using the cellular network.
• Systems without Navigation or STARLINK Telematics: Automatically adjust the clock when a phone is paired and connected via Bluetooth
®. “Phonebook Download” must be
enabled in the Phone Settings.
For step-by-step procedure to pair a phone to the SUBARU STARLINK™ Touchscreen,
see page 110 for Android devices or page 113 for Apple devices.
SETTINGS AND UPDATES
109
Page 124 of 132
FIRMWARE SOFTWARE UPDATES
For 11.6-inch Multimedia Plus and the 11.6-inch Multimedia Navigation systems only, the
system software may also be updated by you via a Wi-Fi connection or using the aha
application on your smartphone (depending on your smartphone communication and
transfer speed). The update process involves downloading and installing the software
update. Note that system functionality will be restricted during installation.
1. Connect to a Wi-Fi network or start the aha application on your smartphone.
2. Display the general setting screen by pressing the “Home” button, then select“Settings”, and finally “General”.
3. Select “Software Update”. If “Automatically Check for Updates” is turned on at the general settings screen, an update check will be performed automatically before
proceeding to the next step. If “Automatically Download Updates” is turned on at the
general settings screen, the software update will be downloaded automatically before
proceeding to “Update Installation”.
4. If the system is not set to “Automatically Check for Updates”, select “Download Now” to begin the download. The download status progress is displayed in the upper right of
the screen. If you need to stop the download and restart at a later time, select “Later” to
stop the process.
5. Select “Install Now” to start the installation process. The installation process will take several minutes to complete. If you need to stop the installation process, press
“Cancel”.
6. When the installation is complete, select “I Agree” on the confirmation message to complete the update process. By selecting “I Agree”, the system will restart
automatically.
APPENDIX: HOW TO
122
Page 125 of 132
MAP UPDATES
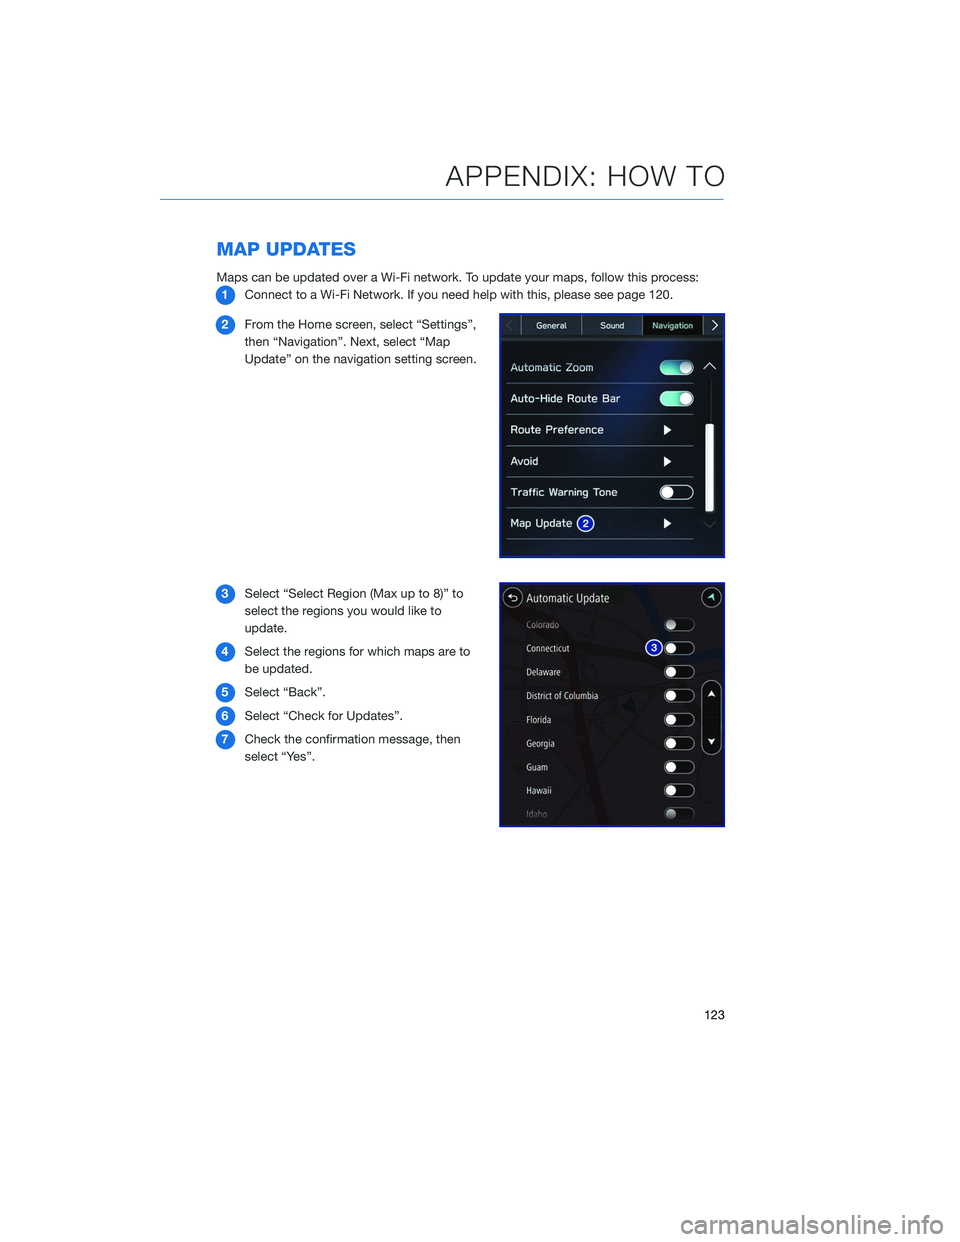
Maps can be updated over a Wi-Fi network. To update your maps, follow this process:1 Connect to a Wi-Fi Network. If you need help with this, please see page 120.
2 From the Home screen, select “Settings”,
then “Navigation”. Next, select “Map
Update” on the navigation setting screen.
3 Select “Select Region (Max up to 8)” to
select the regions you would like to
update.
4 Select the regions for which maps are to
be updated.
5 Select “Back”.
6 Select “Check for Updates”.
7 Check the confirmation message, then
select “Yes”.
APPENDIX: HOW TO
123
Page 127 of 132
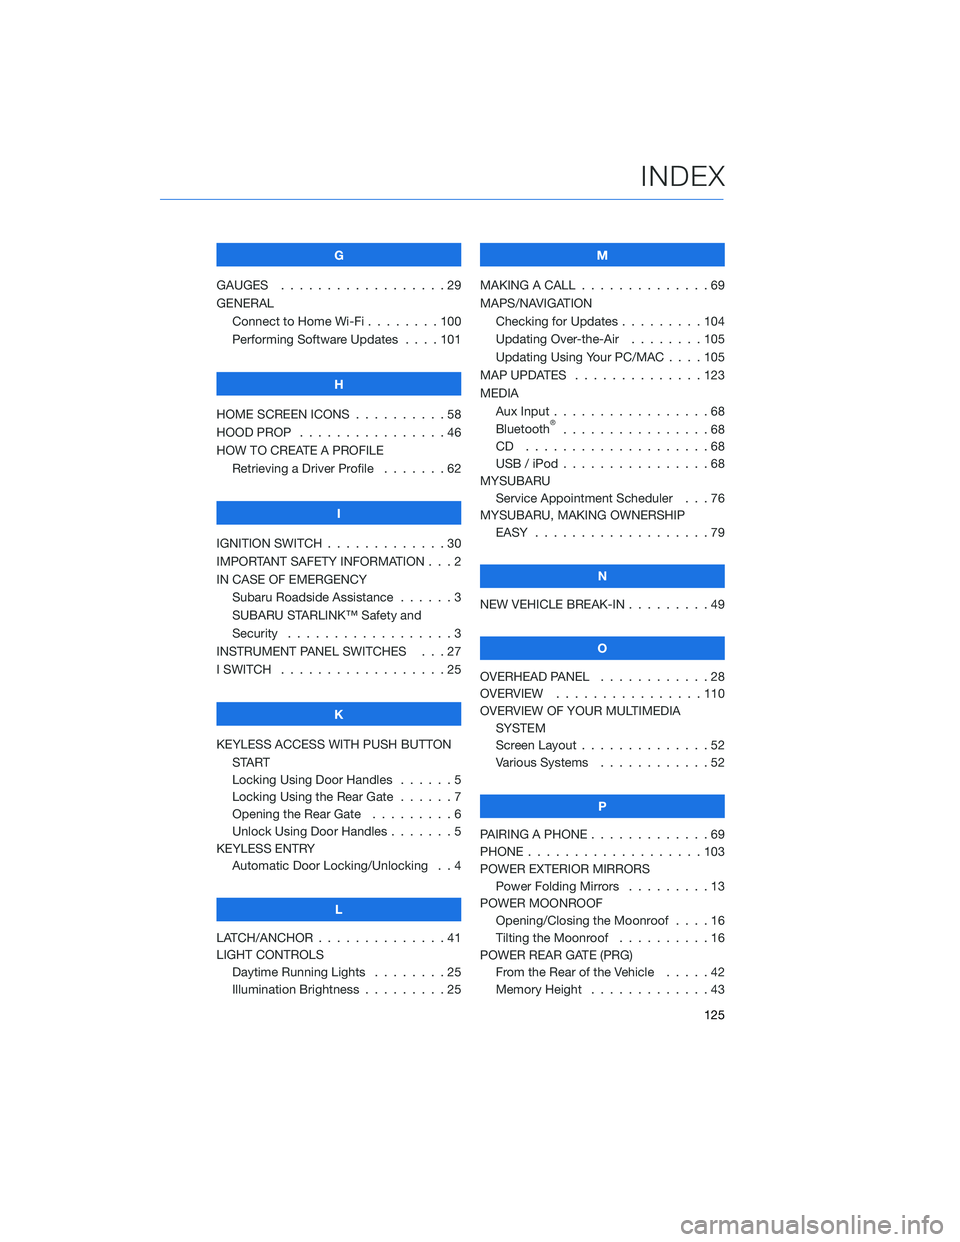
G
GAUGES . . . . . . . . . . ........29
GENERAL Connect to Home Wi-Fi . . ......100
Performing Software Updates . . . . 101
H
HOME SCREEN ICONS . . ........58
HOOD PROP . . . . . . . . ........46
HOW TO CREATE A PROFILE Retrieving a Driver Profile .......62
I
IGNITION SWITCH . . . . . . . . . . . . . 30
IMPORTANT SAFETY INFORMATION . . . 2
IN CASE OF EMERGENCY Subaru Roadside Assistance . . . . . . 3
SUBARU STARLINK™ Safety and
Security . . . . . . . . . . ........3
INSTRUMENT PANEL SWITCHES . . . 27
I SWITCH . . . . . . . . . . . . . . . . . . 25
K
KEYLESS ACCESS WITH PUSH BUTTON START
Locking Using Door Handles ......5
Locking Using the Rear Gate ......7
Opening the Rear Gate . ........6
Unlock Using Door Handles .......5
KEYLESS ENTRY Automatic Door Locking/Unlocking . . 4
L
LATCH/ANCHOR . . . . . .........41
LIGHT CONTROLS Daytime Running Lights . . . . . . . . 25
Illumination Brightness . ........25 M
MAKING A CALL . . . ...........69
MAPS/NAVIGATION Checking for Updates . . . ......104
Updating Over-the-Air . . . . . . . . 105
Updating Using Your PC/MAC . . . . 105
MAP UPDATES . . . . . . ........123
MEDIA Aux Input .................68
Bluetooth
®................68
CD ....................68
USB / iPod . . . . . . ..........68
MYSUBARU Service Appointment Scheduler . . . 76
MYSUBARU, MAKING OWNERSHIP EASY ...................79
N
NEW VEHICLE BREAK-IN . . . ......49
O
OVERHEAD PANEL ............28
OVERVIEW . . ..............110
OVERVIEW OF YOUR MULTIMEDIA SYSTEM
Screen Layout . . . . . . . . ......52
Various Systems . . . . . . . . . . . . 52
P
PAIRING A PHONE . . . . . . . . . . . . . 69
PHONE . . . . . . .............103
POWER EXTERIOR MIRRORS Power Folding Mirrors . . . . . ....13
POWER MOONROOF Opening/Closing the Moonroof . . . . 16
Tilting the Moonroof . . . . ......16
POWER REAR GATE (PRG) From the Rear of the Vehicle . . . . . 42
Memory Height . . . . . . . ......43
INDEX
125