stop start SUBARU OUTBACK 2021 Getting Started Guide
[x] Cancel search | Manufacturer: SUBARU, Model Year: 2021, Model line: OUTBACK, Model: SUBARU OUTBACK 2021Pages: 172, PDF Size: 53.92 MB
Page 3 of 172
PURPOSE OF THIS GUIDE
WELCOME................. 4
IMPORTANT SAFETY
INFORMATION.............. 4
OWNER’S RESOURCES....... 5
IN CASE OF EMERGENCY..... 6
TOWING YOUR ALL-WHEEL
DRIVE SUBARU............. 7
ENTRY AND EXIT
KEYLESS ENTRY............ 8
KEYLESS ACCESS WITH PUSH
BUTTON START.............10
POWER REAR GATE (PRG)....12
INSTRUMENT PANEL........16
GETTING COMFORTABLE
SEATING...................18
TILT AND TELESCOPIC STEERING
COLUMN...................21
POWER EXTERIOR MIRRORS . . 21
REAR VIEW MIRROR.........23
POWER WINDOWS..........24
CENTER CONSOLE STORAGE . . 25
POWER MOONROOF........25
CLIMATE CONTROL..........26
ACCESSORY CONNECTIONS . . 34
CONTROLS
INSTRUMENT PANEL SWITCHES
(LOWER LEFT)..............35AUDIO CONTROLS...........35
ADVANCED ADAPTIVE CRUISE
CONTROL..................36
I SWITCH...................36
LIGHT CONTROLS...........37
TURN SIGNALS.............38
WINDSHIELD WIPERS........38
REAR WINDOW WIPER.......39
OVERHEAD CONSOLE........40
GAUGES AND WARNING LIGHTS
COMBINATION METER.......41
WARNING AND INDICATOR
LIGHTS....................41
OPERATING THE VEHICLE
IGNITION SWITCH...........42
PUSH-BUTTON IGNITION
SWITCH...................42
STARTING THE VEHICLE......42
DRIVING THE VEHICLE.......43
AUTO START–STOP..........44
ELECTRONIC PARKING BRAKE
(EPB).....................46
X-MODE
®..................48
TURNING OFF THE VEHICLE...49
REFUELING
FUEL FILLER LID............50
FUEL......................50
FUEL CAPACITY.............50
TABLE OF CONTENTS
Page 44 of 172
IGNITION SWITCH
The ignition switch has four positions:
LOCK:You can only insert or remove the key in this position.
ACC (Accessory):Provides power to the radio and accessory power outlets.
ON:All electrical systems are available. The key returns to this position after starting the
engine.
START:Turn the key to this position to start the engine.
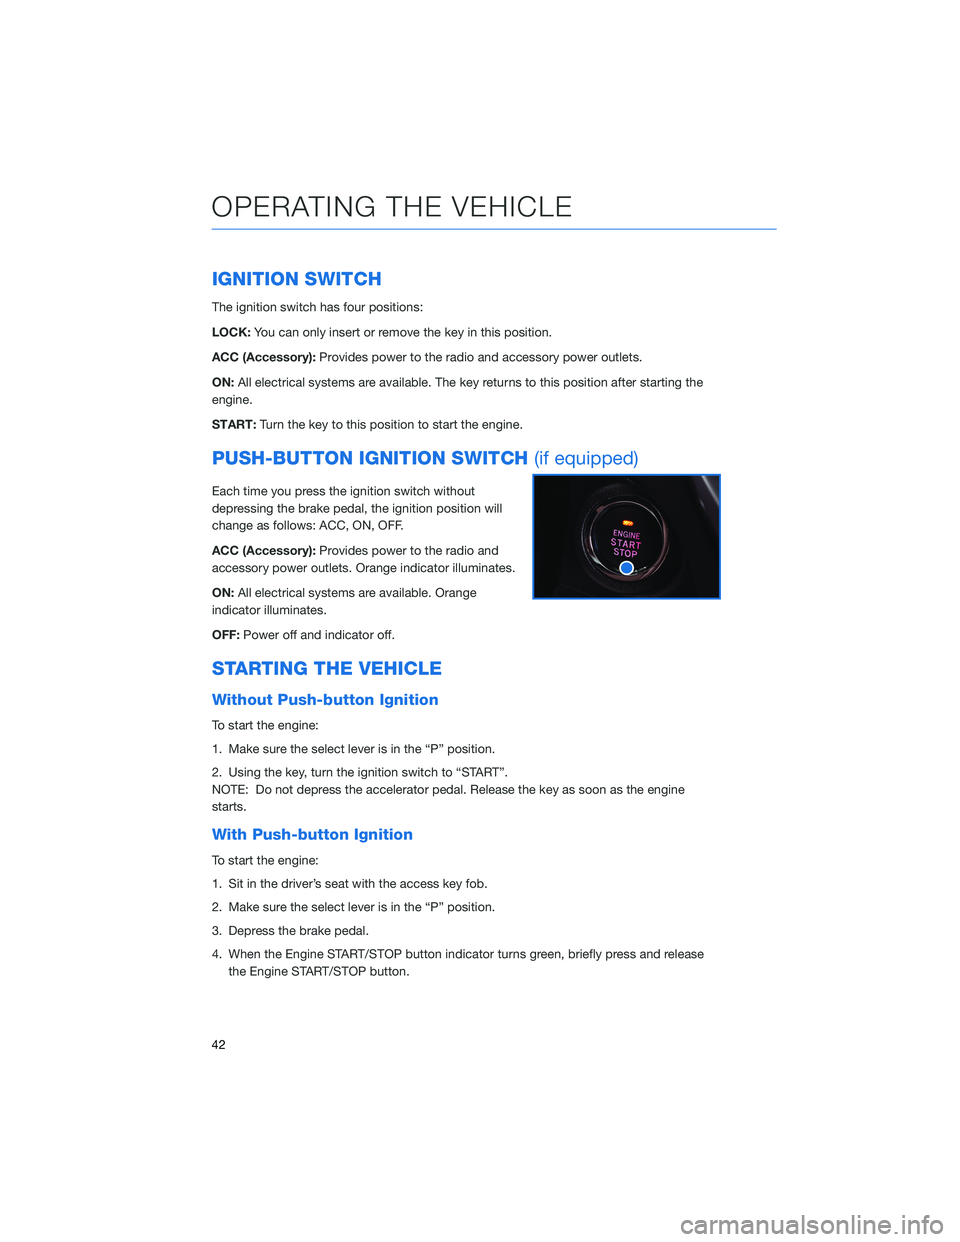
PUSH-BUTTON IGNITION SWITCH(if equipped)
Each time you press the ignition switch without
depressing the brake pedal, the ignition position will
change as follows: ACC, ON, OFF.
ACC (Accessory):Provides power to the radio and
accessory power outlets. Orange indicator illuminates.
ON:All electrical systems are available. Orange
indicator illuminates.
OFF:Power off and indicator off.
STARTING THE VEHICLE
Without Push-button Ignition
To start the engine:
1. Make sure the select lever is in the “P” position.
2. Using the key, turn the ignition switch to “START”.
NOTE: Do not depress the accelerator pedal. Release the key as soon as the engine
starts.
With Push-button Ignition
To start the engine:
1. Sit in the driver’s seat with the access key fob.
2. Make sure the select lever is in the “P” position.
3. Depress the brake pedal.
4. When the Engine START/STOP button indicator turns green, briefly press and release
the Engine START/STOP button.
OPERATING THE VEHICLE
42
Page 46 of 172
AUTO START–STOP
The Auto Start-Stop system is designed to automatically stop and restart the engine when
the vehicle is stationary for a short period of time (while waiting for a traffic light or in a
traffic jam) after the engine has warmed up. The system operates in order to reduce fuel
consumption, exhaust emissions and undesired idling noise.
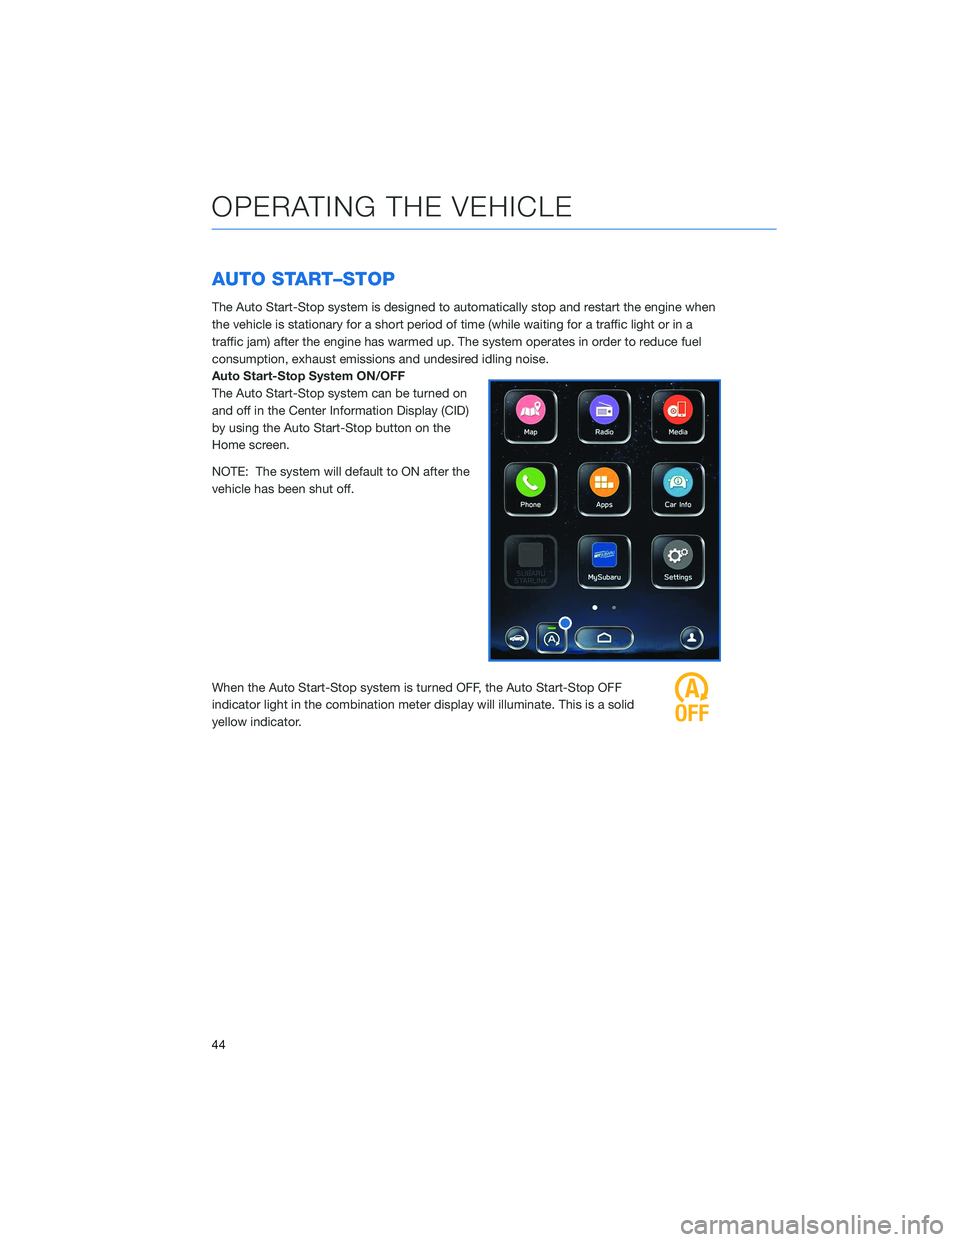
Auto Start-Stop System ON/OFF
The Auto Start-Stop system can be turned on
and off in the Center Information Display (CID)
by using the Auto Start-Stop button on the
Home screen.
NOTE: The system will default to ON after the
vehicle has been shut off.
When the Auto Start-Stop system is turned OFF, the Auto Start-Stop OFF
indicator light in the combination meter display will illuminate. This is a solid
yellow indicator.
OPERATING THE VEHICLE
44
Page 47 of 172
System Operation
So that it can be used safely and comfortably, in addition to driver operations, the Auto
Start-Stop system is designed to constantly monitor the vehicle conditions as well as the
environment inside and outside the vehicle, in order to control stopping and restarting of
the engine.
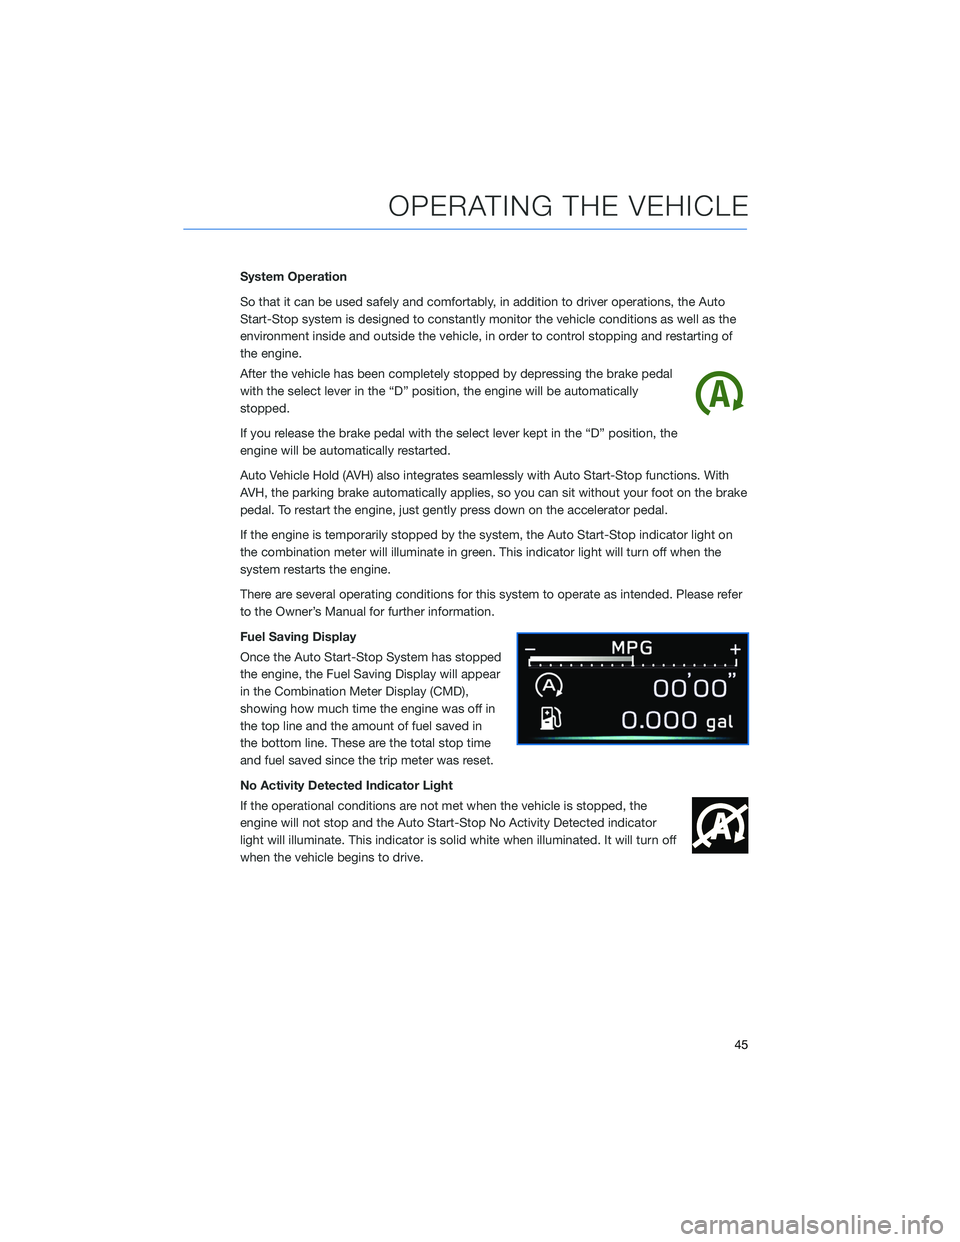
After the vehicle has been completely stopped by depressing the brake pedal
with the select lever in the “D” position, the engine will be automatically
stopped.
If you release the brake pedal with the select lever kept in the “D” position, the
engine will be automatically restarted.
Auto Vehicle Hold (AVH) also integrates seamlessly with Auto Start-Stop functions. With
AVH, the parking brake automatically applies, so you can sit without your foot on the brake
pedal. To restart the engine, just gently press down on the accelerator pedal.
If the engine is temporarily stopped by the system, the Auto Start-Stop indicator light on
the combination meter will illuminate in green. This indicator light will turn off when the
system restarts the engine.
There are several operating conditions for this system to operate as intended. Please refer
to the Owner’s Manual for further information.
Fuel Saving Display
Once the Auto Start-Stop System has stopped
the engine, the Fuel Saving Display will appear
in the Combination Meter Display (CMD),
showing how much time the engine was off in
the top line and the amount of fuel saved in
the bottom line. These are the total stop time
and fuel saved since the trip meter was reset.
No Activity Detected Indicator Light
If the operational conditions are not met when the vehicle is stopped, the
engine will not stop and the Auto Start-Stop No Activity Detected indicator
light will illuminate. This indicator is solid white when illuminated. It will turn off
when the vehicle begins to drive.
OPERATING THE VEHICLE
45
Page 48 of 172
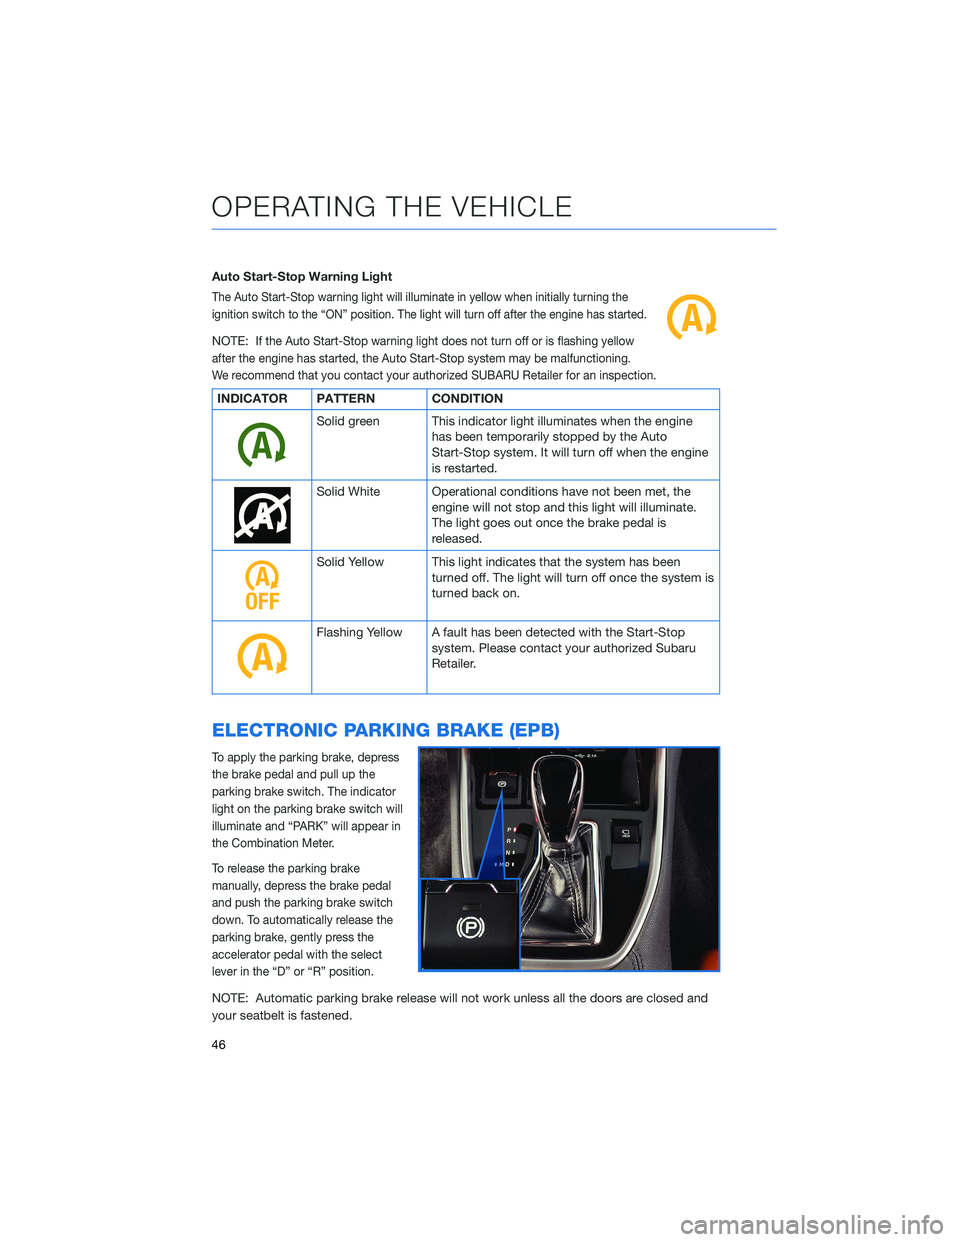
Auto Start-Stop Warning Light
The Auto Start-Stop warning light will illuminate in yellow when initially turning the
ignition switch to the “ON” position. The light will turn off after the engine has started.
NOTE:If the Auto Start-Stop warning light does not turn off or is flashing yellow
after the engine has started, the Auto Start-Stop system may be malfunctioning.
We recommend that you contact your authorized SUBARU Retailer for an inspection.
INDICATOR PATTERN CONDITION
Solid green This indicator light illuminates when the engine
has been temporarily stopped by the Auto
Start-Stop system. It will turn off when the engine
is restarted.
Solid White Operational conditions have not been met, the
engine will not stop and this light will illuminate.
The light goes out once the brake pedal is
released.
Solid Yellow This light indicates that the system has been
turned off. The light will turn off once the system is
turned back on.
Flashing Yellow A fault has been detected with the Start-Stop
system. Please contact your authorized Subaru
Retailer.
ELECTRONIC PARKING BRAKE (EPB)
To apply the parking brake, depress
the brake pedal and pull up the
parking brake switch. The indicator
light on the parking brake switch will
illuminate and “PARK” will appear in
the Combination Meter.
To release the parking brake
manually, depress the brake pedal
and push the parking brake switch
down. To automatically release the
parking brake, gently press the
accelerator pedal with the select
lever in the “D” or “R” position.
NOTE: Automatic parking brake release will not work unless all the doors are closed and
your seatbelt is fastened.
OPERATING THE VEHICLE
46
Page 68 of 172
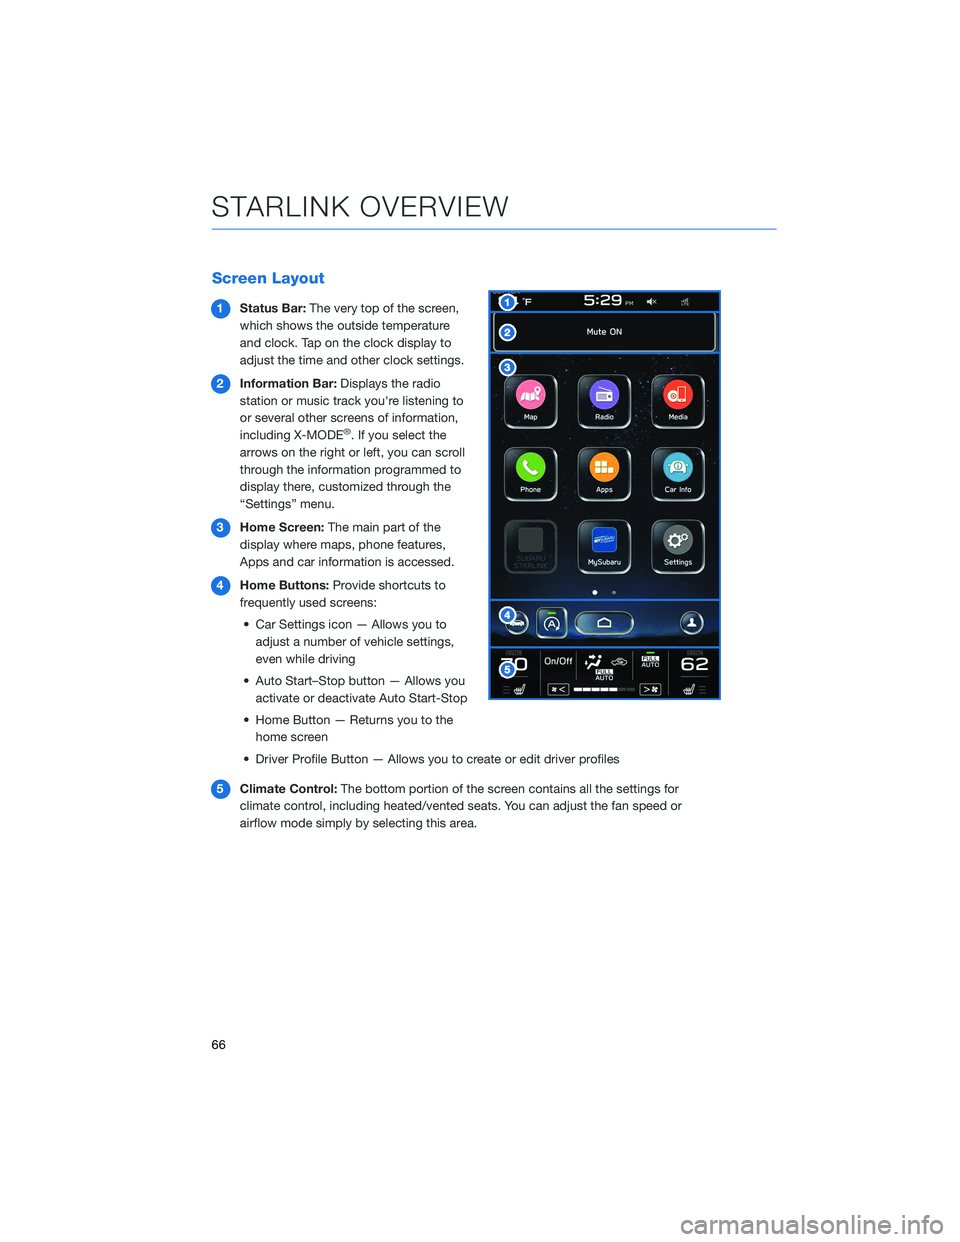
Screen Layout
1Status Bar:The very top of the screen,
which shows the outside temperature
and clock. Tap on the clock display to
adjust the time and other clock settings.
2Information Bar:Displays the radio
station or music track you're listening to
or several other screens of information,
including X-MODE
®. If you select the
arrows on the right or left, you can scroll
through the information programmed to
display there, customized through the
“Settings” menu.
3Home Screen:The main part of the
display where maps, phone features,
Apps and car information is accessed.
4Home Buttons:Provide shortcuts to
frequently used screens:
• Car Settings icon — Allows you to
adjust a number of vehicle settings,
even while driving
• Auto Start–Stop button — Allows you
activate or deactivate Auto Start-Stop
• Home Button — Returns you to the
home screen
• Driver Profile Button — Allows you to create or edit driver profiles
5Climate Control:The bottom portion of the screen contains all the settings for
climate control, including heated/vented seats. You can adjust the fan speed or
airflow mode simply by selecting this area.
STARLINK OVERVIEW
66
Page 69 of 172
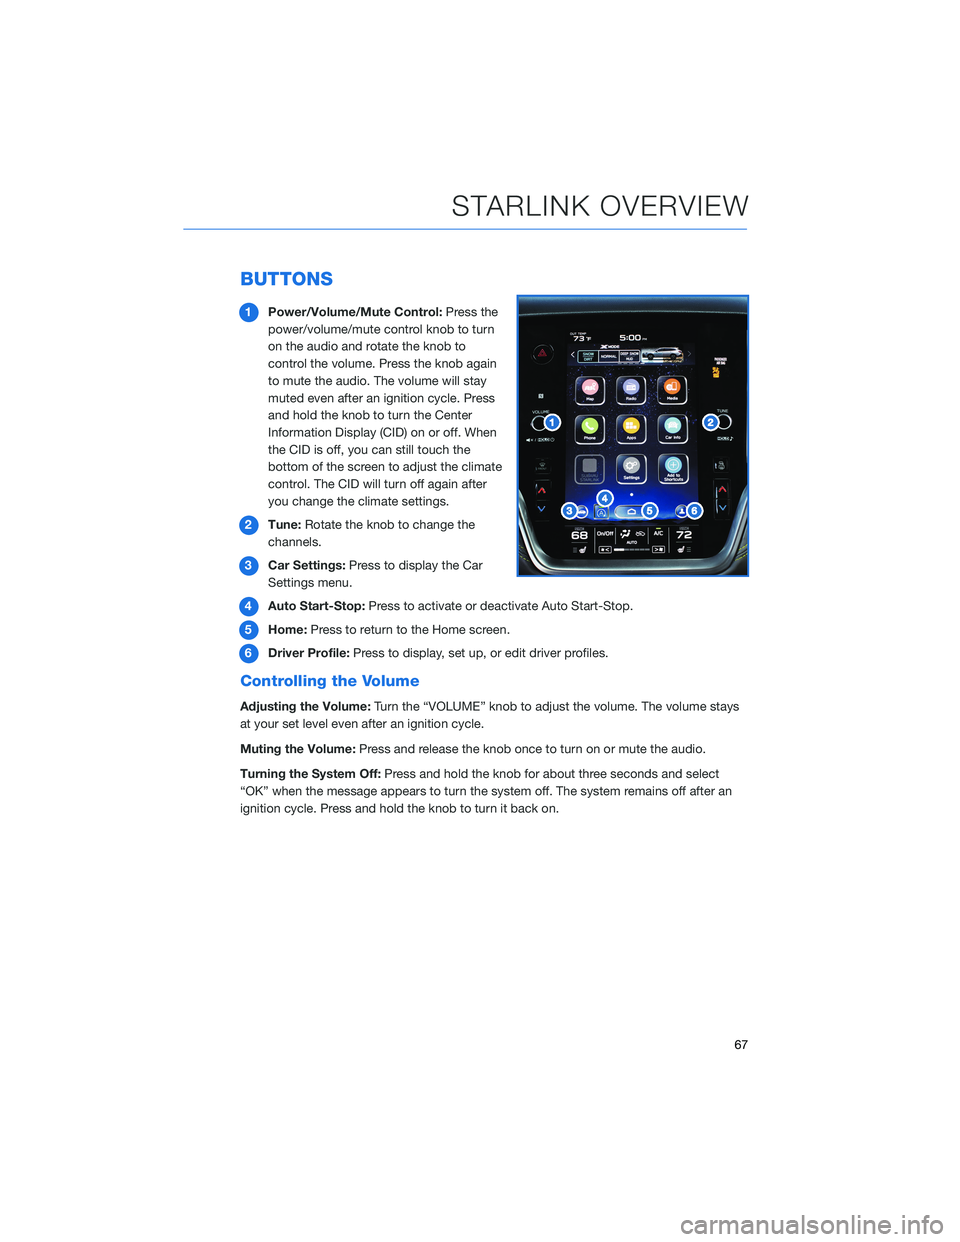
BUTTONS
1Power/Volume/Mute Control:Press the
power/volume/mute control knob to turn
on the audio and rotate the knob to
control the volume. Press the knob again
to mute the audio. The volume will stay
muted even after an ignition cycle. Press
and hold the knob to turn the Center
Information Display (CID) on or off. When
the CID is off, you can still touch the
bottom of the screen to adjust the climate
control. The CID will turn off again after
you change the climate settings.
2Tune:Rotate the knob to change the
channels.
3Car Settings:Press to display the Car
Settings menu.
4Auto Start-Stop:Press to activate or deactivate Auto Start-Stop.
5Home:Press to return to the Home screen.
6Driver Profile:Press to display, set up, or edit driver profiles.
Controlling the Volume
Adjusting the Volume:Turn the “VOLUME” knob to adjust the volume. The volume stays
at your set level even after an ignition cycle.
Muting the Volume:Press and release the knob once to turn on or mute the audio.
Turning the System Off:Press and hold the knob for about three seconds and select
“OK” when the message appears to turn the system off. The system remains off after an
ignition cycle. Press and hold the knob to turn it back on.
STARLINK OVERVIEW
67
Page 104 of 172
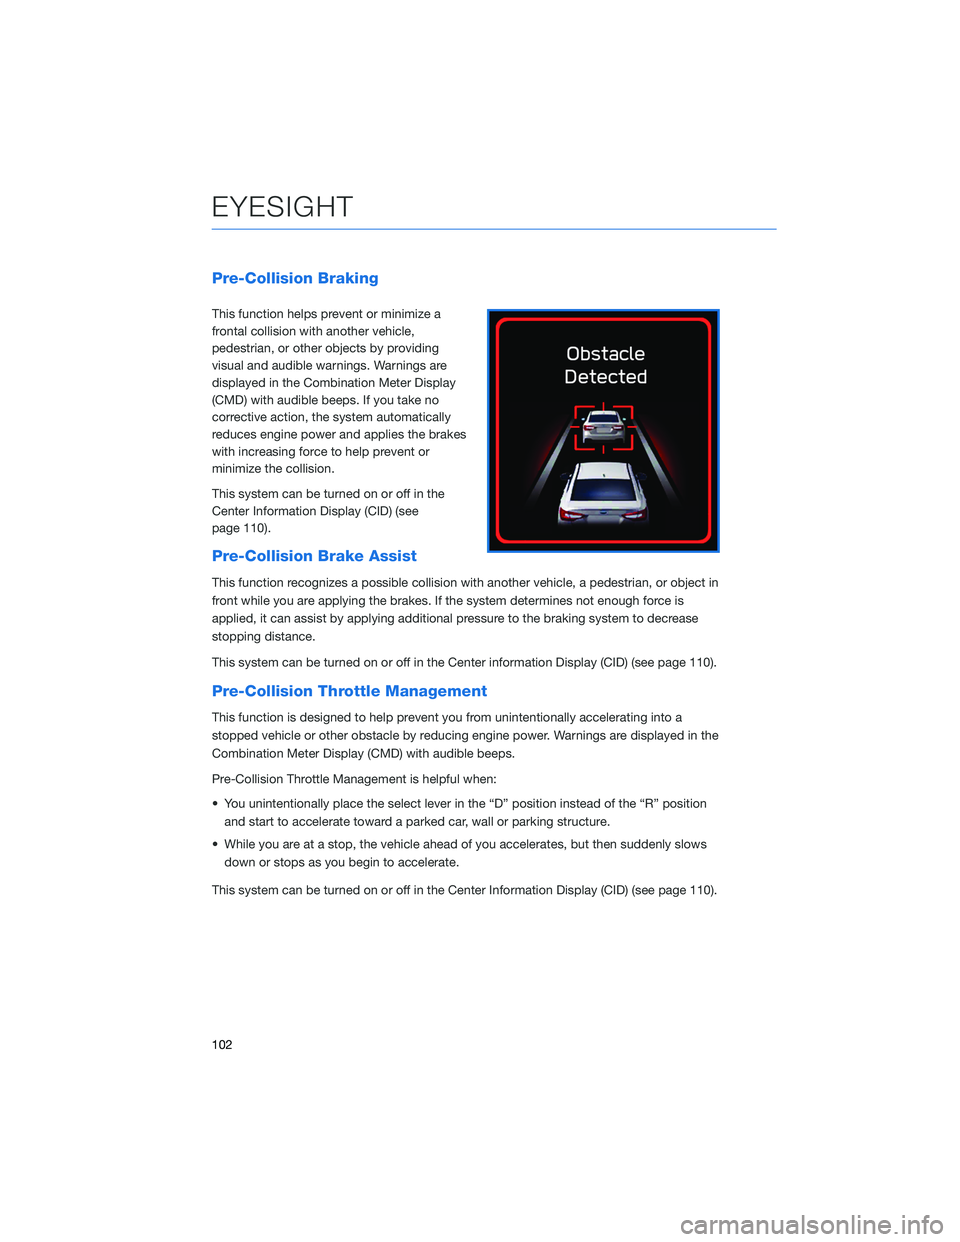
Pre-Collision Braking
This function helps prevent or minimize a
frontal collision with another vehicle,
pedestrian, or other objects by providing
visual and audible warnings. Warnings are
displayed in the Combination Meter Display
(CMD) with audible beeps. If you take no
corrective action, the system automatically
reduces engine power and applies the brakes
with increasing force to help prevent or
minimize the collision.
This system can be turned on or off in the
Center Information Display (CID) (see
page 110).
Pre-Collision Brake Assist
This function recognizes a possible collision with another vehicle, a pedestrian, or object in
front while you are applying the brakes. If the system determines not enough force is
applied, it can assist by applying additional pressure to the braking system to decrease
stopping distance.
This system can be turned on or off in the Center information Display (CID) (see page 110).
Pre-Collision Throttle Management
This function is designed to help prevent you from unintentionally accelerating into a
stopped vehicle or other obstacle by reducing engine power. Warnings are displayed in the
Combination Meter Display (CMD) with audible beeps.
Pre-Collision Throttle Management is helpful when:
• You unintentionally place the select lever in the “D” position instead of the “R” position
and start to accelerate toward a parked car, wall or parking structure.
• While you are at a stop, the vehicle ahead of you accelerates, but then suddenly slows
down or stops as you begin to accelerate.
This system can be turned on or off in the Center Information Display (CID) (see page 110).
EYESIGHT
102
Page 109 of 172
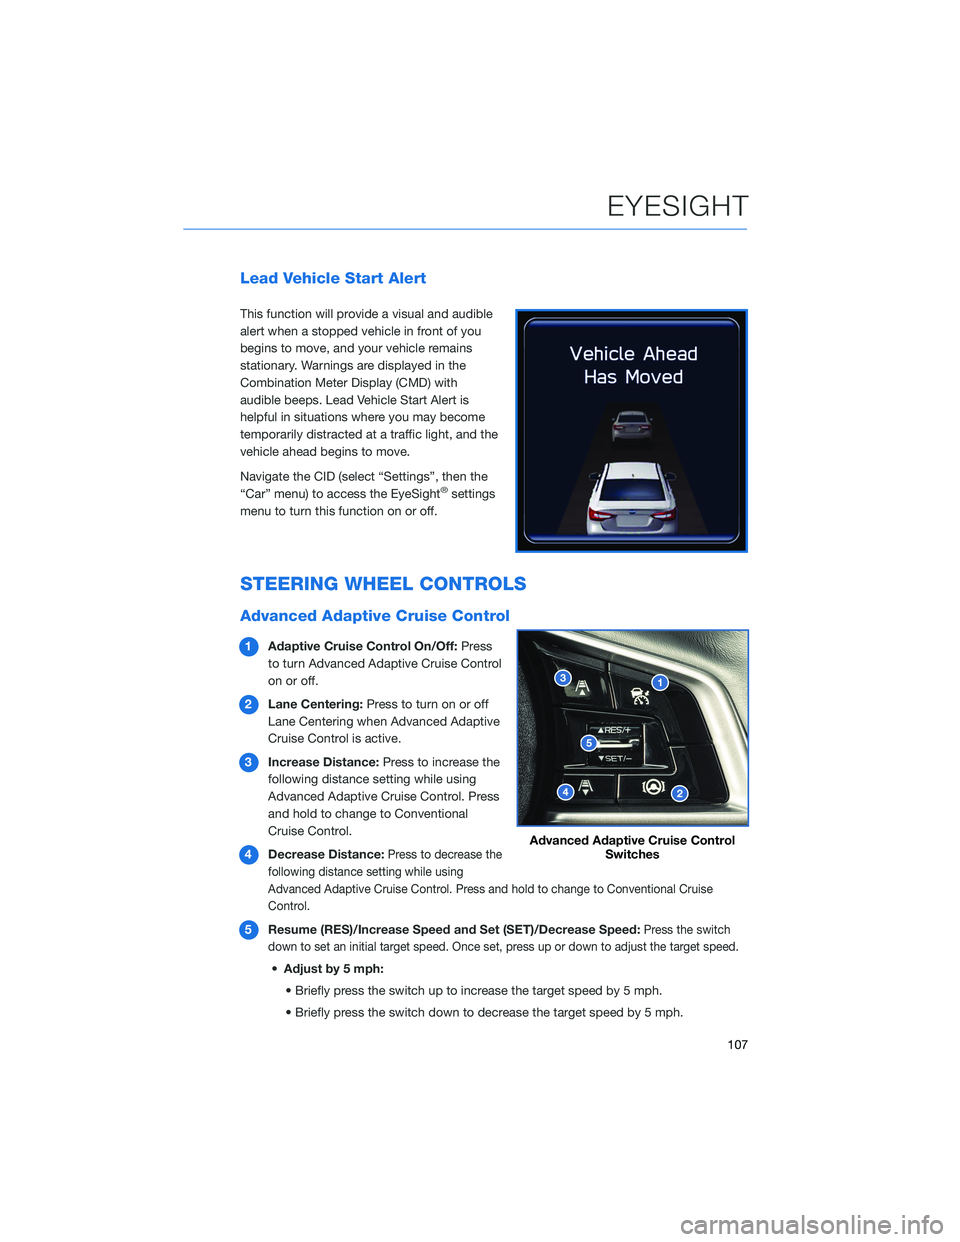
Lead Vehicle Start Alert
This function will provide a visual and audible
alert when a stopped vehicle in front of you
begins to move, and your vehicle remains
stationary. Warnings are displayed in the
Combination Meter Display (CMD) with
audible beeps. Lead Vehicle Start Alert is
helpful in situations where you may become
temporarily distracted at a traffic light, and the
vehicle ahead begins to move.
Navigate the CID (select “Settings”, then the
“Car” menu) to access the EyeSight
®settings
menu to turn this function on or off.
STEERING WHEEL CONTROLS
Advanced Adaptive Cruise Control
1Adaptive Cruise Control On/Off:Press
to turn Advanced Adaptive Cruise Control
on or off.
2Lane Centering:Press to turn on or off
Lane Centering when Advanced Adaptive
Cruise Control is active.
3Increase Distance:Press to increase the
following distance setting while using
Advanced Adaptive Cruise Control. Press
and hold to change to Conventional
Cruise Control.
4Decrease Distance:
Press to decrease the
following distance setting while using
Advanced Adaptive Cruise Control. Press and hold to change to Conventional Cruise
Control.
5Resume (RES)/Increase Speed and Set (SET)/Decrease Speed:Press the switch
down to set an initial target speed. Once set, press up or down to adjust the target speed.
•Adjust by 5 mph:
• Briefly press the switch up to increase the target speed by 5 mph.
• Briefly press the switch down to decrease the target speed by 5 mph.
Advanced Adaptive Cruise Control
Switches
EYESIGHT
107
Page 150 of 172
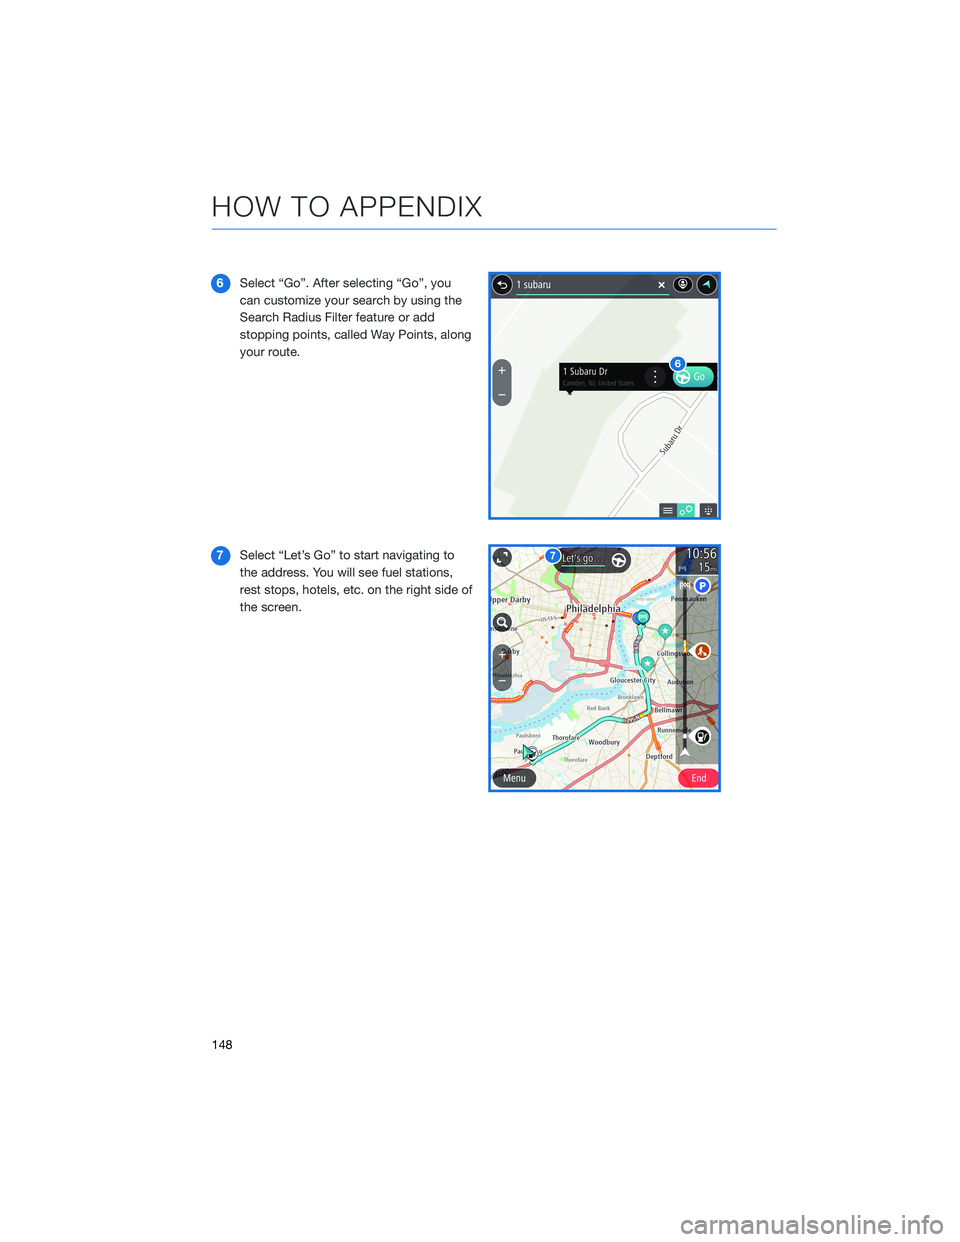
6Select “Go”. After selecting “Go”, you
can customize your search by using the
Search Radius Filter feature or add
stopping points, called Way Points, along
your route.
7Select “Let’s Go” to start navigating to
the address. You will see fuel stations,
rest stops, hotels, etc. on the right side of
the screen.
HOW TO APPENDIX
148