navigation SUBARU OUTBACK 2022 Getting Started Guide
[x] Cancel search | Manufacturer: SUBARU, Model Year: 2022, Model line: OUTBACK, Model: SUBARU OUTBACK 2022Pages: 172, PDF Size: 58.6 MB
Page 100 of 172
Checking for Map Updates
You can update the maps to the latest information. The maps should be checked and
updated regularly for the best possible navigation experience.
Atwww.subaru-maps.com, you can update the entire USA map at once via USB. The
maps can also be updated over the air. When updating over the air, you can update eight
regions at a time. This allows you to update your home state without having to download
the entire map program for the United States. This option is great if you normally stay in
your home state and/or surrounding states.
Updating Over-the-Air
To check for available updates over-the-air, first connect to a Wi-Fi network (see page141).
Map updates can be found by selecting “Settings”, then “Navigation” on the Touchscreen.
For step by step directions for updating your maps through Wi-Fi, please refer to
page 162.
Updating Maps Using Your PC/MAC
Maps can also be updated using a USB memory device, which will
allow the entire map program to be updated at one time. This is a
great option if you are going to take a cross-country trip and your
maps have not been updated in a while.
To update the map using a USB memory device, start by going to
www.subaru-maps.com.
SETTINGS AND UPDATES
98
Page 127 of 172
Manually
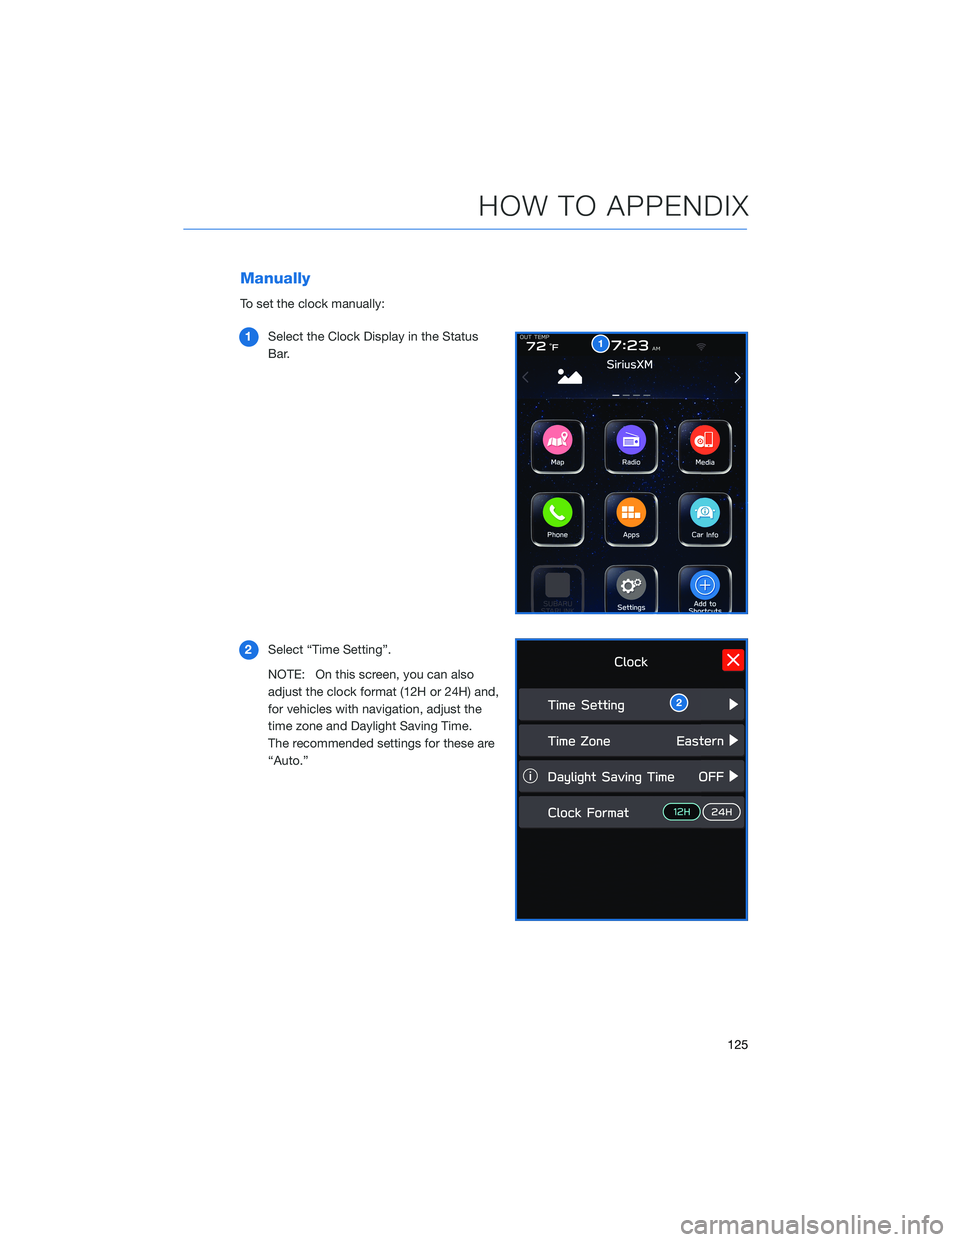
To set the clock manually:
1Select the Clock Display in the Status
Bar.
2Select “Time Setting”.
NOTE: On this screen, you can also
adjust the clock format (12H or 24H) and,
for vehicles with navigation, adjust the
time zone and Daylight Saving Time.
The recommended settings for these are
“Auto.”
1
2
HOW TO APPENDIX
125
Page 129 of 172
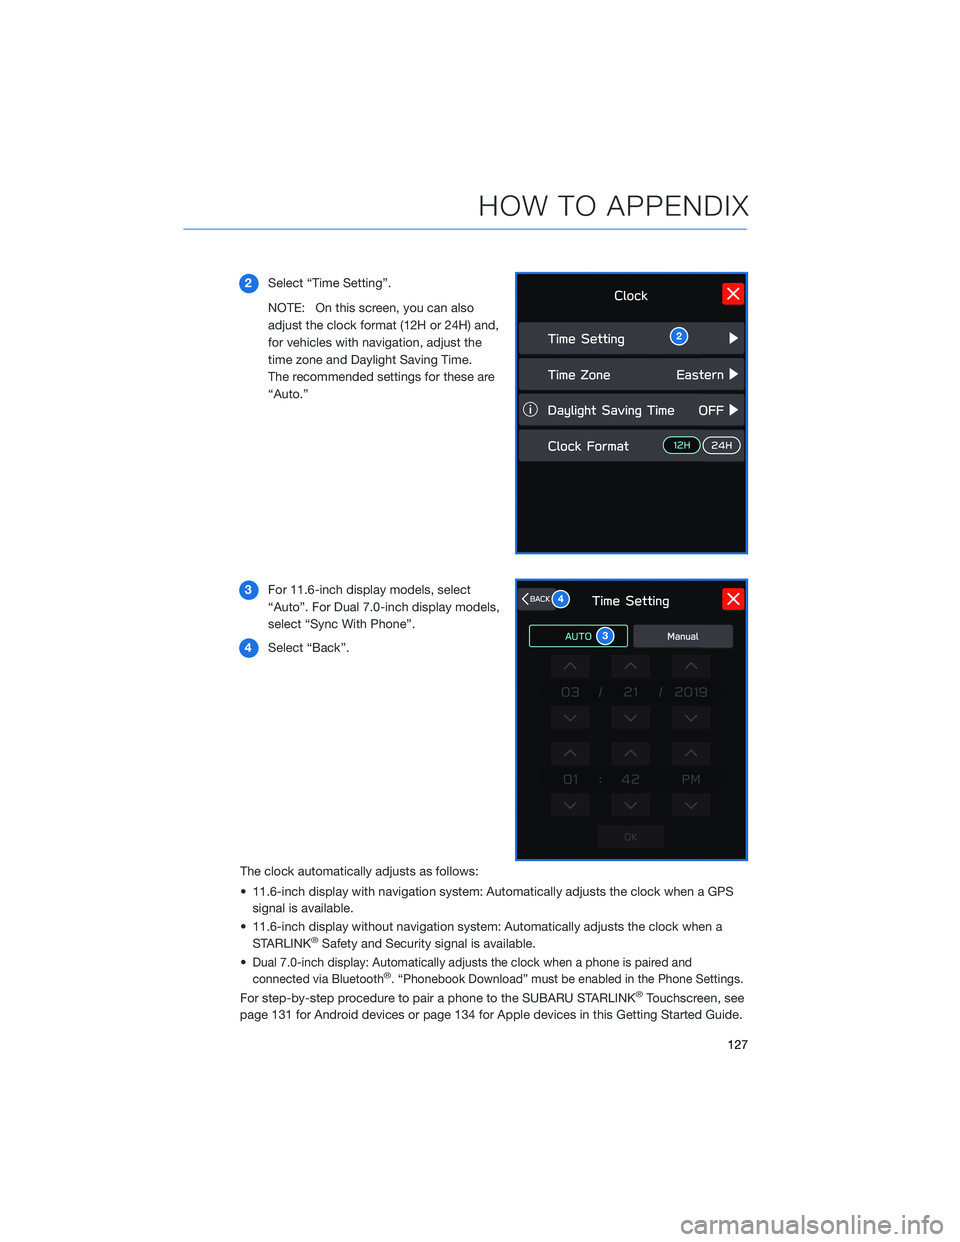
2Select “Time Setting”.
NOTE: On this screen, you can also
adjust the clock format (12H or 24H) and,
for vehicles with navigation, adjust the
time zone and Daylight Saving Time.
The recommended settings for these are
“Auto.”
3For 11.6-inch display models, select
“Auto”. For Dual 7.0-inch display models,
select “Sync With Phone”.
4Select “Back”.
The clock automatically adjusts as follows:
• 11.6-inch display with navigation system: Automatically adjusts the clock when a GPS
signal is available.
• 11.6-inch display without navigation system: Automatically adjusts the clock when a
STARLINK
®Safety and Security signal is available.
•
Dual 7.0-inch display: Automatically adjusts the clock when a phone is paired and
connected via Bluetooth®. “Phonebook Download” must be enabled in the Phone Settings.
For step-by-step procedure to pair a phone to the SUBARU STARLINK®Touchscreen, see
page 131 for Android devices or page 134 for Apple devices in this Getting Started Guide.
2
3
4
HOW TO APPENDIX
127
Page 155 of 172
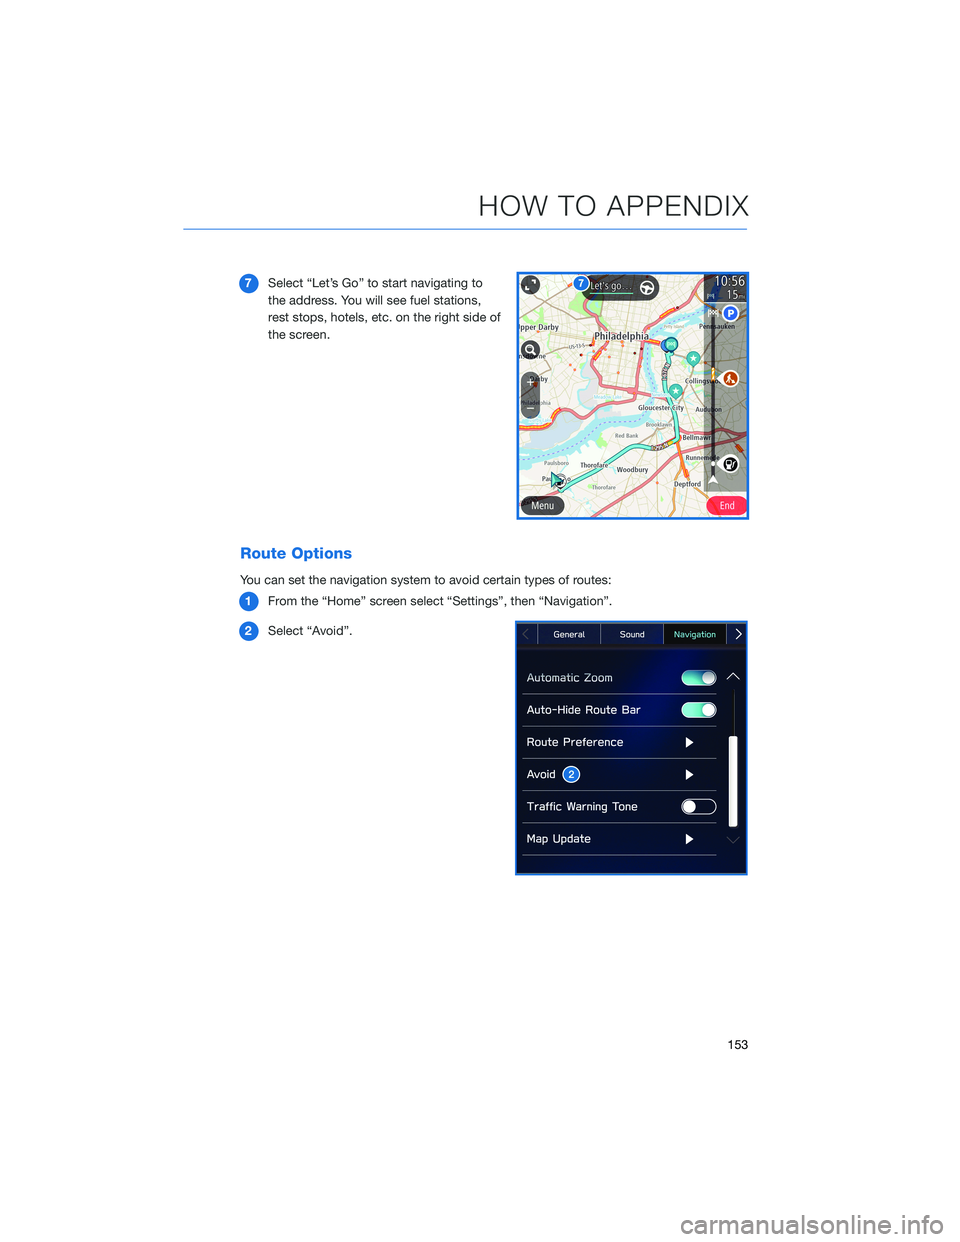
7Select “Let’s Go” to start navigating to
the address. You will see fuel stations,
rest stops, hotels, etc. on the right side of
the screen.
Route Options
You can set the navigation system to avoid certain types of routes:
1From the “Home” screen select “Settings”, then “Navigation”.
2Select “Avoid”.
HOW TO APPENDIX
153
Page 156 of 172
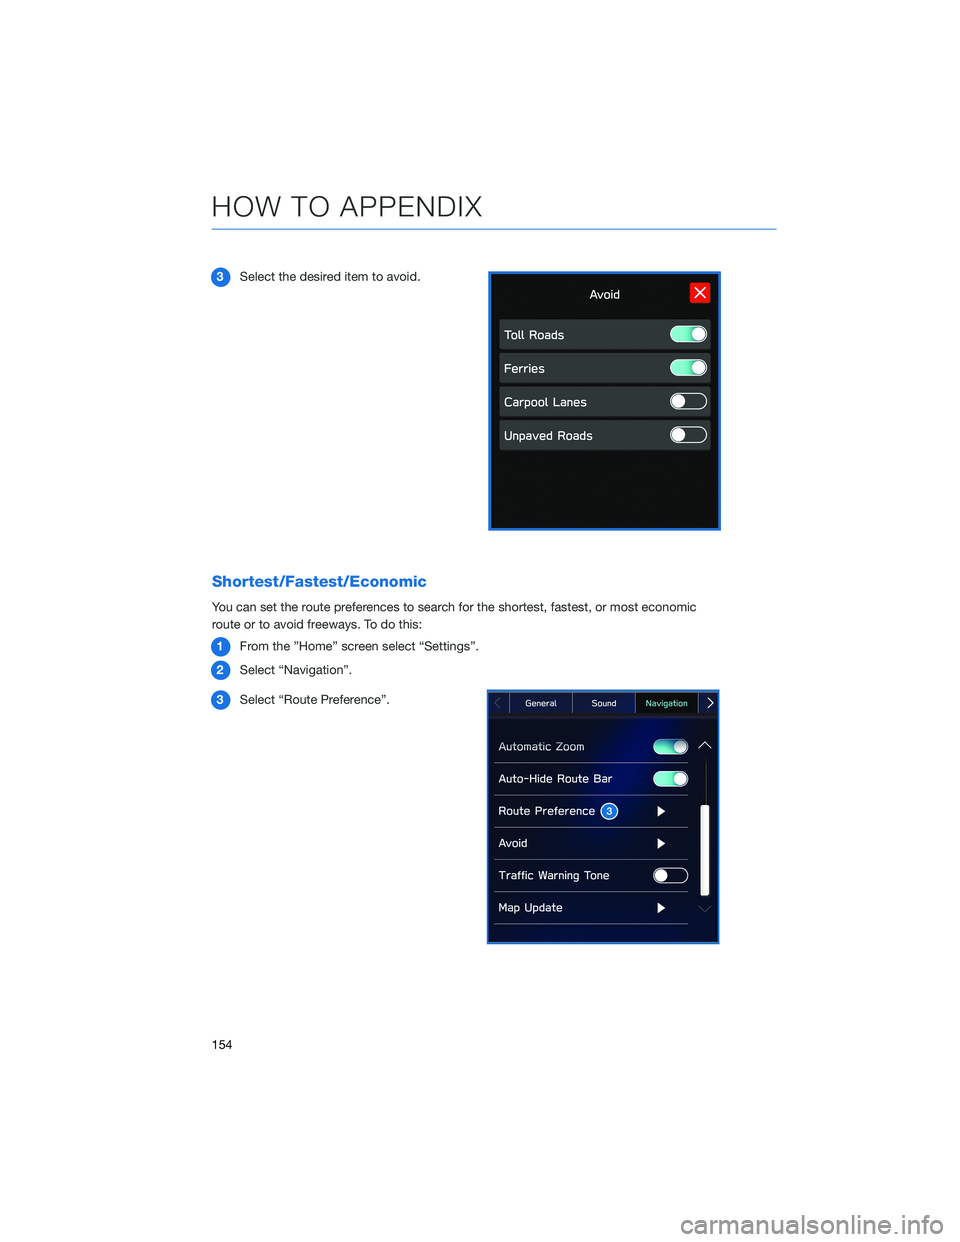
3Select the desired item to avoid.
Shortest/Fastest/Economic
You can set the route preferences to search for the shortest, fastest, or most economic
route or to avoid freeways. To do this:
1From the ”Home” screen select “Settings”.
2Select “Navigation”.
3Select “Route Preference”.
HOW TO APPENDIX
154
Page 161 of 172
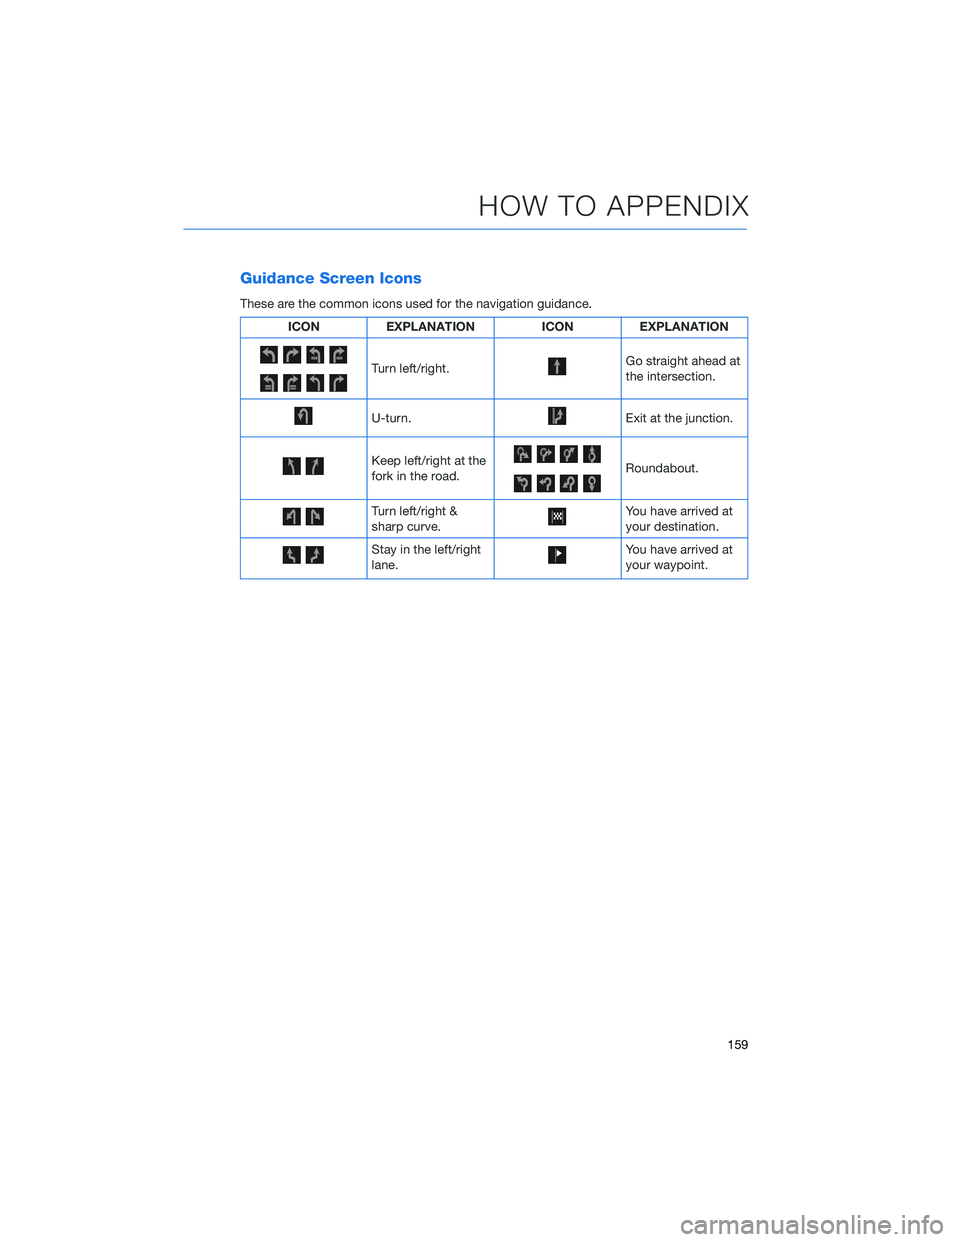
Guidance Screen Icons
These are the common icons used for the navigation guidance.
ICON EXPLANATION ICON EXPLANATION
Turn left/right.Go straight ahead at
the intersection.
U-turn.Exit at the junction.
Keep left/right at the
fork in the road.Roundabout.
Turn left/right &
sharp curve.You have arrived at
your destination.
Stay in the left/right
lane.You have arrived at
your waypoint.
HOW TO APPENDIX
159
Page 163 of 172
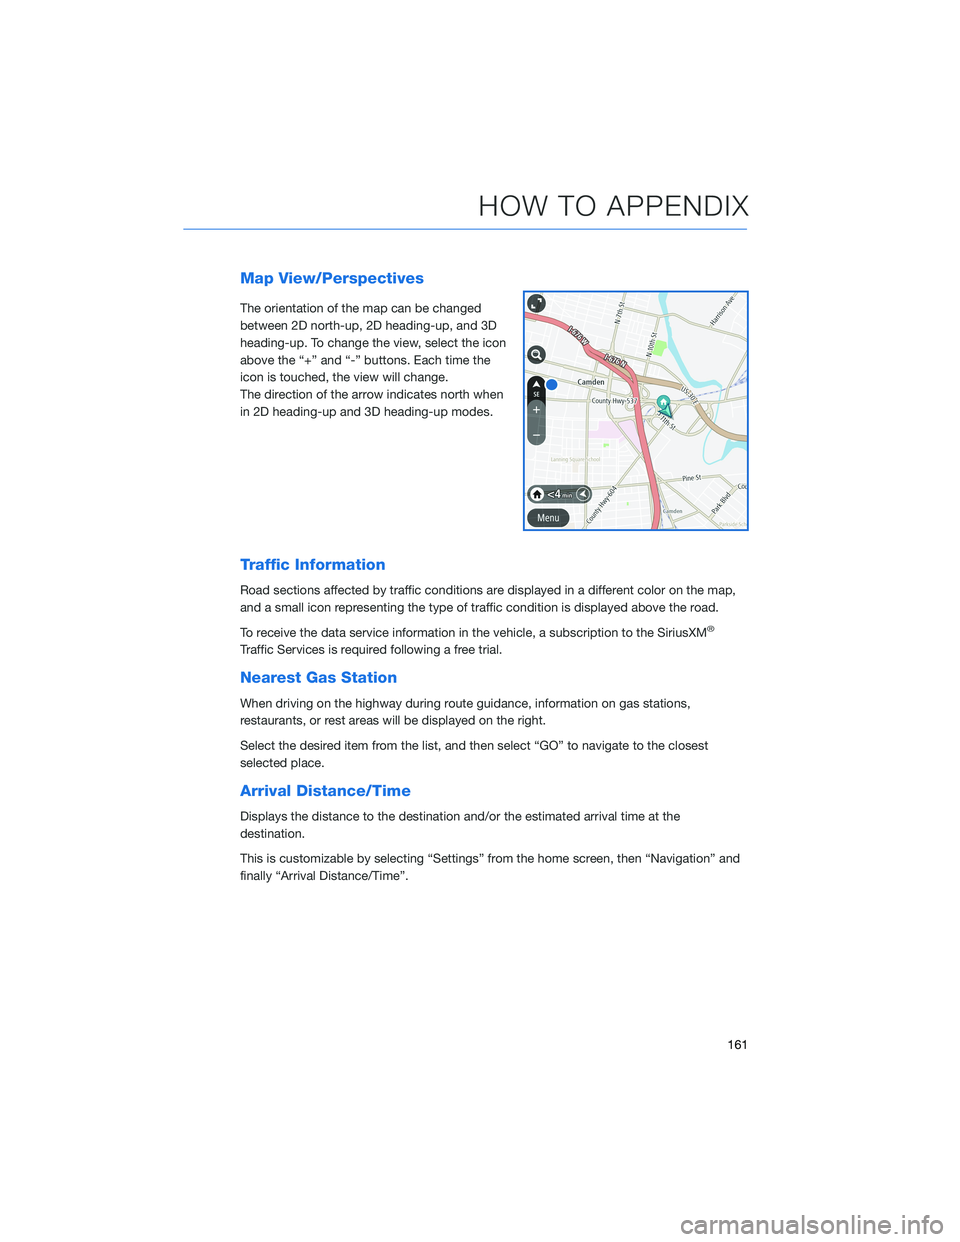
Map View/Perspectives
The orientation of the map can be changed
between 2D north-up, 2D heading-up, and 3D
heading-up. To change the view, select the icon
above the “+” and “-” buttons. Each time the
icon is touched, the view will change.
The direction of the arrow indicates north when
in 2D heading-up and 3D heading-up modes.
Traffic Information
Road sections affected by traffic conditions are displayed in a different color on the map,
and a small icon representing the type of traffic condition is displayed above the road.
To receive the data service information in the vehicle, a subscription to the SiriusXM
®
Traffic Services is required following a free trial.
Nearest Gas Station
When driving on the highway during route guidance, information on gas stations,
restaurants, or rest areas will be displayed on the right.
Select the desired item from the list, and then select “GO” to navigate to the closest
selected place.
Arrival Distance/Time
Displays the distance to the destination and/or the estimated arrival time at the
destination.
This is customizable by selecting “Settings” from the home screen, then “Navigation” and
finally “Arrival Distance/Time”.
HOW TO APPENDIX
161
Page 164 of 172
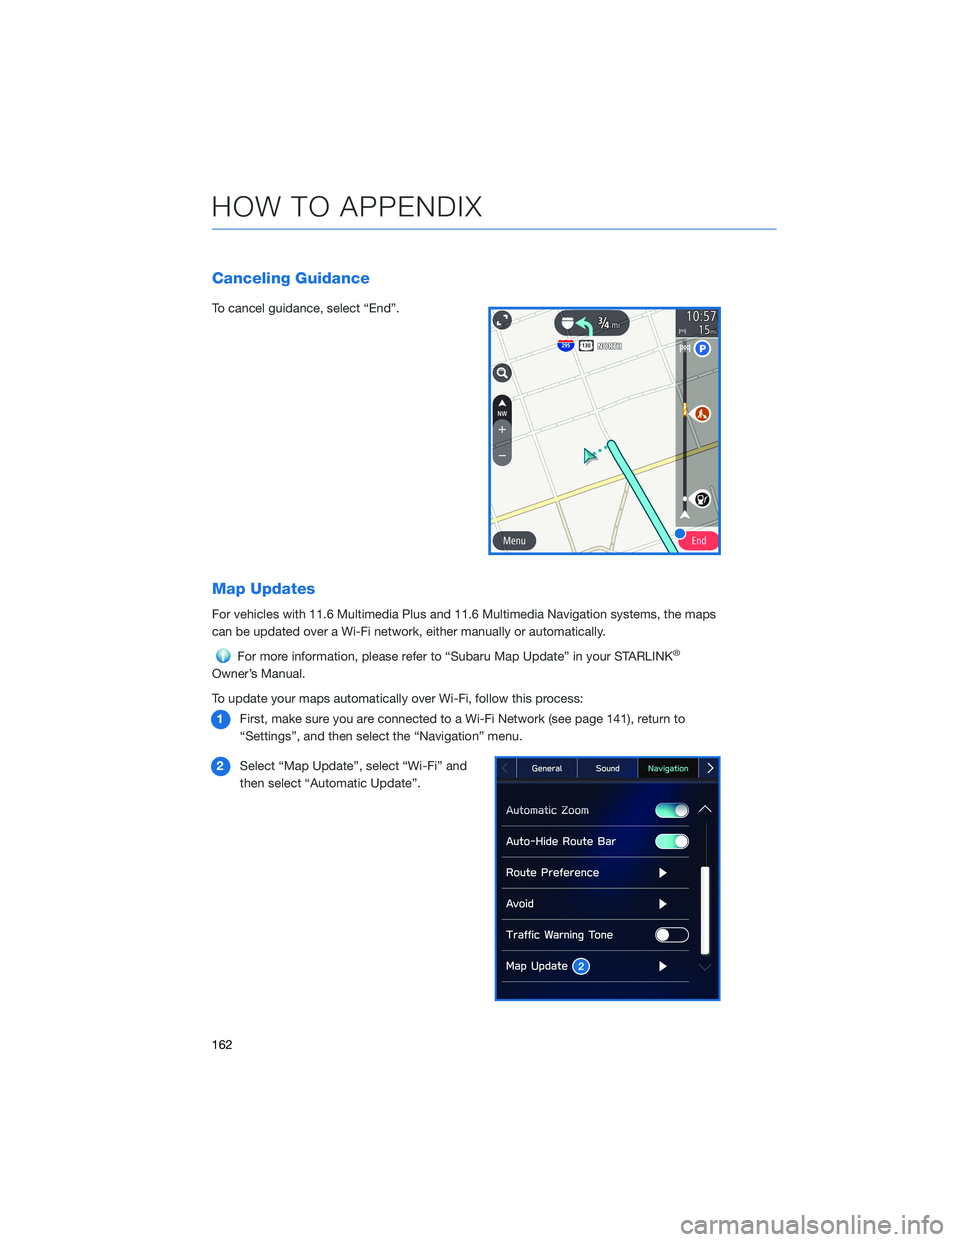
Canceling Guidance
To cancel guidance, select “End”.
Map Updates
For vehicles with 11.6 Multimedia Plus and 11.6 Multimedia Navigation systems, the maps
can be updated over a Wi-Fi network, either manually or automatically.
For more information, please refer to “Subaru Map Update” in your STARLINK®
Owner’s Manual.
To update your maps automatically over Wi-Fi, follow this process:
1First, make sure you are connected to a Wi-Fi Network (see page 141), return to
“Settings”, and then select the “Navigation” menu.
2Select “Map Update”, select “Wi-Fi” and
then select “Automatic Update”.
HOW TO APPENDIX
162
Page 166 of 172
FIRMWARE AND SOFTWARE UPDATES
Software updates provide enhancements to the system, such as new features, added
security, and upgraded functions. You can ask your preferred Subaru retailer to check for
and perform a full update to the system software. Please ask your preferred Subaru retailer
for specific details on update content.
For the 11.6-inch Multimedia Plus and the 11.6-inch Multimedia Navigation systems, some
system software can be updated via a Wi-Fi network. The update process involves
downloading and installing the software update.
NOTE: System functionality will be restricted during installation, and you may need to
reset radio station presets and volume settings after the update process. Set your clock to
“Auto” (see page 126) before updating the software.
To update the software via Wi-Fi:
1. Connect to a Wi-Fi network (see page 141).
2. Display the general setting screen by pressing the “Home” button, then select
“Settings”, and finally “General”.
3. Select “Software Update”, select “Update”, and then select “Check for Updates”
• If “Automatically Check for Updates” is enabled, an update check will be performed
automatically before proceeding to the next step.
• If “Automatically Download Updates” is enabled, available software updates will be
downloaded automatically.
4. Select “Download Now” to begin the download. The download status progress is
displayed in the upper right of the screen. If you need to stop the download and restart
at a later time, select “Cancel” to stop the process.
5. Select “Install Now” to start the installation process. The installation process will take
several minutes to complete.
6. When the installation is complete, select “OK” on the confirmation message to
complete the update process.
7. Turn the ignition to the “OFF” position and open and close the driver’s door. After about
5 minutes, restart the engine, and the software installation will be applied.
HOW TO APPENDIX
164
Page 169 of 172
MAPS/NAVIGATION . ........... 97
Checking for Map Updates . . . . . . 98
Updating Maps Using Your
PC/MAC . . . . . . . . . ........98
Updating Over-the-Air . . . ......98
MAPS OVERVIEW . . . . . . . . . . . . . 91
MEDIA . . . . . . . . ........... 83
AUX Input . . . . . . . . . . . . . . . . 83
Bluetooth
®................83
CD ....................83
USB / iPod . . . . . ...........83
MEMORY DRIVER’S SEAT ....... 130
MEMORY HEIGHT . . ......... 128
MYSUBARU . . . . . ........... 90
Service Appointment Scheduler . . . 90
MYSUBARU INTEGRATION....... 93
N
NEW VEHICLE BREAK-IN . . . . . . . . 61
O
OPERATION . . . . . . ......... 101
OVERHEAD CONSOLE .......... 39
OVERVIEW OF YOUR MULTIMEDIA
SYSTEM . . . . . . . . . . . . . . . . . 66
Screen Layout . . ............67
Various Systems . ...........66
OWNER’S RESOURCES . ......... 4
P
PAIRING A PHONE . . . . . . . . . . . . 84
PHONE . . . . . . . . ........... 97
POWER EXTERIOR MIRRORS . . . . . 20
Power Folding Mirrors . . . . . . . . . 20
Reverse Tilt Mirror ...........21
POWER MOONROOF.......... 24
Opening/Closing the Moonroof . . . . 24
Tilting the Moonroof..........24POWER REAR GATE (PRG)....... 10
From the Rear of the Vehicle .....11
Hands-free Power Rear Gate . . . . . 12
Power Rear Gate Button . . ......10
Power Rear Gate Lock.........12
POWER WINDOWS . . . . ........ 23
PUSH-BUTTON IGNITION SWITCH . . 42
R
RADIO.................... 81
AM/FM Radio . . . . . . . . . .....81
Presets . . . . . . . ...........82
Satellite Radio . . . . ..........82
REARRANGING ICONS.......... 74
REAR SEAT REMINDER . . . . . . . . . 55
Passenger Occupant Detection and
Seatbelt Reminders . . . ........55
REAR VIEW MIRROR . . ......... 22
Auto-dimming Mirror . .........22
HomeLink
®5 Accessory Mirror . . . 22
REAR-VISION CAMERA . . . ...... 111
Rear-vision Camera Washer.....111
REAR WINDOW WIPER . . . ...... 38
Rear-vision Camera Washer . . . . . . 38
RECEIVING A CALL . . . . . . . . . . . . 86
REVERSE AUTOMATIC BRAKING
(RAB) . . . . . . ........... 115
Reverse Automatic Braking (RAB)
OFF ...................115
ROOF RAIL CAPACITY.......... 62
S
SAFETY AND SECURITY OVERVIEW . . 92
SEATING . . . . .............. 16
Head Restraint Adjustment ......18
Manual Seats . . . . . . . . . . . . . . 16
Power Driver’s Seat (if equipped) . . . 17
Seatbelt Adjuster . . . .........18
SETTINGS AND UPDATES OVERVIEW . . 95
Connect to Home Wi-Fi........95
Performing Software Updates . . . . . 95
INDEX
167