SUBARU SOLTERRA 2023 Owners Manual
Manufacturer: SUBARU, Model Year: 2023, Model line: SOLTERRA, Model: SUBARU SOLTERRA 2023Pages: 628, PDF Size: 11.91 MB
Page 531 of 628
5318-2. Steps to take in an emergency
Owners Manual_USA_M42C01_en
8
When trouble arises
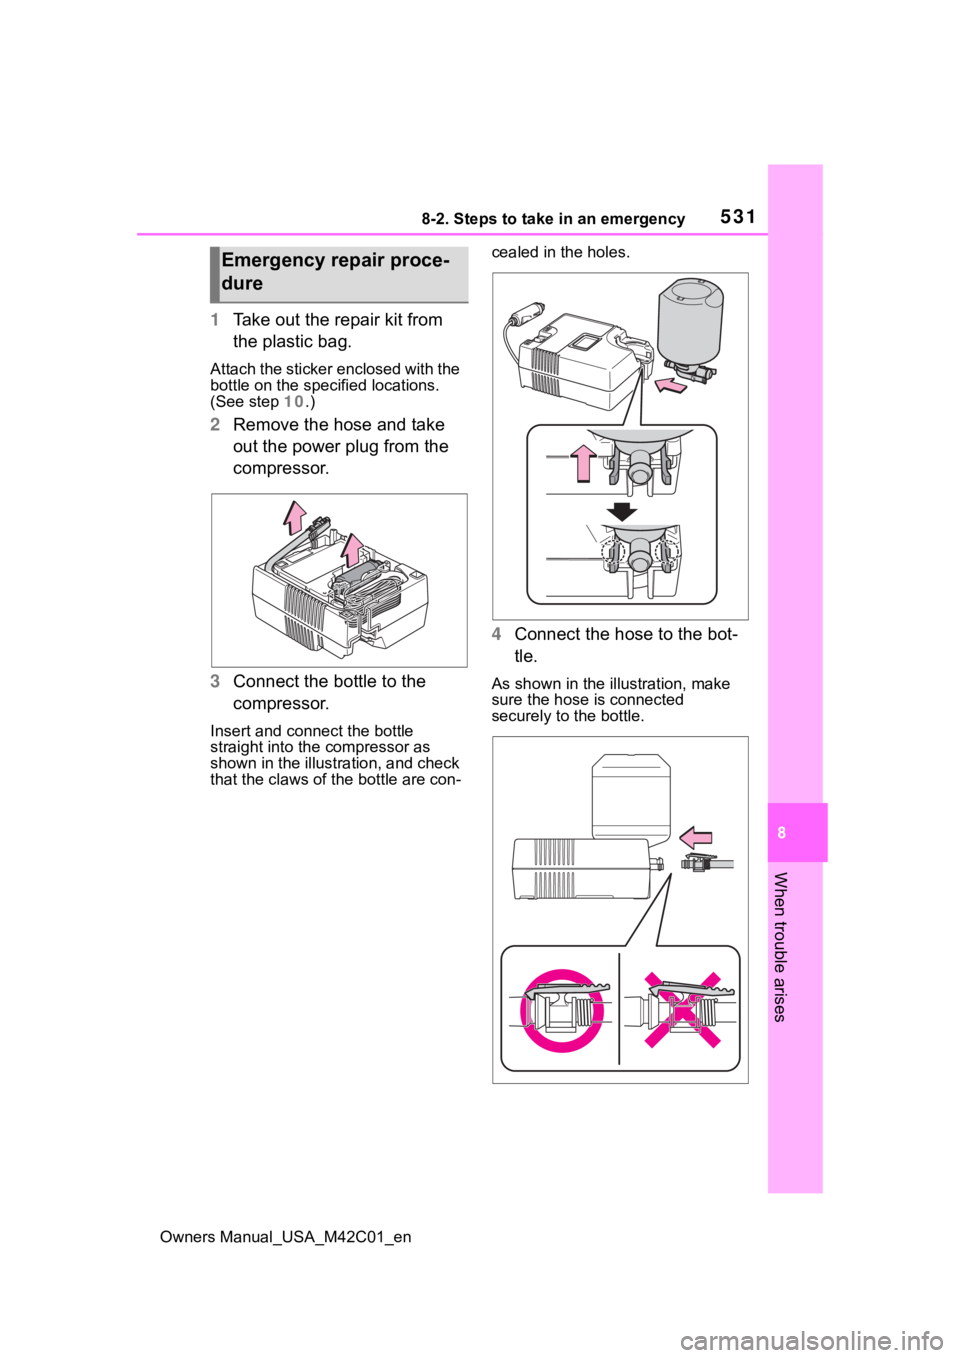
1 Take out the repair kit from
the plastic bag.
Attach the sticker enclosed with the
bottle on the specified locations.
(See step 10.)
2Remove the hose and take
out the power plug from the
compressor.
3 Connect the bottle to the
compressor.
Insert and connect the bottle
straight into the compressor as
shown in the illustration, and check
that the claws of t he bottle are con- cealed in the holes.
4
Connect the hose to the bot-
tle.
As shown in the illustration, make
sure the hose is connected
securely to the bottle.
Emergency repair proce-
dure
Page 532 of 628
5328-2. Steps to take in an emergency
Owners Manual_USA_M42C01_en
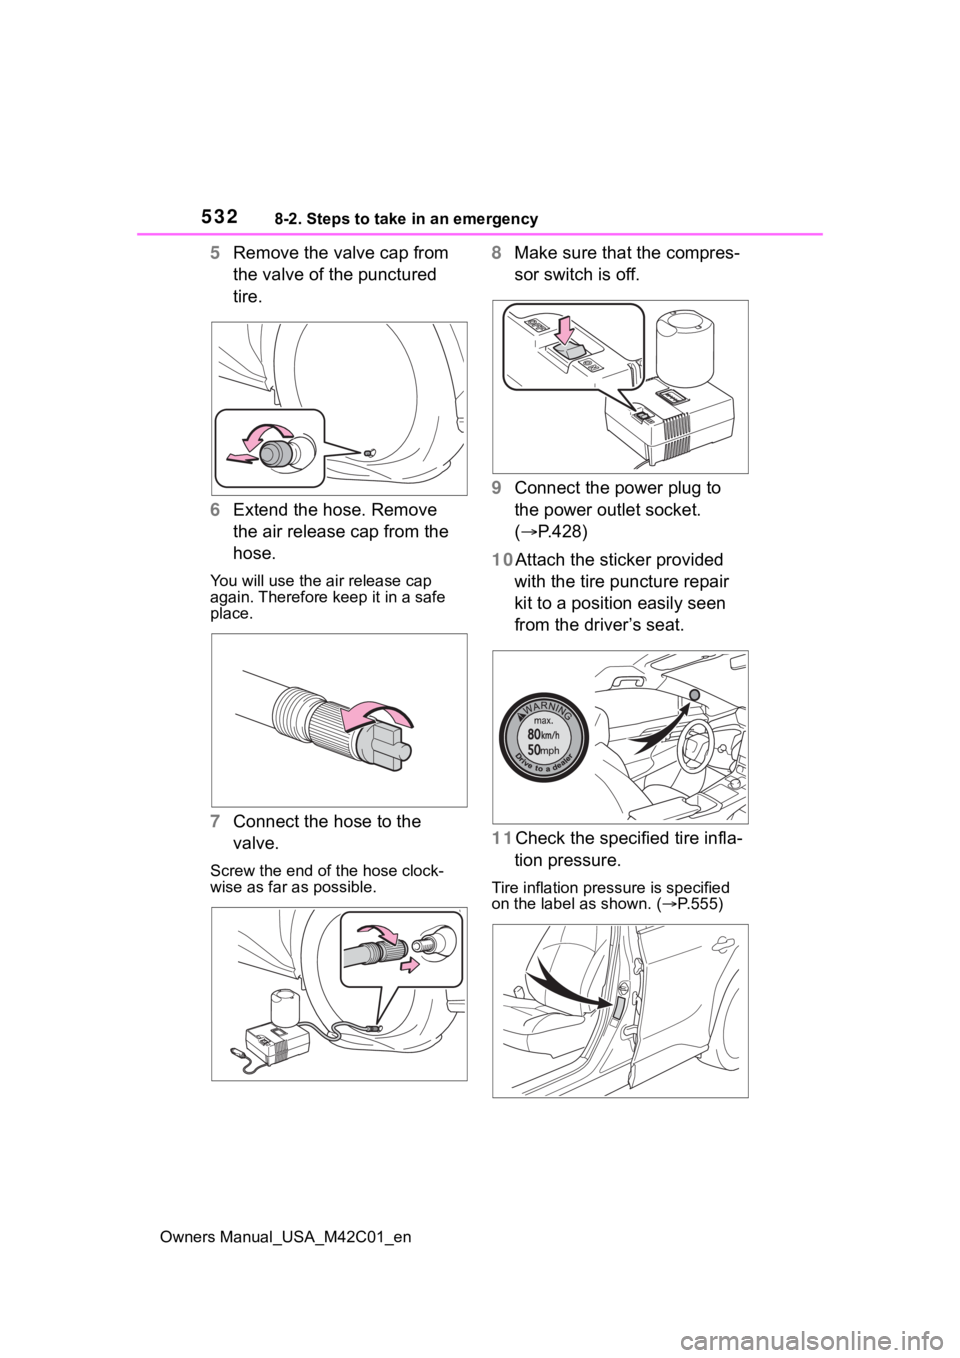
5Remove the valve cap from
the valve of the punctured
tire.
6 Extend the hose. Remove
the air release cap from the
hose.
You will use the air release cap
again. Therefore keep it in a safe
place.
7Connect the hose to the
valve.
Screw the end of the hose clock-
wise as far as possible.
8Make sure that the compres-
sor switch is off.
9 Connect the power plug to
the power outlet socket.
( P.428)
10Attach the sticker provided with the tire puncture repair
kit to a position easily seen
from the driver’s seat.
11Check the specified tire infla- tion pressure.
Tire inflation pressure is specified
on the label as shown. ( P.555)
Page 533 of 628
5338-2. Steps to take in an emergency
Owners Manual_USA_M42C01_en
8
When trouble arises
12 Start the EV system.
( P.231)
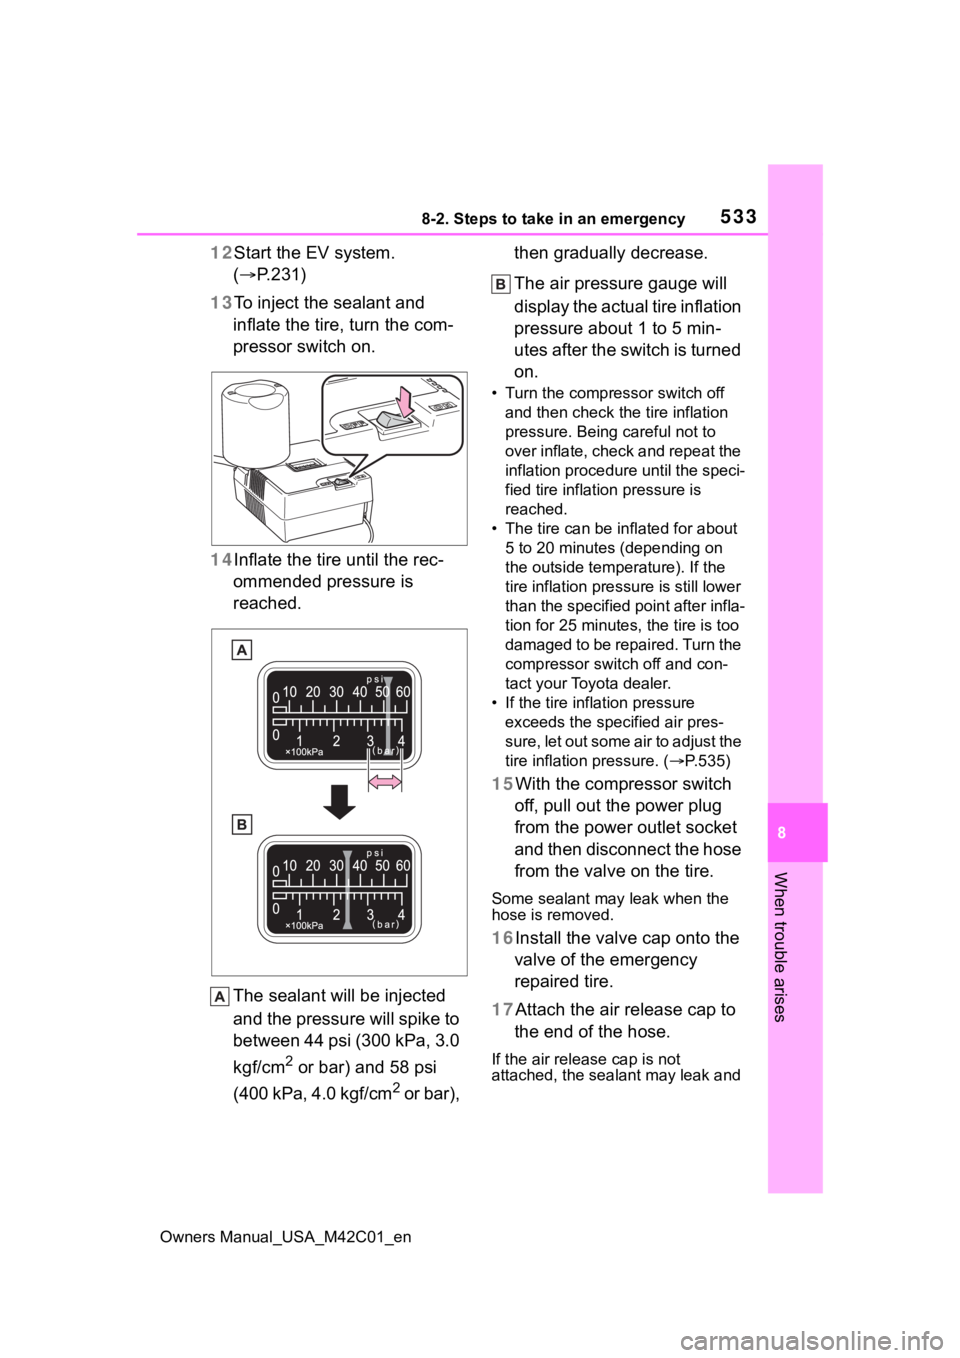
13 To inject the sealant and
inflate the tire, turn the com-
pressor switch on.
14 Inflate the tire until the rec-
ommended pressure is
reached.
The sealant will be injected
and the pressure will spike to
between 44 psi (300 kPa, 3.0
kgf/cm
2 or bar) and 58 psi
(400 kPa, 4.0 kgf/cm
2 or bar), then gradually decrease.
The air pressure gauge will
display the actual tire inflation
pressure about 1 to 5 min-
utes after the switch is turned
on.
• Turn the compressor switch off
and then check the tire inflation
pressure. Being careful not to
over inflate, check and repeat the
inflation procedure until the speci-
fied tire inflation pressure is
reached.
• The tire can be in flated for about
5 to 20 minutes (depending on
the outside temperature). If the
tire inflation press ure is still lower
than the specified point after infla-
tion for 25 minutes, the tire is too
damaged to be repaired. Turn the
compressor switch off and con-
tact your Toyota dealer.
• If the tire inflation pressure exceeds the spec ified air pres-
sure, let out some air to adjust the
tire inflation pressure. ( P.535)
15With the compressor switch
off, pull out the power plug
from the power outlet socket
and then disconnect the hose
from the valve on the tire.
Some sealant may leak when the
hose is removed.
16Install the valve cap onto the valve of the emergency
repaired tire.
17Attach the air release cap to the end of the hose.
If the air release cap is not
attached, the sealant may leak and
Page 534 of 628
5348-2. Steps to take in an emergency
Owners Manual_USA_M42C01_enthe vehicle ma
y get dirty.
18Temporarily store the bottle
in the luggage compartment
while it is connected to the
compressor.
19 To spread the liquid sealant
evenly within the tire, imme-
diately drive safely for about
3 miles (5 km) below 50 mph
(80 km/h).
20 After driving, stop your vehi-
cle in a safe place on a hard,
flat surface and reconnect
the repair kit.
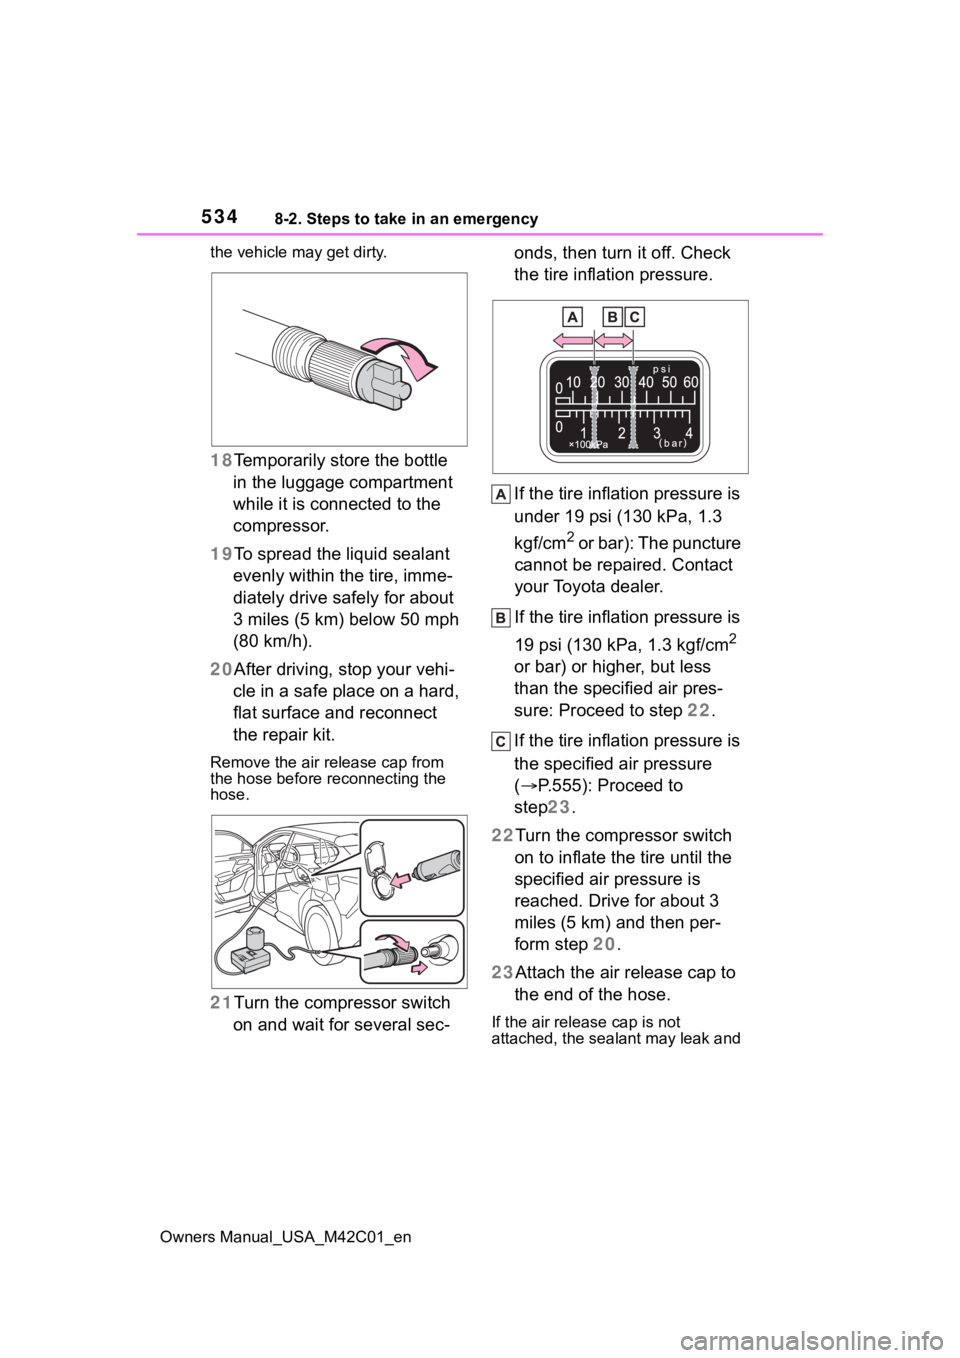
Remove the air release cap from
the hose before reconnecting the
hose.
21 Turn the compressor switch
on and wait for several sec- onds, then turn it off. Check
the tire inflation pressure.
If the tire inflation pressure is
under 19 psi (130 kPa, 1.3
kgf/cm
2 or bar): The puncture
cannot be repaired. Contact
your Toyota dealer.
If the tire inflation pressure is
19 psi (130 kPa, 1.3 kgf/cm
2
or bar) or higher, but less
than the specified air pres-
sure: Proceed to step 22.
If the tire inflation pressure is
the specified air pressure
( P.555): Proceed to
step 23.
22Turn the compressor switch on to inflate the tire until the
specified air pressure is
reached. Drive for about 3
miles (5 km) and then per-
form step 20.
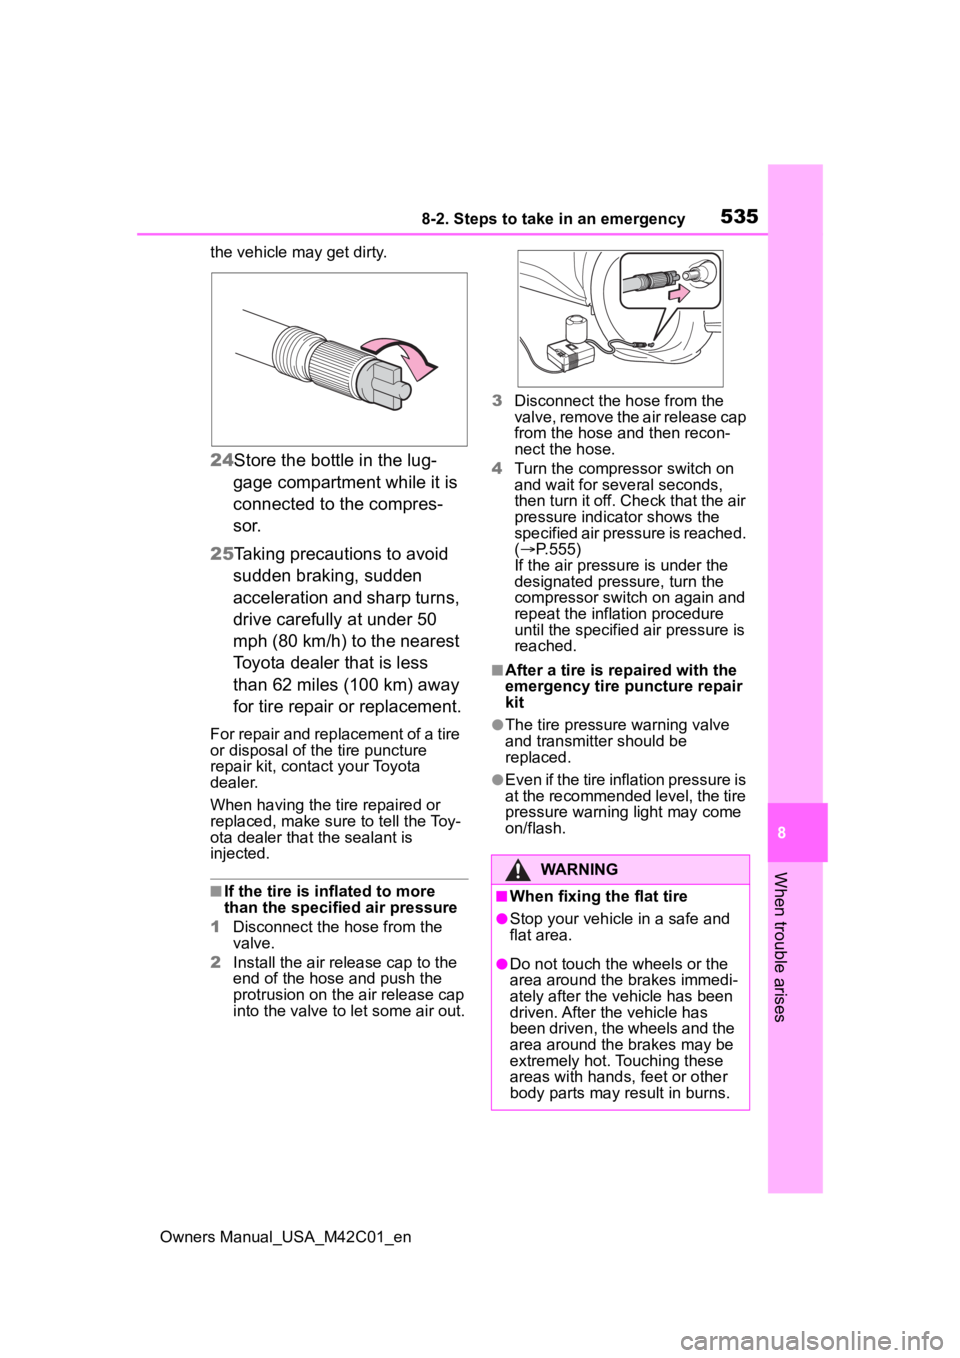
23Attach the air release cap to the end of the hose.
If the air release cap is not
attached, the sealant may leak and
Page 535 of 628
5358-2. Steps to take in an emergency
Owners Manual_USA_M42C01_en
8
When trouble arises
the vehicle ma y get dirty.
24Store the bottle in the lug-
gage compartment while it is
connected to the compres-
sor.
25 Taking precautions to avoid
sudden braking, sudden
acceleration and sharp turns,
drive carefully at under 50
mph (80 km/h) to the nearest
Toyota dealer that is less
than 62 miles (100 km) away
for tire repair or replacement.
For repair and replacement of a tire
or disposal of the tire puncture
repair kit, contact your Toyota
dealer.
When having the tire repaired or
replaced, make sure to tell the Toy-
ota dealer that the sealant is
injected.
■If the tire is i nflated to more
than the specified air pressure
1 Disconnect the hose from the
valve.
2 Install the air release cap to the
end of the hose and push the
protrusion on the air release cap
into the valve to let some air out. 3
Disconnect the hose from the
valve, remove the air release cap
from the hose and then recon-
nect the hose.
4 Turn the compressor switch on
and wait for seve ral seconds,
then turn it off. Check that the air
pressure indicator shows the
specified air pressure is reached.
( P.555)
If the air pressure is under the
designated pressure, turn the
compressor switch on again and
repeat the inflation procedure
until the specified air pressure is
reached.
■After a tire is re paired with the
emergency tire puncture repair
kit
●The tire pressure warning valve
and transmitter should be
replaced.
●Even if the tire inflation pressure is
at the recommended level, the tire
pressure warning light may come
on/flash.
WARNING
■When fixing the flat tire
●Stop your vehicle in a safe and
flat area.
●Do not touch the wheels or the
area around the brakes immedi-
ately after the vehicle has been
driven. After the vehicle has
been driven, the wheels and the
area around the brakes may be
extremely hot. Touching these
areas with hands, feet or other
body parts may result in burns.
Page 536 of 628
5368-2. Steps to take in an emergency
Owners Manual_USA_M42C01_en
WARNING
●Connect the valve and hose
securely with the tire installed
on the vehicle.
If the hose is not properly con-
nected to the valve, air leakage
may occur as sealant may be
sprayed out.
●If the hose comes off the valve
while inflating the tire, there is a
risk that the hose will move
abruptly due to air pressure.
●After inflation of the tire has
completed, the sealant may
splatter when the hose is dis-
connected or some air is let out
of the tire.
●Follow the operation procedure
to repair the tire. If the proce-
dure is not followed, the sealant
may spray out.
●Keep back from the tire while it
is being repaired, as there is a
chance of it bursting while the
repair operation is being per-
formed. If you notice any cracks
or deformation of the tire, turn
off the compressor switch and
stop the repair operation imme-
diately.
●The repair kit may overheat if
operated for a long period of
time. Do not operate the com-
pressor continuously for more
than 40 minutes.
●Parts of the repair kit become
hot during operation. Be careful
handling the repair kit during
and after operation. Do not
touch the metal part connecting
the bottle and the compressor. It
will be extremely hot.
●Do not attach the vehicle speed
warning sticker to an area other
than the one indicated. If the
sticker is attached to an area
where an SRS airbag is located,
such as the pad of the steering
wheel, it may prevent the SRS
air bag from operating properly.
■Driving to spread the liquid
sealant evenly
Observe the following precautions
to reduce the risk of accidents.
Failing to do so may result in a
loss of vehicle control and cause
death or serious injury.
●Drive the vehicle carefully at a
low speed. Be especially careful
when turning and cornering.
●If the vehicle does not drive
straight or you feel a pull
through the steering wheel, stop
the vehicle and check the fol-
lowing:
• Tire condition. The tire may have separated from the wheel.
• Tire inflation pressure. If the tire inflation pressure is 19 psi (130
kPa, 1.3 kgf/cm
2 or bar) or less,
the tire may be severely dam-
aged.
NOTICE
■When performing an emer-
gency repair
●Perform the emergency repair
without removing the nail or
screw that has punctured the
tread of the tire. If the object
that has punctur ed the tire is
removed, repair by the emer-
gency tire puncture repair kit
may not be possible.
●The repair kit is not waterproof.
Make sure that the repair kit is
not exposed to water, such as
when it is being used in the rain.
Page 537 of 628
5378-2. Steps to take in an emergency
Owners Manual_USA_M42C01_en
8
When trouble arises
One of the following may be the
cause of the problem:
The charging cable may be
connected to the vehicle.
( P.102)
The electronic key may not be
functioning properly.
*
( P.539)
The traction battery may be
completely discharged.
Charge the traction battery.
( P.98)
There may be a malfunction
in the immobilizer system.
*
( P.68)
There may be a malfunction
in the shift control system.
*
( P.233, 525)
The EV system may be mal-
functioning due to an electri-
cal problem such as
electronic key battery deple-
tion or a blown fuse. However,
NOTICE
●Do not put the repair kit directly
onto dusty ground such as sand
at the side of the road. If the
repair kit vacuums up dust, etc.,
a malfunction may occur.
●Make sure the sealant bottle of
the repair kit is in a vertical posi-
tion. The repair kit does not
operate properly when it is laid.
■Precautions for the emer-
gency tire puncture repair kit
●The repair kit power source
should be 12 V DC suitable for
vehicle use. Do not connect the
repair kit to any other source.
●Place the repair kit in a storage
to prevent it from being exposed
to dirt or water.
●Store the repair kit in the lug-
gage compartment out of reach
of children.
●Do not disassemble or modify
the repair kit. Do not subject
parts such as the air pressure
indicator to impacts. This may
cause a malfunction.
■To avoid damage to the tire
pressure warning valves and
transmitters
When a tire is repaired with liquid
sealants, the tire pressure warn-
ing valve and transmitter may not
operate properly. If a liquid seal-
ant is used, contact your Toyota
dealer or other qualified service
shop as soon as possible. After
use of liquid sealant, make sure to
replace the tire pressure warning
valve and transmitter when repair-
ing or replacing the tire. ( P.476)
If the EV system will
not star t
Reasons for the EV system
not starting vary depending
on the situation. Check the
following and perform the
appropriate procedure:
The EV system will not
start even though the cor-
rect starting procedure is
being followed ( P.231)
Page 538 of 628
5388-2. Steps to take in an emergency
Owners Manual_USA_M42C01_en
depending on the type of mal-
function, an interim measure
is available to start the EV
system. (P.538)
There is a possibility that the
temperature of the traction
battery is extremely low
(approximately below -22°F [-
30°C]). ( P.77, 232)
*: It may not be possible to shift the
shift position from P
One of the following may be the
cause of the problem:
The 12-volt battery may be
discharged. ( P.541)
The 12-volt battery terminal
connections may be loose or
corroded. ( P.468)
One of the following may be the
cause of the problem:
The 12-volt battery may be
discharged. ( P.541)
One or both of the 12-volt bat-
tery terminals may be discon-
nected. ( P.468)
Contact your Toyota dealer if the problem cannot be repaired, or if
repair procedures are unknown.
When the EV system does not
start, the following steps can be
used as an interim measure to
start the EV system if the power
switch is functioning normally.
Do not use this starting proce-
dure except in cases of emer-
gency.
1
Set the parking brake.
2 Turn the power switch to
ACC.
*
3Press and hold the power
switch for about 15 seconds
while depressing the brake
pedal firmly.
After pressing the power switch for
a while, a message regarding 12-
volt battery control will be dis-
played, however continuing press-
ing the switch.
Even if the EV system can be
started using the above steps,
the system may be malfunction-
ing. Have the vehicle inspected
by your Toyota dealer.
*: Setting can be customized.
( P.571)
The interior lights and
headlights are dim, or the
horn does not sound or
sounds at a low volume
The interior lights and
headlights do not turn on,
or the horn does not
sound
Starting the EV system in
an emergency
Page 539 of 628
5398-2. Steps to take in an emergency
Owners Manual_USA_M42C01_en
8
When trouble arises
■When the electronic key does
not work properly
●Make sure that the smart key sys-
tem has not been deactivated in
the customization setting. If it is
off, turn the function on.
(Customizable features: P.569)
●Check if battery-saving mode is
set. If it is set, cancel the function.
( P.188)
Use the mechanical key
( P.164) in order to perform the
following operations.
If you lose your keys
New genuine keys can be
made by your Toyota dealer
using the other key and the
key number stamped on
your key number plate.
Keep the plate in a safe
place such as your wallet,
not in the vehicle.
NOTICE
■When an electronic key is lost
If the electronic key remains lost,
the risk of vehicle theft increases
significantly. Visit your Toyota
dealer immediately with all
remaining electronic keys that
were provided wit h your vehicle.
If the electronic key
does not operate prop-
erly
If communication between
the electronic key and vehi-
cle is interrupted ( P.188)
or the electronic key cannot
be used because the battery
is depleted, the smart key
system and wireless remote
control cannot be used. In
such cases, the doors can
be opened and the EV sys-
tem can be started by fol-
lowing the procedure below.
NOTICE
■In case of a smart key system
malfunction, o r other key
related problems
Take your vehicle with all the elec-
tronic keys provided with your
vehicle to your Toyota dealer.
Locking and unlocking
the doors
Page 540 of 628
5408-2. Steps to take in an emergency
Owners Manual_USA_M42C01_en
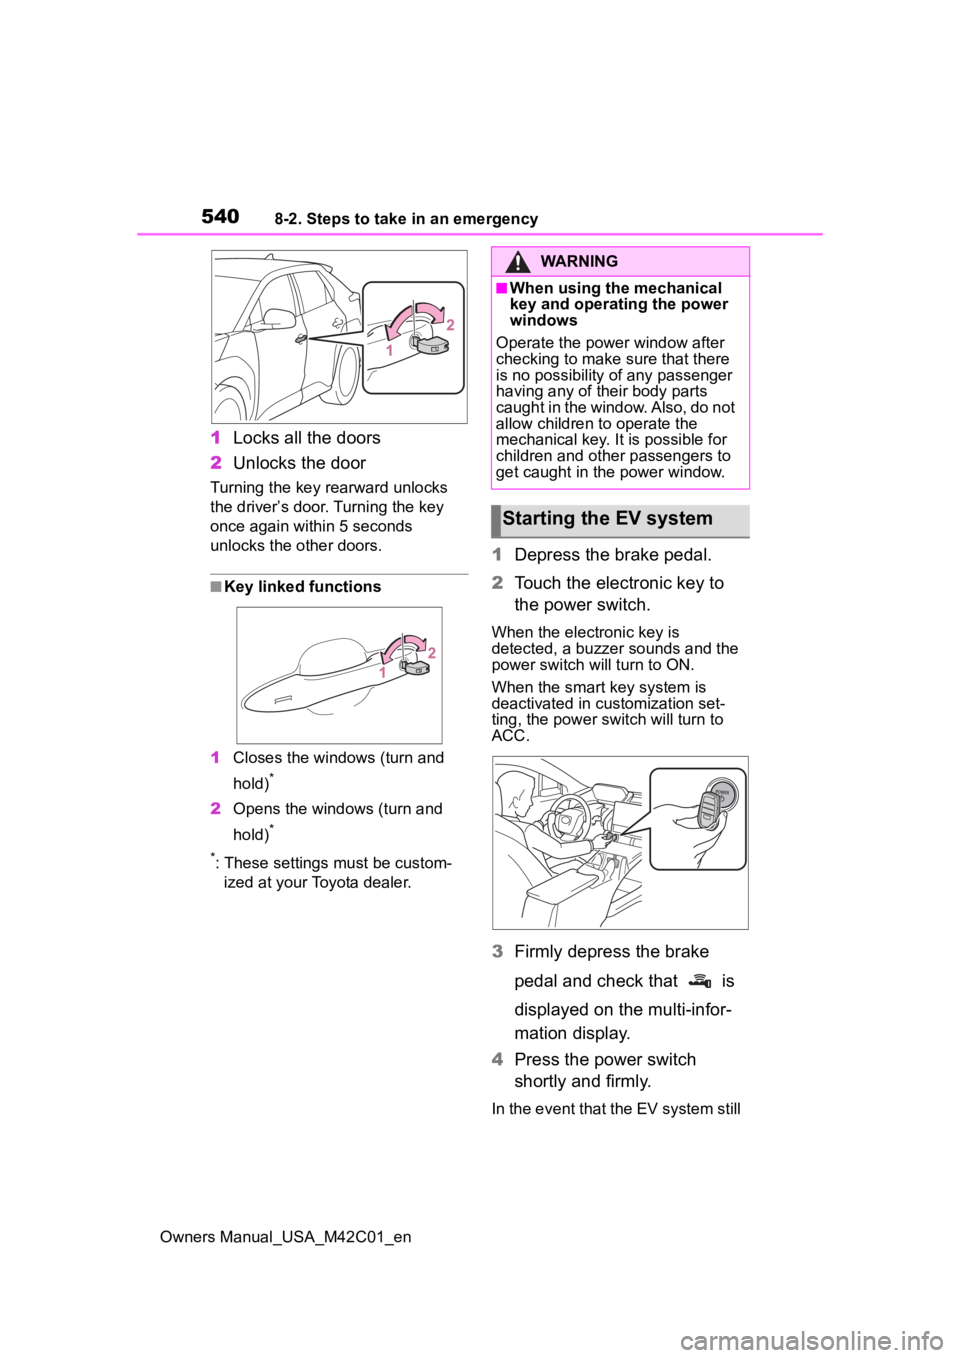
1Locks all the doors
2 Unlocks the door
Turning the key rearward unlocks
the driver’s door. Turning the key
once again within 5 seconds
unlocks the other doors.
■Key linked functions
1 Closes the windo ws (turn and
hold)
*
2 Opens the windows (turn and
hold)
*
*
: These settings must be custom- ized at your Toyota dealer.
1 Depress the brake pedal.
2 Touch the electronic key to
the power switch.
When the electronic key is
detected, a buzzer sounds and the
power switch will turn to ON.
When the smart key system is
deactivated in customization set-
ting, the power switch will turn to
ACC.
3Firmly depress the brake
pedal and check that is
displayed on the multi-infor-
mation display.
4 Press the power switch
shortly and firmly.
In the event that the EV system still
WARNING
■When using the mechanical
key and operating the power
windows
Operate the power window after
checking to make sure that there
is no possibility of any passenger
having any of their body parts
caught in the window. Also, do not
allow children to operate the
mechanical key. It is possible for
children and other passengers to
get caught in the power window.
Starting the EV system