window SUBARU TRIBECA 2008 Service Manual
[x] Cancel search | Manufacturer: SUBARU, Model Year: 2008, Model line: TRIBECA, Model: SUBARU TRIBECA 2008Pages: 409, PDF Size: 5.75 MB
Page 243 of 409
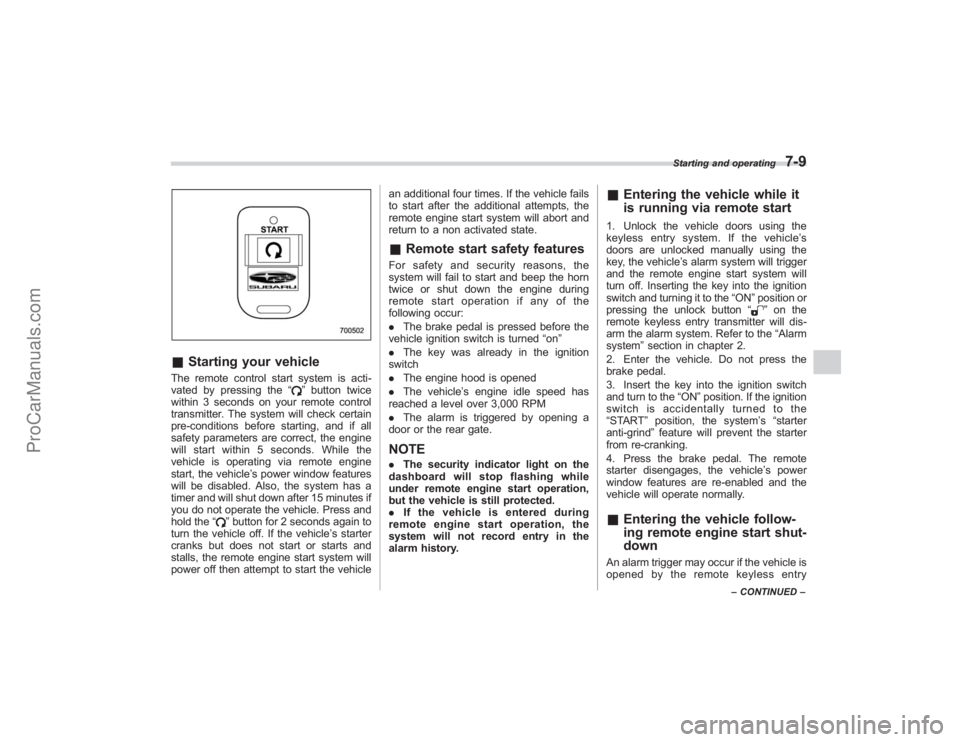
&Starting your vehicleThe remote control start system is acti-
vated by pressing the “
”button twice
within 3 seconds on your remote control
transmitter. The system will check certain
pre-conditions before starting, and if all
safety parameters are correct, the engine
will start within 5 seconds. While the
vehicle is operating via remote engine
start, the vehicle’ s power window features
will be disabled. Also, the system has a
timer and will shut down after 15 minutes if
you do not operate the vehicle. Press and
hold the “
”button for 2 seconds again to
turn the vehicle off. If the vehicle ’s starter
cranks but does not start or starts and
stalls, the remote engine start system will
power off then attempt to start the vehicle an additional four times. If the vehicle fails
to start after the additional attempts, the
remote engine start system will abort and
return to a non activated state.
&
Remote start safety featuresFor safety and security reasons, the
system will fail to start and beep the horn
twice or shut down the engine during
remote start operation if any of the
following occur:
. The brake pedal is pressed before the
vehicle ignition switch is turned “on ”
. The key was already in the ignition
switch
. The engine hood is opened
. The vehicle’ s engine idle speed has
reached a level over 3,000 RPM
. The alarm is triggered by opening a
door or the rear gate.NOTE. The security indicator light on the
dashboard will stop flashing while
under remote engine start operation,
but the vehicle is still protected.
. If the vehicle is entered during
remote engine start operation, the
system will not record entry in the
alarm history.
& Entering the vehicle while it
is running via remote start1. Unlock the vehicle doors using the
keyless entry system. If the vehicle ’s
doors are unlocked manually using the
key, the vehicle’ s alarm system will trigger
and the remote engine start system will
turn off. Inserting the key into the ignition
switch and turning it to the “ON”position or
pressing the unlock button “
”on the
remote keyless entry transmitter will dis-
arm the alarm system. Refer to the “Alarm
system ”section in chapter 2.
2. Enter the vehicle. Do not press the
brake pedal.
3. Insert the key into the ignition switch
and turn to the “ON”position. If the ignition
switch is accidentally turned to the
“START ”position, the system ’s “starter
anti-grind ”feature will prevent the starter
from re-cranking.
4. Press the brake pedal. The remote
starter disengages, the vehicle ’s power
window features are re-enabled and the
vehicle will operate normally.
& Entering the vehicle follow-
ing remote engine start shut-
downAn alarm trigger may occur if the vehicle is
opened by the remote keyless entry
Starting and operating
7-9
–CONTINUED –
ProCarManuals.com
Page 271 of 409
exhaust fumes are entering the
vehicle, have the problem
checked and corrected as soon
as possible. If you must drive
under these conditions, drive
only with all windows fully open.
. Keep the rear gate closed while
driving to prevent exhaust gas
from entering the vehicle.
NOTEDue to the expansion and contraction
of the metals used in the manufacture
of the exhaust system, you may hear a
crackling sound coming from the ex-
haust system for a short time after the
engine has been shut off. This sound is
normal.
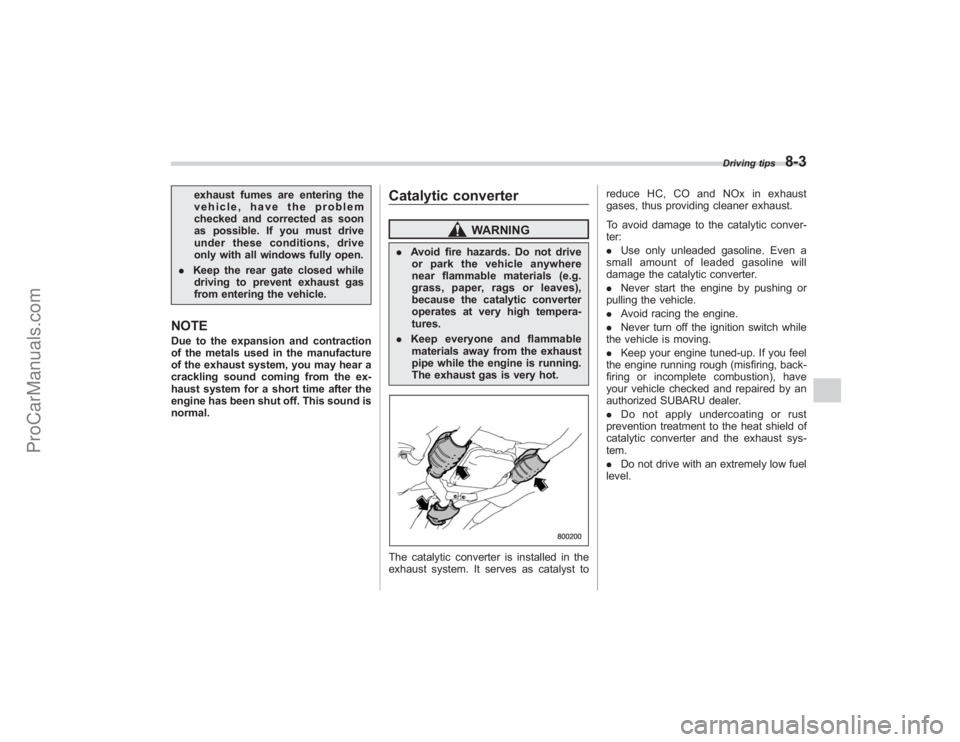
Catalytic converter
WARNING
. Avoid fire hazards. Do not drive
or park the vehicle anywhere
near flammable materials (e.g.
grass, paper, rags or leaves),
because the catalytic converter
operates at very high tempera-
tures.
. Keep everyone and flammable
materials away from the exhaust
pipe while the engine is running.
The exhaust gas is very hot.The catalytic converter is installed in the
exhaust system. It serves as catalyst to reduce HC, CO and NOx in exhaust
gases, thus providing cleaner exhaust.
To avoid damage to the catalytic conver-
ter:
.
Use only unleaded gasoline. Even a
small amount of leaded gasoline will
damage the catalytic converter.
. Never start the engine by pushing or
pulling the vehicle.
. Avoid racing the engine.
. Never turn off the ignition switch while
the vehicle is moving.
. Keep your engine tuned-up. If you feel
the engine running rough (misfiring, back-
firing or incomplete combustion), have
your vehicle checked and repaired by an
authorized SUBARU dealer.
. Do not apply undercoating or rust
prevention treatment to the heat shield of
catalytic converter and the exhaust sys-
tem.
. Do not drive with an extremely low fuel
level.
Driving tips
8-3
ProCarManuals.com
Page 275 of 409
underbody. Clear off any such matter from
the underbody. If the vehicle is used with
these materials trapped or adhering to the
underbody, a mechanical breakdown or
fire could occur.
.Secure all cargo carried inside the
vehicle and make certain that it is not
piled higher than the seatbacks. During
sudden stops or jolts, unsecured cargo
could be thrown around in the vehicle and
cause injury. Do not pile heavy loads on
the roof. Those loads raise the vehicle ’s
center of gravity and make it more prone
to tip over.
. If you must rock the vehicle to free it
from sand or mud, depress the accelerator
pedal slightly and move the selector lever
back and forth between “D ” and “R ”
repeatedly. Do not race the engine. For
the best possible traction, avoid spinning
the wheels when trying to free the vehicle.
. When the road surface is extremely
slippery, you can obtain better traction by
starting the vehicle with the transmission
in 2nd than 1st.
. Never equip your vehicle with tires
larger than those specified in this manual.
. Wash the vehicle ’s underbody after off-
road driving. Suspension components are
particularly prone to dirt buildup, so they
need to be washed thoroughly.
. Frequent driving of an AWD vehicle under hard-driving conditions such as
rough roads or off roads will necessitate
more frequent replacement of engine oil,
brake fluid and transmission oil than that
specified in the maintenance schedule
described in the
“Warranty and Mainte-
nance Booklet ”.
Remember that damage done to your
SUBARU while operating it off-road and
not using common sense precautions
such as those listed above is not eligible
for warranty coverage.
Winter driving& Operation during cold
weatherCarry some emergency equipment, such
as tire chains, a window scraper, a bag of
sand, flares, a small shovel, and jumper
cables.
Check the battery and cables. Cold
temperatures reduce battery capacity.
The battery must be in good condition to
provide enough power for cold winter
starts.
Use an engine oil of proper grade and
viscosity for cold weather. Heavy summer
oil will cause harder starting.
Keep the door locks from freezing by
Driving tips
8-7
–CONTINUED –
ProCarManuals.com
Page 277 of 409
and brake hoses underneath the vehicle.
If there is caked snow or ice, remove it,
being careful not to damage the disc
brakes and brake hoses and ABS har-
ness.
!Refueling in cold weather
To help prevent moisture from forming in
the fuel system and the risk of its freezing,
use of an antifreeze additive in the fuel
tank is recommended during cold weather.
Use only additives that are specifically
designed for this purpose. When an
antifreeze additive is used, its effect lasts
longer if the tank is refilled whenever the
fuel level reaches half empty.
If your SUBARU is not going to be used
for an extended period, it is best to have
the fuel tank filled to capacity.& Driving on snowy and icy
roads
WARNING
Do not use the cruise control on
slippery roads such as snowy or icy
roads. This may cause loss of
vehicle control.
CAUTION
Avoid prolonged continuous driving
in snowstorms. Snow will enter the
engine ’sintakesystemandmay
hinder the air flow, which could
result in engine shutdown or even
breakdown.
To prevent skidding and slipping, avoid
sudden braking, abrupt acceleration, high-
speed driving, and sharp turning when
driving on snowy or icy roads.
Always maintain ample distance between
your vehicle and the vehicle ahead of you
to avoid the need for sudden braking.
To supplement the foot brake, use the
engine brake effectively to control the
vehicle speed. (Shift into a lower gear
when necessary.)
Avoid shifting down abruptly. Such beha-
vior can cause the wheels to lock, possibly
leading to loss of vehicle control.
An anti-lock brake system (ABS) en-
hances your vehicle ’s braking perfor-
mance on snowy and icy roads. Refer to
the “ABS (Anti-lock Brake System) ”and
“Vehicle Dynamics Control system ”sec-
tion in chapter 7 for information on braking
on slippery surfaces. !
Wiper operation when snowing
Before driving in cold weather, make sure
the wiper blades are not frozen to the
windshield or rear window. If the wiper
blades are frozen to the windshield or rear
window, use the defroster with the airflow
control button in the “
”position and the
temperature control dial set for maximum
warmth until the wiper blades are com-
pletely thawed out. If your vehicle is
equipped with a wiper deicer, it is helpful
to thaw the windshield wiper blades. To
thaw out the rear wiper blade, use the rear
window defogger.
When driving in snow, if frozen snow starts
to stick on the surface of the windshield
despite wiper operation, use the defroster
with the airflow control button in “
”and
the temperature control dial set for max-
imum warmth. After the windshield gets
warmed enough to melt the frozen snow
on it, wash it away using the windshield
washer.
Snow stuck on the wiper arm prevents the
wiper from working effectively. If snow is
stuck on the wiper arm, pull off the road to
a safe place, then remove it. If you stop
the vehicle at road side, use the hazard
warning flasher to alert other drivers.
We recommend use of non-freezing type
Driving tips
8-9
– CONTINUED –
ProCarManuals.com
Page 318 of 409
10-2
Appearance care
Exterior care&Washing
CAUTION
. When washing the vehicle, the
brakes may get wet. As a result,
the brake stopping distance will
be longer. To dry the brakes,
drive the vehicle at a safe speed
while lightly pressing the brake
pedal to heat up the brakes.
. Do not wash the engine compart-
ment and areas adjacent to it. If
water enters the engine air in-
take, electrical parts or the power
steering fluid reservoir, it will
cause engine trouble or faulty
power steering respectively. .
Since your vehicle is equipped
with a rear wiper, automatic car-
wash brushes could become
tangled around it, damaging the
wiper arm and other compo-
nents. Ask the automatic car-
wash operator not to let the
brushes touch the wiper arm or
to fix the wiper arm on the rear
window glass with adhesive tape
before operating the machine.
NOTEWhen having your vehicle washed in
an automatic car wash, make sure
beforehand that the car wash is of
suitable type.
The best way to preserve your vehicle’ s
beauty is frequent washing. Wash the
vehicle at least once a month to avoid
contamination by road grime.
Wash dirt off with a wet sponge and plenty
of lukewarm or cold water. Do not wash
the vehicle with hot water and in direct
sunlight.
Salt, chemicals, insects, tar, soot, tree
sap, and bird droppings should be washed
off by using a light detergent, as required.
If you use a light detergent, make certain
that it is a neutral detergent. Do not use strong soap or chemical detergents. All
cleaning agents should be promptly
flushed from the surface and not allowed
to dry there. Rinse the vehicle thoroughly
with plenty of lukewarm water. Wipe the
remaining water off with a chamois or soft
cloth.
!
Washing the underbody
Chemicals, salts and gravel used for
deicing road surfaces are extremely cor-
rosive, accelerating the corrosion of un-
derbody components, such as the exhaust
system, fuel and brake lines, brake
cables, floor pan and fenders, and sus-
pension.
Thoroughly flush the underbody and in-
side of the fenders with lukewarm or cold
water at frequent intervals to reduce the
harmful effects of such agents.
Mud and sand adhering to the underbody
components may accelerate their corro-
sion.
After driving off-road or muddy or sandy
roads, wash the mud and sand off the
underbody.
Carefully flush the suspension and axle
parts, as they are particularly prone to
mud and sand buildup. Do not use a
sharp-edged tool to remove caked mud.
ProCarManuals.com
Page 321 of 409
Cleaning the interiorUse a soft, damp cloth to clean the climate
control panel, audio equipment, instru-
ment panel, center console, combination
meter panel, and switches. (Do not use
organic solvents.)&Seat fabricRemove loose dirt, dust or debris with a
vacuum cleaner. If the dirt is caked on the
fabric or hard to remove with a vacuum
cleaner, use a soft blush then vacuum it.
Wipe the fabric surface with a tightly
wrung cloth and dry the seat fabric
thoroughly. If the fabric is still dirty, wipe
using a solution of mild soap and luke-
warm water then dry thoroughly.
If the stain does not come out, try a
commercially-available fabric cleaner. Use
the cleaner on a hidden place and make
sure it does not affect the fabric adversely.
Use the cleaner according to its instruc-
tions.NOTEWhen cleaning the seat, do not use
benzine, paint thinner, or any similar
materials.
&Leather seat materialsThe leather used by SUBARU is a high
quality natural product which will retain its
distinctive appearance and feel for many
years with proper care.
Allowing dust or road dirt to build up on the
surface can cause the material to become
brittle and to wear prematurely. Regular
cleaning with a soft, moist, natural fiber
cloth should be performed monthly, taking
care not to soak the leather or allow water
to penetrate the stitched seams.
A mild detergent suitable for cleaning
woolen fabrics may be used to remove
difficult dirt spots, rubbing with a soft, dry
cloth afterwards to restore the luster. If
your SUBARU is to be parked for a long
time in bright sunlight, it is recommended
that the seats and headrests be covered,
or the windows shaded, to prevent fading
or shrinkage.
Minor surface blemishes or bald patches
may be treated with a commercial leather
spray lacquer. You will discover that each
leather seat section will develop soft folds
or wrinkles, which is characteristic of
genuine leather.&Synthetic leather upholsteryThe synthetic leather material used on the
SUBARU may be cleaned using mild soap or detergent and water, after first vacuum-
ing or brushing away loose dirt. Allow the
soap to soak in for a few minutes and wipe
off with a clean, damp cloth. Commercial
foam-type cleaners suitable for synthetic
leather materials may be used when
necessary.
NOTEStrong cleaning agents such as sol-
vents, paint thinners, window cleaner
or gasoline must never be used on
leather or synthetic interior materials.&
Climate control panel, audio
panel, instrument panel,
console panel, switches,
combination meter, and other
plastic surfaceUse a soft, damp cloth to clean the climate
control panel, audio equipment, instru-
ment panel, center console, combination
meter panel, and switches.NOTEDo not use organic solvents such as
paint thinners or gasoline, or strong
cleaning agents that contain those
solvents.
Appearance care
10-5
–CONTINUED –
ProCarManuals.com
Page 324 of 409
Maintenance and serviceReplacement of wiper blades...................... 11-33
Windshield wiper blade assembly .................. 11-33
Windshield wiper blade rubber ...................... 11-34
Rear window wiper blade assembly ............... 11-35
Rear window wiper blade rubber .................... 11-35
Battery........................................................... 11-37
Fuses ............................................................ 11-38
Main fuse ...................................................... 11-39
Installation of accessories ........................... 11-40
Replacing bulbs ........................................... 11-41
Headlights (Vehicles with HID headlights) ...... 11-42
Headlights (Vehicles without HID headlights) .................................................. 11-43
Parking light (right-hand side) ........................ 11-44 Front turn signal light (right-hand side)
......... 11-45
Front fog light ............................................... 11-45
Rear combination lights ................................ 11-46
Back-up light/Tail light .................................. 11-47
Rear gate light .............................................. 11-47
License plate light ........................................ 11-47
Dome light .................................................... 11-48
Map light ...................................................... 11-49
Vanity mirror light ......................................... 11-49
Door step light .............................................. 11-50
Cargo area light ............................................ 11-50
ProCarManuals.com
Page 355 of 409
concentration to the outside temperature.
If you fill the reservoir tank with a fluid with
a different concentration from the one
used previously, purge the old fluid from
the piping between the reservoir tank and
washer nozzles by operating the washer
for a certain period of time. Otherwise, if
the concentration of the fluid remaining in
thepipingistoolowfortheoutside
temperature, it may freeze and block the
nozzles.
CAUTION
Adjust the washer fluid concentra-
tion appropriately for the outside
temperature. If the concentration is
inappropriate, sprayed washer fluid
may freeze on the windshield and
obstruct your view, and the fluid
may freeze in the reservoir tank.
Replacement of wiper bladesGrease, wax, insects, or other materials
on the windshield or the wiper blade
results in jerky wiper operation and streak-
ing on the glass. If you cannot remove the
streaks after operating the windshield
washer or if the wiper operation is jerky,
clean the outer surface of the windshield
(or rear window) and the wiper blades
using a sponge or soft cloth with a neutral
detergent or mild-abrasive cleaner. After
cleaning, rinse the windshield and wiper
blades with clean water. The windshield is
clean if beads do not form when you rinse
the windshield with water.
CAUTION
.Do not clean the wiper blades
with gasoline or a solvent, such
as paint thinner or benzine. This
will cause deterioration of the
wiper blades.
. Whenyouwishtoraisethe
passenger-side wiper arm, first
raise the driver-side wiper arm.
Otherwise, the passenger-side
wiper assembly and driver-side
wiper assembly will touch each
other, possibly resulting in
scratches. .
Return the passenger-side wiper
arm to its original position before
returning the driver-side wiper
arm to its original position.
Otherwise, the passenger-side
wiper assembly and driver-side
wiper assembly will touch each
other, possibly resulting in
scratches.
If you cannot eliminate the streaking even
after following this method, replace the
wiper blades using the following proce-
dures. Be sure to use genuine SUBARU
wiper blade rubbers as replacements.
& Windshield wiper blade as-
sembly1. Raise the windshield wiper arm on the
driver ’s side.
2. Next, raise the windshield wiper arm
on the passenger ’s side.
Maintenance and service
11-33
– CONTINUED –
ProCarManuals.com
Page 357 of 409
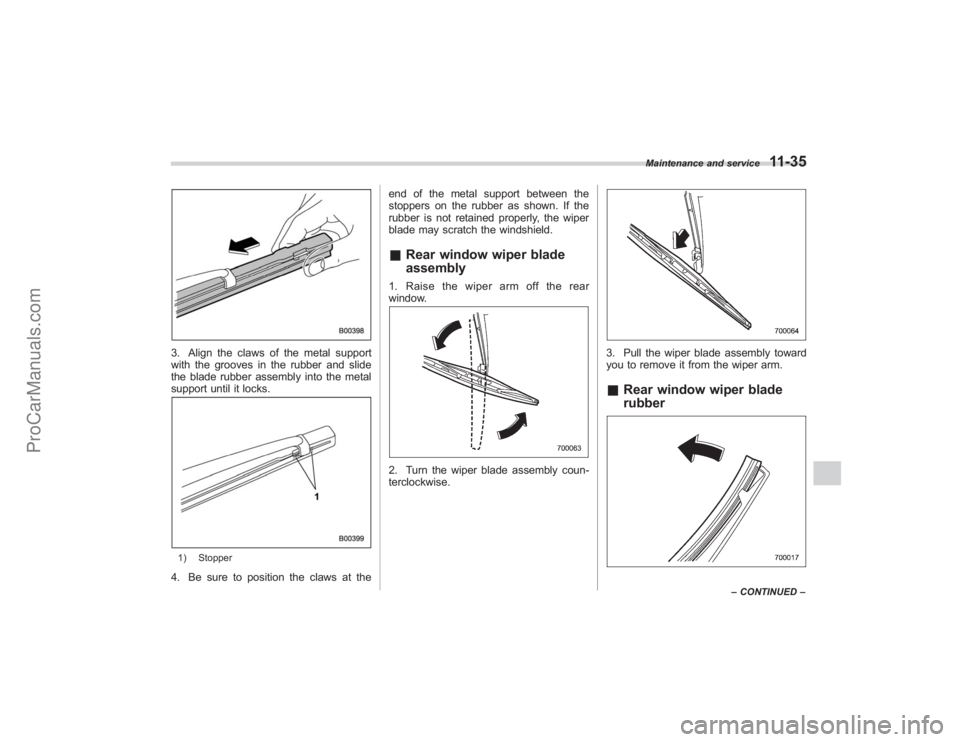
3. Align the claws of the metal support
with the grooves in the rubber and slide
the blade rubber assembly into the metal
support until it locks.1) Stopper4. Be sure to position the claws at theend of the metal support between the
stoppers on the rubber as shown. If the
rubber is not retained properly, the wiper
blade may scratch the windshield.
&
Rear window wiper blade
assembly1. Raise the wiper arm off the rear
window.2. Turn the wiper blade assembly coun-
terclockwise.
3. Pull the wiper blade assembly toward
you to remove it from the wiper arm.&Rear window wiper blade
rubber
Maintenance and service
11-35
–CONTINUED –
ProCarManuals.com
Page 358 of 409
11-36
Maintenance and service
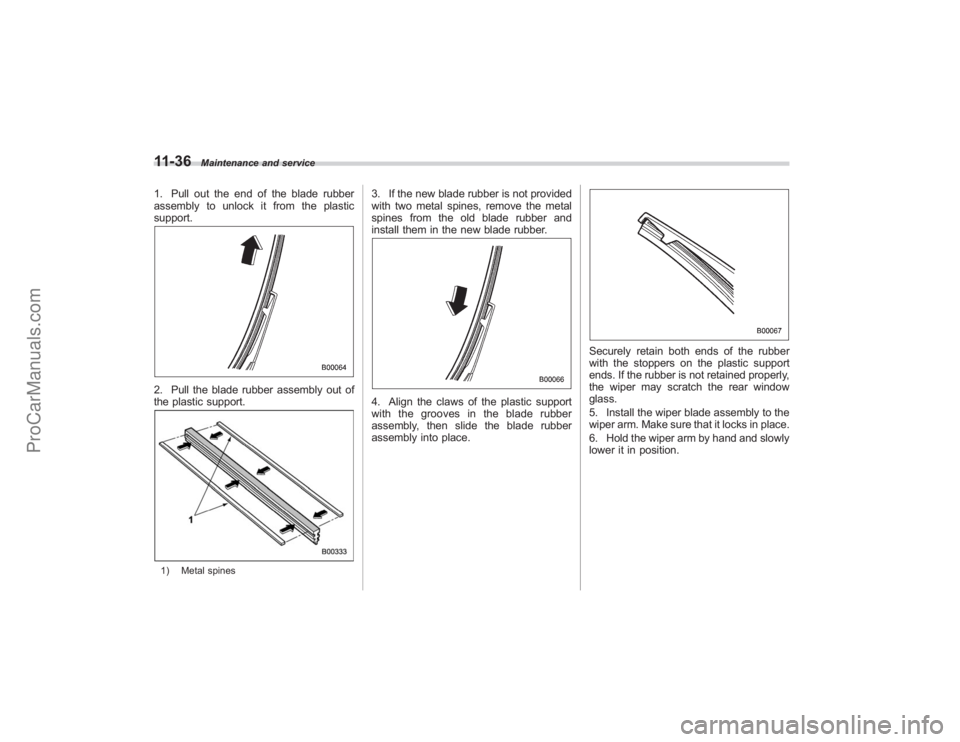
1. Pull out the end of the blade rubber
assembly to unlock it from the plastic
support.2. Pull the blade rubber assembly out of
the plastic support.1) Metal spines
3. If the new blade rubber is not provided
with two metal spines, remove the metal
spines from the old blade rubber and
install them in the new blade rubber.4. Align the claws of the plastic support
with the grooves in the blade rubber
assembly, then slide the blade rubber
assembly into place.
Securely retain both ends of the rubber
with the stoppers on the plastic support
ends. If the rubber is not retained properly,
the wiper may scratch the rear window
glass.
5. Install the wiper blade assembly to the
wiper arm. Make sure that it locks in place.
6. Hold the wiper arm by hand and slowly
lower it in position.
ProCarManuals.com