power window SUBARU TRIBECA 2009 1.G Service Workshop Manual
[x] Cancel search | Manufacturer: SUBARU, Model Year: 2009, Model line: TRIBECA, Model: SUBARU TRIBECA 2009 1.GPages: 2453, PDF Size: 46.32 MB
Page 252 of 2453
EI-10
General Description
EXTERIOR/INTERIOR TRIM
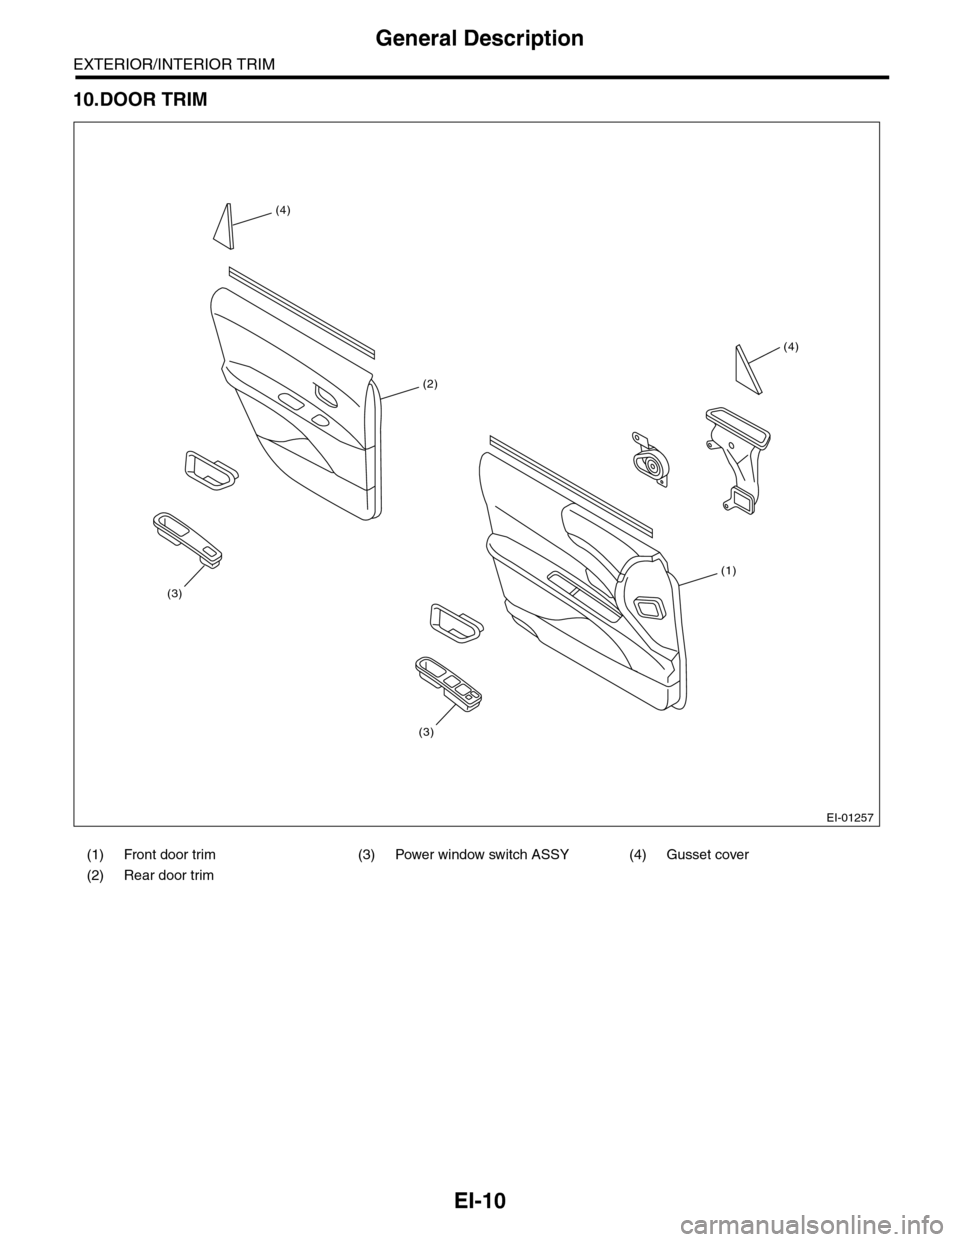
10.DOOR TRIM
(1) Front door trim (3) Power window switch ASSY (4) Gusset cover
(2) Rear door trim
EI-01257
(1)
(2)
(4)
(3)
(3)
(4)
Page 277 of 2453
EI-35
Door Trim
EXTERIOR/INTERIOR TRIM
12.Door Trim
A: REMOVAL
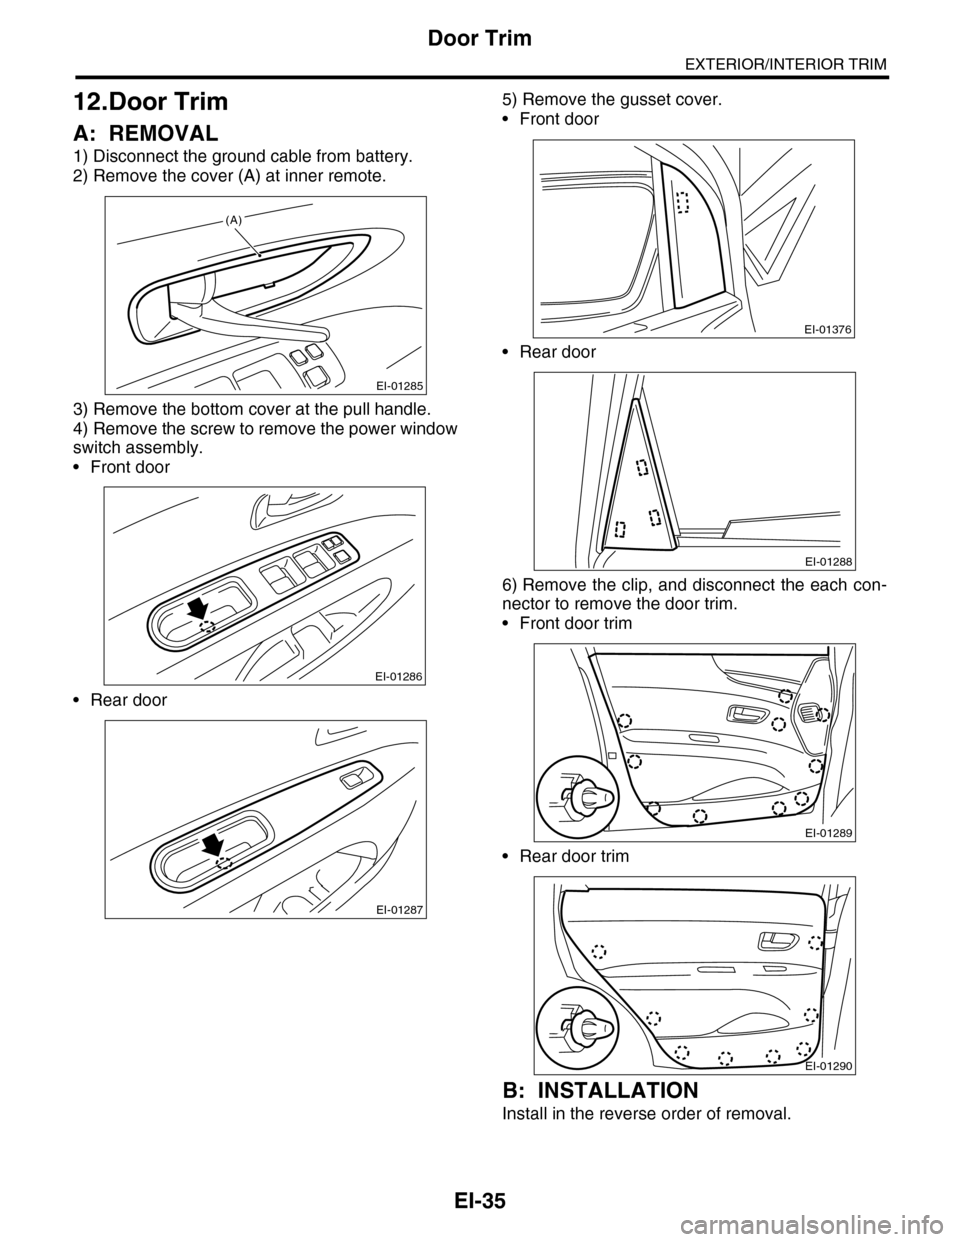
1) Disconnect the ground cable from battery.
2) Remove the cover (A) at inner remote.
3) Remove the bottom cover at the pull handle.
4) Remove the screw to remove the power window
switch assembly.
•Front door
•Rear door
5) Remove the gusset cover.
•Front door
•Rear door
6) Remove the clip, and disconnect the each con-
nector to remove the door trim.
•Front door trim
•Rear door trim
B: INSTALLATION
Install in the reverse order of removal.
EI-01285
(A)
EI-01286
EI-01287
EI-01376
EI-01288
EI-01289
EI-01290
Page 301 of 2453
GW-6
Power Window System
GLASS/WINDOWS/MIRRORS
2. Power Window System
A: WIRING DIAGRAM
B: INSPECTION
Symptom Repair order
All power windows do not operate.
1. Fuse (SBF-4)
2. Power window circuit breaker
3. Power window relay
4. Wiring Harness
5. Body integrated unit
Par ticular window does not operate.
1. Power window main switch
2. Power window sub switch
3. Power window motor
4. Wiring Harness
“Window Lock” does not operate. Power window main switch
Page 302 of 2453
GW-7
Power Window Control Switch
GLASS/WINDOWS/MIRRORS
3. Power Window Control
Switch
A: REMOVAL
1. MAIN SWITCH
1) Disconnect the ground cable from battery.
2) Peel the cover inside the hand grip, and remove
the screw.
3) Remove the power window switch cover assem-
bly.
4) Disconnect the harness connector.
5) Remove the clip, and remove the power window
main switch assembly.
2. SUB SWITCH
1) Disconnect the ground cable from battery.
2) Peel the cover inside the hand grip, and remove
the screw.
3) Remove the power window switch cover assem-
bly.
4) Disconnect the connector.
5) Detach the claw and remove the power window
sub switch.
B: INSTALLATION
Install in the reverse order of removal.
C: INSPECTION
1. MAIN SWITCH
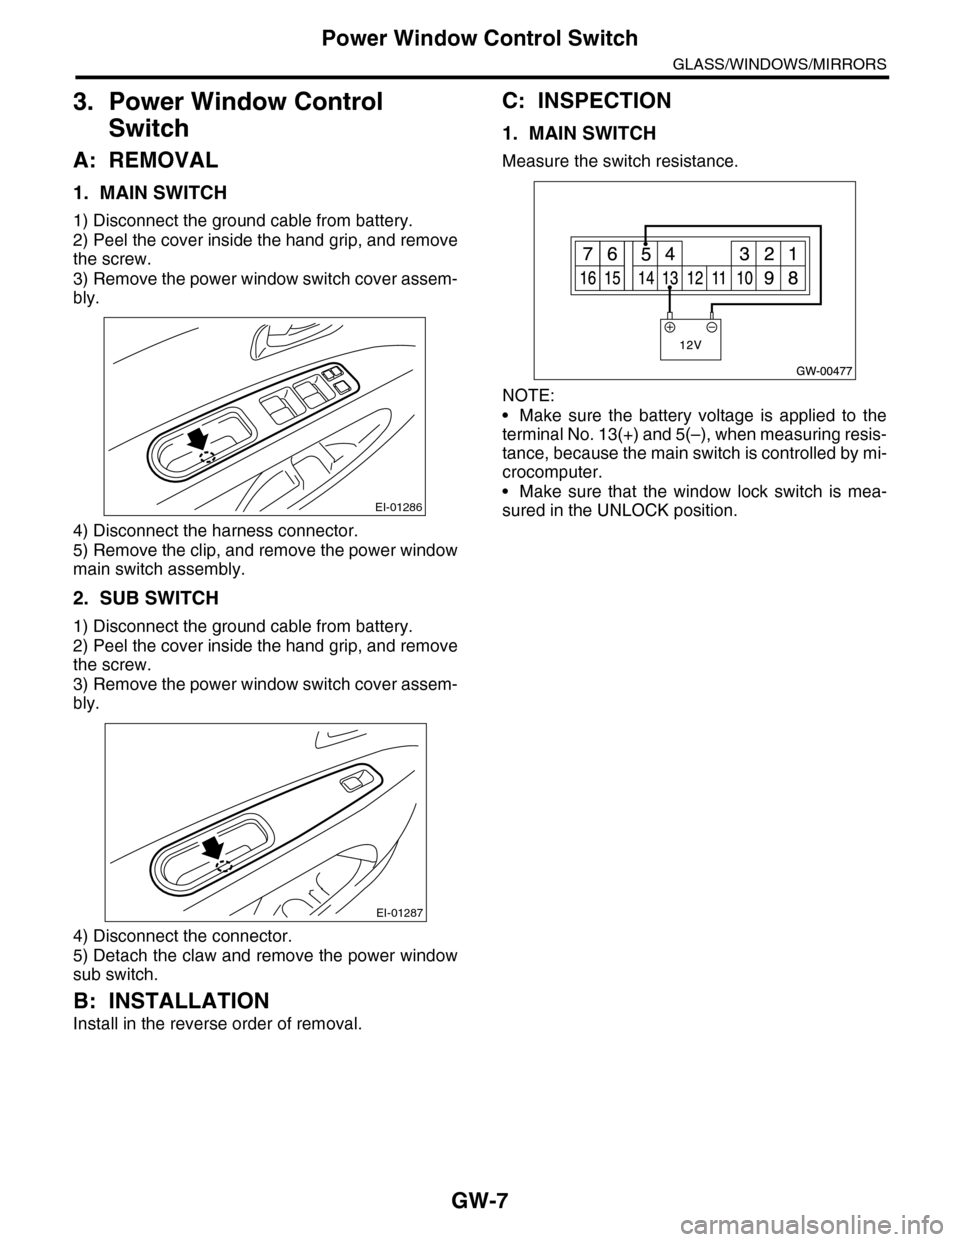
Measure the switch resistance.
NOTE:
•Make sure the battery voltage is applied to the
terminal No. 13(+) and 5(–), when measuring resis-
tance, because the main switch is controlled by mi-
crocomputer.
•Make sure that the window lock switch is mea-
sured in the UNLOCK position.EI-01286
EI-01287
Page 303 of 2453
GW-8
Power Window Control Switch
GLASS/WINDOWS/MIRRORS
Replace the main switch if faulty.
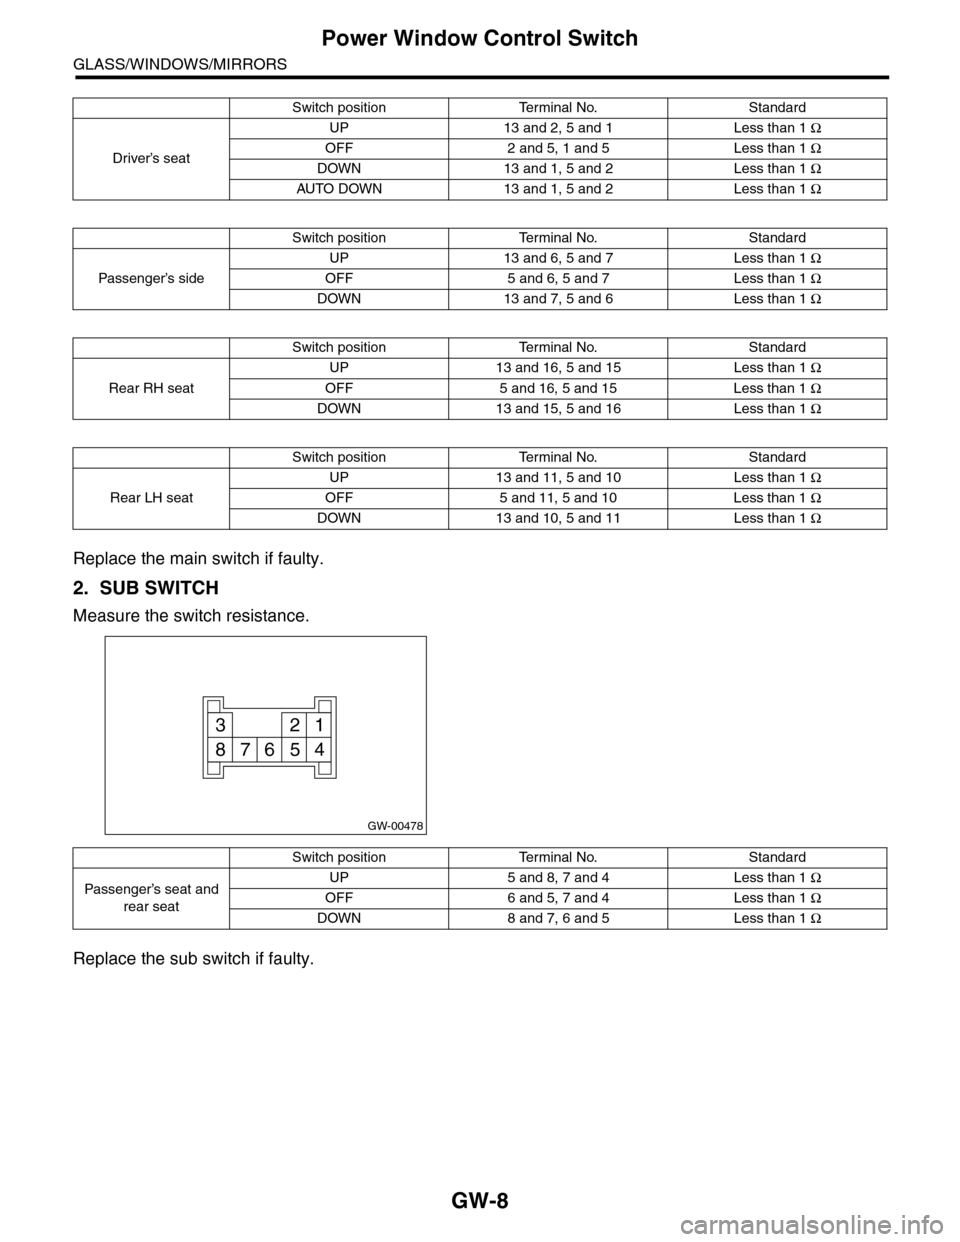
2. SUB SWITCH
Measure the switch resistance.
Replace the sub switch if faulty.
Switch positionTerminal No.Standard
Driver’s seat
UP 13 and 2, 5 and 1 Less than 1 Ω
OFF 2 and 5, 1 and 5 Less than 1 Ω
DOWN 13 and 1, 5 and 2 Less than 1 Ω
AUTO DOWN 13 and 1, 5 and 2 Less than 1 Ω
Switch positionTerminal No.Standard
Passenger’s side
UP 13 and 6, 5 and 7 Less than 1 Ω
OFF 5 and 6, 5 and 7 Less than 1 Ω
DOWN 13 and 7, 5 and 6 Less than 1 Ω
Switch positionTerminal No.Standard
Rear RH seat
UP 13 and 16, 5 and 15 Less than 1 Ω
OFF 5 and 16, 5 and 15 Less than 1 Ω
DOWN 13 and 15, 5 and 16 Less than 1 Ω
Switch positionTerminal No.Standard
Rear LH seat
UP 13 and 11, 5 and 10 Less than 1 Ω
OFF 5 and 11, 5 and 10 Less than 1 Ω
DOWN 13 and 10, 5 and 11 Less than 1 Ω
GW-00478
123
45678
Switch positionTerminal No.Standard
Passenger’s seat and
rear seat
UP 5 and 8, 7 and 4 Less than 1 Ω
OFF 6 and 5, 7 and 4 Less than 1 Ω
DOWN 8 and 7, 6 and 5 Less than 1 Ω
Page 304 of 2453
GW-9
Front Door Glass
GLASS/WINDOWS/MIRRORS
4. Front Door Glass
A: REMOVAL
1) Remove the front door trim.
2) Remove the sealing cover.
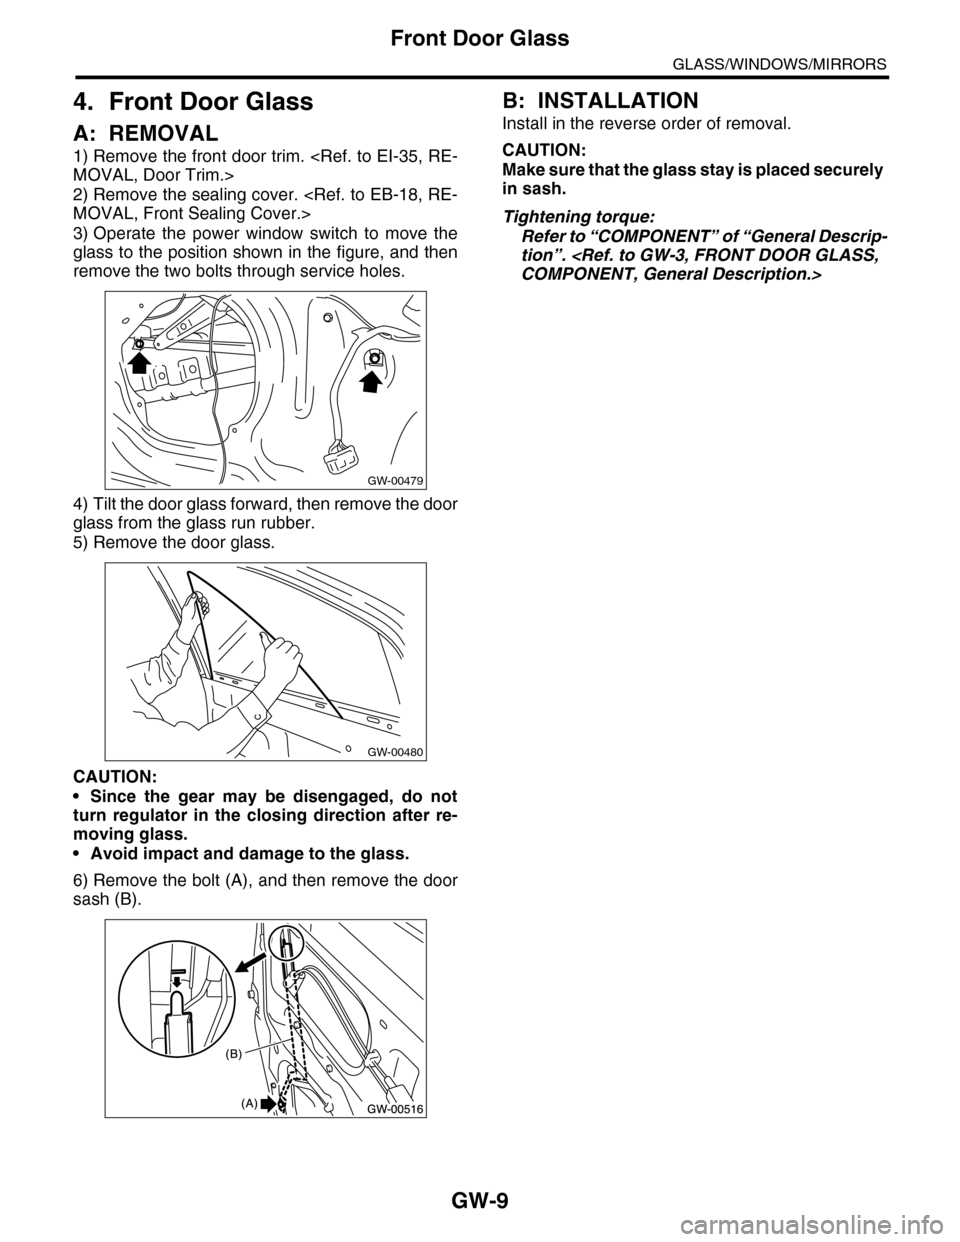
3) Operate the power window switch to move the
glass to the position shown in the figure, and then
remove the two bolts through service holes.
4) Tilt the door glass forward, then remove the door
glass from the glass run rubber.
5) Remove the door glass.
CAUTION:
•Since the gear may be disengaged, do not
turn regulator in the closing direction after re-
moving glass.
•Avoid impact and damage to the glass.
6) Remove the bolt (A), and then remove the door
sash (B).
B: INSTALLATION
Install in the reverse order of removal.
CAUTION:
Make sure that the glass stay is placed securely
in sash.
Tightening torque:
Refer to “COMPONENT” of “General Descrip-
tion”.
GW-00479
GW-00480
Page 305 of 2453
GW-10
Front Regulator and Motor Assembly
GLASS/WINDOWS/MIRRORS
5. Front Regulator and Motor
Assembly
A: REMOVAL
1) Remove the door glass.
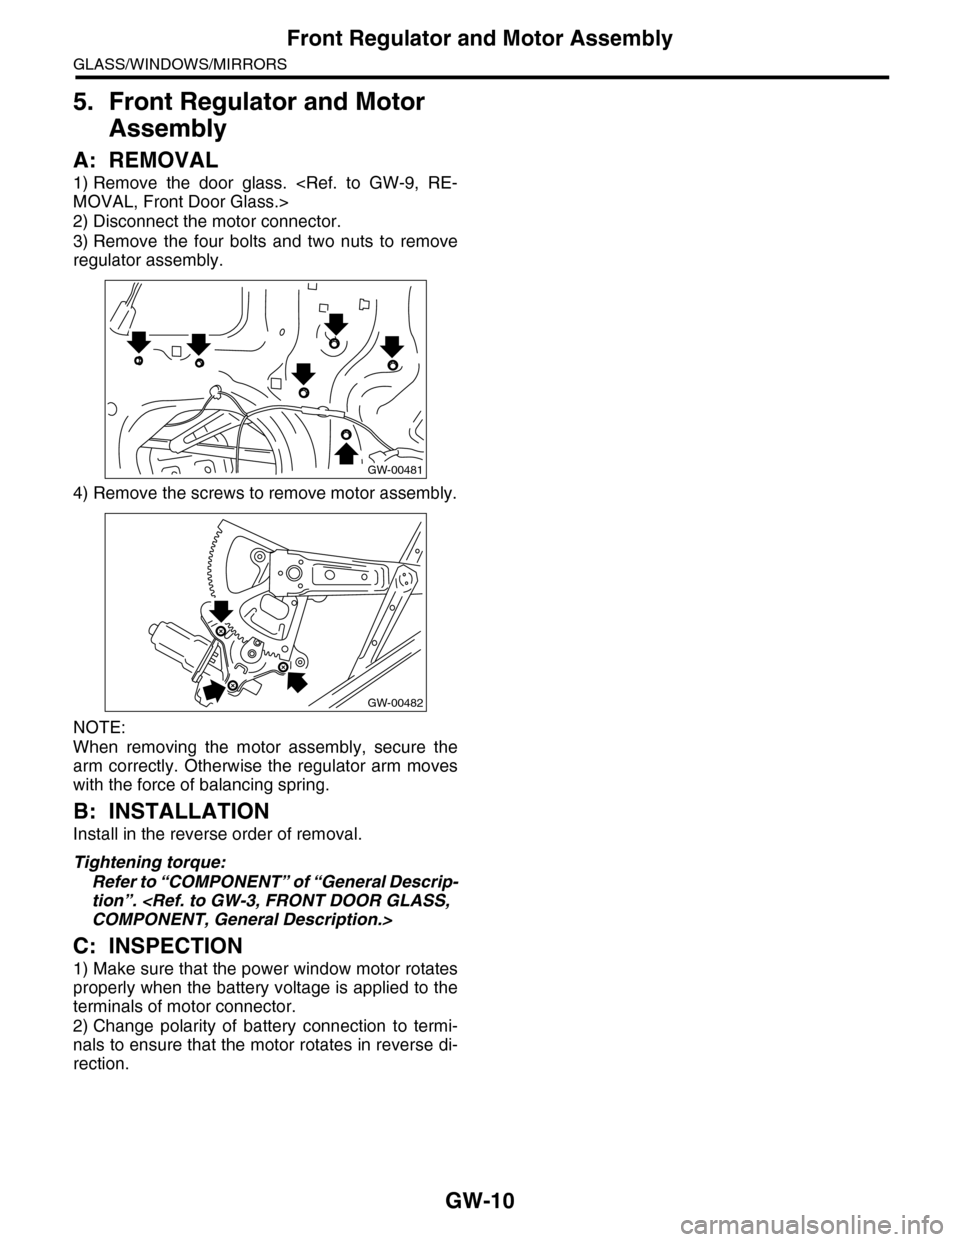
2) Disconnect the motor connector.
3) Remove the four bolts and two nuts to remove
regulator assembly.
4) Remove the screws to remove motor assembly.
NOTE:
When removing the motor assembly, secure the
arm correctly. Otherwise the regulator arm moves
with the force of balancing spring.
B: INSTALLATION
Install in the reverse order of removal.
Tightening torque:
Refer to “COMPONENT” of “General Descrip-
tion”.
C: INSPECTION
1) Make sure that the power window motor rotates
properly when the battery voltage is applied to the
terminals of motor connector.
2) Change polarity of battery connection to termi-
nals to ensure that the motor rotates in reverse di-
rection.
GW-00481
GW-00482
Page 311 of 2453
GW-16
Rear Door Glass
GLASS/WINDOWS/MIRRORS
11.Rear Door Glass
A: REMOVAL
1) Remove the rear door trim.
2) Remove the sealing cover.
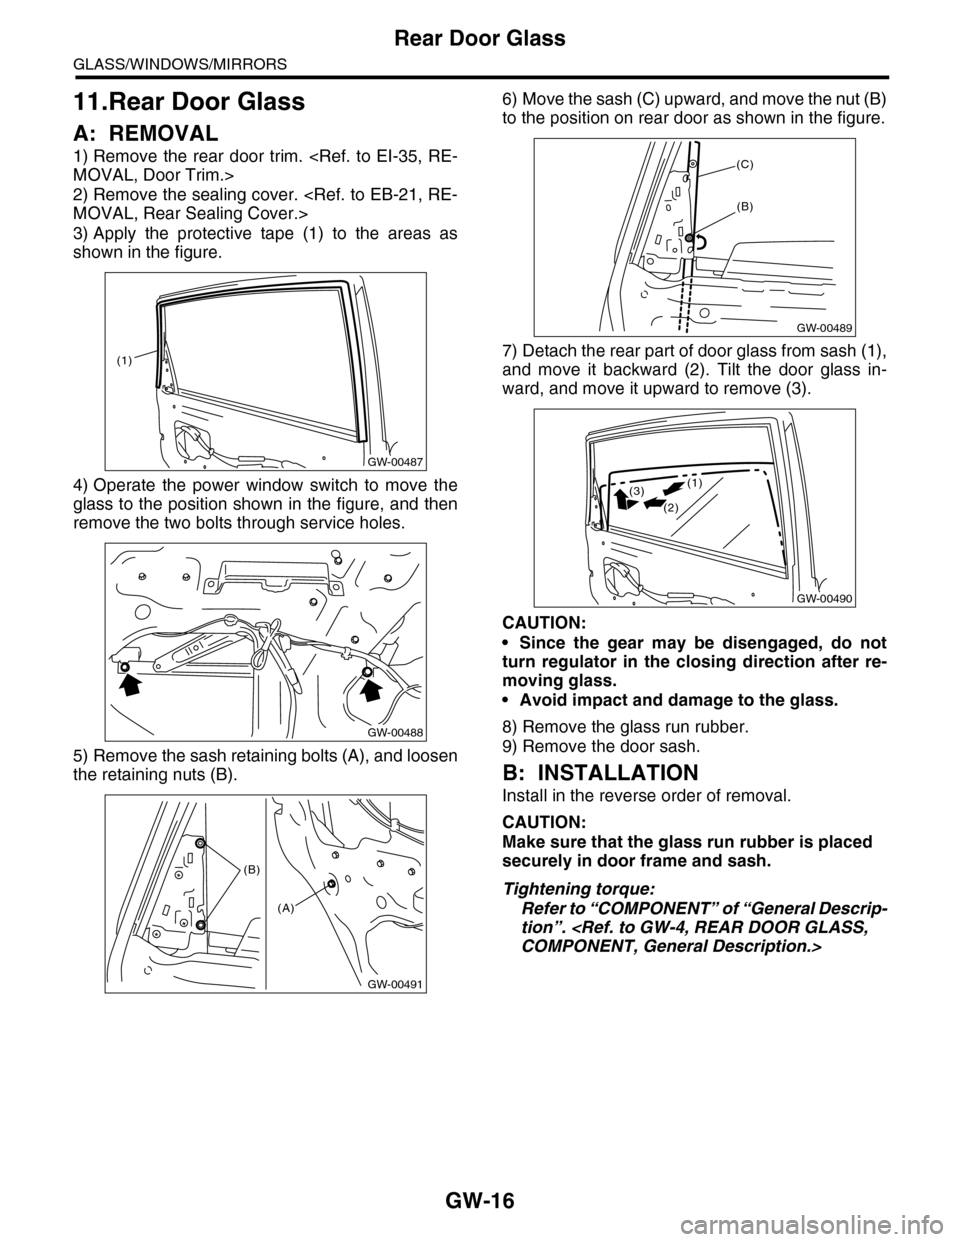
3) Apply the protective tape (1) to the areas as
shown in the figure.
4) Operate the power window switch to move the
glass to the position shown in the figure, and then
remove the two bolts through service holes.
5) Remove the sash retaining bolts (A), and loosen
the retaining nuts (B).
6) Move the sash (C) upward, and move the nut (B)
to the position on rear door as shown in the figure.
7) Detach the rear part of door glass from sash (1),
and move it backward (2). Tilt the door glass in-
ward, and move it upward to remove (3).
CAUTION:
•Since the gear may be disengaged, do not
turn regulator in the closing direction after re-
moving glass.
•Avoid impact and damage to the glass.
8) Remove the glass run rubber.
9) Remove the door sash.
B: INSTALLATION
Install in the reverse order of removal.
CAUTION:
Make sure that the glass run rubber is placed
securely in door frame and sash.
Tightening torque:
Refer to “COMPONENT” of “General Descrip-
tion”.
GW-00487
(1)
GW-00488
GW-00491
(B)
(A)
GW-00489
(C)
(B)
GW-00490
(1)
(2)
(3)
Page 312 of 2453
GW-17
Rear Regulator and Motor Assembly
GLASS/WINDOWS/MIRRORS
12.Rear Regulator and Motor As-
sembly
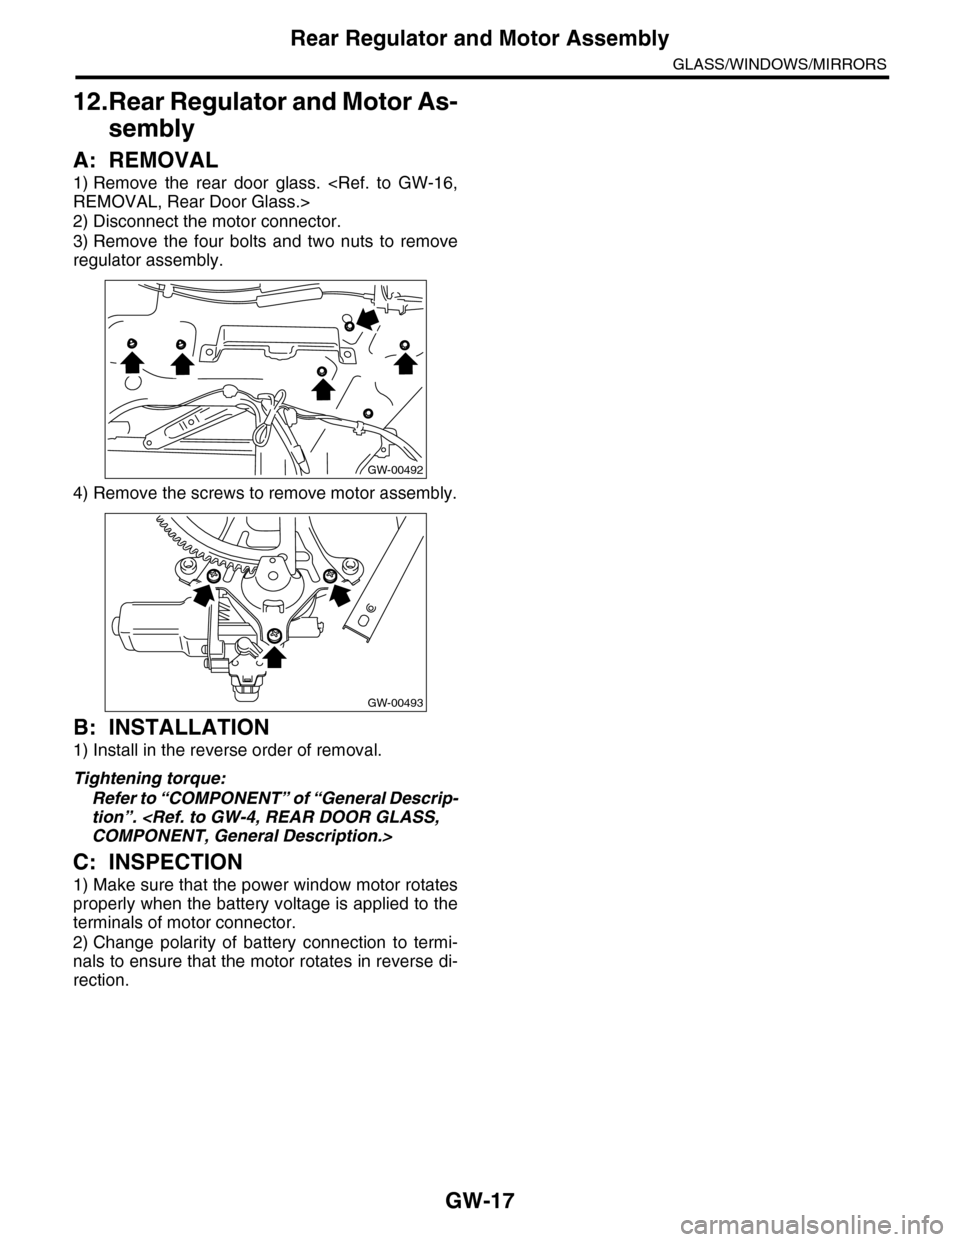
A: REMOVAL
1) Remove the rear door glass.
2) Disconnect the motor connector.
3) Remove the four bolts and two nuts to remove
regulator assembly.
4) Remove the screws to remove motor assembly.
B: INSTALLATION
1) Install in the reverse order of removal.
Tightening torque:
Refer to “COMPONENT” of “General Descrip-
tion”.
C: INSPECTION
1) Make sure that the power window motor rotates
properly when the battery voltage is applied to the
terminals of motor connector.
2) Change polarity of battery connection to termi-
nals to ensure that the motor rotates in reverse di-
rection.
GW-00492
GW-00493
Page 641 of 2453
SL-12
Keyless Entry System
SECURITY AND LOCKS
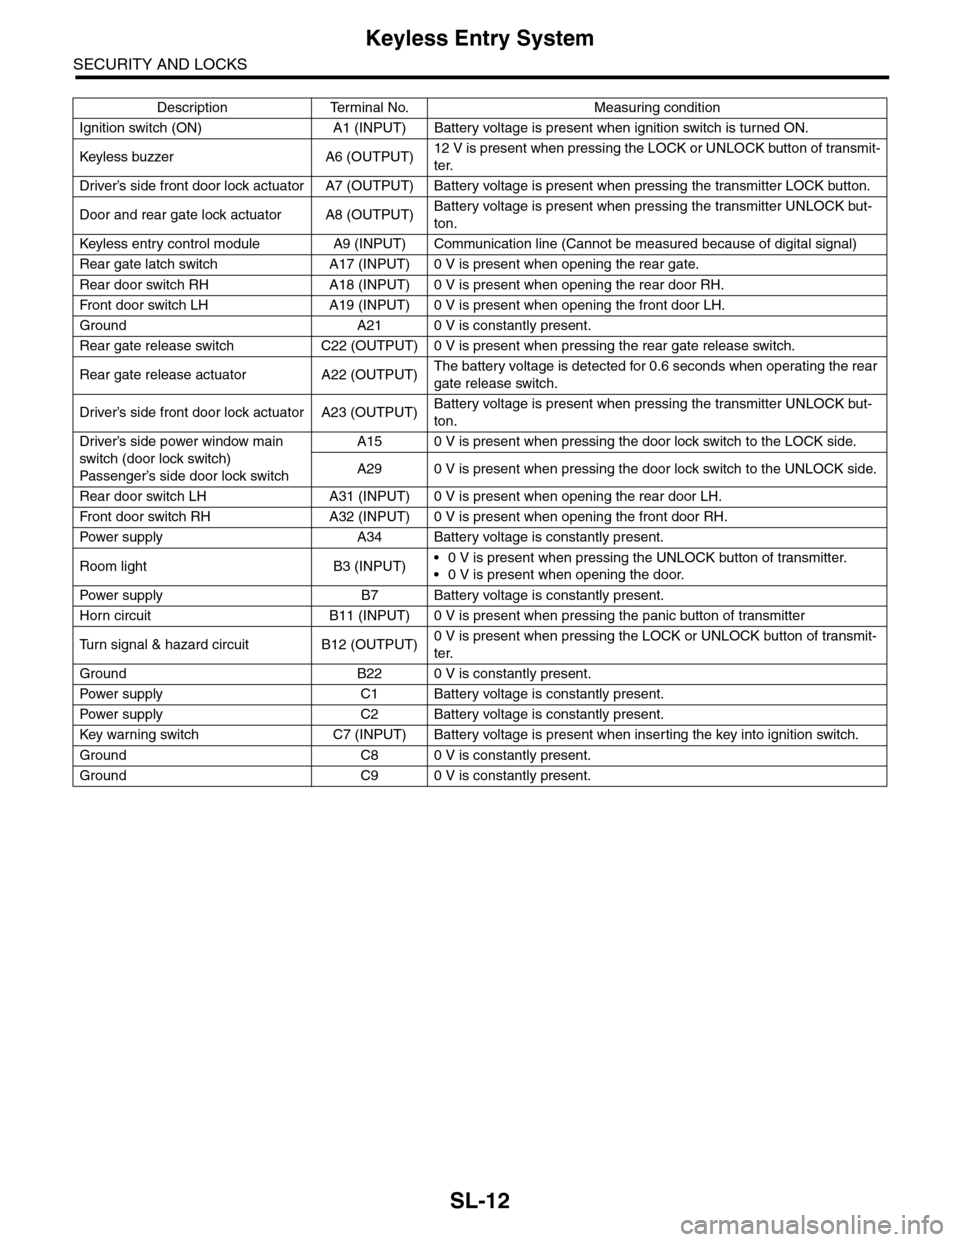
Description Terminal No. Measuring condition
Ignition switch (ON) A1 (INPUT) Battery voltage is present when ignition switch is turned ON.
Keyless buzzer A6 (OUTPU T)12 V is present when pressing the LOCK or UNLOCK button of transmit-
ter.
Driver’s side front door lock actuator A7 (OUTPUT) Battery voltage is present when pressing the transmitter LOCK button.
Door and rear gate lock actuator A8 (OUTPUT)Battery voltage is present when pressing the transmitter UNLOCK but-
ton.
Keyless entr y control module A9 (INPUT) Communication line (Cannot be measured because of digital signal)
Rear gate latch switch A17 (INPUT) 0 V is present when opening the rear gate.
Rear door switch RH A18 (INPUT) 0 V is present when opening the rear door RH.
Fr o nt d oo r swi tc h L H A 19 ( I NP UT ) 0 V i s pr e se n t wh e n o p en in g th e f r o n t d oo r L H.
Ground A21 0 V is constantly present.
Rear gate release switch C22 (OUTPUT) 0 V is present when pressing the rear gate release switch.
Rear gate release actuator A22 (OUTPUT)The battery voltage is detected for 0.6 seconds when operating the rear
gate release switch.
Driver’s side front door lock actuator A23 (OUTPUT)Battery voltage is present when pressing the transmitter UNLOCK but-
ton.
Driver’s side power window main
switch (door lock switch)
Passenger’s side door lock sw itch
A15 0 V is present when pressing the door lock switch to the LOCK side.
A29 0 V is present when pressing the door lock switch to the UNLOCK side.
Rear door switch LH A31 (INPUT) 0 V is present when opening the rear door LH.
Fr o nt d oo r swi tc h RH A 32 ( I NP UT ) 0 V i s pr e se n t wh e n o p en in g th e f r o n t d oo r RH.
Pow er s up p ly A 34 B at t e r y vol t ag e i s c on s ta n tl y p r e se nt .
Room light B3 (INPUT)•0 V is present when pressing the UNLOCK button of transmitter.
•0 V is present when opening the door.
Pow er s up p ly B 7 B at t e r y vol t ag e i s c on s ta n tl y p r e se nt .
Horn circuit B11 (INPUT) 0 V is present when pressing the panic button of transmitter
Tu r n s i g n a l & h a z a r d c i r c u i t B 1 2 ( O U T P U T )0 V is present when pressing the LOCK or UNLOCK button of transmit-
ter.
Ground B22 0 V is constantly present.
Pow er s up p ly C 1 B at t e r y vol t ag e i s c on s ta n tl y p r e se nt .
Pow er s up p ly C 2 B at t e r y vol t ag e i s c on s ta n tl y p r e se nt .
Key war ning switch C7 (INPUT) Batter y voltage is present when inser ting the key into ignition switch.
Ground C8 0 V is constantly present.
Ground C9 0 V is constantly present.