rear view mirror SUBARU TRIBECA 2010 1.G Owners Manual
[x] Cancel search | Manufacturer: SUBARU, Model Year: 2010, Model line: TRIBECA, Model: SUBARU TRIBECA 2010 1.GPages: 422, PDF Size: 12.87 MB
Page 78 of 422
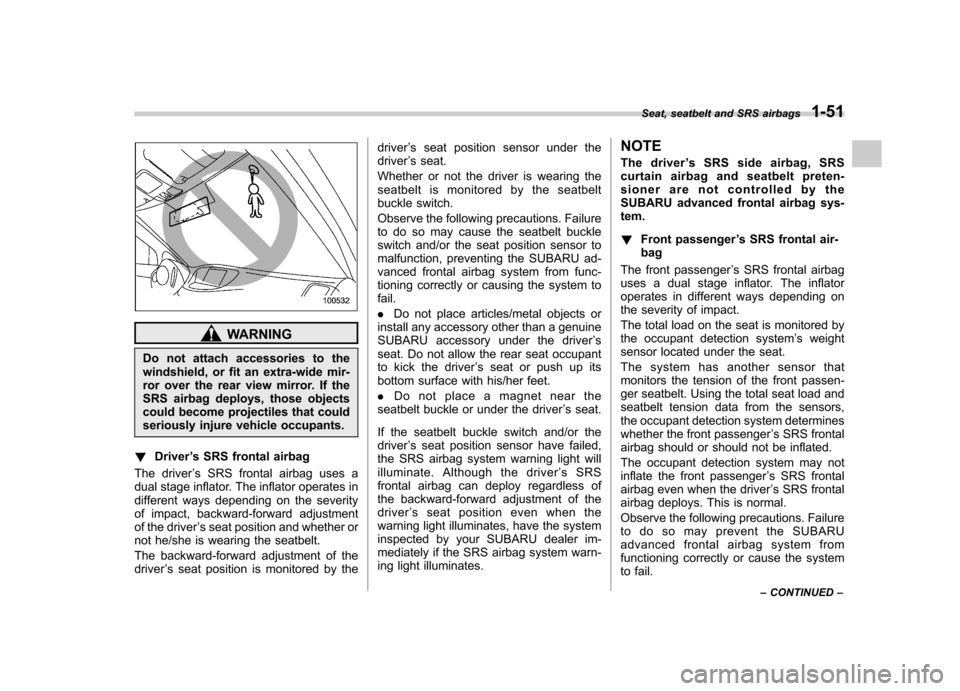
WARNING
Do not attach accessories to the
windshield, or fit an extra-wide mir-
ror over the rear view mirror. If the
SRS airbag deploys, those objects
could become projectiles that could
seriously injure vehicle occupants.
! Driver ’s SRS frontal airbag
The driver ’s SRS frontal airbag uses a
dual stage inflator. The inflator operates in
different ways depending on the severity
of impact, backward-forward adjustment
of the driver ’s seat position and whether or
not he/she is wearing the seatbelt.
The backward-forward adjustment of the driver ’s seat position is monitored by the driver
’s seat position sensor under the
driver ’s seat.
Whether or not the driver is wearing the
seatbelt is monitored by the seatbelt
buckle switch.
Observe the following precautions. Failure
to do so may cause the seatbelt buckle
switch and/or the seat position sensor to
malfunction, preventing the SUBARU ad-
vanced frontal airbag system from func-
tioning correctly or causing the system tofail. . Do not place articles/metal objects or
install any accessory other than a genuine
SUBARU accessory under the driver ’s
seat. Do not allow the rear seat occupant
to kick the driver ’s seat or push up its
bottom surface with his/her feet. . Do not place a magnet near the
seatbelt buckle or under the driver ’s seat.
If the seatbelt buckle switch and/or the driver ’s seat position sensor have failed,
the SRS airbag system warning light will
illuminate. Although the driver ’sSRS
frontal airbag can deploy regardless of
the backward-forward adjustment of the
driver ’s seat position even when the
warning light illuminates, have the system
inspected by your SUBARU dealer im-
mediately if the SRS airbag system warn-
ing light illuminates. NOTE
The driver
’s SRS side airbag, SRS
curtain airbag and seatbelt preten-
sioner are not controlled by the
SUBARU advanced frontal airbag sys-tem. ! Front passenger ’s SRS frontal air-
bag
The front passenger ’s SRS frontal airbag
uses a dual stage inflator. The inflator
operates in different ways depending on
the severity of impact.
The total load on the seat is monitored by
the occupant detection system ’s weight
sensor located under the seat.
The system has another sensor that
monitors the tension of the front passen-
ger seatbelt. Using the total seat load and
seatbelt tension data from the sensors,
the occupant detection system determines
whether the front passenger ’s SRS frontal
airbag should or should not be inflated.
The occupant detection system may not
inflate the front passenger ’s SRS frontal
airbag even when the driver ’s SRS frontal
airbag deploys. This is normal.
Observe the following precautions. Failure
to do so may prevent the SUBARU
advanced frontal airbag system from
functioning correctly or cause the system
to fail. Seat, seatbelt and SRS airbags
1-51
– CONTINUED –
Page 167 of 422
3-38Instruments and controls
NOTE
The outside mirror defogger also oper-
ates while the rear window defogger isoperating. Mirrors
Always check that the inside and outside
mirrors are properly adjusted before you
start driving. &
Type A inside mirror (if equipped)
The mirror has a day and night position.
Pull the tab at the bottom of the mirror
toward you for the night position. Push it
away for the day position. The night
position reduces glare from headlights. &
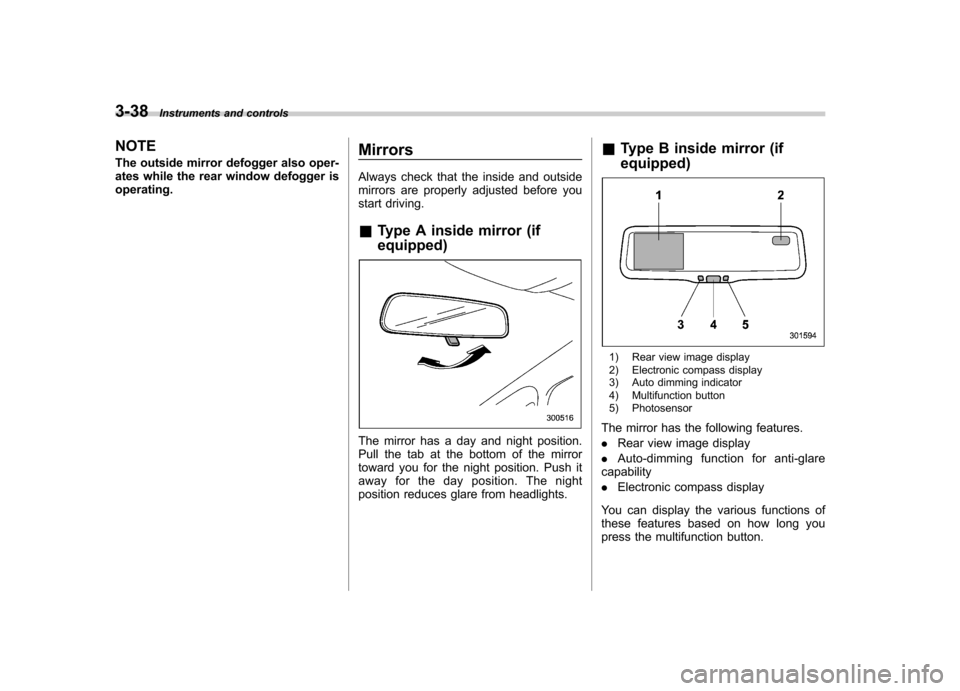
Type B inside mirror (if equipped)
1) Rear view image display
2) Electronic compass display
3) Auto dimming indicator
4) Multifunction button
5) Photosensor
The mirror has the following features. . Rear view image display
. Auto-dimming function for anti-glare
capability. Electronic compass display
You can display the various functions of
these features based on how long you
press the multifunction button.
Page 168 of 422
Gear
position Period of
time multi-
function
button is pressed Function
displayed
R (reverse) Briefly
Rear view display ON/OFF*
More than
3 seconds Help lines indica-
tion ON/OFF
Except
R (reverse) Briefly
Auto-dimming
function ON/OFF*
3to6 seconds Electronic com-
pass display ON/ OFF
6to9seconds Enter the com-
pass zone setting mode
9to12 seconds Enter the com-
pass calibration mode
*: The setting returns to “ON ”as a default
setting every time the ignition switch is turned tothe “ON ”position.
! Rear view image display
When the ignition switch is “ON ”and the
select lever is set to “R ”, the rear view
camera automatically displays the rear
view image behind the vehicle on the
inside mirror.
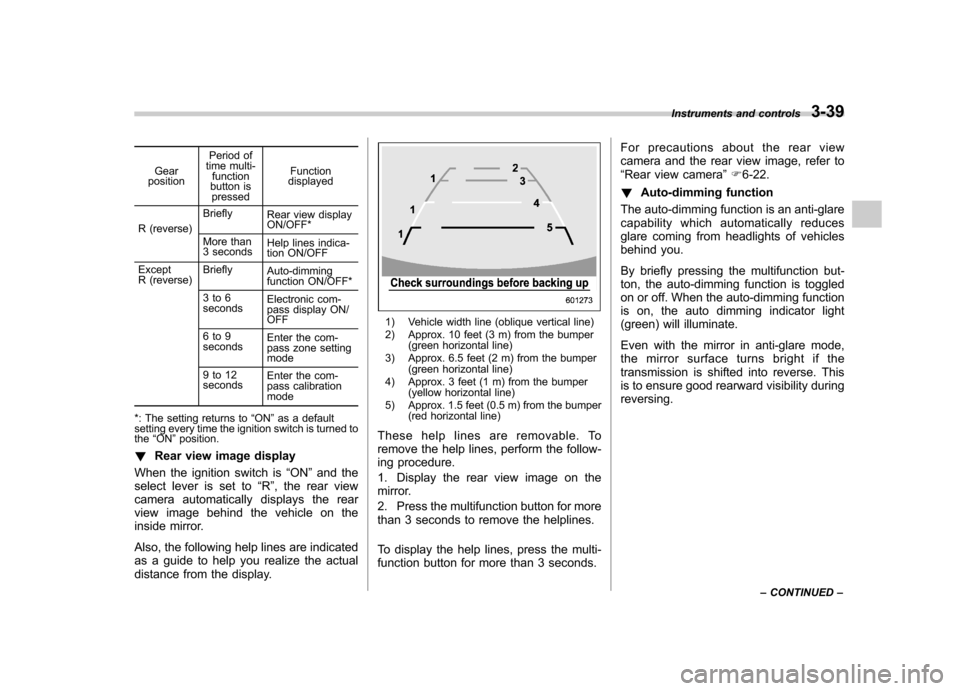
Also, the following help lines are indicated
as a guide to help you realize the actual
distance from the display.
1) Vehicle width line (oblique vertical line)
2) Approx. 10 feet (3 m) from the bumper (green horizontal line)
3) Approx. 6.5 feet (2 m) from the bumper (green horizontal line)
4) Approx. 3 feet (1 m) from the bumper (yellow horizontal line)
5) Approx. 1.5 feet (0.5 m) from the bumper (red horizontal line)
These help lines are removable. To
remove the help lines, perform the follow-
ing procedure.
1. Display the rear view image on the
mirror.
2. Press the multifunction button for more
than 3 seconds to remove the helplines.
To display the help lines, press the multi-
function button for more than 3 seconds. For precautions about the rear view
camera and the rear view image, refer to“
Rear view camera ”F 6-22.
! Auto-dimming function
The auto-dimming function is an anti-glare
capability which automatically reduces
glare coming from headlights of vehicles
behind you.
By briefly pressing the multifunction but-
ton, the auto-dimming function is toggled
on or off. When the auto-dimming function
is on, the auto dimming indicator light
(green) will illuminate.
Even with the mirror in anti-glare mode,
the mirror surface turns bright if the
transmission is shifted into reverse. This
is to ensure good rearward visibility duringreversing. Instruments and controls
3-39
– CONTINUED –
Page 218 of 422
Interior light......................................................... 6-2
Dome light .......................................................... 6-2
Cargo area light .................................................. 6-3
Rear gate light .................................................... 6-3
Map light ............................................................. 6-3
Automatic ambient light for center console area (if equipped) ...................................................... 6-4
Sun visors ........................................................... 6-4
Sun visor extension plate .................................... 6-5
Vanity mirror with light ........................................ 6-5
Storage compartment ......................................... 6-6
Glove box ........................................................... 6-6
Center console box ............................................. 6-6
Rear console ....................................................... 6-7
Overhead console ............................................... 6-8
Cup holder ........................................................... 6-8
Front passenger ’s cup holder .............................. 6-8
Rear seat (5-seater models)/Second-row seat (7-seater models) passenger ’s cup holder .......... 6-9
Third-row seat cup holders (7-seater models) ....... 6-9
Bottle holders ...................................................... 6-9
Accessory power outlets ................................... 6-10
Coat hook ........................................................... 6-12
Shopping bag hook ............................................ 6-13
Floor mat ............................................................ 6-13 Cargo area cover (if equipped)
......................... 6-14
Using the cover ................................................. 6-14
To remove the cover .......................................... 6-15
To install the cover housing ............................... 6-15
Convenient tie-down hooks .............................. 6-16
Under-floor storage compartment .................... 6-16
5-seater models ................................................. 6-16
7-seater models ................................................. 6-17
HomeLink ®Wireless Control System
(if equipped) .................................................... 6-17
Garage door opener programming in the U.S.A. .............................................................. 6-18
Programming rolling-code-protected garage door openers in the U.S.A. ....................................... 6-19
Programming for entrance gates and garage door openers in Canada ........................................... 6-20
Programming other devices ............................... 6-21
Operating the HomeLink ®Wireless Control
System ............................................................ 6-21
Reprogramming a single HomeLink ®button .. ..... 6-21
Erasing HomeLink ®button memory ................... 6-21
In case a problem occurs ................................... 6-21
Rear view camera (if equipped) ........................ 6-22
How to use the rear view camera ....................... 6-23
Viewing range on the screen .............................. 6-23
Help line ............................................................ 6-24 Interior equipment
6
Page 222 of 422
&Sun visor extension plate
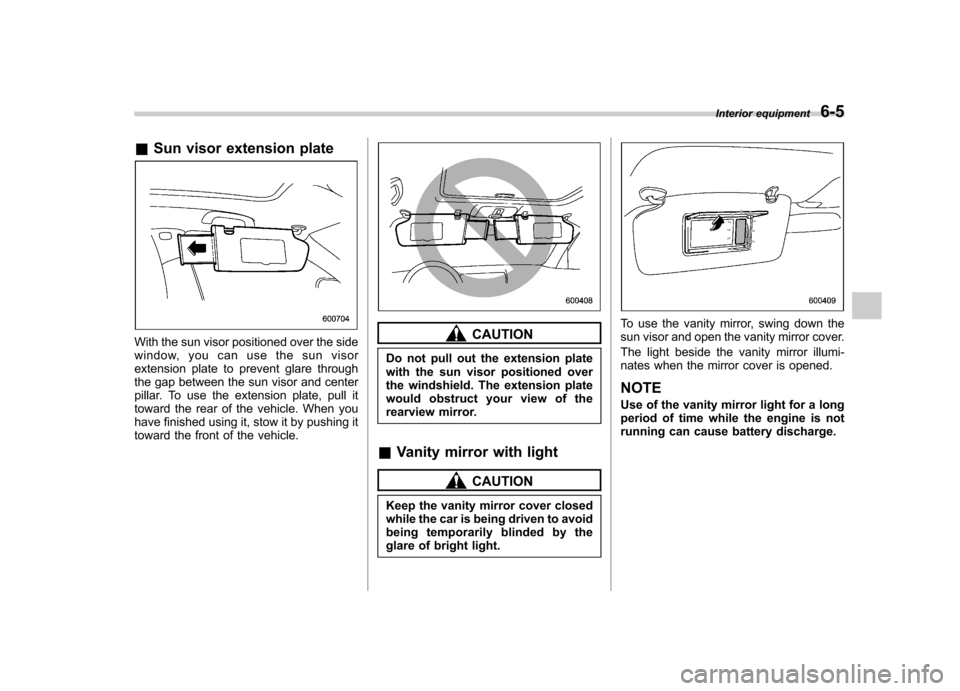
With the sun visor positioned over the side
window, you can use the sun visor
extension plate to prevent glare through
the gap between the sun visor and center
pillar. To use the extension plate, pull it
toward the rear of the vehicle. When you
have finished using it, stow it by pushing it
toward the front of the vehicle.CAUTION
Do not pull out the extension plate
with the sun visor positioned over
the windshield. The extension plate
would obstruct your view of the
rearview mirror.
& Vanity mirror with light
CAUTION
Keep the vanity mirror cover closed
while the car is being driven to avoid
being temporarily blinded by the
glare of bright light.
To use the vanity mirror, swing down the
sun visor and open the vanity mirror cover.
The light beside the vanity mirror illumi-
nates when the mirror cover is opened. NOTE
Use of the vanity mirror light for a long
period of time while the engine is not
running can cause battery discharge. Interior equipment
6-5
Page 239 of 422
6-22Interior equipment
Rear view camera (if equipped)
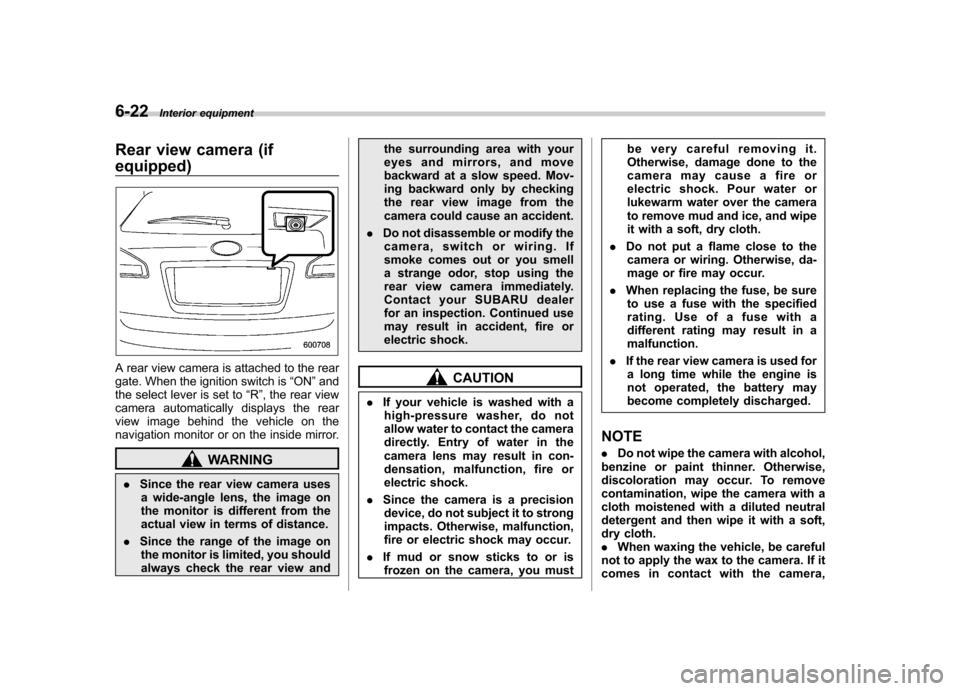
A rear view camera is attached to the rear
gate. When the ignition switch is “ON ”and
the select lever is set to “R ”, the rear view
camera automatically displays the rear
view image behind the vehicle on the
navigation monitor or on the inside mirror.
WARNING
. Since the rear view camera uses
a wide-angle lens, the image on
the monitor is different from the
actual view in terms of distance.
. Since the range of the image on
the monitor is limited, you should
always check the rear view and the surrounding area with your
eyes and mirrors, and move
backward at a slow speed. Mov-
ing backward only by checking
the rear view image from the
camera could cause an accident.
. Do not disassemble or modify the
camera, switch or wiring. If
smoke comes out or you smell
a strange odor, stop using the
rear view camera immediately.
Contact your SUBARU dealer
for an inspection. Continued use
may result in accident, fire or
electric shock.
CAUTION
. If your vehicle is washed with a
high-pressure washer, do not
allow water to contact the camera
directly. Entry of water in the
camera lens may result in con-
densation, malfunction, fire or
electric shock.
. Since the camera is a precision
device, do not subject it to strong
impacts. Otherwise, malfunction,
fire or electric shock may occur.
. If mud or snow sticks to or is
frozen on the camera, you must be very careful removing it.
Otherwise, damage done to the
camera may cause a fire or
electric shock. Pour water or
lukewarm water over the camera
to remove mud and ice, and wipe
it with a soft, dry cloth.
. Do not put a flame close to the
camera or wiring. Otherwise, da-
mage or fire may occur.
. When replacing the fuse, be sure
to use a fuse with the specified
rating. Use of a fuse with a
different rating may result in amalfunction.
. If the rear view camera is used for
a long time while the engine is
not operated, the battery may
become completely discharged.
NOTE . Do not wipe the camera with alcohol,
benzine or paint thinner. Otherwise,
discoloration may occur. To remove
contamination, wipe the camera with a
cloth moistened with a diluted neutral
detergent and then wipe it with a soft,
dry cloth.. When waxing the vehicle, be careful
not to apply the wax to the camera. If it
comes in contact with the camera,
Page 240 of 422
moisten a clean cloth with a diluted
neutral detergent to remove the wax..The camera lens has hard coating to
help prevent scratches. However, when
washing the vehicle or cleaning the
camera lens, be careful not to scratch
the camera lens. Do not use a washing
brush directly on the camera lens. The
monitor screen may be adversely af-fected.. Strong light shined on the camera
lens may develop white light stripes
around the light source. This is not amalfunction.. Under the fluorescent light, the dis-
play may flicker. However, this is not a malfunction. . The image of the rear view camera
may be slightly different from the
actual color of the objects. & How to use the rear view camera
When the select lever is set to “R ”, the rear
view camera automatically displays the
rear view image from the vehicle. When
the lever is set to other positions, the
image before setting to “R ”is displayed.
1. Set the ignition switch to “ON ”.
2. Set the select lever to “R ”. NOTE .
The image of the rear view camera
has priority over other screen displays. . The image of the rear view camera is
horizontally reversed as is the case
with the vehicle rearview mirror or the
side view mirror.. It may be difficult to see the image of
the rearview camera in the following
cases. This is not a malfunction of thecamera.
–The vehicle is in a dark place (at
night, in a tunnel, etc.). – The vehicle is in an extremely hot
or cold place.– An object (such as raindrops,
snow, dirt, etc.) that disturbs the
view of the rear view camera sticks
to the lens of the camera. – Strong light shined directly on
the camera lens (occasionally, there
are vertical lines on the screen). &
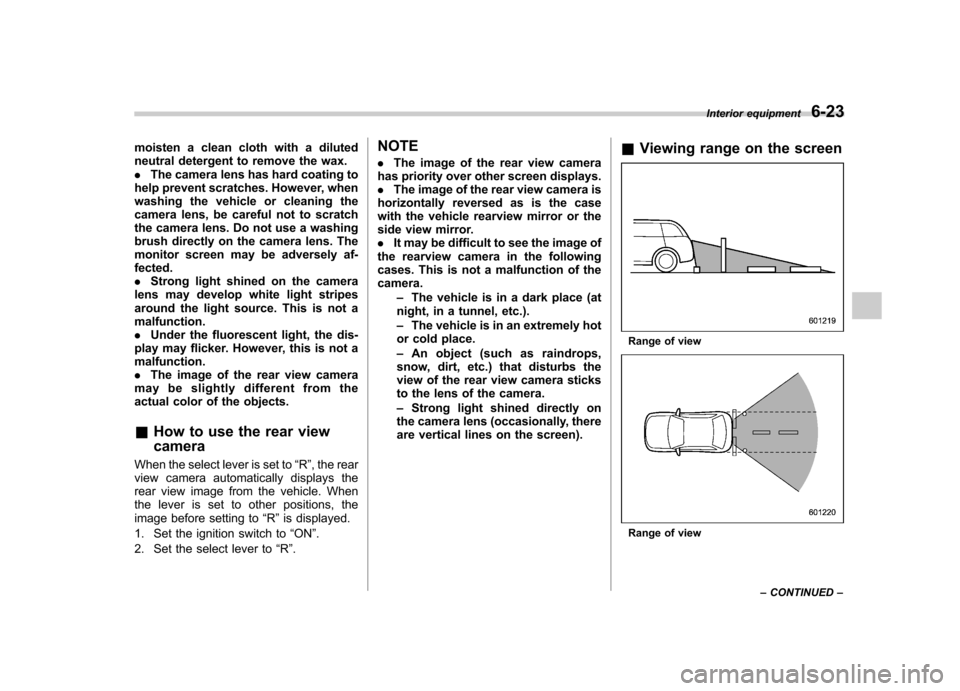
Viewing range on the screen
Range of view
Range of view Interior equipment
6-23
– CONTINUED –
Page 242 of 422
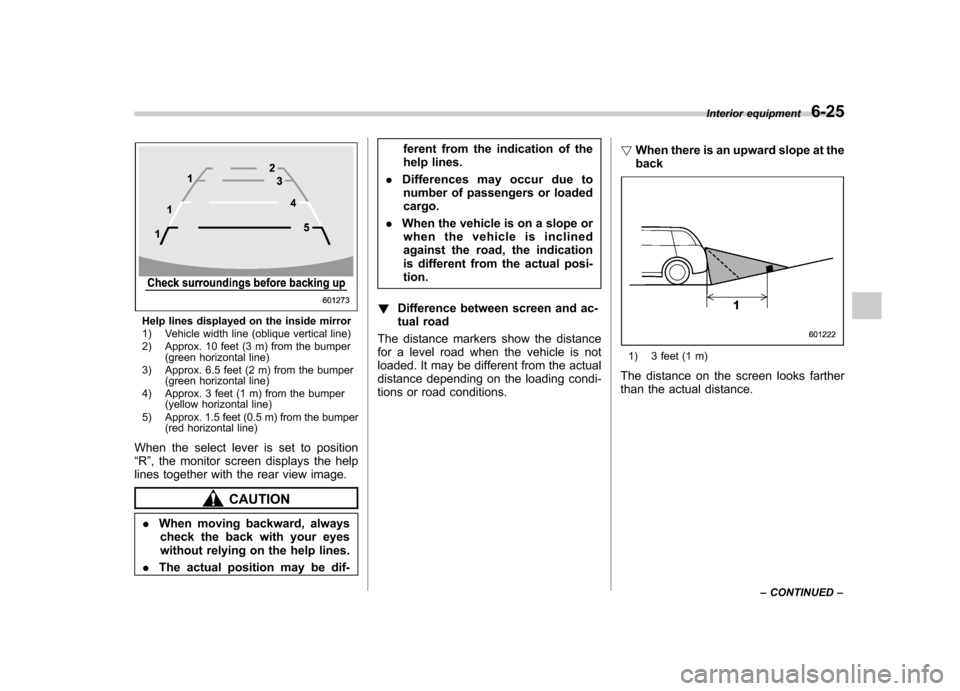
Help lines displayed on the inside mirror
1) Vehicle width line (oblique vertical line)
2) Approx. 10 feet (3 m) from the bumper(green horizontal line)
3) Approx. 6.5 feet (2 m) from the bumper (green horizontal line)
4) Approx. 3 feet (1 m) from the bumper (yellow horizontal line)
5) Approx. 1.5 feet (0.5 m) from the bumper (red horizontal line)
When the select lever is set to position “ R ”, the monitor screen displays the help
lines together with the rear view image.
CAUTION
. When moving backward, always
check the back with your eyes
without relying on the help lines.
. The actual position may be dif- ferent from the indication of the
help lines.
. Differences may occur due to
number of passengers or loadedcargo.
. When the vehicle is on a slope or
when the vehicle is inclined
against the road, the indication
is different from the actual posi-tion.
! Difference between screen and ac-
tual road
The distance markers show the distance
for a level road when the vehicle is not
loaded. It may be different from the actual
distance depending on the loading condi-
tions or road conditions. !
When there is an upward slope at theback
1) 3 feet (1 m)
The distance on the screen looks farther
than the actual distance. Interior equipment
6-25
– CONTINUED –
Page 302 of 422
create a traffic safety hazard.
For safety, always connect the towing
vehicle and trailer with trailer safety
chains. Pass the chains crossing each
other under the trailer tongue to prevent
the trailer from dropping onto the ground
in case the trailer tongue should discon-
nect from the hitch ball. Allow sufficient
slack in the chains taking tight-turn situa-
tions into account; however, be careful not
to let them drag on the ground.
For more information about the safety
chain connection, refer to the instructions
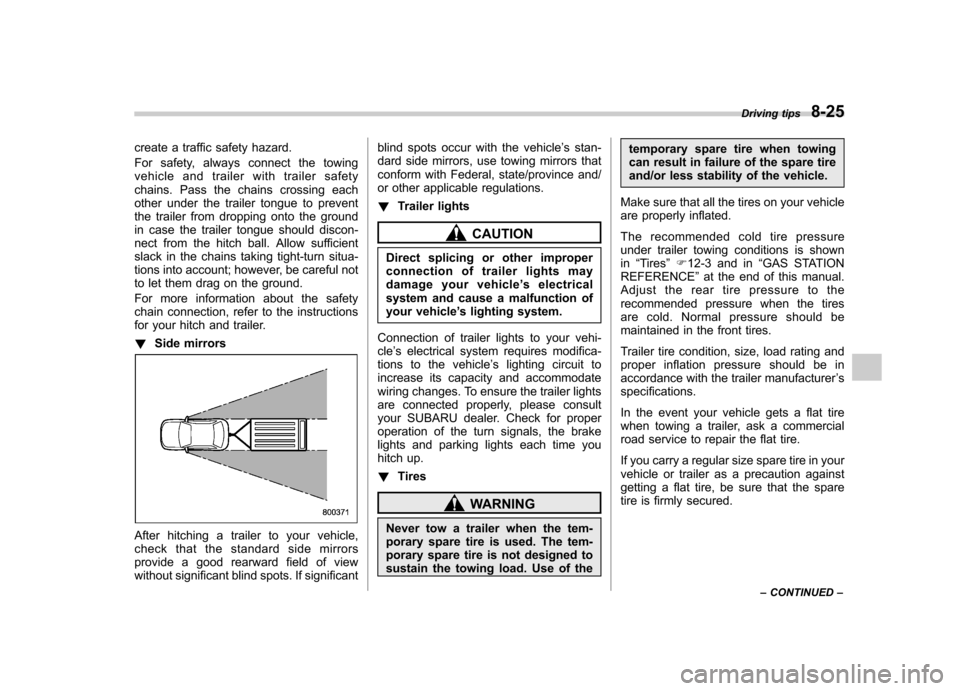
for your hitch and trailer. !Side mirrors
After hitching a trailer to your vehicle,
check that the standard side mirrors
provide a good rearward field of view
without significant blind spots. If significant blind spots occur with the vehicle
’s stan-
dard side mirrors, use towing mirrors that
conform with Federal, state/province and/
or other applicable regulations. ! Trailer lights
CAUTION
Direct splicing or other improper
connection of trailer lights may
damage your vehicle ’s electrical
system and cause a malfunction of
your vehicle ’s lighting system.
Connection of trailer lights to your vehi-cle ’s electrical system requires modifica-
tions to the vehicle ’s lighting circuit to
increase its capacity and accommodate
wiring changes. To ensure the trailer lights
are connected properly, please consult
your SUBARU dealer. Check for proper
operation of the turn signals, the brake
lights and parking lights each time you
hitch up. ! Tires
WARNING
Never tow a trailer when the tem-
porary spare tire is used. The tem-
porary spare tire is not designed to
sustain the towing load. Use of the temporary spare tire when towing
can result in failure of the spare tire
and/or less stability of the vehicle.
Make sure that all the tires on your vehicle
are properly inflated.
The recommended cold tire pressure
under trailer towing conditions is shownin “Tires ”F 12-3 and in “GAS STATION
REFERENCE ”at the end of this manual.
Adjust the rear tire pressure to the
recommended pressure when the tires
are cold. Normal pressure should be
maintained in the front tires.
Trailer tire condition, size, load rating and
proper inflation pressure should be in
accordance with the trailer manufacturer ’s
specifications.
In the event your vehicle gets a flat tire
when towing a trailer, ask a commercial
road service to repair the flat tire.
If you carry a regular size spare tire in your
vehicle or trailer as a precaution against
getting a flat tire, be sure that the spare
tire is firmly secured. Driving tips
8-25
– CONTINUED –
Page 303 of 422
8-26Driving tips
&Trailer towing tips
CAUTION
. Never exceed 45 mph (72 km/h)
when towing a trailer in hilly
country on hot days.
. When towing a trailer, steering,
stability, stopping distance and
braking performance will be dif-
ferent from normal operation. Forsafety ’s sake, you should employ
extra caution when towing a
trailer and you should never
speed. You should also keep the
following tips in mind:
! Before starting out on a trip
. Check that the vehicle and vehicle-to-
hitch mounting are in good condition. If
any problems are apparent, do not tow the
trailer. . Check that the vehicle sits horizontally
with the trailer attached. If the vehicle is
tipped sharply up at the front and down at
the rear, check the total trailer weight,
GVW, GAWs and tongue load again, then
confirm that the load and its distribution
are acceptable. . Check that the tire pressures are
correct. .
Check that the vehicle and trailer are
connected properly. Confirm that
–the trailer tongue is connected
properly to the hitch ball. – the trailer lights connector is con-
nected properly and trailer ’sbrake
lights illuminate when the vehicle ’s
brake pedal is pressed, and that the trailer ’s turn signal lights flash when
the vehicle ’s turn signal lever is oper-
ated. – the safety chains are connected
properly.– all cargo in the trailer is secured
safely in position.– the side mirrors provide a good
rearward field of view without a sig-
nificant blind spot.
. Sufficient time should be taken to learn
the “feel ”of the vehicle/trailer combination
before starting out on a trip. In an area free
of traffic, practice turning, stopping and
backing up. ! Driving with a trailer
. You should allow for considerably more
stopping distance when towing a trailer.
Avoid sudden braking because it may
result in skidding or jackknifing and loss ofcontrol. . Avoid uneven steering, sharp turns and
rapid lane changes. .
Slow down before turning. Make a
longer than normal turning radius because
the trailer wheels will be closer than the
vehicle wheels to the inside of the turn. In
a tight turn, the trailer could hit yourvehicle. . Crosswinds will adversely affect the
handling of your vehicle and trailer, caus-
ing sway. Crosswinds can be due to
weather conditions or the passing of large
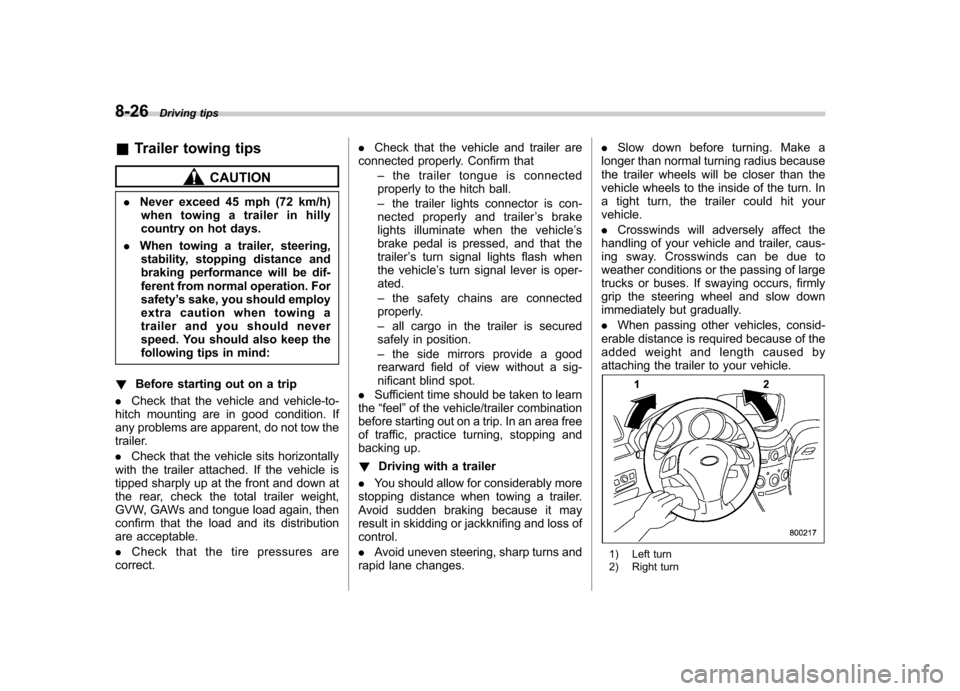
trucks or buses. If swaying occurs, firmly
grip the steering wheel and slow down
immediately but gradually. . When passing other vehicles, consid-
erable distance is required because of the
added weight and length caused by
attaching the trailer to your vehicle.
1) Left turn
2) Right turn