CD player SUBARU WRX 2016 Owners Manual
[x] Cancel search | Manufacturer: SUBARU, Model Year: 2016, Model line: WRX, Model: SUBARU WRX 2016Pages: 594, PDF Size: 19.43 MB
Page 71 of 594
Seat, seatbelt and SRS airbags/*SRS airbag (Supplemental Restraint System airbag)
! Occupant detection system
The occupant detection system sensor is
installed under the seat upholstery and
monitors the physique and posture of the
front passenger. Using this information,
the occupant detection system determines
whether the front passenger ’ s SRS frontal
airbag should be deployed or not.
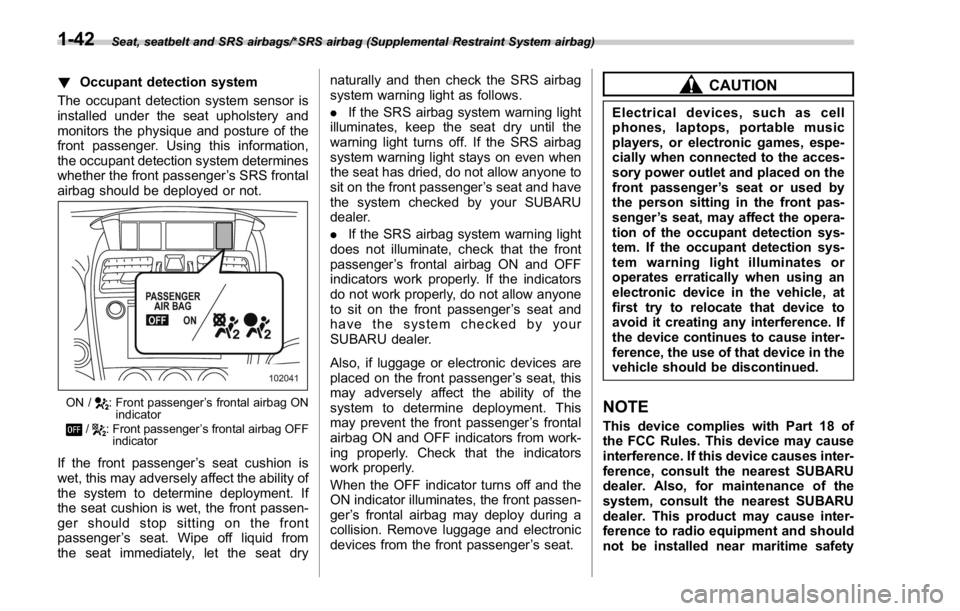
ON / : Front passenger ’ s frontal airbag ON
indicator
/ : Front passenger ’ s frontal airbag OFF
indicator
If the front passenger ’ s seat cushion is
wet, this may adversely affect the ability of
the system to determine deployment. If
the seat cushion is wet, the front passen-
ger should stop sitting on the front
passenger ’ s seat. Wipe off liquid from
the seat immediately, let the seat dry naturally and then check the SRS airbag
system warning light as follows.
. If the SRS airbag system warning light
illuminates, keep the seat dry until the
warning light turns off. If the SRS airbag
system warning light stays on even when
the seat has dried, do not allow anyone to
sit on the front passenger ’ s seat and have
the system checked by your SUBARU
dealer.
. If the SRS airbag system warning light
does not illuminate, check that the front
passenger ’ s frontal airbag ON and OFF
indicators work properly. If the indicators
do not work properly, do not allow anyone
to sit on the front passenger ’ s seat and
have the system checked by your
SUBARU dealer.
Also, if luggage or electronic devices are
placed on the front passenger ’ s seat, this
may adversely affect the ability of the
system to determine deployment. This
may prevent the front passenger ’ s frontal
airbag ON and OFF indicators from work-
ing properly. Check that the indicators
work properly.
When the OFF indicator turns off and the
ON indicator illuminates, the front passen-
ger ’ s frontal airbag may deploy during a
collision. Remove luggage and electronic
devices from the front passenger ’ s seat. CAUTIONElectrical devices, such as cell
phones, laptops, portable music
players, or electronic games, espe-
cially when connected to the acces-
sory power outlet and placed on the
front passenger ’ s seat or used by
the person sitting in the front pas-
senger ’ s seat, may affect the opera-
tion of the occupant detection sys-
tem. If the occupant detection sys-
tem warning light illuminates or
operates erratically when using an
electronic device in the vehicle, at
first try to relocate that device to
avoid it creating any interference. If
the device continues to cause inter-
ference, the use of that device in the
vehicle should be discontinued.
NOTE This device complies with Part 18 of
the FCC Rules. This device may cause
interference. If this device causes inter-
ference, consult the nearest SUBARU
dealer. Also, for maintenance of the
system, consult the nearest SUBARU
dealer. This product may cause inter-
ference to radio equipment and should
not be installed near maritime safety1-42
Page 260 of 594
Basic information before use & Initial screen ! Initial screen
1. When the ignition switch is in the
“ ACC ” or “ ON ” position, the initial screen
will be displayed and the system will begin
operating.
. When using the STARLINK function,
the display screen may be different
from the screen above.
. After a few seconds, the “ Caution
(Caution) ” screen will be displayed.
. After about 5 seconds, the “ Caution
(Caution) ” screen automatically
switches to the next screen. WARNINGWhen the vehicle is stopped with the
engine running, always apply the
parking brake for safety. & Loading and unloading a disc ! Loading a disc
CAUTIONNever try to disassemble the audio
kit or lubricate any part of the CD
player. Do not insert anything other
than a disc into the slot.
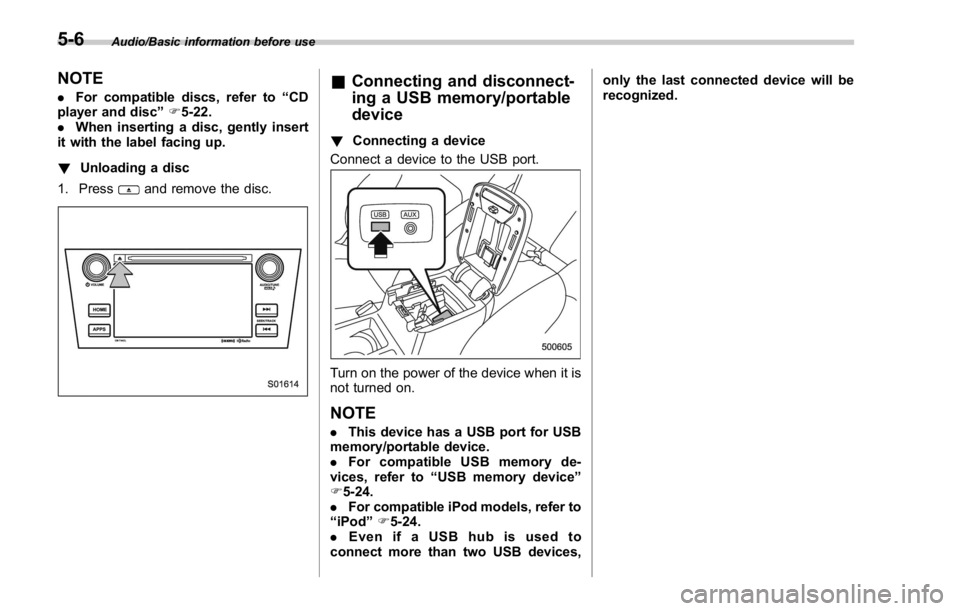
1. Insert a disc into the disc slot.
. After insertion, the disc is automati-
cally loaded. Audio/Basic information before use
– CONTINUED –5-5
Page 261 of 594
Audio/Basic information before use
NOTE . For compatible discs, refer to “ CD
player and disc ” F 5-22.
. When inserting a disc, gently insert
it with the label facing up.
! Unloading a disc
1. Press
and remove the disc. & Connecting and disconnect-
ing a USB memory/portable
device ! Connecting a device
Connect a device to the USB port.
Turn on the power of the device when it is
not turned on.
NOTE . This device has a USB port for USB
memory/portable device.
. For compatible USB memory de-
vices, refer to “ USB memory device ”
F 5-24.
. For compatible iPod models, refer to
“ iPod ” F 5-24.
. Even if a USB hub is used to
connect more than two USB devices, only the last connected device will be
recognized.
5-6
Page 277 of 594
Audio/Tips for operating the audio/visual system
! CD player and disc
. This CD player is intended for use with
4.7 in. (12 cm) discs only.
. Extremely high temperatures can keep
the CD player from working. On hot days,
use the air conditioning system to cool the
inside of the vehicle before using the
player.
. Bumpy roads or other vibrations may
make the CD player skip.
. If moisture gets into the CD player, the
discs may not be able to be played.
Remove the discs from the player and
wait until it dries.
WARNINGCD players use an invisible laser
beam which could cause hazardous
radiation exposure if directed out-
side the unit. Be sure to operate the
player correctly.
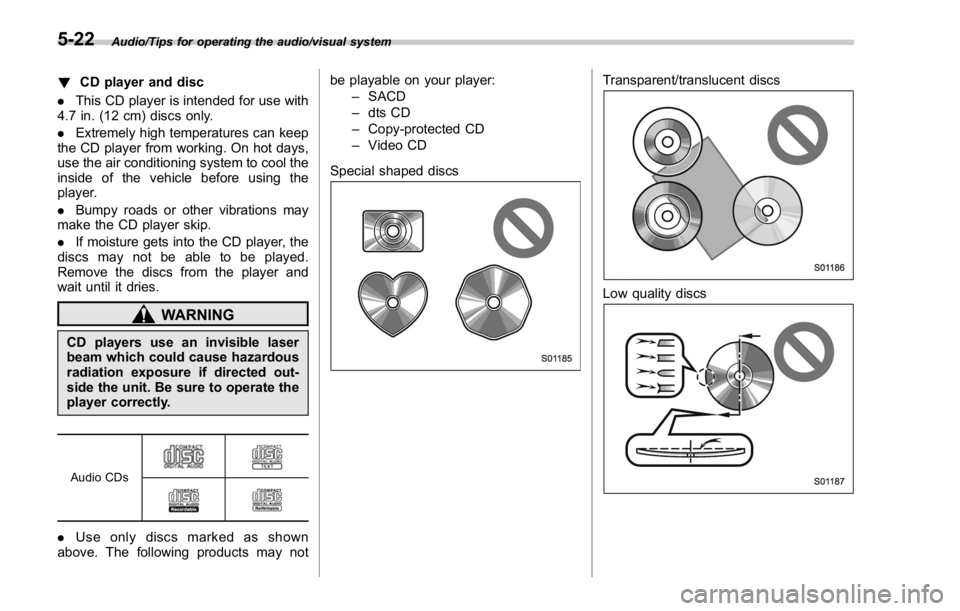
Audio CDs
. Use only discs marked as shown
above. The following products may not be playable on your player:
– SACD
– dts CD
– Copy-protected CD
– Video CD
Special shaped discs Transparent/translucent discs
Low quality discs5-22
Page 278 of 594
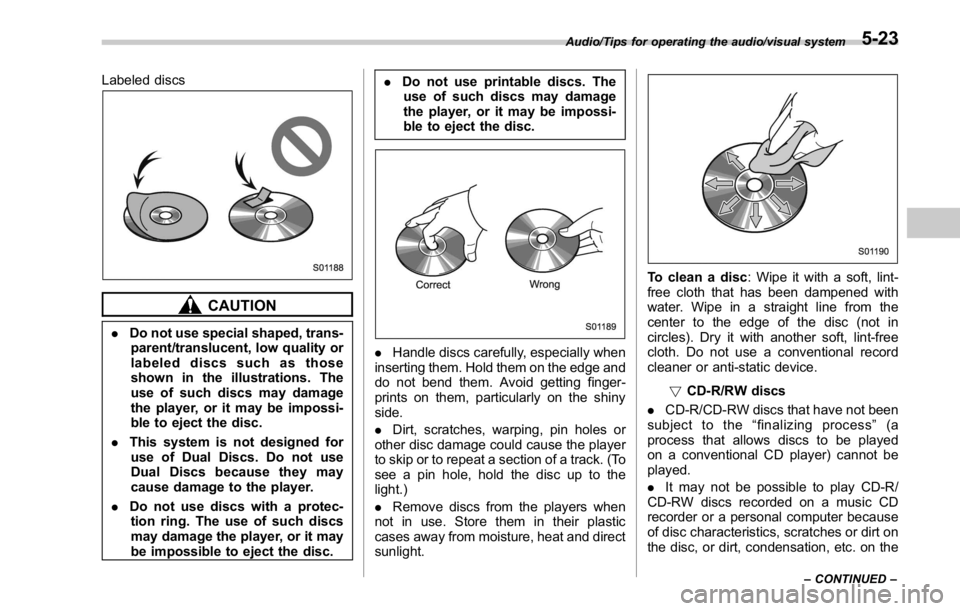
Labeled discs
CAUTION. Do not use special shaped, trans-
parent/translucent, low quality or
labeled discs such as those
shown in the illustrations. The
use of such discs may damage
the player, or it may be impossi-
ble to eject the disc.
. This system is not designed for
use of Dual Discs. Do not use
Dual Discs because they may
cause damage to the player.
. Do not use discs with a protec-
tion ring. The use of such discs
may damage the player, or it may
be impossible to eject the disc. . Do not use printable discs. The
use of such discs may damage
the player, or it may be impossi-
ble to eject the disc.
. Handle discs carefully, especially when
inserting them. Hold them on the edge and
do not bend them. Avoid getting finger-
prints on them, particularly on the shiny
side.
. Dirt, scratches, warping, pin holes or
other disc damage could cause the player
to skip or to repeat a section of a track. (To
see a pin hole, hold the disc up to the
light.)
. Remove discs from the players when
not in use. Store them in their plastic
cases away from moisture, heat and direct
sunlight. To clean a disc : Wipe it with a soft, lint-
free cloth that has been dampened with
water. Wipe in a straight line from the
center to the edge of the disc (not in
circles). Dry it with another soft, lint-free
cloth. Do not use a conventional record
cleaner or anti-static device.
! CD-R/RW discs
. CD-R/CD-RW discs that have not been
subject to the “ finalizing process ” (a
process that allows discs to be played
on a conventional CD player) cannot be
played.
. It may not be possible to play CD-R/
CD-RW discs recorded on a music CD
recorder or a personal computer because
of disc characteristics, scratches or dirt on
the disc, or dirt, condensation, etc. on theAudio/Tips for operating the audio/visual system
– CONTINUED –5-23
Page 279 of 594

Audio/Tips for operating the audio/visual system
lens of the unit.
. It may not be possible to play discs
recorded on a personal computer depend-
ing on the application settings and the
environment. Record with the correct
format. (For details, contact the appropri-
ate application manufacturers of the ap-
plications.)
. CD-R/CD-RW discs may be damaged
by direct exposure to sunlight, high tem-
peratures or other storage conditions. The
unit may be unable to play some damaged
discs.
. If you insert a CD-RW disc into the
player, playback will begin more slowly
than with a conventional CD or CD-R disc.
. Recordings on CD-R/CD-RW cannot
be played using the DDCD (Double
Density CD) system.
! USB memory device
. USB communication formats: USB
1.1/2.0 HS (480 Mbps) and FS (12 Mbps)
. File formats: FAT 16/32
. Correspondence class: Mass storage
class
! iPod
The following iPod ®
, iPod nano ®
, iPod
classic ®
, iPod touch ®
and iPhone ®
de-
vices can be used with this system. Made for
. iPod touch (5th generation)*
. iPod touch (4th generation)
. iPod touch (3rd generation)
. iPod touch (2nd generation)
. iPod touch (1st generation)
. iPod classic
. iPod nano (7th generation)*
. iPod nano (6th generation)*
. iPod nano (5th generation)
. iPod nano (4th generation)
. iPod nano (3rd generation)
. iPod nano (2nd generation)*
. iPod nano (1st generation)*
. iPhone 5S*
. iPhone 5C*
. iPhone 5*
. iPhone 4S
. iPhone 4
. iPhone 3GS
. iPhone 3G
. iPhone
*: iPod video not supported
Depending on differences between mod-
els or software versions etc., some mod-
els might be incompatible with this sys-
tem. ! File information
Compatible compressed files (Audio) Item USB DISC
Compatible
file format MP3/WMA/AAC
Folders in the
device Maximum
512 Maximum
255
Files in the
device Maximum
8000 Maximum
512
Files per
folder Maximum
255 —
Corresponding sampling frequency
(Audio) File type Frequency (kHz)
MP3 files:
MPEG 1 LAYER 3 32/44.1/48
MP3 files:
MPEG 2 LSF LAYER 3 16/22.05/24
WMA files:
Ver. 7, 8, 9 (9.1/9.2) 32/48/64/80/96/128/
160/192
AAC files:
MPEG4/AAC-LC 48/44.1/32/24/22.05/
16/12/11.025/85-24
Page 280 of 594

Corresponding bit rates (Audio) File type Bit rate (kbps)
MP3 files:
MPEG 1 LAYER 3 32 - 320
MP3 files:
MPEG 2 LSF LAYER 3 8 - 160
WMA files: Ver. 7, 8 CBR 48 - 192
WMA files:
Ver. 9 (9.1/9.2) CBR 32 - 192
AAC files:
MPEG4/AAC-LC 16 - 320
(Variable Bit Rate (VBR) compatible)
. MP3 (MPEG Audio Layer 3), WMA
(Windows Media Audio) and AAC (Ad-
vanced Audio Coding) are audio compres-
sion standards.
. This system can play MP3/WMA/AAC
files on CD-R, CD-RW discs, USB mem-
ory, and Bluetooth device.
. This system can play disc recordings
compatible with ISO 9660 level 1 and level
2 and with the Romeo and Joliet file
system.
. When naming an MP3/WMA/AAC file,
add an appropriate file extension (.mp3/
.wma/.m4a).
. This system plays back files with .mp3/
.wma/.m4a file extensions as MP3/WMA/
AAC files respectively. To prevent noise and playback errors, use the appropriate
file extension.
. This system can play only the first
session when using multi-session compa-
tible CDs.
. MP3 files are compatible with the ID3
Tag Ver. 1.0, Ver. 1.1, Ver. 2.2 and Ver. 2.3
formats. This system cannot display disc
title, track title and artist name in other
formats.
. WMA/AAC files can contain a WMA/
AAC tag that is used in the same way as
an ID3 tag. WMA/AAC tags carry informa-
tion such as track title and artist name.
. The emphasis function is available only
when playing MP3/WMA files recorded at
32, 44.1 and 48 kHz.
. This system can play back AAC files
encoded by iTunes.
. The sound quality of MP3/WMA files
generally improves with higher bit rates. In
order to achieve a reasonable level of
sound quality, discs recorded with a bit
rate of at least 128 kbps are recom-
mended.
. The MP3/WMA player does not play
back MP3/WMA files from discs recorded
using packet write data transfer (UDF
format). Discs should be recorded using
“ pre-mastering ” software rather than
“ packet write ” software. . M3u playlists are not compatible with
the audio device.
. MP3i (MP3 interactive) and MP3PRO
formats are not compatible with the audio
device.
. The player is compatible with VBR
(Variable Bit Rate).
. When playing back files recorded as
VBR (Variable Bit Rate) files, the play time
will not be correctly displayed if the fast
forward or reverse operations are used.
. It is not possible to check folders that
do not include MP3/WMA/AAC files.
. MP3/WMA/AAC files in folders up to 8
levels deep can be played. However, the
start of playback may be delayed when
using discs containing numerous levels of
folders. For this reason, we recommend
creating discs with no more than 2 levels
of folders.Audio/Tips for operating the audio/visual system
– CONTINUED –5-25
Page 310 of 594
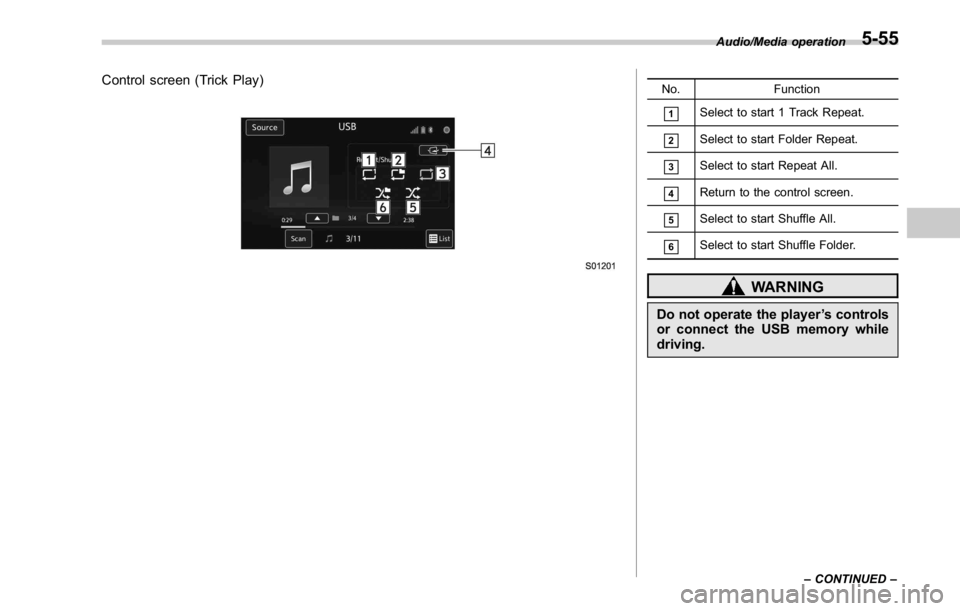
Control screen (Trick Play) No. Function
& 1
Select to start 1 Track Repeat.
& 2
Select to start Folder Repeat.
& 3
Select to start Repeat All.
& 4
Return to the control screen.
& 5
Select to start Shuffle All.
& 6
Select to start Shuffle Folder.
WARNINGDo not operate the player ’ s controls
or connect the USB memory while
driving. Audio/Media operation
– CONTINUED –5-55
Page 311 of 594
Audio/Media operation
CAUTION. Do not leave your portable player
in the car. In particular, high
temperatures inside the vehicle
may damage the portable player.
. Do not push down on or apply
unnecessary pressure to the por-
table player while it is connected
as this may damage the portable
player or its terminal.
. Do not insert foreign objects into
the port as this may damage the
portable player or its terminal.
NOTE If you press the “ Mute ” switch on the
steering wheel during playback, the
track pauses. If you press the “ Mute ”
switch once again, the playback will
resume. & iPod ! Overview
TheiPodoperationscreencanbe
reached by the following methods:
. Connect an iPod. Refer to “ Connecting
and disconnecting a USB memory/porta-
ble device ” F 5-6.
. Select
USB/iPod (USB/iPod) on the
“ Select Audio Source (Select Audio
Source) ” screen. Refer to “ Selecting an
audio source ” F 5-13.5-56
Page 315 of 594
Audio/Media operation
WARNINGDo not operate the player ’ s controls
or connect the iPod while driving.
CAUTION. Do not leave your portable player
in the car. In particular, high
temperatures inside the vehicle
may damage the portable player.
. Do not push down on or apply
unnecessary pressure to the por-
table player while it is connected
as this may damage the portable
player or its terminal.
. Do not insert foreign objects into
the port as this may damage the
portable player or its terminal.
NOTE . When an iPod is connected using a
genuine iPod cable, the iPod starts
charging its battery.
. When an iPod is connected and the
audio source is changed to iPod mode,
the iPod will resume playing from the
same point it was last used.
. Depending on the iPod that is con-
nected to the system, certain functions may not be available.
. Files/tracks selected by operating a
connected iPod may not be recognized
or displayed properly.
. If you press the “ Mute ” switch on
the steering wheel during playback, the
track pauses. If you press the “ Mute ”
switch once again, the playback will
resume.
& Bluetooth audio The Bluetooth audio system enables
users to enjoy listening to music that is
played on a portable player on the vehicle
speakers via wireless communication.
This audio system supports Bluetooth, a
wireless data system capable of playing
portable audio music without cables. If
your device does not support Bluetooth,
the Bluetooth audio system will not func-
tion.
! Overview
Select
BT Audio (BT Audio) on the “ Select
Audio Source (Select Audio Source) ”
screen. Refer to “ Selecting an audio
source ” F 5-13.
Depending on the type of portable player
connected, some functions may not be
available and/or the screen may look
differently than shown in this manual.5-60