lights SUBARU WRX 2016 Owners Manual
[x] Cancel search | Manufacturer: SUBARU, Model Year: 2016, Model line: WRX, Model: SUBARU WRX 2016Pages: 594, PDF Size: 19.43 MB
Page 8 of 594

Abbreviation Meaning
INT Intermittent
LATCH Lower anchors and tethers for
children
LED Light emitting diode
LSD Limited slip differential
MIL Malfunction indicator light
MMT Methylcyclopentadienyl man-
ganese tricarbonyl
MT Manual transmission
OBD On-board diagnostics
RON Research octane number
SI-DRIVE SUBARU Intelligent Drive
SRF Steering responsive fog lights
system
SRS Supplemental restraint sys-
tem
TIN Tire identification number
TPMS Tire pressure monitoring sys-
tem Vehicle symbols These are some of the symbols you may
see on your vehicle.
For warning and indicator lights, refer to
“ Warning and indicator lights ” F 21.Mark Name
WARNING
CAUTIONSafety precautions when
driving & Seatbelt and SRS airbag WARNING. All persons in the vehicle should
fasten their seatbelts BEFORE
the vehicle starts to move. Other-
wise, the possibility of serious
injury becomes greater in the
event of a sudden stop or acci-
dent.
. To obtain maximum protection in
the event of an accident, the
driver and all passengers in the
vehicle should always wear seat-
belts when the vehicle is moving.
The SRS (Supplemental Restraint
System) airbag does not do away
with the need to fasten seatbelts.
In combination with the seat-
belts, it offers the best combined
protection in case of a serious
accident.
Not wearing a seatbelt increases
the chance of severe injury or
death in a crash even when the
vehicle has the SRS airbag.
– CONTINUED –3
Page 21 of 594

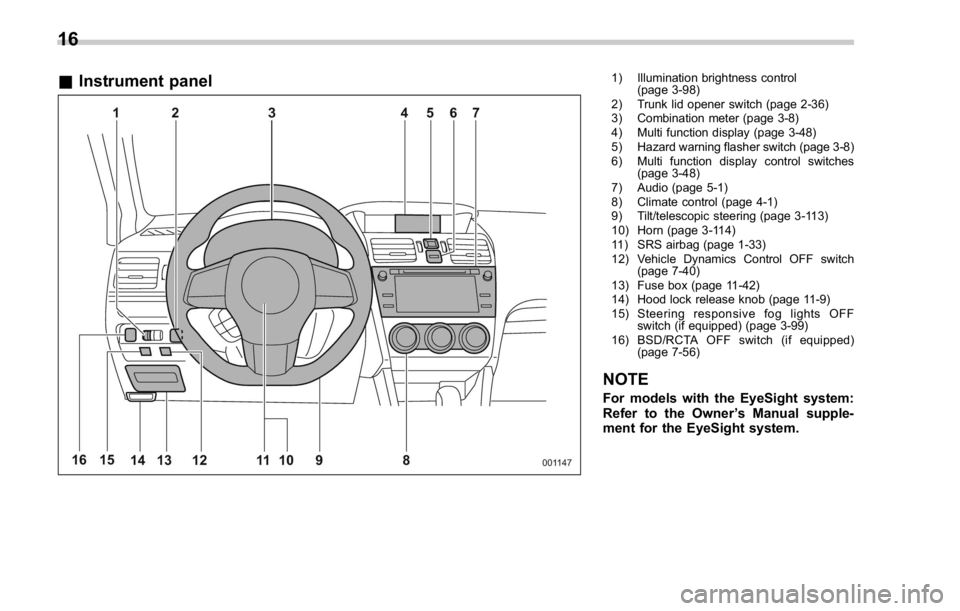
& Instrument panel 1) Illumination brightness control
(page 3-98)
2) Trunk lid opener switch (page 2-36)
3) Combination meter (page 3-8)
4) Multi function display (page 3-48)
5) Hazard warning flasher switch (page 3-8)
6) Multi function display control switches
(page 3-48)
7) Audio (page 5-1)
8) Climate control (page 4-1)
9) Tilt/telescopic steering (page 3-113)
10) Horn (page 3-114)
11) SRS airbag (page 1-33)
12) Vehicle Dynamics Control OFF switch
(page 7-40)
13) Fuse box (page 11-42)
14) Hood lock release knob (page 11-9)
15) Steering responsive fog lights OFF
switch (if equipped) (page 3-99)
16) BSD/RCTA OFF switch (if equipped)
(page 7-56)
NOTE For models with the EyeSight system:
Refer to the Owner ’ s Manual supple-
ment for the EyeSight system.16
Page 26 of 594

& Warning and indicator lights Mark Name Page
Seatbelt warning light 3-14
Front passenger ’ s
seatbelt warning light 3-14
SRS airbag system
warning light 3-15
/ Front passenger ’ s
frontal airbag ON indi-
cator 3-16
/ Front passenger ’ s
frontal airbag OFF in-
dicator 3-16
CHECK ENGINE
warning light/Malfunc-
tion indicator light 3-16
Charge warning light 3-17
Oil pressure warning
light 3-17
Engine oil level warn-
ing indicator (except
STI) 3-17
AT OIL TEMP warning
light (CVT models) 3-18 Mark Name Page
Rear differential oil
temperature warning
light (STI) 3-18
ABS warning light 3-20
Brake system warning
light 3-21
Electronic parking
brake indicator light
(models with electro-
nic parking brake sys-
tem) 3-23
Door open warning
light 3-25
AWD warning light
(if equipped) 3-25
Power steering warn-
ing light (except STI) 3-25
Hill start assist warn-
ing light/Hill start assist
OFF indicator light
(models without elec-
tronic parking brake
system) 3-24
Hill holder indicator
light (models with
electronic parking
brake system) 3-24 Mark Name Page
Vehicle Dynamics
Control warning light/
Vehicle Dynamics
Control operation indi-
cator light 3-26
Vehicle Dynamics
Control OFF indicator
light 3-27
Turn signal indicator
lights 3-35
LED headlight warning
light (if equipped) 3-25
High beam indicator
light 3-35
Automatic headlight
beam leveler warning
light (if equipped) 3-35
Front fog light indicator
light (if equipped) 3-35
Access key warning
light (if equipped) 3-28
Security indicator light 3-33
Headlight indicator
light 3-35
– CONTINUED –21
Page 27 of 594

Mark Name Page
Cruise control indica-
tor 3-35
Cruise control set in-
dicator 3-35
Traction mode indica-
tor 3-27
Low fuel warning light 3-24
Low tire pressure
warning light
(U.S.-spec. models) 3-19
Windshield washer
fluid warning indicator 3-18
Sport (S) mode indi-
cator (if equipped) 3-34
Intelligent (I) mode in-
dicator (if equipped) 3-34
Sport Sharp (S#)
mode indicator (if
equipped) 3-34
Shift-up indicator (STI) 3-34
Driver ’ s control center
differential auto indi-
cator (STI) 3-35 Mark Name Page
Auto [+] mode indica-
tor (STI) 3-36
Auto [ − ] mode indica-
tor (STI) 3-36
Driver ’ s control center
differential indicator
and warning (STI) 3-36
REV indicator light
(STI) 3-37
Steering responsive
fog lights warning in-
dicator/Steering re-
sponsive fog lights
OFF indicator (if
equipped) 3-37
BSD/RCTA warning
indicator (if equipped) 3-37
BSD/RCTA OFF indi-
cator (if equipped) 3-3722
Page 28 of 594

Function settings A SUBARU dealer can change the settings of the functions shown in the following table to meet your personal requirements. If your
vehicle is equipped with a multi function display, the settings for some of these functions can be changed using the display. Contact the
nearest SUBARU dealer for details. For details, refer to “ Multi function display ” F 3-48.Item Function Possible settings Default setting
Alarm system Alarm system Operation/Non-operation Operation
Monitoring start delay time (after closure of doors) 0 seconds/30 seconds 30 seconds
Impact sensor operation (only models with shock
sensors (dealer option)) Operation/Non-operation Non-operation
Passive arming (models without “ keyless access with
push-button start system ” ) Operation/Non-operation Non-operation
Dome light and map lights (models with moonroof)
illumination ON/OFF OFF
Keyless access (if equipped) Hazard warning flasher* Operation/Non-operation Operation
Audible signal Operation/Non-operation Operation
Audible signal volume* Level 1 - 7 Level 5
Door unlock selection function (driver ’ s door unlock) Driver ’ s door only/All doors Driver ’ s door only
Remote keyless entry system Hazard warning flasher* Operation/Non-operation Operation
Audible signal Operation/Non-operation Operation
Audible signal volume* Level 1 - 7 Level 5
Key lock-in prevention Key lock-in prevention Operation/Non-operation Operation
Defogger and deicer system for models
with the automatic climate control sys-
tem* Rear window defogger, outside mirror defogger and
windshield wiper deicer Operation for 15 minutes/
Continuous operation Operation for 15
minutes
Dome light Operation of dome light/map light OFF delay timer OFF/10 seconds/20 sec-
onds/30 seconds 30 seconds
Map light (models with moonroof)
– CONTINUED –23
Page 29 of 594

Item Function Possible settings Default setting
Battery drainage prevention function Battery drainage prevention function Operation/Non-operation Operation
Seatbelt warning Sounds a chime while driving Operation/Non-operation Operation
Auto on/off headlights (if equipped)* Sensitivity of the operation of the auto on/off headlights Low/Normal/High/Very high Normal
Welcome lighting* Approaching (operation of timer) OFF/30 seconds/60 sec-
onds/90 seconds 30 seconds
Exiting (operation of timer)
One-touch lane changer Operation of the one-touch lane changer Operation/Non-operation Operation
*: The settings can be changed by the customer using the multi function display.
24
Page 96 of 594

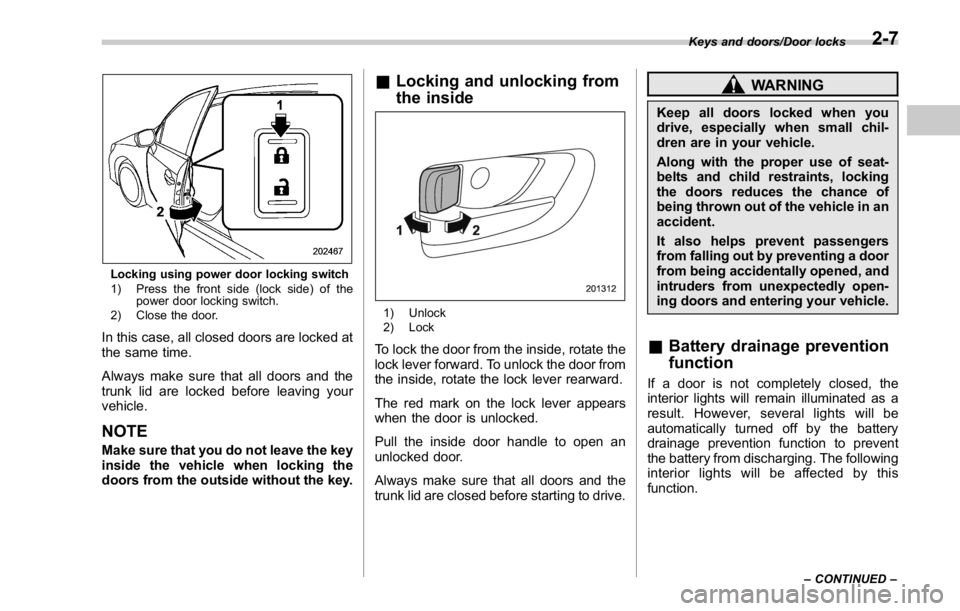
Locking using power door locking switch
1) Press the front side (lock side) of the
power door locking switch.
2) Close the door.
In this case, all closed doors are locked at
the same time.
Always make sure that all doors and the
trunk lid are locked before leaving your
vehicle.
NOTE Make sure that you do not leave the key
inside the vehicle when locking the
doors from the outside without the key. & Locking and unlocking from
the inside
1) Unlock
2) Lock
To lock the door from the inside, rotate the
lock lever forward. To unlock the door from
the inside, rotate the lock lever rearward.
The red mark on the lock lever appears
when the door is unlocked.
Pull the inside door handle to open an
unlocked door.
Always make sure that all doors and the
trunk lid are closed before starting to drive. WARNINGKeep all doors locked when you
drive, especially when small chil-
dren are in your vehicle.
Along with the proper use of seat-
belts and child restraints, locking
the doors reduces the chance of
being thrown out of the vehicle in an
accident.
It also helps prevent passengers
from falling out by preventing a door
from being accidentally opened, and
intruders from unexpectedly open-
ing doors and entering your vehicle.
& Battery drainage prevention
function If a door is not completely closed, the
interior lights will remain illuminated as a
result. However, several lights will be
automatically turned off by the battery
drainage prevention function to prevent
the battery from discharging. The following
interior lights will be affected by this
function. Keys and doors/Door locks
– CONTINUED –2-7
Page 97 of 594

Keys and doors/Power door locking switches
Item Switch
position Automatically turning
off
Map lights* OFF* Approximately 20
minutes later
Dome light DOOR Approximately 20
minutes later
Ignition
switch light — Approximately 20
minutes later
Trunk light — Approximately 20
minutes later
*: The battery drainage prevention function
affects only the map lights on models with the
moonroof, and only when the map light
switches are in the OFF position. The map
lights on models without the moonroof do not
turn off automatically, so push the light switches
manually to turn them off.
The operational/non-operational setting of
this function can be changed by a
SUBARU dealer. Contact your SUBARU
dealer to change the setting.
NOTE . The factory setting (default setting)
for this function is set as “ operational ” .
. When leaving the vehicle, make sure
that all doors and the trunk lid are
completely closed.
. The battery drainage prevention
function does not operate while the key is in the ignition switch.
Power door locking switches
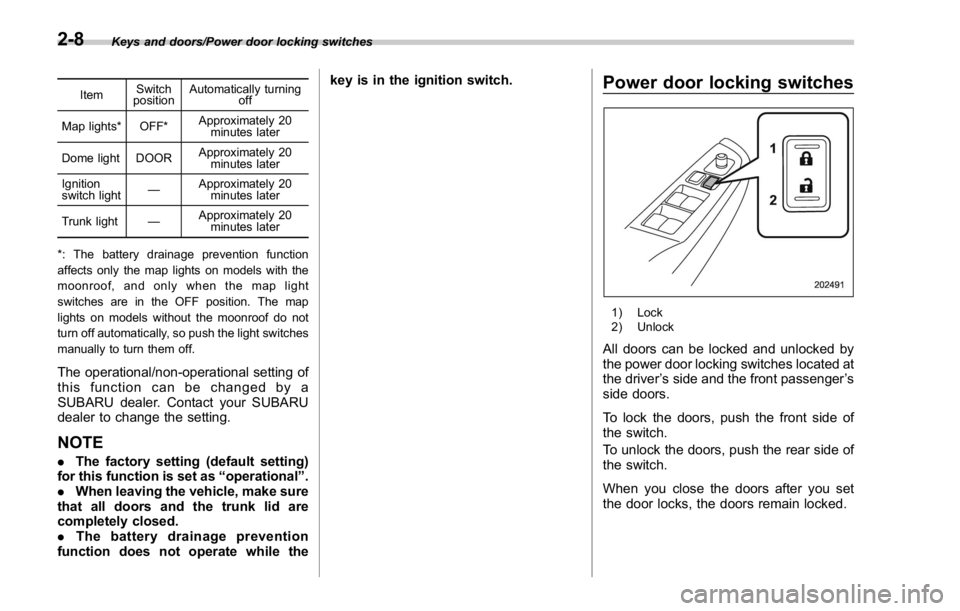
1) Lock
2) Unlock
All doors can be locked and unlocked by
the power door locking switches located at
the driver ’ s side and the front passenger ’ s
side doors.
To lock the doors, push the front side of
the switch.
To unlock the doors, push the rear side of
the switch.
When you close the doors after you set
the door locks, the doors remain locked.2-8
Page 112 of 594

NOTE If the interval between the first and
second presses of the unlock/disarm
button (for unlocking of all of the
doors) is extremely short, the system
may not respond.
& Opening the trunk lid The trunk lid opens when the “ ” button
is pressed continuously for at least 2
seconds. An electronic chirp will sound
twice and the turn signal lights will flash
twice.
& Vehicle finder function Use this function to find your vehicle
parked among many vehicles in a large
parking lot. Provided you are within 30 feet
(10 meters) of the vehicle, pressing the
lock/arm button three times in a 5-second
period will cause your vehicle ’ s horn to
sound once and its hazard warning
flashers to flash three times.
NOTE If the interval between presses is too
short when you press the lock/arm
button three times, the system may
not respond to the signals from the
access key/remote transmitter. & Sounding a panic alarm To activate the alarm, press the “ PANIC ”
button once.
The horn will sound and the hazard
warning flashers will flash.
To deactivate the panic alarm, press any
button on the access key/remote transmit-
ter. Unless a button on the access key/
remote transmitter is pressed, the alarm
will be deactivated after approximately 30
seconds.
& Selecting audible signal op-
eration (models without
“ keyless access with push-
button start system ” )Using an electronic chirp, the system will
give you an audible signal when the doors
lock and unlock. If desired, you may turn
the audible signal off.
Perform the following steps to deactivate
the audible signal. You can also use the
same steps to restore the function.
1. Sit in the driver ’ s seat and shut all
doors and the trunk. 2. Hold down the REAR (UNLOCK) side
of the power door locking switch.
3. While holding down the REAR (UN-
LOCK) side of the power door locking
switch, pull the key out and re-insert it into
the ignition switch at least 6 times within
10 seconds after Step 2.
4. Open and close the driver ’ s door once
within 10 seconds after Step 3.
5. The hazard warning flashers flash 3
times to indicate completion of the setting.
You may have the above settings done by
your SUBARU dealer. Also, the setting
can be changed using the multi function
display. For details, refer to “ Keyless
buzzer volume setting ” F 3-84.
You may also change the volume of the
audible signal by operating the multi Keys and doors/Remote keyless entry system
– CONTINUED –2-23
Page 113 of 594

Keys and doors/Remote keyless entry system
function display.
& Replacing the batteryRefer to “ Replacing battery ” F 11-50.
& Replacing lost transmittersIf you lose a transmitter or want to
purchase additional transmitters (up to
four can be programmed), your transmit-
ters should be reprogrammed for security
reasons. For details, contact your
SUBARU dealer and have the transmitters
programmed into the remote keyless entry
system.
& Welcome lighting (if
equipped)The welcome lighting turns on the head-
lights, interior lights, etc. for smooth
approaching to or exiting from the vehicle
at night or in a dark place.
NOTE . For the operation of the interior
lights, refer to “ Interior lights ” F 6-2.
. The factory setting (default setting)
of the operation duration of the head-
lights and the exterior lights is 30
seconds for both approaching and
exiting. This setting can be changed
to OFF (no operation), 30 seconds, 60
seconds, or 90 seconds, respectively for approaching and exiting at
SUBARU dealers. For more details,
contact a SUBARU dealer.
! Approaching
When it is dark and the light control switch
is in the “ AUTO ” position, if the doors are
unlocked using the unlock button on the
transmitter, the headlight low beams and
some exterior lights will illuminate. The
interior lights will also illuminate if the
dome light switch is in the “ DOOR ”
position.
The headlight low beams and the exterior
lights will illuminate for 30 seconds.
NOTE If the doors are locked using the lock
button on the transmitter or the lock
sensor on the door handle, the head-
lights and exterior lights will turn off.
! Exiting
When the light control switch is in the
“ AUTO ” position and the headlight indica-
tor light is on, if the ignition switch is turned
off or the key is removed from the ignition
switch, the headlight low beams and some
exterior lights will continue illuminating.
The headlights and exterior lights will turn
off under either of the following conditions. . 30 seconds have elapsed since the
driver ’ s door was opened and closed.
. The lock button on the transmitter or
the lock sensor on the door handle is
operated two times successively.
NOTE . If the light control switch is set to a
position other than “ AUTO ” position,
the headlights and the exterior lights
will turn off.
. When exiting from the vehicle, the
headlights and exterior lights will turn
off if the driver ’ s door is not opened
and closed within 3 minutes from turn-
ing on of the welcome lighting.
& Certification for Remote key-
less entry system ! U.S.-spec. models
FCC ID: CWTWB1U811
FCC ID: CWTWD1U781
CAUTION
FCC CAUTION
Changes or modifications not ex-
pressly approved by the party re-
sponsible for compliance could void
the user ’ s authority to operate the
equipment.2-24