lock SUBARU WRX 2018 Owners Manual
[x] Cancel search | Manufacturer: SUBARU, Model Year: 2018, Model line: WRX, Model: SUBARU WRX 2018Pages: 578, PDF Size: 33.21 MB
Page 208 of 578
(213,1)
北米Model "A1700BE-B" EDITED: 2017/ 10/ 11
Illumination brightness con-
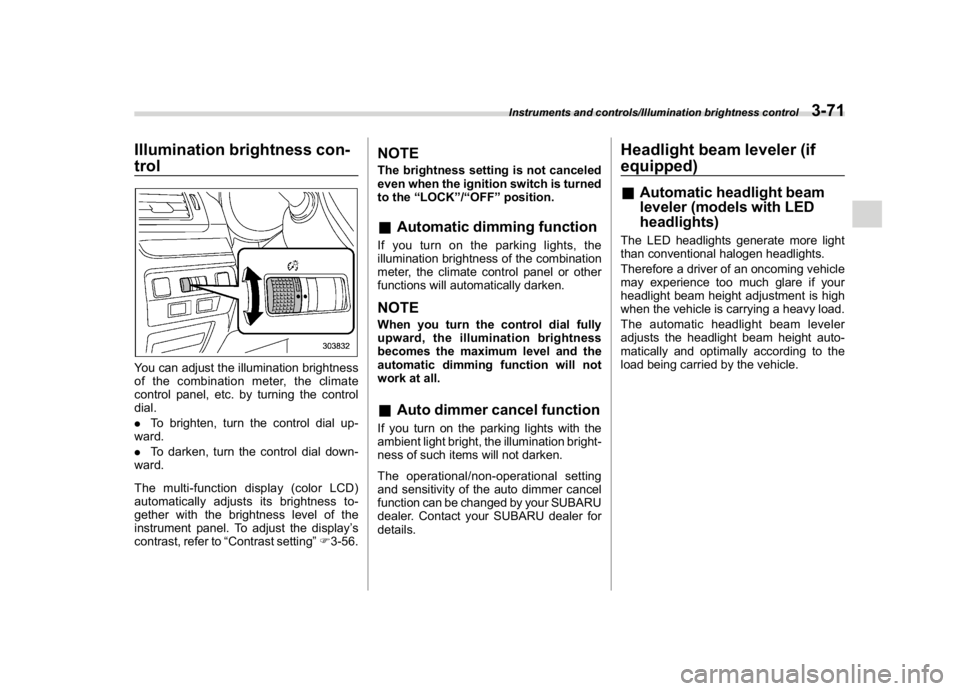
trolYou can adjust the illumination brightness
of the combination meter, the climate
control panel, etc. by turning the control
dial.
.To brighten, turn the control dial up-
ward.
.To darken, turn the control dial down-
ward.
Themulti-functiondisplay(colorLCD)
automatically adjusts its brightness to-
gether with the brightness level of the
instrument panel. To adjust the display’s
contrast, refer to“Contrast setting”F3-56.
NOTEThe brightness setting is not canceled
even when the ignition switch is turned
to the“LOCK”/“OFF”position.&Automatic dimming functionIf you turn on the parking lights, the
illumination brightness of the combination
meter, the climate control panel or other
functions will automatically darken.NOTEWhen you turn the control dial fully
upward, the illumination brightness
becomes the maximum level and the
automatic dimming function will not
work at all.&Auto dimmer cancel functionIf you turn on the parking lights with the
ambient light bright, the illumination bright-
ness of such items will not darken.
The operational/non-operational setting
and sensitivity of the auto dimmer cancel
function can be changed by your SUBARU
dealer. Contact your SUBARU dealer for
details.
Headlight beam leveler (if
equipped)&Automatic headlight beam
leveler (models with LED
headlights)The LED headlights generate more light
than conventional halogen headlights.
Therefore a driver of an oncoming vehicle
may experience too much glare if your
headlight beam height adjustment is high
when the vehicle is carrying a heavy load.
The automatic headlight beam leveler
adjusts the headlight beam height auto-
matically and optimally according to the
load being carried by the vehicle.
Instruments and controls/Illumination brightness control
3-71
3
Page 209 of 578
(214,1)
北米Model "A1700BE-B" EDITED: 2017/ 10/ 11
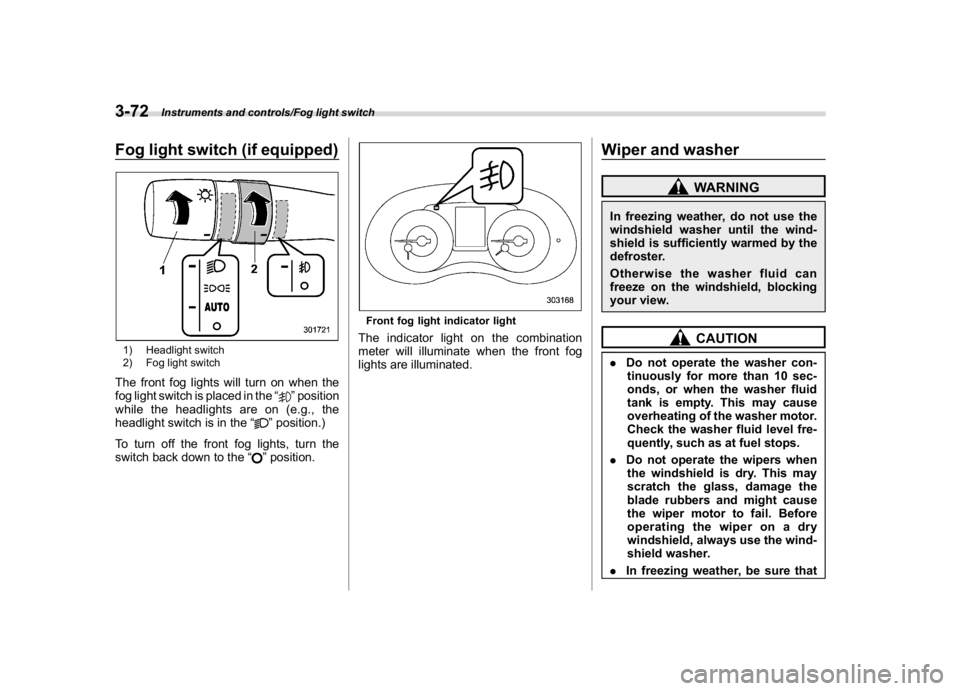
Fog light switch (if equipped)1) Headlight switch
2) Fog light switchThe front fog lights will turn on when the
fog light switch is placed in the“
”position
while the headlights are on (e.g., the
headlight switch is in the“
”position.)
To turn off the front fog lights, turn the
switch back down to the“”position.
Front fog light indicator lightThe indicator light on the combination
meter will illuminate when the front fog
lights are illuminated.
Wiper and washer
WARNING
In freezing weather, do not use the
windshield washer until the wind-
shield is sufficiently warmed by the
defroster.
Otherwise the washer fluid can
freeze on the windshield, blocking
your view.
CAUTION
.Do not operate the washer con-
tinuously for more than 10 sec-
onds, or when the washer fluid
tank is empty. This may cause
overheating of the washer motor.
Check the washer fluid level fre-
quently, such as at fuel stops.
.Do not operate the wipers when
the windshield is dry. This may
scratch the glass, damage the
blade rubbers and might cause
the wiper motor to fail. Before
operating the wiper on a dry
windshield, always use the wind-
shield washer.
.In freezing weather, be sure that
Instruments and controls/Fog light switch
3-72
Page 210 of 578

(215,1)
北米Model "A1700BE-B" EDITED: 2017/ 10/ 11
the blade rubbers are not frozen
to the windshield before switch-
ing on the wipers. Attempting to
operate the wiper with the blade
rubbers frozen to the window
glass could cause not only the
blade rubbers to be damaged but
also might cause the wiper motor
to fail. If the blade rubbers are
frozen to the window glass, be
sure to operate the defroster or
the windshield wiper deicer (if
equipped) before turning on the
wiper.
.If the wipers stop during opera-
tion because of ice or some other
obstruction on the window, this
might cause the wiper motor to
fail even if the wiper switch is
turned off. If this occurs,
promptly stop the vehicle in a
safe place, turn the ignition
switch to the“LOCK”/“OFF”po-
sition and clean the window glass
to allow proper wiper operation.
.Use clean water if windshield
washer fluid is unavailable. In
areas where water freezes in
winter, use SUBARU Windshield
Washer Fluid or the equivalent.
Refer to“Windshield washer
fluid”F11-38.Also, when driving the vehicle
when there are freezing tempera-
tures, use non-freezing type wi-
per blades.
.Do not clean the wiper blades
with gasoline or a solvent, such
as paint thinner or benzine. This
will cause deterioration of the
wiper blades.
NOTE.The windshield wiper motor is pro-
tected against overloads by a circuit
breaker. If the motor operates continu-
ously under an unusually heavy load,
the circuit breaker may trip to stop the
motor temporarily. If this happens, park
your vehicle in a safe place, turn off the
wiper switch, and wait for approxi-
mately 10 minutes. The circuit breaker
will reset itself, and the wipers will
again operate normally.
.Clean your blade rubbers and win-
dow glass periodically with a washer
solution to prevent streaking, and to
remove accumulations of road salt or
road film. Operate the windshield
washer for at least 1 second so that
washer solution will be sprinkled all
over the windshield.
.Grease, wax, insects or other mate-rial on the windshield or the blade
rubbers results in jerky wiper operation
and streaking on the glass. If you
cannot remove those streaks after
operating the washer or if the wiper
operation is jerky, clean the outer sur-
face of the windshield and the blade
rubbers using a sponge or soft cloth
with a neutral detergent or mild-abra-
sive cleaner. After cleaning, rinse the
window glass and blade rubbers with
clean water. The glass is clean if no
beads form on the glass when you rinse
with water.
.If you cannot eliminate the streaking
even after following this procedure,
replace the wiper blades (or blade
rubbers) with new ones. For replace-
ment instructions, refer to“Replace-
ment of wiper blades”F11-39.
–CONTINUED–
Instruments and controls/Wiper and washer
3-73
3
Page 214 of 578
(219,1)
北米Model "A1700BE-B" EDITED: 2017/ 10/ 11
!To Operate the Auto-Dimming Fea-
ture
Press the“
”switch to turn the auto-
dimming feature on/off. The auto-dimming
feature is enabled when the switch’s green
LED indicator is on. The auto-dimming
feature will default to on with each ignition
cycle.
!To Operate the Compass Feature
1. To turn the compass feature on/off,
press and hold the“
”switch for more
than 3 seconds or until the display turns
on/off. The compass feature will default to
on with each ignition cycle.
2. If the display reads“C”, slowly drive the
vehicle in circles until compass is cali-
brated.
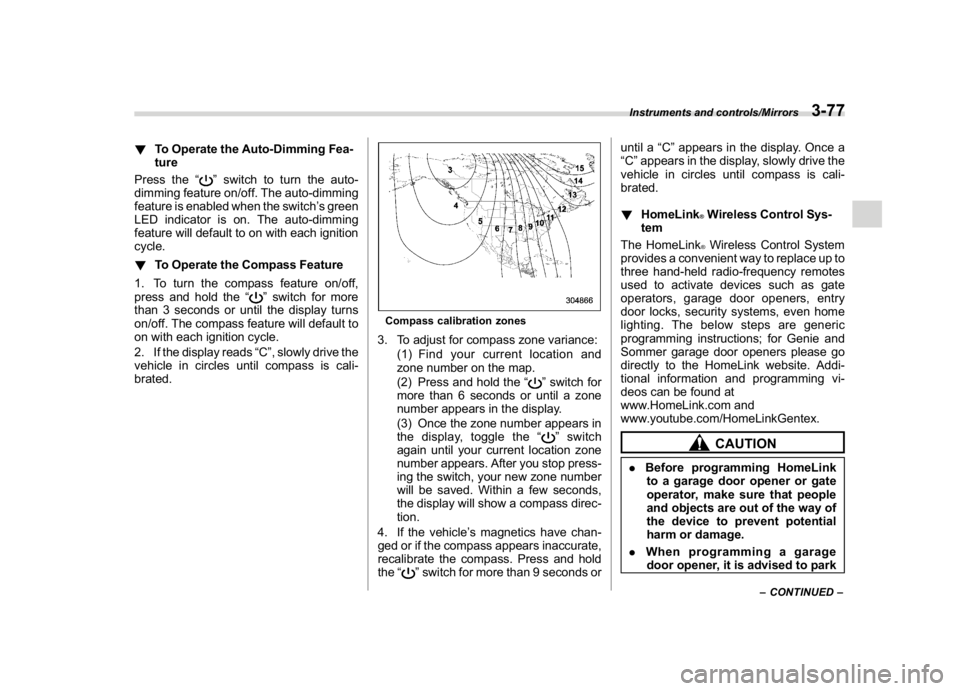
Compass calibration zones3. To adjust for compass zone variance:
(1) Find your current location and
zone number on the map.
(2) Press and hold the“
”switch for
more than 6 seconds or until a zone
number appears in the display.
(3) Once the zone number appears in
the display, toggle the“”switch
again until your current location zone
number appears. After you stop press-
ing the switch, your new zone number
will be saved. Within a few seconds,
the display will show a compass direc-
tion.
4. If the vehicle’s magnetics have chan-
ged or if the compass appears inaccurate,
recalibrate the compass. Press and hold
the“
”switch for more than 9 seconds oruntil a“C”appears in the display. Once a
“C”appears in the display, slowly drive the
vehicle in circles until compass is cali-
brated.
!HomeLink
®Wireless Control Sys-
tem
The HomeLink®Wireless Control System
provides a convenient way to replace up to
three hand-held radio-frequency remotes
used to activate devices such as gate
operators, garage door openers, entry
door locks, security systems, even home
lighting. The below steps are generic
programming instructions; for Genie and
Sommer garage door openers please go
directly to the HomeLink website. Addi-
tional information and programming vi-
deos can be found at
www.HomeLink.com and
www.youtube.com/HomeLinkGentex.CAUTION
.Before programming HomeLink
to a garage door opener or gate
operator, make sure that people
and objects are out of the way of
the device to prevent potential
harm or damage.
.When programming a garage
door opener, it is advised to park
–CONTINUED–
Instruments and controls/Mirrors
3-77
3
Page 218 of 578
(223,1)
北米Model "A1700BE-B" EDITED: 2017/ 10/ 11
the device during the“cycling”process
to prevent possible overheating.
Proceed with“Programming a New
HomeLink Button”step 4 to complete.
!Using HomeLink
To operate, simply press and release the
programmed HomeLink button. Activation
will now occur for the trained device (i.e.
garage door opener, gate operator, secur-
ity system, entry door lock, home/office
lighting, etc.). For convenience, the hand-
held remote of the device may also be
used at any time.
!Erasing HomeLink Buttons
To erase programming from the three
buttons (individual buttons cannot be
erased but can be“reprogrammed”as
outlined below), follow the step noted:
Press and hold the two outer HomeLink
buttons for at least 10 seconds. The LED
indicator will change from continuously lit
to rapidly flashing. Release both buttons.
Do not hold for longer than 20 seconds.
HomeLink is now ready to be programmed
at any time beginning with“Programming a
New HomeLink Button”- step 1.!Reprogramming a Single
HomeLink Button
To program a previously trained button,
follow these steps:
1. Press and hold the desired HomeLink
button. DO NOT release the button.
2. The indicator light will begin to slowly
flash orange after 20 seconds. The
HomeLink button can be released at this
point. Proceed with“Programming a New
HomeLink Button”- step 3.
3. If you do not complete the program-
ming of a new device to the button, it will
revert to the previously stored program-
ming.
!Garage Door Two-Way Commu-
nication
HomeLink has the capability of commu-
nicating with your garage door opener.
HomeLink can receive and display“clos-
ing”or“opening”status messages from
compatible garage door opener systems.
At any time, HomeLink can also recall and
display the last recorded status commu-
nicated by the garage door opener to
indicate your garage door being“closed”
or“opened”.
HomeLink has the capability of receiving
this communication from the garage door
opener at a range up to 820 feet (250 m).Range may be reduced by obstacles such
as houses or trees. You may have to slow
your vehicle speed to successfully receive
the garage door opener communication.
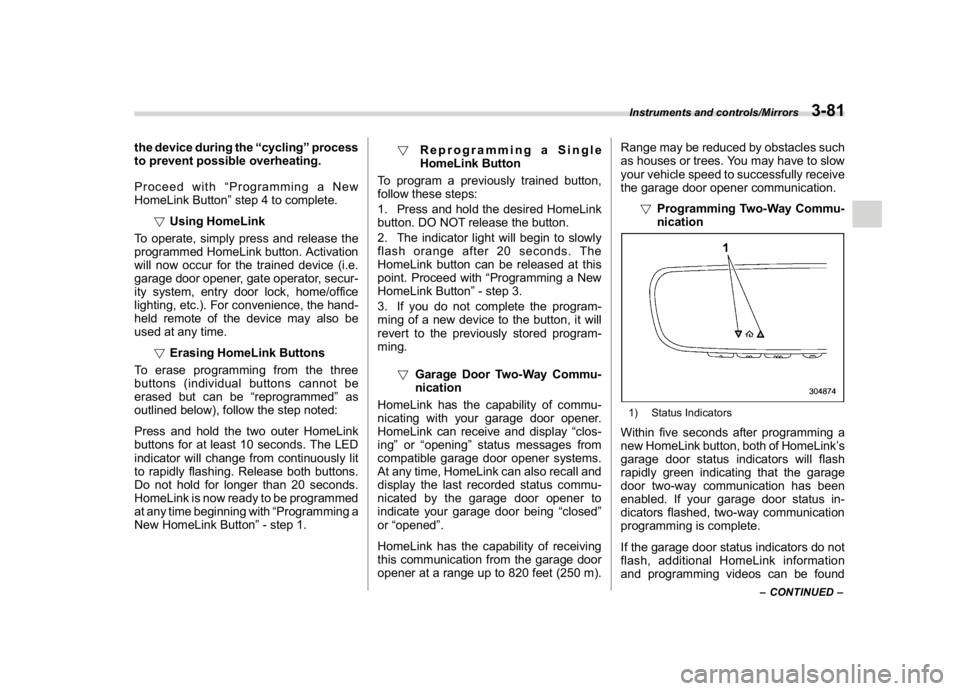
!Programming Two-Way Commu-
nication
1) Status IndicatorsWithin five seconds after programming a
new HomeLink button, both of HomeLink’s
garage door status indicators will flash
rapidly green indicating that the garage
door two-way communication has been
enabled. If your garage door status in-
dicators flashed, two-way communication
programming is complete.
If the garage door status indicators do not
flash, additional HomeLink information
and programming videos can be found
–CONTINUED–
Instruments and controls/Mirrors
3-81
3
Page 221 of 578
(226,1)
北米Model "A1700BE-B" EDITED: 2017/ 10/ 11
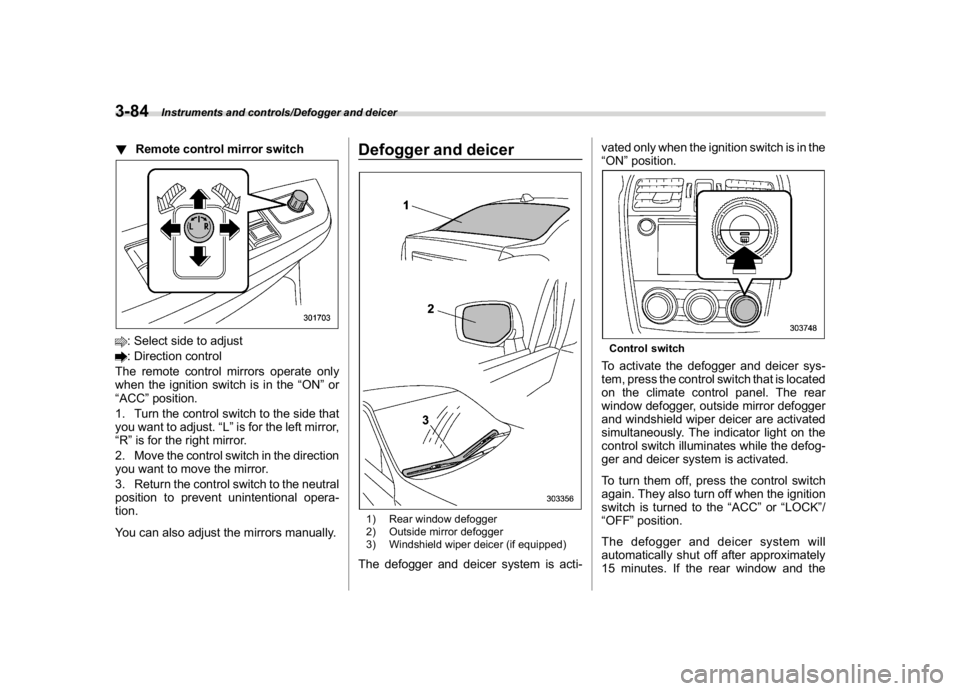
!Remote control mirror switch: Select side to adjust: Direction control
The remote control mirrors operate only
when the ignition switch is in the“ON”or
“ACC”position.
1. Turn the control switch to the side that
you want to adjust.“L”is for the left mirror,
“R”is for the right mirror.
2. Move the control switch in the direction
you want to move the mirror.
3. Return the control switch to the neutral
position to prevent unintentional opera-
tion.
You can also adjust the mirrors manually.
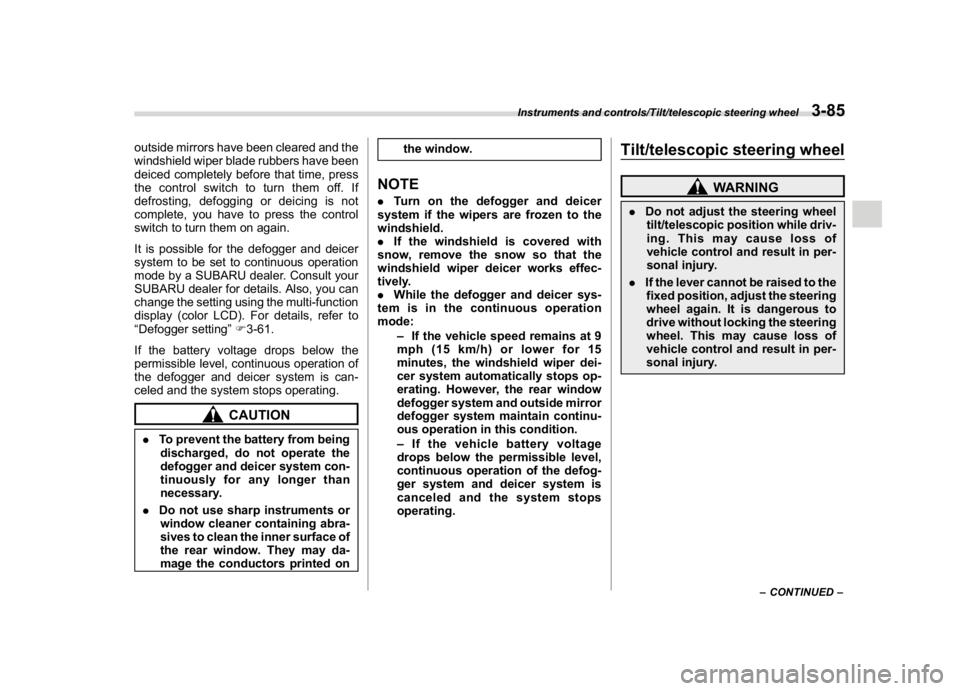
Defogger and deicer1) Rear window defogger
2) Outside mirror defogger
3) Windshield wiper deicer (if equipped)The defogger and deicer system is acti-vated only when the ignition switch is in the
“ON”position.
Control switchTo activate the defogger and deicer sys-
tem, press the control switch that is located
on the climate control panel. The rear
window defogger, outside mirror defogger
and windshield wiper deicer are activated
simultaneously. The indicator light on the
control switch illuminates while the defog-
ger and deicer system is activated.
To turn them off, press the control switch
again. They also turn off when the ignition
switch is turned to the“ACC”or“LOCK”/
“OFF”position.
The defogger and deicer system will
automatically shut off after approximately
15 minutes. If the rear window and the
Instruments and controls/Defogger and deicer
3-84
Page 222 of 578
(227,1)
北米Model "A1700BE-B" EDITED: 2017/ 10/ 11
outside mirrors have been cleared and the
windshield wiper blade rubbers have been
deiced completely before that time, press
the control switch to turn them off. If
defrosting, defogging or deicing is not
complete, you have to press the control
switch to turn them on again.
It is possible for the defogger and deicer
system to be set to continuous operation
mode by a SUBARU dealer. Consult your
SUBARU dealer for details. Also, you can
change the setting using the multi-function
display (color LCD). For details, refer to
“Defogger setting”F3-61.
If the battery voltage drops below the
permissible level, continuous operation of
the defogger and deicer system is can-
celed and the system stops operating.
CAUTION
.To prevent the battery from being
discharged, do not operate the
defogger and deicer system con-
tinuously for any longer than
necessary.
.Do not use sharp instruments or
window cleaner containing abra-
sives to clean the inner surface of
the rear window. They may da-
mage the conductors printed onthe window.
NOTE.Turn on the defogger and deicer
system if the wipers are frozen to the
windshield.
.If the windshield is covered with
snow, remove the snow so that the
windshield wiper deicer works effec-
tively.
.While the defogger and deicer sys-
tem is in the continuous operation
mode:
–If the vehicle speed remains at 9
mph (15 km/h) or lower for 15
minutes, the windshield wiper dei-
cer system automatically stops op-
erating. However, the rear window
defogger system and outside mirror
defogger system maintain continu-
ous operation in this condition.
–If the vehicle battery voltage
drops below the permissible level,
continuous operation of the defog-
ger system and deicer system is
canceled and the system stops
operating.
Tilt/telescopic steering wheel
WARNING
.Do not adjust the steering wheel
tilt/telescopic position while driv-
ing. This may cause loss of
vehicle control and result in per-
sonal injury.
.If the lever cannot be raised to the
fixed position, adjust the steering
wheel again. It is dangerous to
drive without locking the steering
wheel. This may cause loss of
vehicle control and result in per-
sonal injury.
–CONTINUED–
Instruments and controls/Tilt/telescopic steering wheel
3-85
3
Page 223 of 578
(228,1)
北米Model "A1700BE-B" EDITED: 2017/ 10/ 11
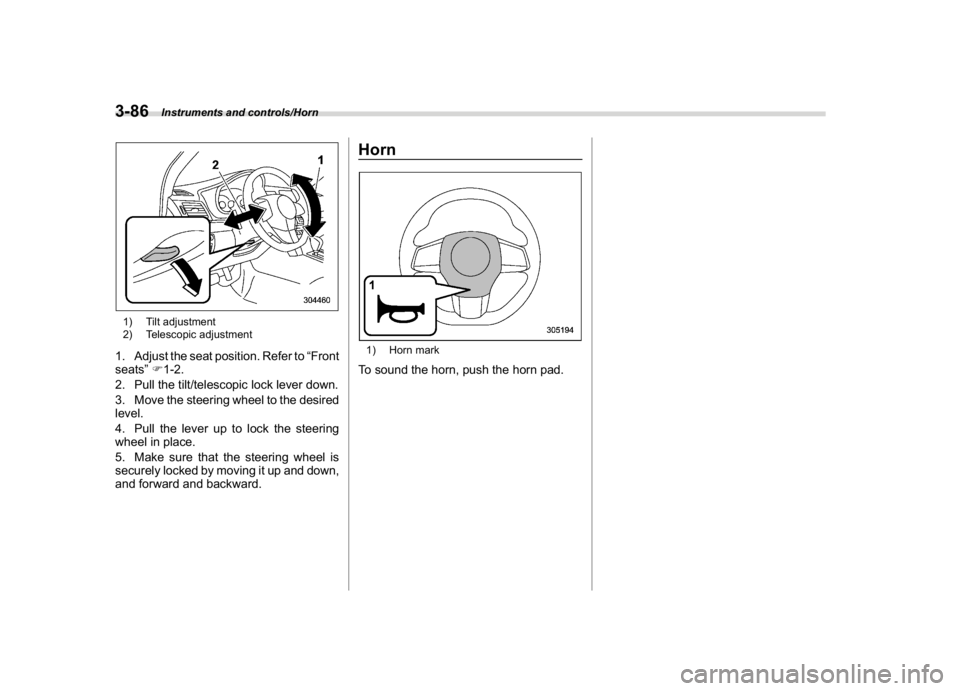
1) Tilt adjustment
2) Telescopic adjustment1. Adjust the seat position. Refer to“Front
seats”F1-2.
2. Pull the tilt/telescopic lock lever down.
3. Move the steering wheel to the desired
level.
4. Pull the lever up to lock the steering
wheel in place.
5. Make sure that the steering wheel is
securely locked by moving it up and down,
and forward and backward.
Horn1) Horn markTo sound the horn, push the horn pad.
Instruments and controls/Horn
3-86
Page 230 of 578
(237,1)
北米Model "A1700BE-B" EDITED: 2017/ 10/ 11
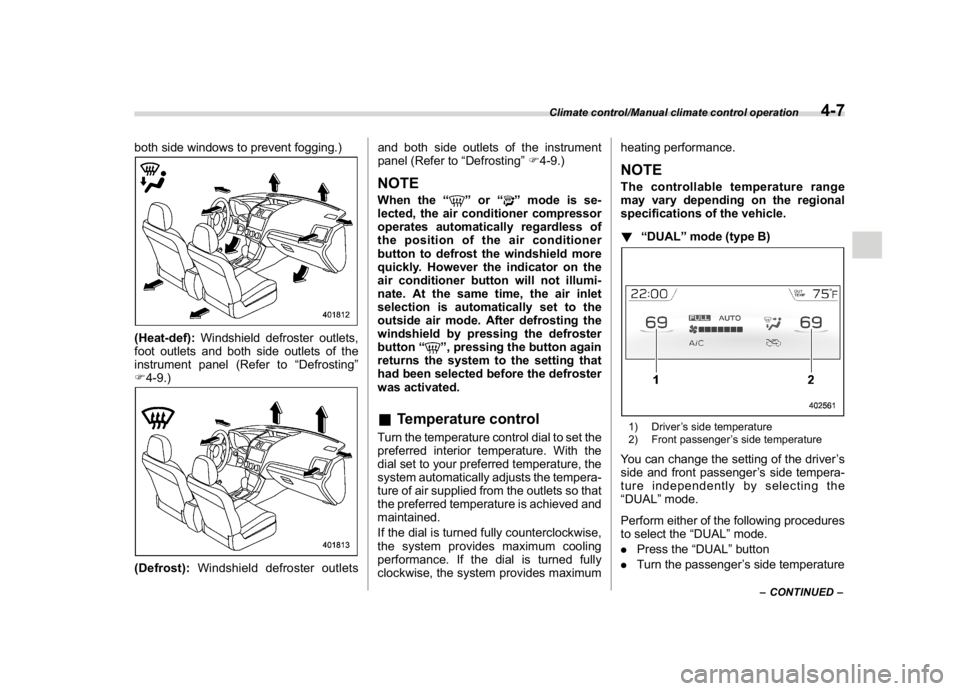
both side windows to prevent fogging.)(Heat-def):Windshield defroster outlets,
foot outlets and both side outlets of the
instrument panel (Refer to“Defrosting”
F4-9.)(Defrost):Windshield defroster outletsand both side outlets of the instrument
panel (Refer to“Defrosting”F4-9.)
NOTEWhen the“
”or“
”mode is se-
lected, the air conditioner compressor
operates automatically regardless of
the position of the air conditioner
button to defrost the windshield more
quickly. However the indicator on the
air conditioner button will not illumi-
nate. At the same time, the air inlet
selection is automatically set to the
outside air mode. After defrosting the
windshield by pressing the defroster
button“
”, pressing the button again
returns the system to the setting that
had been selected before the defroster
was activated.
&Temperature controlTurn the temperature control dial to set the
preferred interior temperature. With the
dial set to your preferred temperature, the
system automatically adjusts the tempera-
ture of air supplied from the outlets so that
the preferred temperature is achieved and
maintained.
If the dial is turned fully counterclockwise,
the system provides maximum cooling
performance. If the dial is turned fully
clockwise, the system provides maximumheating performance.
NOTEThe controllable temperature range
may vary depending on the regional
specifications of the vehicle.
!“DUAL”mode (type B)1) Driver’s side temperature
2) Front passenger’s side temperatureYou can change the setting of the driver’s
side and front passenger’s side tempera-
ture independently by selecting the
“DUAL”mode.
Perform either of the following procedures
to select the“DUAL”mode.
.Press the“DUAL”button
.Turn the passenger’s side temperature
–CONTINUED–
Climate control/Manual climate control operation
4-7
4
Page 234 of 578
(241,1)
北米Model "A1700BE-B" EDITED: 2017/ 10/ 11
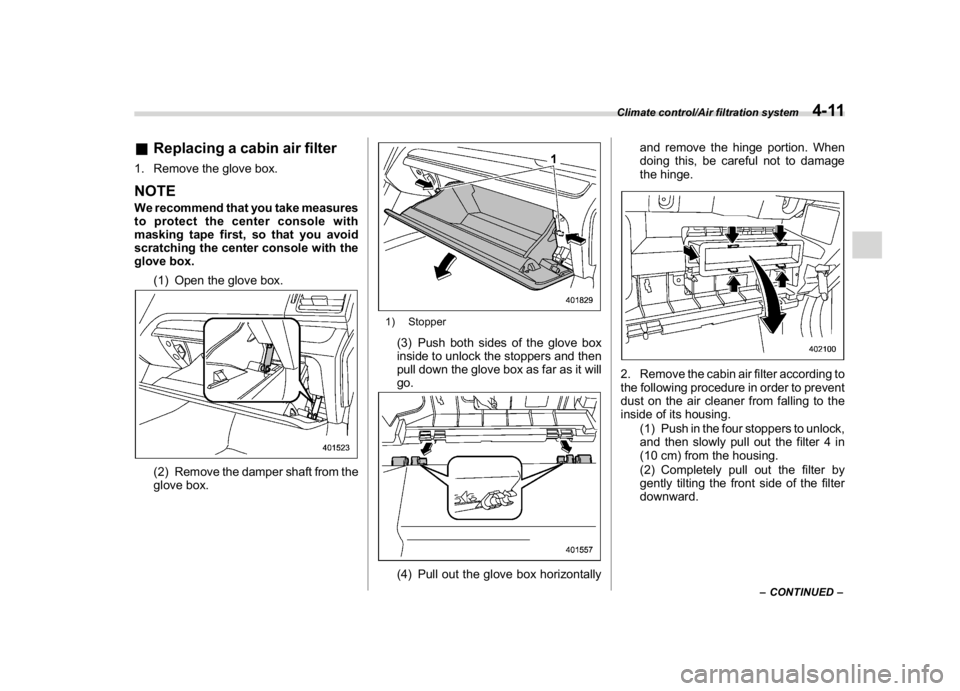
&Replacing a cabin air filter1. Remove the glove box.NOTEWe recommend that you take measures
to protect the center console with
masking tape first, so that you avoid
scratching the center console with the
glove box.
(1) Open the glove box.
(2) Remove the damper shaft from the
glove box.
1) Stopper(3) Push both sides of the glove box
inside to unlock the stoppers and then
pull down the glove box as far as it will
go.(4) Pull out the glove box horizontallyand remove the hinge portion. When
doing this, be careful not to damage
the hinge.
2. Remove the cabin air filter according to
the following procedure in order to prevent
dust on the air cleaner from falling to the
inside of its housing.
(1) Push in the four stoppers to unlock,
and then slowly pull out the filter 4 in
(10 cm) from the housing.
(2) Completely pull out the filter by
gently tilting the front side of the filter
downward.
–CONTINUED–
Climate control/Air filtration system
4-11
4