rear SUZUKI ALTO 2015 Owners Manual
[x] Cancel search | Manufacturer: SUZUKI, Model Year: 2015, Model line: ALTO, Model: SUZUKI ALTO 2015Pages: 139, PDF Size: 2.22 MB
Page 16 of 139

1776G-74E
BEFORE DRIVING
3-4
Central door locking system (if equipped)
You can lock and unlock all doors simultan-
eously by using the key in the driver’s door
lock.
To lock all doors simultaneously, insert the
key in the driver’s door lock and turn the
top of the key toward the rear of the
vehicle.
To unlock all doors simultaneously, insert
the key in a driver’s door lock and turn the
top of the key toward the front of the
vehicle.
You can also lock or unlock all the side
doors by pushing down or pulling up the
driver's door lock knob.
76G-03-007
Side Door Locks
To lock the driver's door from outside the vehicle:
a) Insert the key fully and turn the top ofthe key toward the rear of the vehicle,
or
b) Push in the lock knob down and hold the door handle up as you close the door.
To unlock the driver's door from outside the
vehicle, insert the key fully and turn the top
of the key toward the front of the vehicle.
To lock a front passenger’s door from
outside the vehicle, turn the lock knob
forward, then pull and hold the door handle
as you close the door.
To lock a rear door from outside the
vehicle, push in the lock knob down and
close the door. To lock a door from inside the vehicle, push
the lock knob down. Pull the lock knob up
to unlock the door.
ww ww
w WARNING
DOOR LOCKS
76G-03-005 76G-03-006
Always lock all doors when driving.
Locking the door prevents occupants
from being thrown from the vehicle
in the event of an accident. It also
helps prevent unintentional opening
of the doors.
Page 17 of 139

18
76G-74E
NOTE: Moving the lock knob on passenger's door locks or unlocks the passenger'sdoor only.
Be sure to hold the door handle up when you close a locked front door, orthe door will not remain locked.
ww ww
w WARNING
Child-Proof Locks (if equipped)
As illustrated, a child-proof lock is provided
for both rear doors. When the lock lever is
down, position 1 , the child proof lock is
activated, and when up, in position 2 the
child-proof lock is deactivated, when the
child-proof lock is activated, the rear door
cannot be opened from the inside even if
the inside door lock is unlocked but can be
opened from the outside.
Be sure to place the child-proof lock
in the locked position whenever
children are seated in the rear.
Rearend Door Lock
To unlock the door, insert the key into the
lock knob and turn it clockwise.
76G-03-008 76G-03-009
TYPE-1 (ALTO)
EXAMPLE
3-5BEFORE DRIVING
Page 18 of 139

1976G-74E
BEFORE DRIVING
3-6
ww ww
w WARNING
76G-03-009A
Always make sure that the rearend
door is closed and latched securely.
Closing the door completely helps to
prevent exhaust gases from entering
the vehicle. Completely closing the
rearend door also helps prevent
occupants from being thrown from the
vehicle in the event of an accident.TYPE-2 (ALTO K10)
WINDOWSRaise or lower the door windows by turning
the handle located on the door panel.
76G-03-011
Electric window controls (if equipped)
The driver’s door has switches 1 & 2 to
operate the driver’s window and front
passenger’s window respectively.
The passenger’s door only has a switch 3
to operate the passenger’s window. The
electric windows can only be operated when
the ignition switch is in the “ON” position.
To open a window with the driver's door
switches, push the top part of the switch
and to close the window lift up the top part
of the switch.
76G-03-012
Page 20 of 139

2176G-74E
BEFORE DRIVING
3-8
MIRRORSInside Rearview Mirror
To adjust the inside rearview mirror, move
the mirror up, down, or sideways to obtain
the best view.
76G-03-015
Outside Rearview Mirrors
Adjust the outside rearview mirrors (with the
help of control lever, if equipped), so that
you can just see the side of your vehicle
in the mirrors.Be careful when judging the size or
distance of a vehicle or other object
seen in the side convex mirror (if
equipped). Be aware that objects look
smaller and appear farther away than
when seen in a flat mirror.
ww ww
w WARNING
76G-03-017
76G-03-017A
TYPE-1 (ALTO)
TYPE-2 (ALTO K10)
Page 22 of 139

2376G-74E
BEFORE DRIVING
3-10
The adjustment lever for each front seat is
located under the front of the seat. To
adjust the seat position, pull up on the
adjustment lever and slide the seat forward
or rearward. After adjustment, try to move
the seat forward and rearward to ensure
that it is securely latched.
ww ww
w WARNING
To avoid excessive seat belt slack,
which reduces the effectiveness of the
seat belts as a safety device, make
sure that the seats are adjusted
before the seat belts are fastened.
Seatbacks should always be in an
upright position when driving, or seat
belt effectiveness may be reduced.
Seat belts are designed to offer
maximum protection when seatbacks
are in the fully upright position.
Front Seats
The seatbacks can be adjusted to different
angles. To adjust the seatback angle, pull
up the lever on the outboard side of the
seat, move the seatback to the desired
position, and release the lever to lock the
seatback in place.
ww ww
w WARNING
76G-03-022
76G-03-023
TYPE-1 (ALTO)
TYPE-2 (ALTO K10)ADJUSTING SEATBACKS
Page 23 of 139

24
76G-74E
BEFORE DRIVING3-11Seat belts are good help to protect
occupants from injury or death in the
event of accidents. We urge you to
wear seat belts at all times if the belts
are equipped. If seat belts are not
equipped at the rear seating positions,
we recommend you to install optional
or after market high quality seat belts
to increase occupant's safety.SEAT BELTS
ww ww
w WARNING
76G-03-026
Never allow persons to ride in the
cargo area of a vehicle. In the event
of an accident, there is a much
greater risk of injury for persons
who are not riding in a seat with
their seat belt securely fastened.
Seat belts should always be adjusted so the lap portion of the
belt is worn low across the pelvis,
not across the waist. Shoulder
straps should be worn on the
outside shoulder only, and never
under the arm. Seat belts should
never be worn with the straps
twisted and should be adjusted as
ww ww
w WARNING
VV
VV
V
76G-03-027
tightly as is comfortable to provide
the protection for which they have
been designed. A slack belt will
provide less protection than one
which is snug.
Make sure that each seat belt buckle is inserted into the proper buckle
catch.
Do not wear your seat belt over
hard or breakable objects in your
pockets or on your clothing. If an
accident occurs, objects such as
glasses, pens, etc. under the seat
belt can cause injury.
ww ww
w WARNING
VV
VV
V
VV
VV
V
76G-03-028
Page 27 of 139

28
76G-74E
BEFORE DRIVING3-15
To lengthen, release the tounge from the
buckle unit, pull the tounge (adjuster) in
the direction of the arrow, at right angles
to the belt. The tounge should then be
refitted into the buckle unit and the belt
tightened as previously described.
76G-03-038
NOTE:To identify the center seat belt buckle catchand tongue in the rear seat, "CENTER" is
moulded on the buckle catch and tongue ofthe center lap belt. The buckle catches aredesigned so a buckle tongue can not be
inserted into the wrong buckle catch.
76G-03-039
On this belt the adjuster is incorporated in
the tounge unit.
To tighten the belt, pull the free end of
the belt across alongside the lap strap
until it is adjusted to a snug comfortable
position.LAP BELT (if equipped)
76G-03-037
Page 56 of 139

5776G-74E
OTHER CONTROLS AND EQUIPMENT
6
OTHER CONTROLS AND EQUIPMENT
Parking Brake Lever
........................................................................\
.................. 6-1
Pedals ........................................................................\
........................................... 6-2
Gear Lever ........................................................................\
................................... 6-3
Fuel Filler Cap ........................................................................\
............................ 6-3
Folding Rear Seats ........................................................................\
.................... 6-5
Sun Visor ........................................................................\
..................................... 6-5
Interior Light Switch........................................................................\
.................. 6-6
Assist Grips ........................................................................\
................................ 6-6
Bonnet ........................................................................\
........................................... 6-6
Frame Hooks (if equipped) ........................................................................\
...... 6-7
Cup Holder (if equipped) ........................................................................\
......... 6-8
Tyre Changing Tools ........................................................................\
................. 6-8
High Mount Stop Lamp ........................................................................\
............ 6-9
Page 57 of 139

58
76G-74E
PARKING BRAKE LEVER
Never drive your vehicle with theparking brake on: rear brake
effectiveness can be reduced from
over heating, brake life may be
shortened, or permanent brake
damage may result.
If the parking brake does not hold the vehicle securely or does not
fully release, have your vehicle
inspected immediately by an
authorized MARUTI SUZUKI dealer.
Always apply the parking brake fully
before leaving your vehicle or it may
move, causing injury or damage.
When parking, make sure the gear
shift lever for manual transmission is
left in first gear or reverse. Remember,
even though the transmission is in
gear, you must always apply the
parking brake fully.
The parking brake lever is located between
the seats. To apply the parking brake, hold
the brake pedal down and pull the parking
brake lever all the way up.
To release the parking brake, hold the brake
pedal down, pull up slightly on the parking
brake lever, push the button on the end of
the lever with your thumb, and lower the
lever to its original position.
ww ww
w WARNING
6-1
ww
ww
w WARNING
OTHER CONTROLS AND EQUIPMENT
76G-06-001
76G-06-002
Page 58 of 139
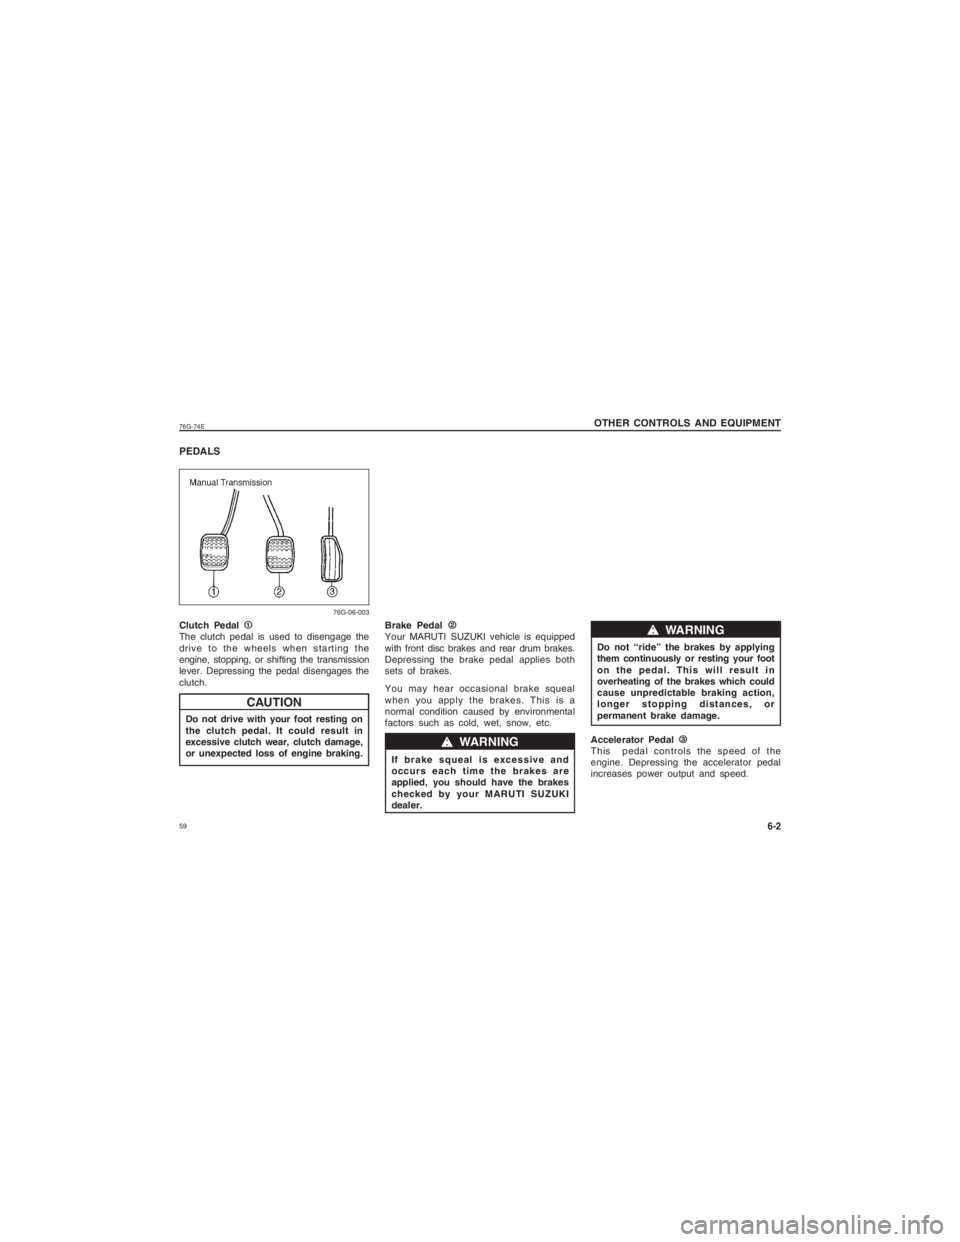
5976G-74EPEDALS
6-2
Clutch Pedal 11 11
1
The clutch pedal is used to disengage the
drive to the wheels when starting the
engine, stopping, or shifting the transmission
lever. Depressing the pedal disengages the
clutch.
Do not drive with your foot resting on
the clutch pedal. It could result in
excessive clutch wear, clutch damage,
or unexpected loss of engine braking. Brake Pedal
22 22
2
Your MARUTI SUZUKI vehicle is equipped
with front disc brakes and rear drum brakes.
Depressing the brake pedal applies both
sets of brakes.
You may hear occasional brake squeal
when you apply the brakes. This is a
normal condition caused by environmental
factors such as cold, wet, snow, etc.
If brake squeal is excessive and
occurs each time the brakes are
applied, you should have the brakes
checked by your MARUTI SUZUKI
dealer.
ww ww
w WARNING
CAUTION
ww
ww
w WARNING
OTHER CONTROLS AND EQUIPMENTDo not “ride” the brakes by applying
them continuously or resting your foot
on the pedal. This will result in
overheating of the brakes which could
cause unpredictable braking action,
longer stopping distances, or
permanent brake damage.
Accelerator Pedal 33 33
3
This pedal controls the speed of the
engine. Depressing the accelerator pedal
increases power output and speed.
76G-06-003