key SUZUKI CELERIO 2022 User Guide
[x] Cancel search | Manufacturer: SUZUKI, Model Year: 2022, Model line: CELERIO, Model: SUZUKI CELERIO 2022Pages: 201, PDF Size: 5.82 MB
Page 33 of 201
2-11
BEFORE DRIVING
76MH1-74E
76MH1-74E
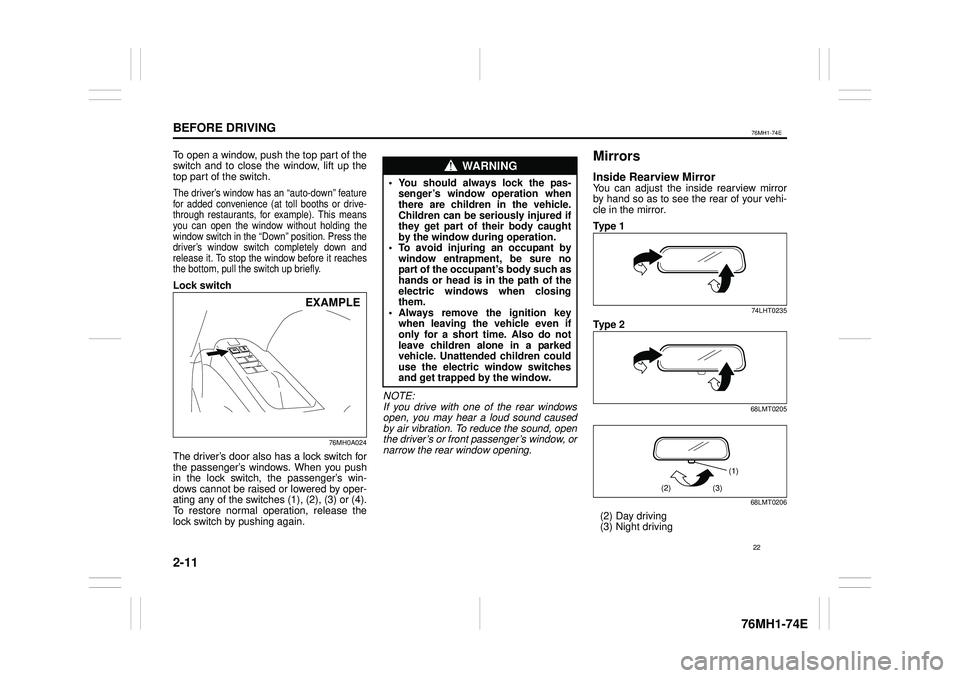
To open a window, push the top part of the switch and to close the window, lift up the top part of the switch.
The driver’s window has an “auto-down” featurefor added convenience (at toll booths or drive-through restaurants, for example). This means you can open the window without holding the window switch in the “Down” position. Press thedriver’s window switch completely down and release it. To stop the window before it reaches the bottom, pull the switch up briefly.
Lock switch
76MH0A024
The driver’s door also has a lock switch forthe passenger’s windows. When you pushin the lock switch, the passenger’s win- dows cannot be raised or lowered by oper- ating any of the switches (1), (2), (3) or (4).To restore normal operation, release the lock switch by pushing again.
NOTE:If you drive with one of the rear windows open, you may hear a loud sound causedby air vibration. To reduce the sound, open the driver’s or front passenger’s window, or narrow the rear window opening.
Mirrors
Inside Rearview MirrorYou can adjust the inside rearview mirrorby hand so as to see the rear of your vehi-cle in the mirror.
Ty p e 1
74LHT0235
Ty p e 2
68LMT0205
68LMT0206
(2) Day driving (3) Night driving
EXAMPLE
WA R N I N G
• You should always lock the pas-senger’s window operation whenthere are children in the vehicle. Children can be seriously injured if they get part of their body caughtby the window during operation.• To avoid injuring an occupant bywindow entrapment, be sure nopart of the occupant’s body such as hands or head is in the path of the electric windows when closingthem.• Always remove the ignition keywhen leaving the vehicle even ifonly for a short time. Also do not leave children alone in a parked vehicle. Unattended children coulduse the electric window switches and get trapped by the window.
(1)
(2)(3)
22
Page 40 of 201

2-18
BEFORE DRIVING
76MH1-74E
76MH1-74E
80JS029
To lengthen, release the latch plate from the buckle, pull the latch plate (adjuster) in the direction of the arrow, at right angles tothe belt. The latch plate should then be refitted into the buckle and the belt tight- ened as previously described.
To unfasten the belt, press the release but- ton on the buckle catch.
80JS031
NOTE: To identify the center seat belt buckle and latch plate in the rear seat, “CENTER” ismarked on the buckle and latch plate of the center lap belt. The buckles are designed so a latch plate cannot be inserted into thewrong buckle.
Driver’s Seat Belt Reminder
(if equipped)
With tachometer
76MH028
Without tachometer
76MS013
When the driver doesn’t buckle his or her seat belt with the ignition switch in the “ON” position, the driver’s seat belt reminderlight in the instrument cluster will blink until the driver’s seat belt is buckled.
TO LOOSEN
Right angleEXAMPLE
WA R N I N G
It is absolutely essential that thedriver and passengers wear their seat belts at all times. Persons who arenot wearing seat belts have a much greater risk of injury if an accident occurs. Make a regular habit of buck-ling your seat belt before putting the key in the ignition.
EXAMPLE
29
Page 44 of 201
2-22
BEFORE DRIVING
76MH1-74E
76MH1-74E
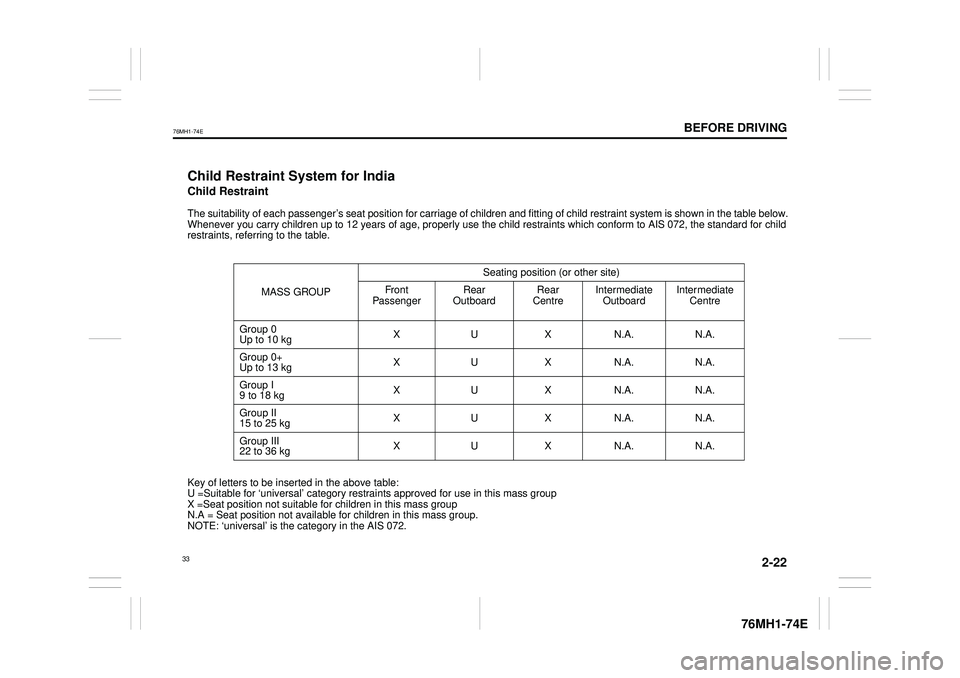
Child Restraint System for India
Child Restraint
The suitability of each passenger’s seat position for carriage of children and fitting of child restraint system is shown in the table below. Whenever you carry children up to 12 years of age, properly use the child restraints which conform to AIS 072, the standard for child restraints, referring to the table.
MASS GROUP
Seating position (or other site)
Fr on t PassengerRear OutboardRear CentreIntermediate OutboardIntermediate Centre
Group 0 Up to 10 kgXUXN.A.N.A.
Group 0+Up to 13 kgXUXN.A.N.A.
Group I9 to 18 kgXUXN.A.N.A.
Group II15 to 25 kgXUXN.A.N.A.
Group III22 to 36 kgXUXN.A.N.A.
Key of letters to be inserted in the above table: U =Suitable for ‘universal’ category restraints approved for use in this mass group X =Seat position not suitable for children in this mass group N.A = Seat position not available for children in this mass group. NOTE: ‘universal’ is the category in the AIS 072.
33
Page 63 of 201
2-41
BEFORE DRIVING
76MH1-74E
76MH1-74E
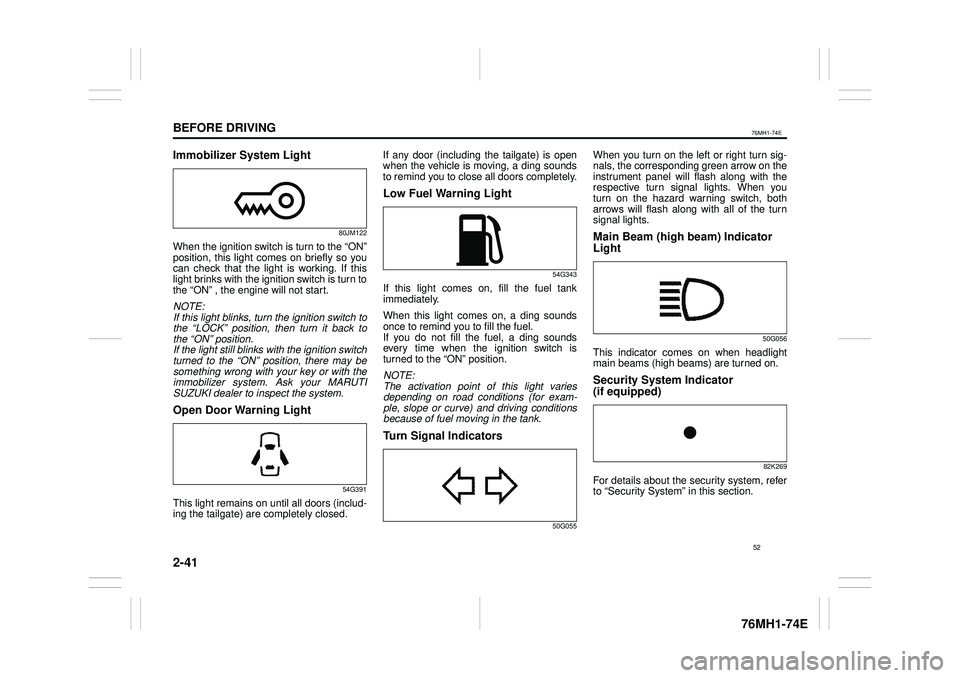
Immobilizer System Light
80JM122
When the ignition switch is turn to the “ON” position, this light comes on briefly so you can check that the light is working. If thislight brinks with the ignition switch is turn to the “ON” , the engine will not start.
NOTE: If this light blinks, turn the ignition switch to the “LOCK” position, then turn it back to the “ON” position. If the light still blinks with the ignition switchturned to the “ON” position, there may be something wrong with your key or with the immobilizer system. Ask your MARUTISUZUKI dealer to inspect the system.
Open Door Warning Light
54G391
This light remains on until all doors (includ-ing the tailgate) are completely closed.
If any door (including the tailgate) is open when the vehicle is moving, a ding sounds to remind you to close all doors completely.
Low Fuel Warning Light
54G343
If this light comes on, fill the fuel tankimmediately.
When this light comes on, a ding sounds once to remind you to fill the fuel. If you do not fill the fuel, a ding sounds every time when the ignition switch isturned to the “ON” position.
NOTE: The activation point of this light varies depending on road conditions (for exam- ple, slope or curve) and driving conditionsbecause of fuel moving in the tank.
Turn Signal Indicators
50G055
When you turn on the left or right turn sig- nals, the corresponding green arrow on the instrument panel will flash along with therespective turn signal lights. When you turn on the hazard warning switch, both arrows will flash along with all of the turnsignal lights.
Main Beam (high beam) Indicator
Light
50G056
This indicator comes on when headlight main beams (high beams) are turned on.
Security System Indicator
(if equipped)
82K269
For details about the security system, referto “Security System” in this section.
52
Page 72 of 201
3-2
OPERATING YOUR VEHICLE
76MH1-74E
76MH1-74E
NOTE: It is normal for water to drip from the air conditioning system after use.
4) Make sure the hood is fully closed and latched.5) Check the headlights, turn signal lights, brake lights and horn for proper opera- tion.6) Adjust the seat and head restraint (if equipped). 7) Check the brake pedal and the parkingbrake lever. 8) Adjust the mirrors. 9) Make sure that you and all passengershave properly fastened your seat belts. 10)Make sure that all warning lights come on as the key is turned to the “ON” posi-tion. 11)Check all gauges. 12)Make sure that the BRAKE SYSTEMWARNING light turns off when the parking brake is released.
Once a week, or each time you fill your fuel tank, perform the following under-hood checks:
1) Engine oil level 2) Coolant level3) Brake fluid level 4) Windshield washer fluid level 5) Battery solution level6) Hood latch operation Pull the hood release handle inside the vehicle. Make sure that you cannotopen the hood all the way without
releasing the secondary latch. Be sure to close the hood securely after check- ing for proper latch operation. See “Alllatches, hinges & locks” of “CHASSIS AND BODY” in the “Periodic Mainte- nance Schedule” in the “INSPECTIONAND MAINTENANCE” section for lubri- cation schedule.
Once a month, or each time you fill your fuel tank, check the tire pressure using a tire pressure gauge. Also check the tirepressure of the spare tire.
Engine Oil Consumption
It is normal for the engine to consume some engine oil during normal vehicle operation.
The amount of engine oil consumed depends on the viscosity of the oil, thequality of the oil and the conditions the vehicle is driven under. More oil is consumed during high-speeddriving and when there is frequent acceler- ation and deceleration. Under high loads, your engine also will consume more oil.A new engine also consumes more oil, since its pistons, piston rings and cylinder
walls have not yet become conditioned. New engines reach the normal level of oil consumption only after approximately 5000km (3000 miles) driving.
Oil consumption: Max. 1.0 L per 1000 km (1 Qt. per 600 miles)
When judging the amount of oil consump- tion, note that the oil may become diluted and make it difficult to accurately judge thetrue oil level. As an example, if a vehicle is used for repeated short trips, and consumes a nor-mal amount of oil, the dipstick may not show any drop in the oil level at all, even after 1000 km (600 miles) or more of driv-ing. This is because the oil is gradually becoming diluted with fuel or moisture, making it appear that the oil level has notchanged. You should also be aware that the diluting ingredients evaporate out when the vehicleis subsequently driven at high speeds, such as on an expressway, making it appear that oil is excessively consumedafter high-speed driving.
WA R N I N G
Make sure the hood is fully closed and latched before driv ing. If it is not, it can fly up unexpectedly duringdriving, obstructing your view and resulting in an accident.
61
Page 73 of 201
3-3
OPERATING YOUR VEHICLE
76MH1-74E
76MH1-74E
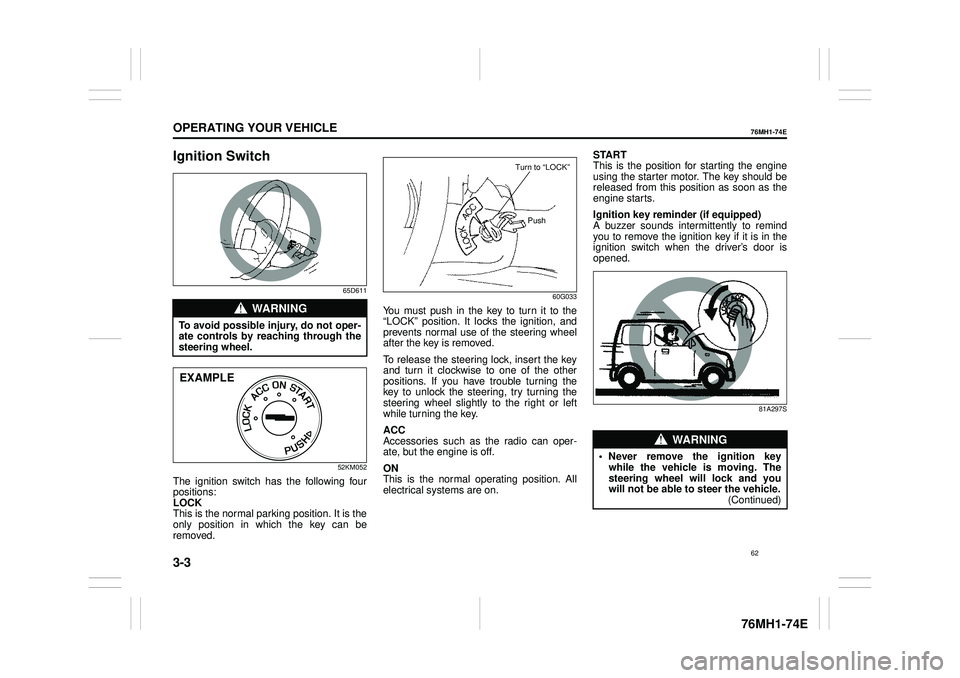
Ignition Switch
65D611
52KM052
The ignition switch has the following four positions: LOCK This is the normal parking position. It is theonly position in which the key can be removed.
60G033
You must push in the key to turn it to the “LOCK” position. It lo cks the ignition, and prevents normal use of the steering wheel after the key is removed.
To release the steering lock, insert the key and turn it clockwise to one of the other positions. If you have trouble turning thekey to unlock the steering, try turning the steering wheel slightly to the right or left while turning the key.
ACC Accessories such as the radio can oper-ate, but the engine is off.
ON This is the normal operating position. All electrical systems are on.
START This is the position for starting the engine using the starter motor. The key should bereleased from this position as soon as the engine starts.
Ignition key reminder (if equipped) A buzzer sounds intermittently to remind you to remove the ignition key if it is in theignition switch when the driver’s door is opened.
81A297S
WA R N I N G
To avoid possible injury, do not oper- ate controls by reaching through thesteering wheel.
EXAMPLE
Turn to “LOCK”
Push
WA R N I N G
• Never remove the ignition keywhile the vehicle is moving. The steering wheel will lock and you will not be able to steer the vehicle.(Continued)
62
Page 74 of 201
3-4
OPERATING YOUR VEHICLE
76MH1-74E
76MH1-74E
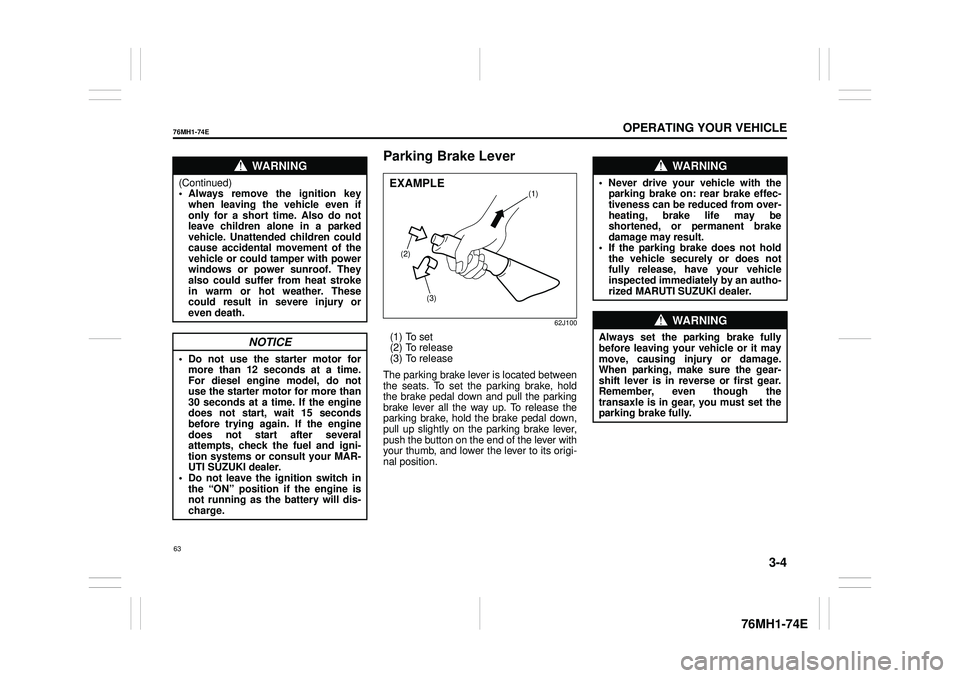
Parking Brake Lever
62J100
(1) To set (2) To release(3) To release
The parking brake lever is located between the seats. To set the parking brake, hold the brake pedal down and pull the parking brake lever all the way up. To release theparking brake, hold the brake pedal down, pull up slightly on the parking brake lever, push the button on the end of the lever withyour thumb, and lower the lever to its origi- nal position.
WA R N I N G
(Continued) • Always remove the ignition keywhen leaving the vehicle even if only for a short time. Also do not leave children alone in a parkedvehicle. Unattended children could cause accidental movement of the vehicle or could tamper with powerwindows or power sunroof. They also could suffer from heat stroke in warm or hot weather. Thesecould result in severe injury or even death.
NOTICE
• Do not use the starter motor for more than 12 seconds at a time.For diesel engine model, do not use the starter motor for more than 30 seconds at a time. If the enginedoes not start, wait 15 seconds before trying again. If the engine does not start after severalattempts, check the fuel and igni- tion systems or consult your MAR- UTI SUZUKI dealer.• Do not leave the ignition switch in the “ON” position if the engine is not running as the battery will dis-charge.
(2)
(3)
(1)EXAMPLE
WA R N I N G
• Never drive your vehicle with theparking brake on: rear brake effec-tiveness can be reduced from over- heating, brake life may be shortened, or permanent brakedamage may result. • If the parking brake does not hold the vehicle securely or does notfully release, have your vehicle inspected immediately by an autho- rized MARUTI SUZUKI dealer.
WA R N I N G
Always set the pa rking brake fully before leaving your vehicle or it may move, causing injury or damage. When parking, make sure the gear-shift lever is in reverse or first gear. Remember, even though the transaxle is in gear, you must set theparking brake fully.
63
Page 77 of 201

3-7
OPERATING YOUR VEHICLE
76MH1-74E
76MH1-74E
Restarting diesel engine after fuel- empty stopIf the engine stops and the low fuel warn- ing light and the malfunction indicator light come on, use the following procedure:1) Fill the fuel tank. 2) Hold the ignition key in
Page 91 of 201
4-3
DRIVING TIPS
76MH1-74E
76MH1-74E
Keep weight to a minimum The heavier the load, the more fuel the vehicle consumes. Take out any luggageor cargo when it is not necessary.
Keep tire pressures correct Underinflation of the tires can waste fuel due to increased running resistance of the tires. Keep your tires inflated to the correctpressure shown on the label on the driver’s side door or the driver’s door lock pillar.
Highway Driving
When driving at highway speeds, pay attention to the following: Stopping distance progressively increases with vehicle speed. Apply the brakes far enough ahead of the stoppingpoint to allow for the extra stopping dis- tance. On rainy days, “Hydroplaning” can occur.“Hydroplaning” is the loss of direct con- tact between the road surface and the vehicle’s tires due to a water film formingbetween them. Steering or braking the vehicle while “Hydroplaning” can be very difficult, and loss of control can occur.Keep speed down when the road surface is wet. At high speeds, the vehicle may beaffected by side winds. Therefore, reduce speed and be prepared for unex- pected buffeting, which can occur at theexits of tunnels, when passing by a cut of a hill, or when being overtaken by large vehicles, etc.
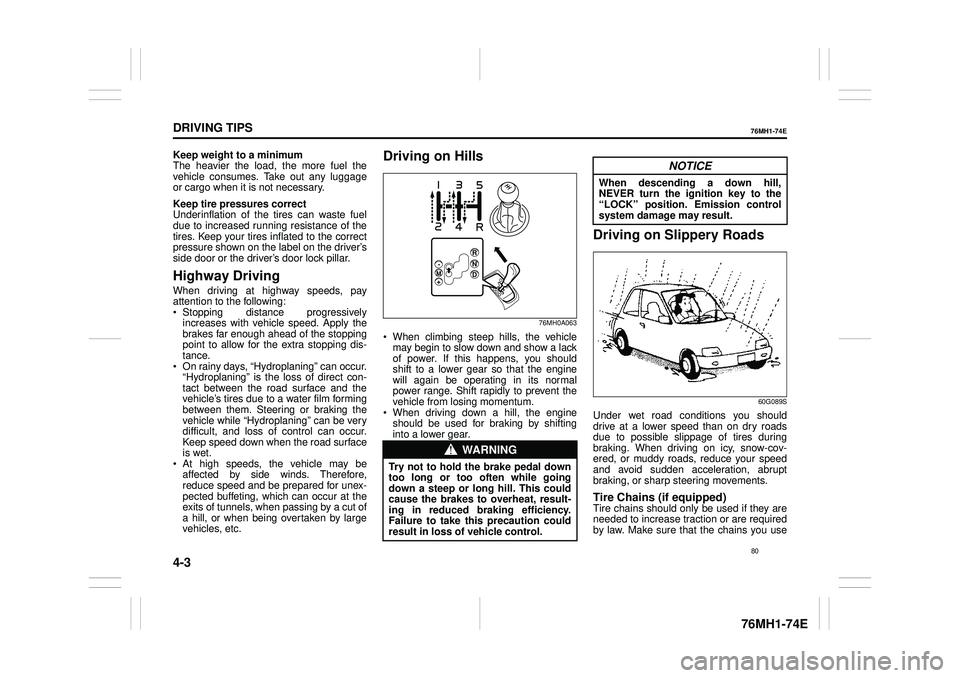
Driving on Hills
76MH0A063
When climbing steep hills, the vehiclemay begin to slow down and show a lackof power. If this happens, you should shift to a lower gear so that the engine will again be operating in its normalpower range. Shift rapidly to prevent the vehicle from losing momentum. When driving down a hill, the engineshould be used for braking by shifting into a lower gear.
Driving on Slippery Roads
60G089S
Under wet road conditions you should drive at a lower speed than on dry roadsdue to possible slippage of tires during braking. When driving on icy, snow-cov- ered, or muddy roads, reduce your speedand avoid sudden acceleration, abrupt braking, or sharp steering movements.
Tire Chains (if equipped)Tire chains should only be used if they are needed to increase traction or are required by law. Make sure that the chains you use
WA R N I N G
Try not to hold the brake pedal down too long or too often while goingdown a steep or long hill. This could cause the brakes to overheat, result- ing in reduced braking efficiency.Failure to take this precaution could result in loss of vehicle control.
R N D -M+
NOTICE
When descending a down hill, NEVER turn the igni tion key to the “LOCK” position. Emission control system damage may result.
80
Page 100 of 201
5-4
OTHER CONTROLS AND EQUIPMENT
76MH1-74E
76MH1-74E
Vanity mirror (if equipped)
74LHT0532
(2) Vanity mirror
There is a vanity mirror (2) on the back of the sun visor.
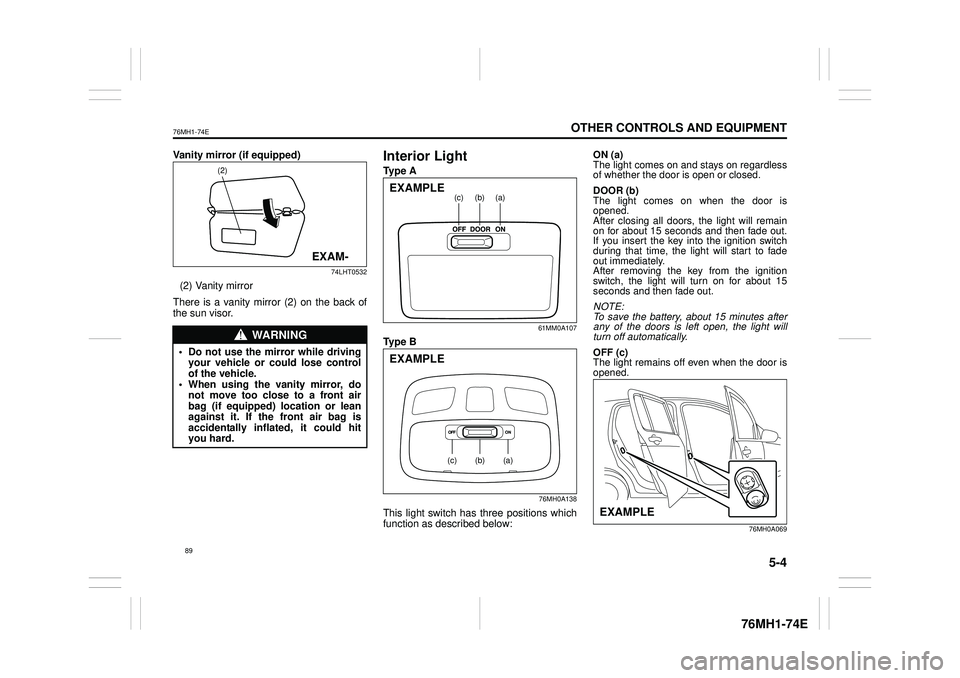
Interior Light
Ty p e A
61MM0A107
Ty p e B
76MH0A138
This light switch has three positions which function as described below:
ON (a) The light comes on and stays on regardless of whether the door is open or closed.
DOOR (b) The light comes on when the door isopened. After closing all doors, the light will remain on for about 15 seconds and then fade out.If you insert the key into the ignition switch during that time, the light will start to fade out immediately. After removing the key from the ignition switch, the light will turn on for about 15 seconds and then fade out.
NOTE: To save the battery, about 15 minutes after any of the doors is left open, the light will turn off automatically.
OFF (c) The light remains off even when the door is opened.
76MH0A069
WA R N I N G
• Do not use the mirror while driving your vehicle or could lose controlof the vehicle. • When using the vanity mirror, do not move too close to a front airbag (if equipped) location or lean against it. If the front air bag is accidentally inflated, it could hityou hard.
(2)
EXAM-
(a)(b)(c)EXAMPLE
(a)(b)(c)
EXAMPLE
EXAMPLE
89