set clock SUZUKI CELERIO 2022 Owners Manual
[x] Cancel search | Manufacturer: SUZUKI, Model Year: 2022, Model line: CELERIO, Model: SUZUKI CELERIO 2022Pages: 201, PDF Size: 5.82 MB
Page 53 of 201

2-31
BEFORE DRIVING
76MH1-74E
76MH1-74E
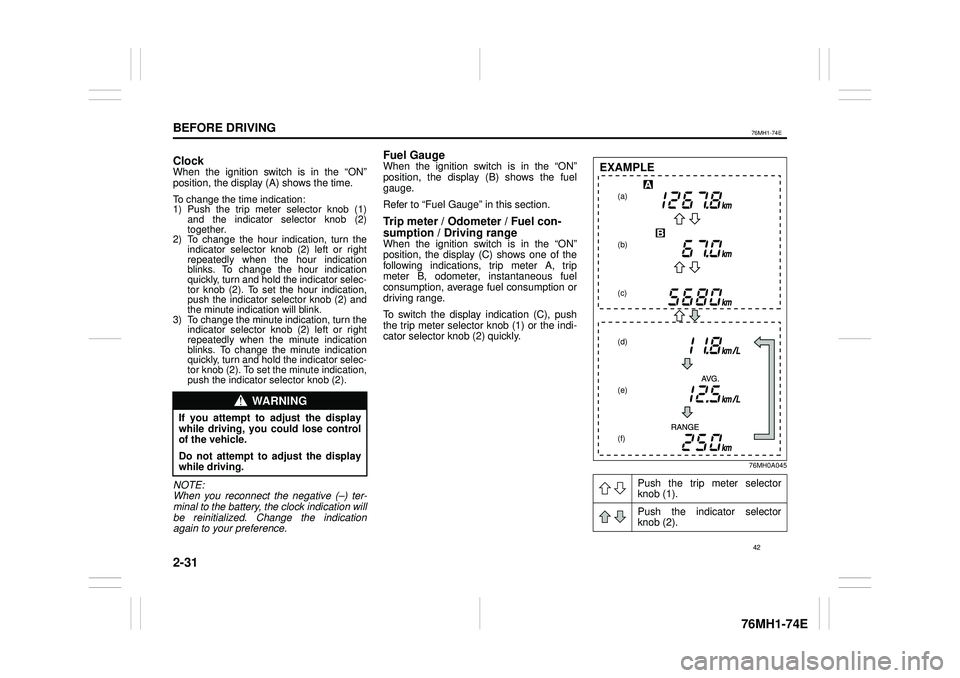
ClockWhen the ignition switch is in the “ON” position, the display (A) shows the time.
To change the time indication: 1) Push the trip meter selector knob (1)and the indicator selector knob (2)together.2) To change the hour indication, turn theindicator selector knob (2) left or rightrepeatedly when the hour indicationblinks. To change the hour indication quickly, turn and hold the indicator selec- tor knob (2). To set the hour indication,push the indicator selector knob (2) and the minute indication will blink.3) To change the minute indication, turn theindicator selector knob (2) left or rightrepeatedly when the minute indication blinks. To change the minute indicationquickly, turn and hold the indicator selec- tor knob (2). To set the minute indication, push the indicator selector knob (2).
NOTE: When you reconnect the negative (–) ter-minal to the battery, the clock indication will be reinitialized. Change the indication again to your preference.
Fuel GaugeWhen the ignition switch is in the “ON”position, the display (B) shows the fuel gauge.
Refer to “Fuel Gauge” in this section.
Trip meter / Odometer / Fuel con-
sumption / Driving rangeWhen the ignition switch is in the “ON” position, the display (C) shows one of the following indications, trip meter A, tripmeter B, odometer, instantaneous fuel consumption, average fuel consumption or driving range.
To switch the display indication (C), push the trip meter selector knob (1) or the indi-cator selector knob (2) quickly.
76MH0A045
WA R N I N G
If you attempt to adjust the display while driving, you could lose control of the vehicle.
Do not attempt to adjust the displaywhile driving.
Push the trip meter selector knob (1).
Push the indicator selector knob (2).
(a)
(b)
(c)
(d)
(e)
(f)
EXAMPLE
42
Page 56 of 201

2-34
BEFORE DRIVING
76MH1-74E
76MH1-74E
Setting ModeIn the setting mode, you can set up the following functions.
Indication Functions
Temperature unit (if equipped) “tE”
Time indication of clock “CL”
Central door locking system “d1”
Automatic door locking function “d2”
Automatic door unlocking function “d3”
Door locking and unlocking siren “d5”
45
Page 109 of 201

5-13
OTHER CONTROLS AND EQUIPMENT
76MH1-74E
76MH1-74E
faster if you open the windows briefly while you operate the air conditioner with the air intake selector at “FRESH AIR”and the blower at high speed.
DehumidifyingSet the air flow selector to a desired air flow selector position, the temperature selector to the desired temperature position and theblower speed selector to the desired blower speed position. Also select “FRESH AIR” and turn on the “A/C” switch.
NOTE:Because the air conditioner dehumidifiesthe air, turning it on will help keep the win- dows clear, even when blowing heated air using the “DEFROST” or “HEAT &DEFROST” functions.
76MH0A090
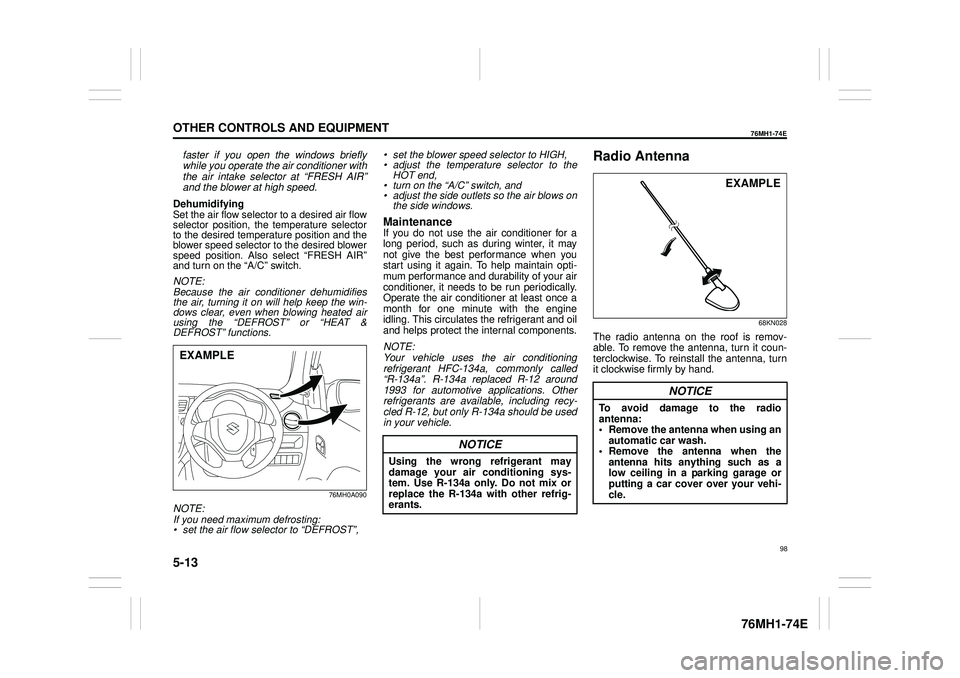
NOTE:If you need maximum defrosting:• set the air flow selector to “DEFROST”,
• set the blower speed selector to HIGH, • adjust the temperature selector to the HOT end, • turn on the “A/C” switch, and• adjust the side outlets so the air blows on the side windows.
MaintenanceIf you do not use the air conditioner for a long period, such as during winter, it may not give the best performance when youstart using it again. To help maintain opti- mum performance and durability of your air conditioner, it needs to be run periodically.Operate the air conditioner at least once a month for one minute with the engine idling. This circulates the refrigerant and oiland helps protect the internal components.
NOTE: Your vehicle uses the air conditioning refrigerant HFC-134a, commonly called “R-134a”. R-134a replaced R-12 around1993 for automotive applications. Other refrigerants are available, including recy- cled R-12, but only R-134a should be usedin your vehicle.
Radio Antenna
68KN028
The radio antenna on the roof is remov-able. To remove the antenna, turn it coun-terclockwise. To reinstall the antenna, turn it clockwise firmly by hand.
EXAMPLE
NOTICE
Using the wrong refrigerant may damage your air conditioning sys- tem. Use R-134a only. Do not mix or replace the R-134a with other refrig-erants.
NOTICE
To avoid damage to the radio antenna: • Remove the antenna when using anautomatic car wash. • Remove the antenna when the antenna hits anything such as alow ceiling in a parking garage or putting a car cover over your vehi- cle.
EXAMPLE
98
Page 112 of 201

5-16
OTHER CONTROLS AND EQUIPMENT
76MH1-74E
76MH1-74E
The Bluetooth® word mark and logo are registered trademarks and are owned by the Bluetooth SIG, Ink.
Stop using this unit and a Bluetooth®
ready device whenever requested. This unit shares the communication fre-quency with other private or public wireless communication equipment such as a wire- less LAN and other wireless communica-tion radios. You should stop using this unit whenever you are notified that your unit disturbs other wireless communication immediately.
Bluetooth® Mic (1) (if equipped)
Basic Operations
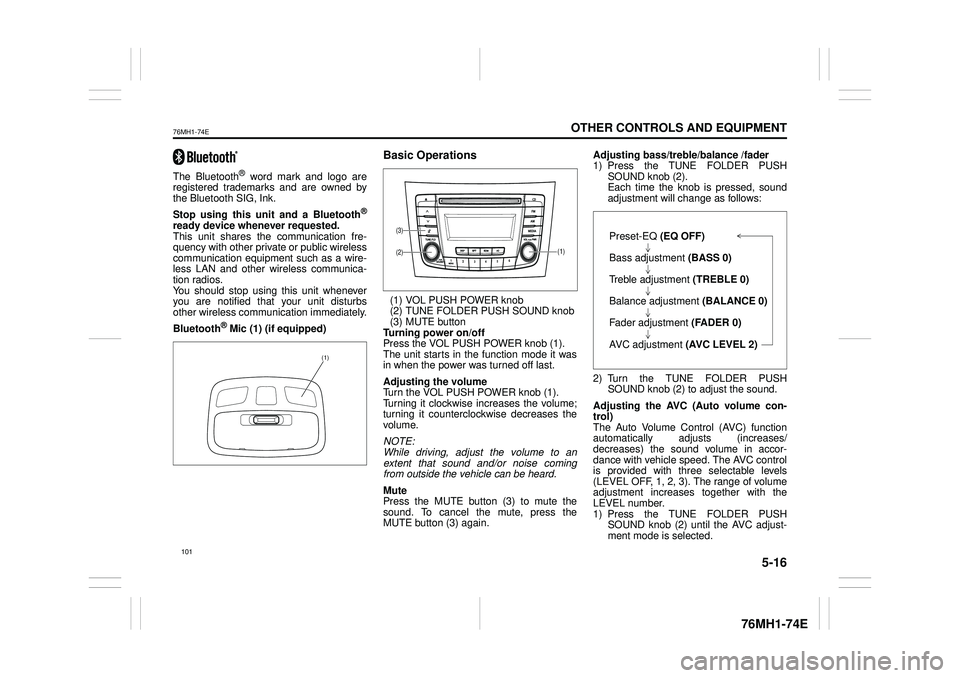
(1) VOL PUSH POWER knob (2) TUNE FOLDER PUSH SOUND knob(3) MUTE button Turning power on/off Press the VOL PUSH POWER knob (1).The unit starts in th e function mode it was in when the power was turned off last.
Adjusting the volume Turn the VOL PUSH POWER knob (1). Turning it clockwise increases the volume;turning it counterclockwise decreases the volume.
NOTE: While driving, adjust the volume to an extent that sound and/or noise comingfrom outside the vehicle can be heard.
Mute Press the MUTE button (3) to mute the sound. To cancel the mute, press the MUTE button (3) again.
Adjusting bass/treble/balance /fader 1) Press the TUNE FOLDER PUSH SOUND knob (2).Each time the knob is pressed, sound adjustment will change as follows:
2) Turn the TUNE FOLDER PUSH SOUND knob (2) to adjust the sound.
Adjusting the AVC (Auto volume con- trol) The Auto Volume C ontrol (AVC) function automatically adjusts (increases/ decreases) the sound volume in accor- dance with vehicle speed. The AVC controlis provided with three selectable levels (LEVEL OFF, 1, 2, 3). The range of volume adjustment increases together with the LEVEL number. 1) Press the TUNE FOLDER PUSHSOUND knob (2) until the AVC adjust- ment mode is selected.
(1)
(1)(2)
(3)Preset-EQ (EQ OFF)
Bass adjustment (BASS 0)
Treble adjustment (TREBLE 0)
Balance adjustment (BALANCE 0)
Fader adjustment (FADER 0)
AVC adjustment (AVC LEVEL 2)
Page 182 of 201

8-1
EMERGENCY SERVICE
76MH1-74E
76MH1-74E
Tire Changing Tool
76MH1004
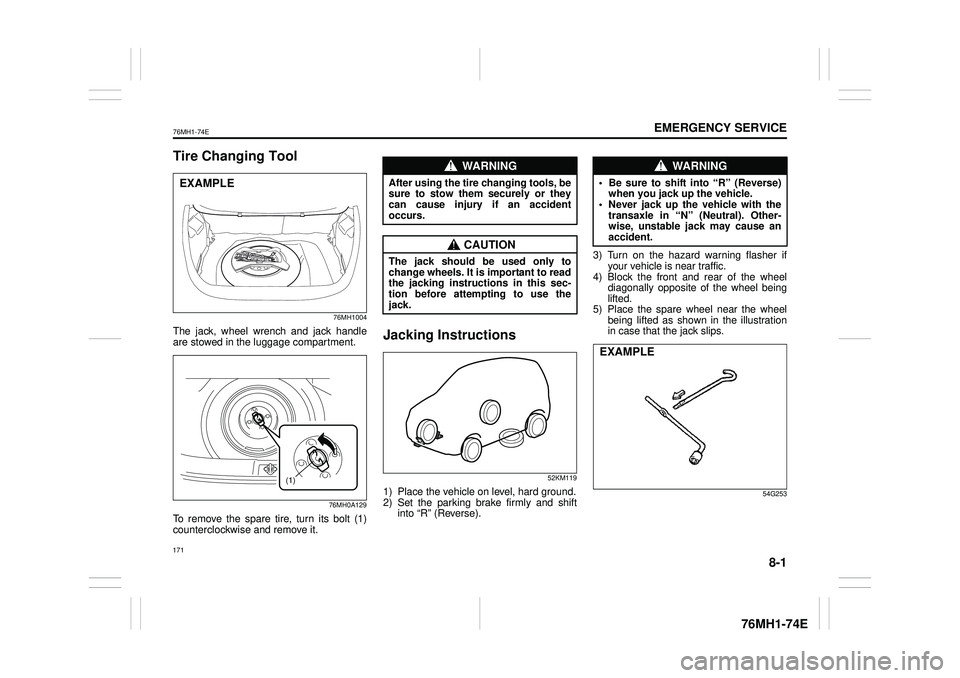
The jack, wheel wrench and jack handle are stowed in the luggage compartment.
76MH0A129
To remove the spare tire, turn its bolt (1) counterclockwise and remove it.
Jacking Instructions
52KM119
1) Place the vehicle on level, hard ground. 2) Set the parking brake firmly and shift into “R” (Reverse).
3) Turn on the hazard warning flasher if your vehicle is near traffic. 4) Block the front and rear of the wheel diagonally opposite of the wheel beinglifted. 5) Place the spare wheel near the wheel being lifted as shown in the illustrationin case that the jack slips.
54G253
EXAMPLE
(1)
WA R N I N G
After using the tire changing tools, besure to stow them securely or theycan cause injury if an accident occurs.
CAUTION
The jack should be used only to change wheels. It is important to readthe jacking instructions in this sec- tion before attemp ting to use the jack.
WA R N I N G
• Be sure to shift into “R” (Reverse) when you jack up the vehicle.• Never jack up the vehicle with the transaxle in “N” (Neutral). Other- wise, unstable jack may cause anaccident.
EXAMPLE
171