air control SUZUKI GRAND VITARA 2001 2.G Owner's Manual
[x] Cancel search | Manufacturer: SUZUKI, Model Year: 2001, Model line: GRAND VITARA, Model: SUZUKI GRAND VITARA 2001 2.GPages: 656, PDF Size: 14.31 MB
Page 88 of 656
FRONT SUSPENSION 3D-1
3D
SECTION 3D
FRONT SUSPENSION
CONTENTS
On-Vehicle Service......................................... 3D-1
Suspension Control Arm/Bushings .............. 3D-1Tightening Torque Specification .................. 3D-2
On-Vehicle Service
Suspension Control Arm/Bushings
INSTALLATION
For the details, refer to the same item of the same section in the
Service Manual mentioned in the FOREWORD of this manual
noting following point.
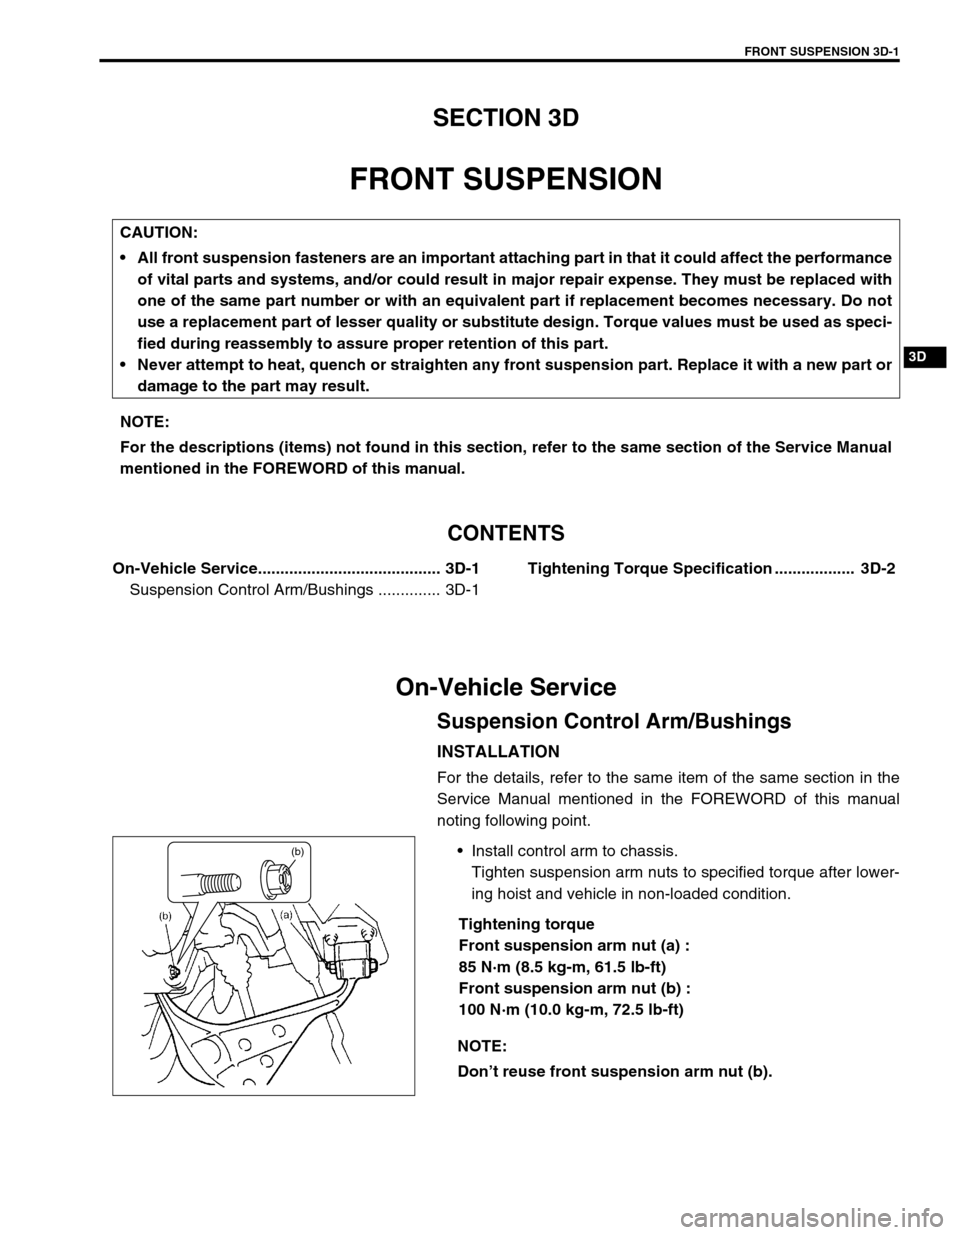
Install control arm to chassis.
Tighten suspension arm nuts to specified torque after lower-
ing hoist and vehicle in non-loaded condition.
Tightening torque
Front suspension arm nut (a) :
85 N·m (8.5 kg-m, 61.5 lb-ft)
Front suspension arm nut (b) :
100 N·m (10.0 kg-m, 72.5 lb-ft) CAUTION:
All front suspension fasteners are an important attaching part in that it could affect the performance
of vital parts and systems, and/or could result in major repair expense. They must be replaced with
one of the same part number or with an equivalent part if replacement becomes necessary. Do not
use a replacement part of lesser quality or substitute design. Torque values must be used as speci-
fied during reassembly to assure proper retention of this part.
Never attempt to heat, quench or straighten any front suspension part. Replace it with a new part or
damage to the part may result.
NOTE:
For the descriptions (items) not found in this section, refer to the same section of the Service Manual
mentioned in the FOREWORD of this manual.
NOTE:
Don’t reuse front suspension arm nut (b).
(b)
Page 126 of 656
ANTILOCK BRAKE SYSTEM (ABS) 5E2-1
5E2
SECTION 5E2
ANTILOCK BRAKE SYSTEM (ABS)
CONTENTS
General Description ..................................... 5E2-3
Components/Parts Location ....................... 5E2-3
ABS Hydraulic Unit/control Module
Assembly .................................................... 5E2-4
Self-diagnosis function ........................... 5E2-4
Fail-safe function .................................... 5E2-5
Diagnosis ...................................................... 5E2-5
Precautions in Diagnosing Troubles .......... 5E2-5
ABS Diagnostic Flow Table ........................ 5E2-6
ABS Warning Lamp Check ........................ 5E2-9
EBD Warning Lamp (Brake Warning Lamp)
Check ......................................................... 5E2-9
Diagnostic Trouble Code (DTC) Check
(Using ABS Warning Lamp) ..................... 5E2-10
Diagnostic Trouble Code (DTC) Check
(Using SUZUKI Scan Tool) ...................... 5E2-11
Diagnostic Trouble Code (DTC)
Clearance ................................................. 5E2-11
Diagnostic Trouble Code (DTC) Table ..... 5E2-12
System Circuit .......................................... 5E2-14Table-A ABS Warning Lamp Circuit Check
– Lamp Does Not Come “ON” at Ignition
Switch ON ................................................ 5E2-15
Table-B ABS Warning Lamp Circuit Check
– Lamp Comes “ON” Steady.................... 5E2-16
Table-C ABS Warning Lamp Circuit Check
– The Lamp Flashes Continuously While
Ignition Switch Is ON ................................ 5E2-17
Table-D Code (DTC) Is Not Outputted
Even with Diagnosis Switch Terminal
Connected to Ground............................... 5E2-18
Table-E EBD Warning Lamp (Brake
Warning Lamp) Check – Lamp Comes
“ON” Steady ............................................. 5E2-19
DTC C1015 (DTC 15) – G Sensor Circuit
and 4WD Lamp Circuit ............................. 5E2-20
DTC C1021 (DTC 21), DTC C1022
(DTC 22) – Right-Front Wheel Speed
Sensor Circuit or Sensor Ring ................. 5E2-22
DTC C1025 (DTC 25), DTC C1026
(DTC 26) – Left-Front Wheel Speed WARNING:
For vehicles equipped with Supplemental Restraint (Air Bag) System:
Service on and around the air bag system components or wiring must be performed only by an
authorized SUZUKI dealer. Refer to “Air Bag System Components and Wiring Location View” under
“General Description” in air bag system section in order to confirm whether you are performing ser-
vice on or near the air bag system components or wiring. Please observe all WARNINGS and “Ser-
vice Precautions” under “On-Vehicle Service” in air bag system section before performing service
on or around the air bag system components or wiring. Failure to follow WARNINGS could result in
unintentional activation of the system or could render the system inoperative. Either of these two
conditions may result in severe injury.
Technical service work must be started at least 90 seconds after the ignition switch is turned to the
“LOCK” position and the negative cable is disconnected from the battery. Otherwise, the system
may be activated by reserve energy in the Sensing and Diagnostic Module (SDM).
NOTE:
For the descriptions (items) not found in this section, refer to Section 5E1 of the Service Manual
mentioned in the FOREWORD of this manual.
All brake fasteners are important attaching parts in that they could affect the performance of vital
parts and systems, and/or could result in major repair expense. They must be replaced with one of
same part number or with an equivalent part if replacement becomes necessary. Do not use a
replacement part of lesser quality or substitute design. Torque values must be used as specified
during reassembly to assure proper retention of all parts. There is to be no welding as it may result
in extensive damage and weakening of the metal.
Page 133 of 656
5E2-8 ANTILOCK BRAKE SYSTEM (ABS)
b) Problem Symptom Confirmation
Check if what the customer claimed in “CUSTOMER QUESTIONNAIRE” is actually found in the vehicle
and if that symptom is found, whether it is identified as a failure. (This step should be shared with the cus-
tomer if possible.) Check warning lamps related to brake system referring to “EBD WARNING LAMP
(BRAKE WARNING LAMP) CHECK” and “ABS WARNING LAMP CHECK” in this section.
c) Diagnostic Trouble Code (DTC) Check, Record and Clearance
Perform “DIAGNOSTIC TROUBLE CODE CHECK” procedure in this section, record it and then clear it
referring to “DIAGNOSTIC TROUBLE CODE CLEARANCE” in this section.
If the malfunction DTC which was once displayed and then cleared cannot be detected (indicated) again
when the ignition switch is turned ON, attempt to diagnose the trouble based on the DTC recorded in this
step may mislead the diagnosis or make diagnosing difficult. Proceed to Step 2) to check control module for
proper self-diagnosis function.
If the malfunction DTC which was once displayed and then cleared can be detected (indicated) again when
ignition switch is turned ON, proceed to Step 3).
2) DRIVING TEST
Test drive the vehicle at 40 km/h for more than a minute and check if any trouble symptom (such as abnor-
mal lighting of ABS warning light) exists.
If the malfunction DTC is confirmed again at ignition switch ON, driving test as described in above is not nec-
essary. Proceed to Step 3).
3) DIAGNOSTIC TROUBLE CODE CHECK
Recheck diagnostic trouble code referring to “DTC CHECK” as shown in the following page.
4) DIAGNOSTIC TROUBLE CODE FLOW TABLE
According to Diagnostic flow table for the diagnostic trouble code confirmation in Step 3), locate the cause of
the trouble, namely in a sensor, switch, wire harness, connector, actuator assembly or other part and repair
or replace faulty parts.
5)“DIAGNOSIS” IN “BRAKES” SECTION
Check the parts or system suspected as a possible cause referring to “DIAGNOSIS” in “BRAKES” section
and based on symptoms appearing on the vehicle (symptom obtained through Steps 1)-a, 1)-b and 2) and
repair or replace faulty parts, if any).
6) CHECK FOR INTERMITTENT PROBLEM
Check parts where an intermittent trouble is easy to occur (e.g., wire harness, connector, etc.), referring to
“INTERMITTENT TROUBLE” in “GENERAL INFORMATION” section and related circuit of trouble code
recorded in Step 1)-c.
7) FINAL CONFIRMATION TEST
Confirm that the problem symptom has gone and the ABS is free from any abnormal conditions. If what has
been repaired is related to the malfunction DTC, clear the DTC once and perform test driving and confirm
that no DTC is indicated.
Page 140 of 656
ANTILOCK BRAKE SYSTEM (ABS) 5E2-15
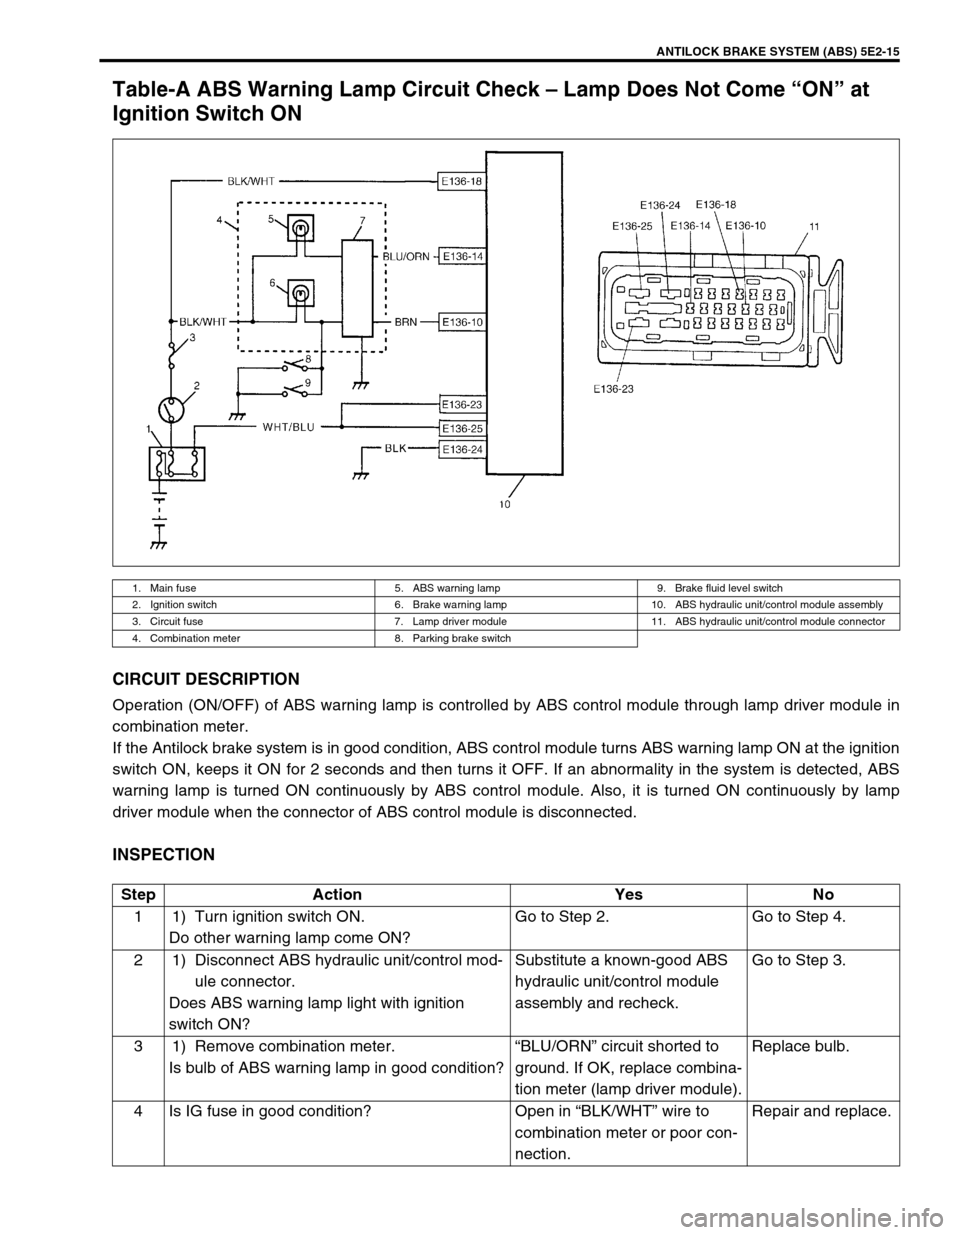
Table-A ABS Warning Lamp Circuit Check – Lamp Does Not Come “ON” at
Ignition Switch ON
CIRCUIT DESCRIPTION
Operation (ON/OFF) of ABS warning lamp is controlled by ABS control module through lamp driver module in
combination meter.
If the Antilock brake system is in good condition, ABS control module turns ABS warning lamp ON at the ignition
switch ON, keeps it ON for 2 seconds and then turns it OFF. If an abnormality in the system is detected, ABS
warning lamp is turned ON continuously by ABS control module. Also, it is turned ON continuously by lamp
driver module when the connector of ABS control module is disconnected.
INSPECTION
1. Main fuse 5. ABS warning lamp 9. Brake fluid level switch
2. Ignition switch 6. Brake warning lamp 10. ABS hydraulic unit/control module assembly
3. Circuit fuse 7. Lamp driver module 11. ABS hydraulic unit/control module connector
4. Combination meter 8. Parking brake switch
Step Action Yes No
1 1) Turn ignition switch ON.
Do other warning lamp come ON?Go to Step 2. Go to Step 4.
2 1) Disconnect ABS hydraulic unit/control mod-
ule connector.
Does ABS warning lamp light with ignition
switch ON?Substitute a known-good ABS
hydraulic unit/control module
assembly and recheck.Go to Step 3.
3 1) Remove combination meter.
Is bulb of ABS warning lamp in good condition?“BLU/ORN” circuit shorted to
ground. If OK, replace combina-
tion meter (lamp driver module).Replace bulb.
4 Is IG fuse in good condition? Open in “BLK/WHT” wire to
combination meter or poor con-
nection.Repair and replace.
Page 143 of 656

5E2-18 ANTILOCK BRAKE SYSTEM (ABS)
Table-D Code (DTC) Is Not Outputted Even with Diagnosis Switch Terminal
Connected to Ground
CIRCUIT DESCRIPTION
When diagnosis switch terminal is connected to ground with ignition switch turned ON, the ABS control module
outputs diagnostic trouble code by flashing ABS warning lamp.
INSPECTION
1. ABS warning lamp in combination meter 3. Diagnosis monitor coupler 3-2. Diagnosis ground terminal
2. ABS hydraulic unit/control module assembly 3-1. Diagnosis switch terminal 4. ABS hydraulic unit/control module connector
Step Action Yes No
1 Is it shorted diagnosis switch terminal and
ground terminal by service wire properly?Go to Step 2. Connect service wire
securely.
2 1) Disconnect service wire.
2) Disconnect ABS hydraulic unit/control mod-
ule connector.
3) Measure resistance between diagnosis
switch terminal and connector terminal
“E136-12”.
Is it infinite (∞)?“PNK” circuit open. Go to Step 3.
3 1) Measure resistance between ground termi-
nal of monitor coupler and body ground.
Is continuity indicated?Go to Step 4.“BLK” circuit open or poor
connection.
4 1) Check for proper connection to ABS
hydraulic unit/control module at terminal
“E136-12”.
2) If OK, then check ABS warning lamp circuit
referring to TABLE A, B and C.
Is it in good condition?Substitute a known-good
ABS hydraulic with/control
module assembly and
recheck.Repair “ABS” warning
lamp circuit.
Page 146 of 656
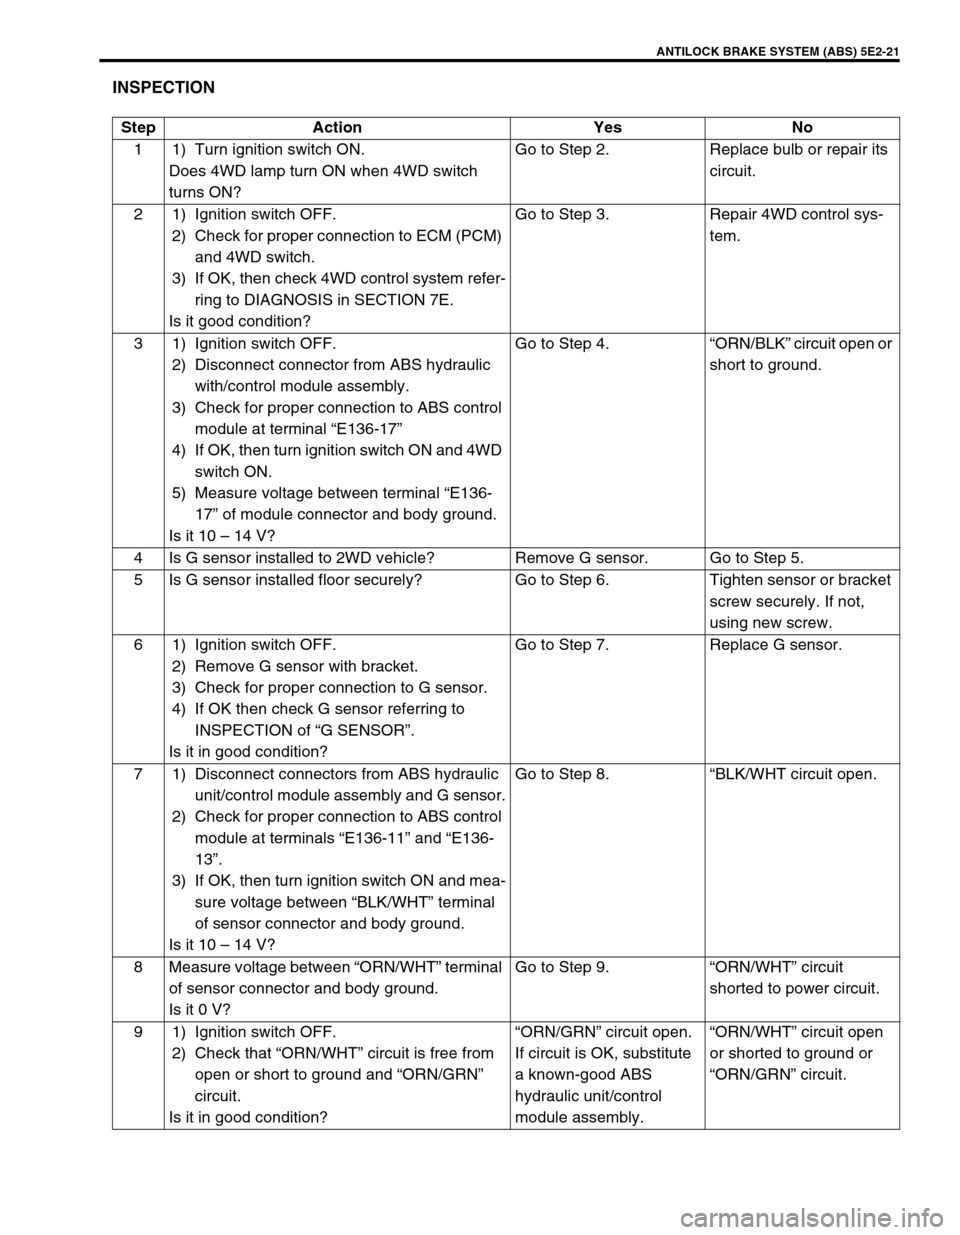
ANTILOCK BRAKE SYSTEM (ABS) 5E2-21
INSPECTION
Step Action Yes No
1 1) Turn ignition switch ON.
Does 4WD lamp turn ON when 4WD switch
turns ON?Go to Step 2. Replace bulb or repair its
circuit.
2 1) Ignition switch OFF.
2) Check for proper connection to ECM (PCM)
and 4WD switch.
3) If OK, then check 4WD control system refer-
ring to DIAGNOSIS in SECTION 7E.
Is it good condition?Go to Step 3. Repair 4WD control sys-
tem.
3 1) Ignition switch OFF.
2) Disconnect connector from ABS hydraulic
with/control module assembly.
3) Check for proper connection to ABS control
module at terminal “E136-17”
4) If OK, then turn ignition switch ON and 4WD
switch ON.
5) Measure voltage between terminal “E136-
17” of module connector and body ground.
Is it 10 – 14 V?Go to Step 4.“ORN/BLK” circuit open or
short to ground.
4 Is G sensor installed to 2WD vehicle? Remove G sensor. Go to Step 5.
5 Is G sensor installed floor securely? Go to Step 6. Tighten sensor or bracket
screw securely. If not,
using new screw.
6 1) Ignition switch OFF.
2) Remove G sensor with bracket.
3) Check for proper connection to G sensor.
4) If OK then check G sensor referring to
INSPECTION of “G SENSOR”.
Is it in good condition?Go to Step 7. Replace G sensor.
7 1) Disconnect connectors from ABS hydraulic
unit/control module assembly and G sensor.
2) Check for proper connection to ABS control
module at terminals “E136-11” and “E136-
13”.
3) If OK, then turn ignition switch ON and mea-
sure voltage between “BLK/WHT” terminal
of sensor connector and body ground.
Is it 10 – 14 V?Go to Step 8.“BLK/WHT circuit open.
8 Measure voltage between “ORN/WHT” terminal
of sensor connector and body ground.
Is it 0 V?Go to Step 9.“ORN/WHT” circuit
shorted to power circuit.
9 1) Ignition switch OFF.
2) Check that “ORN/WHT” circuit is free from
open or short to ground and “ORN/GRN”
circuit.
Is it in good condition?“ORN/GRN” circuit open.
If circuit is OK, substitute
a known-good ABS
hydraulic unit/control
module assembly.“ORN/WHT” circuit open
or shorted to ground or
“ORN/GRN” circuit.
Page 147 of 656
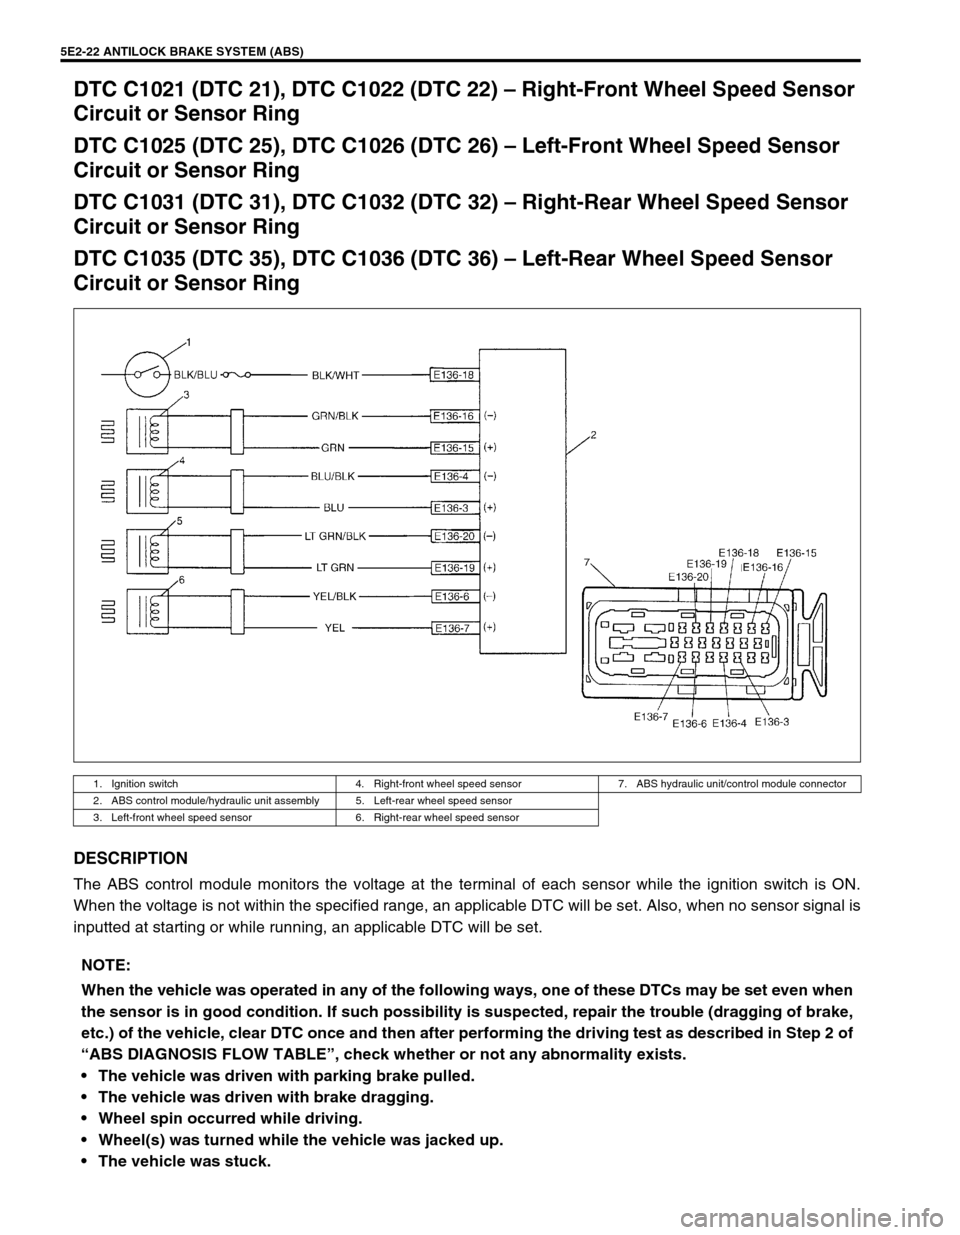
5E2-22 ANTILOCK BRAKE SYSTEM (ABS)
DTC C1021 (DTC 21), DTC C1022 (DTC 22) – Right-Front Wheel Speed Sensor
Circuit or Sensor Ring
DTC C1025 (DTC 25), DTC C1026 (DTC 26) – Left-Front Wheel Speed Sensor
Circuit or Sensor Ring
DTC C1031 (DTC 31), DTC C1032 (DTC 32) – Right-Rear Wheel Speed Sensor
Circuit or Sensor Ring
DTC C1035 (DTC 35), DTC C1036 (DTC 36) – Left-Rear Wheel Speed Sensor
Circuit or Sensor Ring
DESCRIPTION
The ABS control module monitors the voltage at the terminal of each sensor while the ignition switch is ON.
When the voltage is not within the specified range, an applicable DTC will be set. Also, when no sensor signal is
inputted at starting or while running, an applicable DTC will be set.
1. Ignition switch 4. Right-front wheel speed sensor 7. ABS hydraulic unit/control module connector
2. ABS control module/hydraulic unit assembly 5. Left-rear wheel speed sensor
3. Left-front wheel speed sensor 6. Right-rear wheel speed sensor
NOTE:
When the vehicle was operated in any of the following ways, one of these DTCs may be set even when
the sensor is in good condition. If such possibility is suspected, repair the trouble (dragging of brake,
etc.) of the vehicle, clear DTC once and then after performing the driving test as described in Step 2 of
“ABS DIAGNOSIS FLOW TABLE”, check whether or not any abnormality exists.
The vehicle was driven with parking brake pulled.
The vehicle was driven with brake dragging.
Wheel spin occurred while driving.
Wheel(s) was turned while the vehicle was jacked up.
The vehicle was stuck.
Page 148 of 656
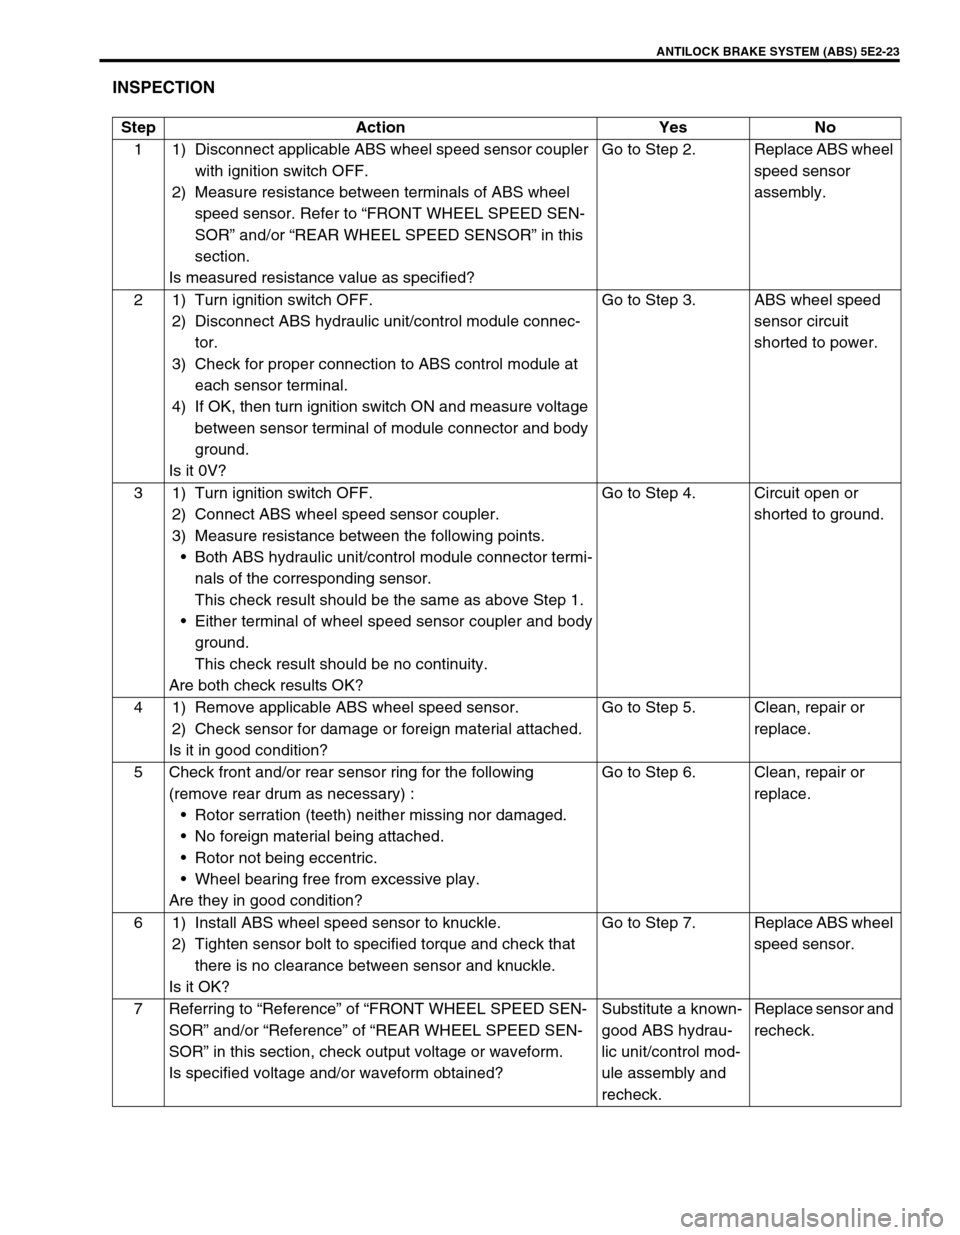
ANTILOCK BRAKE SYSTEM (ABS) 5E2-23
INSPECTION
Step Action Yes No
1 1) Disconnect applicable ABS wheel speed sensor coupler
with ignition switch OFF.
2) Measure resistance between terminals of ABS wheel
speed sensor. Refer to “FRONT WHEEL SPEED SEN-
SOR” and/or “REAR WHEEL SPEED SENSOR” in this
section.
Is measured resistance value as specified?Go to Step 2. Replace ABS wheel
speed sensor
assembly.
2 1) Turn ignition switch OFF.
2) Disconnect ABS hydraulic unit/control module connec-
tor.
3) Check for proper connection to ABS control module at
each sensor terminal.
4) If OK, then turn ignition switch ON and measure voltage
between sensor terminal of module connector and body
ground.
Is it 0V?Go to Step 3. ABS wheel speed
sensor circuit
shorted to power.
3 1) Turn ignition switch OFF.
2) Connect ABS wheel speed sensor coupler.
3) Measure resistance between the following points.
Both ABS hydraulic unit/control module connector termi-
nals of the corresponding sensor.
This check result should be the same as above Step 1.
Either terminal of wheel speed sensor coupler and body
ground.
This check result should be no continuity.
Are both check results OK?Go to Step 4. Circuit open or
shorted to ground.
4 1) Remove applicable ABS wheel speed sensor.
2) Check sensor for damage or foreign material attached.
Is it in good condition?Go to Step 5. Clean, repair or
replace.
5 Check front and/or rear sensor ring for the following
(remove rear drum as necessary) :
Rotor serration (teeth) neither missing nor damaged.
No foreign material being attached.
Rotor not being eccentric.
Wheel bearing free from excessive play.
Are they in good condition?Go to Step 6. Clean, repair or
replace.
6 1) Install ABS wheel speed sensor to knuckle.
2) Tighten sensor bolt to specified torque and check that
there is no clearance between sensor and knuckle.
Is it OK?Go to Step 7. Replace ABS wheel
speed sensor.
7 Referring to “Reference” of “FRONT WHEEL SPEED SEN-
SOR” and/or “Reference” of “REAR WHEEL SPEED SEN-
SOR” in this section, check output voltage or waveform.
Is specified voltage and/or waveform obtained?Substitute a known-
good ABS hydrau-
lic unit/control mod-
ule assembly and
recheck.Replace sensor and
recheck.
Page 152 of 656
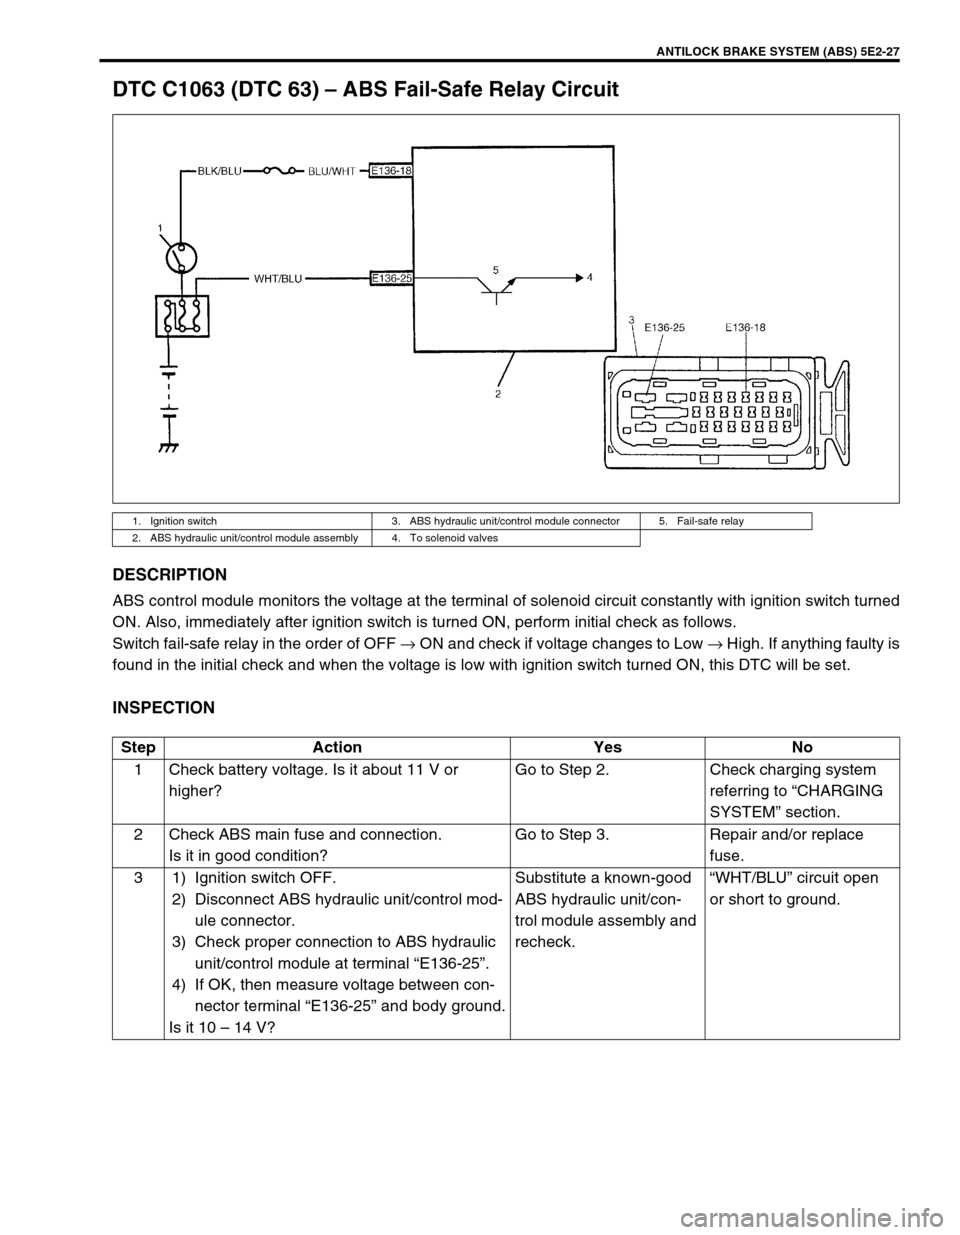
ANTILOCK BRAKE SYSTEM (ABS) 5E2-27
DTC C1063 (DTC 63) – ABS Fail-Safe Relay Circuit
DESCRIPTION
ABS control module monitors the voltage at the terminal of solenoid circuit constantly with ignition switch turned
ON. Also, immediately after ignition switch is turned ON, perform initial check as follows.
Switch fail-safe relay in the order of OFF → ON and check if voltage changes to Low → High. If anything faulty is
found in the initial check and when the voltage is low with ignition switch turned ON, this DTC will be set.
INSPECTION
1. Ignition switch 3. ABS hydraulic unit/control module connector 5. Fail-safe relay
2. ABS hydraulic unit/control module assembly 4. To solenoid valves
Step Action Yes No
1 Check battery voltage. Is it about 11 V or
higher?Go to Step 2. Check charging system
referring to “CHARGING
SYSTEM” section.
2 Check ABS main fuse and connection.
Is it in good condition?Go to Step 3. Repair and/or replace
fuse.
3 1) Ignition switch OFF.
2) Disconnect ABS hydraulic unit/control mod-
ule connector.
3) Check proper connection to ABS hydraulic
unit/control module at terminal “E136-25”.
4) If OK, then measure voltage between con-
nector terminal “E136-25” and body ground.
Is it 10 – 14 V?Substitute a known-good
ABS hydraulic unit/con-
trol module assembly and
recheck.“WHT/BLU” circuit open
or short to ground.
Page 153 of 656
5E2-28 ANTILOCK BRAKE SYSTEM (ABS)
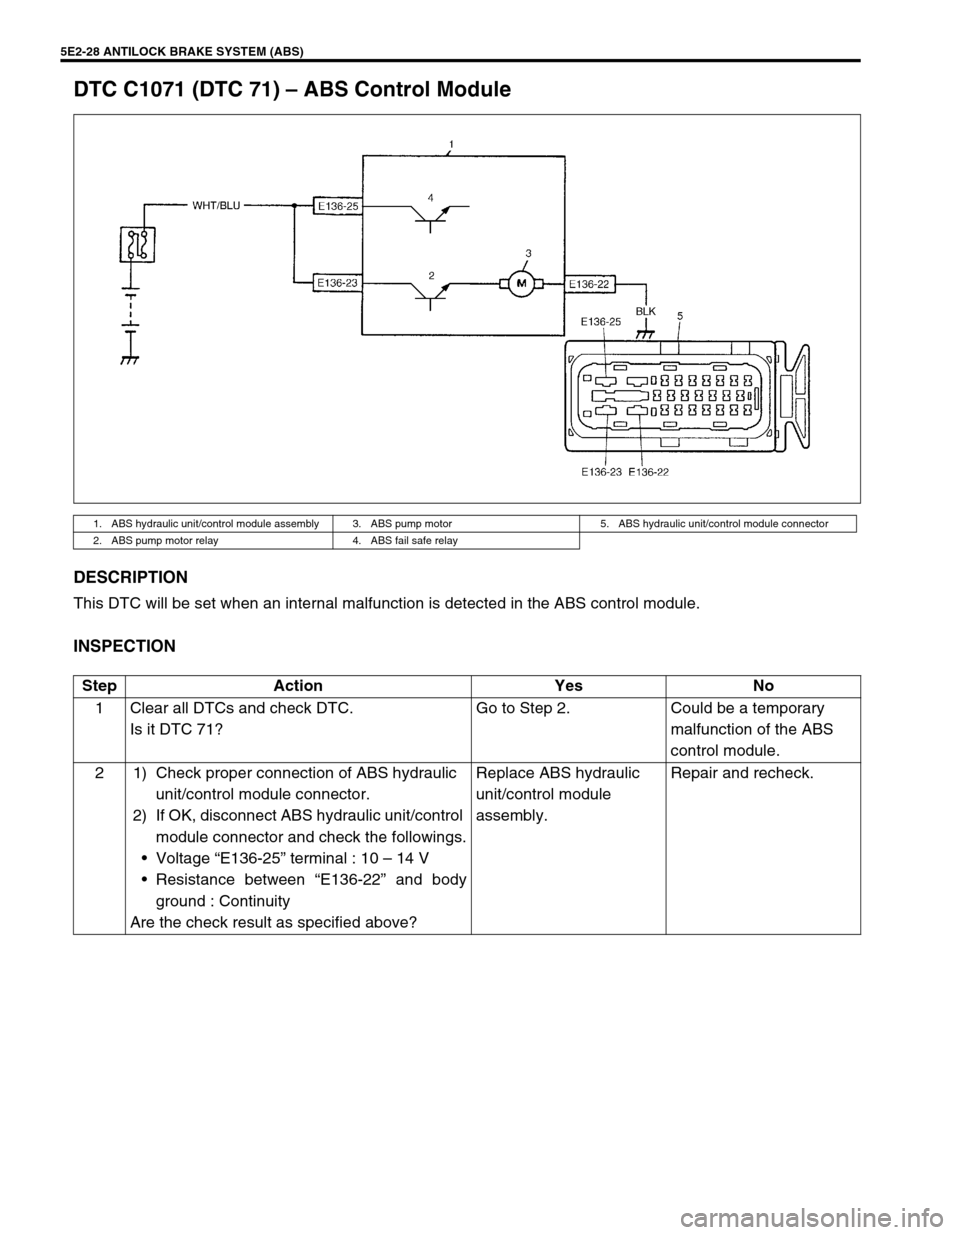
DTC C1071 (DTC 71) – ABS Control Module
DESCRIPTION
This DTC will be set when an internal malfunction is detected in the ABS control module.
INSPECTION
1. ABS hydraulic unit/control module assembly 3. ABS pump motor 5. ABS hydraulic unit/control module connector
2. ABS pump motor relay 4. ABS fail safe relay
Step Action Yes No
1 Clear all DTCs and check DTC.
Is it DTC 71?Go to Step 2. Could be a temporary
malfunction of the ABS
control module.
2 1) Check proper connection of ABS hydraulic
unit/control module connector.
2) If OK, disconnect ABS hydraulic unit/control
module connector and check the followings.
Voltage “E136-25” terminal : 10 – 14 V
Resistance between “E136-22” and body
ground : Continuity
Are the check result as specified above?Replace ABS hydraulic
unit/control module
assembly.Repair and recheck.