Drive shift SUZUKI GRAND VITARA 2001 2.G Owners Manual
[x] Cancel search | Manufacturer: SUZUKI, Model Year: 2001, Model line: GRAND VITARA, Model: SUZUKI GRAND VITARA 2001 2.GPages: 656, PDF Size: 14.31 MB
Page 87 of 656
3C1-12 AIR BAG STEERING WHEEL AND COLUMN
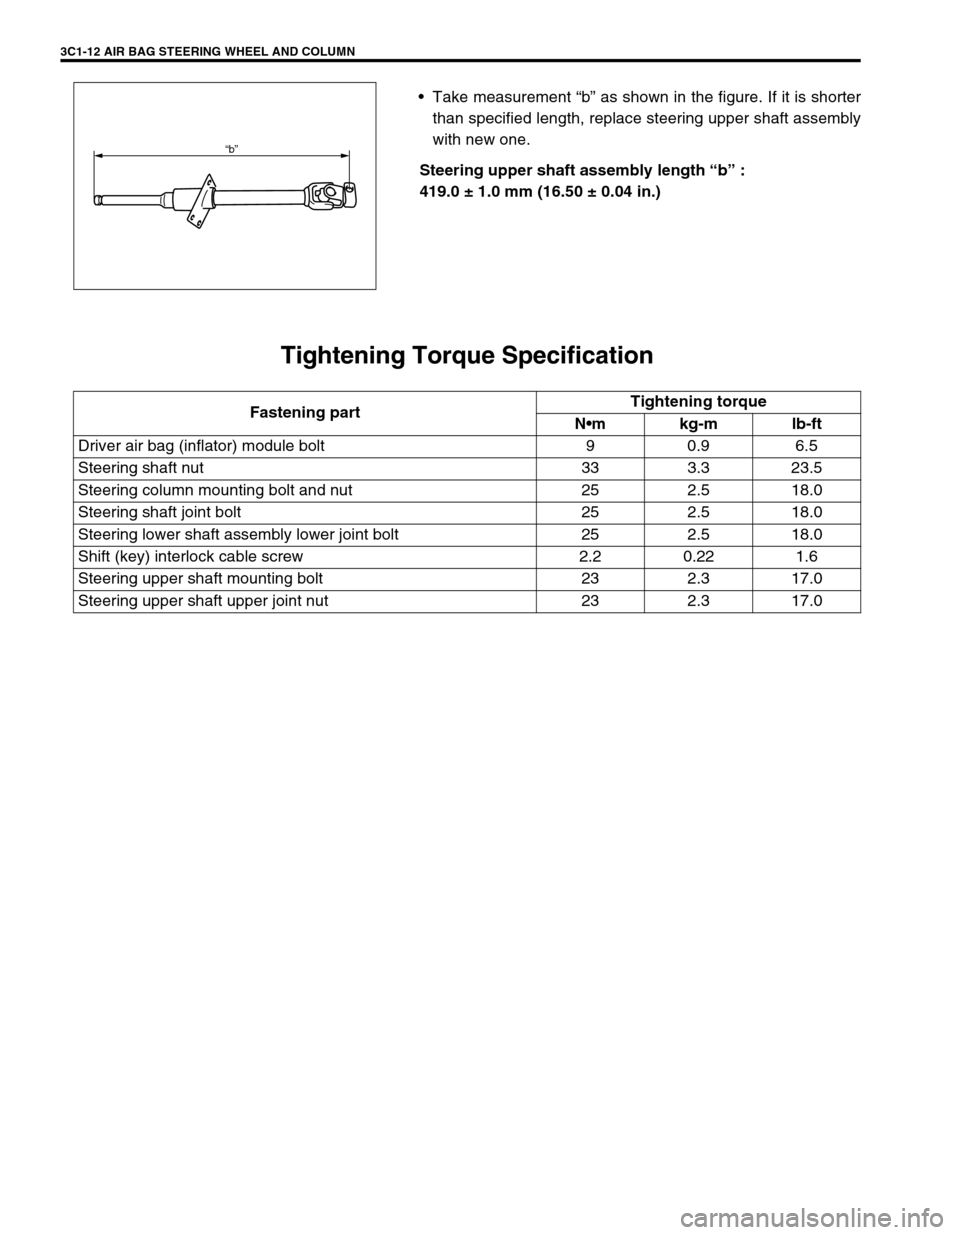
Take measurement “b” as shown in the figure. If it is shorter
than specified length, replace steering upper shaft assembly
with new one.
Steering upper shaft assembly length “b” :
419.0 ± 1.0 mm (16.50 ± 0.04 in.)
Tightening Torque Specification
“b”
Fastening partTightening torque
Nm kg-m lb-ft
Driver air bag (inflator) module bolt 9 0.9 6.5
Steering shaft nut 33 3.3 23.5
Steering column mounting bolt and nut 25 2.5 18.0
Steering shaft joint bolt 25 2.5 18.0
Steering lower shaft assembly lower joint bolt 25 2.5 18.0
Shift (key) interlock cable screw 2.2 0.22 1.6
Steering upper shaft mounting bolt 23 2.3 17.0
Steering upper shaft upper joint nut 23 2.3 17.0
Page 166 of 656
ENGINE GENERAL INFORMATION AND DIAGNOSIS (H27 ENGINE) 6-1-5
Fuel Pressure Relief Procedure
After making sure that engine is cold, relief fuel pressure as fol-
lows.
1) Place transmission gear shift lever in “Neutral” (shift selector
lever to “P” range for A/T vehicle), set parking brake, and
block drive wheels.
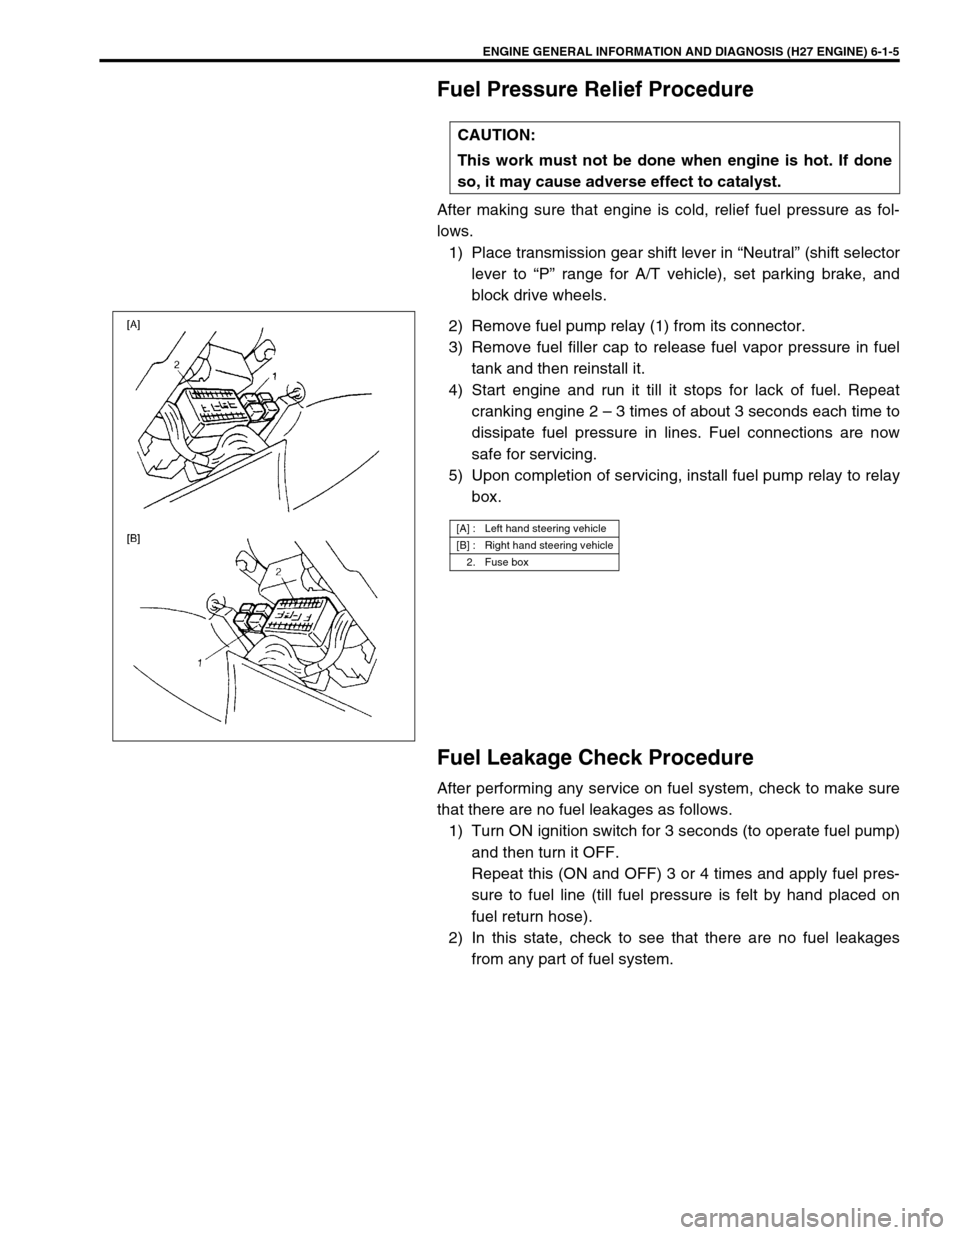
2) Remove fuel pump relay (1) from its connector.
3) Remove fuel filler cap to release fuel vapor pressure in fuel
tank and then reinstall it.
4) Start engine and run it till it stops for lack of fuel. Repeat
cranking engine 2 – 3 times of about 3 seconds each time to
dissipate fuel pressure in lines. Fuel connections are now
safe for servicing.
5) Upon completion of servicing, install fuel pump relay to relay
box.
Fuel Leakage Check Procedure
After performing any service on fuel system, check to make sure
that there are no fuel leakages as follows.
1) Turn ON ignition switch for 3 seconds (to operate fuel pump)
and then turn it OFF.
Repeat this (ON and OFF) 3 or 4 times and apply fuel pres-
sure to fuel line (till fuel pressure is felt by hand placed on
fuel return hose).
2) In this state, check to see that there are no fuel leakages
from any part of fuel system. CAUTION:
This work must not be done when engine is hot. If done
so, it may cause adverse effect to catalyst.
[A] : Left hand steering vehicle
[B] : Right hand steering vehicle
2. Fuse box
Page 184 of 656
ENGINE GENERAL INFORMATION AND DIAGNOSIS (H27 ENGINE) 6-1-23
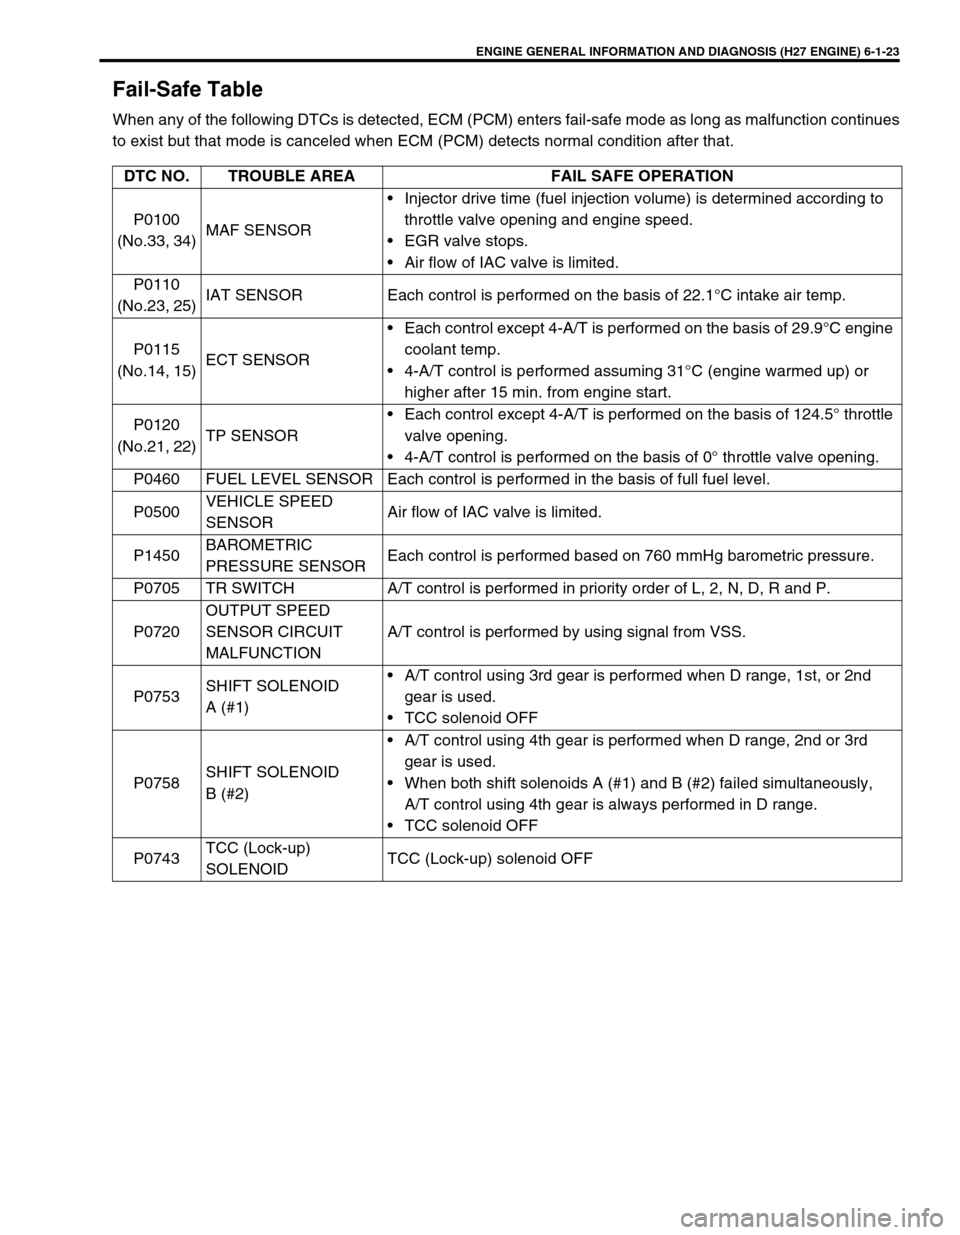
Fail-Safe Table
When any of the following DTCs is detected, ECM (PCM) enters fail-safe mode as long as malfunction continues
to exist but that mode is canceled when ECM (PCM) detects normal condition after that.
DTC NO. TROUBLE AREA FAIL SAFE OPERATION
P0100
(No.33, 34)MAF SENSOR• Injector drive time (fuel injection volume) is determined according to
throttle valve opening and engine speed.
• EGR valve stops.
• Air flow of IAC valve is limited.
P0110
(No.23, 25)IAT SENSOR Each control is performed on the basis of 22.1°C intake air temp.
P0115
(No.14, 15)ECT SENSOR• Each control except 4-A/T is performed on the basis of 29.9°C engine
coolant temp.
• 4-A/T control is performed assuming 31°C (engine warmed up) or
higher after 15 min. from engine start.
P0120
(No.21, 22)TP SENSOR• Each control except 4-A/T is performed on the basis of 124.5° throttle
valve opening.
• 4-A/T control is performed on the basis of 0° throttle valve opening.
P0460 FUEL LEVEL SENSOR Each control is performed in the basis of full fuel level.
P0500VEHICLE SPEED
SENSORAir flow of IAC valve is limited.
P1450BAROMETRIC
PRESSURE SENSOREach control is performed based on 760 mmHg barometric pressure.
P0705 TR SWITCH A/T control is performed in priority order of L, 2, N, D, R and P.
P0720OUTPUT SPEED
SENSOR CIRCUIT
MALFUNCTIONA/T control is performed by using signal from VSS.
P0753SHIFT SOLENOID
A (#1)• A/T control using 3rd gear is performed when D range, 1st, or 2nd
gear is used.
• TCC solenoid OFF
P0758SHIFT SOLENOID
B (#2)• A/T control using 4th gear is performed when D range, 2nd or 3rd
gear is used.
• When both shift solenoids A (#1) and B (#2) failed simultaneously,
A/T control using 4th gear is always performed in D range.
• TCC solenoid OFF
P0743TCC (Lock-up)
SOLENOIDTCC (Lock-up) solenoid OFF
Page 187 of 656
6-1-26 ENGINE GENERAL INFORMATION AND DIAGNOSIS (H27 ENGINE)
PNP SIGNAL (Transmis-
sion Range Switch) (for 4-
A/T)With ignition switch ON, selector lever in “P”
or “N” positionP/N Range
✱
With ignition switch ON, selector lever in “R”,
“D”, “2” or “L” positionD Range
FUEL TANK LEVEL Ignition switch ON 0 – 100 %✱
ELECTRIC LOAD Ignition ON, small light OFF OFF✱
Ignition switch ON, small light ON ON✱
VSS (Vehicle speed sen-
sor) (for 4-A/T)At stop.
0 km/h 0 MPH✱
GEAR POSITION (for 4-
A/T)Ignition switch ON, selector lever is shifted at
“R”, “D”, “2” or “L” range and vehicle stops.1st✱
THROT POS LEVEL
(Throttle position level for
4-A/T)“0” (about idle position), “1”,“2”,“3”,“4”,“5”,“6” or “7” (about full open)
appears according to throttle valve opening.✱
SHIFT SOL #1 (A)
CON (Shift solenoid #1
command signal)
MON (Shift solenoid #1
monitor) (for 4-A/T)Ignition switch ON
Selector lever is shifted at “P”, “R”, “N”, “D”,
“2” or “L” range.
Vehicle stops.ON✱
SHIFT SOL #2 (B)
CON (Shift solenoid #2
command signal)
MON (Shift solenoid #2
monitor) (for 4-A/T)Ignition switch ON
Selector lever is shifted at “P”, “R”, “N”, “D”,
“2” or “L” range.
Vehicle stops.OFF✱
TCC SOL (for 4-A/T)
CON (Torque converter
clutch solenoid command
signal)
MON (Torque converter
clutch solenoid monitor)Ignition switch ON
Selector lever is shifted at “P”, “R”, “N”, “D”,
“2” or “L” range.
Vehicle stops.OFF✱
TRANS RANGE
(for 4-A/T)Ignition switch ON, selector lever is at “P”,
“R”, “N”, “D”, “2” or “L” range.P, R, N, D, 2 or L✱
BRAKE SW
(Brake, stop lamp, switch)
(for 4-A/T)Ignition switch ON, Brake pedal is released. OFF
✱
Ignition switch ON, Brake pedal is
depressed.ON
O/D OFF SW
(Overdrive cut switch)Ignition switch ON, Overdrive cut switch OFF OFF
✱
Ignition switch ON, Overdrive cut switch ON ON
MODE SELECT SW
(Power/Normal change
switch) (for 4-A/T)Ignition switch ON, P/N change switch is at
normal position.NORMAL
✱
Ignition switch ON, P/N change switch is at
power position.POWER
4WD-L SW
(4WD low switch)Ignition switch ON, Transfer lever is shifted
at “4H” or “2H” position.OFF
✱
Ignition switch ON, Transfer lever is shifted
at “4L” position.ON SCAN TOOL DATA CONDITIONNORMAL CONDITION/
REFERENCE VALUEOTHER
Page 191 of 656
6-1-30 ENGINE GENERAL INFORMATION AND DIAGNOSIS (H27 ENGINE)
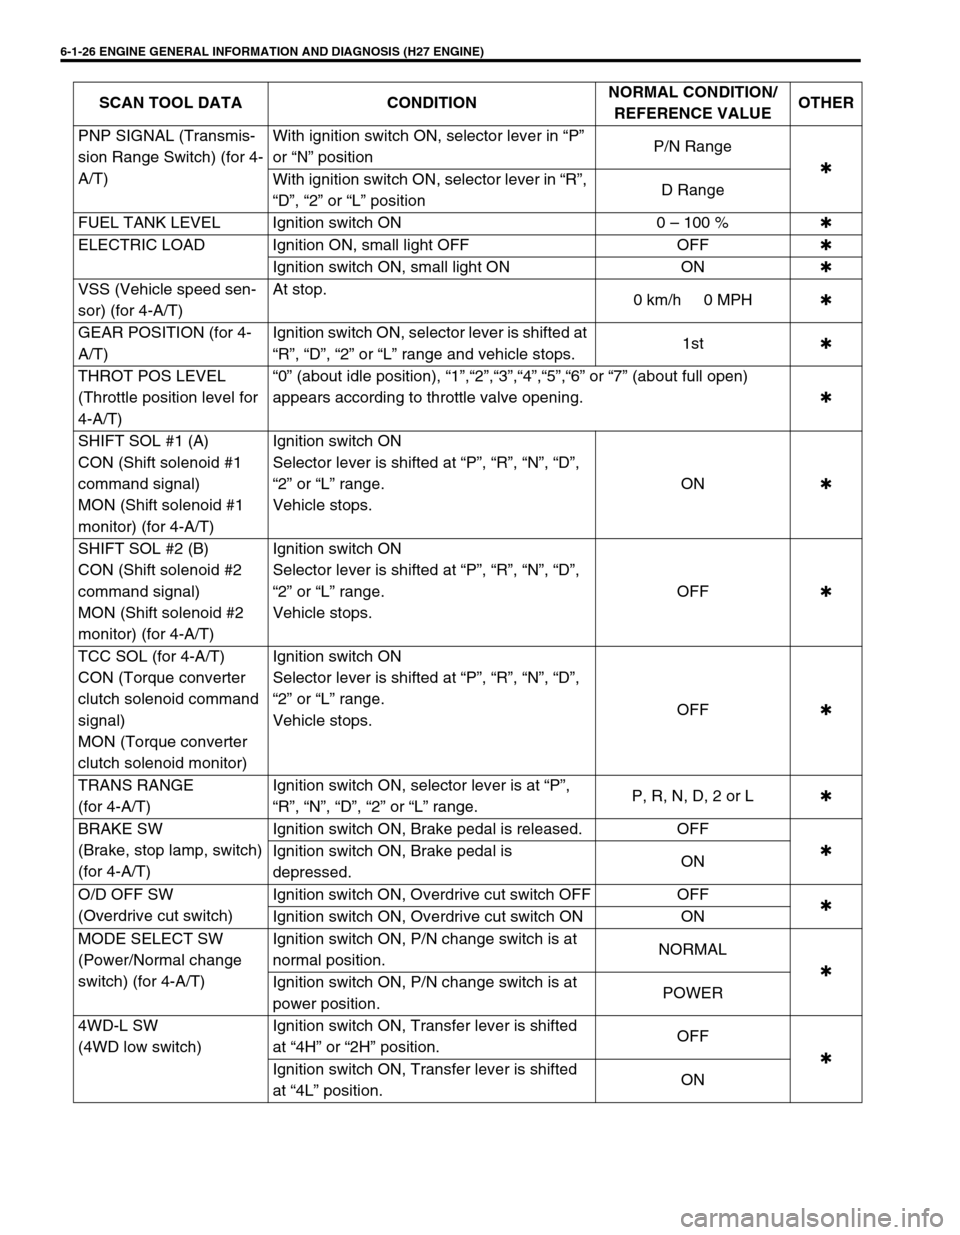
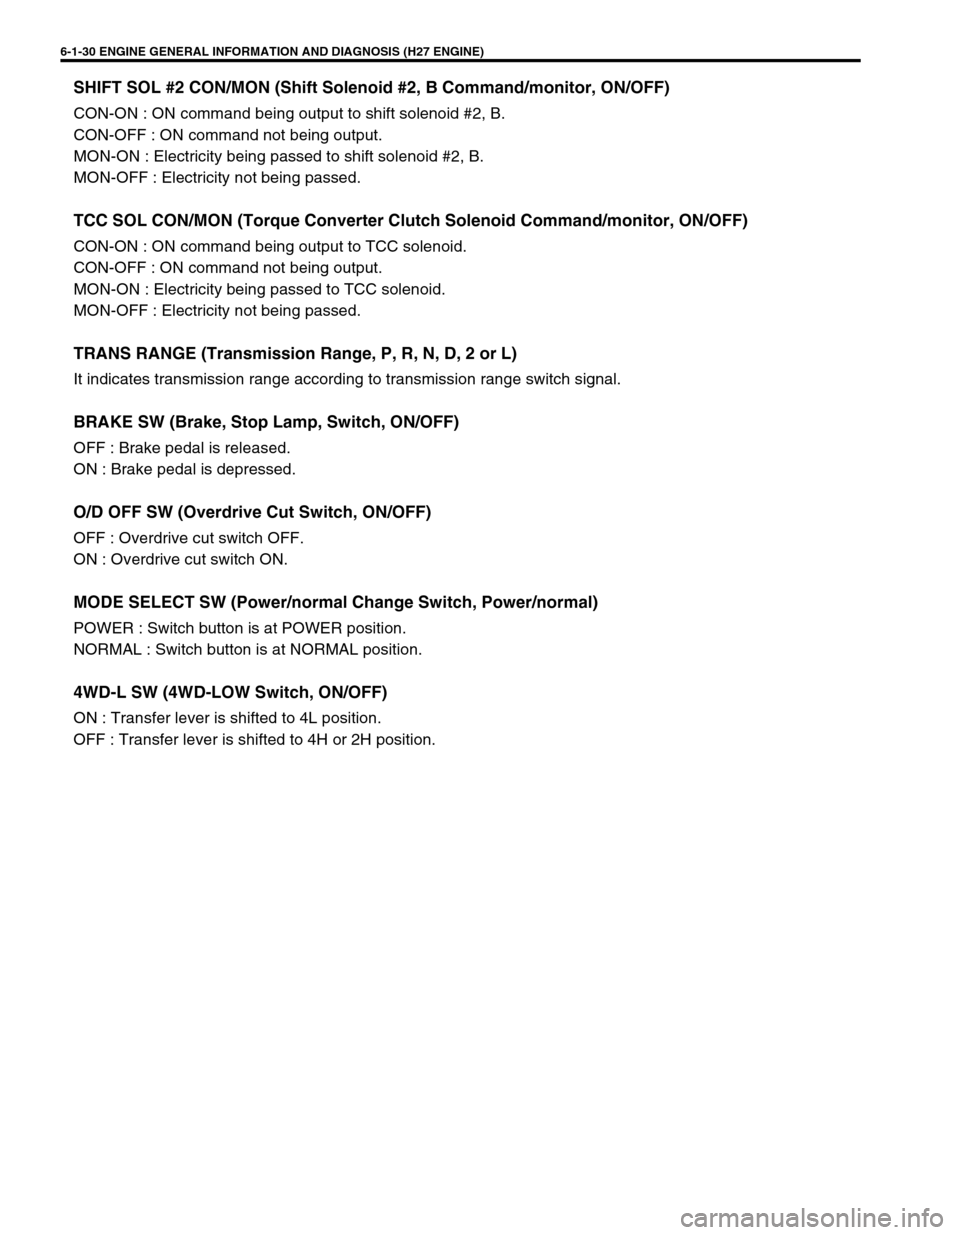
SHIFT SOL #2 CON/MON (Shift Solenoid #2, B Command/monitor, ON/OFF)
CON-ON : ON command being output to shift solenoid #2, B.
CON-OFF : ON command not being output.
MON-ON : Electricity being passed to shift solenoid #2, B.
MON-OFF : Electricity not being passed.
TCC SOL CON/MON (Torque Converter Clutch Solenoid Command/monitor, ON/OFF)
CON-ON : ON command being output to TCC solenoid.
CON-OFF : ON command not being output.
MON-ON : Electricity being passed to TCC solenoid.
MON-OFF : Electricity not being passed.
TRANS RANGE (Transmission Range, P, R, N, D, 2 or L)
It indicates transmission range according to transmission range switch signal.
BRAKE SW (Brake, Stop Lamp, Switch, ON/OFF)
OFF : Brake pedal is released.
ON : Brake pedal is depressed.
O/D OFF SW (Overdrive Cut Switch, ON/OFF)
OFF : Overdrive cut switch OFF.
ON : Overdrive cut switch ON.
MODE SELECT SW (Power/normal Change Switch, Power/normal)
POWER : Switch button is at POWER position.
NORMAL : Switch button is at NORMAL position.
4WD-L SW (4WD-LOW Switch, ON/OFF)
ON : Transfer lever is shifted to 4L position.
OFF : Transfer lever is shifted to 4H or 2H position.
Page 348 of 656
ENGINE AND EMISSION CONTROL SYSTEM (SEQUENTIAL MULTIPORT FUEL INJECTION FOR H27 ENGINE) 6E2-15
Idle Speed/Idle Air Control (IAC) Duty Inspec-
tion
Before idle speed/IAC duty check, make sure of the following.
•Lead wires and hoses of engine/emission control systems
are connected securely.
•Accelerator cable is adjusted.
•Ignition timing is within specification.
•All accessories (wipers, heater, lights, A/C, etc.) are out of
service.
•Air cleaner has been properly installed and is in good condi-
tion.
•ECM (PCM) does not detect any malfunction DTC.
After above items are all confirmed, check idle speed and IAC
duty as follows.
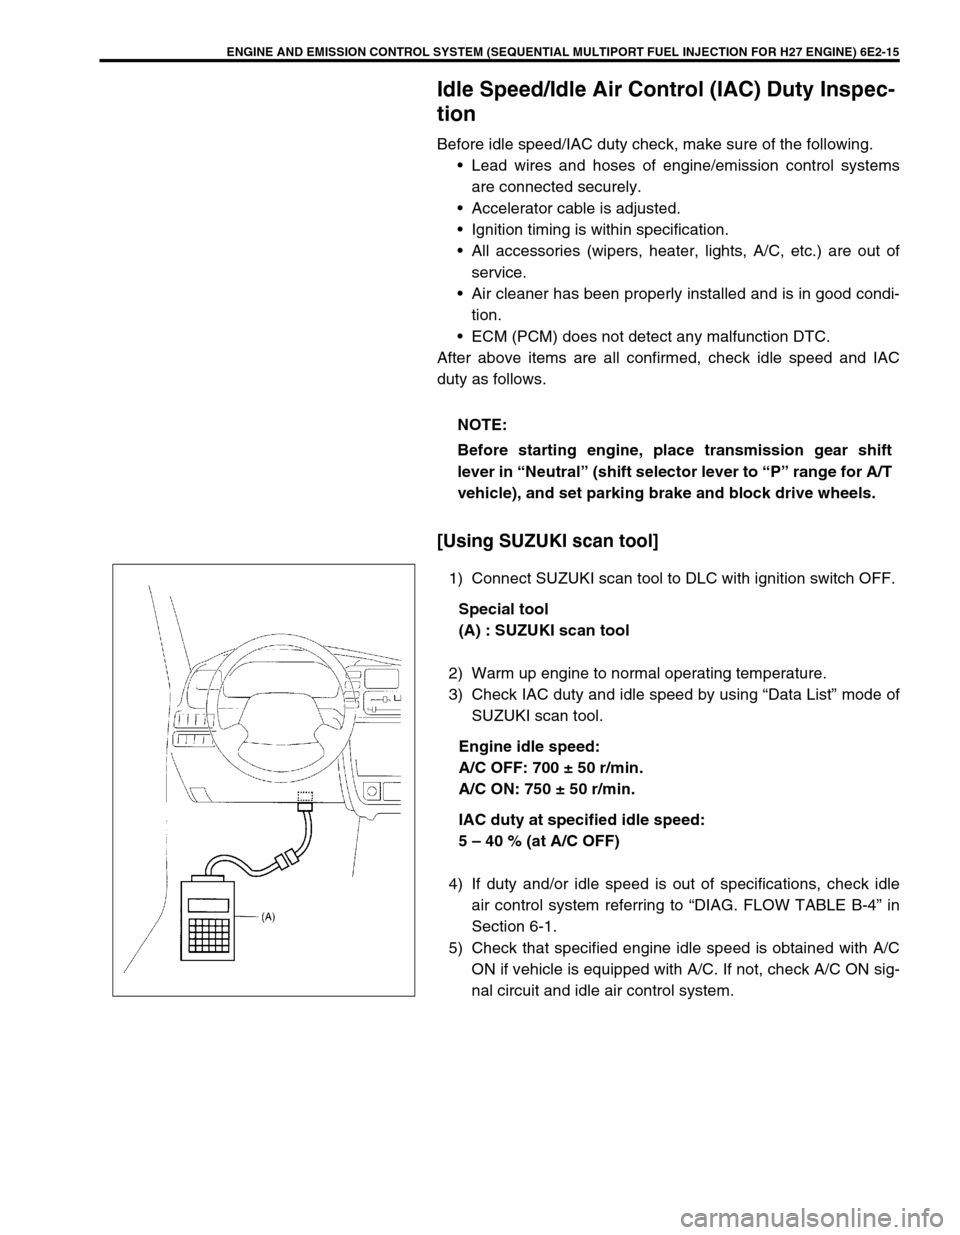
[Using SUZUKI scan tool]
1) Connect SUZUKI scan tool to DLC with ignition switch OFF.
Special tool
(A) : SUZUKI scan tool
2) Warm up engine to normal operating temperature.
3) Check IAC duty and idle speed by using “Data List” mode of
SUZUKI scan tool.
Engine idle speed:
A/C OFF: 700 ± 50 r/min.
A/C ON: 750 ± 50 r/min.
IAC duty at specified idle speed:
5 – 40 % (at A/C OFF)
4) If duty and/or idle speed is out of specifications, check idle
air control system referring to “DIAG. FLOW TABLE B-4” in
Section 6-1.
5) Check that specified engine idle speed is obtained with A/C
ON if vehicle is equipped with A/C. If not, check A/C ON sig-
nal circuit and idle air control system. NOTE:
Before starting engine, place transmission gear shift
lever in “Neutral” (shift selector lever to “P” range for A/T
vehicle), and set parking brake and block drive wheels.
Page 411 of 656
7B1-2 AUTOMATIC TRANSMISSION (4 A/T)
Stall Test ................................................... 7B1-38
Line Pressure Test .................................... 7B1-39
Road Test ................................................. 7B1-40
Manual Road Test..................................... 7B1-41
Time Lag Test ........................................... 7B1-41
Engine Brake Test .................................... 7B1-42
“P” Range Test.......................................... 7B1-42
On-Vehicle Service ..................................... 7B1-43
Maintenance Service ................................ 7B1-43
Fluid level .............................................. 7B1-43
Fluid change.......................................... 7B1-44
A/T Throttle Cable ..................................... 7B1-45Solenoid Valves (Shift Solenoid Valves
and TCC Solenoid Valve) ......................... 7B1-45
MANUAL SELECTOR ASSEMBLY .......... 7B1-46
SELECT CABLE ....................................... 7B1-48
Unit Repair .................................................. 7B1-49
Sub-Assembly Repair ............................... 7B1-49
Overdrive (case side) ............................ 7B1-49
Forward clutch ...................................... 7B1-50
Front upper valve body ......................... 7B1-54
Unit Assembly ........................................... 7B1-59
Tightening Torque Specification............... 7B1-60
Special Tool ................................................ 7B1-61
Page 412 of 656
AUTOMATIC TRANSMISSION (4 A/T) 7B1-3
General Description
Item Specifications
Torque
converterType 3-element, 1-step, 2-phase type (with TCC (lock-up) mechanism)
Stall torque ratio 2.0
Oil pump Type Trochoid type oil pump
Drive system Engine driven
Gear
change
deviceType Forward 4-step, reverse 1-step planetary gear type
Shift position“P” range Gear in neutral, output shaft fixed, engine start
“R” range Reverse
“N” range Gear in neutral, engine start
“D” range
(O/D ON)Forward 1st ↔ 2nd ↔ 3rd ↔ 4th (O/D)
automatic gear change
“D” range
(O/D OFF)Forward 1st ↔ 2nd ↔ 3rd
automatic gear change
“2” range (Normal mode) Forward 1st ↔ 2nd ← 3rd auto-
matic gear change
(Power mode) Forward 2nd ← 3rd automatic gear
change and fixed at 2nd gear
“L” range Forward 1st ← 2nd ← 3rd reduction, and fixed at
1st gear
Gear
ratio1st
(low gear)2.826
2nd
(second gear)1.493
3rd
(top gear)1.000
4th
(overdrive gear)0.689
Reverse
(reverse gear2.703
Control elements Wet type multi-disc clutch ... 3 sets
Wet type multi-disc brake ... 4 sets
One-way clutch ... 3 sets
Transfer Hi : 1.000
Lo : 1.816 (4WD model only)
Final gear reduction
ratio (Differential)5.125
Lubrication Lubrication system Force feed system by oil pump
Cooling Cooling system Radiator assisted cooling (water-cooled)
Fluid used
An equivalent of DEXRON
III
Page 425 of 656
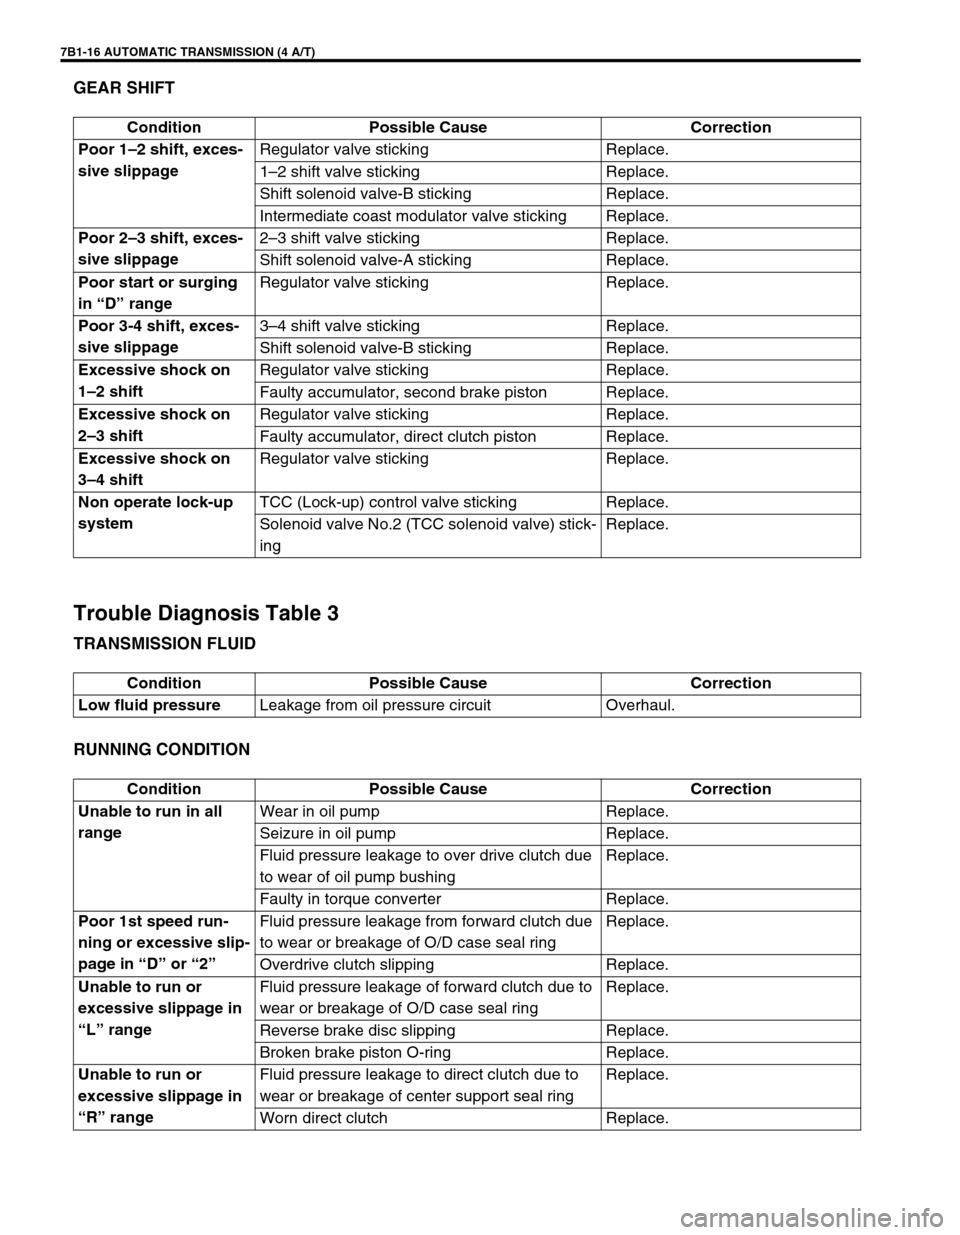
7B1-16 AUTOMATIC TRANSMISSION (4 A/T)
GEAR SHIFT
Trouble Diagnosis Table 3
TRANSMISSION FLUID
RUNNING CONDITION
Condition Possible Cause Correction
Poor 1–2 shift, exces-
sive slippageRegulator valve sticking Replace.
1–2 shift valve sticking Replace.
Shift solenoid valve-B sticking Replace.
Intermediate coast modulator valve sticking Replace.
Poor 2–3 shift, exces-
sive slippage2–3 shift valve sticking Replace.
Shift solenoid valve-A sticking Replace.
Poor start or surging
in “D” rangeRegulator valve sticking Replace.
Poor 3-4 shift, exces-
sive slippage3–4 shift valve sticking Replace.
Shift solenoid valve-B sticking Replace.
Excessive shock on
1–2 shiftRegulator valve sticking Replace.
Faulty accumulator, second brake piston Replace.
Excessive shock on
2–3 shiftRegulator valve sticking Replace.
Faulty accumulator, direct clutch piston Replace.
Excessive shock on
3–4 shiftRegulator valve sticking Replace.
Non operate lock-up
systemTCC (Lock-up) control valve sticking Replace.
Solenoid valve No.2 (TCC solenoid valve) stick-
ingReplace.
Condition Possible Cause Correction
Low fluid pressureLeakage from oil pressure circuit Overhaul.
Condition Possible Cause Correction
Unable to run in all
rangeWear in oil pump Replace.
Seizure in oil pump Replace.
Fluid pressure leakage to over drive clutch due
to wear of oil pump bushingReplace.
Faulty in torque converter Replace.
Poor 1st speed run-
ning or excessive slip-
page in “D” or “2”Fluid pressure leakage from forward clutch due
to wear or breakage of O/D case seal ringReplace.
Overdrive clutch slipping Replace.
Unable to run or
excessive slippage in
“L” rangeFluid pressure leakage of forward clutch due to
wear or breakage of O/D case seal ringReplace.
Reverse brake disc slipping Replace.
Broken brake piston O-ring Replace.
Unable to run or
excessive slippage in
“R” rangeFluid pressure leakage to direct clutch due to
wear or breakage of center support seal ringReplace.
Worn direct clutch Replace.
Page 426 of 656
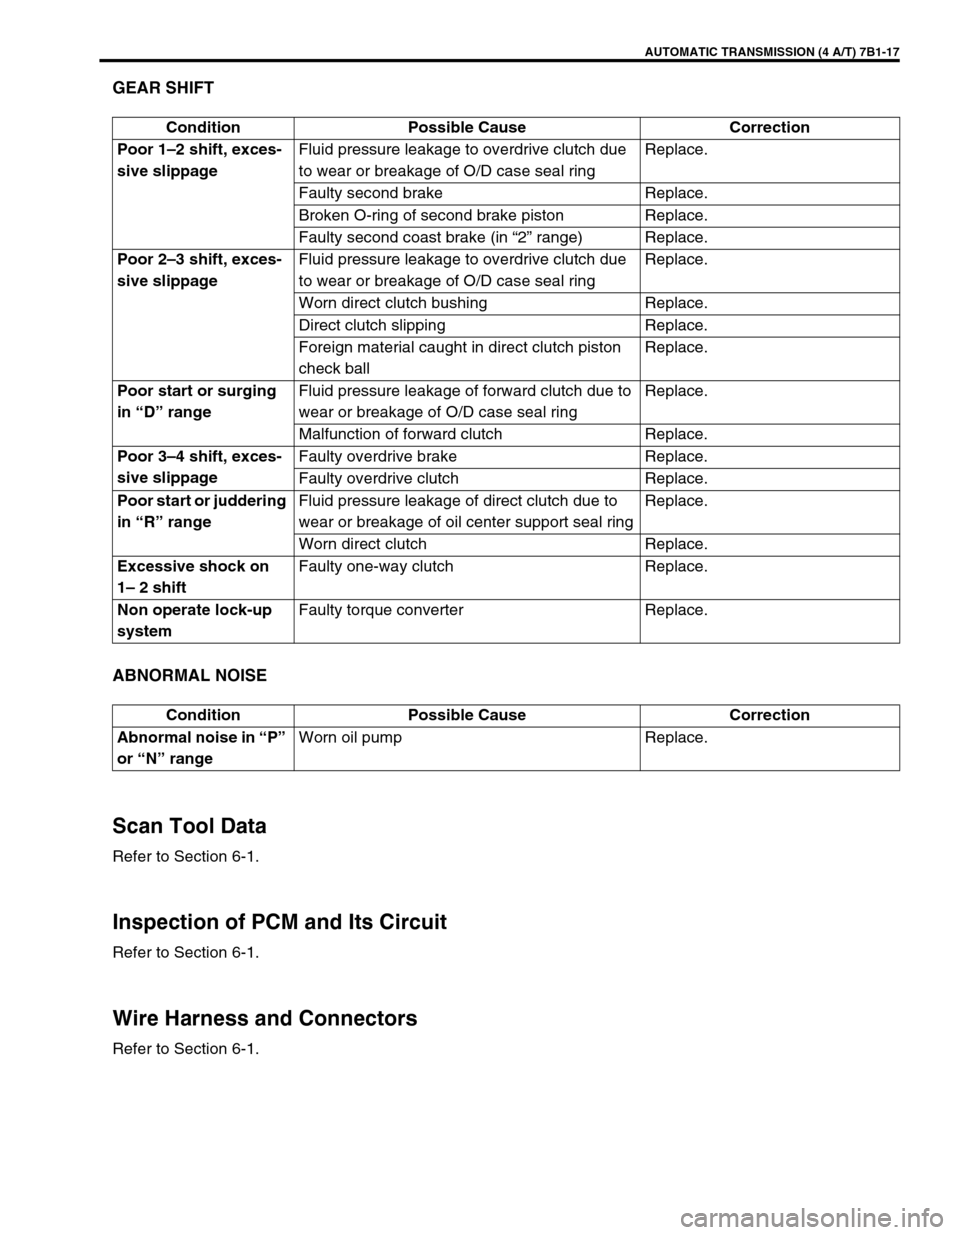
AUTOMATIC TRANSMISSION (4 A/T) 7B1-17
GEAR SHIFT
ABNORMAL NOISE
Scan Tool Data
Refer to Section 6-1.
Inspection of PCM and Its Circuit
Refer to Section 6-1.
Wire Harness and Connectors
Refer to Section 6-1.Condition Possible Cause Correction
Poor 1–2 shift, exces-
sive slippageFluid pressure leakage to overdrive clutch due
to wear or breakage of O/D case seal ringReplace.
Faulty second brake Replace.
Broken O-ring of second brake piston Replace.
Faulty second coast brake (in “2” range) Replace.
Poor 2–3 shift, exces-
sive slippageFluid pressure leakage to overdrive clutch due
to wear or breakage of O/D case seal ringReplace.
Worn direct clutch bushing Replace.
Direct clutch slipping Replace.
Foreign material caught in direct clutch piston
check ballReplace.
Poor start or surging
in “D” rangeFluid pressure leakage of forward clutch due to
wear or breakage of O/D case seal ringReplace.
Malfunction of forward clutch Replace.
Poor 3–4 shift, exces-
sive slippageFaulty overdrive brake Replace.
Faulty overdrive clutch Replace.
Poor start or juddering
in “R” rangeFluid pressure leakage of direct clutch due to
wear or breakage of oil center support seal ringReplace.
Worn direct clutch Replace.
Excessive shock on
1– 2 shiftFaulty one-way clutch Replace.
Non operate lock-up
systemFaulty torque converter Replace.
Condition Possible Cause Correction
Abnormal noise in “P”
or “N” rangeWorn oil pump Replace.