turn signal SUZUKI IGNIS 2022 Owners Manual
[x] Cancel search | Manufacturer: SUZUKI, Model Year: 2022, Model line: IGNIS, Model: SUZUKI IGNIS 2022Pages: 505, PDF Size: 8.36 MB
Page 16 of 505
ILLUSTRATED TABLE OF CONTENTS
75RM4-01E
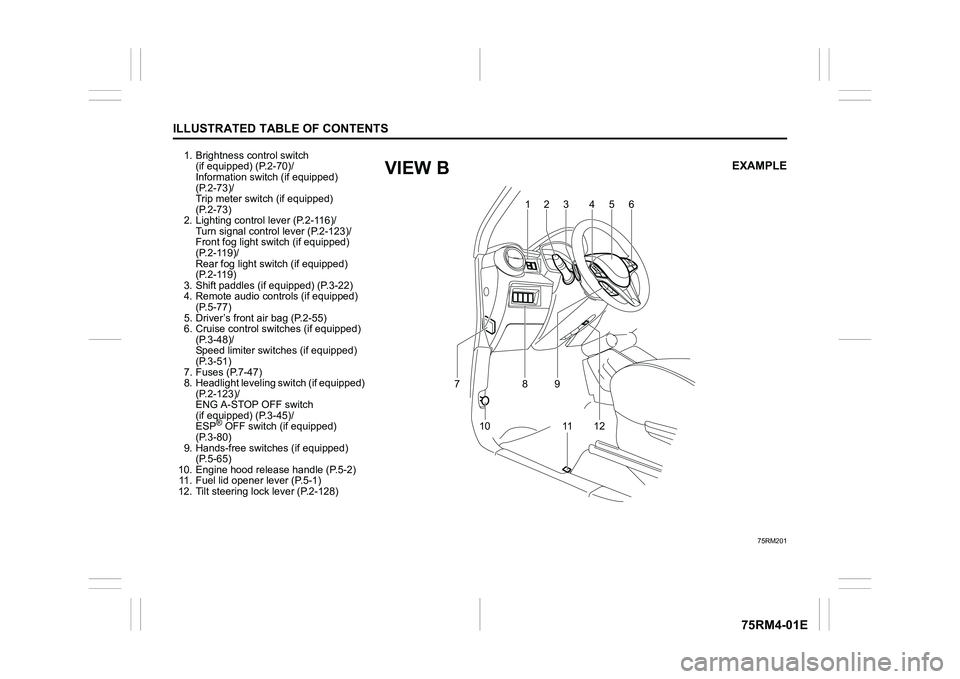
1. Brightness control switch (if equipped) (P.2-70)/
Information switch (if equipped)
(P.2-73)/
Trip meter switch (if equipped)
(P.2-73)
2. Lighting control lever (P.2-116)/
Turn signal control lever (P.2-123)/
Front fog light swit ch (if equipped)
(P.2-119)/
Rear fog light swit ch (if equipped)
(P.2-119)
3. Shift paddles (if equipped) (P.3-22)
4. Remote audio controls (if equipped) (P.5-77)
5. Driver’s front air bag (P.2-55)
6. Cruise control switches (if equipped) (P.3-48)/
Speed limiter switch es (if equipped)
(P.3-51)
7. Fuses (P.7-47)
8. Headlight leveling switch (if equipped) (P.2-123)/
ENG A-STOP OFF switch
(if equipped) (P.3-45)/
ESP
® OFF switch (if equipped)
(P.3-80)
9. Hands-free switc hes (if equipped)
(P.5-65)
10. Engine hood release handle (P.5-2) 11. Fuel lid opener lever (P.5-1)
12. Tilt steering lock lever (P.2-128)
75RM201
123 4 5
6
10 8
11 1 2
7
9
EXAMPLE
VIEW B
Page 23 of 505
BEFORE DRIVING
2
75RM4-01E
60G404
Keys ......................................................................................2-1
Door locks .................................................... ........................2-2
Keyless push start system remote controller /
Keyless entry system transmitte r (if equipped) ................2-7
Theft deterrent alarm system (if equipped) .................... ...2-16
Theft deterrent light (if equipped) ........................... ...........2-19
Windows ....................................................... ........................2-20
Mirrors ....................................................... ...........................2-23
Front seats ................................................... ........................2-27
Rear seats .................................................... .........................2-29
BEFORE DRIVINGSeat belts and child restraint systems ........................ ...... 2-33
Child restraint system f or countries applied for
UN Regulation No.16 ........................................... ................ 2-43
Supplemental restraint system (air bags) ...................... ... 2-54
Instrument cluster ............................................ ................... 2-68
Speedometer ................................................... .................... 2-69
Tachometer (if equipped) ...................................... ............. 2-69
Fuel gauge .................................................... ....................... 2-70
Brightness control ............................................ .................. 2-70
Information display
(instrument clus ter with tachometer) .......................... ...... 2-72
Information display
(instrument clus ter without tachometer) ....................... ... 2-93
Warning and indicator lights .................................. .......... 2-101
Lighting control lever ........................................ ............... 2-116
Headlight leveling switch (if equipped) ....................... .... 2-123
Turn signal control lever ..................................... ............. 2-123
Hazard warning switch ......................................... ............ 2-125
Windshield wiper and washer lever ............................. ... 2-125
Tilt steering lock lever ... ................................................... 2-128
Horn .......................................................... .......................... 2-128
Heated rear window switch /
heated outside rearview mirror switch (if equipped) ..... 2-129
Page 31 of 505
2-8
BEFORE DRIVING
75RM4-01E
There are two ways to lock or unlock all
doors (including the tailgate) simultane-
ously by operating the remote controller
near the vehicle.
Central door locking system
• To lock all doors, push LOCK button (1)once.
• For models except for Hong Kong, to
unlock only the driver’s door, push
UNLOCK button (2) once. To unlock
other doors, push UNLOCK button (2)
once again.
• For Hong Kong models, to unlock all doors, push UNLOCK button (2) once.
NOTE:
For models except for Hong Kong, you can
switch the function that unlocks all doors
from requiring two pushes to requiring one
push, and vice versa, via the information
display setting mode. For details on how to
use the information display, refer to “Infor-
mation display” in this section.
The turn signal lights will flash once and
the exterior buzzer will sound once when
the doors are locked.
Central door locking system with the
dead lock system (if equipped)
If you want to prevent tamper-unlocking of
the door locks, use this method. When the
dead lock system is activated, operating the
lock knobs will not unlock the side doors. To activate this system:
To lock all doors, push LOCK button (1)
twice within 3 seconds.
To release this system:
• To unlock only the driver’s door, push
UNLOCK button (2) once.
• To unlock other doors, push UNLOCK
button (2) once again.
NOTE:
You can switch the fu nction that unlocks all
doors from requiring two pushes to requir-
ing one push, and vice versa, via the infor-
mation display setting mode. For details on
how to use the informati on display, refer to
“Information display” in this section.
The turn signal lights will flash once and
the exterior buzzer will sound once when
the doors are locked, and then the turn sig-
nal lights will flash once and the exterior
buzzer will sound once again when the
doors are locked with the dead lock sys-
tem.
With the remote controller inside the vehi-
cle, if you push LOCK button on the
remote controller, the exterior buzzer will
sound and doors cannot be locked. When the doors are unlocked:
• The turn signal lights will flash twice and
the exterior buzzer will sound twice.
• If the interior light switch is in DOOR position, the interior light will turn on for
about 15 seconds and then fade out. If
you press the engine switch during this
time, the light will start to fade out imme-
diately.
Check that the doors are locked after you
operate LOCK button (1).
If no door is opened within about 30 sec-
onds after UNLOCK button (2) is operated,
the doors will automatically lock again.
NOTE:
• The maximum operating distance of the
remote controller is about 5 m (16 ft.),
but this can vary depending on the sur-
roundings, especially near other trans-
mitting devices such as radio towers or
CB (Citizen’s Band) radios.
• The door locks cannot be operated with
the remote controller if the ignition mode
is in any other mode than LOCK (OFF).
• When any door is open, if you push
LOCK button on the remote controller,
the exterior buzzer will sound and doors
cannot be locked.
• If you lose one of the remote controllers, ask your SUZUKI dealer as soon as pos-
sible for replacement. Have your dealer
program the new remo te controller code
in your vehicle’s memory so that the old
code is erased.
WA R N I N G
Do not activate the dead lock system
if there are occupants in the vehicle.
They will be locked in the vehicle and
cannot unlock the doors from inside.
Page 32 of 505
2-9BEFORE DRIVING
75RM4-01E
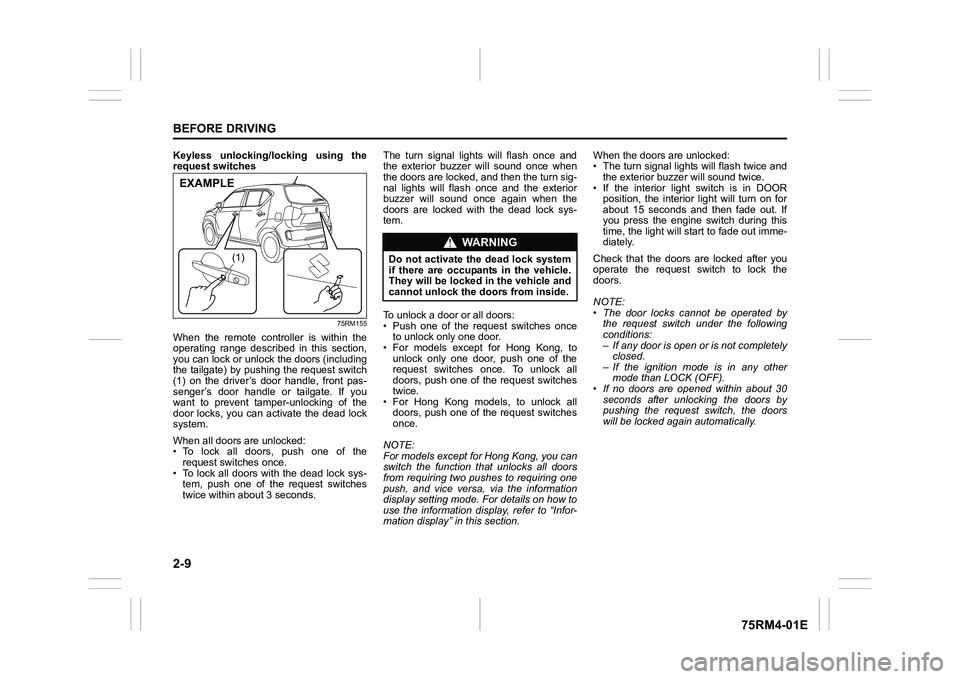
Keyless unlocking/locking using the
request switches
75RM155
When the remote controller is within the
operating range described in this section,
you can lock or unlock the doors (including
the tailgate) by pushing the request switch
(1) on the driver’s door handle, front pas-
senger’s door handle or tailgate. If you
want to prevent tamper-unlocking of the
door locks, you can activate the dead lock
system.
When all doors are unlocked:
• To lock all doors, push one of the request switches once.
• To lock all doors with the dead lock sys- tem, push one of the request switches
twice within abou t 3 seconds. The turn signal lights will flash once and
the exterior buzzer will sound once when
the doors are locked, and then the turn sig-
nal lights will flash once and the exterior
buzzer will sound once again when the
doors are locked with the dead lock sys-
tem.
To unlock a door or all doors:
• Push one of the request switches once
to unlock only one door.
• For models except for Hong Kong, to
unlock only one door, push one of the
request switches once. To unlock all
doors, push one of the request switches
twice.
• For Hong Kong models, to unlock all doors, push one of the request switches
once.
NOTE:
For models except for Hong Kong, you can
switch the function that unlocks all doors
from requiring two pushes to requiring one
push, and vice versa, via the information
display setting mode. For details on how to
use the information display, refer to “Infor-
mation display” in this section. When the doors are unlocked:
• The turn signal lights will flash twice and
the exterior buzzer will sound twice.
• If the interior light switch is in DOOR position, the interior light will turn on for
about 15 seconds and then fade out. If
you press the engine switch during this
time, the light will start to fade out imme-
diately.
Check that the doors are locked after you
operate the request switch to lock the
doors.
NOTE:
• The door locks cannot be operated by the request switch under the following
conditions:
– If any door is open or is not completelyclosed.
– If the ignition mode is in any other mode than LOCK (OFF).
• If no doors are opened within about 30
seconds after unlocking the doors by
pushing the request switch, the doors
will be locked again automatically.
(1)
EXAMPLE
WA R N I N G
Do not activate the dead lock system
if there are occupants in the vehicle.
They will be locked in the vehicle and
cannot unlock the doors from inside.
Page 37 of 505
2-14
BEFORE DRIVING
75RM4-01E
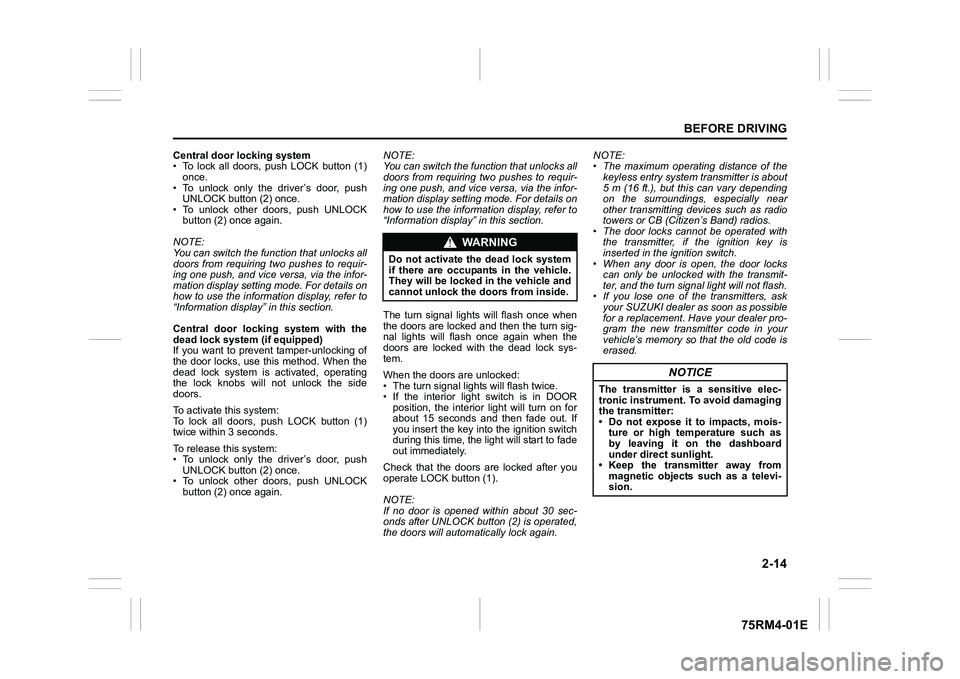
Central door locking system
• To lock all doors, push LOCK button (1)once.
• To unlock only the driver’s door, push UNLOCK button (2) once.
• To unlock other doors, push UNLOCK
button (2) once again.
NOTE:
You can switch the fu nction that unlocks all
doors from requiring two pushes to requir-
ing one push, and vice versa, via the infor-
mation display setting mode. For details on
how to use the informati on display, refer to
“Information display” in this section.
Central door locking system with the
dead lock system (if equipped)
If you want to prevent tamper-unlocking of
the door locks, use this method. When the
dead lock system is activated, operating
the lock knobs will not unlock the side
doors.
To activate this system:
To lock all doors, push LOCK button (1)
twice within 3 seconds.
To release this system:
• To unlock only the driver’s door, push UNLOCK button (2) once.
• To unlock other doors, push UNLOCK
button (2) once again. NOTE:
You can switch the fu
nction that unlocks all
doors from requiring two pushes to requir-
ing one push, and vice versa, via the infor-
mation display setting mode. For details on
how to use the informati on display, refer to
“Information display” in this section.
The turn signal lights will flash once when
the doors are locked and then the turn sig-
nal lights will flash once again when the
doors are locked with the dead lock sys-
tem.
When the doors are unlocked:
• The turn signal lights will flash twice.
• If the interior light switch is in DOOR position, the interior light will turn on for
about 15 seconds and then fade out. If
you insert the key into the ignition switch
during this time, the light will start to fade
out immediately.
Check that the doors are locked after you
operate LOCK button (1).
NOTE:
If no door is opened within about 30 sec-
onds after UNLOCK button (2) is operated,
the doors will automatically lock again. NOTE:
• The maximum operating distance of the
keyless entry system transmitter is about
5 m (16 ft.), but this can vary depending
on the surroundings, especially near
other transmitting devices such as radio
towers or CB (Citizen’s Band) radios.
• The door locks cannot be operated with the transmitter, if the ignition key is
inserted in the ignition switch.
• When any door is open, the door locks can only be unlocked with the transmit-
ter, and the turn signal light will not flash.
• If you lose one of the transmitters, ask your SUZUKI dealer as soon as possible
for a replacement. Have your dealer pro-
gram the new transmitter code in your
vehicle’s memory so that the old code is
erased.
WA R N I N G
Do not activate the dead lock system
if there are occupants in the vehicle.
They will be locked in the vehicle and
cannot unlock the doors from inside.
NOTICE
The transmitter is a sensitive elec-
tronic instrument. To avoid damaging
the transmitter:
• Do not expose it to impacts, mois-ture or high temperature such as
by leaving it on the dashboard
under direct sunlight.
• Keep the transmitter away from magnetic objects such as a televi-
sion.
Page 103 of 505
2-80
BEFORE DRIVING
75RM4-01E
NOTE:
• If you push and hold the informationswitch (2) to enter the setting mode
when the display (C) shows average fuel
consumption, average speed, driving
time, total idling stop time or total idling
fuel saved, the value will be reset simul-
taneously. If you do not want to reset the
value, push the information switch
quickly to switch the indication of the dis-
play.
• If you turn the ignition switch, press the
engine switch or start to move the vehi-
cle when the display is in the setting
mode, the setting mode will be canceled
automatically.
Distance unit (Odometer / trip meter distance unit setting)You can change the units in which odome-
ter / trip meter / driving range distance is
displayed.
Fuel economy
(Fuel consumption unit setting)
You can change the units that fuel con-
sumption is displayed in.
Language
You can change the language of the infor-
mation display.
Fuel reset
(Average fuel consumption reset setting)
You can change when the value of aver-
age fuel consumption is reset. Temperature (Tempera
ture unit setting)
You can change the units that temperature
is displayed in.
NOTE:
When you change the units that tempera-
ture is displayed in, the automatic heating
and air conditioning system (if equipped)
temperature display units will be changed
automatically.
Clock setting (Adjusting the clock)
• To change the hour indication, push the brightness control switch (4) up or down
repeatedly when the hour indication
appears as reversed color. To change
the hour indication quickly, push and
hold the brightness control switch (4). To
set the hour indication, push the informa-
tion switch (2) and the minute indication
appears as reversed color.
• To change the minute indication, push the brightness control switch (4) up or
down repeatedly when the minute indi-
cation appears as reversed color. To
change the minute indication quickly,
push and hold the brightness control
switch (4). To set the minute indication,
push the information switch (2).
You can also switch the time indication
between 12-hour and 24-hour format. Door lock (Door
unlock setting)
(if equipped)
You can choose either once or twice oper-
ation(s) to unlock all doors (including the
tailgate) by turning the key, or operating
the keyless entry syst em transmitter, key-
less push start system remote controller or
request switch.
If your vehicle is equip ped with the keyless
push start system, you can also turn off or
on the buzzer sound when the door(s)
is(are) locked or unlocked.
Lights (Light setting)
Lane change (Turn signal lights setting)
The turn signal and its indicator can be set
whether they flash three times even if you
return the turn signal control lever immedi-
ately after moving it.
Guide me light setting (Light setting)
(if equipped)
You can change the lighting time of “To
car” function or “To home” function.
Antitheft
(Theft deterrent alarm system setting)
(if equipped)
You can switch the theft deterrent alarm
system from the enabled state to the dis-
abled state, and vice versa.
The state of the theft deterrent alarm sys-
tem is shown on the information display as
follows:
• Mode A: Disabled state
• Mode D: Enabled state
Page 122 of 505
2-99BEFORE DRIVING
75RM4-01E
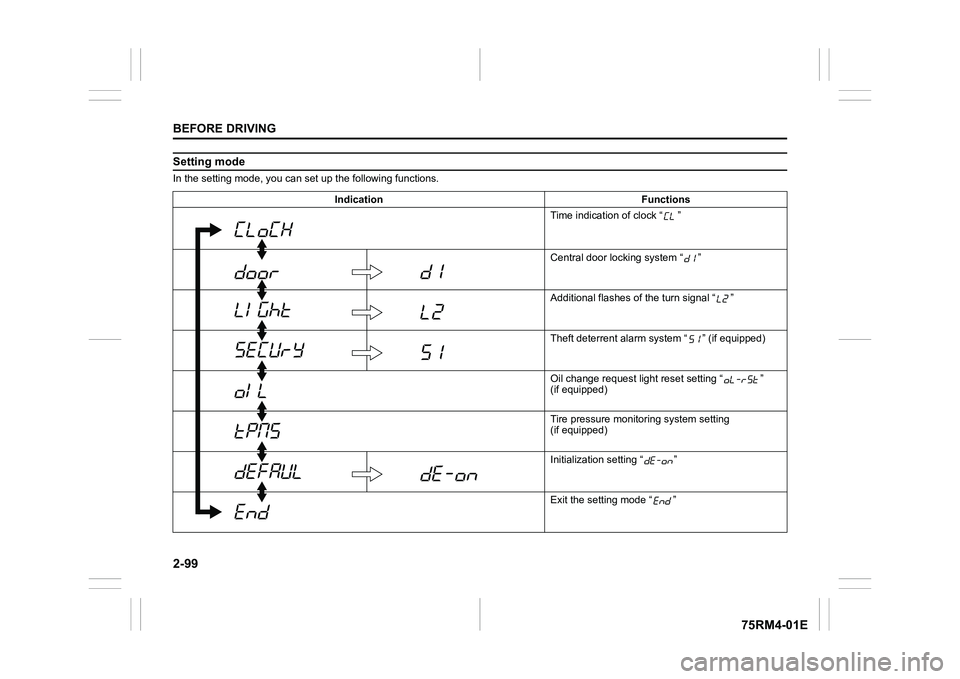
Setting modeIn the setting mode, you can set up the following functions.
Indication Functions Time indication of clock “ ”
Central door locking system “ ”
Additional flashes of the turn signal “ ”
Theft deterrent alarm system “ ” (if equipped)
Oil change request lig ht reset setting “ ”
(if equipped)
Tire pressure monito ring system setting
(if equipped)
Initialization setting “ ”
Exit the setting mode “ ”
Page 123 of 505
2-100
BEFORE DRIVING
75RM4-01E
NOTE:
Depending on vehicle’s specifications,
some items may not be displayed.
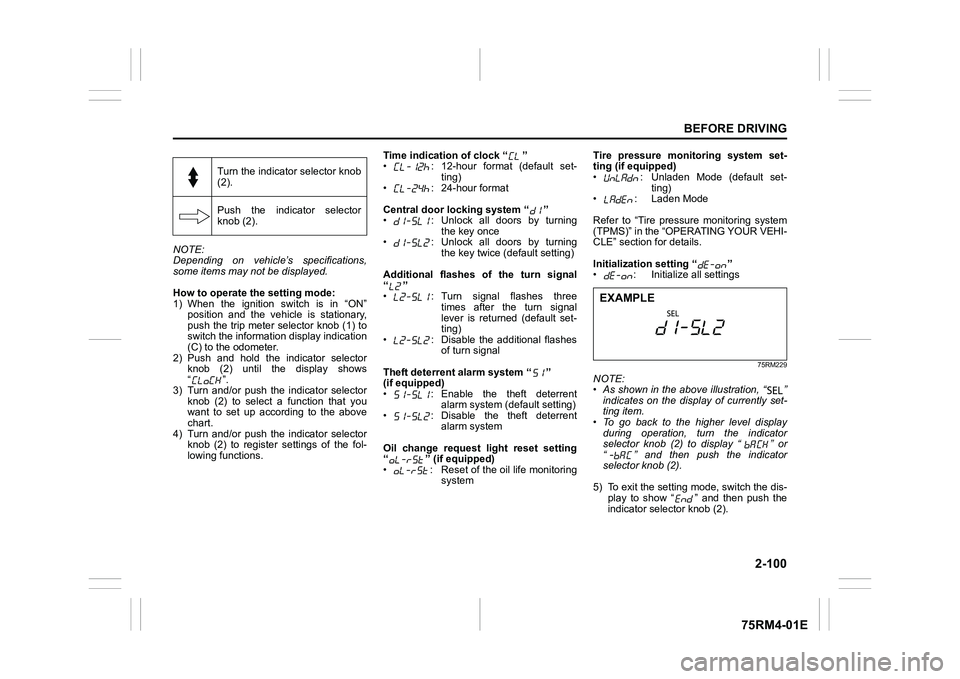
How to operate the setting mode:
1) When the ignition switch is in “ON”
position and the vehicle is stationary,
push the trip meter selector knob (1) to
switch the information display indication
(C) to the odometer.
2) Push and hold the indicator selector knob (2) until the display shows
“”.
3) Turn and/or push the indicator selector knob (2) to select a function that you
want to set up according to the above
chart.
4) Turn and/or push the indicator selector knob (2) to register settings of the fol-
lowing functions. Time indication of clock “ ”
• : 12-hour format (default set-
ting)
• : 24-hour format
Central door locking system “ ”
• : Unlock all doors by turning the key once
• : Unlock all doors by turning
the key twice (default setting)
Additional flashes of the turn signal
“”
• : Turn signal flashes three times after the turn signal
lever is returned (default set-
ting)
• : Disable the additional flashes of turn signal
Theft deterrent alarm system “ ”
(if equipped)
• : Enable the theft deterrent alarm system (default setting)
• : Disable the theft deterrent alarm system
Oil change request light reset setting
“ ” (if equipped)
• : Reset of the oil life monitoring system Tire pressure monitoring system set-
ting (if equipped)
• : Unladen Mode (default set-
ting)
• : Laden Mode
Refer to “Tire pressure monitoring system
(TPMS)” in the “OPERATING YOUR VEHI-
CLE” section for details.
Initialization setting “ ”
• : Initialize all settings
75RM229
NOTE:
• As shown in the above illustration, “ ”
indicates on the disp lay of currently set-
ting item.
• To go back to the higher level display
during operation, turn the indicator
selector knob (2) to display “ ” or
“ ” and then push the indicator
selector knob (2).
5) To exit the setting mode, switch the dis- play to show “ ” and then push the
indicator selector knob (2).
Turn the indicator selector knob
(2).
Push the indicator selector
knob (2).EXAMPLE
Page 135 of 505
2-112
BEFORE DRIVING
75RM4-01E
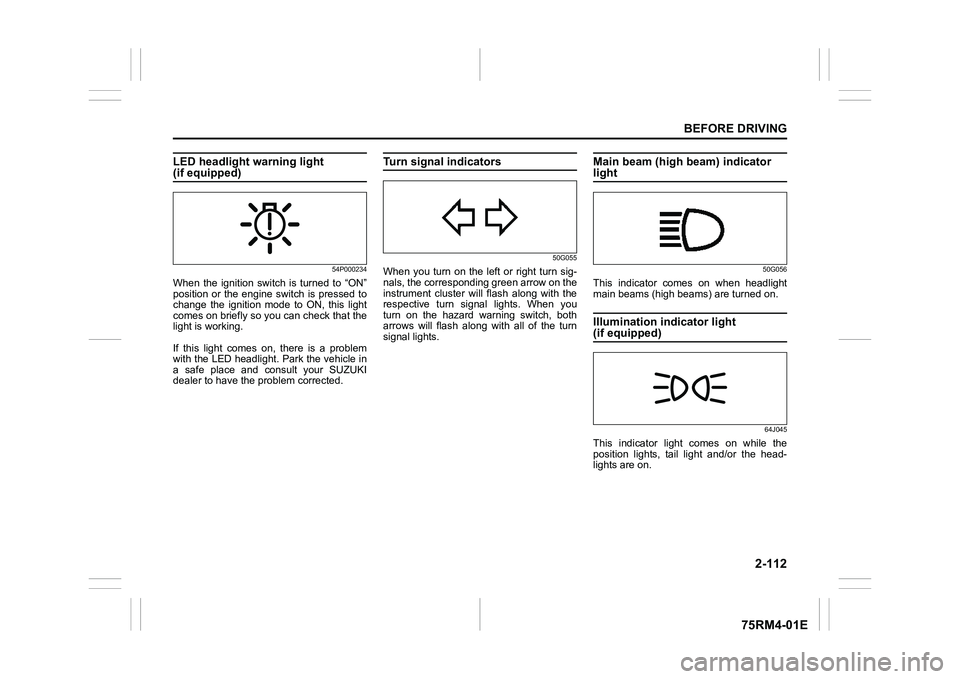
LED headlight warning light (if equipped)
54P000234
When the ignition switch is turned to “ON”
position or the engine switch is pressed to
change the ignition mode to ON, this light
comes on briefly so you can check that the
light is working.
If this light comes on, there is a problem
with the LED headlight. Park the vehicle in
a safe place and consult your SUZUKI
dealer to have the problem corrected.
Turn signal indicators
50G055
When you turn on the left or right turn sig-
nals, the corresponding green arrow on the
instrument cluster will flash along with the
respective turn signal lights. When you
turn on the hazard warning switch, both
arrows will flash along with all of the turn
signal lights.
Main beam (high beam) indicator light
50G056
This indicator comes on when headlight
main beams (high beams) are turned on.Illumination indicator light (if equipped)
64J045
This indicator light comes on while the
position lights, tail light and/or the head-
lights are on.
Page 140 of 505
2-117BEFORE DRIVING
75RM4-01E
68PM00230
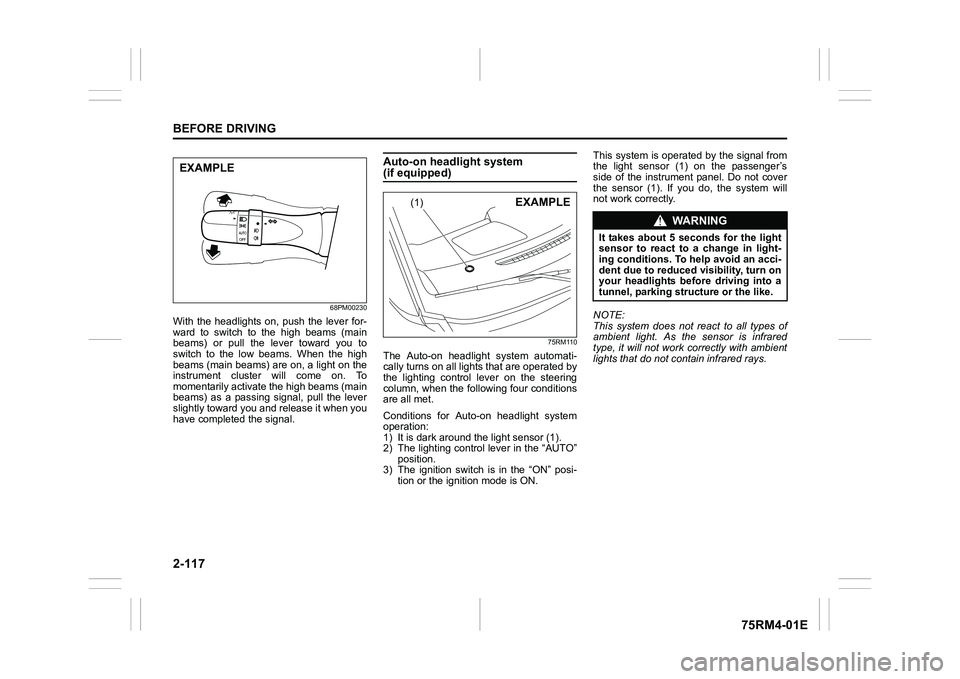
With the headlights on, push the lever for-
ward to switch to the high beams (main
beams) or pull the lever toward you to
switch to the low beams. When the high
beams (main beams) are on, a light on the
instrument cluster will come on. To
momentarily activate the high beams (main
beams) as a passing signal, pull the lever
slightly toward you and release it when you
have completed the signal.
Auto-on headlight system (if equipped)
75RM110
The Auto-on headlig ht system automati-
cally turns on all lights that are operated by
the lighting control lever on the steering
column, when the following four conditions
are all met.
Conditions for Auto-on headlight system
operation:
1) It is dark around the light sensor (1).
2) The lighting control lever in the “AUTO” position.
3) The ignition switch is in the “ON” posi-
tion or the ignition mode is ON. This system is operated by the signal from
the light sensor (1) on the passenger’s
side of the instrument panel. Do not cover
the sensor (1). If you do, the system will
not work correctly.
NOTE:
This system does not react to all types of
ambient light. As the sensor is infrared
type, it will not work correctly with ambient
lights that do not contain infrared rays.
EXAMPLE
(1)
EXAMPLE
WA R N I N G
It takes about 5 seconds for the light
sensor to react to a change in light-
ing conditions. To help avoid an acci-
dent due to reduced visibility, turn on
your headlights before driving into a
tunnel, parking structure or the like.