cvt SUZUKI IGNIS 2022 Owner's Guide
[x] Cancel search | Manufacturer: SUZUKI, Model Year: 2022, Model line: IGNIS, Model: SUZUKI IGNIS 2022Pages: 505, PDF Size: 8.36 MB
Page 194 of 505
3-41OPERATING YOUR VEHICLE
75RM4-01E
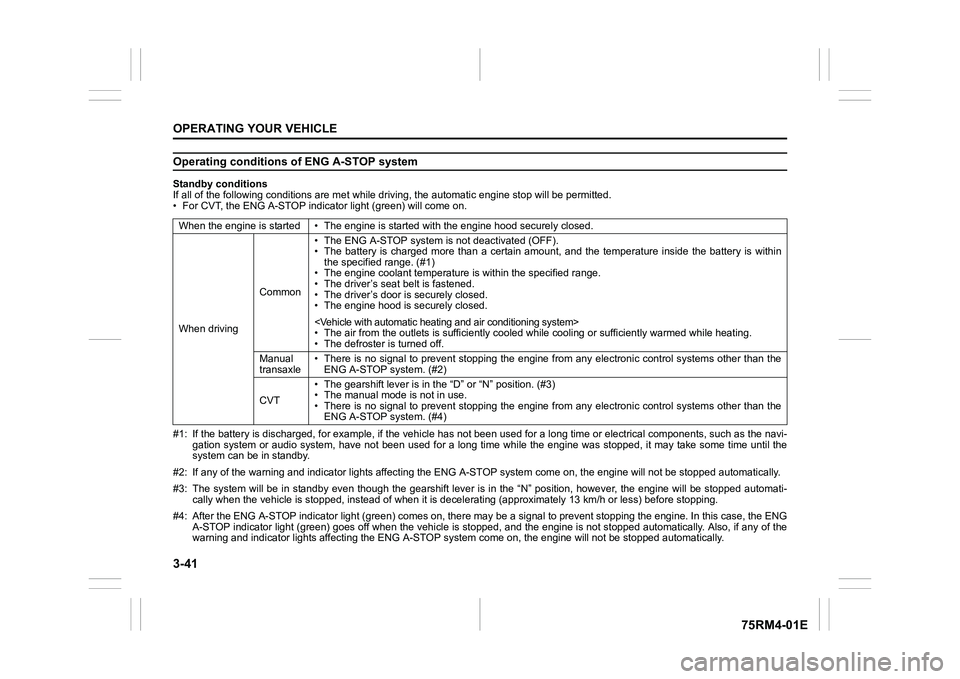
Operating conditions of ENG A-STOP systemStandby conditions
If all of the following conditions are met while driving, the automatic engine stop will be permitted.
• For CVT, the ENG A-STOP indicator light (green) will come on.
#1: If the battery is discharged, for example, if the vehicle has not been used for a long time or electrical components, such as the navi-
gation system or audio system, have not been used for a long ti me while the engine was stopped, it may take some time until th e
system can be in standby.
#2: If any of the warning and indi cator lights affecting the ENG A-STOP system come on, the e ngine will not be stopped automati cally.
#3: The system will be in standby even though the gearshift leve r is in the “N” position, however, the engine will be stopped automati-
cally when the vehicl e is stopped, instead of when it is decelerating (approximately 13 km/ h or less) before stopping.
#4: After the ENG A-STOP indicator light (green) comes on, there may be a signal to prevent stopping the engine. In this case, the ENG
A-STOP indicator light (green) goes off when the vehicle is sto pped, and the engine is not stopped automatically. Also, if any of the
warning and indi cator lights affecting the ENG A-STOP system co me on, the engine will not be stopped automatically.
When the engine is started • The
engine is started with the engine hood securely closed.
When driving Common• The ENG A-STOP system is
not deactivated (OFF).
• The battery is charged more than a certain amount, and the tem perature inside the battery is within
the specified range. (#1)
• The engine coolant temperature i s within the specified range.
• The driver’s seat belt is fastened.
• The driver’s door is securely closed.
• The engine hood is s ecurely closed.
• The air from the outlets is su fficiently cooled while cooling or sufficiently warmed while heating.
• The defroster is turned off.
Manual
transaxle • There is no signal to prevent stopping the engine from any ele
ctronic control systems other than the
ENG A-STOP system. (#2)
CVT • The gearshift lever is in the
“D” or “N” position. (#3)
• The manual mode is not in use.
• There is no signal to prevent stopping the engine from any ele ctronic control systems other than the
ENG A-STOP system. (#4)
Page 195 of 505
3-42
OPERATING YOUR VEHICLE
75RM4-01E
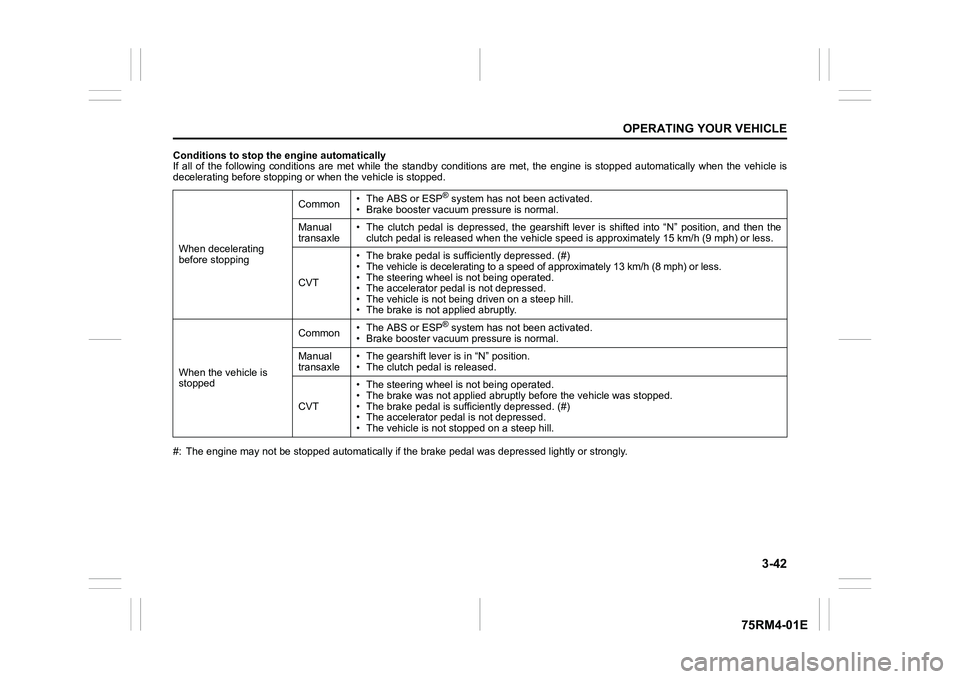
Conditions to stop the engine automatically
If all of the following conditions are met while the standby conditions are met, the engine is stopped automatically when the vehicle is
decelerating before stopping or when the vehicle is stopped.
#: The engine may not be stopped automatically if the brake peda l was depressed lightly or strongly.
When decelerating
before stopping
Common
• The ABS or ESP
® system has not been activated.
• Brake booster vacuum pressure is normal.
Manual
transaxle • The clutch pedal is depressed, the gearshift lever is shifted
into “N” position, and then the
clutch pedal is released when the vehicle speed is approximately 15 km/h (9 mph) or less.
CVT • The brake pedal is sufficiently depressed. (#)
• The vehicle is decelerating to a speed of approximately 13 km/
h (8 mph) or less.
• The steering wheel is not being operated.
• The accelerator pedal is not depressed.
• The vehicle is not being driven on a steep hill.
• The brake is not applied abruptly.
When the vehicle is
stopped Common
• The ABS or ESP® system has not been activated.
• Brake booster vacuum pressure is normal.
Manual
transaxle • The gearshift lever is in “N” position.
• The clutch pedal is released.
CVT • The steering wheel is not being operated.
• The brake was not app
lied abruptly before the vehicle was stop ped.
• The brake pedal is sufficiently depressed. (#)
• The accelerator pedal is not depressed.
• The vehicle is not s topped on a steep hill.
Page 196 of 505
3-43OPERATING YOUR VEHICLE
75RM4-01E
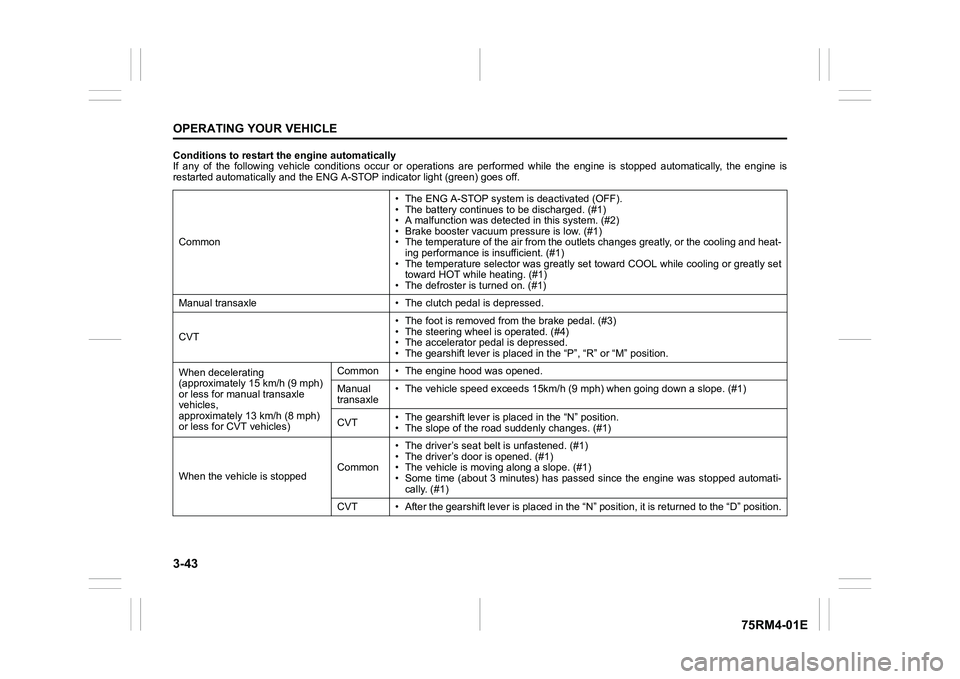
Conditions to restart the engine automatically
If any of the following vehicle conditions occur or operations are performed while the engine is stopped automatically, the en gine is
restarted automatically and the ENG A-STOP i ndicator light (green) goes off.
Common • The ENG A-STOP system is deactivated (OFF).
• The battery continues to be discharged. (#1)
• A malfunction was detect
ed in this system. (#2)
• Brake booster vacuum pressure is low. (#1)
• The temperature of the air from the outlets changes greatly, o r the cooling and heat-
ing performance is insufficient. (#1)
• The temperature selector was greatly set toward COOL while coo ling or greatly set
toward HOT while heating. (#1)
• The defroster is turned on. (#1)
Manual transaxle • The cl utch pedal is depressed.
CVT • The foot is removed from the brake pedal. (#3)
• The steering wheel is operated. (#4)
• The accelerator pedal is depressed.
• The gearshift lever is placed
in the “P”, “R” or “M” position.
When decelerating
(approximately 15 km/h (9 mph)
or less for manual transaxle
vehicles,
approximately 13 km/h (8 mph)
or less for CVT vehicles) Common • The engine hood was opened.
Manual
transaxle
• The vehicle speed exceeds 15km/
h (9 mph) when going down a slope. (#1)
CVT • The gearshift lever is placed in the “N” position.
• The slope of the road
suddenly changes. (#1)
When the vehicle is stopped Common• The driver’s seat
belt is unfastened. (#1)
• The driver’s door is opened. (#1)
• The vehicle is movi ng along a slope. (#1)
• Some time (about 3 minutes) has passed since the engine was st opped automati-
cally. (#1)
CVT • After the gearshift lever is placed in the “N” position, it is returned to the “D” position.
Page 200 of 505
3-47OPERATING YOUR VEHICLE
75RM4-01E
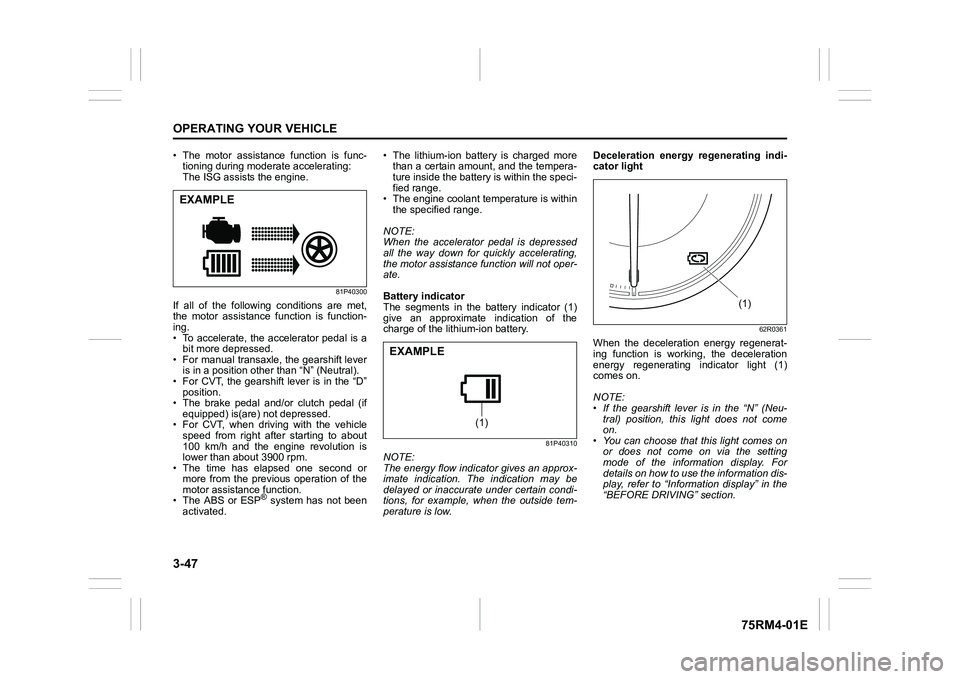
• The motor assistance function is func-tioning during moderate accelerating:
The ISG assists the engine.
81P40300
If all of the following conditions are met,
the motor assistance function is function-
ing.
• To accelerate, the accelerator pedal is a
bit more depressed.
• For manual transaxle, the gearshift lever is in a position other than “N” (Neutral).
• For CVT, the gearshift lever is in the “D” position.
• The brake pedal and/or clutch pedal (if
equipped) is(are) not depressed.
• For CVT, when driving with the vehicle speed from right after starting to about
100 km/h and the engine revolution is
lower than about 3900 rpm.
• The time has elapsed one second or
more from the previous operation of the
motor assistance function.
• The ABS or ESP
® system has not been
activated. • The lithium-ion battery is charged more
than a certain amount, and the tempera-
ture inside the battery is within the speci-
fied range.
• The engine coolant temperature is within the specified range.
NOTE:
When the accelerator pedal is depressed
all the way down for quickly accelerating,
the motor assistance function will not oper-
ate.
Battery indicator
The segments in the battery indicator (1)
give an approximate indication of the
charge of the lithium-ion battery.
81P40310
NOTE:
The energy flow indicator gives an approx-
imate indication. The indication may be
delayed or inaccurate under certain condi-
tions, for example, when the outside tem-
perature is low. Deceleration energy regenerating indi-
cator light
62R0361
When the deceleration energy regenerat-
ing function is working, the deceleration
energy regenerating indicator light (1)
comes on.
NOTE:
• If the gearshift lever is in the “N” (Neu-
tral) position, this light does not come
on.
• You can choose that this light comes on or does not come on via the setting
mode of the information display. For
details on how to use the information dis-
play, refer to “Informa tion display” in the
“BEFORE DRIVING” section.
EXAMPLE
(1)
EXAMPLE
(1)
Page 201 of 505
3-48
OPERATING YOUR VEHICLE
75RM4-01E
Eco-Cool (if equipped)When driving while using the air condi-
tioner, cold air is stored in the cooling stor-
age medium of the air conditioner unit.
Since stored cold air will be blown into the
vehicle when the engine has been stopped
automatically by the ENG A-STOP system,
the rise of the inside temperature can be
reduced when the air conditioner is not
running.
For the automatic heating and air condi-
tioning system, reducing the rise of the
inside temperature increases the length of
time that the engine is stopped automati-
cally, leading to improved fuel economy.
NOTE:
Sufficient cold air may not be stored if the
vehicle has not been running for very long
or in a traffic jam. The effect varies
depending on the outside temperature and
the air conditioner settings.
I/S AC Settings (if equipped)• When using the automatic heating andair conditioning system (if equipped),
you can select one of the following set-
tings via the setting mode of the informa-
tion display.
– Standard
– Economy
–Comfort
For details on how to use the information
display, refer to “Information display” in
the “BEFORE DRIVING” section.
• When “Economy” is selected, engine auto stop condition is eased, compared
with “Standard”. Engine auto stop condi-
tion will occur more f requently, the stop
time will be longer, leading to reduction
of fuel consumption.
• When “Comfort” is sel ected, engine auto
stop condition becomes severe, com-
pared with “Standard”. Engine auto stop
condition will occur less frequently, the
stop time will be shorter, leading to more
comfortable cabin condition by air condi-
tioner.
Cruise control (if equipped)The cruise control system allows you to
maintain a steady speed without keeping
your foot on the accelerator pedal. The
controls for operating the cruise control
system are on the steering wheel.
You can use the cruise control system
under the following conditions:
• For manual transaxle vehicle, the gear position is in 3rd, 4th or 5th.
• For CVT vehicle, the select lever is in “D” position, or the gear position is in 3rd,
4th, 5th, 6th or 7th in the manual mode
(if equipped).
• For Auto Gear Shift vehicle, the select lever is in “D” position, or the gear posi-
tion is in 3rd, 4th or 5th in the manual
mode.
• The vehicle speed is about 45 km/h (28
mph) or higher.
WA R N I N G
To help avoid loss of vehicle control,
do not use the cruise control system
when driving in heavy traffic, on slip-
pery or winding roads, or on steep
downhills.
Page 203 of 505
3-50
OPERATING YOUR VEHICLE
75RM4-01E
Be careful of the following when operat-
ing with the cruise control
Even if your vehicle is equipped with the
dual camera brake support, it cannot auto-
matically adjust to the speed of the vehicle
in front of you. Turn off the cruise control
system if you cannot operate safely at a
cruising speed.
Even in the following conditions, the set
indicator (5) will not go off and the cruising
speed will not be canceled.
• When the frontal collision warning isworking. If you depress the brake pedal,
the cruise speed will be canceled tempo-
rarily.
• When the stereo camera detects dirt on
the windshield and the dual camera
brake support stops functioning. For
safety purposes, push the cruise switch
(1) to turn off the cru ise indicator (4).
If the automatic brake system is working,
the cruise indicator (4) will turn off and the
cruise control system will be canceled.
Once you have determined that the condi-
tions are once again safe, reset the cruise
speed.
Changing speed temporarilyWhen the cruising speed is maintained,
you can temporarily accelerate or deceler-
ate.
To accelerate, depre ss the accelerator
pedal. When you take your foot off the
pedal, your vehicle will return to the set
speed.
To decelerate, depress the brake pedal.
The set speed will be canceled and the set
indicator (5) or “SET” indicator light (7) will
go off.
To resume the previously set speed, push
up the “RES +/SET –” switch (3) and turn
on the set indicator (5) or “SET” indicator
light (7) again when vehicle speed is
above 45 km/h (28 mph). The vehicle will
accelerate to and maintain the previously
set speed.
NOTE:
For CVT with manual mode or Auto Gear
Shift vehicle, when the cruising speed is
maintained, you cannot decelerate by
using the engine brake even if you down-
shift from higher gear to 3rd in the manual
mode.
To decelerate while the cruise control is
on, depress the brake pedal or push down
the “RES +/SET –” switch (3).
Changing cruising speedUsing the accelerator pedal
To reset at a faster cruising speed, accel-
erate to the desired speed using the accel-
erator pedal and push down the “RES +/
SET –” switch (3). The new speed will be
maintained.
Using the brake pedal
To reset at a slower cruising speed, decel-
erate to the desired speed using the brake
pedal and push down the “RES +/SET –”
switch (3). The new speed will be main-
tained.
NOTE:
When the brake pedal is depressed, the
set indicator (5) or “ SET” indicator light (7)
goes off until the cruising speed is reset.
Using “RES +/ SET –” switch
To reset at a faster cruising speed, press
repeatedly or hold push up the “RES +/
SET –” switch (3). Vehicle speed will
steadily increase. When you release the
switch, the new speed will be maintained.
To reset at a slower cruising speed, press
repeatedly or hold push down the “RES +/
SET –” switch (3) until the vehicle has
slowed to the desired speed, and then
release the switch. The new speed will be
maintained.
Page 204 of 505
3-51OPERATING YOUR VEHICLE
75RM4-01E
NOTE:
You can adjust the set speed by approxi-
mately 1.5 km/h (0.9 mph) by pushing
“RES +/SET –” switch quickly.Canceling cruise controlThe set indicator (5) or “SET” indicator light
(7) will go off and the cruise control will be
canceled temporarily with the following
conditions:
• Push “CANCEL” switch (2).
• Depress the brake pedal.
• For manual transaxle, depress the clutch pedal.
• For CVT, downshift from 3rd to 2nd in the manual mode (if equipped).
• For Auto Gear Shift, downshift from 3rd to
2nd in the manual mode.
• The vehicle speed falls more than about 20 percent from the set speed.
• Any time the vehicle speed falls below 40 km/h (25 mph).
• When the vehicle skids and ESP
® (if
equipped) is activated.
To resume the previously set speed, push
up the “RES +/SET –” switch (3) and turn
on the set indicator (5) or “SET” indicator
light (7). The vehicle speed must be above
45 km/h (28 mph) when the vehicle is not
under the above conditions. To turn off the cruise control system, push
cruise switch (1) and check that the cruise
indicator (4) or cruise indicator light (6) is
off.
Also, if the malfunction indicator light in the
instrument cluster comes on or blinks, the
cruise control system will be turned off.
NOTE:
If you turn off the cruise control system, the
previously set speed in the memory is
cleared. Reset your cruising speed again.
Speed limiter (if equipped)
54P000363
The speed limiter allows you to choose a
maximum speed that you do not wish to
exceed.
75RM116
(1) “LIMIT” switch
(2) “CANCEL” switch
(3) “RES +/SET –” switchEXAMPLE(1)
(2)
(3)
Page 251 of 505
4-4
DRIVING TIPS
75RM4-01E
CVT
75RM296
• When climbing steep hills, the vehiclemay begin to slow down and show a lack
of power. If this happens, you should
shift to a lower gear so that the engine
will again be operating in its normal
power range. Shift rapidly to prevent the
vehicle from losing momentum.
• When driving down a hill, the engine
should be used for braking by shifting to
the next lower gear.
Driving on slippery roads
60G089S
On wet roads, you shou ld drive at a lower
speed than you do on dry roads due to
possible slippage of tires during braking.
When driving on icy, snow-covered or
muddy roads, reduce your speed and
avoid sudden acceleration, abrupt braking,
or sharp steering movements.
4WD models
Your 4WD is designed to get better traction
on slippery roads than 2-wheel drive mod-
els. However, your 4WD will not have as
much traction in deep snow, mud or sand
as multipurpose 4WD vehicles. You should
not attempt to drive your 4WD in deep
snow, mud or sand. 4WD models are not
sport/utility vehicles, and are not designed
for off-road use.
WA R N I N G
Do not hold the brake pedal down too
long or too often while going down a
steep or long hill. This could cause
the brakes to overheat, resulting in
reduced braking efficiency. Failure to
take this precaution could result in
loss of vehicle control.
NOTICE
When descending a downhill, Never
turn the ignition key to “LOCK” posi-
tion or press the engine switch to
change the ignition mode to LOCK
(OFF). Emission control system and
CVT (if equipped) damage may result.
Page 343 of 505
6-2
VEHICLE LOADING AND TOWING
75RM4-01E
To w b a r sOnly use a tow bar that is designed to
attach to the chassis of your vehicle, and a
hitch that is designed to bolt to this tow bar.
We recommend that you use a genuine
SUZUKI tow bar (available as option), or
equivalent.Safety chainsAlways attach safety chains between your
vehicle and trailer. Cross safety chains
under the nose of the trailer so that the
nose will not drop to the road if the trailer
becomes separated from the tow bar. Fol-
low the manufacturer’s recommendation
for attaching safety chains. Always leave
just enough slack to permit full turning.
Never allow safety chains to drag on the
road.
Trailer lightsCheck that your trailer is equipped with
lights which meet local requirements.
Always check for the proper operation of
all trailer lights before you start to tow.Brakes
WA R N I N G
For vehicles equipped with the dual
camera brake support, if your vehicle
is used to tow a trailer, press the dual
camera brake support OFF switch
and turn off the dual camera brake
support. If not, unexpected acci-
dents related to the system being
turned on may occur.
NOTICE
Trailer towing puts additional stress
on the engine, drive train and brakes
of your vehicle. Never tow a trailer
during the first 960 km (600 miles) of
vehicle operation.
NOTICE
When towing by a vehicle with CVT
on a long steep hill, try to take some
rest on the way to prevent overheat
or damage of the engine or transaxle.
WA R N I N G
Never use a tow bar which attaches
to the axle or the bumper of your
vehicle.
WA R N I N G
Never attach safety chains to the
bumper of your vehicle. Secure con-
nections so that they cannot come
loose.
WA R N I N G
Never connect trailer lights directly
into your vehicle’s electrical system,
or electrical system damage may
occur.
WA R N I N G
If trailer brakes are used, follow all
instructions provided by the manu-
facturer. Never connect to the brake
system of your vehicle and never
take an electrical supply directly from
the wiring harness.
Page 346 of 505
6-5VEHICLE LOADING AND TOWING
75RM4-01E
60A186
WA R N I N G
(Continued)
• Be careful when overtaking othervehicles. Allow enough room for
your trailer before changing lanes,
and use turn signal lights properly
in advance.
• Slow down and shift into a lower gear before you reach long or steep
downhill grades. It is hazardous to
attempt downshifting while you are
descending a hill.
• Do not step on the brake pedal strongly. This could cause the
brakes to over-heat resulting in
reduced braking efficiency. Use
engine braking as much as possi-
ble.
• Because of the added trailer weight, your engine may overheat
on hot days when going up long or
steep hills. Pay attention to your
engine temperature. If the high
engine coolant temperature warn-
ing light (red color) indicates over-
heating, pull off the road and stop
the vehicle in a safe place. Refer to
“Engine trouble: Overheating” in
the “EMERGENCY SERVICE” sec-
tion.
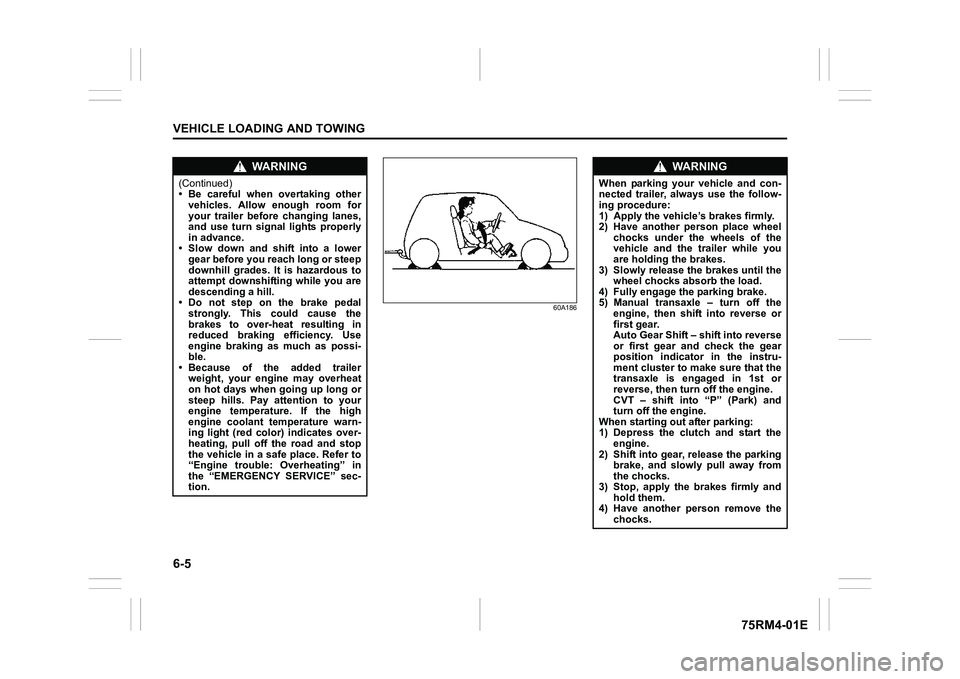
WA R N I N G
When parking your vehicle and con-
nected trailer, always use the follow-
ing procedure:
1) Apply the vehicle’s brakes firmly.
2) Have another person place wheel
chocks under the wheels of the
vehicle and the trailer while you
are holding the brakes.
3) Slowly release the brakes until the wheel chocks absorb the load.
4) Fully engage the parking brake.
5) Manual transaxle – turn off the engine, then shift into reverse or
first gear.
Auto Gear Shift – shift into reverse
or first gear and check the gear
position indicator in the instru-
ment cluster to make sure that the
transaxle is engaged in 1st or
reverse, then turn off the engine.
CVT – shift into “P” (Park) and
turn off the engine.
When starting out after parking:
1) Depress the clutch and start the engine.
2) Shift into gear, release the parking brake, and slowly pull away from
the chocks.
3) Stop, apply the brakes firmly and hold them.
4) Have another person remove the
chocks.