turn SUZUKI JIMNY 2005 3.G Service Owner's Guide
[x] Cancel search | Manufacturer: SUZUKI, Model Year: 2005, Model line: JIMNY, Model: SUZUKI JIMNY 2005 3.GPages: 687, PDF Size: 13.38 MB
Page 157 of 687

Downloaded from www.Manualslib.com manuals search engine 3C-4 STEERING WHEEL AND COLUMN
Drive Air Bag (Inflator) Module (For Vehicle
with Air Bag System)
REMOVAL
1) Disconnect negative battery cable at battery terminal.
2) Disable air bag system. Refer to “Disabling Air Bag System”
in Section 10B.
3) Remove steering wheel side cap (1) of left side.
4) Loosen 2 bolts (2) mounting driver air bag (inflator) module
till it turns freely, pull them out and fix them to bolt clamps (3).
5) Remove driver air bag (inflator) module (1) from steering
wheel.
6) Disconnect yellow connector (2) in order a) – b) as shown.
INSPECTION
WARNING:
When handling an air bag (inflator) module, be sure to
read “Service Precautions” given earlier in this section
and observe each instruction. Failure to follow them
could cause a damage to the air bag (inflator) module or
result in personal injury.
WARNING:
Never disassemble driver air bag (inflator) module or
measure its resistance. Otherwise, personal injury may
result.
CAUTION:
If air bag (inflator) module was dropped from a height of
90 cm (3 ft) or more, it should be replaced.
Page 158 of 687
Downloaded from www.Manualslib.com manuals search engine STEERING WHEEL AND COLUMN 3C-5
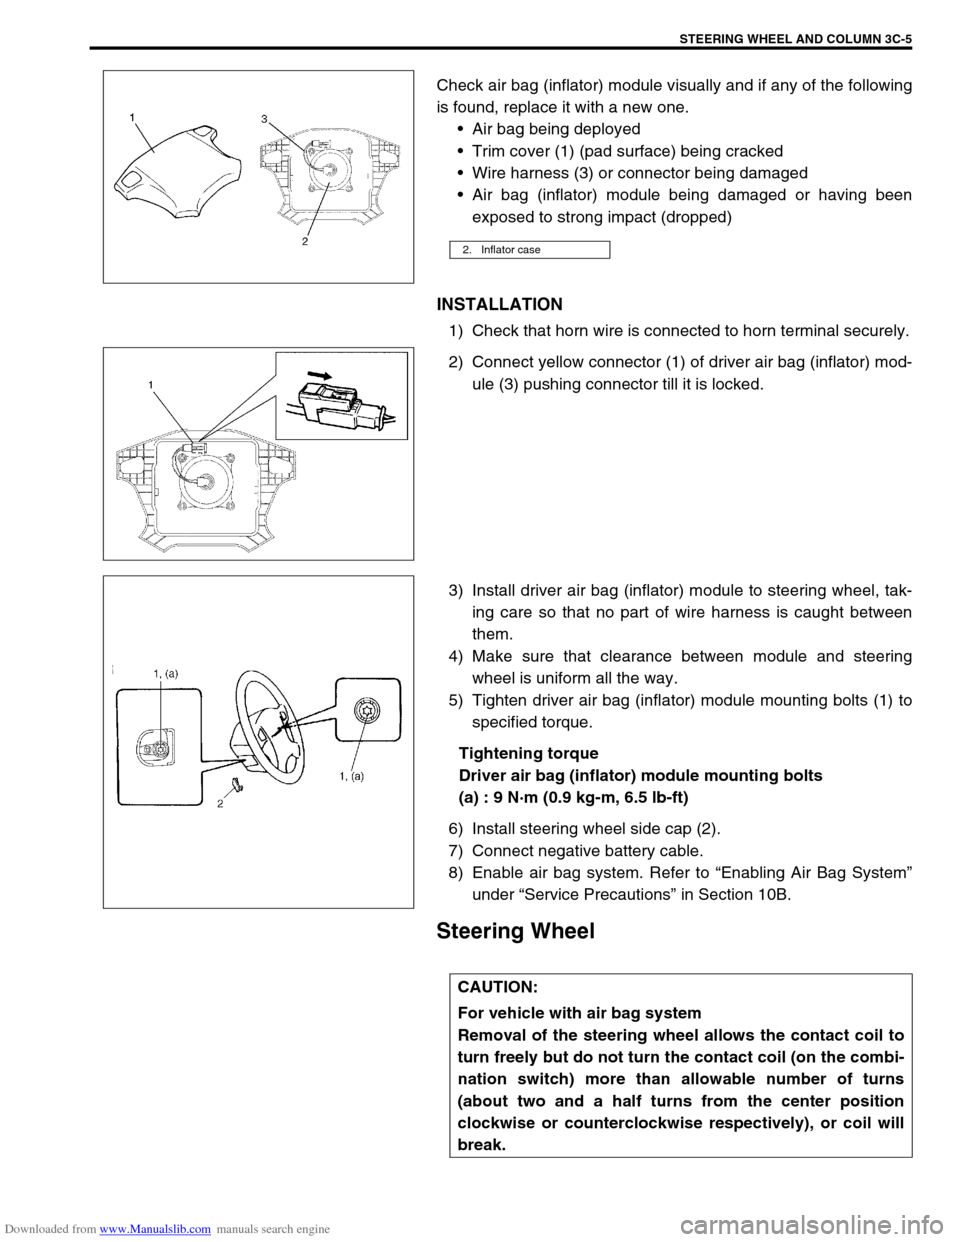
Check air bag (inflator) module visually and if any of the following
is found, replace it with a new one.
Air bag being deployed
Trim cover (1) (pad surface) being cracked
Wire harness (3) or connector being damaged
Air bag (inflator) module being damaged or having been
exposed to strong impact (dropped)
INSTALLATION
1) Check that horn wire is connected to horn terminal securely.
2) Connect yellow connector (1) of driver air bag (inflator) mod-
ule (3) pushing connector till it is locked.
3) Install driver air bag (inflator) module to steering wheel, tak-
ing care so that no part of wire harness is caught between
them.
4) Make sure that clearance between module and steering
wheel is uniform all the way.
5) Tighten driver air bag (inflator) module mounting bolts (1) to
specified torque.
Tightening torque
Driver air bag (inflator) module mounting bolts
(a) : 9 N·m (0.9 kg-m, 6.5 lb-ft)
6) Install steering wheel side cap (2).
7) Connect negative battery cable.
8) Enable air bag system. Refer to “Enabling Air Bag System”
under “Service Precautions” in Section 10B.
Steering Wheel
2. Inflator case
CAUTION:
For vehicle with air bag system
Removal of the steering wheel allows the contact coil to
turn freely but do not turn the contact coil (on the combi-
nation switch) more than allowable number of turns
(about two and a half turns from the center position
clockwise or counterclockwise respectively), or coil will
break.
Page 160 of 687
Downloaded from www.Manualslib.com manuals search engine STEERING WHEEL AND COLUMN 3C-7
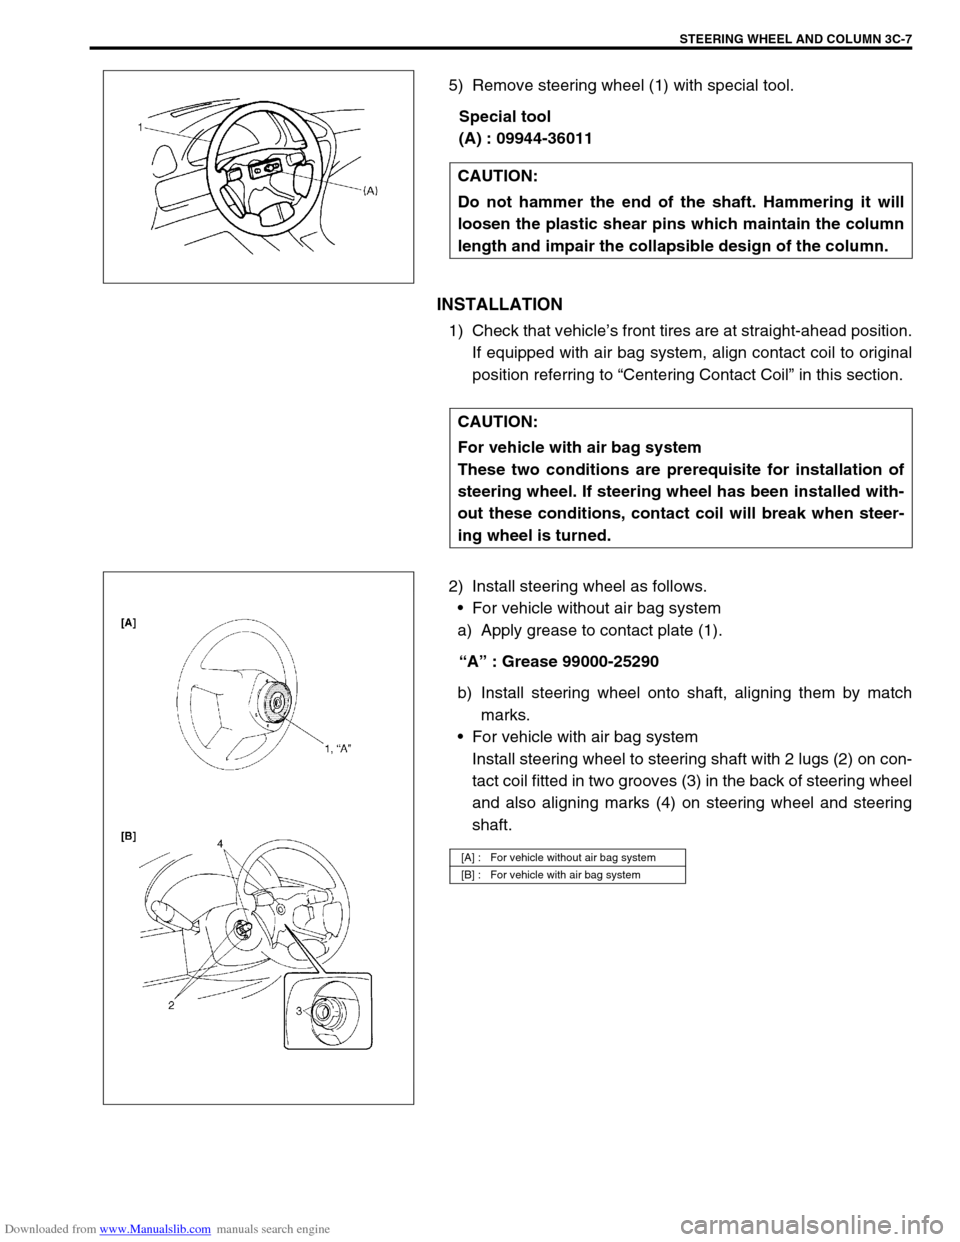
5) Remove steering wheel (1) with special tool.
Special tool
(A) : 09944-36011
INSTALLATION
1) Check that vehicle’s front tires are at straight-ahead position.
If equipped with air bag system, align contact coil to original
position referring to “Centering Contact Coil” in this section.
2) Install steering wheel as follows.
For vehicle without air bag system
a) Apply grease to contact plate (1).
“A” : Grease 99000-25290
b) Install steering wheel onto shaft, aligning them by match
marks.
For vehicle with air bag system
Install steering wheel to steering shaft with 2 lugs (2) on con-
tact coil fitted in two grooves (3) in the back of steering wheel
and also aligning marks (4) on steering wheel and steering
shaft. CAUTION:
Do not hammer the end of the shaft. Hammering it will
loosen the plastic shear pins which maintain the column
length and impair the collapsible design of the column.
CAUTION:
For vehicle with air bag system
These two conditions are prerequisite for installation of
steering wheel. If steering wheel has been installed with-
out these conditions, contact coil will break when steer-
ing wheel is turned.
[A] : For vehicle without air bag system
[B] : For vehicle with air bag system
Page 161 of 687
Downloaded from www.Manualslib.com manuals search engine 3C-8 STEERING WHEEL AND COLUMN
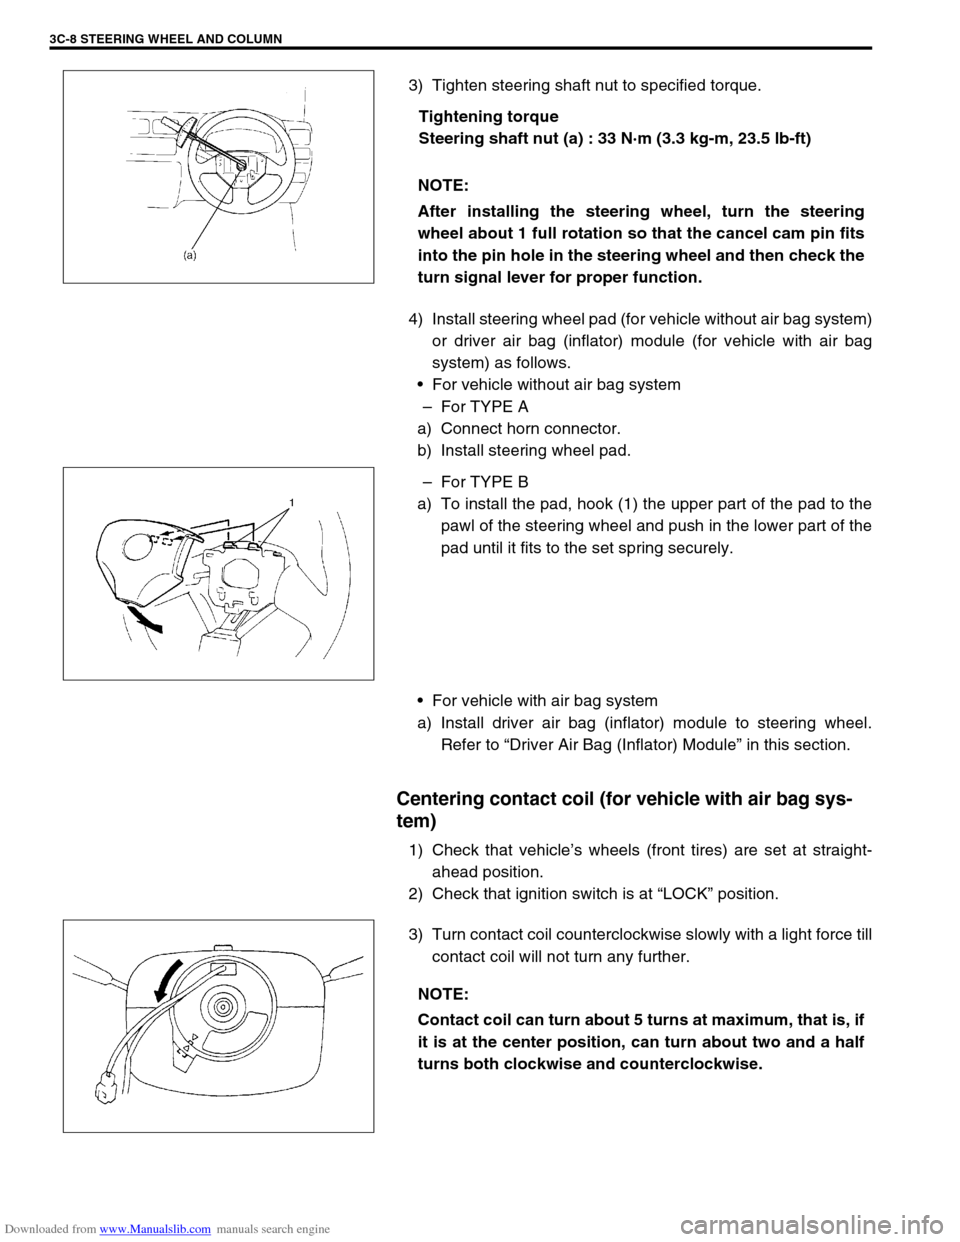
3) Tighten steering shaft nut to specified torque.
Tightening torque
Steering shaft nut (a) : 33 N·m (3.3 kg-m, 23.5 lb-ft)
4) Install steering wheel pad (for vehicle without air bag system)
or driver air bag (inflator) module (for vehicle with air bag
system) as follows.
For vehicle without air bag system
–For TYPE A
a) Connect horn connector.
b) Install steering wheel pad.
–For TYPE B
a) To install the pad, hook (1) the upper part of the pad to the
pawl of the steering wheel and push in the lower part of the
pad until it fits to the set spring securely.
For vehicle with air bag system
a) Install driver air bag (inflator) module to steering wheel.
Refer to “Driver Air Bag (Inflator) Module” in this section.
Centering contact coil (for vehicle with air bag sys-
tem)
1) Check that vehicle’s wheels (front tires) are set at straight-
ahead position.
2) Check that ignition switch is at “LOCK” position.
3) Turn contact coil counterclockwise slowly with a light force till
contact coil will not turn any further. NOTE:
After installing the steering wheel, turn the steering
wheel about 1 full rotation so that the cancel cam pin fits
into the pin hole in the steering wheel and then check the
turn signal lever for proper function.
NOTE:
Contact coil can turn about 5 turns at maximum, that is, if
it is at the center position, can turn about two and a half
turns both clockwise and counterclockwise.
Page 162 of 687
Downloaded from www.Manualslib.com manuals search engine STEERING WHEEL AND COLUMN 3C-9
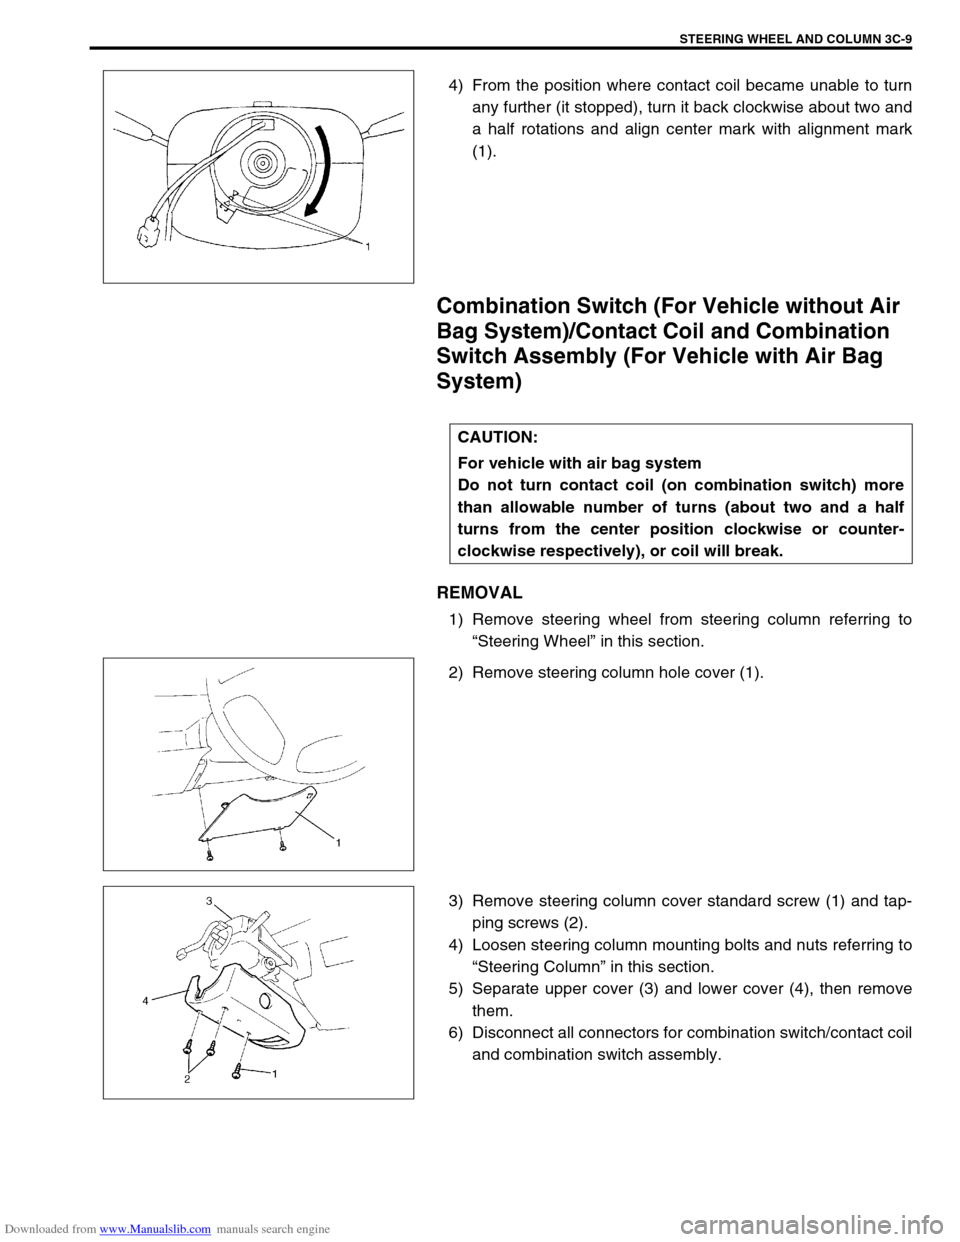
4) From the position where contact coil became unable to turn
any further (it stopped), turn it back clockwise about two and
a half rotations and align center mark with alignment mark
(1).
Combination Switch (For Vehicle without Air
Bag System)/Contact Coil and Combination
Switch Assembly (For Vehicle with Air Bag
System)
REMOVAL
1) Remove steering wheel from steering column referring to
“Steering Wheel” in this section.
2) Remove steering column hole cover (1).
3) Remove steering column cover standard screw (1) and tap-
ping screws (2).
4) Loosen steering column mounting bolts and nuts referring to
“Steering Column” in this section.
5) Separate upper cover (3) and lower cover (4), then remove
them.
6) Disconnect all connectors for combination switch/contact coil
and combination switch assembly.
CAUTION:
For vehicle with air bag system
Do not turn contact coil (on combination switch) more
than allowable number of turns (about two and a half
turns from the center position clockwise or counter-
clockwise respectively), or coil will break.
Page 165 of 687
Downloaded from www.Manualslib.com manuals search engine 3C-12 STEERING WHEEL AND COLUMN
REMOVAL
1) Disconnect negative battery cable at battery terminal.
2) For vehicle equipped with air bag system, disable air bag
system referring to “Disabling Air Bag System” in Section
10B.
3) If necessary, remove steering wheel and combination switch
assembly referring to “Steering Wheel” and “Combination
switch/Contact Coil and Combination Switch Assembly” in
this section.
If not removing steering wheel and/or combination switch
assembly, perform the following procedure.
a) Turn steering wheel so that vehicle’s front tires are at
straight ahead position.
b) Turn ignition switch to “LOCK” position and remove key.
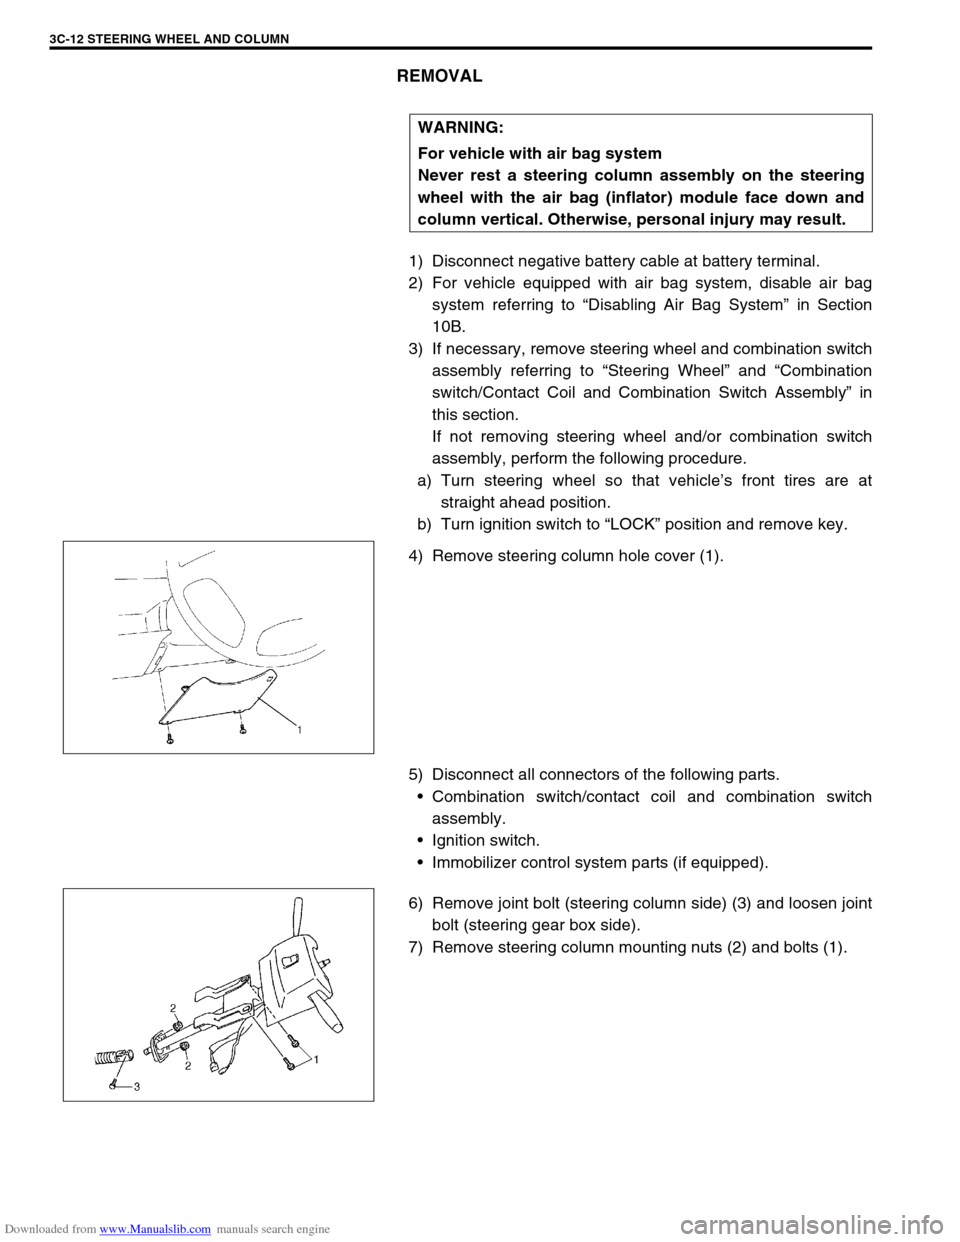
4) Remove steering column hole cover (1).
5) Disconnect all connectors of the following parts.
Combination switch/contact coil and combination switch
assembly.
Ignition switch.
Immobilizer control system parts (if equipped).
6) Remove joint bolt (steering column side) (3) and loosen joint
bolt (steering gear box side).
7) Remove steering column mounting nuts (2) and bolts (1).WARNING:
For vehicle with air bag system
Never rest a steering column assembly on the steering
wheel with the air bag (inflator) module face down and
column vertical. Otherwise, personal injury may result.
Page 169 of 687
Downloaded from www.Manualslib.com manuals search engine 3C-16 STEERING WHEEL AND COLUMN
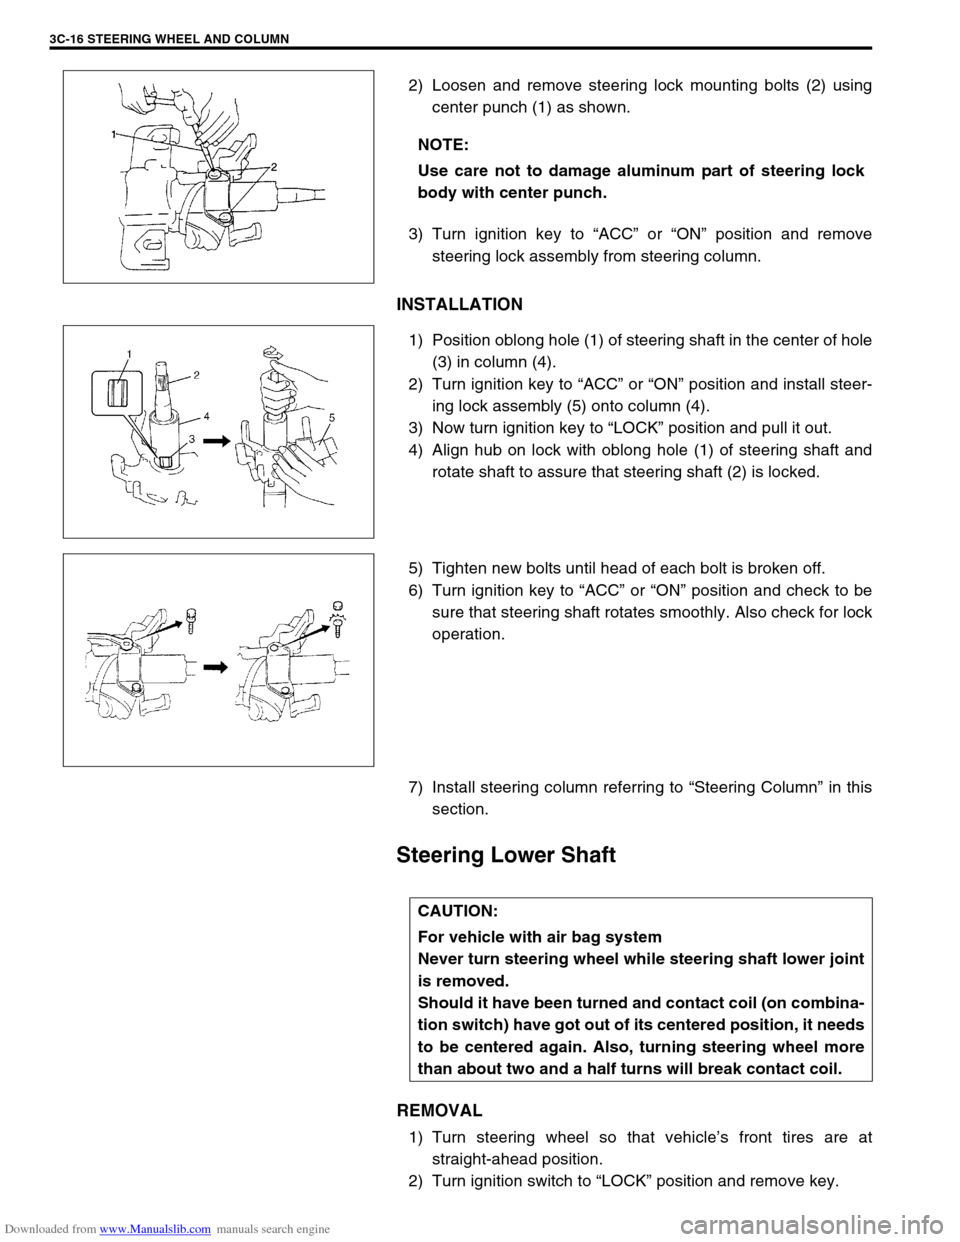
2) Loosen and remove steering lock mounting bolts (2) using
center punch (1) as shown.
3) Turn ignition key to “ACC” or “ON” position and remove
steering lock assembly from steering column.
INSTALLATION
1) Position oblong hole (1) of steering shaft in the center of hole
(3) in column (4).
2) Turn ignition key to “ACC” or “ON” position and install steer-
ing lock assembly (5) onto column (4).
3) Now turn ignition key to “LOCK” position and pull it out.
4) Align hub on lock with oblong hole (1) of steering shaft and
rotate shaft to assure that steering shaft (2) is locked.
5) Tighten new bolts until head of each bolt is broken off.
6) Turn ignition key to “ACC” or “ON” position and check to be
sure that steering shaft rotates smoothly. Also check for lock
operation.
7) Install steering column referring to “Steering Column” in this
section.
Steering Lower Shaft
REMOVAL
1) Turn steering wheel so that vehicle’s front tires are at
straight-ahead position.
2) Turn ignition switch to “LOCK” position and remove key. NOTE:
Use care not to damage aluminum part of steering lock
body with center punch.
CAUTION:
For vehicle with air bag system
Never turn steering wheel while steering shaft lower joint
is removed.
Should it have been turned and contact coil (on combina-
tion switch) have got out of its centered position, it needs
to be centered again. Also, turning steering wheel more
than about two and a half turns will break contact coil.
Page 178 of 687

Downloaded from www.Manualslib.com manuals search engine FRONT SUSPENSION 3D-5
Components and Functions
Component Function
4WD switch When the transfer shift lever is shifted to 4L or 4H position from 2H, this switch
turns ON and cause the 4WD control system to turn ON.
4WD controller When the 4WD switch turns on, the 4WD controller activates VSV2 to lock the
air locking hubs and when it receives an “ON” signal from the vacuum switch, it
makes VSV2 to complete operation within 5 seconds and causes the 4WD indi-
cator light to light up.
If vacuum in the vacuum circuit fails to reach the specified level due to a leakage
in the vacuum circuit (when no “ON” signal is inputted from the vacuum switch),
the 4WD controller stops operation of VSV2 in 15 seconds and makes the 4WD
indicator light to flash to warn occurrence of a trouble.
When the 4WD switch turns off, the 4WD controller activates VSV1 for 10 sec-
onds to unlock the hubs and at the same time makes the 4WD indicator light
turn off.
VSV1 VSV1 operates according to the signal from the 4WD controller. When it is acti-
vated, the port opens and vacuum in the intake manifold is applied through the
vacuum circuit to unlock to the slide gear in the air locking hub. As a result, the
air locking hubs are unlocked.
VSV2 VSV2 operates according to the signal from the 4WD controller. When it is acti-
vated, the port opens and vacuum in the intake manifold is applied through the
vacuum circuit to lock to the slide gear in the air locking hub. As a result, the air
locking hubs are locked.
Vacuum switch When VSV2 receives the “ON” signal from 4WD switch, vacuum is applied
through its circuit to the vacuum switch. The vacuum switch turns on when it
detects vacuum exceeding 260 mmHg.
“4WD” indicator lamp It lights up when 4WD control system is in the 4WD mode.
It flashes to warn that locking hub operation has not completed (4WD control
system fails to shift 4WD).
Page 181 of 687

Downloaded from www.Manualslib.com manuals search engine 3D-8 FRONT SUSPENSION
Diagnosis
Diagnosis Table
For description not found in the table below, refer to “Diagnosis Table” in Section 3.
4WD CONTROL SYSTEM
4WD CONTROL SYSTEM DIAGNOSTIC FLOW TABLE
Before performing the trouble diagnosis, check that the air locking hub assemblies are in good condition and
there is no air leakage from vacuum hoses and vacuum pipe. Refer to “4WD Control System Check” in this sec-
tion for air leakage.
[NOTES ON SYSTEM CIRCUIT INSPECTION]
Be sure to read “Precautions for Electrical Circuit Service” in Section 0A before circuit inspection and
observe what is written there.
For system circuit, refer to the figure of “System Circuit” in this section. Condition Possible Cause Correction
4WD Indicator light
flashingHub locking procedure error
Defective VSV2
Defective vacuum switch
Defective check valve or vacuum tank
Air leak from vacuum circuit
Clogged vacuum hose or pipe
Faulty 4WD controllerShift transfer shift control lever
2WD → 4WD once again
Replace
Replace
Replace
Check and repair
Replace
Check and replace
2WD/4WD switching
errorDefective air locking hub assembly
Abnormality in 4WD control system
Air leakage from vacuum circuit
Clogged vacuum hose or pipe
Defective check valve or vacuum tankReplace
Inspect referring to “4WD Control
System Diagnostic Flow Table”
Check and replace
Replace
Replace
Step Action Yes No
1 Check ground circuit.
1) Disconnect coupler from 4WD controller
with ignition switch OFF.
2) Check for proper connection to 4WD con-
troller at all terminals.
3) If OK, check continuity between A5 terminal
and body ground.
Is there continuity between A5 terminal and
body ground?Go to Step 2.“B” wire is open.
2 Check power circuit.
1) Disconnect coupler from 4WD controller.
2) Turn ignition switch ON.
3) Check voltage between A10 terminal and
ground.
Is it 10 – 14 V?Go to Step 3.“Y/R” circuit is open or
short.
Page 182 of 687

Downloaded from www.Manualslib.com manuals search engine FRONT SUSPENSION 3D-9
3 Check 4WD switch circuit.
1) Connect coupler to 4WD controller.
2) Turn ignition switch ON and check voltage
between A7 terminal and ground.
Transfer lever is in 2H : about 10 – 14 V
Transfer lever is in 4L or 4H : about 0 V
Is check result satisfactory?Go to Step 4. Check 4WD switch (refer
to “4WD Switch” in Sec-
tion 7D), “Bl/B” and “B”
circuits of 4WD switch.
If OK, substitute a known-
good 4WD controller and
recheck.
4 Check VSV1 circuit.
1) Turn ignition switch ON.
2) Check voltage between A1 terminal and
ground.
Is it 10 – 14 V when transfer lever is in 4H or 4L
range and about 0 V for 10 seconds after it is
shifted to 2H range?Go to Step 5. Check VSV1 (refer to
“4WD Control System
Check” in this section),
“Y/R” and “Gr/B” circuits
of VSV1.
If OK, substitute a known-
good 4WD controller and
recheck.
5 Check VSV2 circuit.
1) Turn ignition switch ON.
2) Check voltage between A2 terminal and
ground.
Is it 10 – 14 V when transfer lever is in 2H range
and about 0 V for 5 seconds after it is shifted to
4H or 4L range?Go to Step 6. Check VSV2 (refer to
“4WD Control System
Check” in this section),
“Y/R” and “Gr/R” circuits
of VSV2.
If OK, substitute a known-
good 4WD controller and
recheck.
6 Check vacuum switch circuit.
1) Turn ignition switch ON (stating engine).
2) Check voltage between A6 terminal and
ground.
Is it 10 – 14 V when transfer lever is in 2H range
and about 0 V for 5 seconds after it is shifted to
4H or 4L range?Go to Step 7. Check vacuum switch
(refer to “4WD Control
System Check” in this
section), “Gr” and “B” cir-
cuits of vacuum switch.
If OK, substitute a known-
good 4WD controller and
recheck.
7 Check 4WD indicator light circuit.
1) Turn ignition switch ON.
2) Check voltage between A3 terminal and
ground.
Is it 10 – 14 V when transfer lever is in 2H range
and about 0 V within 15 seconds after it is
shifted to 4H or 4L range?Substitute a known-good
4WD controller and
recheck.Check “Bl” circuit (includ-
ing indicator light and
combination meter refer to
“Combination Meter” in
Section 8).
If OK, substitute a known-
good 4WD controller and
recheck. Step Action Yes No