ECT sensor SUZUKI JIMNY 2005 3.G Service Service Manual
[x] Cancel search | Manufacturer: SUZUKI, Model Year: 2005, Model line: JIMNY, Model: SUZUKI JIMNY 2005 3.GPages: 687, PDF Size: 13.38 MB
Page 353 of 687
Downloaded from www.Manualslib.com manuals search engine 5E-36 ANTILOCK BRAKE SYSTEM (ABS)
Rear Wheel Speed Sensor
OUTPUT VOLTAGE INSPECTION
Check in the same procedure as that used of front wheel speed
sensor check.
Output AC voltage at 1 to 1 1/3 rotation per second
: 100 mV or more at 38 – 49 Hz
Reference
When using oscilloscope, peak-to-peak voltage at 1 to
1 1/3 rotation per second
: 280 mV or more at 38 – 49 Hz
REMOVAL
1) Disconnect negative cable from battery.
2) Hoist vehicle.
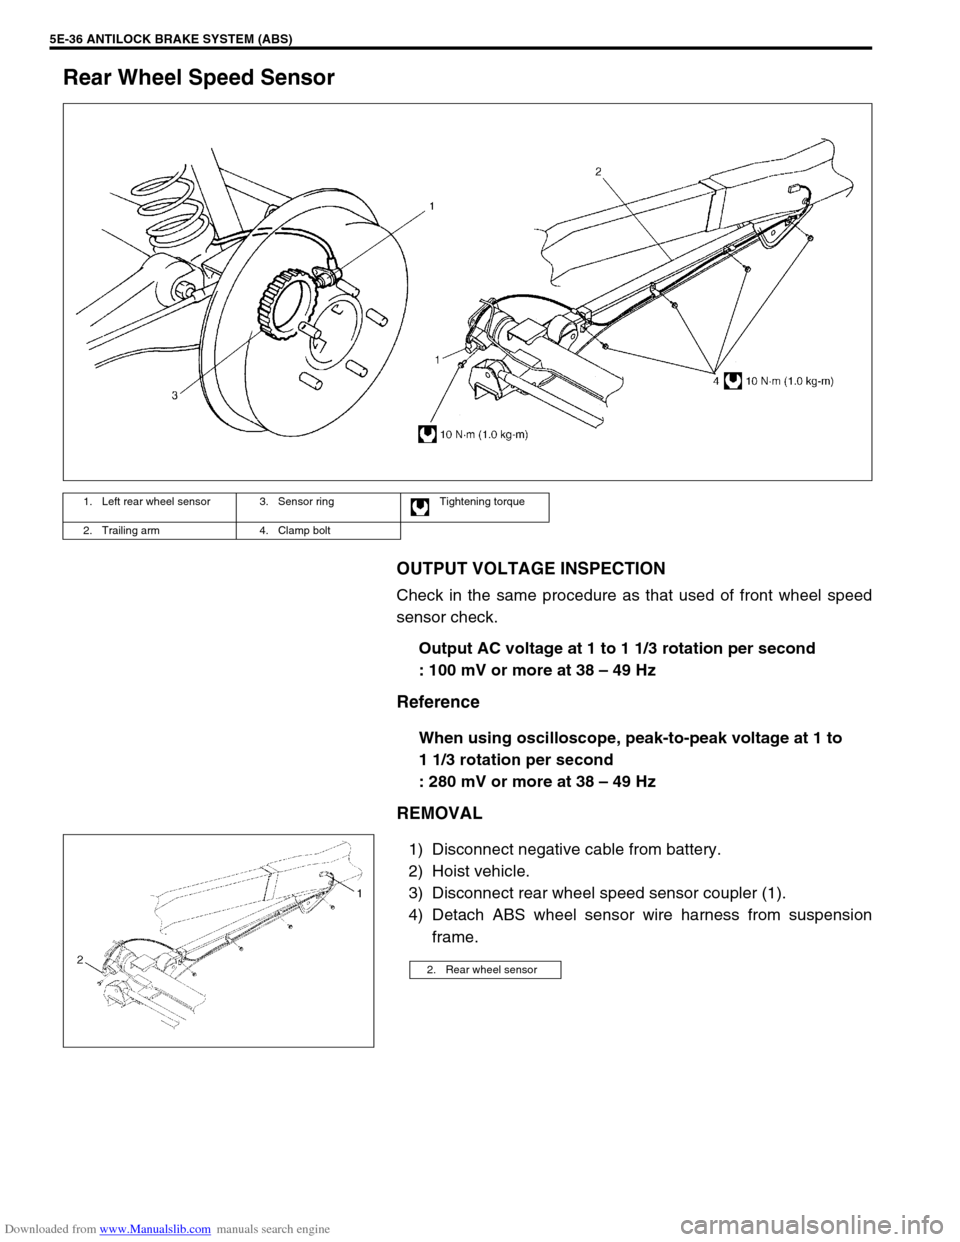
3) Disconnect rear wheel speed sensor coupler (1).
4) Detach ABS wheel sensor wire harness from suspension
frame.
1. Left rear wheel sensor 3. Sensor ring Tightening torque
2. Trailing arm 4. Clamp bolt
2. Rear wheel sensor
Page 354 of 687
Downloaded from www.Manualslib.com manuals search engine ANTILOCK BRAKE SYSTEM (ABS) 5E-37
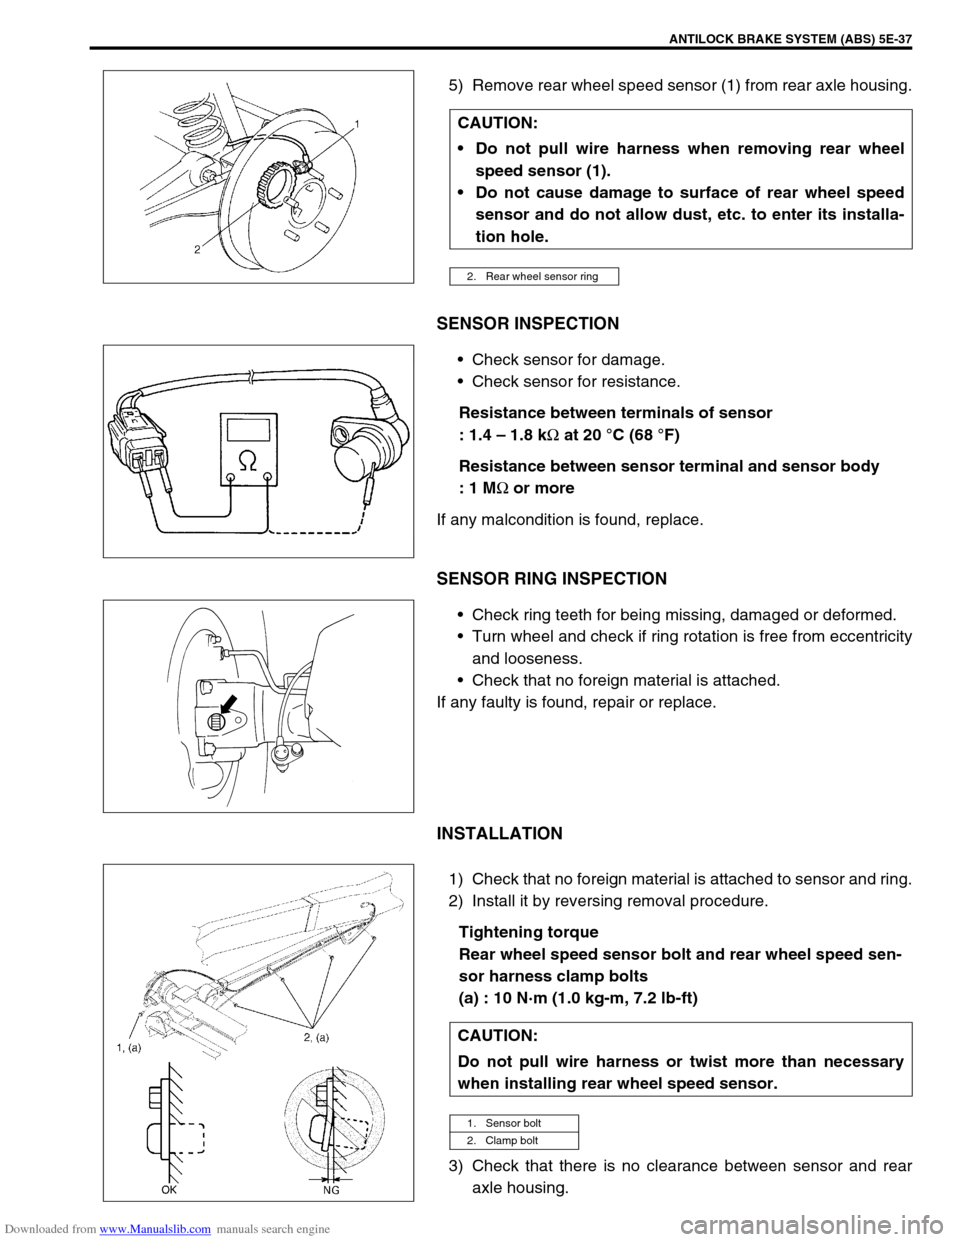
5) Remove rear wheel speed sensor (1) from rear axle housing.
SENSOR INSPECTION
Check sensor for damage.
Check sensor for resistance.
Resistance between terminals of sensor
: 1.4 – 1.8 k
Ω at 20 °C (68 °F)
Resistance between sensor terminal and sensor body
: 1 M
Ω or more
If any malcondition is found, replace.
SENSOR RING INSPECTION
Check ring teeth for being missing, damaged or deformed.
Turn wheel and check if ring rotation is free from eccentricity
and looseness.
Check that no foreign material is attached.
If any faulty is found, repair or replace.
INSTALLATION
1) Check that no foreign material is attached to sensor and ring.
2) Install it by reversing removal procedure.
Tightening torque
Rear wheel speed sensor bolt and rear wheel speed sen-
sor harness clamp bolts
(a) : 10 N·m (1.0 kg-m, 7.2 lb-ft)
3) Check that there is no clearance between sensor and rear
axle housing. CAUTION:
Do not pull wire harness when removing rear wheel
speed sensor (1).
Do not cause damage to surface of rear wheel speed
sensor and do not allow dust, etc. to enter its installa-
tion hole.
2. Rear wheel sensor ring
CAUTION:
Do not pull wire harness or twist more than necessary
when installing rear wheel speed sensor.
1. Sensor bolt
2. Clamp bolt
Page 355 of 687

Downloaded from www.Manualslib.com manuals search engine 5E-38 ANTILOCK BRAKE SYSTEM (ABS)
Rear Wheel Sensor Ring
REMOVAL
1) Remove rear axle shaft. Refer to “Rear Axle Shaft and
Wheel Bearing” in Section 3E.
2) In order to remove sensor ring (3) from retainer ring (2),
grind with a grinder one part of the sensor ring (3) as illus-
trated till it becomes thin.
3) Break with a chisel the thin ground sensor ring, and it can be
removed.
INSTALLATION
1) Press-fit sensor ring (1) as shown.
2) Install rear axle shaft referring to “Rear Axle Shaft and Wheel
Bearing” in Section 3E.
3) Install brake drum and wheel.
Refer to “Brake Drum” in Section 5. CAUTION:
Cover vinyl sheet (4) or the like over wheel bearing so
that fine grains from grinding will not enter there.
Be careful not to go so far as to grind the retainer ring
(2).
1. Rear axle
“A”: Grind with grinder
NOTE:
Use care not to cause any damage to outside of retainer
ring.
Page 356 of 687
Downloaded from www.Manualslib.com manuals search engine ANTILOCK BRAKE SYSTEM (ABS) 5E-39
G Sensor
REMOVAL
1) Turn ignition switch “OFF” and disconnect battery negative
cable.
2) Remove rear center console box.
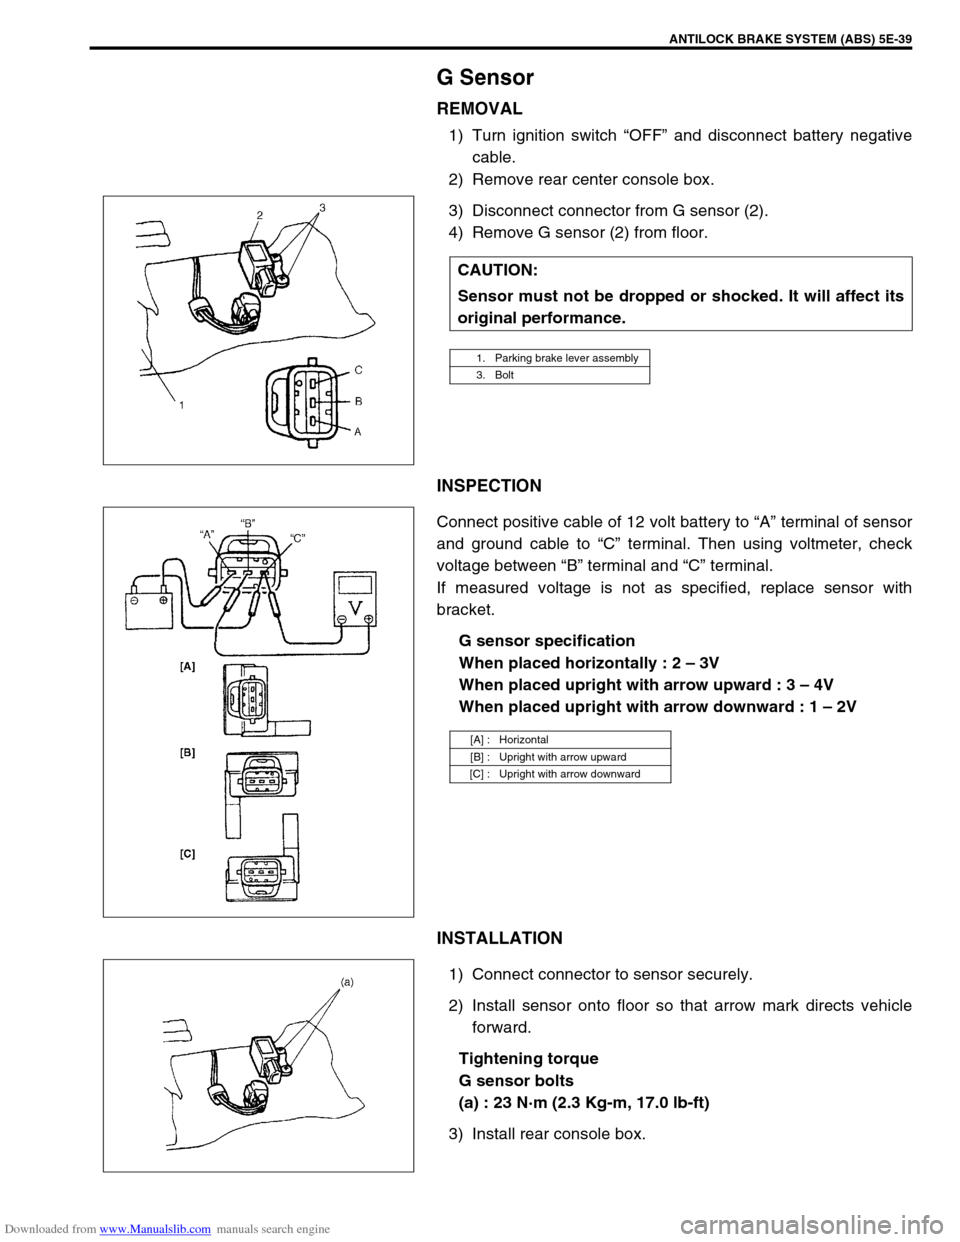
3) Disconnect connector from G sensor (2).
4) Remove G sensor (2) from floor.
INSPECTION
Connect positive cable of 12 volt battery to “A” terminal of sensor
and ground cable to “C” terminal. Then using voltmeter, check
voltage between “B” terminal and “C” terminal.
If measured voltage is not as specified, replace sensor with
bracket.
G sensor specification
When placed horizontally : 2 – 3V
When placed upright with arrow upward : 3 – 4V
When placed upright with arrow downward : 1 – 2V
INSTALLATION
1) Connect connector to sensor securely.
2) Install sensor onto floor so that arrow mark directs vehicle
forward.
Tightening torque
G sensor bolts
(a) : 23 N·m (2.3 Kg-m, 17.0 lb-ft)
3) Install rear console box.CAUTION:
Sensor must not be dropped or shocked. It will affect its
original performance.
1. Parking brake lever assembly
3. Bolt
[A] : Horizontal
[B] : Upright with arrow upward
[C] : Upright with arrow downward
Page 357 of 687
Downloaded from www.Manualslib.com manuals search engine 5E-40 ANTILOCK BRAKE SYSTEM (ABS)
Tightening Torque Specification
Special Tool
Fastening partTightening torque
Nm kg-m lb-ft
Brake pipe flare nuts 16 1.6 11.6
ABS hydraulic unit / control module assembly bracket bolts 11 1.1 8.0
ABS hydraulic unit / control module assembly bolts 9 0.9 6.5
Front wheel speed sensor bolt 10 1.0 7.2
Front wheel speed sensor harness clamp bolts 10 1.0 7.2
Rear wheel speed sensor bolt 10 1.0 7.2
Rear wheel speed sensor harness clamp bolts 10 1.0 7.2
G sensor bolts 23 2.3 17.0
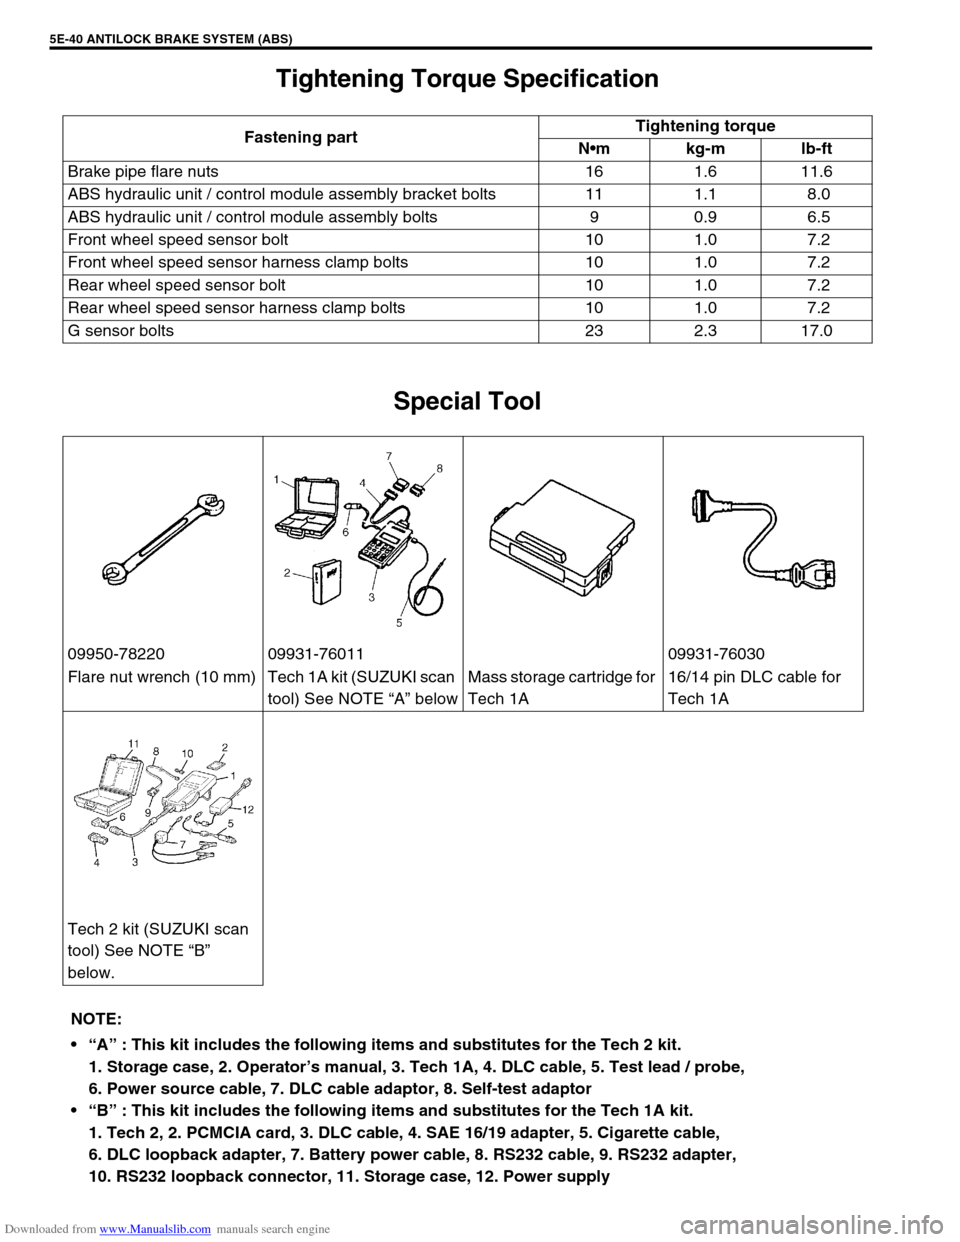
09950-78220 09931-76011 09931-76030
Flare nut wrench (10 mm) Tech 1A kit (SUZUKI scan
tool) See NOTE “A” belowMass storage cartridge for
Tech 1A16/14 pin DLC cable for
Tech 1A
Tech 2 kit (SUZUKI scan
tool) See NOTE “B”
below.
NOTE:
“A” : This kit includes the following items and substitutes for the Tech 2 kit.
1. Storage case, 2. Operator’s manual, 3. Tech 1A, 4. DLC cable, 5. Test lead / probe,
6. Power source cable, 7. DLC cable adaptor, 8. Self-test adaptor
“B” : This kit includes the following items and substitutes for the Tech 1A kit.
1. Tech 2, 2. PCMCIA card, 3. DLC cable, 4. SAE 16/19 adapter, 5. Cigarette cable,
6. DLC loopback adapter, 7. Battery power cable, 8. RS232 cable, 9. RS232 adapter,
10. RS232 loopback connector, 11. Storage case, 12. Power supply
Page 358 of 687
Downloaded from www.Manualslib.com manuals search engine ENGINE GENERAL INFORMATION AND DIAGNOSIS 6-1
6F2
6G
6H
6K
7A
7A1
7B1
7C1
7D
7E
7F
8B
6
8D
8E
8B
9
10A
10B
SECTION 6
ENGINE GENERAL INFORMATION AND
DIAGNOSIS
GENERAL INFORMATION AND ENGINE DIAGNOSIS ..............................................................................
6-1
ENGINE MECHANICAL ...........................................................................................................................
6A1-1
ENGINE COOLING.....................................................................................................................................
6B-1
ENGINE FUEL ............................................................................................................................................
6C-1
ENGINE AND EMISSION CONTROL SYSTEM ........................................................................................
6E-1
IGNITION SYSTEM ....................................................................................................................................
6F-1
CRANKING SYSTEM .................................................................................................................................
6G-1
CHARGING SYSTEM .................................................................................................................................
6H-1
EXHAUST SYSTEM ...................................................................................................................................
6K-1
CONTENTS
General Information .......................................... 6-3
Statement on Cleanliness and Care ............... 6-3
General Information on Engine Service .......... 6-3
Precaution on fuel system service............... 6-4
Fuel pressure relief procedure .................... 6-5
Fuel leakage check procedure .................... 6-5
Engine Diagnosis .............................................. 6-6
General Description ........................................ 6-6
On-Board Diagnostic System (Vehicle with
Immobilizer Indicator Lamp) ............................ 6-6On-Board Diagnostic System (Vehicle without
Immobilizer Indicator Lamp)............................ 6-9
Precaution in Diagnosing Trouble ................. 6-10
Engine Diagnostic Flow Table ...................... 6-11
Customer problem inspection form
(example) .................................................. 6-13
Malfunction indicator lamp (MIL) check..... 6-14
Diagnostic trouble code (DTC) check ....... 6-14
Diagnostic trouble code (DTC)
clearance................................................... 6-15 WARNING:
For vehicles equipped with Supplemental Restraint (Air Bag) System :
Service on and around the air bag system components or wiring must be performed only by an
authorized SUZUKI dealer. Refer to “Air Bag System Components and Wiring Location View” under
“General Description” in air bag system section in order to confirm whether you are performing ser-
vice on or near the air bag system components or wiring. Please observe all WARNINGS and “Ser-
vice Precautions” under “On-Vehicle Service” in air bag system section before performing service
on or around the air bag system components or wiring. Failure to follow WARNINGS could result in
unintentional activation of the system or could render the system inoperative. Either of these two
conditions may result in severe injury.
Technical service work must be started at least 90 seconds after the ignition switch is turned to the
“LOCK” position and the negative cable is disconnected from the battery. Otherwise, the system
may be activated by reserve energy in the Sensing and Diagnostic Module (SDM).
NOTE:
Whether the following systems (parts) are used in the particular vehicle or not depends on vehicle
specifications. Be sure to bear this in mind when performing service work.
EGR valve
Heated oxygen sensor(s) or CO adjusting resistor
Three-way catalytic converter (TWC) and warm up three-way catalytic converter (WU-TWC)
Page 359 of 687

Downloaded from www.Manualslib.com manuals search engine 6-2 ENGINE GENERAL INFORMATION AND DIAGNOSIS
Diagnostic trouble code (DTC) table ......... 6-16
Fail-safe table............................................ 6-19
Visual inspection ....................................... 6-20
Engine basic inspection ............................ 6-21
Engine diagnosis table .............................. 6-23
Scan Tool Data ............................................. 6-28
Scan tool data definitions .......................... 6-30
Inspection of ECM and Its Circuits ................ 6-33
Component Location ..................................... 6-42
Table A-1 Malfunction Indicator Lamp Circuit
Check - Lamp Does Not Come “ON” at Ignition
Switch ON (But Engine at Stop).................... 6-43
Table A-2 Malfunction Indicator Lamp Circuit
Check - Lamp Remains “ON” after Engine
Starts............................................................. 6-44
Table A-3 Malfunction Indicator Lamp Circuit
Check - Mil Flashes at Ignition Switch ON .... 6-45
Table A-4 Malfunction Indicator Lamp Circuit
Check - MIL Does Not Flash, Just Remains
ON or Just Remains OFF Even with Grounding
Diagnosis Switch Terminal............................ 6-45
Table A-5 ECM Power and Ground Circuit
Check - MIL Doesn’t Light at Ignition Switch
ON and Engine Doesn’t Start Though It Is
Cranked Up ................................................... 6-46
DTC P0105 (DTC No.11) Manifold Absolute
Pressure (MAP) Circuit Malfunction .............. 6-48
DTC P0110 (DTC No.18) Intake Air Temp.
(IAT) Circuit Malfunction ............................... 6-51
DTC P0115 (DTC No.19) Engine Coolant
Temperature (ECT) Circuit Malfunction ........ 6-53
DTC P0120 (DTC No.13) Throttle Position
Circuit Malfunction ........................................ 6-55
DTC P0121 Throttle Position Circuit Range /
Performance Problem ................................... 6-57
DTC P0130 (DTC No.14) Heated Oxygen
Sensor (HO2S) Circuit Malfunction
(Sensor-1) ..................................................... 6-59
DTC P0133 Heated Oxygen Sensor (HO2S)
Circuit Slow Response (Sensor-1) ................ 6-61
DTC P0135 (DTC No.14) Heated Oxygen
Sensor (HO2S) Heater Circuit Malfunction
(Sensor-1) ..................................................... 6-62
DTC P0136 Heated Oxygen Sensor (HO2S)
Circuit Malfunction (Sensor-2) ...................... 6-64
DTC P0141 Heated Oxygen Sensor (HO2S)
Heater Circuit Malfunction (Sensor-2)........... 6-66
DTC P0171 Fuel System Too Lean .............. 6-68
DTC P0172 Fuel System Too Rich ............... 6-68
DTC P0300 Random Misfire Detected
(Misfire Detected at 2 or More Cylinders) ..... 6-72DTC P0301 Cylinder 1 Misfire Detected ........ 6-72
DTC P0302 Cylinder 2 Misfire Detected ........ 6-72
DTC P0303 Cylinder 3 Misfire Detected ........ 6-72
DTC P0304 Cylinder 4 Misfire Detected ........ 6-72
DTC P0325 (DTC No.17) Knock Sensor Circuit
Malfunction .................................................... 6-77
DTC P0335 (DTC No.23) Crankshaft Position
(CKP) Sensor Circuit Malfunction .................. 6-79
DTC P0340 (DTC No.15) Camshaft Position
(CMP) Sensor Circuit Malfunction ................. 6-82
DTC P0400 Exhaust Gas Recirculation Flow
Malfunction .................................................... 6-85
DTC P0420 Catalyst System Efficiency below
Threshold ....................................................... 6-88
DTC P0443 Purge Control Valve Circuit
Malfunction .................................................... 6-91
DTC P0481 A/C Condenser Fan Control
Circuit Malfunction ......................................... 6-92
DTC P0500 (DTC No.16) Vehicle Speed
Sensor (VSS) Malfunction ............................. 6-94
DTC P0505 Idle Control System
Malfunction .................................................... 6-96
DTC P0601 Internal Control Module Memory
Check Sum Error (DTC No.71) ...................... 6-98
DTC P1450 Barometric Pressure Sensor
Low / High Input ............................................. 6-99
DTC P1451 Barometric Pressure Sensor
Performance Problem .................................... 6-99
DTC P1500 Engine Starter Signal Circuit
Malfunction .................................................. 6-101
DTC P1510 ECM Back-up Power Supply
Malfunction .................................................. 6-103
DTC P1570 (DTC No.21) ABS Signal Circuit
Malfunction .................................................. 6-104
DTC P1600 Serial Communication Problem
Between ECM and TCM .............................. 6-105
DTC P1717 A/T Drive Range (Park / Neutral
Position) Signal Circuit Malfunction ............. 6-107
Table B-1 Fuel Injector Circuit Check ..........6-109
Table B-2 Fuel Pump and Its Circuit
Check........................................................... 6-110
Table B-3 Fuel Pressure Check................... 6-112
Table B-4 Idle Air Control System Check ....6-114
Table B-5 A/C Signal Circuits Check
(Vehicle with A/C) ........................................ 6-117
Table B-6 Electric Load Signal Circuit
Check........................................................... 6-119
TAble B-7 A/C Condenser Fan Control
System Check.............................................. 6-121
Special Tool ................................................... 6-123
Page 366 of 687
Downloaded from www.Manualslib.com manuals search engine ENGINE GENERAL INFORMATION AND DIAGNOSIS 6-9
On-Board Diagnostic System (Vehicle without
Immobilizer Indicator Lamp)
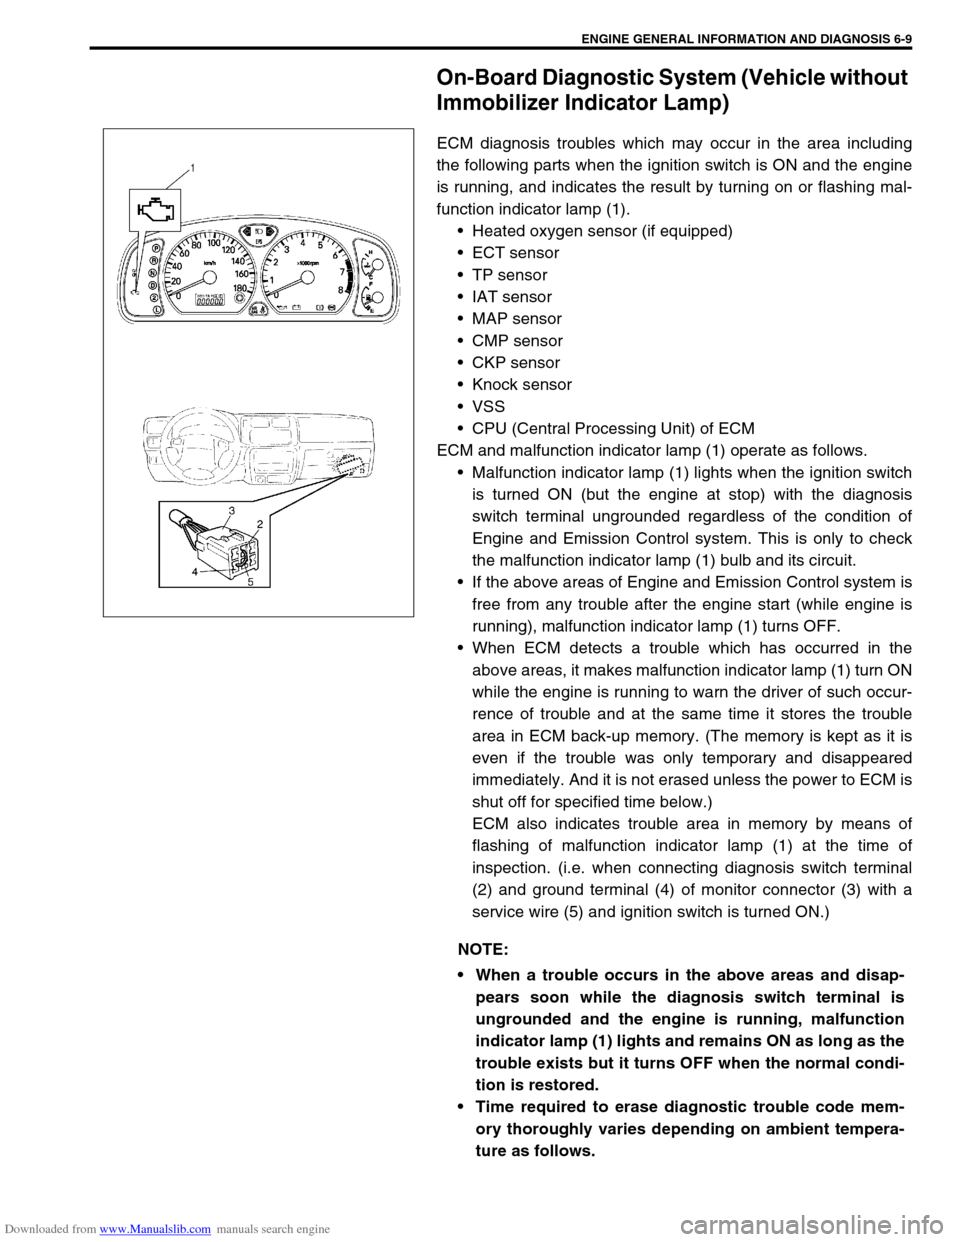
ECM diagnosis troubles which may occur in the area including
the following parts when the ignition switch is ON and the engine
is running, and indicates the result by turning on or flashing mal-
function indicator lamp (1).
Heated oxygen sensor (if equipped)
ECT sensor
TP sensor
IAT sensor
MAP sensor
CMP sensor
CKP sensor
Knock sensor
VSS
CPU (Central Processing Unit) of ECM
ECM and malfunction indicator lamp (1) operate as follows.
Malfunction indicator lamp (1) lights when the ignition switch
is turned ON (but the engine at stop) with the diagnosis
switch terminal ungrounded regardless of the condition of
Engine and Emission Control system. This is only to check
the malfunction indicator lamp (1) bulb and its circuit.
If the above areas of Engine and Emission Control system is
free from any trouble after the engine start (while engine is
running), malfunction indicator lamp (1) turns OFF.
When ECM detects a trouble which has occurred in the
above areas, it makes malfunction indicator lamp (1) turn ON
while the engine is running to warn the driver of such occur-
rence of trouble and at the same time it stores the trouble
area in ECM back-up memory. (The memory is kept as it is
even if the trouble was only temporary and disappeared
immediately. And it is not erased unless the power to ECM is
shut off for specified time below.)
ECM also indicates trouble area in memory by means of
flashing of malfunction indicator lamp (1) at the time of
inspection. (i.e. when connecting diagnosis switch terminal
(2) and ground terminal (4) of monitor connector (3) with a
service wire (5) and ignition switch is turned ON.)
NOTE:
When a trouble occurs in the above areas and disap-
pears soon while the diagnosis switch terminal is
ungrounded and the engine is running, malfunction
indicator lamp (1) lights and remains ON as long as the
trouble exists but it turns OFF when the normal condi-
tion is restored.
Time required to erase diagnostic trouble code mem-
ory thoroughly varies depending on ambient tempera-
ture as follows.
Page 367 of 687

Downloaded from www.Manualslib.com manuals search engine 6-10 ENGINE GENERAL INFORMATION AND DIAGNOSIS
Precaution in Diagnosing Trouble
Don’t disconnect couplers from ECM, battery cable at battery, ECM ground wire harness from engine or
main fuse before confirming diagnostic information (DTC, freeze frame data, etc.) stored in ECM memory.
Such disconnection will erase memorized information in ECM memory.
Diagnostic information stored in ECM memory can be cleared as well as checked by using SUZUKI scan
tool or generic scan tool. Before using scan tool, read its Operator’s (Instruction) Manual carefully to have
good understanding as to what functions are available and how to use it.
Priorities for diagnosing troubles (Vehicle with Immobilizer indicator lamp).
If multiple diagnostic trouble codes (DTCs) are stored, proceed to the flow table of the DTC which has
detected earliest in the order and follow the instruction in that table.
If no instructions are given, troubleshoot diagnostic trouble codes according to the following priorities.
–Diagnostic trouble codes (DTCs) other than DTC P0171/P0172 (Fuel system too lean / too rich), DTC
P0300/P0301/P0302/P0303/P0304 (Misfire detected) and DTC P0400 (EGR flow malfunction)
–DTC P0171/P0172 (Fuel system too lean / too rich) and DTC P0400 (EGR flow malfunction)
–DTC P0300/P0301/P0302/P0303/P0304 (Misfire detected)
Be sure to read “Precautions for Electrical Circuit Service” in Section 0A before inspection and observe what
is written there.
ECM Replacement
When substituting a known-good ECM, check for following conditions. Neglecting this check may cause
damage to a known-good ECM.
–Resistance value of all relays, actuators is as specified respectively.
–MAP sensor and TP sensor are in good condition and none of power circuits of these sensors is shorted
to ground.AMBIENT TEMPERATURE TIME TO CUT POWER TO
ECM
Over 0 °C (32 °F) 60 sec. or longer
Under 0 °C (32 °F)Not specifiable.
Select a place with higher than
0 °C (32 °F) temperature.
Page 369 of 687

Downloaded from www.Manualslib.com manuals search engine 6-12 ENGINE GENERAL INFORMATION AND DIAGNOSIS
1. CUSTOMER COMPLAINT ANALYSIS
Record details of the problem (failure, complaint) and how it occurred as described by the customer. For this
purpose, use of such an inspection form will facilitate collecting information to the point required for proper anal-
ysis and diagnosis.
2. DIAGNOSTIC TROUBLE CODE (DTC) / FREEZE FRAME DATA CHECK, RECORD AND CLEAR-
ANCE
First, check DTC (including pending DTC), referring to “DTC check” section. If DTC is indicated, print it and
freeze frame data or write them down and then clear them by referring to “DTC clearance” section. DTC indi-
cates malfunction that occurred in the system but does not indicate whether it exists now or it occurred in the
past and the normal condition has been restored now. To check which case applies, check the symptom in ques-
tion according to Step 4 and recheck DTC according to Step 5.
Attempt to diagnose a trouble based on DTC in this step only or failure to clear the DTC in this step will lead to
incorrect diagnosis, trouble diagnosis of a normal circuit or difficulty in troubleshooting.
3. AND 4. VISUAL INSPECTION
As a preliminary step, be sure to perform visual check of the items that support proper function of the engine
referring to “Visual Inspection” section.
5. TROUBLE SYMPTOM CONFIRMATION
Based on information obtained in Step 1 Customer complaint analysis and Step 2 DTC / freeze frame data
check, confirm trouble symptoms. Also, reconfirm DTC according to “DTC Confirmation Procedure” described in
each DTC Diagnosis section.
6. AND 7. RECHECKING AND RECORD OF DTC / FREEZE FRAME DATA
Refer to “DTC Check” section for checking procedure.
8. ENGINE BASIC INSPECTION AND ENGINE DIAGNOSIS TABLE
Perform basic engine check according to the “Engine Basic Inspection” first. When the end of the flow table has
been reached, check the parts of the system suspected as a possible cause referring to “Engine Diagnosis
Table” and based on symptoms appearing on the vehicle (symptoms obtained through steps of customer com-
plaint analysis, trouble symptom confirmation and / or basic engine check) and repair or replace faulty parts, if
any.
9. TROUBLESHOOTING FOR DTC (SEE EACH DTC DIAG. FLOW TABLE)
Based on the DTC indicated in Step 5 and referring to the applicable DTC diag. flow table in this section, locate
the cause of the trouble, namely in a sensor, switch, wire harness, connector, actuator, ECM or other part and
repair or replace faulty parts.
10. CHECK FOR INTERMITTENT PROBLEM
Check parts where an intermittent trouble is easy to occur (e.g., wire harness, connector, etc.), referring to
“Intermittent and Poor Connection” in Section 0A and related circuit of DTC recorded in Step 2.
11. FINAL CONFIRMATION TEST
Confirm that the problem symptom has gone and the engine is free from any abnormal conditions. If what has
been repaired is related to the DTC, clear the DTC once, perform DTC confirmation procedure and confirm that
no DTC is indicated.NOTE:
If only Automatic transmission DTCs (P0702-P1717) or Immobilizer DTCs (P1620-P1623) are indicated
in this step, perform trouble diagnosis according to “Diagnosis” in Section 7B or Section 8G.