bolt SUZUKI JIMNY 2005 3.G Service Repair Manual
[x] Cancel search | Manufacturer: SUZUKI, Model Year: 2005, Model line: JIMNY, Model: SUZUKI JIMNY 2005 3.GPages: 687, PDF Size: 13.38 MB
Page 167 of 687
Downloaded from www.Manualslib.com manuals search engine 3C-14 STEERING WHEEL AND COLUMN
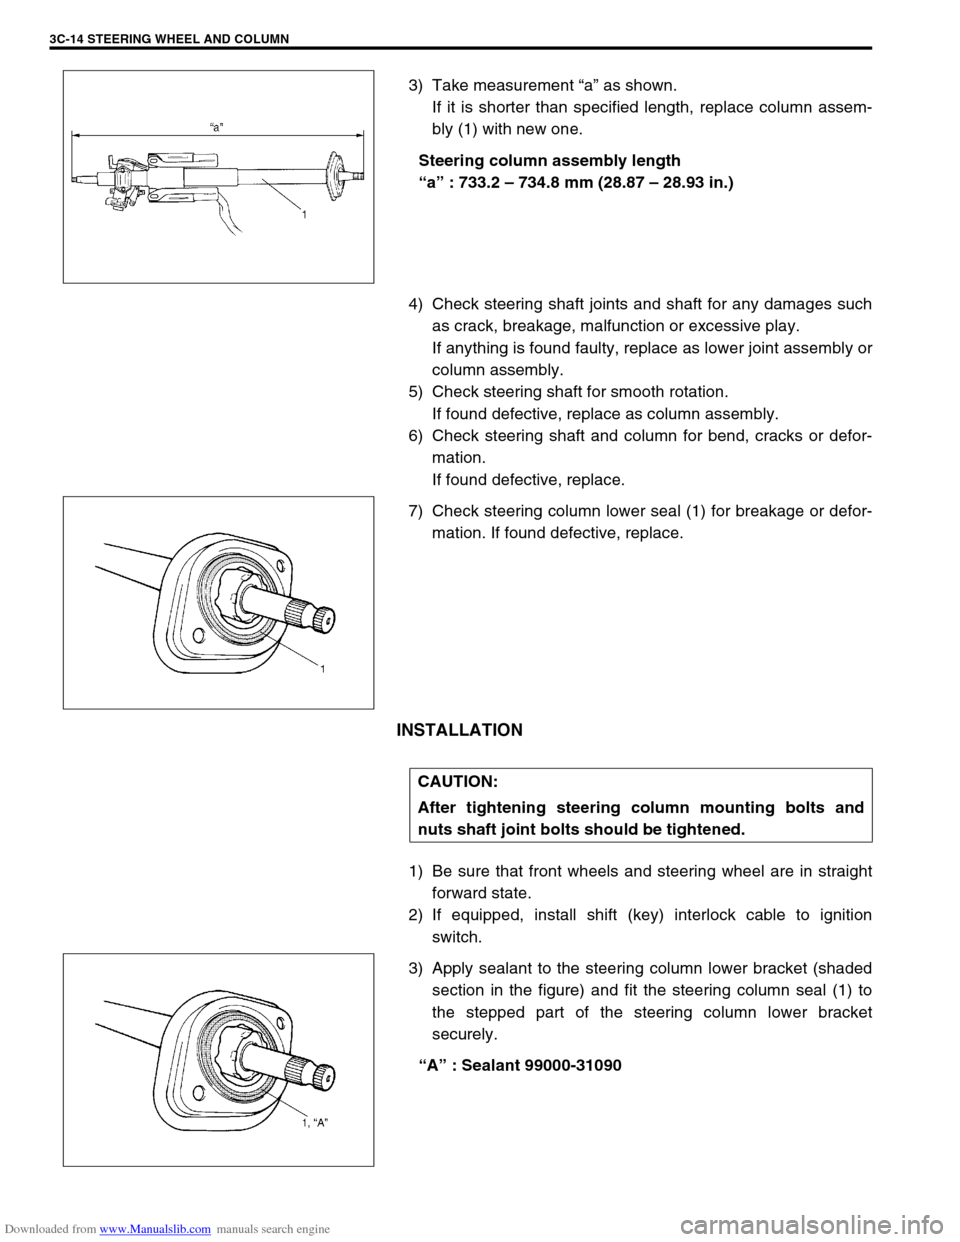
3) Take measurement “a” as shown.
If it is shorter than specified length, replace column assem-
bly (1) with new one.
Steering column assembly length
“a” : 733.2 – 734.8 mm (28.87 – 28.93 in.)
4) Check steering shaft joints and shaft for any damages such
as crack, breakage, malfunction or excessive play.
If anything is found faulty, replace as lower joint assembly or
column assembly.
5) Check steering shaft for smooth rotation.
If found defective, replace as column assembly.
6) Check steering shaft and column for bend, cracks or defor-
mation.
If found defective, replace.
7) Check steering column lower seal (1) for breakage or defor-
mation. If found defective, replace.
INSTALLATION
1) Be sure that front wheels and steering wheel are in straight
forward state.
2) If equipped, install shift (key) interlock cable to ignition
switch.
3) Apply sealant to the steering column lower bracket (shaded
section in the figure) and fit the steering column seal (1) to
the stepped part of the steering column lower bracket
securely.
“A” : Sealant 99000-31090
CAUTION:
After tightening steering column mounting bolts and
nuts shaft joint bolts should be tightened.
Page 168 of 687
Downloaded from www.Manualslib.com manuals search engine STEERING WHEEL AND COLUMN 3C-15
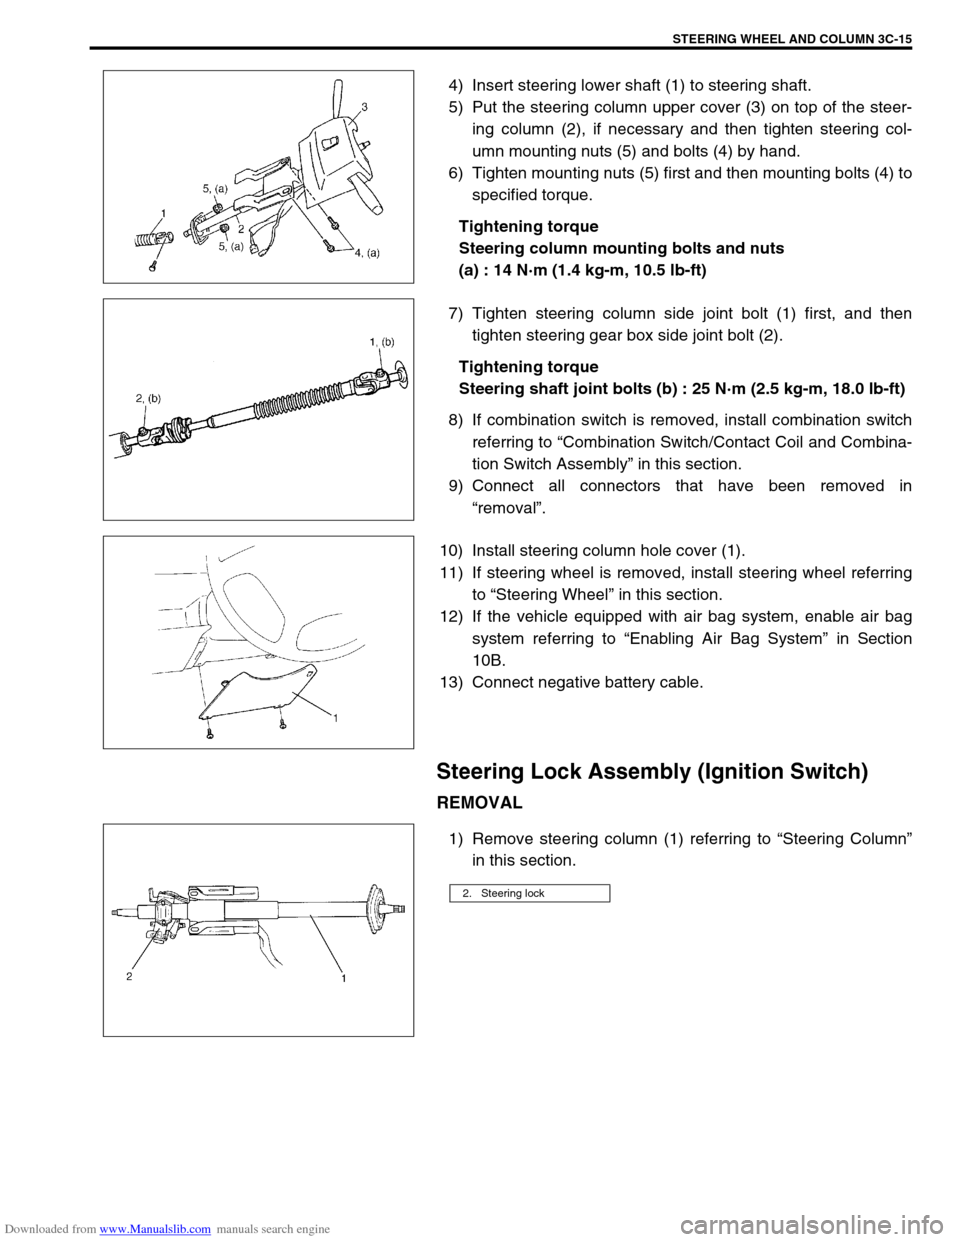
4) Insert steering lower shaft (1) to steering shaft.
5) Put the steering column upper cover (3) on top of the steer-
ing column (2), if necessary and then tighten steering col-
umn mounting nuts (5) and bolts (4) by hand.
6) Tighten mounting nuts (5) first and then mounting bolts (4) to
specified torque.
Tightening torque
Steering column mounting bolts and nuts
(a) : 14 N·m (1.4 kg-m, 10.5 lb-ft)
7) Tighten steering column side joint bolt (1) first, and then
tighten steering gear box side joint bolt (2).
Tightening torque
Steering shaft joint bolts (b) : 25 N·m (2.5 kg-m, 18.0 lb-ft)
8) If combination switch is removed, install combination switch
referring to “Combination Switch/Contact Coil and Combina-
tion Switch Assembly” in this section.
9) Connect all connectors that have been removed in
“removal”.
10) Install steering column hole cover (1).
11) If steering wheel is removed, install steering wheel referring
to “Steering Wheel” in this section.
12) If the vehicle equipped with air bag system, enable air bag
system referring to “Enabling Air Bag System” in Section
10B.
13) Connect negative battery cable.
Steering Lock Assembly (Ignition Switch)
REMOVAL
1) Remove steering column (1) referring to “Steering Column”
in this section.
2. Steering lock
Page 169 of 687
Downloaded from www.Manualslib.com manuals search engine 3C-16 STEERING WHEEL AND COLUMN
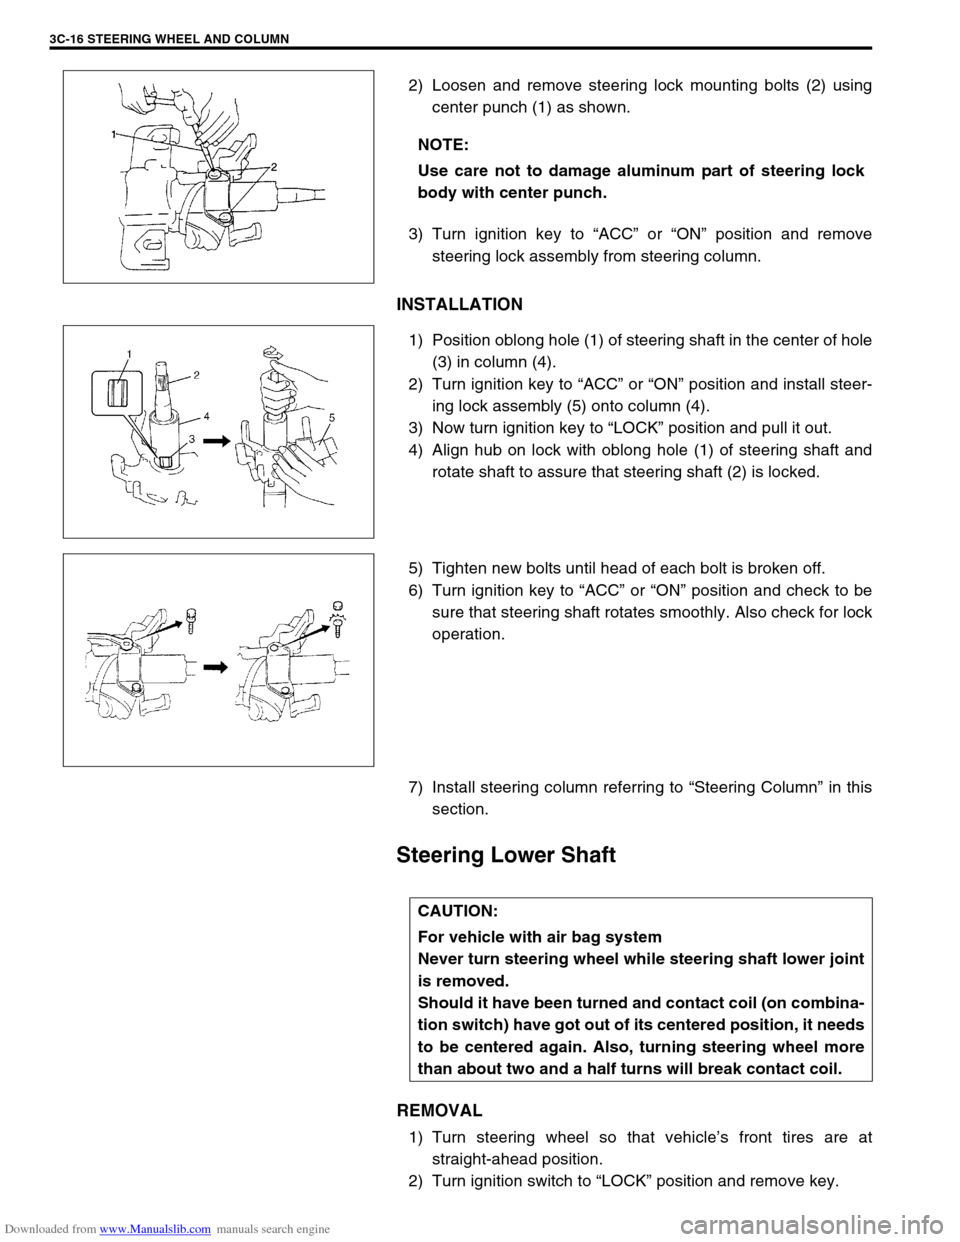
2) Loosen and remove steering lock mounting bolts (2) using
center punch (1) as shown.
3) Turn ignition key to “ACC” or “ON” position and remove
steering lock assembly from steering column.
INSTALLATION
1) Position oblong hole (1) of steering shaft in the center of hole
(3) in column (4).
2) Turn ignition key to “ACC” or “ON” position and install steer-
ing lock assembly (5) onto column (4).
3) Now turn ignition key to “LOCK” position and pull it out.
4) Align hub on lock with oblong hole (1) of steering shaft and
rotate shaft to assure that steering shaft (2) is locked.
5) Tighten new bolts until head of each bolt is broken off.
6) Turn ignition key to “ACC” or “ON” position and check to be
sure that steering shaft rotates smoothly. Also check for lock
operation.
7) Install steering column referring to “Steering Column” in this
section.
Steering Lower Shaft
REMOVAL
1) Turn steering wheel so that vehicle’s front tires are at
straight-ahead position.
2) Turn ignition switch to “LOCK” position and remove key. NOTE:
Use care not to damage aluminum part of steering lock
body with center punch.
CAUTION:
For vehicle with air bag system
Never turn steering wheel while steering shaft lower joint
is removed.
Should it have been turned and contact coil (on combina-
tion switch) have got out of its centered position, it needs
to be centered again. Also, turning steering wheel more
than about two and a half turns will break contact coil.
Page 170 of 687
Downloaded from www.Manualslib.com manuals search engine STEERING WHEEL AND COLUMN 3C-17
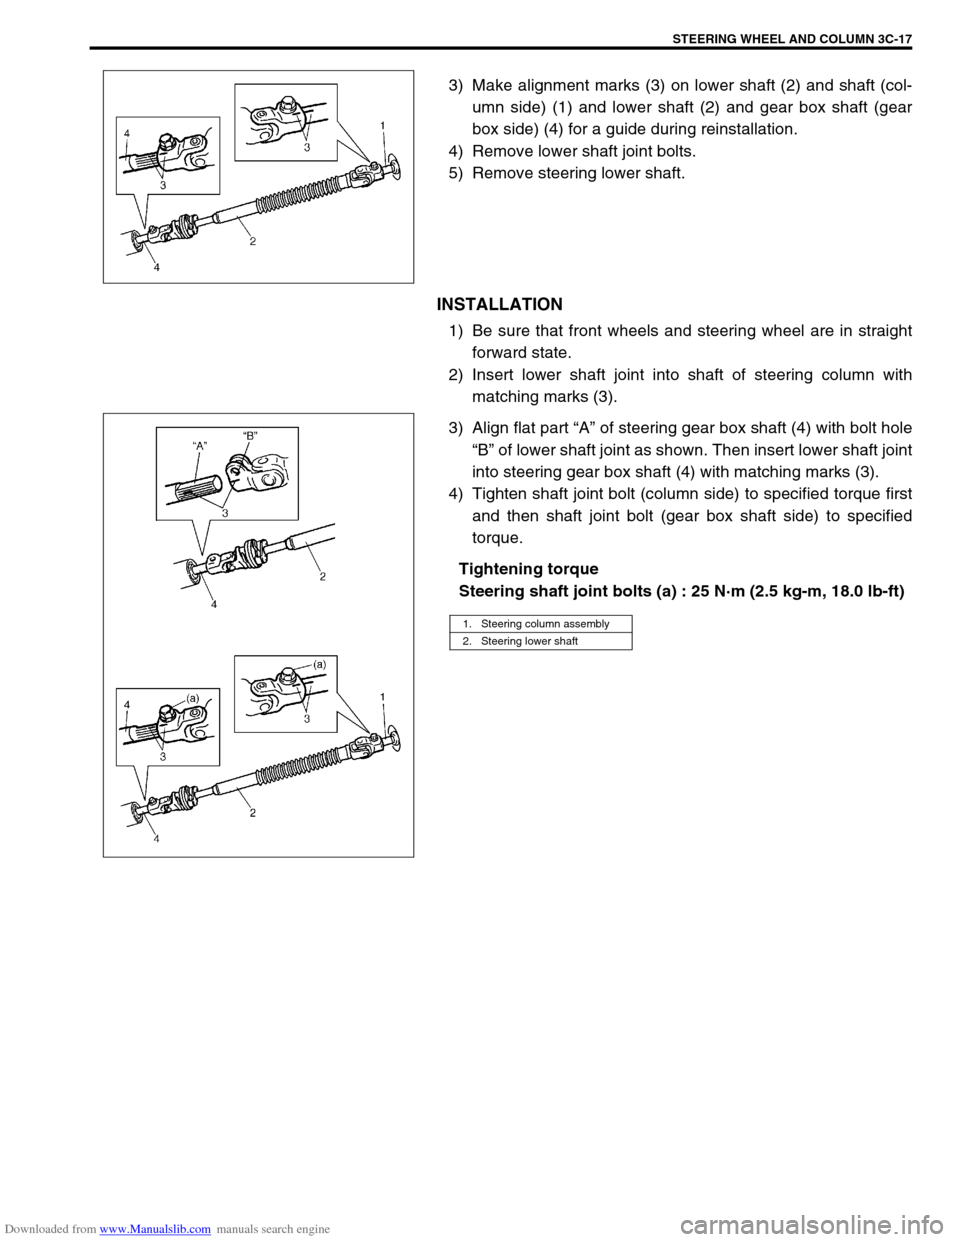
3) Make alignment marks (3) on lower shaft (2) and shaft (col-
umn side) (1) and lower shaft (2) and gear box shaft (gear
box side) (4) for a guide during reinstallation.
4) Remove lower shaft joint bolts.
5) Remove steering lower shaft.
INSTALLATION
1) Be sure that front wheels and steering wheel are in straight
forward state.
2) Insert lower shaft joint into shaft of steering column with
matching marks (3).
3) Align flat part “A” of steering gear box shaft (4) with bolt hole
“B” of lower shaft joint as shown. Then insert lower shaft joint
into steering gear box shaft (4) with matching marks (3).
4) Tighten shaft joint bolt (column side) to specified torque first
and then shaft joint bolt (gear box shaft side) to specified
torque.
Tightening torque
Steering shaft joint bolts (a) : 25 N·m (2.5 kg-m, 18.0 lb-ft)
1. Steering column assembly
2. Steering lower shaft
Page 172 of 687
Downloaded from www.Manualslib.com manuals search engine STEERING WHEEL AND COLUMN 3C-19
6) Check steering shaft joints and shaft for any damages such
as crack, breakage, malfunction or excessive play.
If anything is found faulty, replace as lower joint assembly or
column assembly.
7) Check steering shaft for smooth rotation.
If found defective, replace as column assembly.
8) Check steering shaft and column for bend, cracks or defor-
mation.
If found defective, replace.
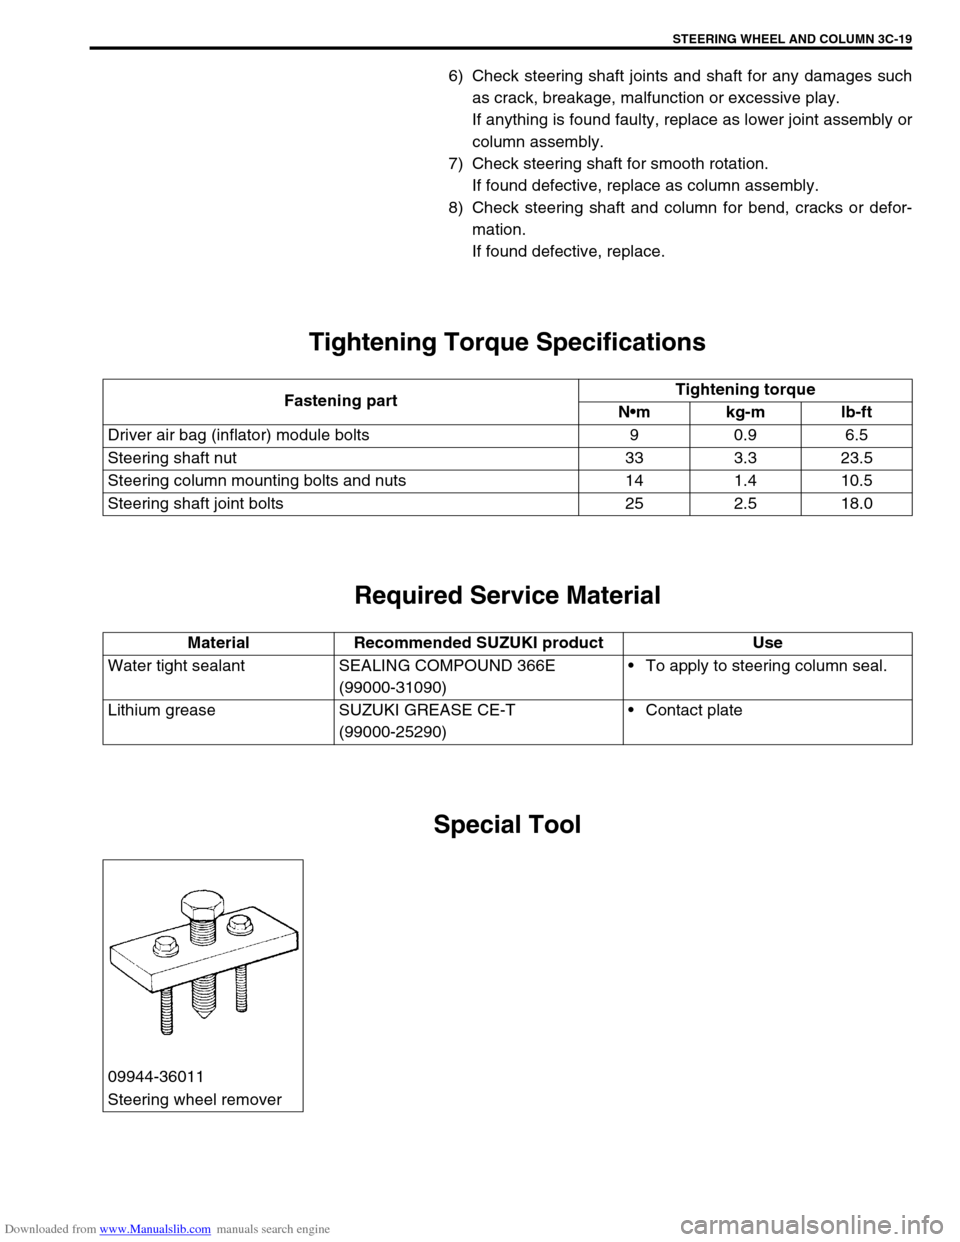
Tightening Torque Specifications
Required Service Material
Special Tool
Fastening partTightening torque
Nm kg-m lb-ft
Driver air bag (inflator) module bolts 9 0.9 6.5
Steering shaft nut 33 3.3 23.5
Steering column mounting bolts and nuts 14 1.4 10.5
Steering shaft joint bolts 25 2.5 18.0
Material Recommended SUZUKI product Use
Water tight sealant SEALING COMPOUND 366E
(99000-31090)To apply to steering column seal.
Lithium grease SUZUKI GREASE CE-T
(99000-25290)Contact plate
09944-36011
Steering wheel remover
Page 190 of 687

Downloaded from www.Manualslib.com manuals search engine FRONT SUSPENSION 3D-17
On-Vehicle Service
Stabilizer Bar / Bushings
REMOVAL
1) Hoist vehicle.
2) Remove front bumper.
3) Disconnect stabilizer ball joints (right & left) (1) from front
axle housing (2).
4) Remove stabilizer bar mount bush bracket bolts (1).
5) Remove stabilizer bar with its ball joint.
6) Disconnect stabilizer ball joints (right & left) from its bar.
INSTALLATION
1) Connect stabilizer ball joints (right & left) to its bar.
Page 191 of 687

Downloaded from www.Manualslib.com manuals search engine 3D-18 FRONT SUSPENSION
2) When installing stabilizer, loosely assemble all components
while insuring that stabilizer is centered, side-to-side.
3) Tighten stabilizer bracket bolts (2) and stabilizer ball joint
nuts to specified torque.
Tightening torque
Stabilizer mount bracket bolts
(a) : 20 N·m (2.0 kg-m, 14.5 lb-ft)
Stabilizer ball joint nuts
(b) : 50 N·m (5.0 kg-m, 36.5 lb-ft)
4) Install front bumper.
5) Lower hoist.NOTE:
For correct installation of stabilizer bar, side-to-side, be
sure that color paint (1) on stabilizer bar aligns with
mount bush, both right and left, as shown.
NOTE:
Tighten stabilizer mount bracket bolts (2) with vehicle
hoisted a little in non-load condition.
3. Stabilizer ball joint
4. Front axle housing
Page 192 of 687
Downloaded from www.Manualslib.com manuals search engine FRONT SUSPENSION 3D-19
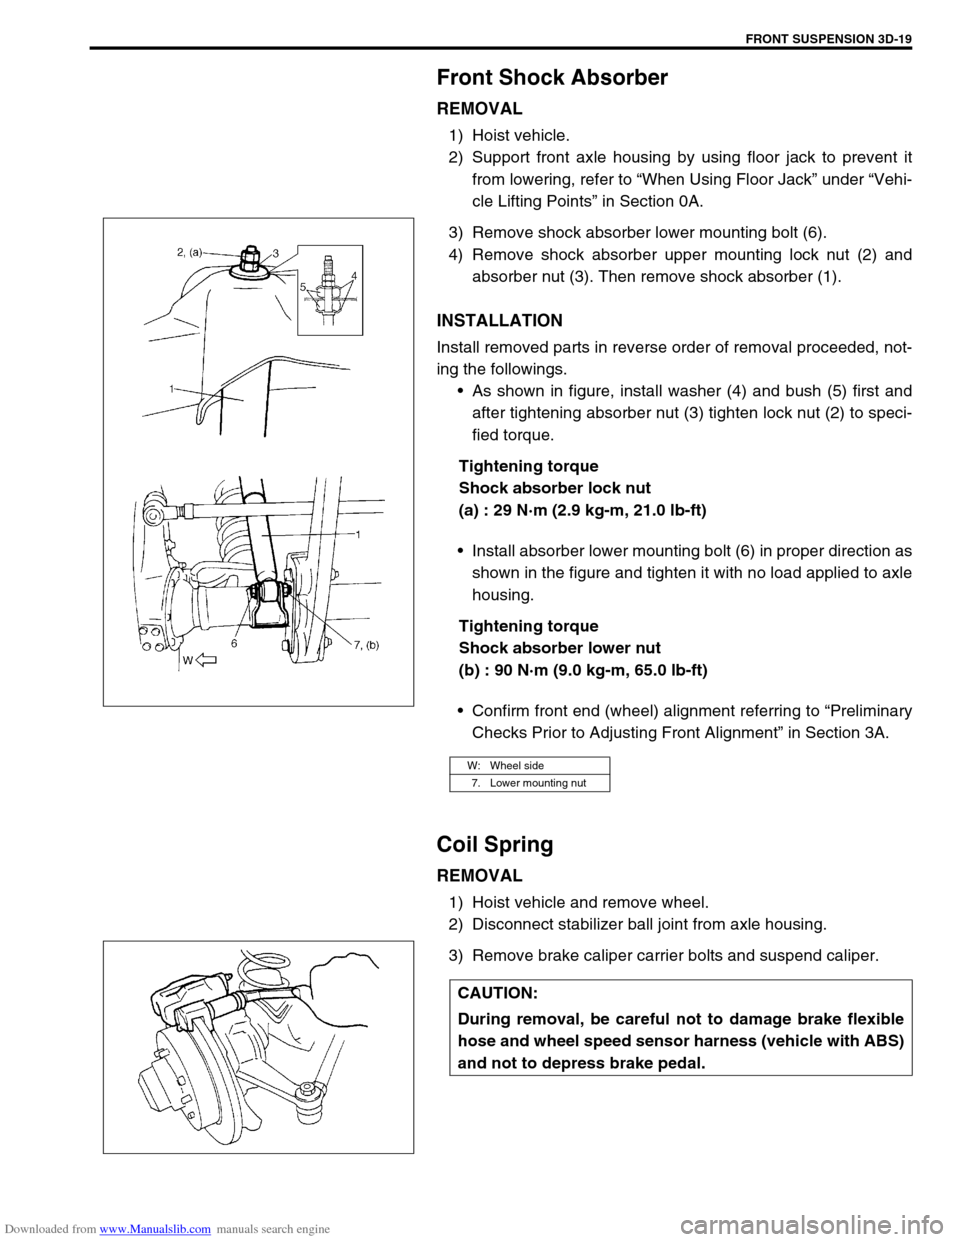
Front Shock Absorber
REMOVAL
1) Hoist vehicle.
2) Support front axle housing by using floor jack to prevent it
from lowering, refer to “When Using Floor Jack” under “Vehi-
cle Lifting Points” in Section 0A.
3) Remove shock absorber lower mounting bolt (6).
4) Remove shock absorber upper mounting lock nut (2) and
absorber nut (3). Then remove shock absorber (1).
INSTALLATION
Install removed parts in reverse order of removal proceeded, not-
ing the followings.
As shown in figure, install washer (4) and bush (5) first and
after tightening absorber nut (3) tighten lock nut (2) to speci-
fied torque.
Tightening torque
Shock absorber lock nut
(a) : 29 N·m (2.9 kg-m, 21.0 lb-ft)
Install absorber lower mounting bolt (6) in proper direction as
shown in the figure and tighten it with no load applied to axle
housing.
Tightening torque
Shock absorber lower nut
(b) : 90 N·m (9.0 kg-m, 65.0 lb-ft)
Confirm front end (wheel) alignment referring to “Preliminary
Checks Prior to Adjusting Front Alignment” in Section 3A.
Coil Spring
REMOVAL
1) Hoist vehicle and remove wheel.
2) Disconnect stabilizer ball joint from axle housing.
3) Remove brake caliper carrier bolts and suspend caliper.
W: Wheel side
7. Lower mounting nut
CAUTION:
During removal, be careful not to damage brake flexible
hose and wheel speed sensor harness (vehicle with ABS)
and not to depress brake pedal.
Page 193 of 687

Downloaded from www.Manualslib.com manuals search engine 3D-20 FRONT SUSPENSION
4) Support front axle housing by using floor jack.
5) Remove shock absorber lower mounting bolt (1).
6) Lower front axle housing (2) gradually as far down as where
coil spring (1) can be removed.
7) Remove coil spring (1).
INSTALLATION
Install removed parts in reverse order of removal procedures, not-
ing the followings.
1) Install coil spring (3).
2) Install absorber lower mounting bolt, refer to “Front Shock
Absorber” in this section.
3) Install caliper assembly and tighten caliper bolts to specified
torque.
Tightening torque
Brake caliper carrier bolts
(a) : 85 N·m (8.5 kg-m, 61.5 lb-ft)
4) Connect stabilizer ball joint to axle housing and tighten nut
referring to “Stabilizer Bar” in this section for tightening
torque specification. NOTE:
When supporting axle housing, it should be in non-load
condition.
NOTE:
Make sure that coil spring direction as shown.
When seating coil spring, mate spring end with
stepped part (4) of lower spring seat (2).
1. Front axle housing
U : Upper side
A : Small
B : Large
Page 194 of 687
Downloaded from www.Manualslib.com manuals search engine FRONT SUSPENSION 3D-21
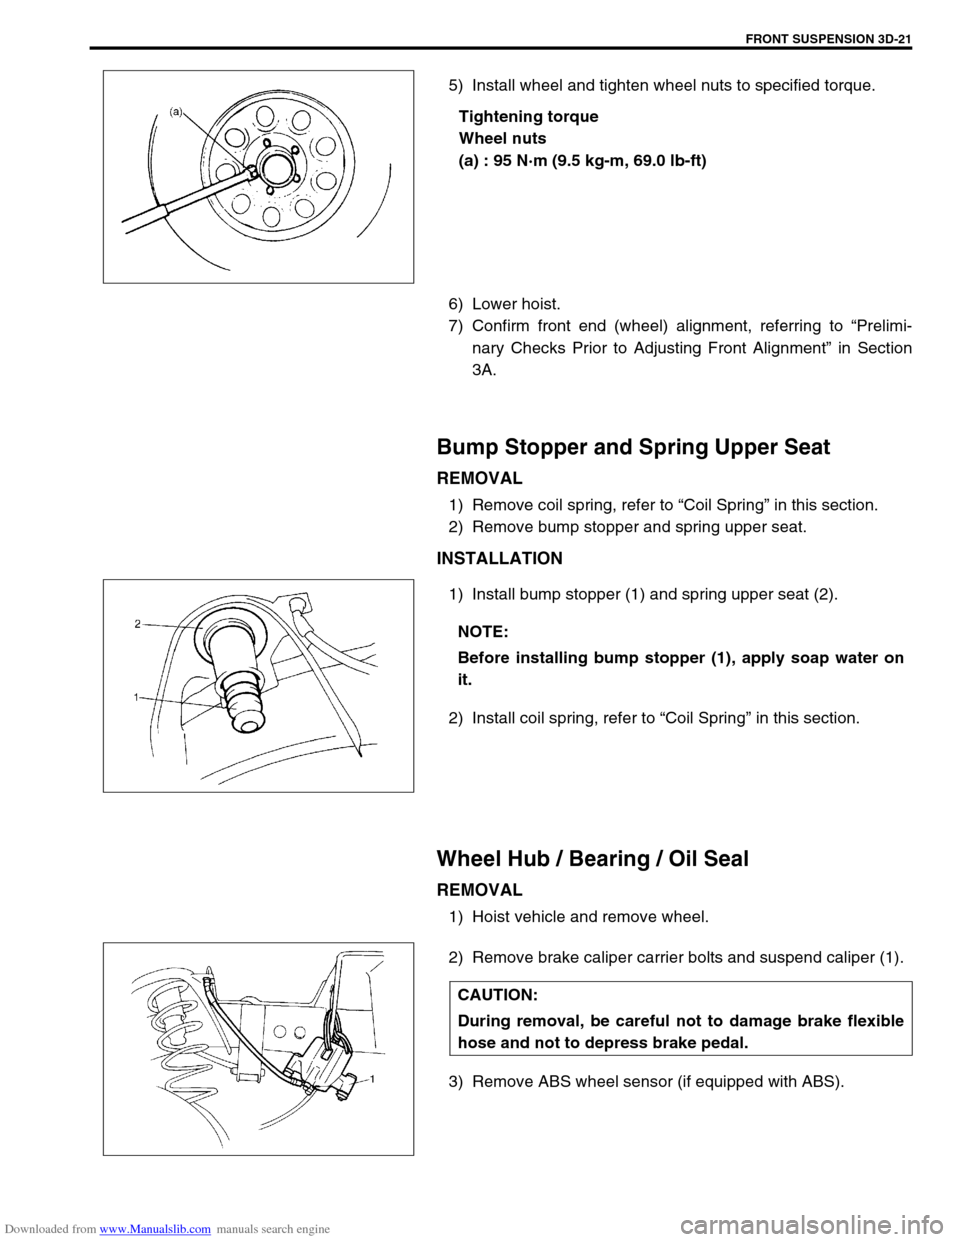
5) Install wheel and tighten wheel nuts to specified torque.
Tightening torque
Wheel nuts
(a) : 95 N·m (9.5 kg-m, 69.0 lb-ft)
6) Lower hoist.
7) Confirm front end (wheel) alignment, referring to “Prelimi-
nary Checks Prior to Adjusting Front Alignment” in Section
3A.
Bump Stopper and Spring Upper Seat
REMOVAL
1) Remove coil spring, refer to “Coil Spring” in this section.
2) Remove bump stopper and spring upper seat.
INSTALLATION
1) Install bump stopper (1) and spring upper seat (2).
2) Install coil spring, refer to “Coil Spring” in this section.
Wheel Hub / Bearing / Oil Seal
REMOVAL
1) Hoist vehicle and remove wheel.
2) Remove brake caliper carrier bolts and suspend caliper (1).
3) Remove ABS wheel sensor (if equipped with ABS).
NOTE:
Before installing bump stopper (1), apply soap water on
it.
CAUTION:
During removal, be careful not to damage brake flexible
hose and not to depress brake pedal.