ECU SUZUKI JIMNY 2018 Owners Manual
[x] Cancel search | Manufacturer: SUZUKI, Model Year: 2018, Model line: JIMNY, Model: SUZUKI JIMNY 2018Pages: 421, PDF Size: 6.35 MB
Page 8 of 421
Conditions under which SUZUKI and the Parties can disclose or provide any of the Recorded Data to a third party SUZUKI and the Parties may disclose or provide any of the Recorded Data to a third party under any of the following conditions: • A consent from the Vehicle owner/user(s), or from lessee of the Vehicle (in case of lease) is obtained. It is officially requested by police, prosecutor, court, or other authorities. · It is provided to a research institute for statistical study after processing in such a manner that owner/user(s) of the Vehicle cannot be
identified. It is used by SUZUKI or the Parties or their directors, officers or employees for the purposes described in the Data Usage. It is used by SUZUKI or the Parties in a lawsuit. Any other cases allowed by applicable laws and regulations. If required, you may receive further information from each of the Parties other than the Suppliers.
NOTE: The data cannot be used to detect the Vehicle's movements. The data stored in data storage modules or memories differ according to the Vehicle's grade or model. • No conversation nor noise/sound will be recorded in any event. • The data may not be recorded in some situations.
If these technical data are combined with other information (e.g. accident or witness report, damage on the Vehicle, etc.), there may be cases that such data may identify a specific person.
e-Call / ERA-GLONASS Functions added based on agreement with the customer may transmit certain vehicle data (e.g. vehicle location in emergency cases) from the Vehicle to police or emergency service official for the purpose of rescue or response to traffic accident.
Page 24 of 421
FOR SAFE DRIVING
78RB02008
1-3
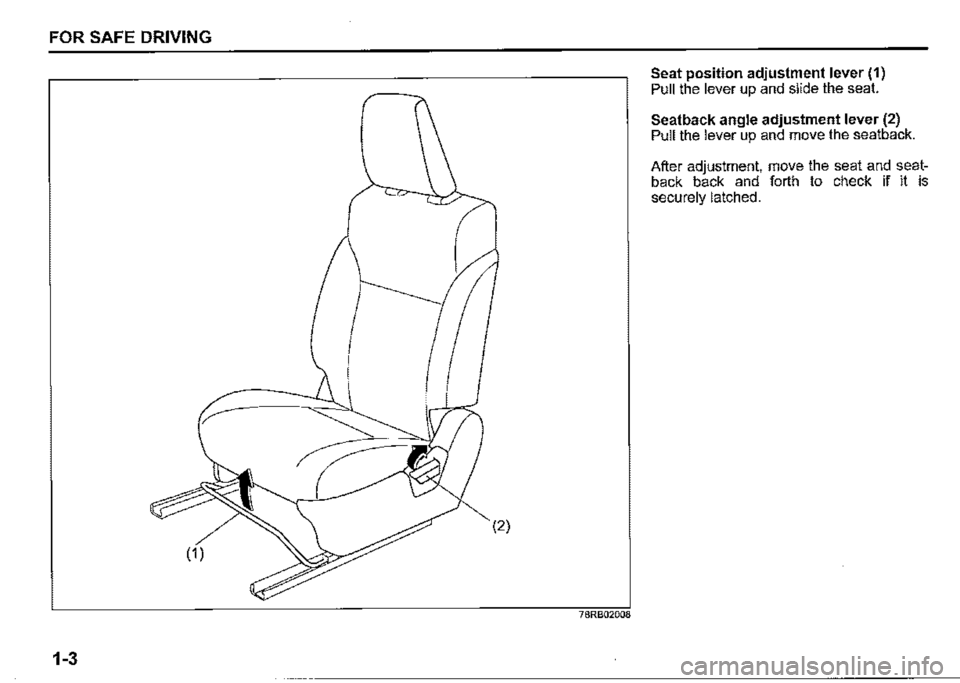
Seat position adjustment lever (1) Pull the lever up and slide the seat.
Seatback angle adjustment lever (2) Pull the lever up and move the seatback.
After adjustment, move the seat and seatback back and forth to check if it is securely latched.
Page 28 of 421
FOR SAFE DRIVING
A. WARNING
If you need to carry cargo in the passenger compartment with the rear seatback folded forward, secure the cargo or it may be thrown about, causing injury. Never pile cargo higher than the seatbacks.
To return the seat to the normal position,
follow the procedure below.
NOTICE
When returning the rear seatback to the normal position, check that there is nothing around the striker. Any foreign materials prevent the seatback from being locked securely.
1-7
78RB02013
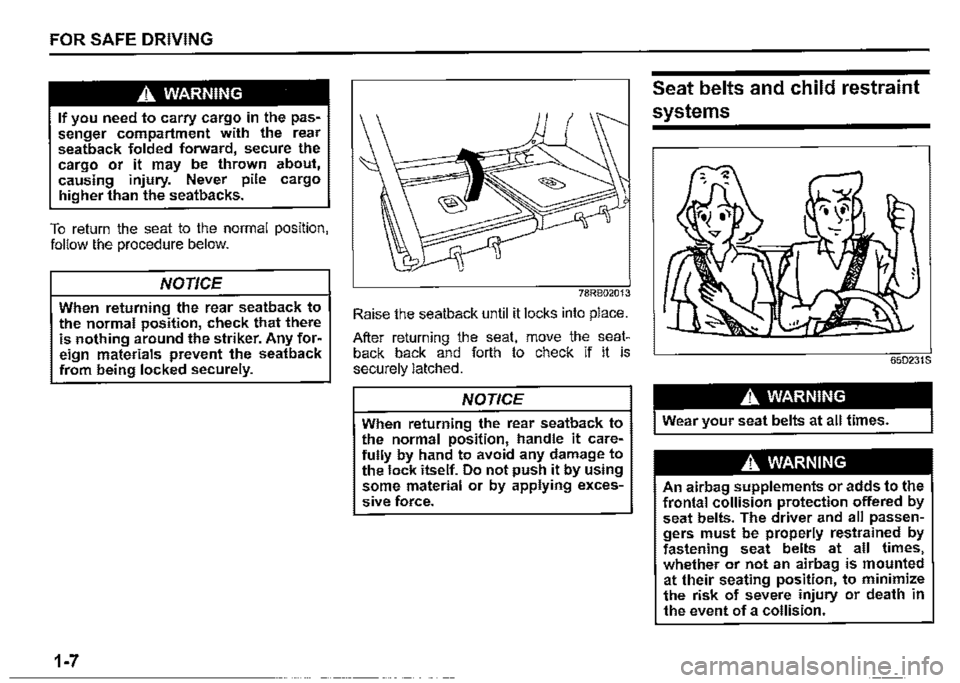
Raise the seatback until it locks into place.
After returning the seat, move the seatback back and forth to check if it is securely latched.
NOTICE
When returning the rear seatback to the normal position, handle it carefully by hand to avoid any damage to the lock itself. Do not push it by using some material or by applying exces
sive force.
Seat belts and child restraint
systems
650231S
A. WARNING
An airbag supplements or adds to the frontal collision protection offered by seat belts. The driver and all passengers must be properly restrained by fastening seat belts at all times, whether or not an airbag is mounted at their seating position, to minimize the risk of severe injury or death in the event of a collision.
Page 29 of 421
A WARNING
Do not modify, remove, disassemble seat belts. Doing so may prevent them from functioning properly and cause the risk of severe injury or death in the event of a collision.
A WARNING
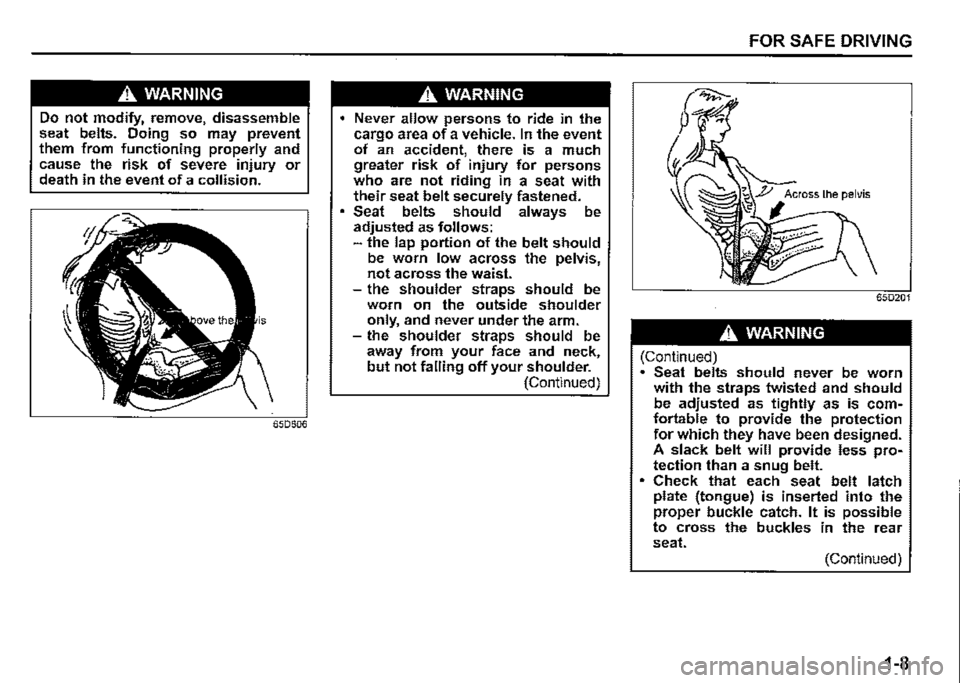
Never allow persons to ride in the cargo area of a vehicle. In the event of an accident, there is a much greater risk of injury for persons who are not riding in a seat with their seat belt securely fastened. Seat belts should always be adjusted as follows: -the lap portion of the belt should be worn low across the pelvis, not across the waist. -the shoulder straps should be worn on the outside shoulder only, and never under the arm. -the shoulder straps should be away from your face and neck, but not falling off your shoulder. (Continued)
FOR SAFE DRIVING
65D201
A WARNING
(Continued) • Seat belts should never be worn with the straps twisted and should be adjusted as tightly as is comfortable to provide the protection for which they have been designed. A slack belt will provide less protection than a snug belt. Check that each seat belt latch plate (tongue) is inserted into the proper buckle catch. It is possible to cross the buckles in the rear seat. (Continued)
1-8
Page 32 of 421
FOR SAFE DRIVING
60A039
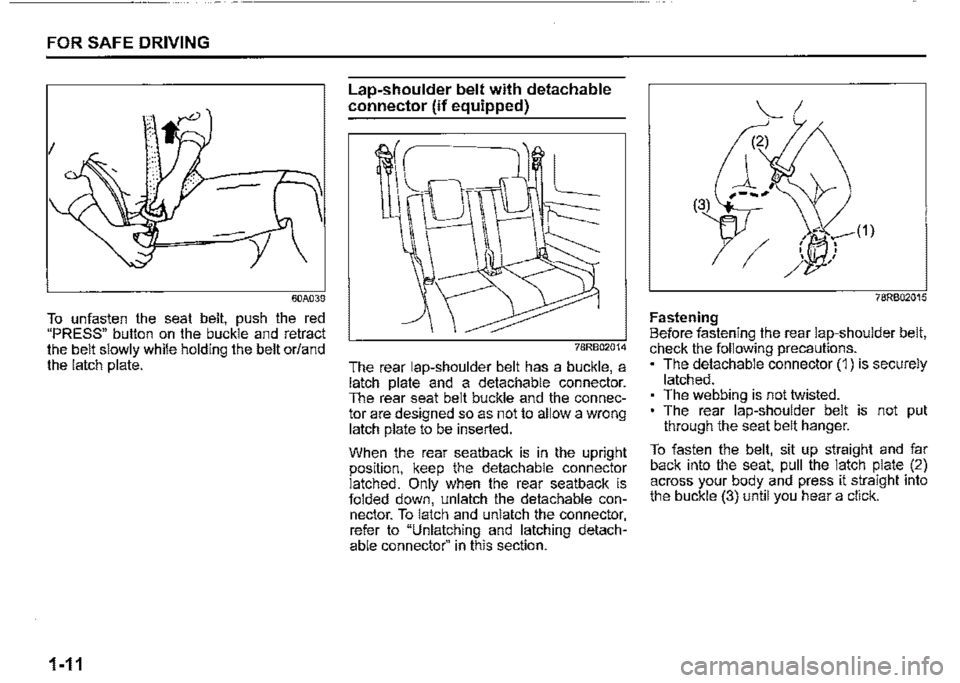
To unfasten the seat belt, push the red "PRESS" button on the buckle and retract the belt slowly while holding the belt or/and the latch plate.
1-11
Lap-shoulder belt with detachable
connector (if equipped)
The rear lap-shoulder belt has a buckle, a latch plate and a detachable connector. The rear seat belt buckle and the connector are designed so as not to allow a wrong latch plate to be inserted.
When the rear seatback is in the upright position, keep the detachable connector latched. Only when the rear seatback is folded down, unlatch the detachable connector. To latch and unlatch the connector, refer to "Unlatching and latching detachable connector" in this section.
78RB02015
Fastening Before fastening the rear lap-shoulder belt, check the following precautions. The detachable connector (1) is securely
latched. The webbing is not twisted. The rear lap-shoulder belt is not put through the seat belt hanger.
To fasten the belt, sit up straight and far back into the seat, pull the latch plate (2) across your body and press it straight into the buckle (3) until you hear a click.
Page 34 of 421
FOR SAFE DRIVING
A WARNING
To minimize risk of severe injury or death in the event of a collision, always fasten seat belt with both latches buckled.
1-13
Unlatching and latching detachable connector
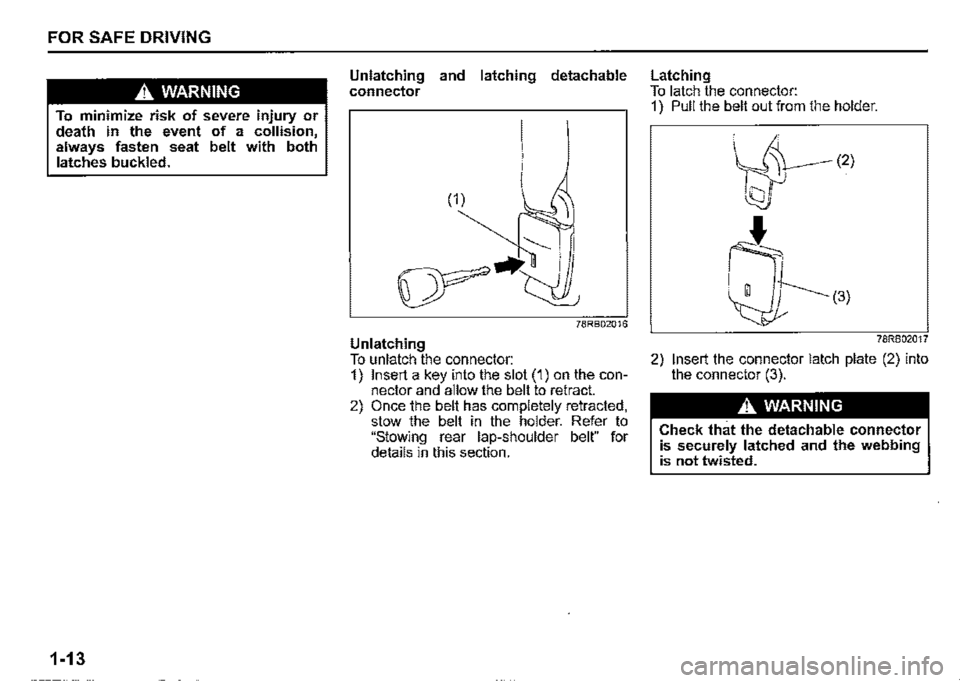
Unlatching To unlatch the connector: 1) Insert a key into the slot (1) on the connector and allow the belt to retract. 2) Once the belt has completely retracted. stow the belt in the holder. Refer to "Stowing rear lap-shoulder belt"" for
details in this section.
Latching To latch the connector: 1) Pull the belt out from the holder.
78RB02017
2) Insert the connector latch plate (2) into the connector (3).
A WARNING
Check that the detachable connector is securely latched and the webbing is not twisted.
Page 39 of 421

Child restraint systems
60G332S
The following types of child restraint system are available generally.
Infant restraint
Child restraint
Booster seat
80JC008
SUZUKI highly recommends that you use a child restraint system to restrain infants and small children. Many different types of child restraint systems are available; check
FOR SAFE DRIVING
that the restraint system you select meets applicable safety standards.
All child restraint systems are designed to be secured in vehicle seats either by seat belts (lap belts or the lap portion of lapshoulder belts) or by special rigid lower anchor bars built onto the floor. Whenever possible, SUZUKI recommends that child restraint systems be installed on the rear seat. According to accident statistics, children are safer when properly restrained in rear seating positions than in front seating positions.
(For countries applied for UN Regulation No.16) When purchasing a child restraint and install it to your SUZUKI vehicle, refer to the information about suitability for child restraints shown in "Child restraint system for countries applied for UN Regulation No.16" in this section.
NOTE: Observe any statutory regulation about child restraints.
1-18
Page 40 of 421

FOR SAFE DRIVING
58MS030
A WARNING
(Vehicle without the front passenger airbag deactivation system) Do not install a rear-facing child restraint in the front passenger's seat. If the passenger's front airbag inflates, a child in a rear-facing child restraint could be killed or severely injured. The back of a rear-facing child restraint would be too close to the inflating airbag.
1-19
A WARNING
(Vehicle with the front passenger airbag deactivation system) When using a child restraint system on the front passenger's seat, the front passenger's airbag system must be deactivated; otherwise deployment of the front passenger's airbag could result in the death or serious injury of the child.
A WARNING
If you install a child restraint system in the rear seat, slide the front seat far enough forward so that the child's feet do not touch the front seatback. This will help avoid injury to the child in the event of an accident.
65D609
A WARNING
Children could be endangered in a collision if their child restraint systems are not properly secured in the vehicle. When installing a child restraint system, follow the instructions below. Secure the child in the restraint system according to the manufacturer's instructions.
Page 50 of 421
FOR SAFE DRIVING
ELR type belt
80JC021
1-29
(For models with front passenger airbag deactivation system) Whenever possible, SUZUKI recommends that child restraint systems be installed on . th_e rear seat. According to· accident stat1st1cs, children are safer when ~roperly restrained in rear seating positions than in front seating positions. • If you must install the child restraint system on the front passenger's seat follow instructions below. ' -D_eactivate the front passenger's front airbag by the front passenger airbag d~activation system (if equipped). -Slide the seat to the most rear position by the seat position adjustment lever. -If there is a gap or space between the child restraint and the seatback, adjust the seatback angle in order to install the child restraint system properly.
Install your child restraint system according to the instructions provided by the child restraint system manufacturer.
Check that the seat belt is securely latched. Move the child restraint system in all directions to check that it is securely installed. When you put your child in the child restraint system, appropriately slide the front seat forward not to touch a part of your child's body.
Installation with ISOFIX type
anchorages
78RB02020
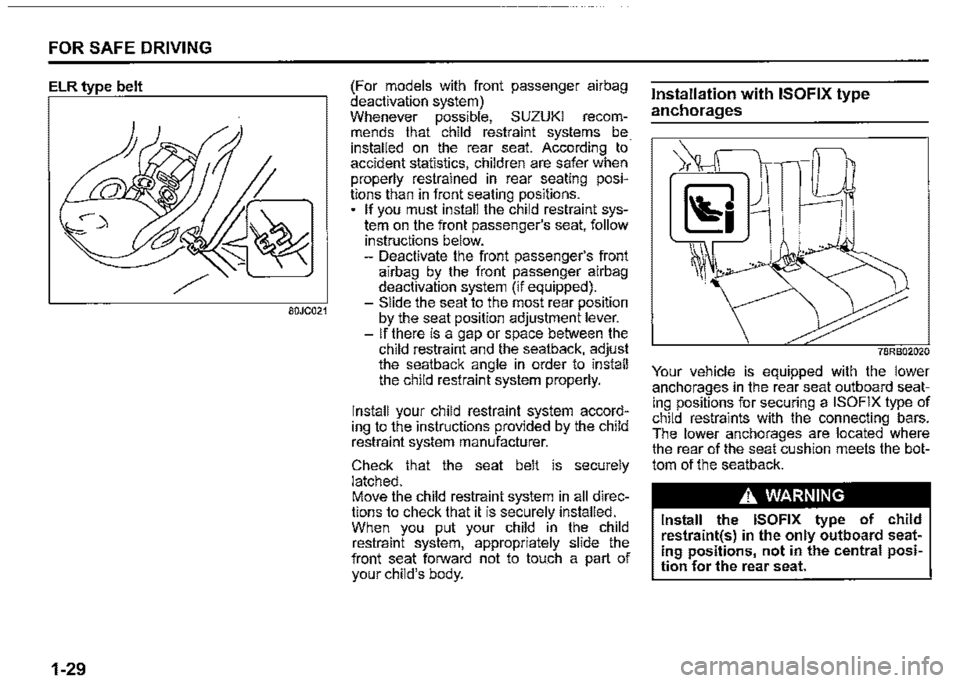
Your vehicle is equipped with the lower anchorages in the rear seat outboard seating positions for securing a ISOFIX type of child restraints with the connecting bars. The lower anchorages are located where the rear of the seat cushion meets the bottom of the seatback.
A WARNING
Install the ISOFIX type of child restraint(s) in the only outboard seating positions, not in the central position for the rear seat.
Page 51 of 421
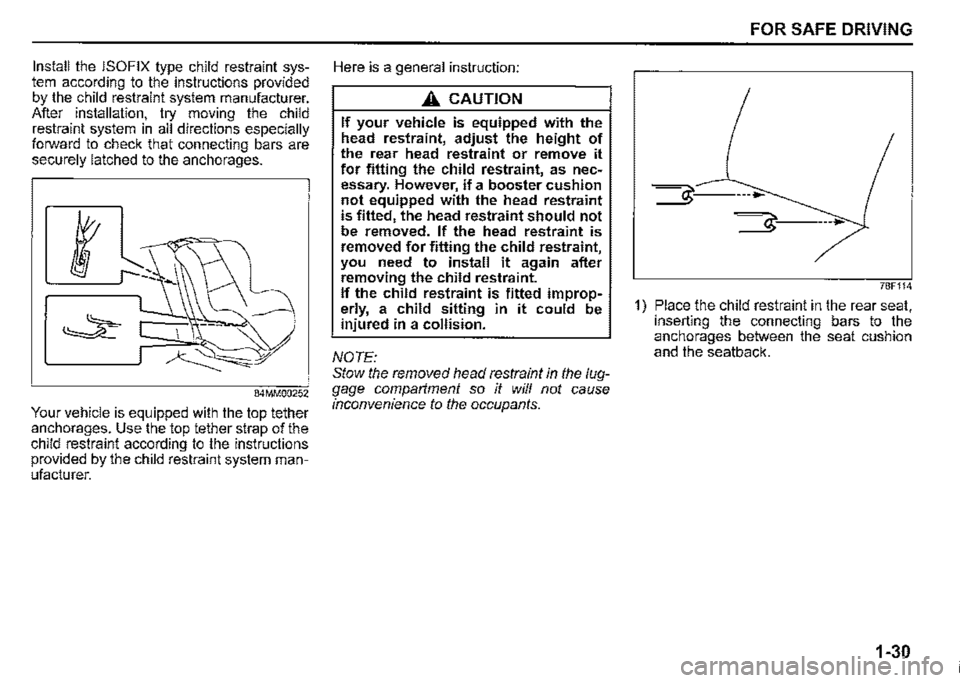
Install the ISOFIX type child restraint system according to the instructions provided by the child restraint system manufacturer. After installation, try moving the child restraint system in all directions especially forward to check that connecting bars are securely latched to the anchorages.
84MM00252
Your vehicle is equipped with the top tether anchorages. Use the top tether strap of the child restraint according to the instructions provided by the child restraint system manufacturer.
Here is a general instruction:
A CAUTION
If your vehicle is equipped with the head restraint, adjust the height of the rear head restraint or remove it for fitting the child restraint, as necessary. However, if a booster cushion not equipped with the head restraint is fitted, the head restraint should not be removed. If the head restraint is removed for fitting the child restraint, you need to install it again after removing the child restraint. If the child restraint is fitted improperly, a child sitting in it could be injured in a collision.
NOTE: Stow the removed head restraint in the luggage comparlment so it will not cause inconvenience to the occupants.
FOR SAFE DRIVING
it'---►
78F114
1) Place the child restraint in the rear seat, inserting the connecting bars to the anchorages between the seat cushion and the seatback.
1-30