clock SUZUKI JIMNY 2019 User Guide
[x] Cancel search | Manufacturer: SUZUKI, Model Year: 2019, Model line: JIMNY, Model: SUZUKI JIMNY 2019Pages: 421, PDF Size: 6.35 MB
Page 154 of 421
OPERATING YOUR VEHICLE
68PH00310
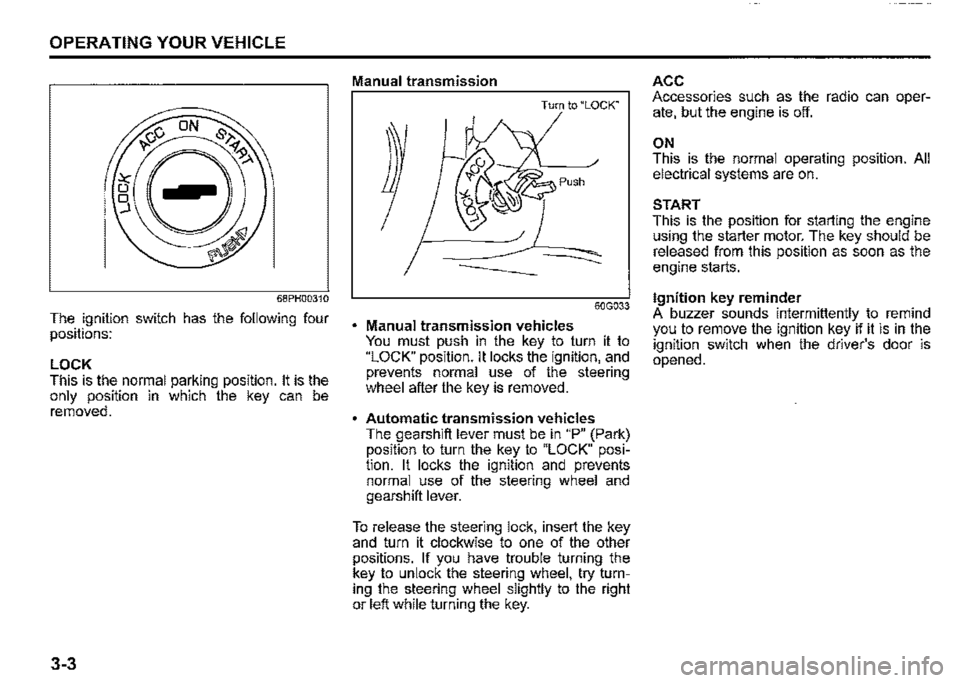
The ignition switch has the following four positions:
LOCK This is the normal parking position. It is the only position in which the key can be removed.
3-3
Manual transmission
Turn to "LOCK"
60G033
Manual transmission vehicles You must push in the key to turn it to "LOCK" position. It locks the ignition, and prevents normal use of the steering wheel after the key is removed.
Automatic transmission vehicles The gearshift lever must be in "P" (Park) position to turn the key to "LOCK" position. It locks the ignition and prevents normal use of the steering wheel and gearshift lever.
To release the steering lock, insert the key and turn it clockwise to one of the other positions. If you have trouble turning the key to unlock the steering wheel, try turning the steering wheel slightly to the right or left while turning the key.
ACC Accessories such as the radio can operate, but the engine is off.
ON This is the normal operating position. All electrical systems are on.
START This is the position for starting the engine using the starter motor. The key should be released from this position as soon as the engine starts.
Ignition key reminder A buzzer sounds intermittently to remind you to remove the ignition key if it is in the ignition switch when the driver's door is opened.
Page 236 of 421
OTHER CONTROLS AND EQUIPMENT
Fuel filler cap
78RB05001
5-1
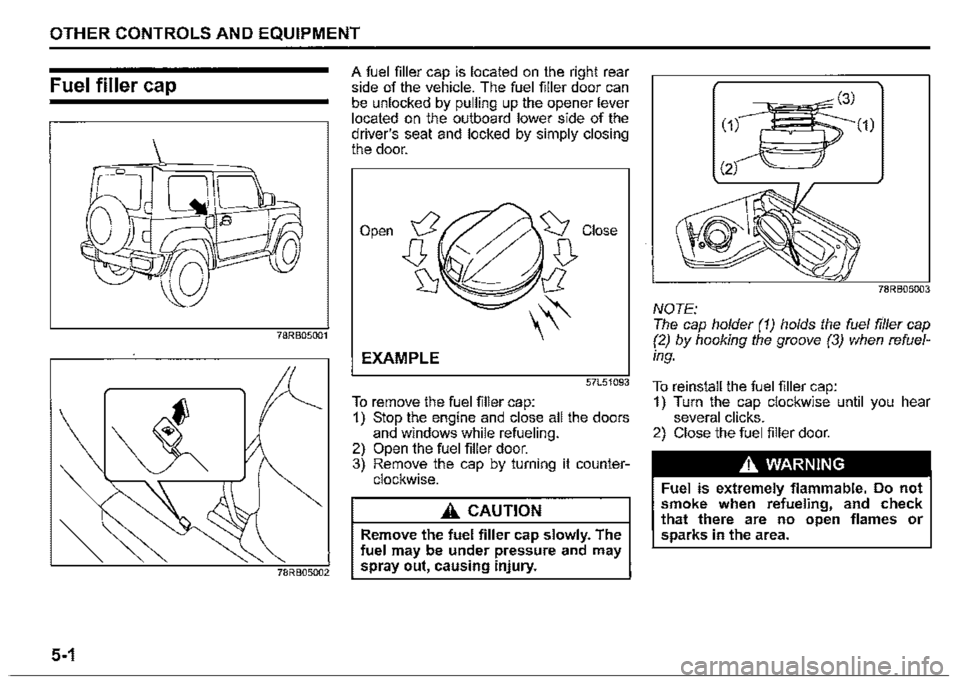
A fuel filler cap is located on the right rear side of the vehicle. The fuel filler door can be unlocked by pulling up the opener lever located on the outboard lower side of the driver's seat and locked by simply closing the door.
Open
EXAMPLE
57L51093
To remove the fuel filler cap: 1) Stop the engine and close all the doors and windows while refueling. 2) Open the fuel filler door. 3) Remove the cap by turning it counterclockwise.
A CAUTION
Remove the fuel filler cap slowly. The fuel may be under pressure and may spray out, causing injury.
78RB05003
NOTE: The cap holder (1) holds the fuel filler cap (2) by hooking the groove (3) when refuel
ing.
To reinstall the fuel filler cap: 1) Turn the cap clockwise until you hear several clicks. 2) Close the fuel filler door.
A WARNING
Fuel is extremely flammable. Do not smoke when refueling, and check that there are no open flames or sparks in the area.
Page 265 of 421

Radio antenna
Type A
63J055
Type B
61MMOA113
OTHER CONTROLS AND EQUIPMENT
The radio antenna on the roof is removable. To remove the antenna, turn it counterclockwise. To reinstall the antenna, turn it clockwise firmly by hand.
NOTICE
To avoid damage to the radio antenna: Remove the antenna when using an automatic car wash. • Remove the antenna when the antenna hits anything such as a low ceiling in a parking garage or putting a car cover over your vehicle.
Installation of radio frequency
transmitters
NOTE: When you intend to use Radio Frequency (RF) transmitting equipment in your vehicle, refer to "Installation of Radio Frequency (RF) Transmitting Equipment" in the end of this book.
NOTICE
Improper installation of mobile communication equipment such as cellular telephones, CB (Citizen's Band) radios or any other wireless transmitters may cause electronic interference with your vehicle's ignition system or any other electrical systems resulting in vehicle performance problems. Consult a SUZUKI dealer or qualified service technician for advice.
5-30
Page 274 of 421
OTHER CONTROLS AND EQUIPMENT
Basic operations
Type B ,,.,.,-------,..,
(1)
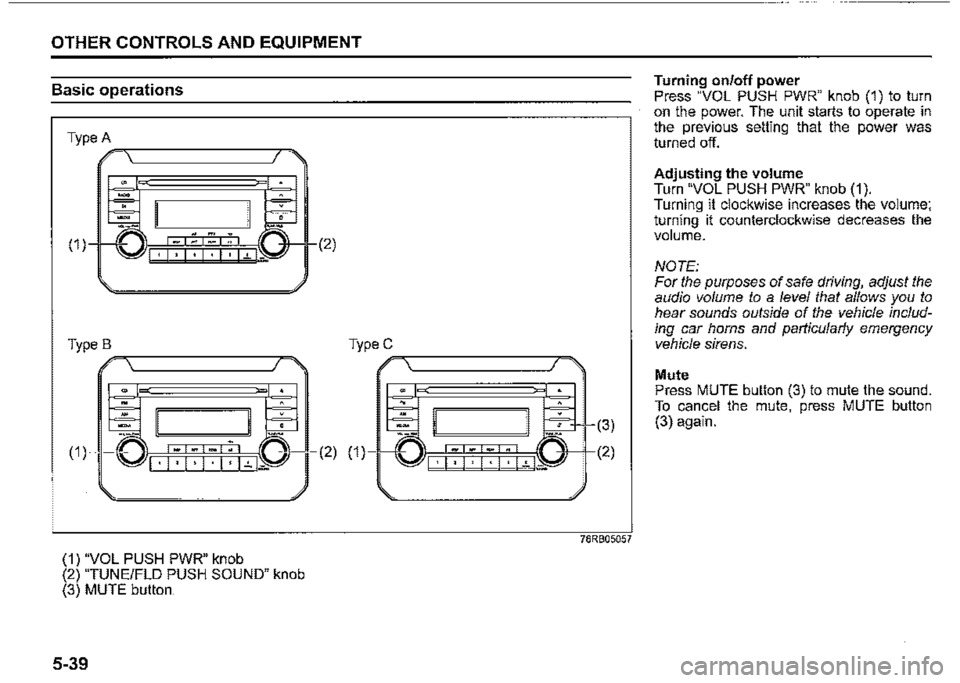
(1) "VOL PUSH PWR" knob (2) "TUNE/FLO PUSH SOUND" knob (3) MUTE button
5-39
(2)
TypeC ,,,=<.,--------------,,-,,,_
(2) (1)
78RB05057
Turning on/off power Press "VOL PUSH PWR" knob (1) to turn on the power. The unit starts to operate in the previous setting that the power was turned off.
Adjusting the volume Turn "VOL PUSH PWR" knob (1). Turning it clockwise increases the volume; turning it counterclockwise decreases the volume.
NOTE: For the purposes of safe driving, adjust the audio volume to a level that allows you to hear sounds outside of the vehicle including car horns and particularly emergency vehicle sirens.
Mute Press MUTE button (3) to mute the sound. To cancel the mute, press MUTE button (3) again.
Page 298 of 421
OTHER CONTROLS AND EQUIPMENT
Phone registration
To use the hands-free function with this unit, it is required to register the phone in advance.
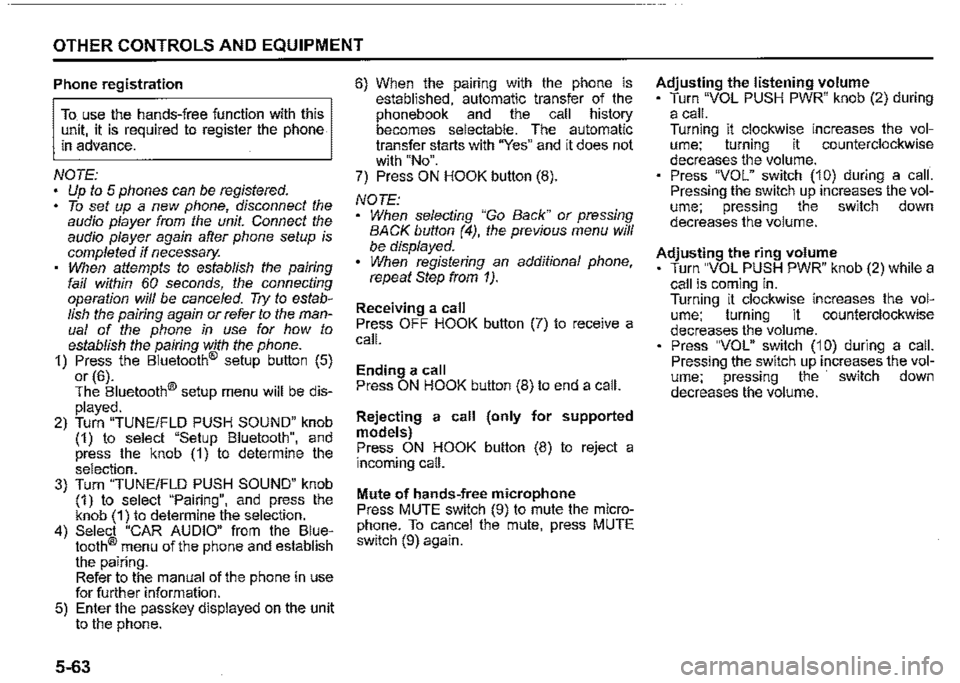
NOTE: Up to 5 phones can be registered. To set up a new phone, disconnect the audio player from the unit. Connect the audio player again after phone setup is completed if necessary. When attempts to establish the pairing fail within 60 seconds, the connecting operation will be cance/ed. Try to establish the pairing again or refer to the manual of the phone in use for how to establish the pairing with the phone. 1) Press the Bluetooth® setup button (5)
or (6). The Bluetooth® setup menu will be dis
played. 2) Turn "TUNE/FLO PUSH SOUND" knob (1) to select "Setup Bluetooth", and press the knob (1) to determine the selection. 3) Turn "TUNE/FLO PUSH SOUND" knob (1) to select "Pairing", and press the knob (1) to determine the selection. 4) Select "CAR AUDIO" from the Bluetooth® menu of the phone and establish the pairing. Refer to the manual of the phone in use for further information. 5) Enter the passkey displayed on the unit to the phone.
5-63
6) When the pamng with the phone is established, automatic transfer of the phonebook and the call history becomes selectable. The automatic transfer starts with "Yes" and it does not with "No". 7) Press ON HOOK button (8).
NOTE: When selecting "Go Back" or pressing BACK button (4), the previous menu will be displayed. When registering an additional phone, repeat Step from 1).
Receiving a call Press OFF HOOK button (7) to receive a call.
Ending a call Press ON HOOK button (8) to end a call.
Rejecting a call (only for supported models) Press ON HOOK button (8) to reject a incoming call.
Mute of hands-free microphone Press MUTE switch (9) to mute the microphone. To cancel the mute, press MUTE switch (9) again.
Adjusting the listening volume Turn "VOL PUSH PWR" knob (2) during a call. Turning it clockwise increases the volume; turning it counterclockwise decreases the volume. Press "VOL" switch (10) during a call. Pressing the switch up increases the volume; pressing the switch down decreases the volume.
Adjusting the ring volume Turn "VOL PUSH PWR" knob (2) while a call is coming in. Turning it clockwise increases the volume; turning it counterclockwise decreases the volume. Press "VOL" switch (10) during a call. Pressing the switch up increases the volume; pressing the switch down decreases the volume.
Page 344 of 421

INSPECTION AND MAINTENANCE
Oil filler replacement
1) Using an oil filter wrench, turn the oil filter counterclockwise and remove ii. 2) Using a clean rag, wipe off the mounting surface on the engine where the new filter will be seated. 3) Smear a small amount of engine oil around the rubber gasket of the new oil filter. 4) Screw the new filter by hand until the filter gasket contacts the mounting surface.
(1) Loosen (2) Tighten
6-27
54G092
Tightening (viewed from filter top)
(1)
(1) Oil filter (2) 3/4 turn
NOTICE
(2)
54G093
To tighten the oil filter properly, it is important to accurately identify the position at which the filter gasket first contacts the mounting surface.
5) Tighten the filter as specified below from the point of contact with the mounting surface (or to the specified torque) using an oil filter wrench.
Tightening torque for oil filter: 3/4 turn or 14 Nm (1.4 kg-m, 10.3 lb-ft)
NOTICE
To prevent oil leakage, check that the oil filter is tight, but do not overtighten it.
Page 366 of 421

INSPECTION AND MAINTENANCE
0
68PH00732
1) Open the engine hood while the engine is stopped. To remove the bulb holder of the front turn signal light or the front position light (for vehicle with halogen headlights) from the light_ housing, turn the holder counterclockw1se and pull 1t out.
6-49
.(2)
Q(3)
78RB07051
(2) Removal (3) Installation
2) To remove and install the bulb of the front position light (1 ), simply pull out or push in the bulb.
Side turn signal light
78RB07031
Since the bulb is built-in type, replace ii as the light assembly. Remove the light assembly by sliding the light housing leftward with your finger.
Page 367 of 421

Front fog light (if equipped)
1) Start the engine. Turn the steering
wheel to the opposite side of the b~6 light to be replaced to repla_ce the easily. Then turn off the engine.
2) Remove the clips (1) and screw (2) at
the bottom of bumper. d For removing the clip, use a _flat-blade screwdriver as shown in the ,11ustrat1on.
78RB07033
3) Open the end of the cover inside the fender.
52R70140
4) Disconnect the coupler (3) ~Y1t~~~~:~ the lock release. Turn the u . (4) counterclockwise and remove ,t.
INSPECTION AND MAINTENANCE
Daytime running light (if equipped)
Models without front fog light
78RB07034
6-50
Page 368 of 421
INSPECTION AND MAINTENANCE
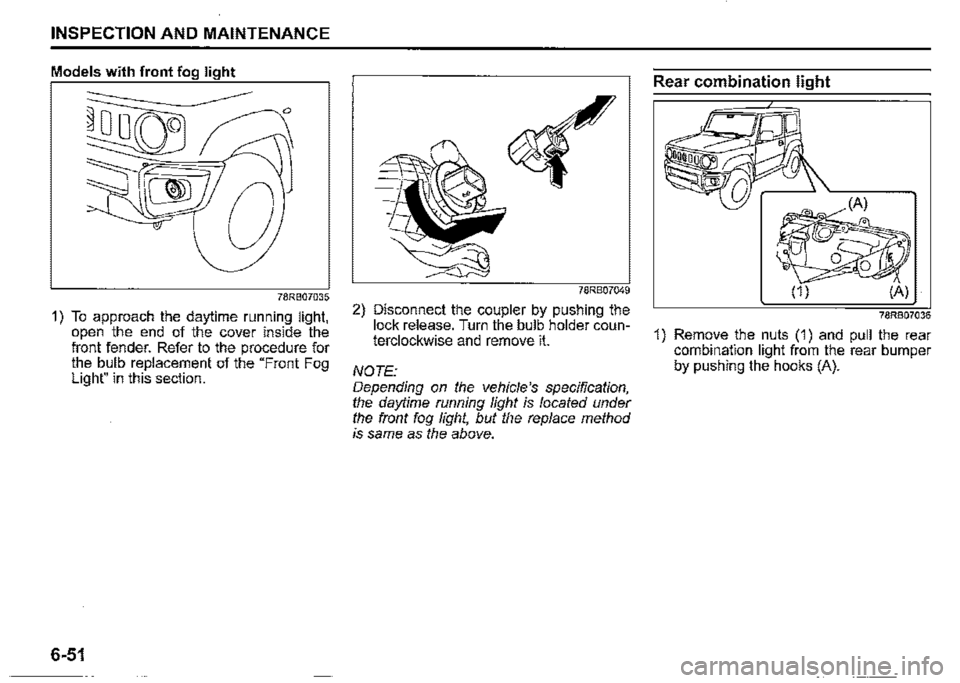
Models with front fog light
78RB07035
1) To approach the daytime running light, open the end of the cover inside the front fender. Refer to the procedure for the bulb replacement of the "Front Fog Light" in this section.
6-51
78RB07049
2) Disconnect the coupler by pushing the lock release. Turn the bulb holder counterclockwise and remove ii.
NOTE: Depending on the vehicle's specification, the daytime running light is located under the front fog light, but the replace method is same as the above.
Rear combination light
78RB07036
1) Remove the nuts (1) and pull the rear combination light from the rear bumper by pushing the hooks (A).
Page 369 of 421
(2) (4)(5)
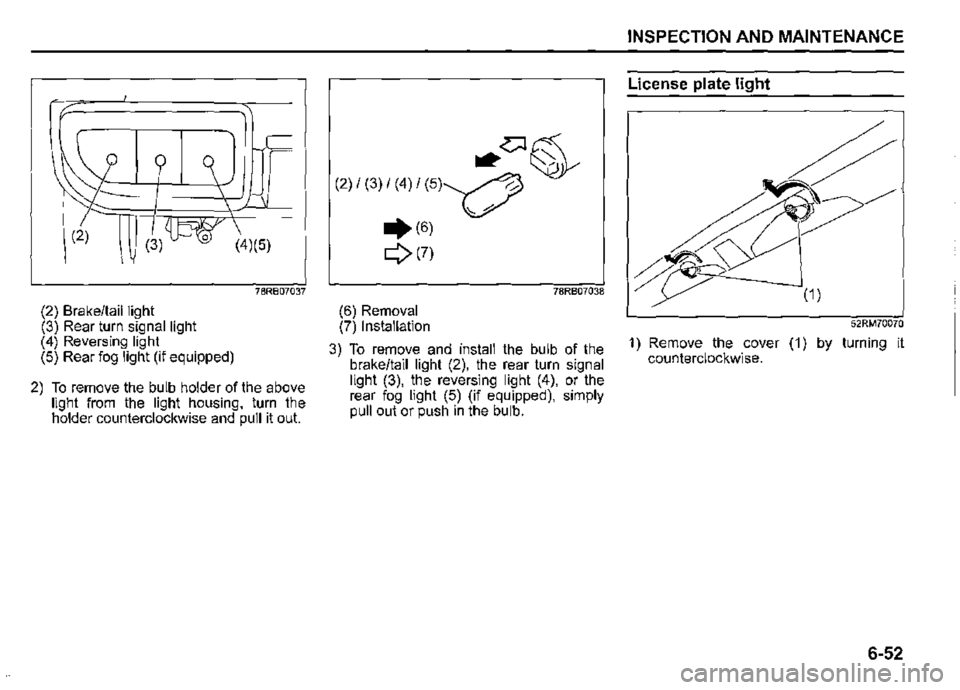
78R807037
(2) Brake/tail light (3) Rear turn signal light (4) Reversing light (5) Rear fog light (if equipped)
2) To remove the bulb holder of the above light from the light housing, turn the holder counterclockwise and pull it out.
~~~
(2) / (3) / (4) / (5)~ ,
.. (6) V'
Q(7)
78RB07038
(6) Removal (7) Installation
3) To remove and install the bulb of the brake/tail light (2), the rear turn signal light (3), the reversing light (4), or the rear fog light (5) (if equipped), simply pull out or push in the bulb.
INSPECTION AND MAINTENANCE
License plate light
52RM70070
1) Remove the cover (1) by turning it counterclockwise.
6-52