steering wheel SUZUKI JIMNY 2019 User Guide
[x] Cancel search | Manufacturer: SUZUKI, Model Year: 2019, Model line: JIMNY, Model: SUZUKI JIMNY 2019Pages: 421, PDF Size: 6.35 MB
Page 154 of 421
OPERATING YOUR VEHICLE
68PH00310
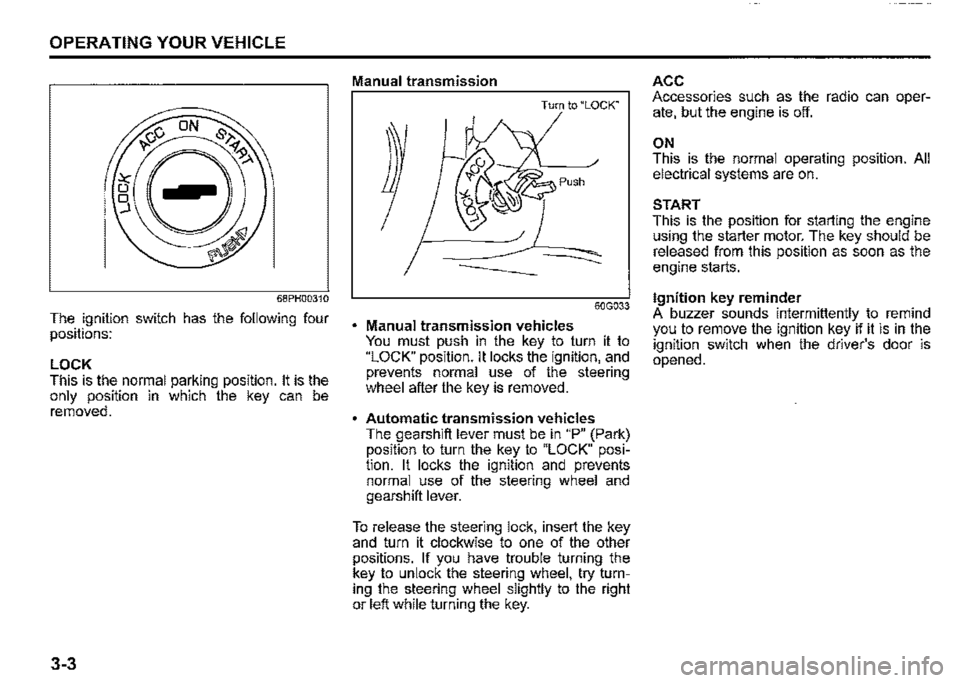
The ignition switch has the following four positions:
LOCK This is the normal parking position. It is the only position in which the key can be removed.
3-3
Manual transmission
Turn to "LOCK"
60G033
Manual transmission vehicles You must push in the key to turn it to "LOCK" position. It locks the ignition, and prevents normal use of the steering wheel after the key is removed.
Automatic transmission vehicles The gearshift lever must be in "P" (Park) position to turn the key to "LOCK" position. It locks the ignition and prevents normal use of the steering wheel and gearshift lever.
To release the steering lock, insert the key and turn it clockwise to one of the other positions. If you have trouble turning the key to unlock the steering wheel, try turning the steering wheel slightly to the right or left while turning the key.
ACC Accessories such as the radio can operate, but the engine is off.
ON This is the normal operating position. All electrical systems are on.
START This is the position for starting the engine using the starter motor. The key should be released from this position as soon as the engine starts.
Ignition key reminder A buzzer sounds intermittently to remind you to remove the ignition key if it is in the ignition switch when the driver's door is opened.
Page 155 of 421

A. WARNING
Never return the ignition switch to "LOCK" position and remove the ignition key while the vehicle is moving. The steering wheel will lock and you will not be able to steer the vehicle. (Continued)
A. WARNING
(Continued) Always return the ignition switch to "LOCK" position and remove the ignition key when leaving the vehicle even only for a short time. Also do not leave children alone in a parked vehicle. Unattended children may be able to start the vehicle or shift the transmission into neutral, which could result in an accident. There is also a danger that children may injure themselves by playing with the power windows or other moving features of the vehicle. In addition, heat build-up or extremely cold temperatures inside the vehicle can be fatal to children.
OPERATING YOUR VEHICLE
NOTICE
For protection of a lead-acid battery and a starter motor, do not use the starter motor by turning the key to "START" for more than 12 seconds at a time. If the engine dose not start, turn the key to "LOCK" position and wait for more than 30 seconds before trying again. If the engine does not start after several attempts, consult a SUZUKI dealer or a qualified workshop. Do not leave the ignition switch in "ON" position if the engine is not running as the lead-acid battery will discharge.
3-4
Page 156 of 421
OPERATING YOUR VEHICLE
Parking brake lever
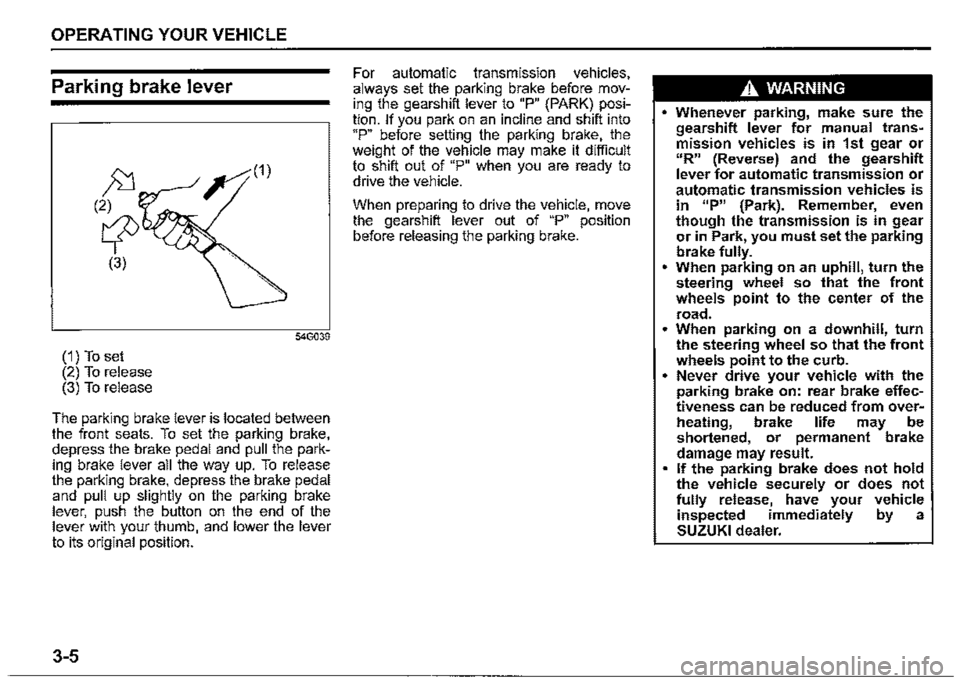
(1) To set (2) To release (3) To release
The parking brake lever is located between the front seats. To set the parking brake, depress the brake pedal and pull the parking brake lever all the way up. To release the parking brake, depress the brake pedal and pull up slightly on the parking brake lever, push the button on the end of the lever with your thumb, and lower the lever to its original position.
3-5
For automatic transmission vehicles, always set the parking brake before moving the gearshift lever to "P" (PARK) position. If you park on an incline and shift into "P" before setting the parking brake, the weight of the vehicle may make it difficult to shift out of "P" when you are ready to drive the vehicle.
When preparing to drive the vehicle, move the gearshift lever out of "P" position before releasing the parking brake.
A WARNING
• Whenever parking, make sure the gearshift lever for manual transmission vehicles is in 1st gear or "R" (Reverse) and the gearshift lever for automatic transmission or automatic transmission vehicles is in 11P" {Park). Remember, even though the transmission is in gear or in Park, you must set the parking brake fully. • When parking on an uphill, turn the steering wheel so that the front wheels point to the center of the
road. • When parking on a downhill, turn the steering wheel so that the front wheels point to the curb. • Never drive your vehicle with the parking brake on: rear brake effectiveness can be reduced from overM heating, brake life may be shortened, or permanent brake damage may result. • If the parking brake does not hold the vehicle securely or does not fully release, have your vehicle inspected immediately by a SUZUKI dealer.
Page 169 of 421
OPERATING YOUR VEHICLE
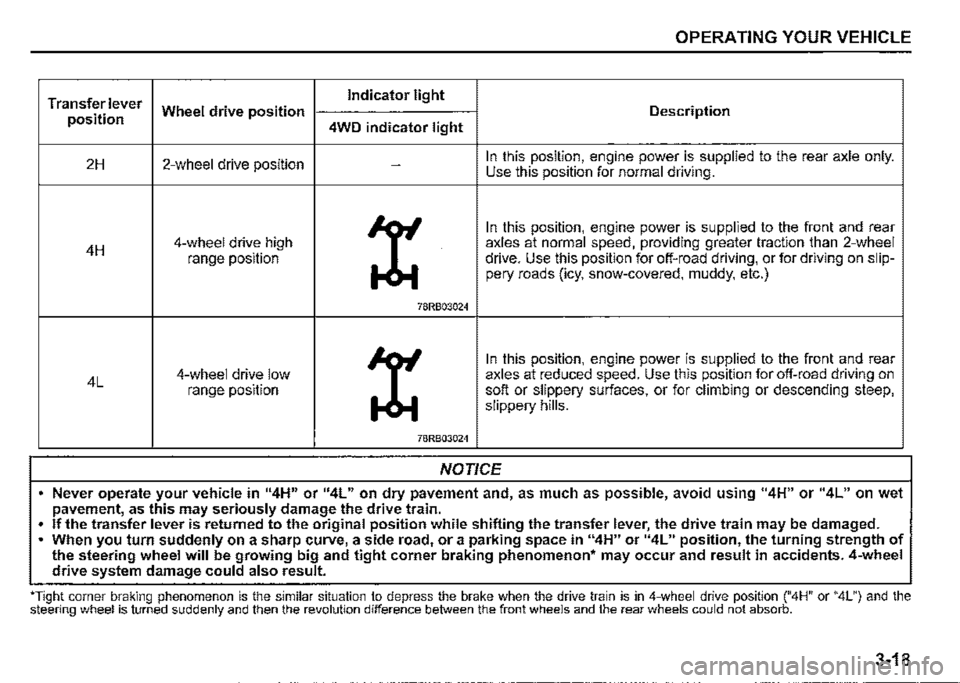
Transfer lever Indicator light
position Wheel drive position Description
4WD indicator light
2H 2-wheel drive position -In this position, engine power is supplied to the rear axle only. Use this position for normal driving.
X
In this position, engine power is supplied to the front and rear
4H 4-wheel drive high axles at normal speed, providing greater traction than 2-wheel
range position drive. Use this position for off-road driving, or for driving on slip-pery roads (icy, snow-covered, muddy, etc.)
78RB03024
X
In this position, engine power is supplied to the front and rear
4L 4-wheel drive low axles at reduced speed. Use this position for off-road driving on range position soft or slippery surfaces, or for climbing or descending steep, slippery hills.
78RB03024
NOTICE
• Never operate your vehicle in 114H" or 114L" on dry pavement and, as much as possible, avoid using "4H" or "4L" on wet pavement, as this may seriously damage the drive train.
• If the transfer lever is returned to the original position while shifting the transfer lever, the drive train may be damaged . . When you turn suddenly on a sharp curve, a side road, or a parking space in "4H" or 114L" position, the turning strength of the steering wheel will be growing big and tight corner braking phenomenon• may occur and result in accidents. 4-wheel drive system damage could also result.
''Tight corner braking phenomenon is the similar situation to depress the brake when the drive train is in 4-wheel drive position ("4H" or "4L") and the steering wheel is turned suddenly and then the revolution difference between the front wheels and the rear wheels could not absorb.
3-18
Page 171 of 421

NOTICE
Pay attention to shifting the transfer lever safely when driving your vehicle.
NOTE: After shifting the transfer lever from "2H'" to "4H", check that the 4WD indicator
light comes on. After shifting the transfer lever from "4H" to "2H", check that the 4WD indicator goes off. ·
When 4WD indicator fight is blinking after shifting the transfer fever to "4H" position, accelerate, slow down your vehicle or stop and reverse your vehicle a little to shift the transfer lever. Pay attention to the vehicles and the circumference toward or backward your vehicle when shifting the transfer fever. When you shift the transfer fever while turning the steering wheel or depressing the accelerator pedal, shifting the transfer fever may be difficult. Operate the transfer fever while driving at low speed if it may be difficult to shift the transfer fever from "2H" position to "4H" position when the vehicle is stopped.
Shift the transfer fever again after decelerating or stopping the vehicle if it may be difficult to shift the transfer fever from "2H" position to "4H" position while driving or when the gear noise occurs. There may be a case to operate the transfer fever heavily when shifting the transfer lever from "4H" position to "2H" P_Osition while driving. In this case, position the front wheels straight ahead and drive for a while and then operate shifting the transfer fever again. When the transfer lever is shifted from 2H" position to "4H" position or from "4H" position to 2H" position and the air locking hubs are activated, the air conditioning system may not be operated for several seconds. This is not a malfunction. When the ignition switch is turned "ON" after the transfer fever is shifted from 2H" position to "4H" position or from "4H" position to 2H" position while stopping the engine, 4WD indicator light may blink. This is not a malfunction.
OPERATING YOUR VEHICLE
78RB03027
Stop the vehicle completely, place the transmission in "N" (Neutral) or depress the clutch pedal fully (if equipped), then shift the transfer lever from "4H" position to "4L" position by pressing the transfer lever.
3-20
Page 173 of 421
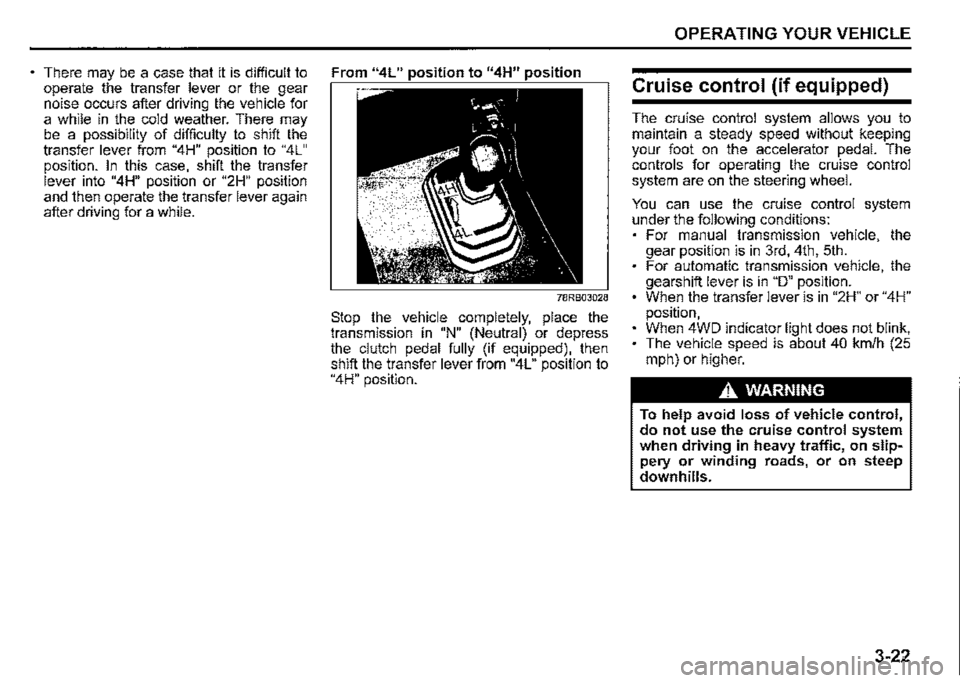
There may be a case that it is difficult to From "4L" position to "4H" position operate the transfer lever or the gear noise occurs after driving the vehicle for a while in the cold weather. There may be a possibility of difficulty to shift the transfer lever from "4H" position to "4L" position. In this case, shift the transfer lever into "4H" position or "2H" position
and then operate the transfer lever again after driving for a while.
78RB03028
Stop the vehicle completely, place the transmission in "N" (Neutral) or depress the clutch pedal fully (if equipped), then shift the transfer lever from "4L" position to "4H" position.
OPERATING YOUR VEHICLE
Cruise control (if equipped)
The cruise control system allows you to maintain a steady speed without keeping your foot on the accelerator pedal. The controls for operating the cruise control system are on the steering wheel.
You can use the cruise control system under the following conditions: For manual transmission vehicle, the gear position is in 3rd, 4th, 5th. For automatic transmission vehicle, the gearshift lever is in "D" position. When the transfer lever is in "2H" or "4H" position, When 4WD indicator light does not blink, The vehicle speed is about 40 km/h (25 mph) or higher.
A, WARNING
To help avoid loss of vehicle control, do not use the cruise control system when driving in heavy traffic, on slippery or winding roads, or on steep downhills.
3-22
Page 181 of 421
Situations where the system does not activate Under the following situations, the system does not activate. When the engine is off When dual sensor brake support indicator light and lane departure warning indicator light are initially lighting immediately after the ignition switch is turned to "ON". When the gearshift lever is in reverse gear When the ESP® system is activated (except the frontal collision warning) When the following switches are pushed and the system is turned off: -Dual sensor brake support OFF switch -ESP® OFF switch
When the dual sensor is temporarily stopped or malfunctioning
Situations where the system may not activate properly Under the following situations, the system may not activate. When the dual sensor cannot detect a vehicle or a pedestrian in front of your vehicle Refer to "Handling dual sensor" in the "OPERATING YOUR VEHICLE" section. When you take evasive action with the steering wheel or accelerator pedal
Situations where the vehicle may not decelerate properly Under the following situations, the vehicle may not decelerate properly even when the system is activated. When the outside temperature is low, or when the temperature of the brake is low such as right after starting When the brake is overheating and the brake effect is deteriorated due to continuing to travel on a downhill road When the brake effect is deteriorated due to passing over puddles or washing the vehicle When driving on the following roads -On sharp curves or extremely rough surfaces -On a steep slope When driving on the following slippery surfaces -Frozen or snow-covered surfaces -Over manholes or metal construction plates -Gravel When driving in a rainy day
OPERATING YOUR VEHICLE
Situations where the system may activate by chance Under the following situations, the dual sensor may judge that there is a vehicle or a pedestrian in front of you, and the system may activate. Drive carefully and calmly. When passing through a toll booth with more than recommended speeds Before the parking lot gates or railroad crossing gates are opened fully When operating on hills that have varying slopes When you suddenly accelerate and approach the vehicle in front of you or on neighboring lane Front visibility is poor due to that there is water vapor, sand or smoke or when the vehicle in front of you or on oncoming lane is surrounded by exhaust gas, water or snow When passing through masses of water vapor or smoke When stopping close to an obstacle in. front of you When passing through near a vehicle or obstacle
3-30
Page 182 of 421
OPERATING YOUR VEHICLE
54P000330
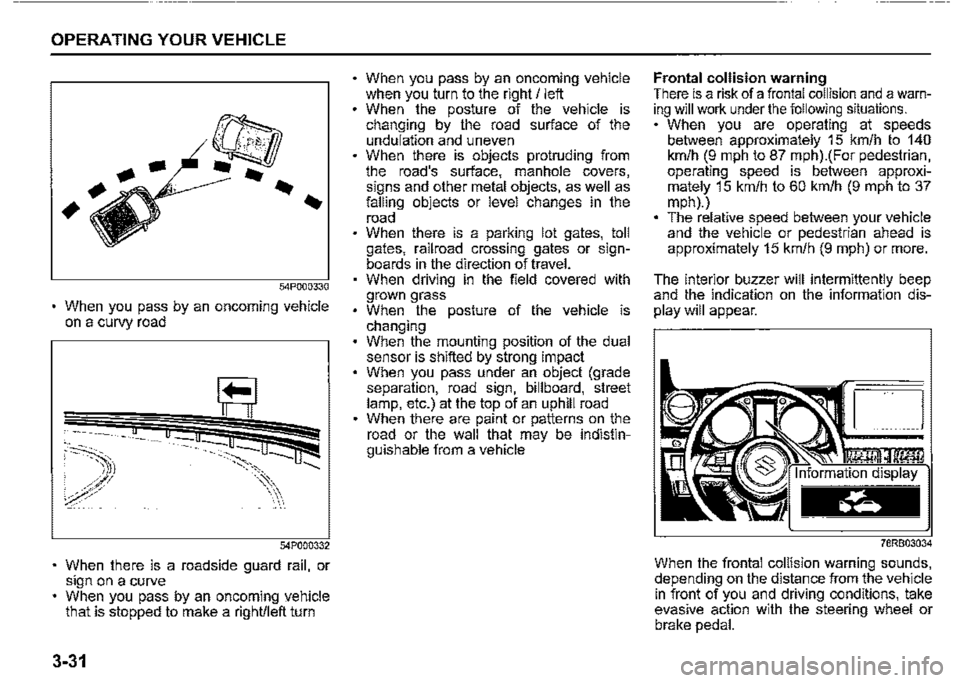
When you pass by an oncoming vehicle on a curvy road
54?000332
When there is a roadside guard rail, or sign on a curve When you pass by an oncoming yehicle that is stopped to make a right/left turn
3-31
When you pass by an oncoming vehicle when you turn to the right/ left When the posture of the vehicle is changing by the road surface of the undulation and uneven When there is objects protruding from the road's surface, manhole covers, signs and other metal objects, as well as falling objects or level changes in the road When there is a parking lot gates, toll gates, railroad crossing gates or signboards in the direction of travel. When driving in the field covered with grown grass When the posture of the vehicle is changing When the mounting position of the dual sensor is shifted by strong impact When you pass under an object (grade separation, road sign, billboard, street lamp, etc.) at the top of an uphill road When there are paint or patterns on the road or the wall that may be indistinguishable from a vehicle
Frontal collision warning There is a risk of a frontal collision and a warning will work under the following situations. When you are operating at speeds between approximately 15 km/h to 140 km/h (9 mph to 87 mph).(For pedestrian, operating speed is between approximately 15 km/h to 60 km/h (9 mph to 37 mph).) The relative speed between your vehicle and the vehicle or pedestrian ahead is approximately 15 km/h (9 mph) or more.
The interior buzzer will intermittently beep and the indication on the information dis
play will appear.
78RB03034
When the frontal collision warning sounds, depending on the distance from the vehicle in front of you and driving conditions, take evasive action with the steering wheel or brake pedal.
Page 184 of 421
OPERATING YOUR VEHICLE
Lane departure warning
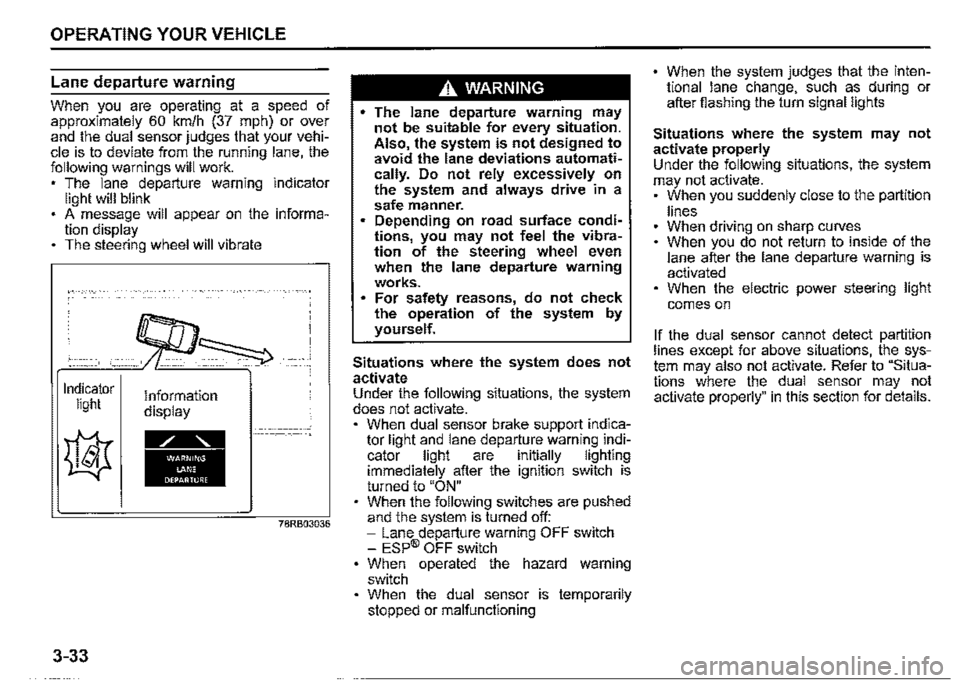
When you are operating at a speed of approximately 60 km/h (37 mph) or ov~r and the dual sensor judges that your vehicle is to deviate from the running lane, the following warnings will work. , The lane departure warning indicator light will blink . A message will appear on the information display The steering wheel will vibrate
Indicator light
3-33
Information display
78RB03036
A WARNING
• The lane departure warning may not be suitable for every situation. Also the system is not designed to avoid the lane deviations automati~ cally. Do not rely excessively on the system and always drive in a safe manner. Depending on road surface conditions, you may n~t feel the vibration of the steering wheel even when the lane departure warning works. For safety reasons, do not check the operation of the system by yourself.
Situations where the system does not activate Under the following situations, the system does not activate. , When dual sensor brake support indicator light and lane departu_re warni~g i~dicator light are 1nitially lighting immediately after the ignition switch is turned to "ON" When the following switches are pushed and the system is turned off: -Lane departure warning OFF switch -ESP® OFF switch When operated the hazard warning switch When the dual sensor is temporarily stopped or malfunctioning
When the system judges that the intentional lane change, such as during or after fiashing the turn signal lights
Situations where the system may not activate properly Under the following situations, the system may not activate. , When you suddenly close to the partition
lines When driving on sharp curves When you do not return to inside of th_e lane after the lane departure warning 1s activated When the electric power steering light
comes on
If the dual sensor cannot detect partition lines except for above situations, t~~ _system may also not activate. Refer to Situations where the dual sensor may not activate properly" in this section for details.
Page 205 of 421
Anti-lock brake system (ABS)
ABS will help you avoid skidding by electronically controlling braking pressure. It will also help you maintain steering control when braking on slippery surfaces or when braking hard. The ABS works automatically, so you do not need any special braking technique. Just push the brake pedal down without pumping. The ABS will operate whenever it senses that the wheels are locking up. You may feel the brake pedal move a little while the ABS is operating.
NOTE: The ABS will not work if vehicle speed is under about 9 km/h (6 mph). ff the ABS system is activated, you may hear a clunking noise and/or feel pulsating in the brake pedal. This is normal and indicates that the brake fluid pressure is being controlled properly. You may hear an operation sound when you start the engine or after the vehicle begins to move. This means that the above systems are in the self-check mode. This sound does not indicate a malfunction.
A WARNING
On some types of loose surfaces (such as gravel, snow-covered roads, etc.), the stopping distance required for a vehicle with ABS may be slightly greater than the one required for a comparable vehicle with a conventional brake system. With a conventional brake system, skidding tyres are able to plow the gravel or snow layer, shortening the stopping distance. ABS minimizes this resistance effect. Allow for extra stopping distance when driving on loose surfaces. On regular paved roads, some drivers may be able to obtain slightly shorter stopping distances with conventional brake systems than with ABS. In both of the above conditions, ABS will still offer the advantage of helping you maintain directional control. However, remember that ABS will not compensate for bad road or weather conditions or poor driver judgment. Use good judgment and do not drive too fast.
OPERATING YOUR VEHICLE
(8) (CD)
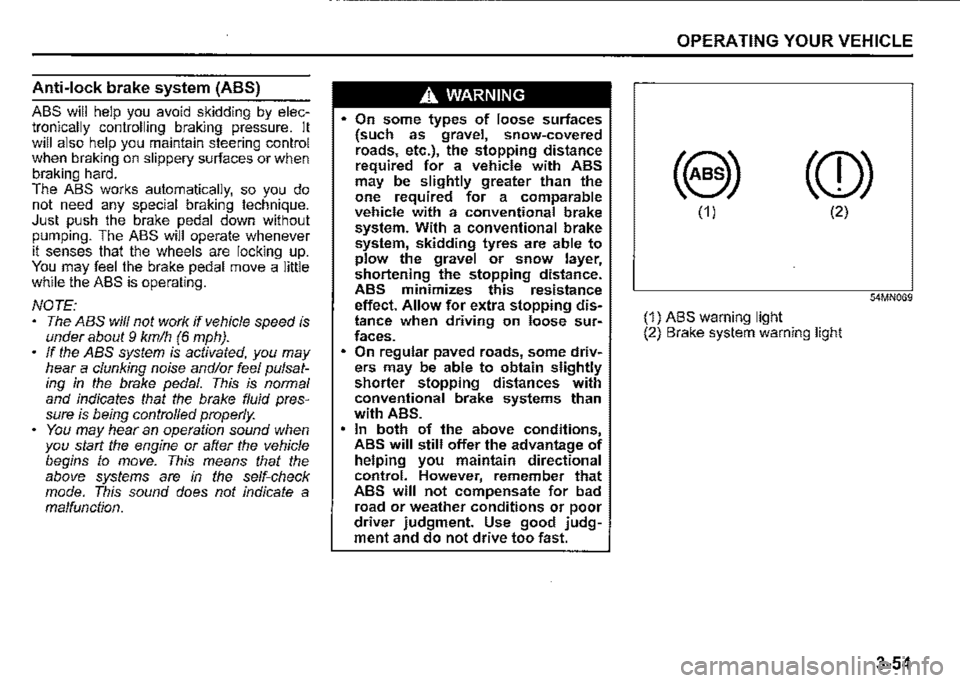
(1) (2)
54MN069
(1) ABS warning light (2) Brake system warning light
3-54