turn signal SUZUKI JIMNY 2020 Owners Manual
[x] Cancel search | Manufacturer: SUZUKI, Model Year: 2020, Model line: JIMNY, Model: SUZUKI JIMNY 2020Pages: 421, PDF Size: 6.35 MB
Page 12 of 421
ILLUSTRATED TABLE OF CONTENTS
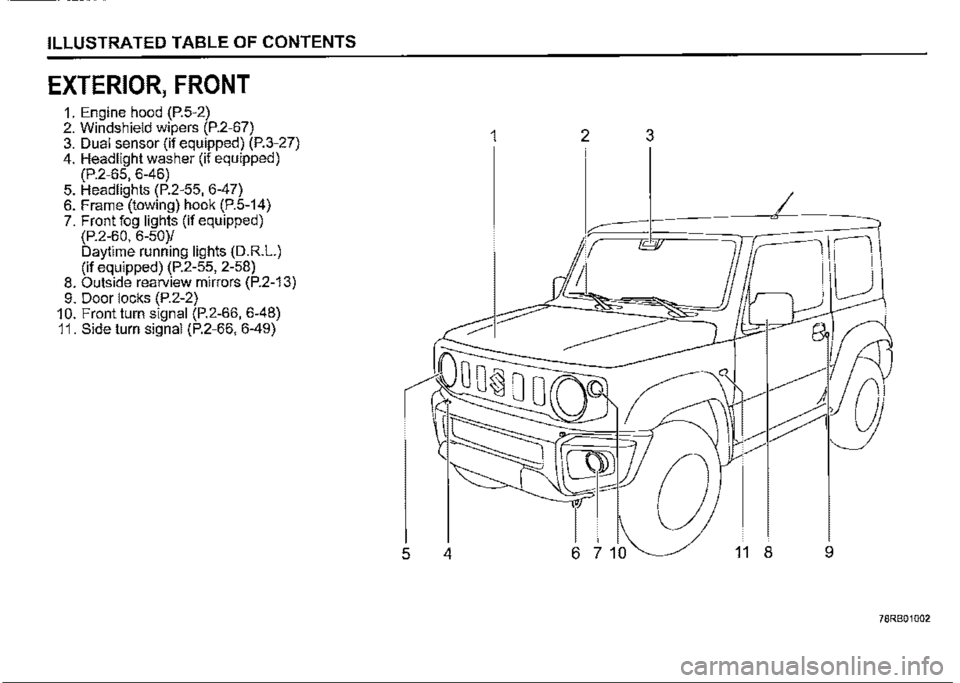
EXTERIOR, FRONT
1. Engine hood (P.5-2) 2. Windshield wipers (P.2-67) 3. Dual sensor (if equipped) (P.3-27) 4. Headlight washer (if equipped) (P.2-65, 6-46) 5. Headlights (P.2-55, 6-47) 6. Frame (towing) hook (P.5-14) 7. Front fog lights (if equipped) (P.2-60, 6-50)/ Daytime running lights (D.R.L.) (if equipped) (P.2-55, 2-58) 8. Outside rearview mirrors (P.2-13) 9. Door locks (P.2-2) 10. Front turn signal (P.2-66, 6-48) 11. Side turn signal (P.2-66, 6-49)
1 2 3
I
5 4 6 7 10 11 8 9
78RB01002
Page 13 of 421
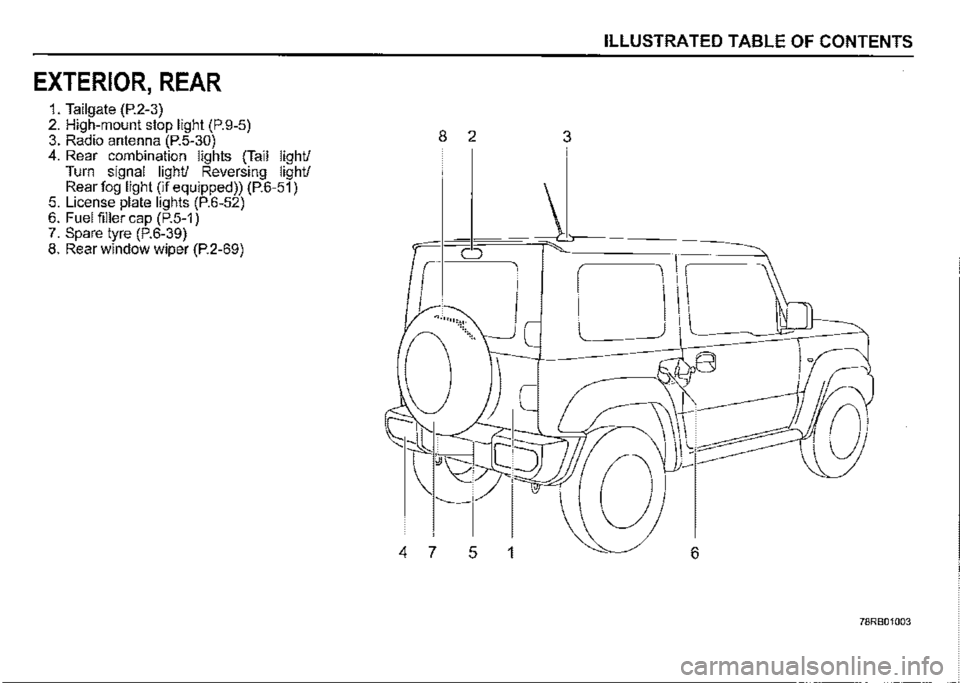
EXTERIOR, REAR
1. Tailgate (P.2-3) 2. High-mount stop light (P.9-5) 3. Radio antenna (P.5-30) 4. Rear combination lights (Tail light/ Turn signal light/ Reversing light/ Rear fog light (if equipped)) (P.6-51) 5. License plate lights (P.6-52) 6. Fuel filler cap (P.5-1) 7. Spare tyre (P.6-39) 8. Rear window wiper (P.2-69)
ILLUSTRATED TABLE OF CONTENTS
8 2 3
0
.... ,,.,,:\:<.
'----
4 7 5 1 6
78RB01003
Page 16 of 421
ILLUSTRATED TABLE OF CONTENTS
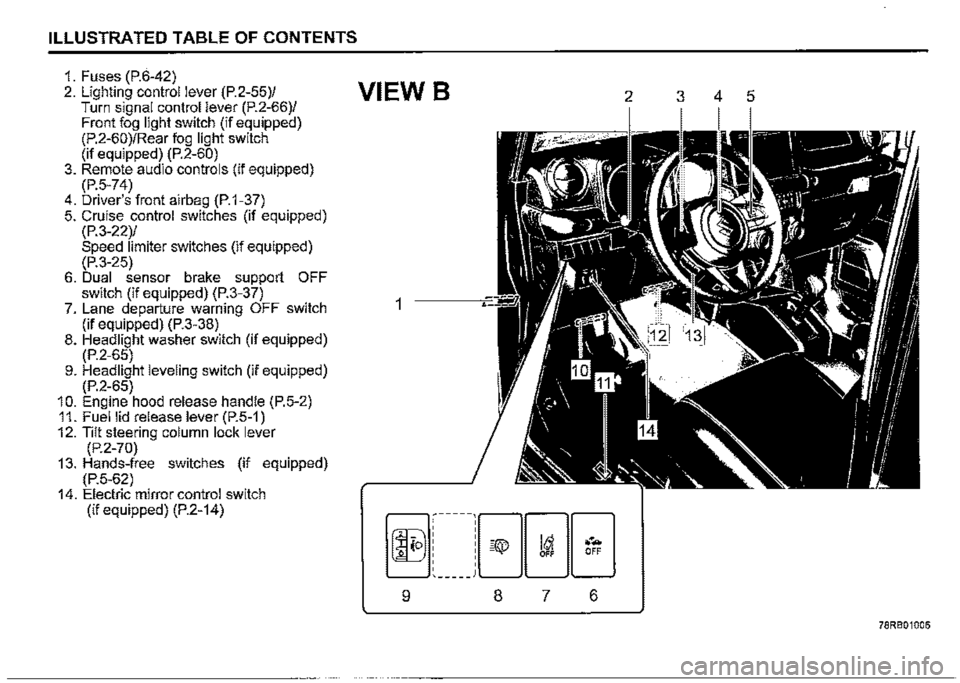
1. Fuses (P.6-42) 2. Lighting control lever (P.2-55)/ Turn signal control lever (P.2-66)/ Front fog light switch (if equipped) (P.2-60)/Rear fog light switch (if equipped) (P.2-60) 3. Remote audio controls (if equipped) (P.5-74) 4. Driver's front airbag (P.1-37) 5. Cruise control switches (if equipped) (P.3-22)/ Speed limiter switches (if equipped) (P.3-25) 6. Dual sensor brake support OFF switch (if equipped) (P.3-37) 7. Lane departure warning OFF switch (if equipped) (P.3-38) 8. Headlight washer switch (if equipped) (P.2-65) 9. Headlight leveling switch (if equipped) (P.2-65) 10. Engine hood release handle (P.5-2) 11. Fuel lid release lever (P.5-1) 12. Tilt steering column lock lever (P.2-70) 13. Hands-free switches (if equipped) (P.5-62) 14. Electric mirror control switch (if equipped) (P.2-14)
VIEW B 2 3 4 5
1
-----18·'"' 0til G ... : -\¥-' OFF OFF
' _____ )
9 8 7 6
78RB01006
Page 71 of 421
BEFORE DRIVING
BEFORE DRIVING
Brightness control .............................................................. 2-17
Information display ............................................................. 2-18 -
Instrument cluster (Type B) (if equipped) ......................... 2-25
Speedometer ....................................................................... 2-26
Tachometer .......................................................................... 2-26
Fuel gauge ........................................................................... 2-26
Brightness control .............................................................. 2-26
Information switch
(if equipped) ......................................................................... 2-27
Information display ............................................................. 2-28
Warning and indicator lights .............................................. 2-39
Lighting control lever ......................................................... 2-55
Headlight leveling switch
(if equipped) ......................................................................... 2-65
Headlight washer switch
(if equipped) ........................................................................ 2-65
60G404 Turn signal control lever .................................................... 2-66
Keys ...................................................................................... 2-1 Hazard warning switch ....................................................... 2-67
Door locks ............................................................................ 2-2 Windshield wiper and washer lever .................................. 2-67
Keyless entry system transmitter (if equipped) ................ 2-6 Tilt steering lock lever ........................................................ 2-70
Theft deterrent alarm system (if equipped) ....................... 2-8 Horn ...................................................................................... 2-70
Theft deterrent light Heated rear window switch /
(if equipped) ........................................................................ 2-10 heated outside rearview mirror switch (if equipped) ...... 2-71
Windows ............................................................................... 2-1 o Vehicle loading .................................................................... 2-72
Mirrors .................................................................................. 2-13 Trailer towing ....................................................................... 2-72
Instrument cluster (Type A) (if equipped) ......................... 2-15
Speedometer ........................................................................ 2-16
Tachometer .......................................................................... 2-16
Fuel gauge ............................................................................ 2-16
Page 77 of 421
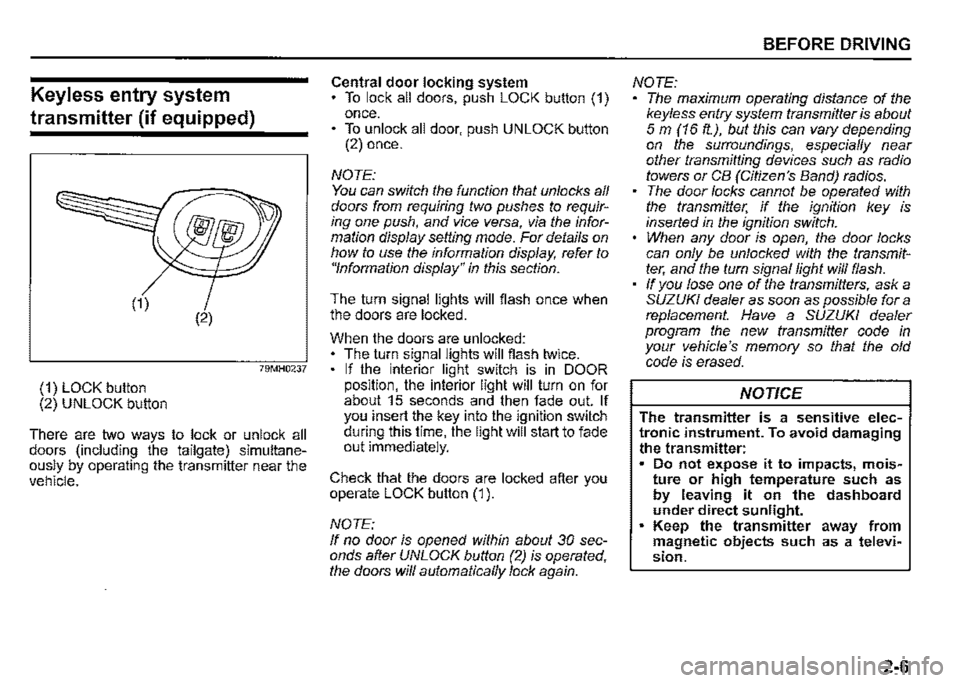
Keyless entry system
transmitter (if equipped)
(2)
79MH0237
(1) LOCK button (2) UNLOCK button
There are two ways to lock or unlock all doors (including the tailgate) simultaneously by operating the transmitter near the vehicle.
Central door locking system To lock all doors, push LOCK button (1) once. • To unlock all door, push UNLOCK button (2) once.
NOTE: You can switch the function that unlocks all doors from requiring two pushes to requiring one push, and vice versa, via the information display setting mode. For details on how to use the information display, refer to "Information display" in this section.
The turn signal lights will flash once when the doors are locked.
When the doors are unlocked: The turn signal lights will flash twice. If the interior light switch is in DOOR position, the interior light will turn on for about 15 seconds and then fade out. If you insert the key into the ignition switch during this time, the light will start to fade out immediately.
Check that the doors are locked after you operate LOCK button (1 ).
NOTE: If no door is opened within about 30 seconds after UNLOCK button (2) is operated, the doors will automatically lock again.
BEFORE DRIVING
NOTE: The maximum operating distance of the keyless entry system transmitter is about 5 m (16 ft.), but this can vary depending on the surroundings, especially near other transmitting devices such as radio towers or CB (Citizen's Band) radios. The door locks cannot be operated with the transmitter, if the ignition key is inserted in the ignition switch. When any door is open, the door locks can only be unlocked with the transmitter, and the turn signal light will flash. If you lose one of the transmitters, ask a SUZUKI dealer as soon as possible for a replacement. Have a SUZUKI dealer program the new transmitter code in your vehicle's memory so that the old code is erased.
NOTICE
The transmitter is a sensitive electronic instrument. To avoid damaging the transmitter: Do not expose it to impacts, moisture or high temperature such as by leaving it on the dashboard under direct sunlight. Keep the transmitter away from magnetic objects such as a television.
2-6
Page 94 of 421
BEFORE DRIVING
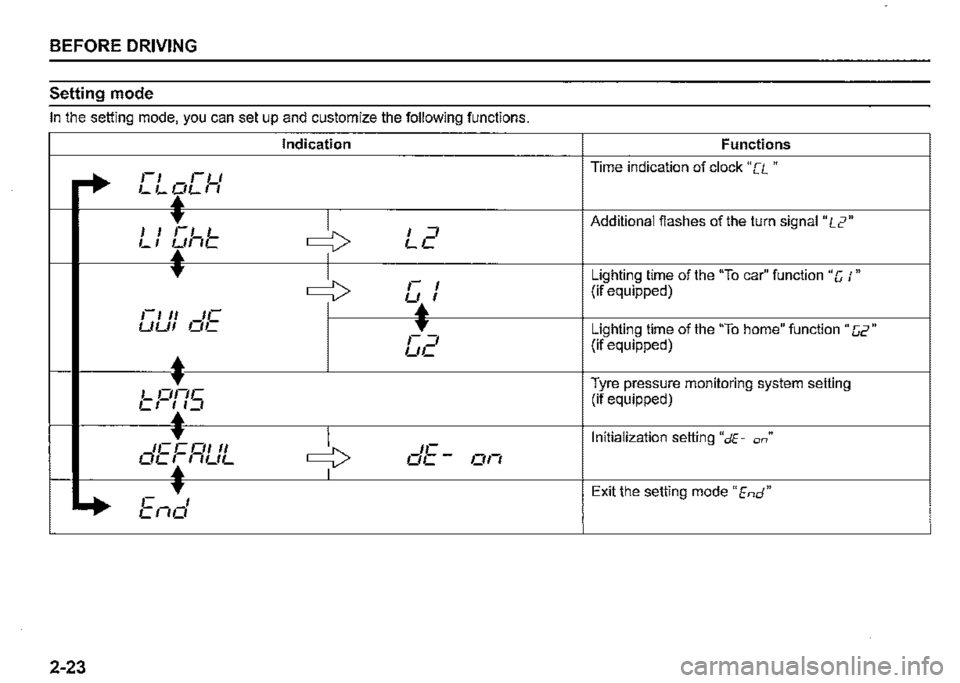
Setting mode
In the setting mode, you can set up and customize the following functions.
Indication Functions
+
,-, ,-u Time indication of clock "[L "
LL~LI I
I I t-1 L ~ I =, Additional flashes of the turn signal" L2"
LI ~//7L LL I
T
~ ,-Lighting time of the "To car" function "C /" I (if equipped) L!t,. I 1-1 II IC LILI/ n1 ,-"' =, Lighting time of the "To home" function "C2" (if equipped)
•
LIL
1 nhc Tyre pressure monitoring system setting
C ,-!t,.1 _, (if equipped)
1ct-q1 II ~ 'E
Initialization setting "dE-on"
OL~I UL o_-017 I
*
C TI Exit the setting mode" End"
Ll70
2-23
Page 95 of 421
•
Turn the indicator selector knob (2).
c:::::> Push the indicator selector knob (2).
NOTE: Depending on vehicle's specifications, some items may not be displayed.
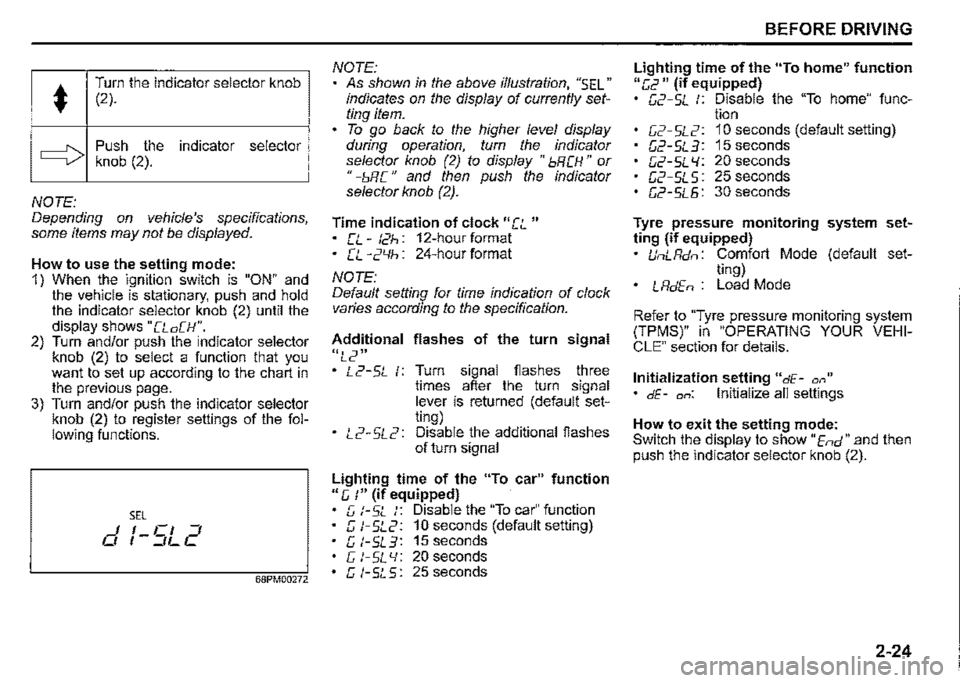
How to use the setting mode: 1) When the ignition switch is "ON" and the vehicle is stationary, push and hold the indicator selector knob (2) until the display shows "[Lo[H". 2) Turn and/or push the indicator selector knob (2) to select a function that you want to set up according to the chart in the previous page. 3) Turn and/or push the indicator selector knob (2) to register settings of the following functions.
SEL I I Cl ::J 0 , -::JL C
68PM00272
NOTE: As shown in the above illustration, "SEL" indicates on the display of currently setting item. To go back to the higher level display during operation, turn the indicator selector knob (2) to display "bRCH" or " -bR C " and then push the indicator selector knob (2).
Time indication of clock "[L " • [L-t2h: 12-hourformat • CL -2'-lh: 24-hour format
NOTE: Default setting for time indication of clock varies according to the specification.
Additional flashes of the turn signal
"L2" • L2-5L 1: Turn signal flashes three times after the turn signal lever is returned (default setting) • L2-5L2: Disable the additional flashes of turn signal
Lighting time of the "To car" function 11 e, :" (if equipped) G t-SL :: Disable the "To car" function c; t-5L2: 10 seconds (default setting) G l-5L3: 15 seconds c; t-SL 'I: 20 seconds G t-5L5: 25 seconds
BEFORE DRIVING
Lighting time of the "To home" function "[,2 11 (if equipped) G2-5L :: Disable the "To home" func-tion C2-5L2: 10 seconds (default setting) G2-5L3: 15seconds G2-5L l/: 20 seconds G2-SLS: 25 seconds G2-5L5: 30 seconds
Tyre pressure monitoring system setting (if equipped) UnLRdn: Comfort Mode (default set-ting) • LRdEn : Load Mode
Refer to "Tyre pressure monitoring system (TPMS)" in "OPERATING YOUR VEHICLE" section for details.
Initialization setting "dE-a,," • dE-on: Initialize all settings
How to exit the setting mode: Switch the display to show "End" and then push the indicator selector knob (2).
2-24
Page 105 of 421
(Selecting 12H/24H format) Switch the time indication between 12-hour and 24-hour format by selecting "Clock setting" in "Setting mode". Then, select "12H" or "24H".
Door lock (Door unlock setting) You can choose either once or twice operation(s) to unlock all doors (including the tailgate) by turning the key or operating the keyless entry system transmitter.
You can also turn off or on the buzzer sound when the door(s) is (are) locked or unlocked.
Lights (Lane change setting) The turn signal and its indicator can be set whether they flash three times even if you return the turn signal control lever shortly after operating it. To change the lane change setting, select "Lane change" in "Setting mode". Then, select "ON" or "OFF" If you want to change the number of flashing, consult a SUZUKI dealer.
Guide me light setting (Light setting) (if equipped) You can change the lighting time of "To car" function or "To home" function.
Oil change (Oil life monitoring system reset setting) (if equipped) The oil life monitoring system must be reset after changing the engine oil and oil filter. To reset the system, push and hold the indicator selector knob (3) for a while.
TPMS (Tyre pressure monitoring system setting) (if equipped) You can check the current tyre pressure on the information display. You can set one of the initial values of tyre pressure below that are indicated on the tyre information label. -Comfort Mode -Load Mode
Refer to "Tyre pressure monitoring system (TPMS)" in the "OPERATING YOUR VEHICLE" section for details.
Traffic sign recognition (Traffic sign recognition setting) (if equipped) If you select "ON" the traffic sign recognition function can be activated.
Refer to "Traffic sign recognition" in the "OPERATING YOUR VEHICLE" section for details.
BEFORE DRIVING
Default (Initialization setting) If you select "YES" and push the indicator selector knob (3), all settings will be reinitialized.
2-34
Page 123 of 421
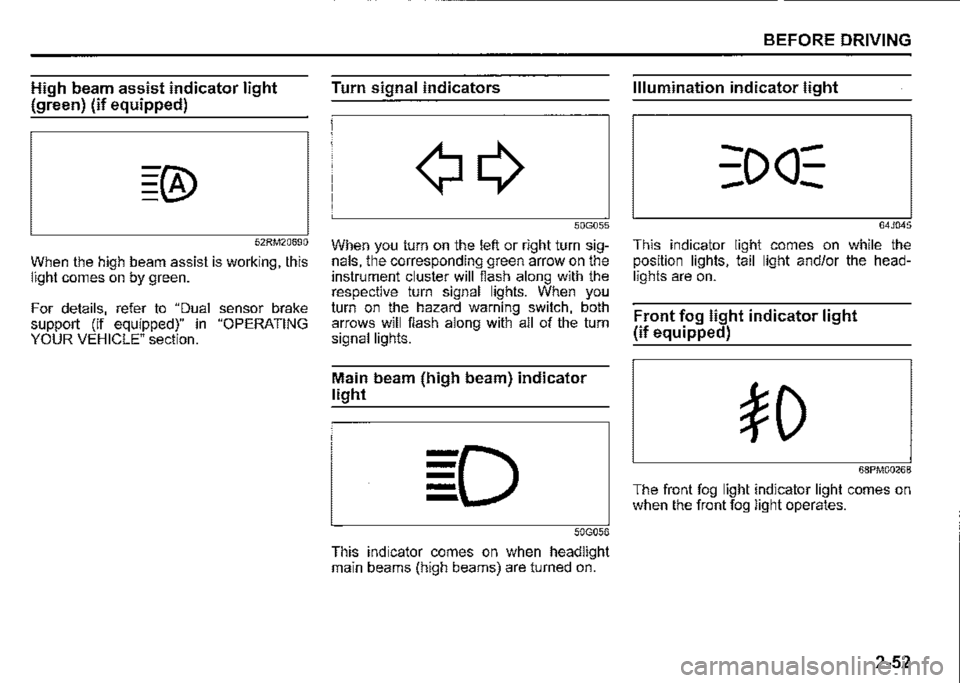
High beam assist indicator light
(green) (if equipped)
52RM20690
When the high beam assist is working, this light comes on by green.
For details, refer to "Dual sensor brake support (if equipped)" in "OPERATING YOUR VEHICLE" section.
Turn signal indicators
50G055
When you turn on the left or right turn signals, the corresponding green arrow on the instrument cluster will flash along with the respective turn signal lights. When you turn on the hazard warning switch, both arrows will flash along with all of the turn signal lights.
Main beam (high beam) indicator
light
50G056
This indicator comes on when headlight main beams (high beams) are turned on.
BEFORE DRIVING
Illumination indicator light
64J045
This indicator light comes on while the position lights, tail light and/or the headlights are on.
Front fog light indicator light
(if equipped)
68PM00268
The front fog light indicator light comes on when the front fog light operates.
2-52
Page 128 of 421

BEFORE DRIVING
To turn the lights on or off, twist the knob on the end of the lever. There are four positions:
OFF (1) All lights are off.
AUTO (2) This function works when the ignition switch is turned "ON". The headlights and position lights are turned on and off automatically according to the amount of outside light detected by the sensor. They go out automatically when you turn the ignition switch to "ACC" or "LOCK" position.
The light sensor (5) for sensing the amount of outside light is installed on the passenger's seat side instrument panel.
When headlights are turned on and the lighting control lever is in "AUTO" position, you can use the high beam assist (if equipped). For details, refer to "High beam assist" in "OPERATING YOUR VEHICLE" section.
2-57
A CAUTION
If the light sensor area of the windshield is covered with mud, ice1 or other similar substances, the headlights and position lights may be turned on even when it is still light outside.
NOTE: Avoid covering the light sensor area of the windshield with a sticker. The sticker may impair the performance of the sensor and make the system unable to control operation of the lights correctly. If you turned the ignition switch to "ON" position and "AUTO" position remains selected, the headlights and position lights come on automatically as it gets dark outside, even with the engine not running. Leaving the lights lit for a long time may lead to a completely discharged battery.
oOO~ (3) Front position lights, tail lights, license plate lights and instrument lights are on, but headlights are off.
~D (4) Front position lights, tail lights, license plate lights, instrument lights and headlights are on.
= IO · OFF 01
f,
68PM00230
With the headlights on, push the lever forward to switch to the high beams (main beams) or pull the lever toward you to switch to the low beams. When the high beams (main beams) are on, a light on the instrument cluster will come on. To momentarily activate the high beams (main beams) as a passing signal, pull the lever slightly toward you and release it when you have completed the signal.