sensor SUZUKI KIZASHI 2010 1.G User Guide
[x] Cancel search | Manufacturer: SUZUKI, Model Year: 2010, Model line: KIZASHI, Model: SUZUKI KIZASHI 2010 1.GPages: 388, PDF Size: 4.94 MB
Page 120 of 388
2-101BEFORE DRIVING
57L20-03E
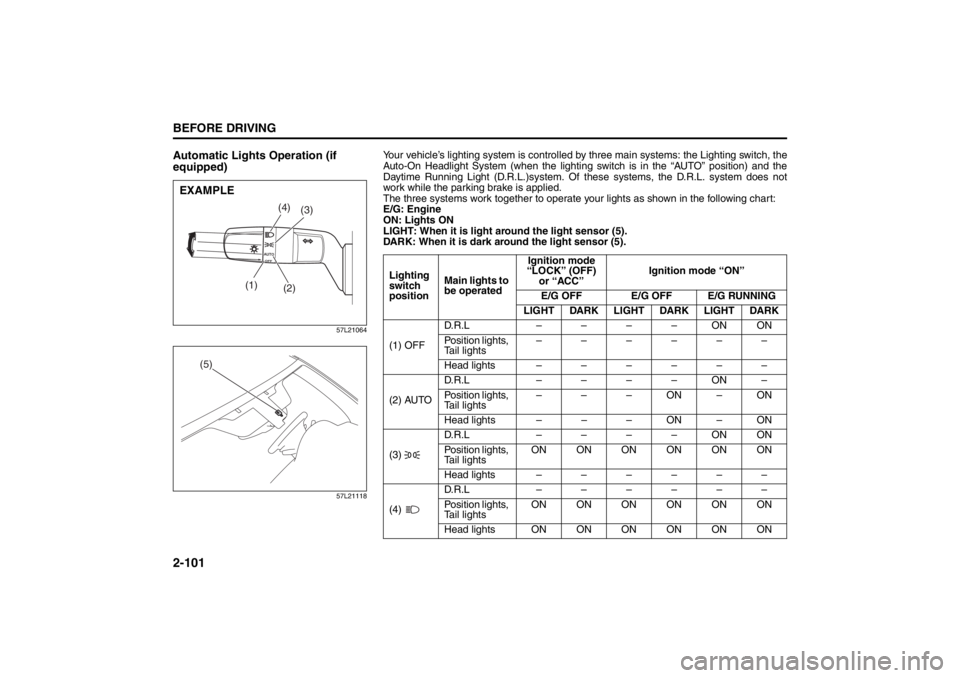
Automatic Lights Operation (if
equipped)
57L21064
57L21118
(1)
(2)
(3) (4)
EXAMPLE
(5)
Your vehicle’s lighting system is controlled by three main systems: the Lighting switch, the
Auto-On Headlight System (when the lighting switch is in the “AUTO” position) and the
Daytime Running Light (D.R.L.)system. Of these systems, the D.R.L. system does not
work while the parking brake is applied.
The three systems work together to operate your lights as shown in the following chart:
E/G: Engine
ON: Lights ON
LIGHT: When it is light around the light sensor (5).
DARK: When it is dark around the light sensor (5).
Lighting
switch
positionMain lights to
be operatedIgnition mode
“LOCK” (OFF)
or “ACC”Ignition mode “ON”
E/G OFF E/G OFF E/G RUNNING
LIGHT DARK LIGHT DARK LIGHT DARK
(1) OFFD.R.L ––––ONON
Position lights,
Tail lights––––––
Head lights ––––––
(2) AUTOD.R.L ––––ON–
Position lights,
Tail lights–––ON–ON
Head lights – – – ON – ON
(3) D.R.L ––––ONON
Position lights,
Tail lightsON ON ON ON ON ON
Head lights ––––––
(4) D.R.L ––––––
Position lights,
Tail lightsON ON ON ON ON ON
Head lights ON ON ON ON ON ON
Page 121 of 388

2-102
BEFORE DRIVING
57L20-03E
To turn the lights on or off, twist the knob
on the end of the lever. There are four posi-
tions:
OFF (1)
All lights are off.
AUTO (2)
This function works when the ignition
mode has been changed to “ON” by press-
ing the engine switch. The headlights and
position lights are turned on and off auto-
matically according to the amount of out-
side light detected by a sensor. They go
out automatically when you change the
ignition mode to “ACC” or “LOCK” by
pressing the engine switch.
The light sensor (5) for sensing the
amount of outside light is installed on the
upper part of the windshield. It also
serves as the rain sensor for the rain-
sensing wipers.NOTE:
Avoid covering the light sensor area of
the windshield with a sticker. The sticker
may impair the performance of the sen-
sor and make the system unable to con-
trol operation of the lights correctly.
If you changed the ignition mode to “ON”
by pressing the engine switch and the
“AUTO” position remains selected, the
headlights and position lights come on
automatically as the outside gets dark
even with the engine not running. Leav-
ing the lights lit for a long time may lead
to a completely discharged battery.
(3)
Front position lights, tail lights, license
plate light and instrument lights are on, but
headlights are off.
(4)
Front position lights, tail lights, license
plate light, instrument lights and headlights
are on.
CAUTION
If the light sensor area of the wind-
shield is covered with mud, ice, or
other similar substances, the head-
lights and position lights may be
turned on even when it is still light
outside. Before removing such sub-
stances from the windshield, always
set the wiper control lever to the
“OFF” position. If the lever is left in
the “AUTO” position, the wipers
could unexpectedly operate and
cause injury, and could also be dam-
aged.
Page 122 of 388
2-103BEFORE DRIVING
57L20-03E
57L21065
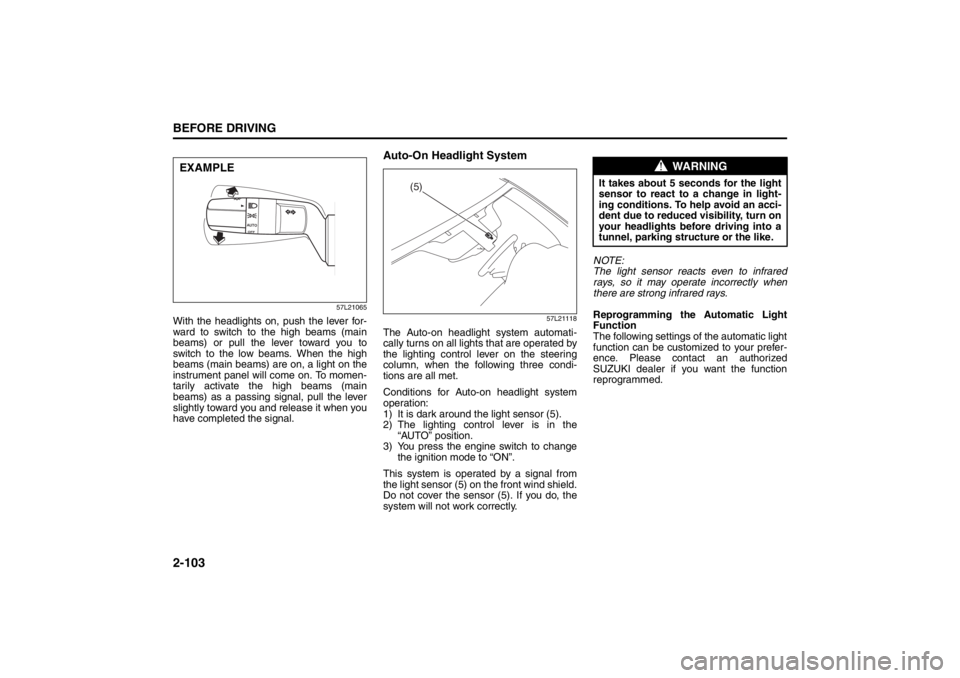
With the headlights on, push the lever for-
ward to switch to the high beams (main
beams) or pull the lever toward you to
switch to the low beams. When the high
beams (main beams) are on, a light on the
instrument panel will come on. To momen-
tarily activate the high beams (main
beams) as a passing signal, pull the lever
slightly toward you and release it when you
have completed the signal.
Auto-On Headlight System
57L21118
The Auto-on headlight system automati-
cally turns on all lights that are operated by
the lighting control lever on the steering
column, when the following three condi-
tions are all met.
Conditions for Auto-on headlight system
operation:
1) It is dark around the light sensor (5).
2) The lighting control lever is in the
“AUTO” position.
3) You press the engine switch to change
the ignition mode to “ON”.
This system is operated by a signal from
the light sensor (5) on the front wind shield.
Do not cover the sensor (5). If you do, the
system will not work correctly.NOTE:
The light sensor reacts even to infrared
rays, so it may operate incorrectly when
there are strong infrared rays.
Reprogramming the Automatic Light
Function
The following settings of the automatic light
function can be customized to your prefer-
ence. Please contact an authorized
SUZUKI dealer if you want the function
reprogrammed.
EXAMPLE
(5)
WARNING
It takes about 5 seconds for the light
sensor to react to a change in light-
ing conditions. To help avoid an acci-
dent due to reduced visibility, turn on
your headlights before driving into a
tunnel, parking structure or the like.
Page 123 of 388

2-104
BEFORE DRIVING
57L20-03E
Sensitivity of the light sensor
The amount of outside light needed to turn
the lights on and off is pre-set at the fac-
tory. The sensitivity of the light sensor can
be adjusted so that the lights are turned on
and off when it is:
lighter outside than the pre-set condition,
or
darker outside than the pre-set condition
Rain-triggered automatic lighting oper-
ation
The setting of the auto-on headlight sys-
tem can be changed to make it turn on the
headlights:
when the rain sensor senses heavy rain-
fall (pre-set at the factory)
when the rain sensor senses light and
heavy rainfall (in coordination with rain-
sensing wiper operation), or
independently from rain-sensing wiper
operation.
Light Reminder BuzzerThe interior buzzer continuously beeps if
you open the driver’s door without turning
off the headlights and position lights. This
function is triggered under the following
condition:
The headlights and position lights are on
even after you change the ignition mode
to “LOCK” (OFF) by pressing the engine
switch.
The buzzer stops sounding when you turn
off the headlights and position lights.
NOTE:
A message is indicated on the information
display in the instrument cluster while the
buzzer is sounding.
Daytime Running Light (D.R.L.)
System
57L21129
(1) D.R.L. indicator light
(2) Illumination indicator light
The headlights light, but are dimmer than
the low beam, when the following three
conditions are all met. Also, the D.R.L. indi-
cator light (1) on the instrument panel
comes on.
Conditions for D.R.L. system operation:
1) The engine is running.
2) The parking brake is released.
3) The headlights are off, or the lighting
switch in the “AUTO” position and it is
light around the light sensor.
(1) (2)
Page 127 of 388
2-108
BEFORE DRIVING
57L20-03E
Rain-sensing Wipers (if equipped)
57L21071
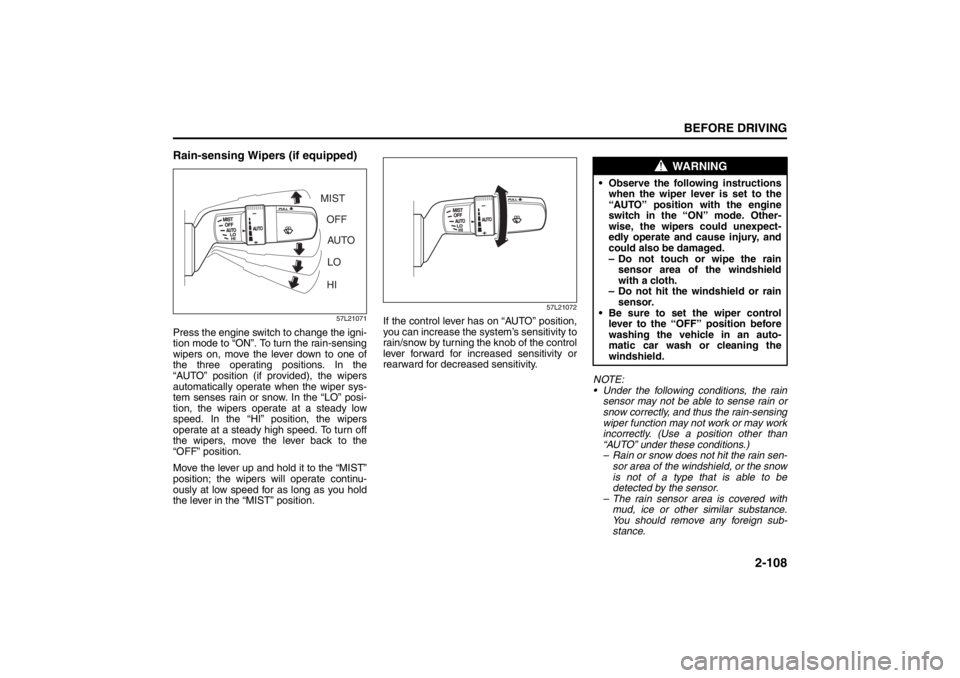
Press the engine switch to change the igni-
tion mode to “ON”. To turn the rain-sensing
wipers on, move the lever down to one of
the three operating positions. In the
“AUTO” position (if provided), the wipers
automatically operate when the wiper sys-
tem senses rain or snow. In the “LO” posi-
tion, the wipers operate at a steady low
speed. In the “HI” position, the wipers
operate at a steady high speed. To turn off
the wipers, move the lever back to the
“OFF” position.
Move the lever up and hold it to the “MIST”
position; the wipers will operate continu-
ously at low speed for as long as you hold
the lever in the “MIST” position.
57L21072
If the control lever has on “AUTO” position,
you can increase the system’s sensitivity to
rain/snow by turning the knob of the control
lever forward for increased sensitivity or
rearward for decreased sensitivity.
NOTE:
Under the following conditions, the rain
sensor may not be able to sense rain or
snow correctly, and thus the rain-sensing
wiper function may not work or may work
incorrectly. (Use a position other than
“AUTO” under these conditions.)
– Rain or snow does not hit the rain sen-
sor area of the windshield, or the snow
is not of a type that is able to be
detected by the sensor.
– The rain sensor area is covered with
mud, ice or other similar substance.
You should remove any foreign sub-
stance.
MIST
OFF
AUTO
LO
HI
WARNING
Observe the following instructions
when the wiper lever is set to the
“AUTO” position with the engine
switch in the “ON” mode. Other-
wise, the wipers could unexpect-
edly operate and cause injury, and
could also be damaged.
– Do not touch or wipe the rain
sensor area of the windshield
with a cloth.
– Do not hit the windshield or rain
sensor.
Be sure to set the wiper control
lever to the “OFF” position before
washing the vehicle in an auto-
matic car wash or cleaning the
windshield.
Page 128 of 388
2-109BEFORE DRIVING
57L20-03E
– There were already raindrops on the
windshield before starting rain-sensing
wiper operation. You should remove
the raindrops by operating the wipers
under manual control.
– The rain sensor is hotter than 80°C
(176°F) in the sun or lower than –10°C
(14°F) in freezing weather. (The wip-
ers do not operate under this condi-
tion.)
– The windshield is coated with a water-
repellent substance, which causes
raindrops to run down quickly. This will
give a clearer view and the wipers may
seem to operate too frequently. In this
case, decrease the system’s sensitiv-
ity.
– The sensor area is covered with a
sticker.
– The wiper blades are damaged. You
should replace them.
The following conditions may indicate
problems with the rain-sensing wiper
system. If your system exhibits any of
the following conditions, have it
inspected by an authorized SUZUKI
dealer.
– Rainfall/snowfall rate varies but the
wiping interval remains constant.
– Rain/snow is falling but the wipers do
not operate.Reprogramming the Rain-sensing
Wiper Function
The AUTO position operation of the rain-
sensing wiper function can be customized
to your preference by reprogramming its
setting as follows. Please contact an
authorized SUZUKI dealer for this customi-
zation.
Semi-automatic wiping
The system automatically selects the most
appropriate of the following wiping modes:
intermittent wiping, low-speed wiping, or
high-speed wiping. (The wipers do not stop
automatically.)
Intermittent wiping
The wipers operate only in the intermittent
wiping mode. The wiping interval can be
changed with the ring control (3).
Full-automatic wiping (factory setting)
The system automatically selects the most
appropriate of the following wiping modes,
no wiping, intermittent wiping, low-speed
wiping, and high-speed wiping.
Windshield Washer
57L21073
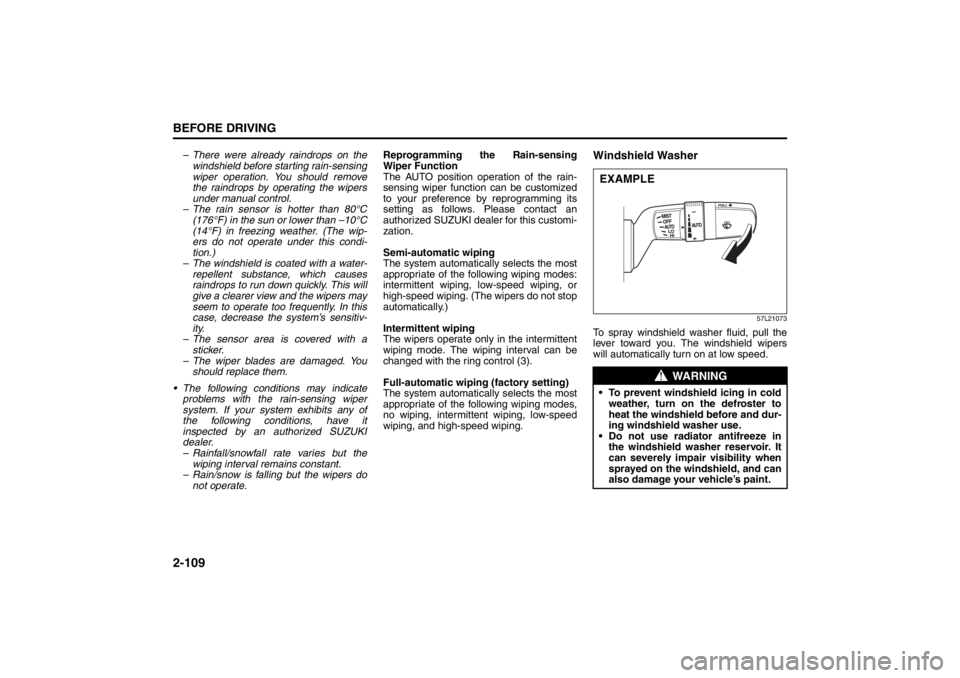
To spray windshield washer fluid, pull the
lever toward you. The windshield wipers
will automatically turn on at low speed.
WARNING
To prevent windshield icing in cold
weather, turn on the defroster to
heat the windshield before and dur-
ing windshield washer use.
Do not use radiator antifreeze in
the windshield washer reservoir. It
can severely impair visibility when
sprayed on the windshield, and can
also damage your vehicle’s paint.EXAMPLE
Page 131 of 388
OPERATING YOUR VEHICLE
3
57L20-03E
60G408
OPERATING YOUR VEHICLEExhaust Gas Warning ......................................................... 3-1
Daily Inspection Checklist .................................................. 3-1
Engine Switch ...................................................................... 3-2
Keyless Push Start System ................................................ 3-4
Starting the Engine ............................................................. 3-7
Parking Brake Lever ........................................................... 3-10
Pedals ................................................................................... 3-11
Engine Block Heater (if equipped) ..................................... 3-12
Using the Transaxle ............................................................ 3-13
Using the 2WD/i-AWD (intelligent All Wheel Drive)
Switch (if equipped) ............................................................ 3-19
Cruise Control (if equipped) ............................................... 3-21
Parking Sensors (if equipped) ........................................... 3-23
Braking ................................................................................. 3-28
Electronic Stability Program (ESP
®) (if equipped) ........... 3-31
Tire Pressure Monitoring System (TPMS) (if equipped) .. 3-34
Page 154 of 388

3-23OPERATING YOUR VEHICLE
57L20-03E
steadily increase. When you release the
switch, the new speed will be maintained.
To reset at a slower cruising speed, press
repeatedly or hold push down the “RES +/
SET –” switch (3) until the vehicle has
slowed to the desired speed, then release
the switch. The new speed will be main-
tained.
NOTE:
You can adjust the set speed by approxi-
mately 1.0 mph (1.6 km/h) by pushing a
cruise control switch quickly.
Cancellation of the Cruise Control
The “SET” indicator light will go off and the
cruise control will be canceled temporarily
with following procedures:
Push the “CANCEL” switch (2).
Depress the brake pedal.
For manual transaxle, depress the clutch
pedal.
For CVT, downshift from 3rd to 2nd in the
manual mode.
The vehicle speed falls more than about
20 percent from the set speed.
Any time the vehicle speed falls below
25 mph (40 km/h).
When the vehicle skids and ESP
® (if
equipped) is activated.
To resume the previously set speed, push
up the “RES +/SET –” switch (3) and turn
on the “SET” indicator light. Besides, the
vehicle speed has to be above 25 mph (40km/h) when the vehicle is not in the above
conditions.
To turn off the cruise control system, push
the “CRUISE” switch (1) and make sure
the “CRUISE” indicator light is off.
Also, if the malfunction indicator light in the
instrument cluster comes on or blinks, the
cruise control system will be turned off.
NOTE:
If you turn off the cruise control system, the
previously set speed in the memory is
cleared. Reset your cruising speed again.
Parking Sensors
(if equipped)
57L40019
(1) Symbol representing an obstacle
detected by parking sensor*
* This symbol represents an obstacle that
is located to the right rear at the vehicle.
The parking sensor system uses ultra-
sonic sensors to detect obstacles near
the rear bumper. If obstacles are sensed
while you are parking or moving the
vehicle slowly, the system warns you by
sounding a buzzer and displaying sym-
bols representing the obstacles on the
information display in the instrument
cluster.
The system emits an ultrasonic wave
and the relevant sensor detects the
return of the wave reflected by an obsta-
cle. The system measures the time
(1)
Page 155 of 388
3-24
OPERATING YOUR VEHICLE
57L20-03E
taken by the ultrasonic wave to reach the
obstacle and return from it, from which it
determines the obstacle’s position.
The parking sensor function can be used
when you press the engine switch to
change the ignition mode to “ON”, the
gearshift lever is in the “R” position and
the parking sensor switch is in the ON
position. This function is helpful when
parallel-parking the vehicle, steering the
vehicle into the garage or moving slowly
in a place with obstacles.
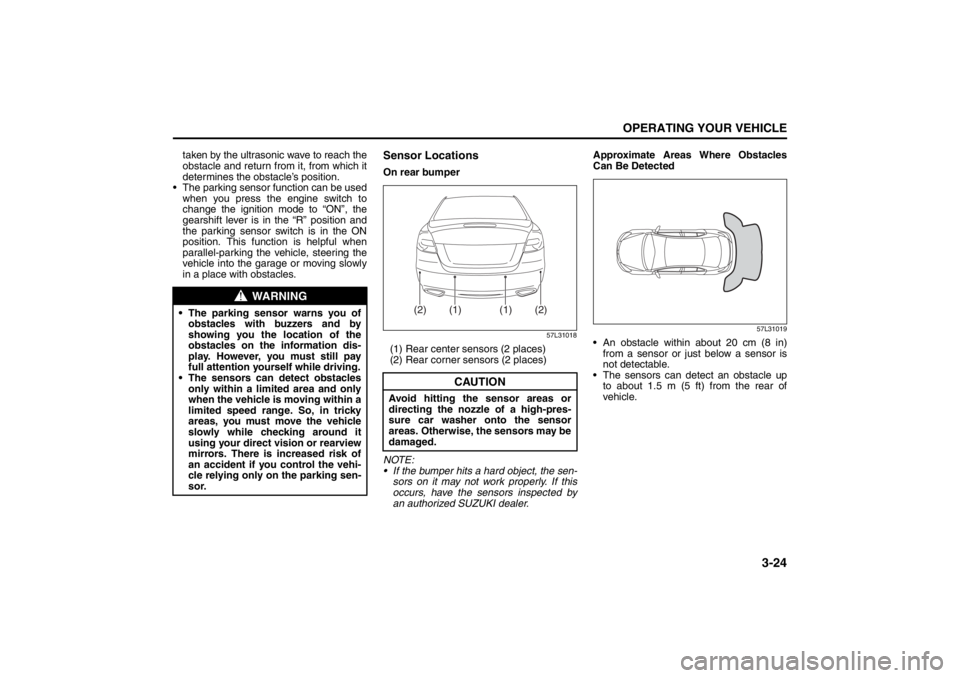
Sensor LocationsOn rear bumper
57L31018
(1) Rear center sensors (2 places)
(2) Rear corner sensors (2 places)
NOTE:
If the bumper hits a hard object, the sen-
sors on it may not work properly. If this
occurs, have the sensors inspected by
an authorized SUZUKI dealer.Approximate Areas Where Obstacles
Can Be Detected
57L31019
An obstacle within about 20 cm (8 in)
from a sensor or just below a sensor is
not detectable.
The sensors can detect an obstacle up
to about 1.5 m (5 ft) from the rear of
vehicle.
WARNING
The parking sensor warns you of
obstacles with buzzers and by
showing you the location of the
obstacles on the information dis-
play. However, you must still pay
full attention yourself while driving.
The sensors can detect obstacles
only within a limited area and only
when the vehicle is moving within a
limited speed range. So, in tricky
areas, you must move the vehicle
slowly while checking around it
using your direct vision or rearview
mirrors. There is increased risk of
an accident if you control the vehi-
cle relying only on the parking sen-
sor.
CAUTION
Avoid hitting the sensor areas or
directing the nozzle of a high-pres-
sure car washer onto the sensor
areas. Otherwise, the sensors may be
damaged.
(1)
(1)
(2)
(2)
Page 156 of 388

3-25OPERATING YOUR VEHICLE
57L20-03E
NOTE:
Thin poles or obstacles lower than the
sensors may become undetectable as
the vehicle moves closer to them even if
they have been detected from longer dis-
tances. The system may calculate the distance
to a road sign or similar obstacle to be
shorter than the actual distance.
Certification (Canada only)
This ISM device complies with Canadian
ICES*-001
* Interference-Causing Equipment Stan-
dards
CAUTION
Under the following conditions, the
parking sensor system may not
work normally because the sensors
cannot detect obstacles correctly.
– Sensors are covered with mud,
ice or other materials. (Such
materials must be removed for
normal operation.)
– Sensors are wet from water
splashes or heavy rain.
– Sensors are covered by a hand,
sticker, accessory, etc.
– There is an accessory or other
object attached within the sen-
sor’s sensing area.
– Items such as tow hooks, a back-
lit license plate, commercially
available corner poles, radio
antenna, etc. are installed on the
bumper.
– The height of the bumper is
changed due to alteration to the
suspension or other causes.
– The sensor areas are extremely
hot from direct sunlight or cold
due to freezing weather.
– The vehicle is on a rough sur-
face, slope, gravel road or grass
field.
– The vehicle is at a steep angle.
(Continued)
CAUTION
(Continued)
– Sensors have intercepted ultra-
sonic noise from another vehi-
cle’s horn, engine, air braking
system (large vehicles), or park-
ing sensor.
– Obstacles are too close to the
sensors.
– Sensors are at an angle to a
highly reflective object such as
glass. (Ultrasonic waves are not
reflected back from the obstacle.)
Sensors may not be able to cor-
rectly detect the following types of
obstacles:
– Objects made of a thin material
like wire netting and ropes
– Square-shaped curbstones or
other objects with sharp edges
– Tall objects with a large upper
part like a road sign
– Low-profile objects such as curb-
stones
– Sound-absorbing objects such
as cotton and snow